This is the multi-page printable view of this section. Click here to print.
Components
- 1: ESB3024 Router
- 1.1: Release Notes for esb3024-1.16.0
- 1.2: Getting Started
- 1.3: Installing a 1.16 release
- 1.4: Firewall
- 1.5: API Overview
- 1.6: Configuration
- 1.6.1: WebUI Configuration
- 1.6.2: Confd and Confcli
- 1.6.3: Session Groups and Classification
- 1.6.4: Accounts
- 1.6.5: Advanced features
- 1.6.5.1: Content popularity
- 1.6.5.2: Consistent Hashing
- 1.6.5.3: Security token verification
- 1.6.5.4: Subnets API
- 1.6.5.5: Lua Features
- 1.6.5.5.1: Built-in Lua Functions
- 1.6.5.5.2: Global Lua Tables
- 1.6.5.5.3: Request Translation Function
- 1.6.5.5.4: Session Translation Function
- 1.6.5.5.5: Host Request Translation Function
- 1.6.5.5.6: Response Translation Function
- 1.6.6: Trusted proxies
- 1.6.7: Confd Auto Upgrade Tool
- 1.7: Operations
- 1.7.1: Services
- 1.8: Convoy Bridge
- 1.9: Monitoring
- 1.9.1: Access logging
- 1.9.2: System troubleshooting
- 1.9.3: Scraping data with Prometheus
- 1.9.4: Visualizing data with Grafana
- 1.9.4.1: Managing Grafana
- 1.9.4.2: Grafana Dashboards
- 1.9.5: Alarms and Alerting
- 1.9.6: Monitoring multiple routers
- 1.9.7: Routing Rule Evaluation Metrics
- 1.9.8: Metrics
- 1.9.8.1: Internal Metrics
- 1.10: Glossary
- 2: ESB3024 Router
- 2.1: Release Notes for esb3024-1.18.0
- 2.2: Getting Started
- 2.3: Installing a 1.18 release
- 2.4: Firewall
- 2.5: API Overview
- 2.6: Configuration
- 2.6.1: WebUI Configuration
- 2.6.2: Confd and Confcli
- 2.6.3: Session Groups and Classification
- 2.6.4: Accounts
- 2.6.5: Advanced features
- 2.6.5.1: Content popularity
- 2.6.5.2: Consistent Hashing
- 2.6.5.3: Security token verification
- 2.6.5.4: Subnets API
- 2.6.5.5: Lua Features
- 2.6.5.5.1: Built-in Lua Functions
- 2.6.5.5.2: Global Lua Tables
- 2.6.5.5.3: Request Translation Function
- 2.6.5.5.4: Session Translation Function
- 2.6.5.5.5: Host Request Translation Function
- 2.6.5.5.6: Response Translation Function
- 2.6.5.5.7: Sending HTTP requests from translation functions
- 2.6.6: Trusted proxies
- 2.6.7: Confd Auto Upgrade Tool
- 2.7: Operations
- 2.7.1: Services
- 2.8: Convoy Bridge
- 2.9: Monitoring
- 2.9.1: Access logging
- 2.9.2: System troubleshooting
- 2.9.3: Scraping data with Prometheus
- 2.9.4: Visualizing data with Grafana
- 2.9.4.1: Managing Grafana
- 2.9.4.2: Grafana Dashboards
- 2.9.5: Alarms and Alerting
- 2.9.6: Monitoring multiple routers
- 2.9.7: Routing Rule Evaluation Metrics
- 2.9.8: Metrics
- 2.9.8.1: Internal Metrics
- 2.10: Glossary
- 3: AgileTV CDN Director (esb3024)
- 3.1: Release Notes for esb3024-1.20.1
- 3.2: Getting Started
- 3.3: Installing a 1.20 release
- 3.4: Firewall
- 3.5: API Overview
- 3.6: Configuration
- 3.6.1: WebUI Configuration
- 3.6.2: Confd and Confcli
- 3.6.3: Session Groups and Classification
- 3.6.4: Accounts
- 3.6.5: Data streams
- 3.6.6: Advanced features
- 3.6.6.1: Content popularity
- 3.6.6.2: Consistent Hashing
- 3.6.6.3: Security token verification
- 3.6.6.4: Subnets API
- 3.6.6.5: Lua Features
- 3.6.6.5.1: Built-in Lua Functions
- 3.6.6.5.2: Global Lua Tables
- 3.6.6.5.3: Request Translation Function
- 3.6.6.5.4: Session Translation Function
- 3.6.6.5.5: Host Request Translation Function
- 3.6.6.5.6: Response Translation Function
- 3.6.6.5.7: Sending HTTP requests from translation functions
- 3.6.7: Trusted proxies
- 3.6.8: Confd Auto Upgrade Tool
- 3.7: Operations
- 3.7.1: Services
- 3.8: Convoy Bridge
- 3.9: Monitoring
- 3.9.1: Access logging
- 3.9.2: System troubleshooting
- 3.9.3: Scraping data with Prometheus
- 3.9.4: Visualizing data with Grafana
- 3.9.4.1: Managing Grafana
- 3.9.4.2: Grafana Dashboards
- 3.9.5: Alarms and Alerting
- 3.9.6: Monitoring multiple routers
- 3.9.7: Routing Rule Evaluation Metrics
- 3.9.8: Metrics
- 3.9.8.1: Internal Metrics
- 3.10: Glossary
- 4: AgileTV CDN Director (esb3024)
- 4.1: Release Notes for esb3024-1.22.0
- 4.2: Getting Started
- 4.3: Installing a 1.22 release
- 4.4: Firewall
- 4.5: Selection Input API
- 4.6: API Overview
- 4.7: Configuration
- 4.7.1: WebUI Configuration
- 4.7.2: OLD WebUI Configuration
- 4.7.3: Confd and Confcli
- 4.7.4: Session Groups and Classification
- 4.7.5: Accounts
- 4.7.6: Data streams
- 4.7.7: Advanced features
- 4.7.7.1: Content popularity
- 4.7.7.2: Consistent Hashing
- 4.7.7.3: Security token verification
- 4.7.7.4: Subnets API
- 4.7.7.5: Lua Features
- 4.7.7.5.1: Built-in Lua Functions
- 4.7.7.5.2: Global Lua Tables
- 4.7.7.5.3: Request Translation Function
- 4.7.7.5.4: Session Translation Function
- 4.7.7.5.5: Host Request Translation Function
- 4.7.7.5.6: Response Translation Function
- 4.7.7.5.7: Sending HTTP requests from translation functions
- 4.7.8: Trusted proxies
- 4.7.9: Confd Auto Upgrade Tool
- 4.8: Operations
- 4.8.1: Services
- 4.8.2: Geographic Databases
- 4.9: Convoy Bridge
- 4.10: Monitoring
- 4.10.1: Access logging
- 4.10.2: System troubleshooting
- 4.10.3: Scraping data with Prometheus
- 4.10.4: Visualizing data with Grafana
- 4.10.4.1: Managing Grafana
- 4.10.4.2: Grafana Dashboards
- 4.10.5: Alarms and Alerting
- 4.10.6: Monitoring multiple routers
- 4.10.7: Routing Rule Evaluation Metrics
- 4.10.8: Metrics
- 4.10.8.1: Internal Metrics
- 4.11: Glossary
- 5: AgileTV CDN Director (esb3024)
- 5.1: Release Notes for esb3024-1.22.1
- 5.2: Getting Started
- 5.3: Installing a 1.22 release
- 5.4: Firewall
- 5.5: API Overview
- 5.6: Configuration
- 5.6.1: WebUI Configuration
- 5.6.2: OLD WebUI Configuration
- 5.6.3: Confd and Confcli
- 5.6.4: Session Groups and Classification
- 5.6.5: Accounts
- 5.6.6: Data streams
- 5.6.7: Selection Input Configurations
- 5.6.8: Advanced features
- 5.6.8.1: Content popularity
- 5.6.8.2: Consistent Hashing
- 5.6.8.3: Security token verification
- 5.6.8.4: Subnets API
- 5.6.8.5: Lua Features
- 5.6.8.5.1: Built-in Lua Functions
- 5.6.8.5.2: Global Lua Tables
- 5.6.8.5.3: Request Translation Function
- 5.6.8.5.4: Session Translation Function
- 5.6.8.5.5: Host Request Translation Function
- 5.6.8.5.6: Response Translation Function
- 5.6.8.5.7: Sending HTTP requests from translation functions
- 5.6.9: Trusted proxies
- 5.6.10: Confd Auto Upgrade Tool
- 5.7: Operations
- 5.7.1: Services
- 5.7.2: Geographic Databases
- 5.8: Convoy Bridge
- 5.9: Monitoring
- 5.9.1: Access logging
- 5.9.2: System troubleshooting
- 5.9.3: Scraping data with Prometheus
- 5.9.4: Visualizing data with Grafana
- 5.9.4.1: Managing Grafana
- 5.9.4.2: Grafana Dashboards
- 5.9.5: Alarms and Alerting
- 5.9.6: Monitoring multiple routers
- 5.9.7: Routing Rule Evaluation Metrics
- 5.9.8: Metrics
- 5.9.8.1: Internal Metrics
- 5.10: Glossary
- 6: AgileTV CDN Director (esb3024)
- 6.1: Release Notes for esb3024-1.24.0
- 6.2: Getting Started
- 6.3: Installing ESB3024 Router release 1.24.0
- 6.4: Firewall
- 6.5: API Overview
- 6.6: Configuration
- 6.6.1: WebUI Configuration
- 6.6.2: OLD WebUI Configuration
- 6.6.3: Confd and Confcli
- 6.6.4: Session Groups and Classification
- 6.6.5: Accounts
- 6.6.6: Data streams
- 6.6.7: Selection Input Configurations
- 6.6.8: Advanced features
- 6.6.8.1: Content popularity
- 6.6.8.2: Consistent Hashing
- 6.6.8.3: Security token verification
- 6.6.8.4: Subnets API
- 6.6.8.5: Lua Features
- 6.6.8.5.1: Built-in Lua Functions
- 6.6.8.5.2: Global Lua Tables
- 6.6.8.5.3: Request Translation Function
- 6.6.8.5.4: Session Translation Function
- 6.6.8.5.5: Host Request Translation Function
- 6.6.8.5.6: Response Translation Function
- 6.6.8.5.7: Sending HTTP requests from translation functions
- 6.6.9: Trusted proxies
- 6.6.10: Confd Auto Upgrade Tool
- 6.7: Operations
- 6.7.1: Services
- 6.7.2: Geographic Databases
- 6.8: Convoy Bridge
- 6.9: Monitoring
- 6.9.1: Access logging
- 6.9.2: System troubleshooting
- 6.9.3: Scraping data with Prometheus
- 6.9.4: Visualizing data with Grafana
- 6.9.4.1: Managing Grafana
- 6.9.4.2: Grafana Dashboards
- 6.9.5: Alarms and Alerting
- 6.9.6: Monitoring multiple routers
- 6.9.7: Routing Rule Evaluation Metrics
- 6.9.8: Metrics
- 6.9.8.1: Internal Metrics
- 6.10: Glossary
- 7: AgileTV CDN Director (esb3024)
- 7.1: Release Notes for esb3024-1.24.0
- 7.2: Getting Started
- 7.3: Installing ESB3024 Router release 1.24.0
- 7.4: Firewall
- 7.5: API Overview
- 7.6: Configuration
- 7.6.1: Advanced features
- 7.6.1.1: Content popularity
- 7.6.1.2: Consistent Hashing
- 7.6.1.3: Security token verification
- 7.6.1.4: Subnets API
- 7.6.1.5: Lua Features
- 7.6.1.5.1: Built-in Lua Functions
- 7.6.1.5.2: Global Lua Tables
- 7.6.1.5.3: Request Translation Function
- 7.6.1.5.4: Session Translation Function
- 7.6.1.5.5: Host Request Translation Function
- 7.6.1.5.6: Response Translation Function
- 7.6.1.5.7: Sending HTTP requests from translation functions
- 7.6.2: WebUI Configuration
- 7.6.3: OLD WebUI Configuration
- 7.6.4: Confcli
- 7.6.5: CDNs and Hosts
- 7.6.6: Routing Rules
- 7.6.7: Session Groups and Classification
- 7.6.8: Accounts
- 7.6.9: The Secret Store
- 7.6.10: Token Verification
- 7.6.11: Token Generation
- 7.6.12: URL Prefixes
- 7.6.13: Selection Input Configurations
- 7.6.14: Data streams
- 7.6.15: Trusted proxies
- 7.6.16: Confd Auto Upgrade Tool
- 7.7: Operations
- 7.7.1: Services
- 7.7.2: Geographic Databases
- 7.8: Convoy Bridge
- 7.9: Monitoring
- 7.9.1: Access logging
- 7.9.2: System troubleshooting
- 7.9.3: Scraping data with Prometheus
- 7.9.4: Visualizing data with Grafana
- 7.9.4.1: Managing Grafana
- 7.9.4.2: Grafana Dashboards
- 7.9.5: Alarms and Alerting
- 7.9.6: Monitoring multiple routers
- 7.9.7: Routing Rule Evaluation Metrics
- 7.9.8: Metrics
- 7.9.8.1: Internal Metrics
- 7.10: Glossary
- 8: AgileTV Account Aggregator (esb3032)
- 8.1: Getting Started
- 8.2: Releases
- 8.2.1: Release esb3032-0.2.0
- 8.2.2: Release esb3032-1.0.0
- 8.2.3: Release esb3032-1.2.1
- 8.2.4: Release esb3032-1.4.0
- 9: AgileTV CDN Manager (esb3027)
- 9.1: Getting Started
- 9.2: System Requirements Guide
- 9.3: Architecture Guide
- 9.4: Installation Guide
- 9.4.1: Overview
- 9.4.2: Requirements
- 9.4.3: Quick Start Guide
- 9.4.4: Installation Guide
- 9.4.5: Upgrade Guide
- 9.4.6: Post Installation Guide
- 9.5: Configuration Guide
- 9.6: Networking
- 9.7: Storage Guide
- 9.8: Metrics and Monitoring
- 9.9: Operations Guide
- 9.10: API Guides
- 9.10.1: Healthcheck API
- 9.10.2: Authentication API
- 9.10.3: Router API
- 9.10.4: Selection Input API
- 9.10.5: Operator UI API
- 9.11: Use Cases
- 9.11.1: Custom Deployments
- 9.12: Common Issues
- 9.13: Troubleshooting Guide
- 9.14: Glossary
- 10: AgileTV CDN Manager (esb3027)
- 10.1: Getting Started
- 10.2: System Requirements Guide
- 10.3: Networking Guide
- 10.3.1: Shared Interface Network Setup
- 10.3.2: Configuring Segregated Networks
- 10.4: Architecture Guide
- 10.5: Installation Guide
- 10.5.1: Installation Checklist
- 10.5.2: Single-Node Installation
- 10.5.3: Multi-Node Installation
- 10.5.4: Air-Gapped Deployment
- 10.5.5: Helm Chart Installation
- 10.5.6: Upgrade Guide
- 10.5.7: Next Steps
- 10.6: Configuration Guide
- 10.7: Performance Tuning Guide
- 10.8: Operations Guide
- 10.9: Metrics & Monitoring Guide
- 10.9.1: Grafana Authentication & Roles
- 10.9.2: Grafana Dashboards
- 10.9.3: Alerts & Alarms
- 10.10: API Guide
- 10.10.1: Authentication API
- 10.10.2: Health API
- 10.10.3: Selection Input API
- 10.10.4: Data Store API
- 10.10.5: Subnets API
- 10.10.6: Routing API
- 10.10.7: Discovery API
- 10.10.8: Metrics API
- 10.10.9: Configuration API
- 10.10.10: Operator UI API
- 10.10.11: OpenAPI Specification
- 10.11: Troubleshooting Guide
- 10.12: Glossary
- 11: AgileTV CDN Manager (esb3027)
- 11.1: Getting Started
- 11.2: System Requirements Guide
- 11.3: Networking Guide
- 11.3.1: Shared Interface Network Setup
- 11.3.2: Configuring Segregated Networks
- 11.4: Architecture Guide
- 11.5: Installation Guide
- 11.5.1: Installation Checklist
- 11.5.2: Single-Node Installation
- 11.5.3: Multi-Node Installation
- 11.5.4: Air-Gapped Deployment
- 11.5.5: Helm Chart Installation
- 11.5.6: Upgrade Guide
- 11.5.7: Next Steps
- 11.6: Configuration Guide
- 11.7: Performance Tuning Guide
- 11.8: Operations Guide
- 11.9: Metrics & Monitoring Guide
- 11.9.1: Grafana Authentication & Roles
- 11.9.2: Grafana Dashboards
- 11.9.3: Alerts & Alarms
- 11.10: API Guide
- 11.10.1: Authentication API
- 11.10.2: Health API
- 11.10.3: Selection Input API
- 11.10.4: Data Store API
- 11.10.5: Subnets API
- 11.10.6: Routing API
- 11.10.7: Discovery API
- 11.10.8: Metrics API
- 11.10.9: Configuration API
- 11.10.10: Operator UI API
- 11.10.11: OpenAPI Specification
- 11.11: Troubleshooting Guide
- 11.12: Glossary
- 12: AgileTV CDN Manager (esb3027)
- 12.1: Getting Started
- 12.2: System Requirements Guide
- 12.3: Networking Guide
- 12.3.1: Shared Interface Network Setup
- 12.3.2: Configuring Segregated Networks
- 12.4: Architecture Guide
- 12.5: Installation Guide
- 12.5.1: Installation Checklist
- 12.5.2: Single-Node Installation
- 12.5.3: Multi-Node Installation
- 12.5.4: Air-Gapped Deployment
- 12.5.5: Helm Chart Installation
- 12.5.6: Upgrade Guide
- 12.5.7: Next Steps
- 12.6: Configuration Guide
- 12.7: Performance Tuning Guide
- 12.8: Operations Guide
- 12.9: Metrics & Monitoring Guide
- 12.9.1: Grafana Authentication & Roles
- 12.9.2: Grafana Dashboards
- 12.9.3: Alerts & Alarms
- 12.10: API Guide
- 12.10.1: Authentication API
- 12.10.2: Health API
- 12.10.3: Selection Input API
- 12.10.4: Data Store API
- 12.10.5: Subnets API
- 12.10.6: Routing API
- 12.10.7: Discovery API
- 12.10.8: Metrics API
- 12.10.9: Configuration API
- 12.10.10: Operator UI API
- 12.10.11: OpenAPI Specification
- 12.11: Troubleshooting Guide
- 12.12: Glossary
- 13: AgileTV Cache (esb2001,esb3004)
- 14: BGP Sniffer (esb3013)
- 15: AgileTV Convoy Manager (classic) (esb3006)
- 16: Orbit CDN Request Router (esb3008)
- 17: Releases
- 17.1: Release esb3027-1.6.1
- 17.2: Release esb3027-1.6.0
- 17.3: Release esb3027-1.4.1
- 17.4: Release esb3027-1.4.0
- 17.5: Release esb3027-1.2.1
- 17.6: Release esb3027-1.2.0
- 17.7: Release esb3027-1.0.0
- 18: Change Log
1 - ESB3024 Router
1.1 - Release Notes for esb3024-1.16.0
Build date
2024-12-04
Release status
Type: production
Compatibility
This release is compatible with the following product versions:
- Orbit, ESB2001-3.6.0 (see Known limitations below)
- SW-Streamer, ESB3004-1.36.0
- Convoy, ESB3006-3.4.0
- Request Router, ESB3008-3.2.1
Breaking changes from previous release
- Access logs are now saved to disk at
/var/log/acd-router/access.loginstead of being handled byjournald.
Change log
- NEW: Collect metrics per account [ESB3024-911]
- NEW: Strip whitespace from beginning and end of names in configuration [ESB3024-954]
- NEW: Improved reselection logging [ESB3024-1089]
- NEW: Access log to file instead of journald. Access logs can now be found in
/var/log/acd-router/access.log[ESB3024-1164] - NEW: Additional Lua checksum functions [ESB3024-1229]
- NEW: Symlink logging directory
/var/log/acd-routerto/opt/edgeware/acd/router/log[ESB3024-1232] - FIXED: Convoy Bridge retries errors too fast [ESB3024-1120]
- FIXED: Memory safety issue. Certain circumstances could cause the director to crash [ESB3024-1123]
- FIXED: Too high severity on some log messages [ESB3024-1171]
- FIXED: Session Proxy sends lowercase header names, which are not supported by Agile Cache [ESB3024-1183]
- FIXED: Translation functions
hostRequestandrequestfail when used together [ESB3024-1184] - FIXED: Lua hashing functions do not accept binary data [ESB3024-1196]
- FIXED: Session Proxy has poor throughput [ESB3024-1197]
- FIXED: Configuration doesn’t handle nested Lua tables as argument to conditions [ESB3024-1218]
Deprecations from previous release
- None
System requirements
- The ACD Router requires a minimum CPU architecture level of x86-64-v2 due to inclusion of Oracle Linux 9 inside the container. While all modern CPUs support this archetecture level, virtual hypervisors may default to a CPU type that has more compatibility with older processors. If this minimum CPU architecture level is not attained the containers may refuse to start. See Operating System Compatibility and Building Red Hat Enterprise Linux 9 for the x86-64-v2 Microarchitecture Level for more information.
Known limitations
- The Telegraf metrics agent might not be able to read all relevant network
interface data on ESB2001 releases older than 3.6.0. The predictive load balancing
function
host_has_bw()and the health check functioninterfaces_online()might therefore not work as expected.- The recommended workaround for
host_has_bw()is to usehost_has_bw_custom(), documented in Built-in Lua functions.host_has_bw_custom()accepts a numeric argument for the host’s network interface capacity which can be used if the data supplied by the Telegraf metrics agents do not contain this information. - It is not recommended to use
interfaces_online()until the issue is resolved on ESB2001.
- The recommended workaround for
1.2 - Getting Started
The Director serves as a versatile network service designed to redirect incoming HTTP(s) requests to the optimal host or Content Delivery Network (CDN) by evaluating various request properties through a set of rules. Although requests can be generic, the primary focus centers around audio-video content delivery. The rule engine allows users to construct routing configurations using predefined blocks, providing for the creation of intricate routing logic. This modular approach allows the users to tailor and streamline the content delivery process to meet their specific needs. The Director’s flexible rule engine takes into account factors such as geographical location, server load, content type, and other metadata from external sources to intelligently route incoming requests. It supports dynamic adjustments to seamlessly adapt to changing network conditions, ensuring efficient and reliable content delivery. The Director improves the overall user experience by delivering content from the most suitable and responsive sources, thereby reducing latency and enhancing performance.
Requirements
Hardware
The Director is designed to be installed and operated on commodity hardware, ensuring accessibility for a broad range of users. The minimum hardware specifications are as follows:
- CPU: x86-64 AMD or Intel with at least 2 cores.
- Memory: At least 2 GB free at runtime.
Operating System Compatibility
The Director is officially supported on Red Hat Enterprise Linux 8 or 9 or any
compatible operating system. In order to run the service, a minimum CPU
architecture of x86-64-v2 is required. This can be determined by running the
following command. If supported, it will be listed as “(supported)” in the
output.
/usr/lib64/ld-linux-x86-64.so.2 --help | grep x86-64-v2
External Internet access is necessary during the installation process for the installer to download and install additional dependencies. This ensures a seamless setup and optimal functionality of the Director on Red Hat Enterprise Linux 8 or 9. It’s worth noting that, due to the unique workings of the DNF package manager in Red Hat Enterprise Linux with rolling package streams, an air-gapped installation process is not available.
Firewall Recommendations
See Firewall.
Installation
See Installation.
Operations
See Operations.
Configuration Process
Once the router is operational, it requires a valid configuration before it can route incoming requests.
There are currently three methods available for configuring the router, each catering to different levels of complexity. The first is a Web UI, suitable for the most common use-cases, providing an intuitive interface for configuration. The second involves utilizing a confd REST service, complemented by an optional command line tool, confcli, suitable for all but the most advanced scenarios. The third method involves leveraging an internal REST API, ideal for the most intricate cases where using confd proves to be less flexible. It’s essential to note that as the configuration method advances through these levels, both flexibility and complexity increase, providing users with tailored options based on their specific needs and expertise.
API Key Management
Regardless of the method used to configure the system, a unique API key is
crucial for safeguarding the router’s configuration and preventing unauthorized
access to the API. This key must be supplied when interacting with the API.
During the router software installation, an automatically generated API key is
created and can be located on the installed system at
/opt/edgeware/acd/router/cache/rest-api-key.json. The structure of this file
is as follows:
{"api_key": "abc123"}
When accessing the internal configuration API, the key must be included in the
X-API-key header of the request, as shown below:
curl -v -k -H "X-API-Key: abc123" https://<router-host.example>:5001/v2/configuration
Modification to the authentication key and behavior can be done through the
/v2/rest_api_key endpoint. To change the key, a PUT request with a JSON body
of the same structure can be sent to the endpoint:
curl -v -k -X PUT -T new-key.json -H "X-API-Key: abc123" \
-H "Content-Type: application/json" https://<router-host.example>:5001/v2/rest_api_key
Additionally, key authentication can be disabled completely by sending a DELETE
request to the endpoint:
curl -v -k -X DELETE -H "X-API-Key: abc123" \
https://<router-host.example>:5001/v2/rest_api_key
In the event of a lost or forgotten authentication key, it can always be
retrieved at /opt/edgeware/acd/router/cache/rest-api-key.json on the
machine running the router. It is critical to emphasize that the API key should
remain private to prevent unauthorized access to the internal API, as it grants
full access to the router’s configuration.
Configuration Basics
Upon completing the installation process and configuring the API keys, the subsequent section will provide guidance on configuring the router to route all incoming requests to a single host. For straightforward CDN Offload use cases, there is a web based user interface described here.
For further details on configuring the router using confd and confcli, please consult the Confd documentation.
The initial step involves defining the target host group. In this illustration,
a singular group named all will be established, comprising two hosts.
$ confcli services.routing.hostGroups -w
Running wizard for resource 'hostGroups'
Hint: Hitting return will set a value to its default.
Enter '?' to receive the help string
hostGroups : [
hostGroup can be one of
1: dns
2: host
3: redirecting
Choose element index or name: host
Adding a 'host' element
hostGroup : {
name (default: ): all
type (default: host):
httpPort (default: 80):
httpsPort (default: 443):
hosts : [
host : {
name (default: ): host1.example.com
hostname (default: ): host1.example.com
ipv6_address (default: ):
}
Add another 'host' element to array 'hosts'? [y/N]: y
host : {
name (default: ): host2.example.com
hostname (default: ): host2.example.com
ipv6_address (default: ):
}
Add another 'host' element to array 'hosts'? [y/N]: n
]
}
Add another 'hostGroup' element to array 'hostGroups'? [y/N]: n
]
Generated config:
{
"hostGroups": [
{
"name": "all",
"type": "host",
"httpPort": 80,
"httpsPort": 443,
"hosts": [
{
"name": "host1.example.com",
"hostname": "host1.example.com",
"ipv6_address": ""
},
{
"name": "host2.example.com",
"hostname": "host2.example.com",
"ipv6_address": ""
}
]
}
]
}
Merge and apply the config? [y/n]:
After defining the host group, the next step is to establish a rule that directs
incoming requests to the designated host. In this example, a sole rule named
random will be generated, ensuring that all incoming requests are consistently
routed to the previously defined host.
$ confcli services.routing.rules -w
Running wizard for resource 'rules'
Hint: Hitting return will set a value to its default.
Enter '?' to receive the help string
rules : [
rule can be one of
1: allow
2: consistentHashing
3: contentPopularity
4: deny
5: firstMatch
6: random
7: rawGroup
8: rawHost
9: split
10: weighted
Choose element index or name: random
Adding a 'random' element
rule : {
name (default: ): random
type (default: random):
targets : [
target (default: ): host1.example.com
Add another 'target' element to array 'targets'? [y/N]: y
target (default: ): host2.example.com
Add another 'target' element to array 'targets'? [y/N]: n
]
}
Add another 'rule' element to array 'rules'? [y/N]: n
]
Generated config:
{
"rules": [
{
"name": "random",
"type": "random",
"targets": [
"host1.example.com",
"host2.example.com"
]
}
]
}
Merge and apply the config? [y/n]:
The last essential step involves instructing the router on which rule should
serve as the entry point into the routing tree. In this example, we designate
the rule random as the entrypoint for the routing process.
$ confcli services.routing.entrypoint random
services.routing.entrypoint = 'random'
Once this configuration is defined, all incoming requests will initiate their
traversal through the routing rules, starting with the rule named random. This
rule is designed to consistently match for every incoming request, effectively load
balancing evenly between host1.example.com and host2.example.com on port 80
or 443, depending on whether the initial request was made using HTTP or HTTPS.
Integration with Convoy
The router is equipped with the capability to synchronize specific configuration metadata with a separate Convoy installation through the integrated convoy-bridge service. However, this service necessitates additional setup and configuration, and you can find comprehensive details on the process here..
Additional Resources
Additional documentation resources are included with the Director and can be
accessed at the following directory: /opt/edgeware/acd/documentation/. This
directory contains supplementary materials to provide users with comprehensive
information and guidance for optimizing their experience with the Director.
Ready for Production
Once the Director software is completely installed and configured, there are a few additional considerations before moving to a full production environment. See the section Ready for Production for additional information.
1.3 - Installing a 1.16 release
To install ESB3024 Router, one first needs to copy the installation ISO image
to the target node where the router will be run. Due to the way the
installer operates, it is necessary that the host is reachable by
password-less SSH from itself for the user account that will perform the
installation, and that this user has sudo access.
Prerequisites:
Ensure that the current user has
sudoaccess.sudo -lIf the above command fails, you may need to add the user to the
/etc/sudoersfile.Ensure that the installer has password-less SSH access to
localhost.If using the
rootuser, thePermitRootLoginproperty of the/etc/ssh/sshd_configfile must be set to ‘yes’.The local host key must also be included in the
.ssh/authorized_keysfile of the user running the installer. That can be done by issuing the following as the intended user:mkdir -m 0700 -p ~/.ssh ssh-keyscan localhost >> ~/.ssh/authorized_keysNote! The
ssh-keyscanutility will result in the key fingerprint being output on the console. As a security best-practice it is recommended to verify that this host-key matches the machine’s true SSH host key. As an alternative, to thisssh-keyscanapproach, establishing an SSH connection to localhost and accepting the host key will have the same result.Disable SELinux.
The Security-Enhanced Linux Project (SELinux) is designed to add an additional layer of security to the operating system by enforcing a set of rules on processes. Unfortunately out of the box the default configuration is not compatible with the way the installer operates. Before proceeding with the installation, it is recommended to disable SELinux. It can be re-enabled after the installation completes, if desired, but will require manual configuration. Refer to the Red Hat Customer Portal for details.
To check if SELinux is enabled:
getenforceThis will result in one of 3 states, “Enforcing”, “Permissive” or “Disabled”. If the state is “Enforcing” use the following to disable SELinux. Either “Permissive” or “Disabled” is required to continue.
setenforce 0This disables SELinux, but does not make the change persistent across reboots. To do that, edit the
/etc/selinux/configfile and set theSELINUXproperty todisabled.It is recommended to reboot the computer after changing SELinux modes, but the changes should take effect immediately.
Assuming the installation ISO image is in the current working directory,
the following steps need to be executed either by root user or with sudo.
Mount the installation ISO image under
/mnt/acd.Note: The mount-point may be any accessible path, but
/mnt/acdwill be used throughout this document.mkdir -p /mnt/acd mount esb3024-acd-router-1.16.0.iso /mnt/acdRun the installer script.
/mnt/acd/installer
Upgrade from and earlier ESB3024 Router release
The following steps can be taken to upgrade the router from a 1.10 or later release to 1.16.0. If upgrading from an earlier release it is recommended to first upgrade to 1.10.1 and then to upgrade to 1.16.0.
The upgrade procedure for the router is performed by taking a backup of the configuration, installing the new release of the router, and applying the saved configuration.
With the router running, save a backup of the configuration.
The exact procedure to accomplish this depends on the current method of configuration, e.g. if
confdis used, then the configuration should be extracted fromconfd, but if the REST API is used directly, then the configuration must be saved by fetching the current configuration snapshot using the REST API.Extracting the configuration using
confdis the recommend approach where available.confcli | tee config_backup.jsonTo extract the configuration from the REST API, the following may be used instead. Depending on the version of the router used, an API-Key may be required to fetch from the REST API.
curl --insecure https://localhost:5001/v2/configuration \ | tee config_backup.jsonIf the API Key is required, it can be found in the file
/opt/edgeware/acd/router/cache/rest-api-key.jsonand can be passed to the API by setting the value of theX-API-Keyheader.curl --insecure -H "X-API-Key: 1234abcd" \ https://localhost:5001/v2/configuration \ | tee config_backup.jsonMount the new installation ISO under
/mnt/acd.Note: The mount-point may be any accessible path, but
/mnt/acdwill be used throughout this document.mkdir -p /mnt/acd mount esb3024-acd-router-1.16.0.iso /mnt/acdStop the router and all associated services.
Before upgrading the router it needs to be stopped, which can be done by typing this:
systemctl stop 'acd-*'Run the installer script.
/mnt/acd/installerMigrate the configuration.
Note that this step only applies if the router is configured using
confd. If it is configured using the REST API, this step is not necessary.The confd configuration used in the previous versions is not directly compatible with 1.16, and may need to be converted. If this is not done, the configuration will not be valid and it will not be possible to make configuration changes.
The
acd-confd-migrationtool will automatically apply any necessary schema migrations. Further details about this tool can be found at Confd Auto Upgrade Tool.The tool takes as input the old configuration file, either by reading the file directly, or by reading from standard input, applies any necessary migrations between the two specified versions, and outputs a new configuration to standard output which is suitable for being applied to the upgraded system. While the tool has the ability to migrate between multiple versions at a time, the earliest supported version is 1.10.1.
The example below shows how to upgrade from 1.10.2. If upgrading from 1.14.0,
--from 1.10.2should be replaced with--from 1.14.0.The command line required to run the tool is different depending on which esb3024 release it is run on. On 1.16.0 it is run like this:
cat config_backup.json | \ podman run -i --rm \ images.edgeware.tv/acd-confd-migration:1.16.0 \ --in - --from 1.10.2 --to 1.16.0 \ | tee config_upgraded.jsonAfter running the above command, apply the new configuration to
confdby runningcat config_upgraded.json | confcli -i.
Troubleshooting
If there is a problem running the installer, additional debug information can
be output by adding -v or -vv or -vvv to the installer command, the
more “v” characters, the more detailed output.
1.3.1 - Configuration changes between 1.14 and 1.16
Confd configuration changes
Below are the changes to the confd configuration between versions 1.14 and 1.16 listed.
Added region GeoIP classifier
Classifiers of type geoip now have a region property.
Added integration.routing.gui configuration
There is now an integration.routing.gui section which will be used by the
GUI.
Added services.routing.accounts configuration
The services.routing.accounts list has been added to the configuration.
1.4 - Firewall
For security reasons, the ESB3024 Installer does not automatically configure the local firewall to allow incoming traffic. It is the responsibility of the operations person to ensure that the system is protected from external access by placing it behind a suitable firewall solution. The following table describes the set of ports required for operation of the router.
| Application | Port | Protocol | Direction | Source | Description |
|---|---|---|---|---|---|
| Prometheus Alert Manager | 9093 | TCP | IN | internal | Monitoring Services |
| Confd | 5000 | TCP | IN | internal | Configuration Services |
| Router | 80 | TCP | IN | public | Incoming HTTP Requests |
| Router | 443 | TCP | IN | public | Incoming HTTPS Requests |
| Router | 5001 | TCP | IN | localhost | Access to router’s REST API |
| Router | 8000 | TCP | IN | localhost | Internal monitoring port |
| EDNS-Proxy | 8888 | TCP | IN | localhost | Proxy EDNS Requests |
| Grafana | 3000 | TCP | IN | internal | Monitoring Services |
| Grafana-Loki | 3100 | TCP | IN | internal | Log monitoring daemon |
| Prometheus | 9090 | TCP | IN | internal | Monitoring Service |
The “Direction” column represents the direction in which the connection is established.
IN- The connection is originated from an outside serverOUT- The connection is established from the host to an external server.
Once a connection is established through the firewall, bidirectional traffic must be allowed using the established connection.
For the “Source” column, the following terms are used.
internal- Any host or network which is allowed to monitor or operate the system.public- Any host or subnet that can access the router. This includes any customer network that will be making routing requests.localhost- Access can be limited to local connections only.any- All traffic from any source or to any destination.
Additional Ports
Convoy bridge integration
The optional convoy-bridge service needs the ability to access the Convoy MariaDB service, which by default runs on port 3306 on all of the Convoy Management servers. To allow this integration to run, port 3306/tcp must be allowed from the router to the configured Convoy Management node.
1.5 - API Overview
ESB3024 Router provides two different types of API:s:
- A content request API that is used by video clients to ask for content, normally using port 80 for HTTP and port 443 for HTTPS.
- A few REST API:s used by administrators to configure and monitor the router installation, using port 5001 over HTTPS by default.
The content API won’t be described further in this document, since it’s a simple HTTP interface serving content as regular files or redirect responses.
Raw configuration – /v2/configuration
Used to check and update the raw configuration of ESB3024 Router. Note that this API is considered an implementation detail and is not documented further.
| REQUEST Method | Content-Type | RESPONSE Result | Status Code | Content-Type |
|---|---|---|---|---|
GET | <N/A> | Success | 200 OK | application/json |
PUT | application/json | Success | 204 No Content | <N/A> |
PUT | application/json | Failure | 400 Bad Request | application/json1 |
Validate Configuration – /v2/validate_configuration
Used to determine if a JSON payload is correctly formatted without actually applying its configuration. A successful return status does not guarantee that the applied configuration will work, it only validates the JSON structure.
| REQUEST Method | Content-Type | RESPONSE Result | Status Code | Content-Type |
|---|---|---|---|---|
PUT | application/json | Success | 204 No Content | <N/A> |
PUT | application/json | Failure | 400 Bad Request | application/json1 |
Example request
When an expected field is missing from the payload, the validation will show which one and return an appropriate error message in its payload:
$ curl -i -X PUT \
-d '{"routing": {"log_level": 3}}' \
-H "Content-Type: application/json" \
https://router.example:5001/v2/validate_configuration
HTTP/1.1 400 Bad Request
Access-Control-Allow-Origin: *
Content-Length: 132
Content-Type: application/json
X-Service-Identity: router.example-5fc78d
"Configuration validation: Configuration parsing failed. \
Exception: [json.exception.out_of_range.403] (/routing) key 'id' not found"
Selection Input – /v1/selection_input
Selection input API can be used to inject external key:value data into the
routing engine, making the data available when making routing decisions. An
arbitrary JSON structure can be pushed to the endpoint. When performing GET or
DELETE requests, specific selection input values can be accessed or deleted by
including a path to the request. Note that not specifying a path will select all
selection input values.
One use case for selection input is to provide data on cache availability. E.g.
If you send {"edge-streamer-2-online": true} to the selection input API,
you can create a routing condition eq('edge-streamer-online', true) to
ensure that no traffic gets routed to the streamer if it’s offline. Note that
sending the same key:value data to the selection input API will overwrite the
previous value.
There is a configurable limit to how many key:value items that can be injected into the router, see the tuning parameter
$ confcli services.routing.tuning.general.selectionInputItemLimit
{
"selectionInputItemLimit": 10000
}
| REQUEST Method | Content-Type | RESPONSE Result | Status Code | Content-Type |
|---|---|---|---|---|
PUT | application/json | Success | 204 No Content | <N/A> |
PUT | application/json | Failure | 400 Bad Request | application/json |
GET | <N/A> | Success | 200 OK | application/json |
DELETE | <N/A> | Success | 204 No Content | <N/A> |
DELETE | <N/A> | Failure | 404 Not Found | <N/A> |
Example successful request (PUT)
$ curl -i -X PUT \
-d '{"host1_bitrate": 13000, "host1_capacity": 50000}' \
-H "Content-Type: application/json" \
https://router.example:5001/v1/selection_input
HTTP/1.1 204 No Content
Access-Control-Allow-Origin: *
Content-Length: 0
X-Service-Identity: router.example-5fc78d
Example unsuccessful request (PUT)
$ curl -i -X PUT \
-d '{"cdn-status": {"session-count": 12345, "load-percent" 98}}' \
-H "Content-Type: application/json" \
https://router.example:5001/v1/selection_input
HTTP/1.1 400 Bad Request
Access-Control-Allow-Origin: *
Content-Length: 169
Content-Type: application/json
X-Service-Identity: router.example-5fc78d
{
"error": "[json.exception.parse_error.101] parse error at line 1, column 57: \
syntax error while parsing object separator - \
unexpected number literal; expected ':'"
}
Example successful request (GET)
curl -i https://router.example:5001/v1/selection_input
HTTP/1.1 200 OK
Access-Control-Allow-Origin: *
Content-Length: 129
Content-Type: application/json
X-Service-Identity: router.example-5fc78d
{
"host1_bitrate": 13000,
"host1_capacity": 50000
}
Example successful specific value request (GET)
curl -i https://router.example:5001/v1/selection_input/path/to/value
HTTP/1.1 200 OK
Access-Control-Allow-Origin: *
Content-Length: 129
Content-Type: application/json
X-Service-Identity: router.example-5fc78d
1
Example successful request (DELETE)
curl -i -X DELETE https://router.example:5001/v1/selection_input
HTTP/1.1 204 OK
Access-Control-Allow-Origin: *
Content-Length: 129
X-Service-Identity: router.example-5fc78d
Example successful specific value request (DELETE)
curl -i -X DELETE https://router.example:5001/v1/selection_input/value/to/delete
HTTP/1.1 204 OK
Access-Control-Allow-Origin: *
Content-Length: 129
X-Service-Identity: router.example-5fc78d
Example unsuccessful request (DELETE)
curl -i -X DELETE https://router.example:5001/v1/selection_input/non/existent/value
HTTP/1.1 404 Not Found
Access-Control-Allow-Origin: *
Content-Length: 129
X-Service-Identity: router.example-5fc78d
Subnets – /v1/subnets
An API for managing named subnets that can be used for routing and block lists. See Subnets for more details.
PUT requests inject key value pairs with the form {<subnet>: <value>}, where
<subnet> is a valid CIDR string, into ACD, e.g.:
$ curl -i -X PUT \
-d '{"255.255.255.255/24": "area1", "1.2.3.4/24": "area2"}' \
-H "Content-Type: application/json" \
https://router.example:5001/v1/subnets
HTTP/1.1 204 No Content
Access-Control-Allow-Origin: *
Content-Length: 0
X-Service-Identity: router.example-5fc78d
GET requests are used to fetch injected subnets, e.g.:
# Fetch all injected subnets
$ curl -i https://router.example:5001/v1/subnets
HTTP/1.1 200 OK
Access-Control-Allow-Origin: *
Content-Length: 411
Content-Type: application/json
X-Service-Identity: router.example-5fc78d
{
"1.2.3.4/16": "area2",
"1.2.3.4/24": "area1",
"1.2.3.4/8": "area3",
"255.255.255.255/16": "area2",
"255.255.255.255/24": "area1",
"255.255.255.255/8": "area3",
"2a02:2e02:9bc0::/16": "area8",
"2a02:2e02:9bc0::/32": "area7",
"2a02:2e02:9bc0::/48": "area6",
"2a02:2e02:9de0::/44": "combined_area",
"2a02:2e02:ada0::/44": "combined_area",
"5.5.0.4/8": "area5",
"90.90.1.3/16": "area4"
}
DELETE requests are used to delete injected subnets, e.g.:
# Delete all injected subnets
$ curl -i https://router.example:5001/v1/subnets -X DELETE
HTTP/1.1 204 No Content
Access-Control-Allow-Origin: *
Content-Length: 0
X-Service-Identity: router.example-5fc78d
Both GET and DELETE requests can be specified with the paths /byKey/ and
/byValue/ to filter which subnets to GET or DELETE.
# Fetch subnet with the CIDR string 1.2.3.4/8 if it exists
$ curl -i https://router.example:5001/v1/subnets/byKey/1.2.3.4/8
HTTP/1.1 200 OK
Access-Control-Allow-Origin: *
Content-Length: 26
Content-Type: application/json
X-Service-Identity: router.example-5fc78d
{
"1.2.3.4/8": "area3"
}
# Fetch all subnets whose CIDR string begins with the IP 1.2.3.4
$ curl -i https://router.example:5001/v1/subnets/byKey/1.2.3.4
HTTP/1.1 200 OK
Access-Control-Allow-Origin: *
Content-Length: 76
Content-Type: application/json
X-Service-Identity: router.example-5fc78d
{
"1.2.3.4/16": "area2",
"1.2.3.4/24": "area1",
"1.2.3.4/8": "area3"
}
# Fetch all subnets whose value equals 'area1'
$ curl -i https://router.example:5001/v1/subnets/byValue/area1
HTTP/1.1 200 OK
Access-Control-Allow-Origin: *
Content-Length: 60
Content-Type: application/json
X-Service-Identity: router.example-5fc78d
{
"1.2.3.4/24": "area1",
"255.255.255.255/24": "area1"
}
# Delete subnet with the CIDR string 1.2.3.4/8 if it exists
$ curl -i https://router.example:5001/v1/subnets/byKey/1.2.3.4/8
HTTP/1.1 204 No Content
Access-Control-Allow-Origin: *
Content-Length: 0
X-Service-Identity: router.example-5fc78d
# Delete all subnets whose CIDR string begins with the IP 1.2.3.4
$ curl -i https://router.example:5001/v1/subnets/byKey/1.2.3.4
HTTP/1.1 204 No Content
Access-Control-Allow-Origin: *
Content-Length: 0
X-Service-Identity: router.example-5fc78d
# Delete all subnets whose value equals 'area1'
$ curl -i https://router.example:5001/v1/subnets/byValue/area1
HTTP/1.1 204 No Content
Access-Control-Allow-Origin: *
Content-Length: 0
X-Service-Identity: router.example-5fc78d
| REQUEST Method | Content-Type | RESPONSE Result | Status Code | Content-Type |
|---|---|---|---|---|
PUT | application/json | Success | 204 No Content | <N/A> |
PUT | application/json | Failure | 400 Bad Request | application/json |
GET | <N/A> | Success | 200 OK | application/json |
GET | <N/A> | Failure | 400 Bad Request | application/json |
DELETE | <N/A> | Success | 204 No Content | application/json |
DELETE | <N/A> | Failure | 400 Bad Request | application/json |
Subrunner Resource Usage – /v1/usage
Used to monitor the load on subrunners, the processes performing those tasks that are possible to run in parallel.
| REQUEST Method | Content-Type | RESPONSE Result | Status Code | Content-Type |
|---|---|---|---|---|
GET | <N/A> | Success | 200 OK | application/json |
Example request
$ curl -i https://router.example:5001/v1/usage
HTTP/1.1 200 OK
Access-Control-Allow-Origin: *
Content-Length: 1234
Content-Type: application/json
X-Service-Identity: router.example-5fc78d
{
"total_usage": {
"content": {
"lru": 0,
"newest": "-",
"oldest": "-",
"total": 0
},
"sessions": 0,
"subrunner_usage": {
[...]
}
},
"usage_per_subrunner": [
{
"subrunner_usage": {
[...]
}
},
[...]
]
}
Metrics – /m1/v1/metrics
An interface intended to be scraped by Prometheus. It is possible to scrape it manually to see current values, but doing so will reset some counters and cause actual Prometheus data to become faulty.
| REQUEST Method | Content-Type | RESPONSE Result | Status Code | Content-Type |
|---|---|---|---|---|
GET | <N/A> | Success | 200 OK | text/plain |
Example request
$ curl -i https://router.example:5001/m1/v1/metrics
HTTP/1.1 200 OK
Access-Control-Allow-Origin: *
Content-Length: 1234
Content-Type: text/plain
X-Service-Identity: router.example-5fc78d
# TYPE num_configuration_changes counter
num_configuration_changes 12
# TYPE num_log_errors_total counter
num_log_errors_total 0
# TYPE num_log_warnings_total counter
num_log_warnings_total{category=""} 123
# TYPE num_log_warnings_total counter
num_log_warnings_total{category="cdn"} 0
# TYPE num_log_warnings_total counter
num_log_warnings_total{category="content"} 0
# TYPE num_log_warnings_total counter
num_log_warnings_total{category="generic"} 10
# TYPE num_log_warnings_total counter
num_log_warnings_total{category="repeated_session"} 0
# TYPE num_ssl_errors_total counter
[...]
Node Visit Counters – /v1/node_visits
Used to gather statistics about the number of visits to each node in the routing tree. The returned value is a JSON object containing node ID names and their corresponding counter values.
| REQUEST Method | Content-Type | RESPONSE Result | Status Code | Content-Type |
|---|---|---|---|---|
GET | <N/A> | Success | 200 OK | application/json |
See Routing Rule Evaluation Metrics for more details.
Example request
$ curl -i https://router.example:5001/v1/node_visits
HTTP/1.1 200 OK
Access-Control-Allow-Origin: *
Content-Length: 73
Content-Type: application/json
X-Service-Identity: router.example-5fc78d
{
"cache1.tv": "99900",
"offload": "100"
"routingtable": "100000"
}
Node Visit Graph – /v1/node_visits_graph
Creates a GraphML representation of the node visitation data that can be rendered into an image to make it easier to understand the data.
| REQUEST Method | Content-Type | RESPONSE Result | Status Code | Content-Type |
|---|---|---|---|---|
GET | <N/A> | Success | 200 OK | application/xml |
See Routing Rule Evaluation Metrics for more details.
Example request
> curl -i -k https://router.example:5001/v1/node_visits_graph
HTTP/1.1 200 OK
Access-Control-Allow-Origin: *
Content-Length: 731
Content-Type: application/xml
X-Service-Identity: router.example-5fc78d
<?xml version="1.0"?>
<graphml xmlns="http://graphml.graphdrawing.org/xmlns"
xmlns:xsi="http://www.w3.org/2001/XMLSchema-instance"
xsi:schemaLocation="http://graphml.graphdrawing.org/xmlns http://graphml.graphdrawing.org/xmlns/1.0/graphml.xsd">
<key id="visits" for="node" attr.name="visits" attr.type="string" />
<graph id="G" edgedefault="directed">
<node id="routingtable">
<data key="visits">100000</data>
</node>
<node id="cache1.tv">
<data key="visits">99900</data>
</node>
<node id="offload">
<data key="visits">100</data>
</node>
<edge id="e0" source="routingtable" target="cache1.tv" />
<edge id="e1" source="routingtable" target="offload" />
</graph>
</graphml>
Session list - /v1/sessions
Used to monitor the load on subrunners, the processes performing those tasks that are possible to run in parallel.
| REQUEST Method | Content-Type | RESPONSE Result | Status Code | Content-Type |
|---|---|---|---|---|
GET | <N/A> | Success | 200 OK | application/json |
Example request
$ curl -k -i https://router.example:5001/v1/sessions
HTTP/1.1 200 OK
Access-Control-Allow-Origin: *
Content-Length: 12345
Content-Type: application/json
X-Service-Identity: router.example-5fc78d
{
"sessions": [
{
"age_seconds": 103,
"cdn": "edgeware",
"cdn_is_redirecting": false,
"client_ip": "1.2.3.4",
"host": "cdn.example:80",
"id": "router.example-5fc78d-00000001",
"idle_seconds": 103,
"last_request_time": "2022-12-02T14:05:05Z",
"latest_request_path": "/__cl/s:storage1/__c/v/f/0/5/v_sintel3v_f05a05f07d352e891d79863131ef4df7/__op/hls-default/__f/index.m3u8",
"no_of_requests": 1,
"requested_bytes": 0,
"requests_redirected": 0,
"requests_served": 0,
"session_groups": [
"all"
],
"session_groups_generation": 2,
"session_path": "/__cl/s:storage1/__c/v/f/0/5/v_sintel3v_f05a05f07d352e891d79863131ef4df7/__op/hls-default/__f/index.m3u8",
"start_time": "2022-12-02T14:05:05Z",
"type": "instream",
"user_agent": "libmpv"
},
[...]
]
}
Session details - /v1/sessions/<id: str>
Used to get details about a specific session from the above session list. The
id part of the URL corresponds to the id field in one of the
returned session entries in the above response.
| REQUEST Method | Content-Type | RESPONSE Result | Status Code | Content-Type |
|---|---|---|---|---|
GET | <N/A> | Success | 200 OK | application/json |
GET | <N/A> | Failure | 404 Not Found | application/json |
Example request
$ curl -k -i https://router.example:5001/v1/sessions/router.example-5fc78d-00000001
HTTP/1.1 200 OK
Access-Control-Allow-Origin: *
Content-Length: 763
Content-Type: application/json
X-Service-Identity: router.example-5fc78d
{
"age_seconds": 183,
"cdn": "edgeware",
"cdn_is_redirecting": false,
"client_ip": "1.2.3.4",
"host": "cdn.example:80",
"id": "router.example-5fc78d-00000001",
"idle_seconds": 183,
"last_request_time": "2022-12-02T14:05:05Z",
"latest_request_path": "/__cl/s:storage1/__c/v/f/0/5/v_sintel3v_f05a05f07d352e891d79863131ef4df7/__op/hls-default/__f/index.m3u8",
"no_of_requests": 1,
"requested_bytes": 0,
"requests_redirected": 0,
"requests_served": 0,
"session_groups": [
"all"
],
"session_groups_generation": 2,
"session_path": "/__cl/s:storage1/__c/v/f/0/5/v_sintel3v_f05a05f07d352e891d79863131ef4df7/__op/hls-default/__f/index.m3u8",
"start_time": "2022-12-02T14:05:05Z",
"type": "instream",
"user_agent": "libmpv"
}
Content List - /v1/content
| REQUEST Method | Content-Type | RESPONSE Result | Status Code | Content-Type |
|---|---|---|---|---|
GET | <N/A> | Success | 200 OK | application/json |
Example request
$ curl -k -i https://router.example:5001/v1/content
HTTP/1.1 200 OK
Access-Control-Allow-Origin: *
Content-Length: 572
Content-Type: application/json
X-Service-Identity: router.example-5fc78d
{
"content": [
[
"/__cl/s:storage1/__c/v/f/0/5/v_sintel3v_f05a05f07d352e891d79863131ef4df7/__op/hls-default/__f/index.m3u8",
{
"cached_count": 0,
"content_requested": false,
"content_set": false,
"expiration_time": "2022-12-02T14:05:05Z",
"key": "/__cl/s:storage1/__c/v/f/0/5/v_sintel3v_f05a05f07d352e891d79863131ef4df7/__op/hls-default/__f/index.m3u8",
"listeners": 0,
"manifest": "",
"request_count": 4,
"state": "HLS:MANIFEST-PENDING",
"wait_count": 0
}
]
]
}
Lua scripts – /v1/lua/<path str>.lua
Used to upload, retrieve and delete custom named Lua scripts on the router.
Global functions in uploaded scripts automatically become available to Lua code
in the configuration (which effectively may be viewed as hooks). Upload a
script by PUTing a application/x-lua to the endpoint, and retrieve it by
GETing the endpoint without payload.
| REQUEST Method | Content-Type | RESPONSE Result | Status Code | Content-Type |
|---|---|---|---|---|
PUT | application/x-lua | Success | 204 No Content | <N/A> |
PUT | application/x-lua | Failure | 400 Bad Request | application/json |
GET | <N/A> | Success | 200 OK | application/x-lua |
GET | <N/A> | Failure | 404 Not Found | application/json |
DELETE | <N/A> | Success | 204 No Content | <N/A> |
DELETE | <N/A> | Failure | 400 Bad Request | application/json |
DELETE | <N/A> | Failure | 404 Not Found | application/json |
Example request (PUT)
Save a Lua script under the name advanced_functions/f1.lua:
$ curl -i -X PUT \
-d 'function fun1() return 1 end' \
-H "Content-Type: application/x-lua" \
https://router.example:5001/v1/lua/advanced_functions/f1.lua
HTTP/1.1 204 Successfully saved Lua file
Access-Control-Allow-Origin: *
Content-Length: 0
X-Service-Identity: router.example-5fc78d
Example request (PUT, from file)
Upload an entire Lua file under the name advanced_functions/f1.lua:
First put your code in a file.
$ cat f1.lua
function fun1()
return 1
end
Then upload it using the --data-binary flag to preserve newlines
$ curl -i -X PUT \
--data-binary @f1.lua \
-H "Content-Type: application/x-lua" \
https://router.example:5001/v1/lua/advanced_functions/f1.lua
HTTP/1.1 204 Successfully saved Lua file
Access-Control-Allow-Origin: *
Content-Length: 0
X-Service-Identity: router.example-5fc78d
Example request (GET)
Request the Lua script named advanced_functions/f1.lua using a GET request:
$ curl -i https://router.example:5001/v1/lua/advanced_functions/f1.lua
HTTP/1.1 200 OK
Access-Control-Allow-Origin: *
Content-Length: 28
Content-Type: application/x-lua
X-Service-Identity: router.example-5fc78d
function fun1() return 1 end
Example request (DELETE)
Delete the Lua script named advanced_functions/f1.lua using a DELETE request:
$ curl -i -X DELETE \
https://router.example:5001/v1/lua/advanced_functions/f1.lua
HTTP/1.1 204 Successfully removed Lua file
Access-Control-Allow-Origin: *
Content-Length: 0
X-Service-Identity: router.example-5fc78d
List Lua scripts – /v1/lua
Used to list previously uploaded custom Lua scripts on the router, retrieving their respective paths and file checksums.
| REQUEST Method | Content-Type | RESPONSE Result | Status Code | Content-Type |
|---|---|---|---|---|
GET | <N/A> | Success | 200 OK | application/json |
Example request
$ curl -k -i https://router.example:5001/v1/lua
HTTP/1.1 200 OK
Access-Control-Allow-Origin: *
Content-Length: 108
Content-Type: application/json
X-Service-Identity: router.example-5fc78d
[
{
"file_checksum": "d41d8cd98f00b204e9800998ecf8427e",
"path": "advanced_functions/f1.lua"
}
]
Debug a Lua expression – /v1/lua/debug
Used to debug an arbitrary Lua expression on the router in a “sandbox” (with no visible side effects to the state of the router), and inspect the result.
The Lua expression in the body is evaluated inside an isolated copy of the
internal Lua environment including selection input. The stdout field of the
resulting JSON body is populated with a concatenation of every string provided
as argument to the Lua print() function during the course of evaluation.
Upon a successful evaluation, as indicated by the success flag,
return.value and return.lua_type_name capture the resulting Lua value.
Otherwise, if valuation was aborted (e.g. due to a Lua exception), error_msg
reflects any error description arising from the Lua environment.
| REQUEST Method | Content-Type | RESPONSE Result | Status Code | Content-Type |
|---|---|---|---|---|
POST | application/x-lua | Success | 200 OK | application/json |
Example successful request
$ curl -i -X POST \
-d 'fun1()' \
-H "Content-Type: application/x-lua" \
https://router.example:5001/v1/lua/debug
HTTP/1.1 200 OK
Access-Control-Allow-Origin: *
Content-Length: 123
Content-Type: application/json
X-Service-Identity: router.example-5fc78d
{
"error_msg": "",
"return": {
"lua_type_name": "number",
"value": 1.0
},
"stdout": "",
"success": true
}
Example unsuccessful request
(attempt to invoke unknown function)
$ curl -i -X POST \
-d 'fun5()' \
-H "Content-Type: application/x-lua" \
https://router.example:5001/v1/lua/debug
HTTP/1.1 200 OK
Access-Control-Allow-Origin: *
Content-Length: 123
Content-Type: application/json
X-Service-Identity: router.example-5fc78d
{
"error_msg": "[string \"function f0() ...\"]:2: attempt to call global 'fun5' (a nil value)",
"return": {
"lua_type_name": "",
"value": null
},
"stdout": "",
"success": false
}
Footnotes
1.6 - Configuration
1.6.1 - WebUI Configuration
The web based user interface is installed as a separate component and can be used to configure many common use cases. After navigating to the UI, a login screen will be presented.

Enter your credentials and log in. In the top left corner is a menu to select what section of the configuration to change. The configuration that will be active on the router is added in the Routing Workflow view. However, basic elements such as classification rules and routing targets, etc must be added first. Hence the following main steps are required to produce a proper configuration:
- Create classifiers serving as basic elements to create session groups.
- Create session groups which, using the classifiers, tag requests/clients for later use in the routing logic. of the incoming traffic.
- Define offload rules.
- Define rules to control behavior of internal traffic.
- Define backup rules to be used if the routing targets in the above step are unavailable.
- Finally, create the desired routing workflow using the elements defined in the previous steps.
A simplified concrete example of the above steps could be:
- Create two classifiers “smartphone” and “off-net”.
- Create a session group “mobile off-net”.
- Offload off-net traffic from mobile phones to a public CDN.
- Route other traffic to a private CDN.
- If the private CDN has an outage, use the public CDN for all traffic.
Hence, to start with, define the classifiers you will need. Those are based on information in the incoming request, optionally in combination with GeoIP databases or subnet information configured via the Subnet API. Here we show how to set up a GeoIP classifier. Note that the Director ships with a compatible snapshot of the GeoIP database, but for a production system a licensed and updated database is required.

Click the plus sign indicated in the picture above to create a new GeoIP classifier. You will be presented with the following view:

Here you can enter the geographical data on which to match, or check the “Inverted” check box to match anything except the entered geographical data.
The other kinds of classifiers are configured in a similar way.
After having added all the classifiers you need, it is time to create the session groups. Those are named filters that group incoming requests, typically video playback sessions in a video streaming CDN, and are defined with the help of the classifiers. For example, a session group “off-net mobile devices” could be composed of the classifiers “off-net traffic” and “mobile devices”.
Open the Session Groups view from the menu and hit the plus sign to add a new session group.

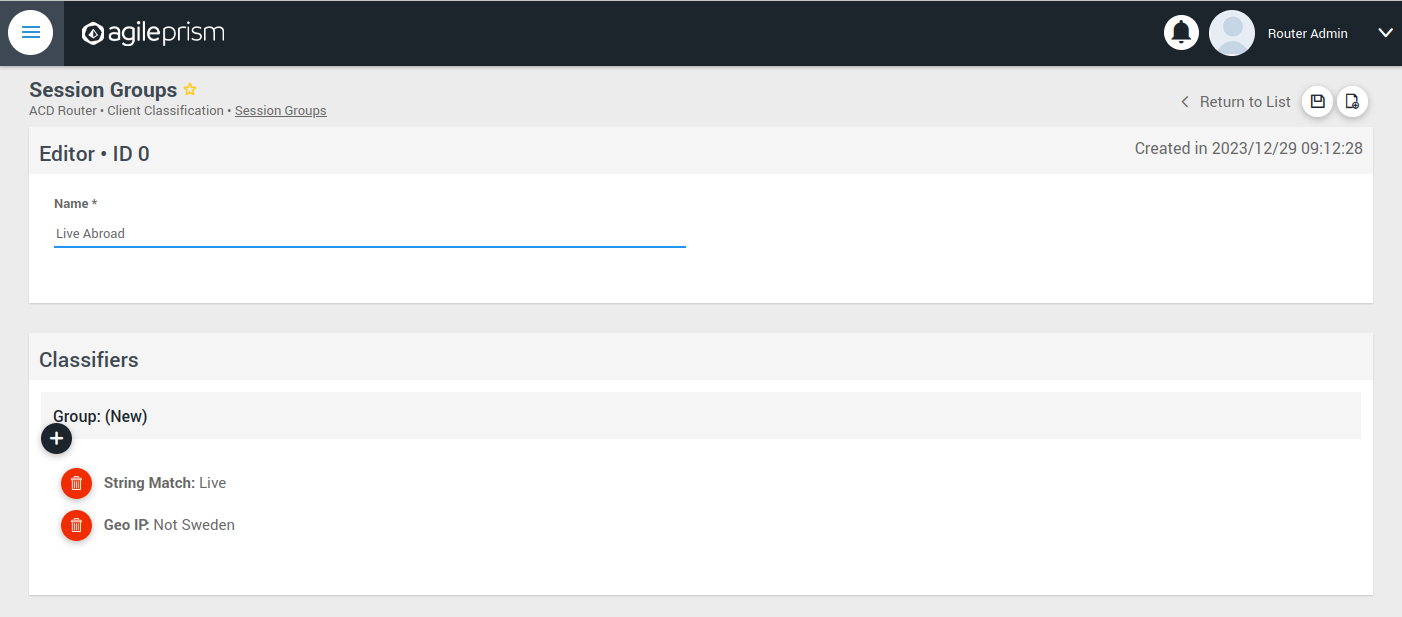
Define the new sessions groups by combining the previously created classifiers. It is often convenient to define an “All” session group that matches any incoming request.
Next go the “CDN Offload” view:

Here you define conditions for CDN offload. Each row defines a rule for offloading a specified session group. The rule makes use of the Selection Input API. This is an integration API that provides a way to supply additional data for use in the routing decision. Common examples are current bitrates or availability status. The selection input variables to use must be defined in the “Selection Input Types” view in the “Administration” section of the menu:

Reach out to the solution engineers from Agile Content in order to perform this integration in the best way. If no external data is required, such that the offload rule can be based solely based on session groups, this is not necessary and the condition field can be set to “Always” or “Disabled”.
When clicking the plus sign to add a new CDN Offload rule, the following view is presented:

The selection input rule is phrased in terms of a variable being above or below a threshold, but also a state such as “available” taking values 0 or 1 can be supported by for instance checking if “available” is below 1.
Moving on, if an incoming request is not offloaded, it will be handled by the Primary CDN section of the routing configuration.

Add all hosts in your primary CDN, together with a weight. A row in this table will be selected by random weighted load balancing. If each weight is the same, each row will be selected with the same probability. Another example would be three rows with weights 100, 100 and 200 which would randomly balance 50% of the load on the last row and the remaining load on the first two rows, i.e. 25% on each of the first and second row. If a Primary CDN host is unavailable, that host will not take part in the random selection.
If all hosts are unavailable, as a final resort the routing evaluation will go to the final Backup CDN step:

Here you can define what to do when all else fail. If not all requests are covered, for example with an “All” session group, then the request will fail with 403 Forbidden.
Now you have defined the basic elements and it is time to define the routing workflow. Select “Routing Workflow” from the menu, as pictured below. Here you can combine the elements previously created to achieve the desired routing behavior.

When everything seems correct, open the “Publish Routing” view from the menu:

Hit “Publish All Changes” and verify that you get a successful result.
1.6.2 - Confd and Confcli
confcli to set up routing rulesConfiguration of a complex routing tree can be difficult. The command line
interface tool called confcli has been developed to make it simpler. It
combines building blocks, representing simple routing decisions, into complex
routing trees capable of satisfying almost any routing requirements.
These blocks are translated into an ESB3024 Router configuration which is automatically sent to the router, overwriting existing routing rules, CDN list and host list.
Installation and Usage
The confcli tools are installed alongside ESB3024 Router, on the same host,
and the confcli command line tool itself is made available on the host machine.
Simply type confcli in a shell on the host to see the current routing
configuration:
$ confcli
{
"services": {
"routing": {
"settings": {
"trustedProxies": [],
"contentPopularity": {
"algorithm": "score_based",
"sessionGroupNames": []
},
"extendedContentIdentifier": {
"enabled": false,
"includedQueryParams": []
},
"instream": {
"dashManifestRewrite": {
"enabled": false,
"sessionGroupNames": []
},
"hlsManifestRewrite": {
"enabled": false,
"sessionGroupNames": []
},
"reversedFilenameComparison": false
},
"usageLog": {
"enabled": false,
"logInterval": 3600000
}
},
"tuning": {
"content": {
"cacheSizeFullManifests": 1000,
"cacheSizeLightManifests": 10000,
"lightCacheTimeMilliseconds": 86400000,
"liveCacheTimeMilliseconds": 100,
"vodCacheTimeMilliseconds": 10000
},
"general": {
"accessLog": false,
"coutFlushRateMilliseconds": 1000,
"cpuLoadWindowSize": 10,
"eagerCdnSwitching": false,
"httpPipeliningEnable": false,
"logLevel": 3,
"maxConnectionsPerHost": 5,
"overloadThreshold": 32,
"readyThreshold": 8,
"redirectingCdnManifestDownloadRetries": 2,
"repeatedSessionStartThresholdSeconds": 30,
"selectionInputMetricsTimeoutSeconds": 30
},
"session": {
"idleDeactivateTimeoutMilliseconds": 20000,
"idleDeleteTimeoutMilliseconds": 1800000
},
"target": {
"responseTimeoutSeconds": 5,
"retryConnectTimeoutSeconds": 2,
"retryResponseTimeoutSeconds": 2,
"connectTimeoutSeconds": 5,
"maxIdleTimeSeconds": 30,
"requestAttempts": 3
}
},
"sessionGroups": [],
"classifiers": [],
"hostGroups": [],
"rules": [],
"entrypoint": "",
"applyConfig": true
}
}
}
The CLI tool can be used to modify, add and delete values by providing it with
the “path” to the object to change. The path is constructed by joining the field
names leading up to the value with a period between each name, e.g. the path to
the entrypoint is services.routing.entrypoint since entrypoint is nested
under the routing object, which in turn is under the services root object.
Lists use an index number in place of a field name, where 0 indicates the very
first element in the list, 1 the second element and so on.
If the list contains objects which have a field with the name name, the
index number can be replaced by the unique name of the object of interest.
Tab completion is supported by confcli. Pressing tab once will complete as far as possible, and pressing tab twice will list all available alternatives at the path constructed so far.
Display the values at a specific path:
$ confcli services.routing.hostGroups
{
"hostGroups": [
{
"name": "internal",
"type": "redirecting",
"httpPort": 80,
"httpsPort": 443,
"hosts": [
{
"name": "rr1",
"hostname": "rr1.example.com",
"ipv6_address": ""
}
]
},
{
"name": "external",
"type": "host",
"httpPort": 80,
"httpsPort": 443,
"hosts": [
{
"name": "offload-streamer1",
"hostname": "streamer1.example.com",
"ipv6_address": ""
},
{
"name": "offload-streamer2",
"hostname": "streamer2.example.com",
"ipv6_address": ""
}
]
}
]
}
Display the values in a specific list index:
$ confcli services.routing.hostGroups.1
{
"1": {
"name": "external",
"type": "host",
"httpPort": 80,
"httpsPort": 443,
"hosts": [
{
"name": "offload-streamer1",
"hostname": "streamer1.example.com",
"ipv6_address": ""
},
{
"name": "offload-streamer2",
"hostname": "streamer2.example.com",
"ipv6_address": ""
}
]
}
}
Display the values in a specific list index using the object’s name:
$ confcli services.routing.hostGroups.1.hosts.offload-streamer2
{
"offload-streamer2": {
"name": "offload-streamer2",
"hostname": "streamer2.example.com",
"ipv6_address": ""
}
}
Modify a single value:
confcli services.routing.hostGroups.1.hosts.offload-streamer2.hostname new-streamer.example.com
services.routing.hostGroups.1.hosts.offload-streamer2.hostname = 'new-streamer.example.com'
Delete an entry:
$ confcli services.routing.sessionGroups.Apple.classifiers.
{
"classifiers": [
"Apple",
""
]
}
$ confcli services.routing.sessionGroups.Apple.classifiers.1 -d
http://localhost:5000/config/__active/services/routing/sessionGroups/Apple/classifiers/1 reset to default/deleted
$ confcli services.routing.sessionGroups.Apple.classifiers.
{
"classifiers": [
"Apple"
]
}
Adding new values in objects and lists is done using a wizard by invoking
confcli with a path and the -w argument. This will be shown extensively in
the examples further down in this document rather than here.
If you have a JSON file with a previously generated confcli configuration
output it can be applied to a system by typing confcli -i <file path>.
CDNs and Hosts
Configuration using confcli has no real concept of CDNs, instead it has groups of hosts that share some common settings such as HTTP(S) port and whether they return a redirection URL, serve content directly or perform a DNS lookup. Of these three variants, the two former share the same parameters, while the DNS variant is slightly different.
Each host belongs to a host group and may itself be an entire CDN using a single public hostname or a single streamer server, all depending on the needs of the user.
Host Health
When creating a host in the confd configuration, you have the option to define a list of health check functions. Each health check function must return true for a host to be selected. This means that the host will only be considered available if all the defined health check functions evaluate to true. If any of the health check functions return false, the host will be considered unavailable and will not be selected for routing. All health check functions are detailed in the section Built-in Lua functions.
$ confcli services.routing.hostGroups -w
Running wizard for resource 'hostGroups'
Hint: Hitting return will set a value to its default.
Enter '?' to receive the help string
hostGroups : [
hostGroup can be one of
1: dns
2: host
3: redirecting
Choose element index or name: redirecting
Adding a 'redirecting' element
hostGroup : {
name (default: ): edgeware
type (default: redirecting): ⏎
httpPort (default: 80): ⏎
httpsPort (default: 443): ⏎
hosts : [
host : {
name (default: ): rr1
hostname (default: ): convoy-rr1.example.com
ipv6_address (default: ): ⏎
healthChecks : [
healthCheck (default: always()): health_check()
Add another 'healthCheck' element to array 'healthChecks'? [y/N]: n
]
}
Add another 'host' element to array 'hosts'? [y/N]: y
host : {
name (default: ): rr2
hostname (default: ): convoy-rr2.example.com
ipv6_address (default: ): ⏎
healthChecks : [
healthCheck (default: always()): ⏎
Add another 'healthCheck' element to array 'healthChecks'? [y/N]: n
]
}
Add another 'host' element to array 'hosts'? [y/N]: ⏎
]
}
Add another 'hostGroup' element to array 'hostGroups'? [y/N]: ⏎
]
Generated config:
{
"hostGroups": [
{
"name": "edgeware",
"type": "redirecting",
"httpPort": 80,
"httpsPort": 443,
"hosts": [
{
"name": "rr1",
"hostname": "convoy-rr1.example.com",
"ipv6_address": "",
"healthChecks": [
"health_check()"
]
},
{
"name": "rr2",
"hostname": "convoy-rr2.example.com",
"ipv6_address": "",
"healthChecks": [
"always()"
]
}
]
}
]
}
Merge and apply the config? [y/n]: y
$ confcli services.routing.hostGroups -w
Running wizard for resource 'hostGroups'
Hint: Hitting return will set a value to its default.
Enter '?' to receive the help string
hostGroups : [
hostGroup can be one of
1: dns
2: host
3: redirecting
Choose element index or name: dns
Adding a 'dns' element
hostGroup : {
name (default: ): external-dns
type (default: dns): ⏎
hosts : [
host : {
name (default: ): dns-host
hostname (default: ): dns.example.com
ipv6_address (default: ): ⏎
healthChecks : [
healthCheck (default: always()): ⏎
Add another 'healthCheck' element to array 'healthChecks'? [y/N]: n
]
}
Add another 'host' element to array 'hosts'? [y/N]: ⏎
]
}
Add another 'hostGroup' element to array 'hostGroups'? [y/N]: ⏎
]
Generated config:
{
"hostGroups": [
{
"name": "external-dns",
"type": "dns",
"hosts": [
{
"name": "dns-host",
"hostname": "dns.example.com",
"ipv6_address": "",
"healthChecks": [
"always()"
]
}
]
}
]
}
Merge and apply the config? [y/n]: y
Rule Blocks
The routing configuration using confcli is done using a combination of logical
building blocks, or rules. Each block evaluates the incoming request in some way
and sends it on to one or more sub-blocks. If the block is of the host type
described above, the client is sent to that host and the evaluation is done.
Existing blocks
Currently supported blocks are:
allow: Incoming requests, for which a given rule function matches, are immediately sent to the providedonMatchtarget.consistentHashing: Splits incoming requests randomly between preferred hosts, determined by the proprietary consistent hashing algorithm. The amount of hosts to split between is controlled by thespreadFactor.contentPopularity: Splits incoming requests into two sub-blocks depending on how popular the requested content is.deny: Incoming requests, for which a given rule function matches, are immediately denied, and all non-matching requests are sent to theonMisstarget.firstMatch: Incoming requests are matched by an ordered series of rules, where the request will be handled by the first rule for which the condition evaluates to true.random: Splits incoming requests randomly and equally between a list of target sub-blocks. Useful for simple load balancing.split: Splits incoming requests between two sub-blocks depending on how the request is evaluated by a provided function. Can be used for sending clients to different hosts depending on e.g. geographical location or client hardware type.weighted: Randomly splits incoming requests between a list of target sub-blocks, weighted according to each target’s associated weight rule. A higher weight means a higher portion of requests will be routed to a sub-block. Rules can be used to decide whether or not to pick a target.rawGroup: Contains a raw ESB3024 Router configuration routing tree node, to be inserted as is in the generated configuration. This is only meant to be used in the rare cases when it’s impossible to construct the required routing behavior in any other way.rawHost: A host reference for use as endpoints in rawGroup trees.
$ confcli services.routing.rules -w
Running wizard for resource 'rules'
Hint: Hitting return will set a value to its default.
Enter '?' to receive the help string
rules : [
rule can be one of
1: allow
2: consistentHashing
3: contentPopularity
4: deny
5: firstMatch
6: random
7: rawGroup
8: rawHost
9: split
10: weighted
Choose element index or name: allow
Adding a 'allow' element
rule : {
name (default: ): allow
type (default: allow): ⏎
condition (default: ): customFunction()
onMatch (default: ): rr1
}
Add another 'rule' element to array 'rules'? [y/N]: ⏎
]
Generated config:
{
"rules": [
{
"name": "content",
"type": "contentPopularity",
"condition": "customFunction()",
"onMatch": "rr1"
}
]
}
Merge and apply the config? [y/n]: y
$ confcli services.routing.rules -w
Running wizard for resource 'rules'
Hint: Hitting return will set a value to its default.
Enter '?' to receive the help string
rules : [
rule can be one of
1: allow
2: consistentHashing
3: contentPopularity
4: deny
5: firstMatch
6: random
7: rawGroup
8: rawHost
9: split
10: weighted
Choose element index or name: consistentHashing
Adding a 'consistentHashing' element
rule : {
name (default: ): consistentHashingRule
type (default: consistentHashing):
spreadFactor (default: 1): 2
hashAlgorithm (default: MD5):
targets : [
target : {
target (default: ): rr1
enabled (default: True):
}
Add another 'target' element to array 'targets'? [y/N]: y
target : {
target (default: ): rr2
enabled (default: True):
}
Add another 'target' element to array 'targets'? [y/N]: y
target : {
target (default: ): rr3
enabled (default: True):
}
Add another 'target' element to array 'targets'? [y/N]: n
]
}
Add another 'rule' element to array 'rules'? [y/N]: n
]
Generated config:
{
"rules": [
{
"name": "consistentHashingRule",
"type": "consistentHashing",
"spreadFactor": 2,
"hashAlgorithm": "MD5",
"targets": [
{
"target": "rr1",
"enabled": true
},
{
"target": "rr2",
"enabled": true
},
{
"target": "rr3",
"enabled": true
}
]
}
]
}
Merge and apply the config? [y/n]: y
$ confcli services.routing.rules -w
Running wizard for resource 'rules'
Hint: Hitting return will set a value to its default.
Enter '?' to receive the help string
rules : [
rule can be one of
1: allow
2: consistentHashing
3: contentPopularity
4: deny
5: firstMatch
6: random
7: rawGroup
8: rawHost
9: split
10: weighted
Choose element index or name: contentPopularity
Adding a 'contentPopularity' element
rule : {
name (default: ): content
type (default: contentPopularity): ⏎
contentPopularityCutoff (default: 10): 20
onPopular (default: ): rr1
onUnpopular (default: ): rr2
}
Add another 'rule' element to array 'rules'? [y/N]: ⏎
]
Generated config:
{
"rules": [
{
"name": "content",
"type": "contentPopularity",
"contentPopularityCutoff": 20.0,
"onPopular": "rr1",
"onUnpopular": "rr2"
}
]
}
Merge and apply the config? [y/n]: y
$ confcli services.routing.rules -w
Running wizard for resource 'rules'
Hint: Hitting return will set a value to its default.
Enter '?' to receive the help string
rules : [
rule can be one of
1: allow
2: consistentHashing
3: contentPopularity
4: deny
5: firstMatch
6: random
7: rawGroup
8: rawHost
9: split
10: weighted
Choose element index or name: deny
Adding a 'deny' element
rule : {
name (default: ): deny
type (default: deny): ⏎
condition (default: ): customFunction()
onMiss (default: ): rr1
}
Add another 'rule' element to array 'rules'? [y/N]: ⏎
]
Generated config:
{
"rules": [
{
"name": "content",
"type": "contentPopularity",
"condition": "customFunction()",
"onMiss": "rr1"
}
]
}
Merge and apply the config? [y/n]: y
$ confcli services.routing.rules -w
Running wizard for resource 'rules'
Hint: Hitting return will set a value to its default.
Enter '?' to receive the help string
rules : [
rule can be one of
1: allow
2: consistentHashing
3: contentPopularity
4: deny
5: firstMatch
6: random
7: rawGroup
8: rawHost
9: split
10: weighted
Choose element index or name: firstMatch
Adding a 'firstMatch' element
rule : {
name (default: ): firstMatch
type (default: firstMatch): ⏎
targets : [
target : {
onMatch (default: ): rr1
rule (default: ): customFunction()
}
Add another 'target' element to array 'targets'? [y/N]: y
target : {
onMatch (default: ): rr2
rule (default: ): otherCustomFunction()
}
Add another 'target' element to array 'targets'? [y/N]: n
]
}
Add another 'rule' element to array 'rules'? [y/N]: n
]
Generated config:
{
"rules": [
{
"name": "firstMatch",
"type": "firstMatch",
"targets": [
{
"onMatch": "rr1",
"condition": "customFunction()"
},
{
"onMatch": "rr2",
"condition": "otherCustomFunction()"
}
]
}
]
}
Merge and apply the config? [y/n]: y
$ confcli services.routing.rules -w
Running wizard for resource 'rules'
Hint: Hitting return will set a value to its default.
Enter '?' to receive the help string
rules : [
rule can be one of
1: allow
2: consistentHashing
3: contentPopularity
4: deny
5: firstMatch
6: random
7: rawGroup
8: rawHost
9: split
10: weighted
Choose element index or name: random
Adding a 'random' element
rule : {
name (default: ): random
type (default: random): ⏎
targets : [
target (default: ): rr1
Add another 'target' element to array 'targets'? [y/N]: y
target (default: ): rr2
Add another 'target' element to array 'targets'? [y/N]: ⏎
]
}
Add another 'rule' element to array 'rules'? [y/N]: ⏎
]
Generated config:
{
"rules": [
{
"name": "random",
"type": "random",
"targets": [
"rr1",
"rr2"
]
}
]
}
Merge and apply the config? [y/n]: y
$ confcli services.routing.rules -w
Running wizard for resource 'rules'
Hint: Hitting return will set a value to its default.
Enter '?' to receive the help string
rules : [
rule can be one of
1: allow
2: consistentHashing
3: contentPopularity
4: deny
5: firstMatch
6: random
7: rawGroup
8: rawHost
9: split
10: weighted
Choose element index or name: split
Adding a 'split' element
rule : {
name (default: ): split
type (default: split): ⏎
condition (default: ): custom_function()
onMatch (default: ): rr2
onMiss (default: ): rr1
}
Add another 'rule' element to array 'rules'? [y/N]: ⏎
]
Generated config:
{
"rules": [
{
"name": "split",
"type": "split",
"condition": "custom_function()",
"onMatch": "rr2",
"onMiss": "rr1"
}
]
}
Merge and apply the config? [y/n]: y
$ confcli services.routing.rules. -w
Running wizard for resource 'rules'
Hint: Hitting return will set a value to its default.
Enter '?' to receive the help string
rules : [
rule can be one of
1: allow
2: consistentHashing
3: contentPopularity
4: deny
5: firstMatch
6: random
7: rawGroup
8: rawHost
9: split
10: weighted
Choose element index or name: weighted
Adding a 'weighted' element
rule : {
name (default: ): weight
type (default: weighted): ⏎
targets : [
target : {
target (default: ): rr1
weight (default: 100): ⏎
condition (default: always()): always()
}
Add another 'target' element to array 'targets'? [y/N]: y
target : {
target (default: ): rr2
weight (default: 100): si('rr2-input-weight')
condition (default: always()): gt('rr2-bandwidth', 1000000)
}
Add another 'target' element to array 'targets'? [y/N]: y
target : {
target (default: ): rr2
weight (default: 100): custom_func()
condition (default: always()): always()
}
Add another 'target' element to array 'targets'? [y/N]: ⏎
]
}
Add another 'rule' element to array 'rules'? [y/N]: ⏎
]
Generated config:
{
"rules": [
{
"name": "weight",
"type": "weighted",
"targets": [
{
"target": "rr1",
"weight": "100",
"condition": "always()"
},
{
"target": "rr2",
"weight": "si('rr2-input-weight')",
"condition": "gt('rr2-bandwith', 1000000)"
},
{
"target": "rr2",
"weight": "custom_func()",
"condition": "always()"
}
]
}
]
}
Merge and apply the config? [y/n]: y
>> First add a raw host block that refers to a regular host
$ confcli services.routing.rules. -w
Running wizard for resource 'rules'
Hint: Hitting return will set a value to its default.
Enter '?' to receive the help string
rules : [
rule can be one of
1: allow
2: consistentHashing
3: contentPopularity
4: deny
5: firstMatch
6: random
7: rawGroup
8: rawHost
9: split
10: weighted
Choose element index or name: rawHost
Adding a 'rawHost' element
rule : {
name (default: ): raw-host
type (default: rawHost): ⏎
hostId (default: ): rr1
}
Add another 'rule' element to array 'rules'? [y/N]: ⏎
]
Generated config:
{
"rules": [
{
"name": "raw-host",
"type": "rawHost",
"hostId": "rr1"
}
]
}
Merge and apply the config? [y/n]: y
>> And then add a rule using the host node
$ confcli services.routing.rules. -w
Running wizard for resource 'rules'
Hint: Hitting return will set a value to its default.
Enter '?' to receive the help string
rules : [
rule can be one of
1: allow
2: consistentHashing
3: contentPopularity
4: deny
5: firstMatch
6: random
7: rawGroup
8: rawHost
9: split
10: weighted
Choose element index or name: rawGroup
Adding a 'rawGroup' element
rule : {
name (default: ): raw-node
type (default: rawGroup): ⏎
memberOrder (default: sequential): ⏎
members : [
member : {
target (default: ): raw-host
weightFunction (default: ): return 1
}
Add another 'member' element to array 'members'? [y/N]: ⏎
]
}
Add another 'rule' element to array 'rules'? [y/N]: ⏎
]
Generated config:
{
"rules": [
{
"name": "raw-node",
"type": "rawGroup",
"memberOrder": "sequential",
"members": [
{
"target": "raw-host",
"weightFunction": "return 1"
}
]
}
]
}
Merge and apply the config? [y/n]: y
Rule Language
Some blocks, such as the split and firstMatch types, have a rule field that
contains a small function in a very simple programming language. This field is
used to filter any incoming client requests in order to determine how to rule
block should react.
In the case of a split block, the rule is evaluated and if it is true the
client is sent to the onMatch part of the block, otherwise it is sent to the
onMiss part for further evaluation.
In the case of a firstMatch block, the rule for each target will be evaluated
top to bottom in order until either a rule evaluates to true or the list is
exhausted. If a rule evaluates to true, the client will be sent to the onMatch
part of the block, otherwise the next target in the list will be tried. If all
targets have been exhausted, then the entire rule evaluation will fail, and the
routing tree will be restarted with the firstMatch block effectively removed.
Example of Boolean Functions
Let’s say we have an ESB3024 Router set up with a session group that matches Apple
devices (named “Apple”). To route all Apple devices to a specific streamer one
would simply create a split block with the following rule:
in_session_group('Apple')
In order to make more complex rules it’s possible to combine several checks like
this in the same rule. Let’s extend the hypothetical ESB3024 Router above with a
configured subnet with all IP addresses in Europe (named “Europe”). To make a
rule that accepts any clients using an Apple device and living outside of
Europe, but only as long as the reported load on the streamer (as indicated by
the selection input variable
“europe_load_mbps”) is less than 1000 megabits per second one could make an
offload block with the following rule (without linebreaks):
in_session_group('Apple')
and not in_subnet('Europe')
and lt('europe_load_mbps', 1000)
In this example in_session_group('Apple') will be true if the client belongs
to the session group named ‘Apple’. The function call in_subnet('Europe') is
true if the client’s IP belongs to the subnet named ‘Europe’, but the word not
in front of it reverses the value so the entire section ends up being false if
the client is in Europe. Finally lt('europe_load_mbps', 1000) is true if
there is a selection input variable named “europe_load_mbps” and its value is
less than 1000.
Since the three parts are conjoined with the and keyword they must all
be true for the entire rule to match. If the keyword or had been used
instead it would have been enough for any of the parts to be true for the
rule to match.
Example of Numeric Functions
A hypothetical CDN has two streamers with different capacity; Host_1 has
roughly twice the capacity of Host_2. A simple random load balancing would put
undue stress on the second host since it will receive as much traffic as the
more capable Host_1.
This can be solved by using a weighted random distribution rule block with
suitable rules for the two hosts:
{
"targets": [
{
"target": "Host_1",
"condition": "always()",
"weight": "100"
}
{
"target": "Host_2",
"condition": "always()",
"weight": "50"
},
]
}
resulting in Host_1 receiving twice as many requests as Host_2 as its
weight function is double that of Host_2.
If the CDN is capable of reporting the free capacity of the hosts, for example by writing to a selection input variable for each host, it’s easy to write a more intelligent load balancing rule by making the weights correspond to the amount of capacity left on each host:
{
"targets": [
{
"target": "Host_1",
"condition": "always()",
"weight": "si('free_capacity_host_1')"
}
{
"target": "Host_2",
"condition": "always()",
"weight": "si('free_capacity_host_2')"
},
]
}
It is also possible to write custom Lua functions that return suitable weights, perhaps taking the host as an argument:
{
"targets": [
{
"target": "Host_1",
"condition": "always()",
"weight": "intelligent_weight_function('Host_1')"
}
{
"target": "Host_2",
"condition": "always()",
"weight": "intelligent_weight_function('Host_1')"
},
]
}
These different weight rules can of course be combined in the same rule block, with one target having a hard coded number, another using a dynamically updated selection input variable and yet another having a custom-built function.
Due to limitations in the random number generator used to distribute requests, it’s better to use somewhat large values, around 100–1000 or so, than to use small values near 0.
Built-in Functions
The following built-in functions are available when writing rules:
in_session_group(str name): True if session belongs to session group<name>in_all_session_groups(str sg_name, ...): True if session belongs to all specified session groupsin_any_session_group(str sg_name, ...): True if session belongs to any specified session groupin_subnet(str subnet_name): True if client IP belongs to the named subnetgt(str si_var, number value): True if selection_inputs[si_var] > valuegt(str si_var1, str si_var2): True if selection_inputs[si_var1] > selection_inputs[si_var2]ge(str si_var, number value): True if selection_inputs[si_var] >= valuege(str si_var1, str si_var2): True if selection_inputs[si_var1] >= selection_inputs[si_var2]lt(str si_var, number value): True if selection_inputs[si_var] < valuelt(str si_var1, str si_var2): True if selection_inputs[si_var1] < selection_inputs[si_var2]le(str si_var, number value): True if selection_inputs[si_var] <= valuele(str si_var1, str si_var2): True if selection_inputs[si_var1] <= selection_inputs[si_var2]eq(str si_var, number value): True if selection_inputs[si_var] == valueeq(str si_var1, str si_var2): True if selection_inputs[si_var1] == selection_inputs[si_var2]neq(str si_var, number value): True if selection_inputs[si_var] != valueneq(str si_var1, str si_var2): True if selection_inputs[si_var1] != selection_inputs[si_var2]si(str si_var): Returns the value of selection_inputs[si_var] if it is defined and non-negative, otherwise it returns 0.always(): Returns true, useful when creating weighted rule blocks.never(): Returns false, opposite ofalways().
These functions, as well as custom functions written in Lua and uploaded to the ESB3024 Router, can be combined to make suitably precise rules.
Combining Multiple Boolean Functions
In order to make the rule language easy to work with, it is fairly restricted
and simple. One restriction is that it’s only possible to chain multiple
function results together using either and or or, but not a
combination of both conjunctions.
Statements joined with and or or keywords are evaluated one by one,
starting with the left-most statement and moving right. As soon as the end
result of the entire expression is certain, the evaluation ends. This means that
evaluation ends with the first false statement for and expressions since a
single false component means the entire expression must also be false. It
also means that evaluation ends with the first true statement for or
expressions since only one component must be true for the entire statement to
be true as well. This is known as short-circuit or lazy evaluation.
Custom Functions
It is possible to write extremely complex Lua functions that take many parameters or calculations into consideration when evaluating an incoming client request. By writing such functions and making sure that they return only non-negative integer values and uploading them to the router they can be used from the rule language. Simply call them like any of the built-in functions listed above, using strings and numbers as arguments if necessary, and their result will be used to determine the routing path to use.
Formal Syntax
The full syntax of the language can be described in just a few lines of BNF grammar:
<rule> := <weight_rule> | <match_rule> | <value_rule>
<weight_rule> := "if" <compound_predicate> "then" <weight> "else" <weight>
<match_rule> := <compound_predicate>
<value_rule> := <weight>
<compound_predicate> := <logical_predicate> |
<logical_predicate> ["and" <logical_predicate> ...] |
<logical_predicate> ["or" <logical_predicate> ...] |
<logical_predicate> := ["not"] <predicate>
<predicate> := <function_name> "(" ")" |
<function_name> "(" <argument> ["," <argument> ...] ")"
<function_name> := <letter> [<function_name_tail> ...]
<function_name_tail> := empty | <letter> | <digit> | "_"
<argument> := <string> | <number>
<weight> := integer | <predicate>
<number> := float | integer
<string> := "'" [<letter> | <digit> | <symbol> ...] "'"
Building a Routing Configuration
This example sets up an entire routing configuration for a system with a ESB3008 Request Router, two streamers and the Apple devices outside of Europe example used earlier in this document. Any clients not matching the criteria will be sent to an offload CDN with two streamers in a simple uniformly randomized load balancing setup.
Set up Session Group
First make a classifier and a session group that uses it:
$ confcli services.routing.classifiers -w
Running wizard for resource 'classifiers'
Hint: Hitting return will set a value to its default.
Enter '?' to receive the help string
classifiers : [
classifier can be one of
1: anonymousIp
2: asnIds
3: contentUrlPath
4: contentUrlQueryParameters
5: geoip
6: hostName
7: ipranges
8: random
9: regexMatcher
10: requestHeader
11: stringMatcher
12: subnet
13: userAgent
Choose element index or name: userAgent
Adding a 'userAgent' element
classifier : {
name (default: ): Apple
type (default: userAgent): ⏎
inverted (default: False): ⏎
patternType (default: stringMatch): ⏎
pattern (default: ): *apple*
}
Add another 'classifier' element to array 'classifiers'? [y/N]: ⏎
]
Generated config:
{
"classifiers": [
{
"name": "Apple",
"type": "userAgent",
"inverted": false,
"patternType": "stringMatch",
"pattern": "*apple*"
}
]
}
Merge and apply the config? [y/n]: y
$ confcli services.routing.sessionGroups -w
Running wizard for resource 'sessionGroups'
Hint: Hitting return will set a value to its default.
Enter '?' to receive the help string
sessionGroups : [
sessionGroup : {
name (default: ): Apple
classifiers : [
classifier (default: ): Apple
Add another 'classifier' element to array 'classifiers'? [y/N]: ⏎
]
}
Add another 'sessionGroup' element to array 'sessionGroups'? [y/N]: ⏎
]
Generated config:
{
"sessionGroups": [
{
"name": "Apple",
"classifiers": [
"Apple"
]
}
]
}
Merge and apply the config? [y/n]: y
Set up Hosts
Create two host groups and add a Request Router to the first and two streamers to the second, which will be used for offload:
$ confcli services.routing.hostGroups -w
Running wizard for resource 'hostGroups'
Hint: Hitting return will set a value to its default.
Enter '?' to receive the help string
hostGroups : [
hostGroup can be one of
1: dns
2: host
3: redirecting
Choose element index or name: redirecting
Adding a 'redirecting' element
hostGroup : {
name (default: ): internal
type (default: redirecting): ⏎
httpPort (default: 80): ⏎
httpsPort (default: 443): ⏎
hosts : [
host : {
name (default: ): rr1
hostname (default: ): rr1.example.com
ipv6_address (default: ): ⏎
}
Add another 'host' element to array 'hosts'? [y/N]: ⏎
]
}
Add another 'hostGroup' element to array 'hostGroups'? [y/N]: y
hostGroup can be one of
1: dns
2: host
3: redirecting
Choose element index or name: host
Adding a 'host' element
hostGroup : {
name (default: ): external
type (default: host): ⏎
httpPort (default: 80): ⏎
httpsPort (default: 443): ⏎
hosts : [
host : {
name (default: ): offload-streamer1
hostname (default: ): streamer1.example.com
ipv6_address (default: ): ⏎
}
Add another 'host' element to array 'hosts'? [y/N]: y
host : {
name (default: ): offload-streamer2
hostname (default: ): streamer2.example.com
ipv6_address (default: ): ⏎
}
Add another 'host' element to array 'hosts'? [y/N]: ⏎
]
}
Add another 'hostGroup' element to array 'hostGroups'? [y/N]: ⏎
]
Generated config:
{
"hostGroups": [
{
"name": "internal",
"type": "redirecting",
"httpPort": 80,
"httpsPort": 443,
"hosts": [
{
"name": "rr1",
"hostname": "rr1.example.com",
"ipv6_address": ""
}
]
},
{
"name": "external",
"type": "host",
"httpPort": 80,
"httpsPort": 443,
"hosts": [
{
"name": "offload-streamer1",
"hostname": "streamer1.example.com",
"ipv6_address": ""
},
{
"name": "offload-streamer2",
"hostname": "streamer2.example.com",
"ipv6_address": ""
}
]
}
]
}
Merge and apply the config? [y/n]: y
Create Load Balancing and Offload Block
Add both offload streamers as targets in a randomgroup block:
$ confcli services.routing.rules -w
Running wizard for resource 'rules'
Hint: Hitting return will set a value to its default.
Enter '?' to receive the help string
rules : [
rule can be one of
1: allow
2: consistentHashing
3: contentPopularity
4: deny
5: firstMatch
6: random
7: rawGroup
8: rawHost
9: split
10: weighted
Choose element index or name: random
Adding a 'random' element
rule : {
name (default: ): balancer
type (default: random): ⏎
targets : [
target (default: ): offload-streamer1
Add another 'target' element to array 'targets'? [y/N]: y
target (default: ): offload-streamer2
Add another 'target' element to array 'targets'? [y/N]: ⏎
]
}
Add another 'rule' element to array 'rules'? [y/N]: ⏎
]
Generated config:
{
"rules": [
{
"name": "balancer",
"type": "random",
"targets": [
"offload-streamer1",
"offload-streamer2"
]
}
]
}
Merge and apply the config? [y/n]: y
Then create a split block with the request router and the load balanced CDN as targets:
$ confcli services.routing.rules -w
Running wizard for resource 'rules'
Hint: Hitting return will set a value to its default.
Enter '?' to receive the help string
rules : [
rule can be one of
1: allow
2: consistentHashing
3: contentPopularity
4: deny
5: firstMatch
6: random
7: rawGroup
8: rawHost
9: split
10: weighted
Choose element index or name: split
Adding a 'split' element
rule : {
name (default: ): offload
type (default: split): ⏎
rule (default: ): in_session_group('Apple') and not in_subnet('Europe') and lt('europe_load_mbps', 1000)
onMatch (default: ): rr1
onMiss (default: ): balancer
}
Add another 'rule' element to array 'rules'? [y/N]: ⏎
]
Generated config:
{
"rules": [
{
"name": "offload",
"type": "split",
"condition": "in_session_group('Apple') and not in_subnet('Europe') and lt('europe_load_mbps', 1000)",
"onMatch": "rr1",
"onMiss": "balancer"
}
]
}
Merge and apply the config? [y/n]: y
The last step required is to set the entrypoint of the routing tree so the router knows where to start evaluating:
$ confcli services.routing.entrypoint offload
services.routing.entrypoint = 'offload'
Evaluate
Now that all the rules have been set up properly and the router has been reconfigured. The translated configuration can be read from the router’s configuration API:
$ curl -k https://router-host:5001/v2/configuration 2> /dev/null | jq .routing
{
"id": "offload",
"member_order": "sequential",
"members": [
{
"host_id": "rr1",
"id": "offload.rr1",
"weight_function": "return ((in_session_group('Apple') ~= 0) and
(in_subnet('Europe') == 0) and
(lt('europe_load_mbps', 1000) ~= 0) and 1) or 0 "
},
{
"id": "offload.balancer",
"member_order": "weighted",
"members": [
{
"host_id": "offload-streamer1",
"id": "offload.balancer.offload-streamer1",
"weight_function": "return 100"
},
{
"host_id": "offload-streamer2",
"id": "offload.balancer.offload-streamer2",
"weight_function": "return 100"
}
],
"weight_function": "return 1"
}
],
"weight_function": "return 100"
}
Note that the configuration language code has been translated into its Lua equivalent.
1.6.3 - Session Groups and Classification
ESB3024 Router provides a flexible classification engine, allowing the assignment of clients into session groups that can then be used to base routing decisions on.
Session Classification
In order to perform routing it is necessary to classify incoming sessions according to the relevant parameters. This is done through session groups and their associated classifiers.
There are different ways of classifying a request:
Strings with wildcards: Simple case-insensitive string pattern with support for adding asterisks (’*’) in order to match any value at that point in the pattern.String with regular expressions: A complex string matching pattern capable of matching more complicated strings than the simple wildcard matching type.
Valid string matching sources are
content_url_path,content_url_query_params,hostnameanduser_agent, examples of which will be shown below.
GeoIP: Based on the geographic location of the client, supporting wildcard matching. Geographic location data is provided by MaxMind. The possible values to match with are any combinations of:- Continent
- Country
- Cities
- ASN
Anonymous IP: Classifies clients using an anonymous IP. Database of anonymous IPs is provided by MaxMind.IP range: Based on whether a client’s IP belongs to any of the listed IP ranges or not.Subnet: Tests if a client’s IP belongs to a named subnet, see Subnets for more details.ASN ID list: Checks to see if a client’s IP belongs to any of the specified ASN IDs.Random: Randomly classifies clients according to a given probability. The classifier is deterministic, meaning that a session will always get the same classification, even if evaluated multiple times.
A session group may have more than one classifier. If it does, all the classifiers must match the incoming client request for it to belong to the session group. It is also possible for a request to belong to multiple session groups, or to none.
To send certain clients to a specific host you first need to create a suitable
classifier using confcli in wizard mode. The wizard will guide you through the
process of creating a new entry, asking you what value to input for each field
and helping you by telling you what inputs are allowed for restricted fields
such as the string comparison source mentioned above:
$ confcli services.routing.classifiers -w
Running wizard for resource 'classifiers'
Hint: Hitting return will set a value to its default.
Enter '?' to receive the help string
classifiers : [
classifier can be one of
1: anonymousIp
2: asnIds
3: contentUrlPath
4: contentUrlQueryParameters
5: geoip
6: hostName
7: ipranges
8: random
9: regexMatcher
10: requestHeader
11: stringMatcher
12: subnet
13: userAgent
Choose element index or name: geoip
Adding a 'geoip' element
classifier : {
name (default: ): sweden_matcher
type (default: geoip): ⏎
inverted (default: False): ⏎
continent (default: ): ⏎
country (default: ): sweden
cities : [
city (default: ): ⏎
Add another 'city' element to array 'cities'? [y/N]: ⏎
]
asn (default: ): ⏎
}
Add another 'classifier' element to array 'classifiers'? [y/N]: ⏎
]
Generated config:
{
"classifiers": [
{
"name": "sweden_matcher",
"type": "geoip",
"inverted": false,
"continent": "",
"country": "sweden",
"cities": [
""
],
"asn": ""
}
]
}
Merge and apply the config? [y/n]: y
$ confcli services.routing.classifiers -w
Running wizard for resource 'classifiers'
Hint: Hitting return will set a value to its default.
Enter '?' to receive the help string
classifiers : [
classifier can be one of
1: anonymousIp
2: asnIds
3: contentUrlPath
4: contentUrlQueryParameters
5: geoip
6: hostName
7: ipranges
8: random
9: regexMatcher
10: requestHeader
11: stringMatcher
12: subnet
13: userAgent
Choose element index or name: ipranges
Adding a 'ipranges' element
classifier : {
name (default: ): company_matcher
type (default: ipranges): ⏎
inverted (default: False): ⏎
ipranges : [
iprange (default: ): 90.128.0.0/12
Add another 'iprange' element to array 'ipranges'? [y/N]: ⏎
]
}
Add another 'classifier' element to array 'classifiers'? [y/N]: ⏎
]
Generated config:
{
"classifiers": [
{
"name": "company_matcher",
"type": "ipranges",
"inverted": false,
"ipranges": [
"90.128.0.0/12"
]
}
]
}
Merge and apply the config? [y/n]: y
$ confcli services.routing.classifiers -w
Running wizard for resource 'classifiers'
Hint: Hitting return will set a value to its default.
Enter '?' to receive the help string
classifiers : [
classifier can be one of
1: anonymousIp
2: asnIds
3: contentUrlPath
4: contentUrlQueryParameters
5: geoip
6: hostName
7: ipranges
8: random
9: regexMatcher
10: requestHeader
11: stringMatcher
12: subnet
13: userAgent
Choose element index or name: stringMatcher
Adding a 'stringMatcher' element
classifier : {
name (default: ): apple_matcher
type (default: stringMatcher): ⏎
inverted (default: False): ⏎
source (default: content_url_path): user_agent
pattern (default: ): *apple*
}
Add another 'classifier' element to array 'classifiers'? [y/N]: ⏎
]
Generated config:
{
"classifiers": [
{
"name": "apple_matcher",
"type": "stringMatcher",
"inverted": false,
"source": "user_agent",
"pattern": "*apple*"
}
]
}
Merge and apply the config? [y/n]: y
$ confcli services.routing.classifiers -w
Running wizard for resource 'classifiers'
Hint: Hitting return will set a value to its default.
Enter '?' to receive the help string
classifiers : [
classifier can be one of
1: anonymousIp
2: asnIds
3: contentUrlPath
4: contentUrlQueryParameters
5: geoip
6: hostName
7: ipranges
8: random
9: regexMatcher
10: requestHeader
11: stringMatcher
12: subnet
13: userAgent
Choose element index or name: regexMatcher
Adding a 'regexMatcher' element
classifier : {
name (default: ): content_matcher
type (default: regexMatcher): ⏎
inverted (default: False): ⏎
source (default: content_url_path): ⏎
pattern (default: ): .*/(live|news_channel)/.*m3u8
}
Add another 'classifier' element to array 'classifiers'? [y/N]: ⏎
]
Generated config:
{
"classifiers": [
{
"name": "content_matcher",
"type": "regexMatcher",
"inverted": false,
"source": "content_url_path",
"pattern": ".*/(live|news_channel)/.*m3u8"
}
]
}
Merge and apply the config? [y/n]: y
$ confcli services.routing.classifiers -w
Running wizard for resource 'classifiers'
Hint: Hitting return will set a value to its default.
Enter '?' to receive the help string
classifiers : [
classifier can be one of
1: anonymousIp
2: asnIds
3: contentUrlPath
4: contentUrlQueryParameters
5: geoip
6: hostName
7: ipranges
8: random
9: regexMatcher
10: requestHeader
11: stringMatcher
12: subnet
13: userAgent
Choose element index or name: subnet
Adding a 'subnet' element
classifier : {
name (default: ): company_matcher
type (default: subnet): ⏎
inverted (default: False): ⏎
pattern (default: ): company
}
Add another 'classifier' element to array 'classifiers'? [y/N]: ⏎
]
Generated config:
{
"classifiers": [
{
"name": "company_matcher",
"type": "subnet",
"inverted": false,
"pattern": "company"
}
]
}
Merge and apply the config? [y/n]: y
$ confcli services.routing.classifiers -w
Running wizard for resource 'classifiers'
Hint: Hitting return will set a value to its default.
Enter '?' to receive the help string
classifiers : [
classifier can be one of
1: anonymousIp
2: asnIds
3: contentUrlPath
4: contentUrlQueryParameters
5: geoip
6: hostName
7: ipranges
8: random
9: regexMatcher
10: requestHeader
11: stringMatcher
12: subnet
13: userAgent
Choose element index or name: hostName
Adding a 'hostName' element
classifier : {
name (default: ): host_name_classifier
type (default: hostName): ⏎
inverted (default: False): ⏎
patternType (default: stringMatch): ⏎
pattern (default: ): *live.example*
}
Add another 'classifier' element to array 'classifiers'? [y/N]: n
]
Generated config:
{
"classifiers": [
{
"name": "host_name_classifier",
"type": "hostName",
"inverted": false,
"patternType": "stringMatch",
"pattern": "*live.example*"
}
]
}
Merge and apply the config? [y/n]: y
$ confcli services.routing.classifiers -w
Running wizard for resource 'classifiers'
Hint: Hitting return will set a value to its default.
Enter '?' to receive the help string
classifiers : [
classifier can be one of
1: anonymousIp
2: asnIds
3: contentUrlPath
4: contentUrlQueryParameters
5: geoip
6: hostName
7: ipranges
8: random
9: regexMatcher
10: requestHeader
11: stringMatcher
12: subnet
13: userAgent
Choose element index or name: contentUrlPath
Adding a 'contentUrlPath' element
classifier : {
name (default: ): vod_matcher
type (default: contentUrlPath): ⏎
inverted (default: False): ⏎
patternType (default: stringMatch): ⏎
pattern (default: ): *vod*
}
Add another 'classifier' element to array 'classifiers'? [y/N]: n
]
Generated config:
{
"classifiers": [
{
"name": "vod_matcher",
"type": "contentUrlPath",
"inverted": false,
"patternType": "stringMatch",
"pattern": "*vod*"
}
]
}
Merge and apply the config? [y/n]: y
$ confcli services.routing.classifiers -w
Running wizard for resource 'classifiers'
Hint: Hitting return will set a value to its default.
Enter '?' to receive the help string
classifiers : [
classifier can be one of
1: anonymousIp
2: asnIds
3: contentUrlPath
4: contentUrlQueryParameters
5: geoip
6: hostName
7: ipranges
8: random
9: regexMatcher
10: requestHeader
11: stringMatcher
12: subnet
13: userAgent
Choose element index or name: contentUrlQueryParameters
Adding a 'contentUrlQueryParameters' element
classifier : {
name (default: ): bitrate_matcher
type (default: contentUrlQueryParameters): ⏎
inverted (default: False): ⏎
patternType (default: stringMatch): regex
pattern (default: ): .*bitrate=100000.*
}
Add another 'classifier' element to array 'classifiers'? [y/N]: n
]
Generated config:
{
"classifiers": [
{
"name": "bitrate_matcher",
"type": "contentUrlQueryParameters",
"inverted": false,
"patternType": "regex",
"pattern": ".*bitrate=100000.*"
}
]
}
Merge and apply the config? [y/n]: y
$ confcli services.routing.classifiers -w
Running wizard for resource 'classifiers'
Hint: Hitting return will set a value to its default.
Enter '?' to receive the help string
classifiers : [
classifier can be one of
1: anonymousIp
2: asnIds
3: contentUrlPath
4: contentUrlQueryParameters
5: geoip
6: hostName
7: ipranges
8: random
9: regexMatcher
10: requestHeader
11: stringMatcher
12: subnet
13: userAgent
Choose element index or name: userAgent
Adding a 'userAgent' element
classifier : {
name (default: ): iphone_matcher
type (default: userAgent): ⏎
inverted (default: False): ⏎
patternType (default: stringMatch): regex
pattern (default: ): i(P|p)hone
}
Add another 'classifier' element to array 'classifiers'? [y/N]: n
]
Generated config:
{
"classifiers": [
{
"name": "iphone_matcher",
"type": "userAgent",
"inverted": false,
"patternType": "regex",
"pattern": "i(P|p)hone"
}
]
}
Merge and apply the config? [y/n]: y
$ confcli services.routing.classifiers -w
Running wizard for resource 'classifiers'
Hint: Hitting return will set a value to its default.
Enter '?' to receive the help string
classifiers : [
classifier can be one of
1: anonymousIp
2: asnIds
3: contentUrlPath
4: contentUrlQueryParameters
5: geoip
6: hostName
7: ipranges
8: random
9: regexMatcher
10: requestHeader
11: stringMatcher
12: subnet
13: userAgent
Choose element index or name: asnIds
Adding a 'asnIds' element
classifier : {
name (default: ): asn_matcher
type (default: asnIds): ⏎
inverted (default: False): ⏎
asnIds <The list of ASN IDs to accept. (default: [])>: [
asnId: 1
Add another 'asnId' element to array 'asnIds'? [y/N]: y
asnId: 2
Add another 'asnId' element to array 'asnIds'? [y/N]: y
asnId: 3
Add another 'asnId' element to array 'asnIds'? [y/N]: ⏎
]
}
Add another 'classifier' element to array 'classifiers'? [y/N]: ⏎
]
Generated config:
{
"classifiers": [
{
"name": "asn_matcher",
"type": "asnIds",
"inverted": false,
"asnIds": [
1,
2,
3
]
}
]
}
Merge and apply the config? [y/n]: y
$ confcli services.routing.classifiers -w
Running wizard for resource 'classifiers'
Hint: Hitting return will set a value to its default.
Enter '?' to receive the help string
classifiers : [
classifier can be one of
1: anonymousIp
2: asnIds
3: contentUrlPath
4: contentUrlQueryParameters
5: geoip
6: hostName
7: ipranges
8: random
9: regexMatcher
10: requestHeader
11: stringMatcher
12: subnet
13: userAgent
Choose element index or name: random
Adding a 'random' element
classifier <A classifier randomly applying to clients based on the provided probability. (default: OrderedDict())>: {
name (default: ): random_matcher
type (default: random):
probability (default: 0.5): 0.7
}
Add another 'classifier' element to array 'classifiers'? [y/N]: n
]
Generated config:
{
"classifiers": [
{
"name": "random_matcher",
"type": "random",
"probability": 0.7
}
]
}
Merge and apply the config? [y/n]: y
$ confcli services.routing.classifiers -w
Running wizard for resource 'classifiers'
Hint: Hitting return will set a value to its default.
Enter '?' to receive the help string
classifiers : [
classifier can be one of
1: anonymousIp
2: asnIds
3: contentUrlPath
4: contentUrlQueryParameters
5: geoip
6: hostName
7: ipranges
8: random
9: regexMatcher
10: requestHeader
11: stringMatcher
12: subnet
13: userAgent
Choose element index or name: anonymousIp
Adding a 'anonymousIp' element
classifier : {
name (default: ): anon_ip_matcher
type (default: anonymousIp):
inverted (default: False):
}
Add another 'classifier' element to array 'classifiers'? [y/N]: n
]
Generated config:
{
"classifiers": [
{
"name": "anon_ip_matcher",
"type": "anonymousIp",
"inverted": false
}
]
}
Merge and apply the config? [y/n]: y
These classifiers can now be used to construct session groups and properly classify clients. Using the examples above, let’s create a session group classifying clients from Sweden using an Apple device:
$ confcli services.routing.sessionGroups -w
Running wizard for resource 'sessionGroups'
Hint: Hitting return will set a value to its default.
Enter '?' to receive the help string
sessionGroups : [
sessionGroup : {
name (default: ): inSwedenUsingAppleDevice
classifiers : [
classifier (default: ): sweden_matcher
Add another 'classifier' element to array 'classifiers'? [y/N]: y
classifier (default: ): apple_matcher
Add another 'classifier' element to array 'classifiers'? [y/N]: ⏎
]
}
Add another 'sessionGroup' element to array 'sessionGroups'? [y/N]: ⏎
]
Generated config:
{
"sessionGroups": [
{
"name": "inSwedenUsingAppleDevice",
"classifiers": [
"sweden_matcher",
"apple_matcher"
]
}
]
}
Merge and apply the config? [y/n]: y
Clients classified by the sweden_matcher and apple_matcher classifiers
will now be put in the session group inSwedenUsingAppleDevice. Using session
groups in routing will be demonstrated later in this document.
Advanced Classification
The above example will simply apply all classifiers in the list, and as long as they all evaluate to true for a session, that session will be tagged with the session group. For situations where this isn’t enough, classifiers can instead be combined using simple logic statements to form complex rules.
A first simple example can be a session group that accepts any viewers in either
ASN 1, 2 or 3 (corresponding to the classifier asn_matcher or living in Sweden.
This can be done by creating a session group, and adding the following logic
statement:
'sweden_matcher' OR 'asn_matcher'
A slightly more advanced case is where a session group should only contain sessions neither in any of the three ASNs nor in Sweden. This is done by negating the previous example:
NOT ('sweden_matcher' OR 'asn_matcher')
A single classifier can also be negated, rather than the whole statement, for example to accept any Swedish viewers except those in the three ASNs:
'sweden_matcher' AND NOT 'asn_matcher'
Arbitrarily complex statements can be created using classifier names, parentheses,
and the keywords AND, OR and NOT.
For example a session group accepting any Swedish viewers except those in the Stockholm region unless they are also Apple users:
'sweden_matcher' AND (NOT 'stockholm_matcher' OR 'apple_matcher')
Note that the classifier names must be enclosed in single quotes when using this syntax.
Applying this kind of complex classifier using confcli is no more difficult than adding a single classifier at a time:
$ confcli services.routing.sessionGroups. -w
Running wizard for resource 'sessionGroups'
Hint: Hitting return will set a value to its default.
Enter '?' to receive the help string
sessionGroups : [
sessionGroup : {
name (default: ): complex_group
classifiers : [
classifier (default: ): 'sweden_matcher' AND (NOT 'stockholm_matcher' OR 'apple_matcher')
Add another 'classifier' element to array 'classifiers'? [y/N]: ⏎
]
}
Add another 'sessionGroup' element to array 'sessionGroups'? [y/N]: ⏎
]
Generated config:
{
"sessionGroups": [
{
"name": "complex_group",
"classifiers": [
"'sweden_matcher' AND (NOT 'stockholm_matcher' OR 'apple_matcher')"
]
}
]
}
Merge and apply the config? [y/n]: y
1.6.4 - Accounts
If accounts are configured, the router will tag sessions as belonging to an
account. Note that if accounts are not configured or a session does not belong to
an account, a session will be tagged with the default account.
Metrics will be tracked separately for each account when applicable.
Configuration
Accounts are configured using session groups, see Classification
for more information. Using confcli, an account is configured by defining an
account name and a list of session groups for which a session must be classified
into to belong to the account. An account called account_1 can be configured by
running the command
confcli services.routing.accounts -w
Running wizard for resource 'accounts'
Hint: Hitting return will set a value to its default.
Enter '?' to receive the help string
accounts : [
account : {
name (default: ): account_1
sessionGroups <A session will be tagged as belonging to this account if it's classified into all of the listed session groups. (default: [])>: [
sessionGroup (default: ): session_group_1
Add another 'sessionGroup' element to array 'sessionGroups'? [y/N]: y
sessionGroup (default: ): session_group_2
Add another 'sessionGroup' element to array 'sessionGroups'? [y/N]: n
]
}
Add another 'account' element to array 'accounts'? [y/N]: n
]
Generated config:
{
"accounts": [
{
"name": "account_1",
"sessionGroups": [
"session_group_1",
"session_group_2"
]
}
]
}
Merge and apply the config? [y/n]: y
A session will belong to the account account_1 if it has been classified into
the two session groups session_group_1 and session_group_2.
Metrics
If using the configuration above, the metrics will be separated per account:
# TYPE num_requests counter
num_requests{account="account_1",selector="initial"} 3
# TYPE num_requests counter
num_requests{account="default",selector="initial"} 3
1.6.5 - Advanced features
1.6.5.1 - Content popularity
ESB3024 Router allows routing decisions based on content popularity. All incoming content requests are tracked to continuously update a content popularity ranking list. The popularity ranking algorithm is designed to let popular content quickly rise to the top while unpopular content decays and sinks towards the bottom.
Routing
A content popularity based routing rule can be created by running
$ confcli services.routing.rules -w
Running wizard for resource 'rules'
Hint: Hitting return will set a value to its default.
Enter '?' to receive the help string
rules : [
rule can be one of
1: allow
2: consistentHashing
3: contentPopularity
4: deny
5: firstMatch
6: random
7: rawGroup
8: rawHost
9: split
10: weighted
Choose element index or name: contentPopularity
Adding a 'contentPopularity' element
rule : {
name (default: ): content_popularity_rule
type (default: contentPopularity):
contentPopularityCutoff (default: 10): 5
onPopular (default: ): edge-streamer
onUnpopular (default: ): offload
}
Add another 'rule' element to array 'rules'? [y/N]: n
]
Generated config:
{
"rules": [
{
"name": "content_popularity_rule",
"type": "contentPopularity",
"contentPopularityCutoff": 5.0,
"onPopular": "edge-streamer",
"onUnpopular": "offload"
}
]
}
Merge and apply the config? [y/n]: y
This rule will route requests for top 5 most popular content to
edge-streamer and all other requests to offload.
Some configuration settings attributed to content popularity are available:
$ confcli services.routing.settings.contentPopularity
{
"contentPopularity": {
"enabled": true,
"algorithm": "score_based",
"sessionGroupNames": []
}
}
enabled: Whether or not to track content popularity. Whenenabledis set tofalse, content popularity will not be tracked. Note that routing on content popularity is possible even ifenabledisfalseand content popularity has been tracked previously.algorithm: Choice of content popularity tracking algorithm. There are two possible choices:score_basedortime_based(detailed below).sessionGroupNames: Names of the session groups for which content popularity should be tracked. Note that content popularity is tracked globally, not per session group.
Algorithm tuning
The behaviour of each content popularity tracking algorithm can be tuned using the raw JSON API.
All configuration parameters for content popularity reside in the
settings object of the configuration, an example of which can be
seen below:
{
"settings": {
"content_popularity": {
"algorithm": "scored_based",
"session_group_names": ["vod_only"],
"score_based:": {
"requests_between_popularity_decay": 1000,
"popularity_list_max_size": 100000,
"popularity_prediction_factor": 2.5,
"popularity_decay_fraction": 0.2
},
"time_based": {
"intervals_per_hour": 10
}
}
}
}
The field algorithm dictates which content popularity tracking
algorithm to use, can either be score_based or time_based.
The field session_group_names defines the sessions for which content
popularity should be tracked. In the example above, session belonging to
the vod_only session group will be tracked for content popularity.
If left empty, content popularity will be tracked for all sessions.
The remaining configuration parameters are algorithm specific.
Score based algorithm
The field popularity_list_max_size defines
the maximum amount of unique contents to track for popularity. This can
be used to limit memory growth. A single entry in the popularity ranking
list will at most consume 180 bytes of memory. E.g. using
"popularity_list_max_size": 1000 would consume at most
180⋅1,000 = 180,000 B = 0.18 MB. If the content popularity list is full,
a request to unique content would replace the least popular content.
Setting a very high max size will not impact performance, it will only consume more memory.
The field requests_between_popularity_decay defines the number of requests
between each popularity decay update, an integral component of this feature.
The fields popularity_prediction_factor and popularity_decay_fraction tune
the behaviour of the content popularity ranking algorithm, explained further
below.
Decay update
To allow for popular content to quickly rise in popularity and unpopular content to sink, a dynamic popularity ranking algorithm is used. The goal of the algorithm is to track content popularity in real time, allowing routing decisions based on the requested content’s popularity. The algorithm is applied every decay update.
The algorithm uses current trending content to predict content popularity. The
field popularity_prediction_factor regulates how much the algorithm should rely
on predicted popularity. A high prediction factor allows rising content to quickly
rise to high popularity but can also cause unpopular content with a sudden burst
of requests to wrongfully rise to the top. A low prediction factor can cause
stagnation in the popularity ranking, not allowing new popular content to rise
to the top.
Unpopular content decays in popularity, the magnitude of which is regulated by
popularity_decay_fraction. A high value will aggressively decay content popularity
every decay update while a low value will bloat the ranking, causing stagnation.
Once content decays to a trivially low popularity score, it is pruned from the
content popularity list.
When configuring these tuning parameters, the most crucial data to consider is
the size of your asset catalog, i.e. the number of unique contents you offer.
The recommended values, obtained through testing, are presented in the table below.
Note that the field popularity_prediction_factor is the principal factor in
controlling the algorithm’s behaviour.
| Catalog size n | popularity_prediction_factor | popularity_decay_fraction |
|---|---|---|
| n < 1000 | 2.2 | 0.2 |
| 1000 < n < 5000 | 2.3 | 0.2 |
| 5000 < n < 10000 | 2.5 | 0.2 |
| n > 10000 | 2.6 | 0.2 |
Time based algorithm
The time based algorithm only requires the configuration parameter
intervals_per_hour. E.g., the value "intervals_per_hour": 10
would give 10 six minute intervals per hour. During each interval,
all unique content requests has an associated counter, increasing
by one for each incoming request. After an hour, all intervals have
been cycled through. The counters in the first interval will be reset
and all incoming content requests will increase the counters in the
first interval again. This cycle continues forever.
When determining a single content’s popularity, the sum of each content’s counter in all intervals is used to determine a popularity ranking.
1.6.5.2 - Consistent Hashing
Consistent hashing based routing is a feature that can be used to distribute requests to a set of hosts in a cache friendly manner. By using Agile Content’s consistent distributed hash algorithm, the amount of cache redistribution is minimized within a set of hosts. Requests for a content will always be routed to the same set of hosts, the amount of which is configured by the spread factor, allowing high cache usage. When adding or removing hosts, the algorithm minimizes cache redistribution.
Say you have the host group [s1, s2, s3, s4, s5] and have
configured spreadFactor = 3. A request for a content asset1 would then be
routed to the same three hosts with one of them being selected randomly for each
request. Requests for a different content asset2 would also be routed to one
of three different hosts, most likely a different combination of hosts than
requests for content asset1.
Example routing results with spreadFactor = 3:
- Request for
asset1→ route to one of[s1, s3, s4]. - Request for
asset2→ route to one of[s2, s4, s5]. - Request for
asset3→ route to one of[s1, s2, s5].
Since consistent hashing based routing ensures that requests for a specific content always get routed to the same set of hosts, the risk of cache misses are lowered on the hosts since they will be served the same content requests over and over again.
Note that the maximum value of
spreadFactoris 64. Consequently, the highest amount of hosts you can use in aconsistentHashingrule block is 64.
Three different hashing algorithms are available: MD5, SDBM and Murmur.
The algorithm is chosen during configuration.
Configuration
Configuring consistent hashing based routing is easily done using confcli. Let’s configure the example described above:
confcli services.routing.rules -w
Running wizard for resource 'rules'
Hint: Hitting return will set a value to its default.
Enter '?' to receive the help string
rules : [
rule can be one of
1: allow
2: consistentHashing
3: contentPopularity
4: deny
5: firstMatch
6: random
7: rawGroup
8: rawHost
9: split
10: weighted
Choose element index or name: consistentHashing
Adding a 'consistentHashing' element
rule : {
name (default: ): consistentHashingRule
type (default: consistentHashing):
spreadFactor (default: 1): 3
hashAlgorithm (default: MD5):
targets : [
target : {
target (default: ): s1
enabled (default: True):
}
Add another 'target' element to array 'targets'? [y/N]: y
target : {
target (default: ): s2
enabled (default: True):
}
Add another 'target' element to array 'targets'? [y/N]: y
target : {
target (default: ): s3
enabled (default: True):
}
Add another 'target' element to array 'targets'? [y/N]: y
target : {
target (default: ): s4
enabled (default: True):
}
Add another 'target' element to array 'targets'? [y/N]: y
target : {
target (default: ): s5
enabled (default: True):
}
Add another 'target' element to array 'targets'? [y/N]: n
]
}
Add another 'rule' element to array 'rules'? [y/N]: n
]
Generated config:
{
"rules": [
{
"name": "consistentHashingRule",
"type": "consistentHashing",
"spreadFactor": 3,
"hashAlgorithm": "MD5",
"targets": [
{
"target": "s1",
"enabled": true
},
{
"target": "s2",
"enabled": true
},
{
"target": "s3",
"enabled": true
},
{
"target": "s4",
"enabled": true
},
{
"target": "s5",
"enabled": true
}
]
}
]
}
Adding hosts
Adding a host to the list will give an additional target for the consistent hashing algorithm to route requests to. This will shift content distribution onto the new host.
confcli services.routing.rules.consistentHashingRule.targets -w
Running wizard for resource 'targets'
Hint: Hitting return will set a value to its default.
Enter '?' to receive the help string
targets : [
target : {
target (default: ): s6
enabled (default: True):
}
Add another 'target' element to array 'targets'? [y/N]: n
]
Generated config:
{
"targets": [
{
"target": "s6",
"enabled": true
}
]
}
Merge and apply the config? [y/n]: y
Removing hosts
There is one very important caveat of using a consistent hashing rule block. As long as you don’t modify the list of hosts, the consistent hashing algorithm will keep routing requests to the same hosts. However, if you remove a host from the block in any position except the last, the consistent hashing algorithm’s behaviour will change and the algorithm cannot maintain a minimum amount of cache redistribution.
If you’re in a situation where you have to remove a host from the routing
targets but want to keep the same consistent hashing behaviour, e.g. during
very high load, you’ll have to toggle that target’s enabled field to false.
E.g., disabling requests to s2 can be accomplished by:
$ confcli services.routing.rules.consistentHashingRule.targets.1.enabled false
services.routing.rules.consistentHashingRule.targets.1.enabled = False
$ confcli services.routing.rules.consistentHashingRule.targets.1
{
"1": {
"target": "s2",
"enabled": false
}
}
If you modify the list order or remove hosts, it is highly recommended to do so during moments where a higher rate of cache misses are acceptable.
1.6.5.3 - Security token verification
The security token verification feature allows for ESB3024 Router to only process requests that contain a correct security token. The token is generated by the client, for example in the portal, using an algorithm that it shares with the router. The router verifies the token and rejects the request if the token is incorrect.
It is beyond the scope of this document to describe how the token is generated, that is described in the Security Tokens application note that is installed with the ESB3024 Router’s extra documentation.
Setting up a routing rule
The token verification is performed by calling the verify_security_token()
function from a routing rule. The function returns 1 if the token is
correct, otherwise it returns 0. It should typically be called from the
first routing rule, to make requests with bad tokens fail as early as possible.
The confcli example assumes that the router already has rules configured, with
an entry point named select_cdn. Token verification is enabled by inserting an
“allow” rule first in the rule list.
confcli services.routing.rules -w
Running wizard for resource 'rules'
Hint: Hitting return will set a value to its default.
Enter '?' to receive the help string
rules : [
rule can be one of
1: allow
2: consistentHashing
3: contentPopularity
4: deny
5: firstMatch
6: random
7: rawGroup
8: rawHost
9: split
10: weighted
Choose element index or name: allow
Adding a 'allow' element
rule : {
name (default: ): token_verification
type (default: allow):
condition (default: always()): verify_security_token()
onMatch (default: ): select_cdn
}
Add another 'rule' element to array 'rules'? [y/N]: n
]
Generated config:
{
"rules": [
{
"name": "token_verification",
"type": "allow",
"condition": "verify_security_token()",
"onMatch": "select_cdn"
}
]
}
Merge and apply the config? [y/n]: y
$ confcli services.routing.entrypoint token_verification
services.routing.entrypoint = 'token_verification'
"routing": {
"id": "token_verification",
"member_order": "sequential",
"members": [
{
"id": "token_verification.0.select_cdn",
"member_order": "weighted",
"members": [
...
],
"weight_function": "return verify_security_token() ~= 0"
},
{
"id": "token_verification.1.rejected",
"member_order": "sequential",
"members": [],
"weight_function": "return 1"
}
],
"weight_function": "return 100"
},Configuring security token options
The secret parameter is not part of the router request, but needs to be
configured separately in the router. That can be done with the host-config
tool that is installed with the router.
Besides configuring the secret, host-config can also configure floating
sessions and a URL prefix. Floating sessions are sessions that are not tied to a
specific IP address. When that is enabled, the token verification will not take
the IP address into account when verifying the token.
The security token verification is configured per host, where a host is the name
of the host that the request was sent to. This makes it possible for a router to
support multiple customer accounts, each with their own secret. If no
configuration is found for a host, a configuration with the name default is
used.
host-config supports three commands: print, set and delete.
The print command prints the current configuration for a host. The following
parameters are supported:
host-config print [-n <host-name>]
By default it prints the configuration for all hosts, but if the optional -n
flag is given it will print the configuration for a single host.
Set
The set command sets the configuration for a host. The configuration is given
as command line parameters. The following parameters are supported:
host-config set
-n <host-name>
[-f floating]
[-p url-prefix]
[-r <secret-to-remove>]
[-s <secret-to-add>]
-n <host-name>- The name of the host to configure.-f floating- A boolean option that specifies if floating sessions are accepted. The parameter accepts the valuestrueandfalse.-p url-prefix- A URL prefix that is used for identifying requests that come from a certain account. This is not used when verifying tokens.-r <secret-to-remove>- A secret that should be removed from the list of secrets.-s <secret-to-add>- A secret that should be added to the list of secrets.
For example, to set the secret “secret-1” and enable floating sessions for the default host, the following command can be used:
host-config set -n default -s secret-1 -f true
The set command only touches the configuration options that are mentioned on
the command line, so the following command line will add a second secret to the
default host without changing the floating session setting:
host-config set -n default -s secret-2
It is possible to set multiple secrets per host. This is useful when updating a secret, then both the old and the new secret can be valid during the transition period. After the transition period the old secret can be removed by typing:
host-config set -n default -r secret-1
Delete
The delete command deletes the configuration for a host. It supports the
following parameters:
host-config delete -n <host-name>
For example, to delete the configuration for example.com, the following
command can be used:
host-config delete -n example.com
Global options
host-config also has a few global options. They are:
-k <security-key>- The security key that is used when communicating with the router. This is normally retrieved automatically.-h- Print a help message and exit.-r <router>- The router to connect to. This default tolocalhost, but can be changed to connect to a remote router.-v- Verbose output, can be given multiple times.
Debugging security token verification
The security token verification only logs messages when the log level is set to
4 or higher. Then it will only log some errors. It is possible to enable more
verbose logging using the security-token-config that is installed together
with the router.
When verbose logging is enabled, the router will log information about the token verification, including the configured token secrets, so it needs to be used with care.
The logged lines are prefixed with verify_security_token.
The security-token-config tool supports the commands print and set.
The print command prints the current configuration. If nothing is configured
it will not print anything.
Set
The set command sets the configuration. The following parameters are
supported:
security-token-config set
[-d <enabled>]
-d <enabled>- A boolean option that specifies if debug logging should be enabled or not. The parameter accepts the valuestrueandfalse.
1.6.5.4 - Subnets API
ESB3024 Router provides utilities to quickly match clients into subnets. Any combination of IPv4 and IPv6 addresses can be used. To begin, a JSON file is needed, defining all subnets, e.g:
{
"255.255.255.255/24": "area1",
"255.255.255.255/16": "area2",
"255.255.255.255/8": "area3",
"90.90.1.3/16": "area4",
"5.5.0.4/8": "area5",
"2a02:2e02:9bc0::/48": "area6",
"2a02:2e02:9bc0::/32": "area7",
"2a02:2e02:9bc0::/16": "area8",
"2a02:2e02:9de0::/44": "combined_area",
"2a02:2e02:ada0::/44": "combined_area"
}
and PUT it to the endpoint :5001/v1/subnets or :5001/v2/subnets, the
API version doesn’t matter for subnets:
curl -k -T subnets.json -H "Content-Type: application/json" https://router-host:5001/v1/subnets
Note that it is possible for several subnet CIDR strings to share the same label, effectively grouping them together.
The router provides the built-in function in_subnet(subnet_name) that
can to make routing decisions based on a client’s subnet. For more details, see
Built-in Lua functions.
To configure a rule that only allows clients in the area1 subnet, run the
command
$ confcli services.routing.rules -w
Running wizard for resource 'rules'
Hint: Hitting return will set a value to its default.
Enter '?' to receive the help string
rules : [
rule can be one of
1: allow
2: consistentHashing
3: contentPopularity
4: deny
5: firstMatch
6: random
7: rawGroup
8: rawHost
9: split
10: weighted
Choose element index or name: allow
Adding a 'allow' element
rule : {
name (default: ): only_allow_area1
type (default: allow):
condition (default: always()): in_subnet('area1')
onMatch (default: ): example-host
}
Add another 'rule' element to array 'rules'? [y/N]: n
]
Generated config:
{
"rules": [
{
"name": "only_allow_area1",
"type": "allow",
"condition": "in_subnet('area1')",
"onMatch": "example-host"
}
]
}
Merge and apply the config? [y/n]: y
Invalid IP-addresses will be omitted during subnet list construction accompanied by a message in the log displaying the invalid IP address.
1.6.5.5 - Lua Features
Detailed descriptions and examples of Lua features offered by ESB3024 Router.
1.6.5.5.1 - Built-in Lua Functions
This section details all built-in Lua functions provided by the router.
Logging functions
The router provides Lua logging functionality that is convenient when creating custom Lua functions. A prefix can be added to the log message which is useful to differentiate log messages from different lua files. At the top of the Lua source file, add the line
local log = log.add_prefix("my_lua_file")
to prepend all log messages with "my_lua_file".
The logging functions support formatting and common log levels:
log.critical('A log message with number %d', 1.5)
log.error('A log message with string %s', 'a string')
log.warning('A log message with integer %i', 1)
log.info('A log message with a local number variable %d', some_local_number)
log.debug('A log message with a local string variable %s', some_local_string)
log.trace('A log message with a local integer variable %i', some_local_integer)
log.message('A log message')
Many of the router’s built-in Lua functions use the logging functions.
Predictive load balancing functions
Predictive load balancing is a tool that can be used to avoid overloading hosts with traffic. Consider the case where a popular event starts at a certain time, let’s say 12 PM. A spike in traffic will be routed to the hosts that are streaming the content at 12 PM, most of them starting at low bitrates. A host might have sufficient bandwidth left to take on more clients but when the recently connected clients start ramping up in video quality and increase their bitrate, the host can quickly become overloaded, possibly dropping incoming requests or going offline. Predictive load balancing solves this issue by considering how many times a host recently been redirected to.
Four functions for predictive load balancing are provided by the router
that can be used when constructing conditions/weight functions: host_bitrate()
, host_bitrate_custom(), host_has_bw() and host_has_bw_custom().
All require data to be supplied to the selection input API and apply
only to leaf nodes in the routing tree. In order for predictive load balancing
to work properly the data must be updated at regular intervals. The data needs
to be supplied by the target system.
These functions are suitable to used as host health checks. To configure host health checks, see configuring CDNs and hosts.
Note that host_bitrate() and host_has_bw() rely on data supplied by metrics
agents, detailed in Cache hardware metrics: monitoring and routing.
host_bitrate_custom() and host_has_bw_custom() rely on
manually supplied selection input data, detailed in selection input API. The
bitrate unit depends on the data submitted to the selection input API.
Example metrics
The data supplied to the selection input API by the metrics agents uses the following structure:
{
"streamer-1": {
"hardware_metrics": {
"/": {
"free": 1741596278784,
"total": 1758357934080,
"used": 16761655296,
"used_percent": 0.9532561585516977
},
"cpu_load1": 0.02,
"cpu_load15": 0.12,
"cpu_load5": 0.02,
"mem_available": 4895789056,
"mem_available_percent": 59.551760354263074,
"mem_total": 8221065216,
"mem_used": 2474393600,
"n_cpus": 4
},
"per_interface_metrics": {
"eths1": {
"link": 1,
"interface_up": true,
"megabits_sent": 22322295739.378456,
"megabits_sent_rate": 8085.2523952,
"speed": 100000
}
}
}
}
Note that all built-in functions interacting with selection input values support indexing into nested selection input data. Consider the selection input data in above. The nested values can be accessed by using dots between the keys:
si('streamer-1.per_interface_metrics.eths1.megabits_sent_rate')
Note that the whole selection input variable name must be within single quotes.
The function si() is documented under
general purpose functions.
host_bitrate({})
host_bitrate() returns the predicted bitrate (in megabits per second) of
the host after the recently connected clients start ramping up in streaming
quality. The function accepts an argument table with the following keys:
interface: The name of the interface to use for bitrate prediction.- Optional
avg_bitrate: the average bitrate per client, defaults to 6 megabits per second. - Optional
num_routers: the number of routers that can route to this host, defaults to 1. This is important to accurately predict the incoming load if multiple routers are used. - Optional
host: The name of the host to use for bitrate prediction. Defaults to the current host if not provided.
Required selection input data
This function relies on the field megabits_sent_rate, supplied by the Telegraf
metrics agent, as seen in example metrics. If these fields
are missing from your selection input data, this function will not work.
Examples of usage:
host_bitrate({interface='eths0'})
host_bitrate({avg_bitrate=1, interface='eths0'})
host_bitrate({num_routers=2, interface='eths0'})
host_bitrate({avg_bitrate=1, num_routers=4, interface='eths0'})
host_bitrate({avg_bitrate=1, num_routers=4, host='custom_host', interface='eths0'})
host_bitrate({}) calculates the predicted bitrate as:
predicted_host_bitrate = current_host_bitrate + (recent_connections * avg_bitrate * num_routers)
host_bitrate_custom({})
Same functionality as host_bitrate() but uses a custom selection input
variable as bitrate input instead of accessing hardware metrics. The function
accepts an argument table with the following keys:
custom_bitrate_var: The name of the selection input variable to be used for accessing current host bitrate.- Optional
avg_bitrate: seehost_bitrate()documentation above. - Optional
num_routers: seehost_bitrate()documentation above.
host_bitrate_custom({custom_bitrate_var='host1_current_bitrate'})
host_bitrate_custom({avg_bitrate=1, custom_bitrate_var='host1_current_bitrate'})
host_bitrate_custom({num_routers=4, custom_bitrate_var='host1_current_bitrate'})
host_has_bw({})
Instead of accessing the predicted bitrate of a host through host_bitrate(),
host_has_bw() returns 1 if the host is predicted to have enough
bandwidth left to take on more clients after recent connections ramp up in
bitrate, otherwise it returns 0. The function accepts an argument table with the
following keys:
interface: seehost_bitrate()documentation above.- Optional
avg_bitrate: seehost_bitrate()documentation above. - Optional
num_routers: seehost_bitrate()documentation above. - Optional
host: seehost_bitrate()documentation above. - Optional
margin: the bitrate (megabits per second) headroom that should be taken into account during calculation, defaults to 0.
host_has_bw({}) returns whether or not the following statement is true:
predicted_host_bitrate + margin < host_bitrate_capacity
Required selection input data
host_has_bw({}) relies on the fields megabits_sent_rate and speed,
supplied by the Telegraf metrics agent, as seen in
example metrics. If these fields are missing from your
selection input data, this function will not work.
Examples of usage:
host_has_bw({interface='eths0'})
host_has_bw({margin=10, interface='eth0'})
host_has_bw({avg_bitrate=1, interface='eth0'})
host_has_bw({num_routers=4, interface='eth0'})
host_has_bw({host='custom_host', interface='eth0'})
host_has_bw_custom({})
Same functionality as host_has_bw() but uses a custom selection input
variable as bitrate. It also uses a number or a custom selection input
variable for the capacity. The function accepts an argument table
with the following keys:
custom_capacity_var: a number representing the capacity of the network interface OR the name of the selection input variable to be used for accessing host capacity.custom_bitrate_var: seehost_bitrate_custom()documentation- Optional
margin: seehost_has_bw()documentation above. above. - Optional
avg_bitrate: seehost_bitrate()documentation above. - Optional
num_routers: seehost_bitrate()documentation above.
Examples of usage:
host_has_bw_custom({custom_capacity_var=10000, custom_bitrate_var='streamer-1.per_interface_metrics.eths1.megabits_sent_rate'})
host_has_bw_custom({custom_capacity_var='host1_capacity', custom_bitrate_var='streamer-1.per_interface_metrics.eths1.megabits_sent_rate'})
host_has_bw_custom({margin=10, custom_capacity_var=10000, custom_bitrate_var='streamer-1.per_interface_metrics.eths1.megabits_sent_rate'})
host_has_bw_custom({avg_bitrate=1, custom_capacity_var=10000, custom_bitrate_var='streamer-1.per_interface_metrics.eths1.megabits_sent_rate'})
host_has_bw_custom({num_routers=4, custom_capacity_var=10000, custom_bitrate_var='streamer-1.per_interface_metrics.eths1.megabits_sent_rate'})
Health check functions
This section details built-in Lua functions that are meant to be used for host health checks. Note that these functions rely on data supplied by metric agents detailed in Cache hardware metrics: monitoring and routing. Make sure cache hardware metrics are supplied to the router before using any of these functions.
cpu_load_ok({})
The function accepts an optional argument table with the following keys:
- Optional
host: The name of the host. Defaults to the name of the selected host if not provided. - Optional
cpu_load5_limit: The acceptable limit for the 5-minute CPU load. Defaults to 0.9 if not provided.
The function returns 1 if the five minute CPU load average is below their respective limits, and 0 otherwise.
Examples of usage:
cpu_load_ok()
cpu_load_ok({host = 'custom_host'})
cpu_load_ok({cpu_load5_limit = 0.8})
cpu_load_ok({host = 'custom_host', cpu_load5_limit = 0.8})
memory_usage_ok({})
The function accepts an optional argument table with the following keys:
- Optional
host: The name of the host. Defaults to the host of the selected host if not provided. - Optional
memory_usage_limit: The acceptable limit for the memory usage. Defaults to 0.9 if not provided.
The function returns 1 if the memory usage is below the limit, and 0 otherwise.
Examples of usage:
memory_usage_ok()
memory_usage_ok({host = 'custom_host'})
memory_usage_ok({memory_usage_limit = 0.7})
memory_usage_ok({host = 'custom_host', memory_usage_limit = 0.7})
interfaces_online({})
The function accepts an argument table with the following keys:
- Required
interfaces: A string or a table of strings representing the network interfaces to check. - Optional
host: The name of the host. Defaults to the host of the selected host if not provided.
The function returns 1 if all the specified interfaces are online, and 0 otherwise.
Required selection input data
This function relies on the fields link and interface_up, supplied by
the Telegraf metrics agent, as seen in example metrics. If
these fields are missing from your selection input data, this function will not
work.
Examples of usage:
interfaces_online({interfaces = 'eth0'})
interfaces_online({interfaces = {'eth0', 'eth1'}})
interfaces_online({host = 'custom_host', interfaces = 'eth0'})
interfaces_online({host = 'custom_host', interfaces = {'eth0', 'eth1'}})
health_check({})
The function accepts an optional argument table with the following keys:
- Required
interfaces: A string or a table of strings representing the network interfaces to check. - Optional
host: The name of the host. Defaults to the host of the selected host if not provided. - Optional
cpu_load5_limit: The acceptable limit for the 5-minute CPU load. Defaults to 0.9 if not provided. - Optional
memory_usage_limit: The acceptable limit for the memory usage. Defaults to 0.9 if not provided.
The function calls the health check functions cpu_load_ok({}),
memory_usage_ok({}) and interfaces_online({}). The functions returns 1 if
all these functions returned 1, otherwise it returns 0.
Examples of usage:
health_check({interfaces = 'eths0'})
health_check({host = 'custom_host', interfaces = 'eths0'})
health_check({cpu_load5_limit = 0.7, memory_usage_limit = 0.8, interfaces = 'eth0'})
health_check({host = 'custom_host', cpu_load5_limit = 0.7, memory_usage_limit = 0.8, interfaces = {'eth0', 'eth1'}})
General purpose functions
The router supplies a number of general purpose Lua functions.
always()
Always returns 1.
never()
Always returns 0. Useful for temporarily disabling caches by using it as a health check.
Examples of usage:
always()
never()
si(si_name)
The function reads the value of the selection input variable si_name and
returns it if it exists, otherwise it returns 0. The function accepts a string
argument for the selection input variable name.
Examples of usage:
si('some_selection_input_variable_name')
si('streamer-1.per_interface_metrics.eths1.megabits_sent_rate')
Comparison functions
All comparison functions use the form function(si_name, value) and compares
the selection input value with the name si_name with value.
ge(si_name, value) - greater than or equal
gt(si_name, value) - greater than
le(si_name, value) - less than or equal
lt(si_name, value) - less than
eq(si_name, value) - equal to
neq(si_name, value) - not equal to
Examples of usage:
ge('streamer-1.hardware_metrics.mem_available_percent', 30)
gt('streamer-1.hardware_metrics./.free', 1000000000)
le('streamer-1.hardware_metrics.cpu_load5', 0.8)
lt('streamer-1.per_interface_metrics.eths1.megabits_sent_rate', 9000)
eq('streamer-1.per_interface_metrics.eths1.link.', 1)
neq('streamer-1.hardware_metrics.n_cpus', 4)
Session checking functions
in_subnet(subnet)
Returns 1 if the current session belongs to subnet, otherwise it returns 0.
See Subnets API for more details on how to use
subnets in routing. The function accepts a string argument for the subnet name.
Examples of usage:
in_subnet('stockholm')
in_subnet('unserviced_region')
in_subnet('some_other_subnet')
These functions checks the current session’s session groups.
in_session_group(session_group)
Returns 1 if the current session has been classified into session_group,
otherwise it returns 0. The function accepts a string argument for the session
group name.
in_any_session_group({})
Returns 1 if the current session has been classified into any of
session_groups, otherwise it returns 0. The function accepts a table array of
strings as argument for the session group names.
in_all_session_groups({})
Returns 1 if the current session has been classified into all of
session_groups, otherwise it returns 0. The function accepts a table array of
strings as argument for the session group names.
Examples of usage:
in_session_group('safari_browser')
in_any_session_group({ 'in_europe', 'in_asia'})
in_all_session_group({ 'vod_content', 'in_america'})
Other built-in functions
base64_encode(data)
base64_encode(data) returns the base64 encoded string of data.
Arguments:
data: The data to encode.
Example:
print(base64_encode('Hello world!'))
SGVsbG8gd29ybGQh
base64_decode(data)
base64_decode(data) returns the decoded data of the base64 encoded string, as
a raw binary string.
Arguments:
data: The data to decode.
Example:
print(base64_decode('SGVsbG8gd29ybGQh'))
Hello world!
base64_url_encode(data)
base64_url_encode(data) returns the base64 URL encoded string of data.
Arguments:
data: The data to encode.
Example:
print(base64_url_encode('ab~~'))
YWJ-fg
base64_url_decode(data)
base64_url_decode(data) returns the decoded data of the base64 URL encoded
string, as a raw binary string.
Arguments:
data: The data to decode.
Example:
print(base64_url_decode('YWJ-fg'))
ab~~
to_hex_string(data)
to_hex_string(data) returns a string containing the hexadecimal
representation of the string data.
Arguments:
data: The data to convert.
Example:
print(to_hex_string('Hello world!\n'))
48656c6c6f20776f726c64210a
from_hex_string(data)
from_hex_string(data) returns a string containing the byte representation of
the hexadecimal string data.
Arguments:
data: The data to convert.
Example:
print(from_hex_string('48656c6c6f20776f726c6421'))
Hello world!
empty(table)
empty(table) returns true if table is empty, otherwise it returns false.
Arguments:
table: The table to check.
Examples:
print(tostring(empty({})))
true
print(tostring(empty({1, 2, 3})))
false
md5(data)
md5(data) returns the MD5 hash of data, as a hexstring.
Arguments:
data: The data to hash.
Example:
print(md5('Hello world!'))
86fb269d190d2c85f6e0468ceca42a20
sha256(date)
sha256(data) returns the SHA-256 hash of data, as a hexstring.
Arguments:
data: The data to hash.
Example:
print(sha256('Hello world!'))
c0535e4be2b79ffd93291305436bf889314e4a3faec05ecffcbb7df31ad9e51a
hmac_sha256(key, data)
hmac_sha256(key, data) returns the HMAC-SHA-256 hash of data using key,
as a base64 encoded string.
Note: This function is to be modified to return raw binary data instead of a base64 encoded string.
Arguments:
key: The key to use.data: The data to hash.
Example:
print(hmac_sha256('secret', 'Hello world!'))
pl9M/PX0If8r4FLgZCvMvP6xJu5z68T+OzgZZDAutjI=
hmac_sha384(key, data)
hmac_sha384(key, data) returns the HMAC-SHA-384 hash of data using key,
as a string containing raw binary data.
Arguments:
key: The key to use.data: The data to hash.
Example:
print(to_hex_string(hmac_sha384('secret', 'Hello world!')))
917516d93d3509a371a129ca50933195dd659712652f07ba5792cbd5cade5e6285a841808842cfa0c3c69c8fb234468a
hmac_sha512(key, data)
hmac_sha512(key, data) returns the HMAC-SHA-512 hash of data using key,
as a string containing raw binary data.
Arguments:
key: The key to use.data: The data to hash.
Example:
print(to_hex_string(hmac_sha512('secret', 'Hello world!')))
dff6c00943387f9039566bfee0994de698aa2005eecdbf12d109e17aff5bbb1b022347fbf4bd94ede7c7d51571022525556b64f9d5e4386de99d0025886eaaff
hmac_md5(key, data)
hmac_md5(key, data) returns the HMAC-MD5 hash of data using key,
as a string containing raw binary data.
Arguments:
key: The key to use.data: The data to hash.
Example:
print(to_hex_string(hmac_md5('secret', 'Hello world!')))
444fad0d374d14369d6b595062da5d91
regex_replace
regex_replace(data, pattern, replacement) returns the string data with all
occurrences of the regular expression pattern replaced with replacement.
Arguments:
data: The data to replace.pattern: The regular expression pattern to match.replacement: The replacement string.
Examples:
print(regex_replace('Hello world!', 'world', 'Lua'))
Hello Lua!
print(regex_replace('Hello world!', 'l+', 'lua'))
Heluao worluad!
If the regular expression pattern is invalid, regex_replace() returns an
error message.
Examples:
print(regex_replace('Hello world!', '*', 'lua'))
regex_error caught: regex_error
unixtime()
unixtime() returns the current Unix timestamp, as seconds since midnight,
Janury 1 1970 UTC, as an integer.
Arguments:
- None
Example:
print(unixtime())
1733517373
now()
now() returns the current Unix timestamp, the number of seconds since
midnight, Janury 1 1970 UTC, as an number with decimals.
Arguments:
- None
Example:
print(now())
1733517373.5007
timeToEpoch(time, fmt)
timeToEpoch(time, fmt) returns the Unix timestamp, the number of seconds
since midnight, Janury 1 1970 UTC, of the time string time, which is
formatted according to the format string fmt.
Note: This function is scheduled to be renamed to time_to_epoch().
Arguments:
time: The time string to convert.fmt(Optional): The format string of the time string, as specified by the POSIX function strptime(). If not specified, it defaults to “%Y-%m-%dT%TZ”.
Examples:
print(timeToEpoch('1972-04-17T06:10:20Z'))
72339020
print(timeToEpoch('17/04-72 06:20:30', '%d/%m-%y %H:%M:%S'))
72339630
epochToTime(time, format)
epochToTime(time, format) returns the time string of the Unix timestamp
time, formatted according to format.
Note: This function is scheduled to be renamed to epoch_to_time().
Arguments:
time: The Unix timestamp to convert, as a number.format(Optional): The format string of the time string, as specified by the POSIX function strftime(). If not specified, it defaults to “%Y-%m-%dT%TZ”.
Examples:
print(epochToTime(123456789))
1973-11-29T21:33:09Z
print(epochToTime(1234567890, '%d/%m-%y %H:%M:%S'))
13/02-09 23:31:30
get_consistent_hashing_weight(contentName, nodeIdsString, spreadFactor, hashAlgoritm, nodeId)
get_consistent_hashing_weight(contentName, nodeIdsString, spreadFactor, hashAlgoritm, nodeId)
returns the priority that node nodeId has in the list of preferred nodes,
determined using consistent hashing. The first spreadfactor:th nodes should
have equal weights to randomize requests between them. Remaining nodes should
have decrementally decreasing weights to honor node priority during failover.
Arguments:
contentName: The name of the content to hash.nodeIdsString: A string containing the node IDs to hash, on the format ‘0,1,2,3’.spreadFactor: The number of nodes to spread the requests between.hashAlgorithm: Which hash algorithm to use. Supported algorithms are “MD5”, “SDBM” and “Murmur”. Default is “MD5”.nodeId: The ID of the node to calculate the weight for.
Examples:
print(get_consistent_hashing_weight('/vod/film1', '0,1,2,3,4,5', 3, 'MD5', 3))
6
print(get_consistent_hashing_weight('/vod/film2', '0,1,2,3,4,5', 3, 'MD5', 3))
4
print(get_consistent_hashing_weight('/vod/film2', '0,1,2', 2, 'Murmur', 1))
2
See Consistent Hashing for more information about consistent hashing.
expand_ipv6_address(address)
expand_ipv6_address(address) returns the fully expanded form of the IPv6
address address.
Arguments:
address: The IPv6 address to expand. If the address is not a valid IPv6 address, the function returns the contents ofaddressunmodified. This allows for the function to pass through IPv4 addresses.
Examples:
print(expand_ipv6_address('2001:db8::1'))
2001:0db8:0000:0000:0000:0000:0000:0001
print(expand_ipv6_address('198.51.100.5'))
198.51.100.5
Configuration examples
Many of the functions documented are suitable to use in host health checks. To configure host health checks, see configuring CDNs and hosts. Here are some configuration examples of using the built-in Lua functions, utilizing the example metrics:
"healthChecks": [
"gt('streamer-1.hardware_metrics.mem_available_percent', 20)", // More than 20% memory is left
"lt('streamer-1.per_interface_metrics.eths1.megabits_sent_rate', 9000)" // Current bitrate is lower than 9000 Mbps
"host_has_bw({host='streamer-1', interface='eths1', margin=1000})", // host_has_bw() uses 'streamer-1.per_interface_metrics.eths1.speed' to determine if there is enough bandwidth left with a 1000 Mbps margin
"interfaces_online({host='streamer-1', interfaces='eths1'})",
"memory_usage_ok({host='streamer-1'})",
"cpu_load_ok({host='streamer-1'})",
"health_check({host='streamer-1', interfaces='eths1'})" // Combines interfaces_online(), memory_usage_ok(), cpu_load_ok()
]
1.6.5.5.2 - Global Lua Tables
There are multiple global tables containing important data available while writing Lua code for the router.
selection_input
Contains arbitrary, custom fields fed into the router by clients, see API overview for details on how to inject data into this table.
Note that the selection_input table is iterable.
Usage examples:
print(selection_input['some_value'])
-- Iterate over table
if selection_input then
for k, v in pairs(selection_input) do
print('here is '..'selection_input!')
print(k..'='..v)
end
else
print('selection_input is nil')
end
session_groups
Defines a mapping from session group name to boolean, indicating whether
the session belongs to the session group or not.
Usage examples:
if session_groups.vod then print('vod') else print('not vod') end
if session_groups['vod'] then print('vod') else print('not vod') end
session_count
Provides counters of number of session types per session group. The table
uses the structure qoe_score.<session_type>.<session_group>.
Usage examples:
print(session_count.instream.vod)
print(session_count.initial.vod)
qoe_score
Provides the quality of experience score per host per session group. The table
uses the structure qoe_score.<host>.<session_group>.
Usage examples:
print(qoe_score.host1.vod)
print(qoe_score.host1.live)
request
Contains data related to the HTTP request between the client and the router.
request.method- Description: HTTP request method.
- Type:
string - Example:
'GET','POST'
request.body- Description: HTTP request body string.
- Type:
stringornil - Example:
'{"foo": "bar"}'
request.major_version- Description: Major HTTP version such as
xinHTTP/x.1. - Type:
integer - Example:
1
- Description: Major HTTP version such as
request.minor_version- Description: Minor HTTP version such as
xinHTTP/1.x. - Type:
integer - Example:
1
- Description: Minor HTTP version such as
request.protocol- Description: Transfer protocol variant.
- Type:
string - Example:
'HTTP','HTTPS'
request.client_ip- Description: IP address of the client issuing the request.
- Type:
string - Example:
'172.16.238.128'
request.path_with_query_params- Description: Full request path including query parameters.
- Type:
string - Example:
'/mycontent/superman.m3u8?b=y&c=z&a=x'
request.path- Description: Request path without query parameters.
- Type:
string - Example:
'/mycontent/superman.m3u8'
request.query_params- Description: The query parameter string.
- Type:
string - Example:
'b=y&c=z&a=x'
request.filename- Description: The part of the path following the final slash, if any.
- Type:
string - Example:
'superman.m3u8'
request.subnet- Description: Subnet of
client_ip. - Type:
stringornil - Example:
'all'
- Description: Subnet of
session
Contains data related to the current session.
session.client_ip- Description: Alias for
request.client_ip. See documentation for table request above.
- Description: Alias for
session.path_with_query_params- Description: Alias for
request.path_with_query_params. See documentation for table request above.
- Description: Alias for
session.path- Description: Alias for
request.path. See documentation for table request above.
- Description: Alias for
session.query_params- Description: Alias for
request.query_params. See documentation for table request above.
- Description: Alias for
session.filename- Description: Alias for
request.filename. See documentation for table request above.
- Description: Alias for
session.subnet- Description: Alias for
request.subnet. See documentation for table request above.
- Description: Alias for
session.host- Description: ID of the currently selected host for the session.
- Type:
stringornil - Example:
'host1'
session.id- Description: ID of the session.
- Type:
string - Example:
'8eb2c1bdc106-17d2ff-00000000'
session.session_type- Description: Type of the session.
- Type:
string - Example:
'initial'or'instream'. Identical to the value of theTypeargument of the session translation function.
session.is_managed- Description: Identifies managed sessions.
- Type:
boolean - Example:
trueifType/session.session_typeis'instream'
request_headers
Contains the headers from the request between the client and the router, keyed by name.
Usage example:
print(request_headers['User-Agent'])
request_query_params
Contains the query parameters from the request between the client and the router, keyed by name.
Usage example:
print(request_query_params.a)
session_query_params
Alias for metatable request_query_params.
response
Contains data related to the outgoing response apart from the headers.
response.body- Description: HTTP response body string.
- Type:
stringornil - Example:
'{"foo": "bar"}'
response.code- Description: HTTP response status code.
- Type:
integer - Example:
200,404
response.text- Description: HTTP response status text.
- Type:
string - Example:
'OK','Not found'
response.major_version- Description: Major HTTP version such as
xinHTTP/x.1. - Type:
integer - Example:
1
- Description: Major HTTP version such as
response.minor_version- Description: Minor HTTP version such as
xinHTTP/1.x. - Type:
integer - Example:
1
- Description: Minor HTTP version such as
response.protocol- Description: Transfer protocol variant.
- Type:
string - Example:
'HTTP','HTTPS'
response_headers
Contains the response headers keyed by name.
Usage example:
print(response_headers['User-Agent'])
1.6.5.5.3 - Request Translation Function
Specifies the body of a Lua function that inspects every incoming HTTP request and overwrites individual fields before further processing by the router.
Returns nil when nothing is to be changed, or HTTPRequest(t) where t
is a table with any of the following optional fields:
Method- Description: Replaces the HTTP request method in the request being processed.
- Type:
string - Example:
'GET','POST'
Path- Description: Replaces the request path in the request being processed.
- Type:
string - Example:
'/mycontent/superman.m3u8'
ClientIp- Description: Replaces client IP address in the request being processed.
- Type:
string - Example:
'172.16.238.128'
Body- Description: Replaces body in the request being processed.
- Type:
stringornil - Example:
'{"foo": "bar"}'
QueryParameters- Description: Adds, removes or replaces individual query parameters in the request being processed.
- Type: nested
table(indexed by number) representing an array of query parameters as{[1]='Name',[2]='Value'}pairs that are added to the request being processed, or overwriting existing query parameters with colliding names. To remove a query parameter from the request, specifynilas value, i.e.QueryParameters={..., {[1]='foo',[2]=nil} ...}. Returning a query parameter with a name but no value, such asain the request'/index.m3u8?a&b=22'is currently not supported.
Headers- Description: Adds, removes or replaces individual headers in the request being processed.
- Type: nested
table(indexed by number) representing an array of request headers as{[1]='Name',[2]='Value'}pairs that are added to the request being processed, or overwriting existing request headers with colliding names. To remove a header from the request, specifynilas value, i.e.Headers={..., {[1]='foo',[2]=nil} ...}. Duplicate names are supported. A multi-value header such asFoo: bar1,bar2is defined by specifyingHeaders={..., {[1]='foo',[2]='bar1'}, {[1]='foo',[2]='bar2'}, ...}.
Example of a request_translation_function body that sets the request path
to a hardcoded value and adds the hardcoded query parameter a=b:
-- Statements go here
print('Setting hardcoded Path and QueryParameters')
return HTTPRequest({
Path = '/content.mpd',
QueryParameters = {
{'a','b'}
}
})
Arguments
The following (iterable) arguments will be known by the function:
QueryParameters
Type: nested
table(indexed by number).Description: Array of query parameters as
{[1]='Name',[2]='Value'}pairs that were present in the query string of the request. Format identical to theHTTPRequest.QueryParameters-field specified for the return value above.Example usage:
for _, queryParam in pairs(QueryParameters) do print(queryParam[1]..'='..queryParam[2]) end
Headers
Type: nested
table(indexed by number).Description: Array of request headers as
{[1]='Name',[2]='Value'}pairs that were present in the request. Format identical to theHTTPRequest.Headers-field specified for the return value above. A multi-value header such asFoo: bar1,bar2is seen inrequest_translation_functionasHeaders={..., {[1]='foo',[2]='bar1'}, {[1]='foo',[2]='bar1'}, ...}.Example usage:
for _, header in pairs(Headers) do print(header[1]..'='..header[2]) end
Additional data
In addition to the arguments above, the following Lua tables, documented in Global Lua Tables, provide additional data that is available when executing the request translation function:
If the request translation function modifies the request, the request,
request_query_params and request_headers tables will be updated with the
modified request and made available to the routing rules.
1.6.5.5.4 - Session Translation Function
Specifies the body of a Lua function that inspects a newly created session and may override its suggested type from “initial” to “instream” or vice versa. A number of helper functions are provided to simplify changing the session type.
Returns nil when the session type is to remain unchanged, or Session(t)
where t is a table with a single field:
Type- Description: New type of the session.
- Type:
string - Example:
'instream','initial'
Basic Configuration
It is possible to configure the maximum number of simultaneous managed sessions
on the router. If the maximum number is reached, no more managed sessions can be
created. Using confcli, it can be configured by running
$ confcli services.routing.tuning.general.maxActiveManagedSessions
{
"maxActiveManagedSessions": 1000
}
$ confcli services.routing.tuning.general.maxActiveManagedSessions 900
services.routing.tuning.general.maxActiveManagedSessions = 900
Common Arguments
While executing the session translation function, the following arguments are available:
Type: The current type of the session ('instream'or'initial').
Usage examples:
-- Flip session type
local newType = 'initial'
if Type == 'initial' then
newType = 'instream'
end
print('Changing session type from ' .. Type .. ' to ' .. newType)
return Session({['Type'] = newType})
Session Translation Helper Functions
The standard Lua library prodives four helper functions to simplify the configuration of the session translation function:
set_session_type(session_type)
This function will set the session type to the supplied session_type and
the maximum number of sessions of that type has not been reached.
Parameters
session_type: The type of session to create, possible values are ‘initial’ or ‘instream’.
Usage Examples
return set_session_type('instream')
return set_session_type('initial')
set_session_type_if_in_group(session_type, session_group)
This function will set the session type to the supplied session_type if the
session is part of session_group and the maximum number of sessions of that
type has not been reached.
Parameters
session_type: The type of session to create, possible values are ‘initial’ or ‘instream’.session_group: The name of the session group.
Usage Examples
return set_session_type_if_in_group('instream', 'sg1')
set_session_type_if_in_all_groups(session_type, session_groups)
This function will set the session type to the supplied session_type if the
session is part of all session groups given by session_groups and the maximum
number of sessions of that type has not been reached.
Parameters
session_type: The type of session to create, possible values are ‘initial’ or ‘instream’.session_groups: A list of session group names.
Usage Examples
return set_session_type_if_in_all_groups('instream', {'sg1', 'sg2'})
set_session_type_if_in_any_group(session_type)
This function will set the session type to the supplied session_type if the
session is part of one or more of the session groups given by session_groups
and the maximum number of sessions of that type has not been reached.
Parameters
session_type: The type of session to create, possible values are ‘initial’ or ‘instream’.session_groups: A list of session group names.
Usage Examples
return set_session_type_if_in_any_group('instream', {'sg1', 'sg2'})
Configuration
Using confcli, example of how the functions above can be used in the session
translation function can be configured by running any of
$ confcli services.routing.translationFunctions.session "return set_session_type('instream')"
services.routing.translationFunctions.session = "return set_session_type('instream')"
$ confcli services.routing.translationFunctions.session "return set_session_type_if_in_group('instream', 'sg1')"
services.routing.translationFunctions.session = "return set_session_type_if_in_group('instream', 'sg1')"
$ confcli services.routing.translationFunctions.session "return set_session_type_if_in_all_groups('instream', {'sg1', 'sg2'})"
services.routing.translationFunctions.session = "return set_session_type_if_in_all_groups('instream', {'sg1', 'sg2'})"
$ confcli services.routing.translationFunctions.session "return set_session_type_if_in_any_group('instream', {'sg1', 'sg2'})"
services.routing.translationFunctions.session = "return set_session_type_if_in_any_group('instream', {'sg1', 'sg2'})"
Additional data
In addition to the arguments above, the following Lua tables, documented in Global Lua Tables, provide additional data that is available when executing the response translation function:
The selection_input table will not change while a routing request is handled.
A request_translation_function and the corresponding
response_translation_function will see the same selection_input table, even
if the selection data is updated while the request is being handled.
1.6.5.5.5 - Host Request Translation Function
The host request translation function defines a Lua function that modifies
HTTP requests sent to a host. These hosts are configured in
services.routing.hostGroups.
Hosts can receive requests for a manifest. A regular host will respond with the manifest itself, while a redirecting host and a DNS host will respond with a redirection to a streamer. This function can modify all these types of requests.
The function returns nil when nothing is to be changed, or HTTPRequest(t)
where t is a table with any of the following optional fields:
Method- Description: Replaces the HTTP request method in the request being processed.
- Type:
string - Example:
'GET','POST'
Path- Description: Replaces the request path in the request being processed.
- Type:
string - Example:
'/mycontent/superman.m3u8'
Body- Description: Replaces body in the request being processed.
- Type:
stringornil - Example:
'{"foo": "bar"}'
QueryParameters- Description: Adds, removes or replaces individual query parameters in the request being processed.
- Type: nested
table(indexed by number) representing an array of query parameters as{[1]='Name',[2]='Value'}pairs that are added to the request being processed, or overwriting existing query parameters with colliding names. To remove a query parameter from the request, specifynilas value, i.e.QueryParameters={..., {[1]='foo',[2]=nil} ...}. Returning a query parameter with a name but no value, such asain the request'/index.m3u8?a&b=22'is currently not supported.
Headers- Description: Adds, removes or replaces individual headers in the request being processed.
- Type: nested
table(indexed by number) representing an array of request headers as{[1]='Name',[2]='Value'}pairs that are added to the request being processed, or overwriting existing request headers with colliding names. To remove a header from the request, specifynilas value, i.e.Headers={..., {[1]='foo',[2]=nil} ...}. Duplicate names are supported. A multi-value header such asFoo: bar1,bar2is defined by specifyingHeaders={..., {[1]='foo',[2]='bar1'}, {[1]='foo',[2]='bar2'}, ...}.
Host- Description: Replaces the host that the request is sent to.
- Type:
string - Example:
'new-host.example.com','192.0.2.7'
Port- Description: Replaces the TCP port that the request is sent to.
- Type:
number - Example:
8081
Protocol- Description: Decides which protocol that will be used for sending the
request. Valid protocols are
'HTTP'and'HTTPS'. - Type:
string - Example:
'HTTP','HTTPS'
- Description: Decides which protocol that will be used for sending the
request. Valid protocols are
Example of a host_request_translation_function body that sets the request path
to a hardcoded value and adds the hardcoded query parameter a=b:
-- Statements go here
print('Setting hardcoded Path and QueryParameters')
return HTTPRequest({
Path = '/content.mpd',
QueryParameters = {
{'a','b'}
}
})
Arguments
The following (iterable) arguments will be known by the function:
QueryParameters
Type: nested
table(indexed by number).Description: Array of query parameters as
{[1]='Name',[2]='Value'}pairs that are present in the query string of the request from the client to the router. Format identical to theHTTPRequest.QueryParameters-field specified for the return value above.Example usage:
for _, queryParam in pairs(QueryParameters) do print(queryParam[1]..'='..queryParam[2]) end
Headers
Type: nested
table(indexed by number).Description: Array of request headers as
{[1]='Name',[2]='Value'}pairs that are present in the request from the client to the router. Format identical to theHTTPRequest.Headers-field specified for the return value above. A multi-value header such asFoo: bar1,bar2is seen inhost_request_translation_functionasHeaders={..., {[1]='foo',[2]='bar1'}, {[1]='foo',[2]='bar1'}, ...}.Example usage:
for _, header in pairs(Headers) do print(header[1]..'='..header[2]) end
Global tables
The following non-iterable global tables are available for use by the
host_request_translation_function.
Table outgoing_request
The outgoing_request table contains the request that is to be sent to the
host.
outgoing_request.method- Description: HTTP request method.
- Type:
string - Example:
'GET','POST'
outgoing_request.body- Description: HTTP request body string.
- Type:
stringornil - Example:
'{"foo": "bar"}'
outgoing_request.major_version- Description: Major HTTP version such as
xinHTTP/x.1. - Type:
integer - Example:
1
- Description: Major HTTP version such as
outgoing_request.minor_version- Description: Minor HTTP version such as
xinHTTP/1.x. - Type:
integer - Example:
1
- Description: Minor HTTP version such as
outgoing_request.protocol- Description: Transfer protocol variant.
- Type:
string - Example:
'HTTP','HTTPS'
Table outgoing_request_headers
Contains the request headers from the request that is to be sent to the host, keyed by name.
Example:
print(outgoing_request_headers['X-Forwarded-For'])
Multiple values are separated with a comma.
Additional data
In addition to the arguments above, the following Lua tables, documented in Global Lua Tables, provide additional data that is available when executing the request translation function:
1.6.5.5.6 - Response Translation Function
Specifies the body of a Lua function that inspects every outgoing HTTP response and overwrites individual fields before being sent to the client.
Returns nil when nothing is to be changed, or HTTPResponse(t) where t
is a table with any of the following optional fields:
Code- Description: Replaces status code in the response being sent.
- Type:
integer - Example:
200,404
Text- Description: Replaces status text in the response being sent.
- Type:
string - Example:
'OK','Not found'
MajorVersion- Description: Replaces major HTTP version such as
xinHTTP/x.1in the response being sent. - Type:
integer - Example:
1
- Description: Replaces major HTTP version such as
MinorVersion- Description: Replaces minor HTTP version such as
xinHTTP/1.xin the response being sent. - Type:
integer - Example:
1
- Description: Replaces minor HTTP version such as
Protocol- Description: Replaces protocol in the response being sent.
- Type:
string - Example:
'HTTP','HTTPS'
Body- Description: Replaces body in the response being sent.
- Type:
stringornil - Example:
'{"foo": "bar"}'
Headers- Description: Adds, removes or replaces individual headers in the response being sent.
- Type: nested
table(indexed by number) representing an array of response headers as{[1]='Name',[2]='Value'}pairs that are added to the response being sent, or overwriting existing request headers with colliding names. To remove a header from the response, specifynilas value, i.e.Headers={..., {[1]='foo',[2]=nil} ...}. Duplicate names are supported. A multi-value header such asFoo: bar1,bar2is defined by specifyingHeaders={..., {[1]='foo',[2]='bar1'}, {[1]='foo',[2]='bar2'}, ...}.
Example of a response_translation_function body that sets the Location
header to a hardcoded value:
-- Statements go here
print('Setting hardcoded Location')
return HTTPResponse({
Headers = {
{'Location', 'cdn1.com/content.mpd?a=b'}
}
})
Arguments
The following (iterable) arguments will be known by the function:
Headers
Type: nested
table(indexed by number).Description: Array of response headers as
{[1]='Name',[2]='Value'}pairs that are present in the response being sent. Format identical to theHTTPResponse.Headers-field specified for the return value above. A multi-value header such asFoo: bar1,bar2is seen inresponse_translation_functionasHeaders={..., {[1]='foo',[2]='bar1'}, {[1]='foo',[2]='bar1'}, ...}.Example usage:
for _, header in pairs(Headers) do print(header[1]..'='..header[2]) end
Additional data
In addition to the arguments above, the following Lua tables, documented in Global Lua Tables, provide additional data that is available when executing the response translation function:
1.6.6 - Trusted proxies
When a request with the header X-Forwarded-For is sent to the router, the
router will check if the client is in the list of trusted proxies. If the client
is not a trusted proxy, the router will drop the connection, returning an empty
reply to the client. If the client is a trusted proxy, the IP address defined
in the X-Forwarded-For will be regarded as the client’s IP address.
The list of trusted proxies can be configured by modifying the configuration
field services.routing.settings.trustedProxies with the IP addresses of
trusted proxies:
$ confcli services.routing.settings.trustedProxies -w
Running wizard for resource 'trustedProxies'
<A list of IP addresses from which the proxy IP address of requests with the X-Forwarded-For header defined are checked. If the IP isn't in this list, the connection is dropped. (default: [])>
Hint: Hitting return will set a value to its default.
Enter '?' to receive the help string
trustedProxies <A list of IP addresses from which the proxy IP address of requests with the X-Forwarded-For header defined are checked. If the IP isn't in this list, the connection is dropped. (default: [])>: [
trustedProxy (default: ): 1.2.3.4
Add another 'trustedProxy' element to array 'trustedProxies'? [y/N]: n
]
Generated config:
{
"trustedProxies": [
"1.2.3.4"
]
}
Merge and apply the config? [y/n]: y
Note that by configuring 0.0.0.0/0 as a trusted proxy, all proxied requests
will be trusted.
1.6.7 - Confd Auto Upgrade Tool
The confd-auto-upgrade tool is a simple utility to automatically migrate the confd
configuration schema between different versions of the Director. Starting with version
1.12.0, it is possible to automatically apply the necessary configuration changes in a
controlled and predictable manner. While this tool is intended to help transition the
configuration format between the different versions, it is not a substitute for proper
backups, and while downgrading to an earlier version, it may not be possible to recover
previously modified or deleted configuration values.
When using the tool, both the “from” and “to” versions must be specified. Internally, the tool will calculate a list of migrations which must be applied to transition between the given versions, and apply them, outputting the final configuration to standard output. The current configuration can either be piped in to the tool via standard input, or supplied as a static file. Providing a “from” version which is later than the “to” version will result in the downgrade migrations being applied in reverse order, effectively downgrading the configuration to the lower version.
For convenience, the tool is deployed to the ACD Nodes automatically at install time as a standard Podman container, however since it is not intended to run as a service, only the image will be present, not a running container.
Performing the Upgrade
In the following example scenario, a system with version 1.10.1 has been upgraded
to 1.14.0. Before upgrading a backup of the configuration was taken and saved to
current_config.json.
Using the image and tag as determined in the above section. Issue the following command:
cat current_config.json | \
podman run -i --rm images.edgeware.tv/acd-confd-migration:1.14.0 \
--in - --from 1.10.1 --to 1.14.0 \
| tee upgraded_config.json
In the above example, the updated configuration is saved to upgraded_config.json.
It is recommended to manually verify the generated configuration, and after
which apply the config to confd by using cat upgraded_config.json | confcli -i.
It is also possible to combine the two commands, by piping the output of the auto-upgrade
tool directly to confcli -i. E.g.
cat current_config.json | podman run ... | tee upgraded_config.json | confcli -i
This will save a backup of the upgraded configuration to upgraded_config.json and
at the same time apply the changes to confd immediately.
Downgrading the Configuration
The steps for downgrading the configuration are exactly the same as for upgrade except for the --from
and --to versions should be swapped. E.g. --from 1.14.0 --to 1.10.1. Keep in mind however,
that during an upgrade some configuration properties may have been deleted or modified, and while
downgrading over those steps, some data loss may occur. In those cases, it may be easier and safer
to simply restore from backup. In most cases where configuration properties are removed during upgrade,
the corresponding downgrade will simply restore the default values of those properties.
1.7 - Operations
This guide describes how to perform day-to-day operations of the ACD Router and its associated services, collectively known as the Director.
Component Overview
To effectively operate the Director software, it is important to understand the composition of the various software components and how they are deployed.
Each Director instance functions as an independent system, comprising multiple containerized services. These containers are managed by a standard container runtime and are seamlessly integrated with the host’s operating system to enhance the overall operator experience.
The containers are managed by the Podman container runtime, which operates without additional daemon services running on the host. Unlike Docker, Podman manages each container as a separate process, eliminating the reliance on a shared daemon and mitigating the risk of a single-point-of-failure scenario.
Although several distinct services make up the Director, the primary component is the router. The router is responsible for listening for incoming requests, processing the request, and redirecting the client to the appropriate host, or CDN to deliver the requested content.
Two additional containers are responsible for configuration management. Those are
confd and confd-transformer. The former manages a local database of configuration
metadata and provides a REST API for managing the configuration. The confd-transformer
simply listens for configuration changes from confd and adapts that configuration
to a format suitable for the router to ingest. For additional information about
setting up and using confd see here..
The next two components, the edns-proxy and the convoy-bridge allow the router
to communicate with an EDNS server for EDNS-based routing, and with synchronization
with Convoy respectively. Additional information about the EDNS-Proxy is available
here.. For the Convoy Bridge
service see here..
The remaining containers are useful for metrics, monitoring, and alerting. These
include prometheus and grafana for monitoring and analytics, and alertmanager
for monitoring and alarms.
1.7.1 - Services
Each container shipped with the Director is fully-integrated with the systemd
service on the host, enabling easy management using standard systemd commands.
The logs for each container are also full-integrated with journald to simplify
troubleshooting.
In order to integrate the Podman containers with systemd, a common prefix
of acd- has been applied to each service name. For example the router
container is managed by the service acd-router, and the confd container
is managed by the service acd-confd. These same prefixed names apply while
fetching logs via journald. This common prefix aids in grouping the related
services as well as provides simpler filtering for tab-completion.
Starting / Stopping Services
Standard systemd commands should be used to start and stop the services.
systemctl start acd-router- Starts theroutercontainer.systemctl stop acd-router- Stops theroutercontainer.systemctl status acd-router- Displays the status of theroutercontainer.
Due to the limitation of needing the acd- prefix, it provides the ability to
work with all ACD services in a group. For example:
systemctl status 'acd-*'- Display the status of all installed ACD components.systemctl start 'acd-*'- Start all ACD components.
Logging
Each ACD component corresponds to a journal entry with the same unit name, with
the acd- prefix. Standard journald commands can be used to view and manage the
logging.
journalctl -u acd-router- Display the logs for theroutercontainer
Access Log
Refer to Access Logging.
Troubleshooting
Some additional logging may be available in the filesystem, the paths of which can
be determined by executing the ew-sysinfo command. See
Diagnostics. for additional details.
1.8 - Convoy Bridge
The convoy-bridge is an optional integration service, pre-installed alongside the router which provides two-way communication between the router and a separate Convoy installation.
The convoy-bridge is designed to allow the Convoy account metadata to be available from within the router for such use-cases as inserting the account specific prefixes in the redirect URL and validating per-account internal security tokens. The service works by periodically polling the Convoy server for changes to the configuration, and when detected, the relevant configuration information is pushed to the router.
In addition, the convoy-bridge has the ability to integrate the router with the Convoy analytics service, such that client sessions started by the router are properly collected by Convoy, and are available in the dashboards.
Configuration
The convoy-bridge service is configured using confcli on the router host.
All configuration for the convoy-bridge exists under the path
integration.convoy.bridge.
{
"logLevel": "info",
"accounts": {
"enabled": true,
"dbUrl": "mysql://convoy:eith7jee@convoy:3306",
"dbPollInterval": 60
},
"analytics": {
"enabled": true,
"brokers": ["broker1:9092", "broker2:9092"],
"batchInterval": 10,
"maxBatchSize": 500
},
"otherRouters": [
{
"url": "https://router2:5001",
"apiKey": "key1",
"validateCerts": true
}
]
}
In the above configuration block, there are three main sections. The accounts
section enables fetching account metadata from Convoy towards the router. The
analytics section controls the integration between the router and the Convoy
analytics service. The otherRouters section is used to synchronize additional
router instances. The local router instance will always be implicitly included.
Additional routers listed in this section will be handled by this instance of
the convoy-bridge service.
Logging
The logs are available in the system journal and can be viewed using:
journalctl -u acd-convoy-bridge
1.9 - Monitoring
1.9.1 - Access logging
Access logging is activated by default and can be enabled/disabled by running
$ confcli services.routing.tuning.general.accessLog true
$ confcli services.routing.tuning.general.accessLog false
Requests are logged in the combined log format and can be found at
/var/log/acd-router/access.log. Additionally, the symbolic link
/opt/edgeware/acd/router/log points to /var/log/acd-router, allowing
the access logs to also be found at /opt/edgeware/acd/router/log/access.log.
Example output
$ cat /var/log/acd-router/access.log
May 29 07:20:00 router[52236]: ::1 - - [29/May/2023:07:20:00 +0000] "GET /vod/batman.m3u8 HTTP/1.1" 302 0 "-" "curl/7.61.1"
Access log rotation
Access logs are rotated and compressed once the access log file reaches a size of 100 MB. By default, 10 rotated logs are stored before being rotated out. These rotation parameters can be reconfigured by editing the lines
size 100M
rotate 10
in /etc/logrotate.d/acd-router-access-log. For more log rotation configuration
possibilites, refer to the
Logrotate documentation.
1.9.2 - System troubleshooting
ESB3024 contains the tool ew-sysinfo that gives an overview of how the
system is doing. Simply use the command and the tool will output information
about the system and the installed ESB3024 services.
The output format can be changed using the --format flag, possible values
are human (default) and json, e.g.:
$ ew-sysinfo
system:
os: ['5.4.17-2136.321.4.el8uek.x86_64', 'Oracle Linux Server 8.8']
cpu_cores: 2
cpu_load_average: [0.03, 0.03, 0.0]
memory_usage: 478 MB
memory_load_average: [0.03, 0.03, 0.0]
boot_time: 2023-09-08T08:30:57Z
uptime: 6 days, 3:43:44.640665
processes: 122
open_sockets:
ipv4: 12
ipv6: 18
ip_total: 30
tcp_over_ipv4: 9
tcp_over_ipv6: 16
tcp_total: 25
udp_over_ipv4: 3
udp_over_ipv6: 2
udp_total: 5
total: 145
system_disk (/):
total: 33271 MB
used: 7978 MB (24.00%)
free: 25293 MB
journal_disk (/run/log/journal):
total: 1954 MB
used: 217 MB (11.10%)
free: 1736 MB
vulnerabilities:
meltdown: Mitigation: PTI
spectre_v1: Mitigation: usercopy/swapgs barriers and __user pointer sanitization
spectre_v2: Mitigation: Retpolines, STIBP: disabled, RSB filling, PBRSB-eIBRS: Not affected
processes:
orc-re:
pid: 177199
status: sleeping
cpu_usage_percent: 1.0%
cpu_load_average: 131.11%
memory_usage: 14 MB (0.38%)
num_threads: 10
hints:
get_raw_router_config: cat /opt/edgeware/acd/router/cache/config.json
get_confd_config: cat /opt/edgeware/acd/confd/store/__active
get_router_logs: journalctl -u acd-router
get_edns_proxy_logs: journalctl -u acd-edns-proxy
check_firewall_status: systemctl status firewalld
check_firewall_config: iptables -nvL# For --format=json, it's recommended to pipe the output to a JSON interpreter
# such as jq
$ ew-sysinfo --format=json | jq
{
"system": {
"os": [
"5.4.17-2136.321.4.el8uek.x86_64",
"Oracle Linux Server 8.8"
],
"cpu_cores": 2,
"cpu_load_average": [
0.01,
0.0,
0.0
],
"memory_usage": "479 MB",
"memory_load_average": [
0.01,
0.0,
0.0
],
"boot_time": "2023-09-08 08:30:57",
"uptime": "6 days, 5:12:24.617114",
"processes": 123,
"open_sockets": {
"ipv4": 13,
"ipv6": 18,
"ip_total": 31,
"tcp_over_ipv4": 10,
"tcp_over_ipv6": 16,
"tcp_total": 26,
"udp_over_ipv4": 3,
"udp_over_ipv6": 2,
"udp_total": 5,
"total": 146
}
},
"system_disk (/)": {
"total": "33271 MB",
"used": "7977 MB (24.00%)",
"free": "25293 MB"
},
"journal_disk (/run/log/journal)": {
"total": "1954 MB",
"used": "225 MB (11.50%)",
"free": "1728 MB"
},
"vulnerabilities": {
"meltdown": "Mitigation: PTI",
"spectre_v1": "Mitigation: usercopy/swapgs barriers and __user pointer sanitization",
"spectre_v2": "Mitigation: Retpolines, STIBP: disabled, RSB filling, PBRSB-eIBRS: Not affected"
},
"processes": {
"orc-re": {
"pid": 177199,
"status": "sleeping",
"cpu_usage_percent": "0.0%",
"cpu_load_average": "137.63%",
"memory_usage": "14 MB (0.38%)",
"num_threads": 10
}
}
}Note that your system might have different monitored processes and field names.
The field hints is different from the rest. It lists common commands
that can be used to further monitor system performance, useful for
quickly troubleshooting a faulty system.
1.9.3 - Scraping data with Prometheus
Prometheus is a third-party data scraper which is installed as a containerized service in the default installation of ESB3024 Router. It periodically reads metrics data from different services, such as acd-router, aggregates it and makes it available to other services that visualize the data. Those services include Grafana and Alertmanager.
The Prometheus configuration file can be found on the host at
/opt/edgeware/acd/prometheus/prometheus.yaml.
Accessing Prometheus
Prometheus has a web interface that is listening for HTTP connections on port 9090. There is no authentication, so anyone who has access to the host that is running Prometheus can access the interface.
Starting / Stopping Prometheus
After the service is configured, it can be managed via systemd, under the
service unit acd-prometheus.
systemctl start acd-prometheus
Logging
The container logs are automatically published to the system journal, under
the same unit descriptor, and can be viewed using journalctl
journalctl -u acd-prometheus
1.9.4 - Visualizing data with Grafana
1.9.4.1 - Managing Grafana
Grafana displays graphs based on data from Prometheus. A default deployment of Grafana is running in a container alongside ESB3024 Router.
Grafana’s configuration and runtime files are stored under
/opt/edgeware/acd/grafana. It comes with default dashboards that are
documented at Grafana dashboards.
Accessing Grafana
Grafana’s web interface is listening for HTTP connections on port
3000. It has two default accounts, edgeware and admin.
The edgeware account can only view graphs, while the admin account can also
edit graphs. The accounts with default passwords are shown in the table below.
| Account | Default password |
|---|---|
edgeware | edgeware |
admin | edgeware |
Starting / Stopping Grafana
Grafana can be managed via systemd, under the service unit acd-grafana.
systemctl start acd-grafana
Logging
The container logs are automatically published to the system journal, under
the same unit descriptor, and can be viewed using journalctl
journalctl -u acd-grafana
1.9.4.2 - Grafana Dashboards
Grafana will be populated with pre-configured graphs which present some metrics on a time scale. Below is a comprehensive list of those dashboards, along with short descriptions.
Router Monitoring dashboard
This dashboard is by default set as home directory - it’s what user will see
after logging in.
Number Of Initial Routing Decisions
HTTP Status Codes
Total number of responses sent back to incoming requests, shown by their status codes. Metric: client-response-status
Incoming HTTP and HTTPS Requests
Total number of incoming requests that were deemed valid, divided into SSL
and Unencrypted categories.
Metric: num_valid_http_requests
Debugging Information dashboard
Number of Lua Exceptions
Number of exceptions encountered so far while evaluating Lua rules. Metric: lua_num_errors
Number of Lua Contexts
Number of active Lua interpreters, both running and idle. Metric: lua_num_evaluators
Time Spent In Lua
Number of microseconds the Lua interpreters were running. Metric: lua_time_spent
Router Latencies
Histogram-like graph showing how many responses were sent within the given latency interval. Metric: orc_latency_bucket
Internal debugging
A folder that contains dashboards intended for internal use.
ACD: Incoming Internet Connections dashboard
SSL Warnings
Rate of warnings logged during TLS connections Metric: num_ssl_warnings_total
SSL Errors
Rate of errors logged during TLS connections Metric: num_ssl_errors_total
Valid Internet HTTPS Requests
Rate of incoming requests that were deemed valid, HTTPS only. Metric: num_valid_http_requests
Invalid Internet HTTPS Requests
Rate of incoming requests that were deemed invalid, HTTPS only. Metric: num_invalid_http_requests
Valid Internet HTTP Requests
Rate of incoming requests that were deemed valid, HTTP only. Metric: num_valid_http_requests
Invalid Internet HTTP Requests
Rate of incoming requests that were deemed invalid, HTTP only. Metric: num_invalid_http_requests
Prometheus: ACD dashboard
Logged Warnings
Rate of logged warnings since the router has started, divided into CDN-related and CDN-unrelated. Metric: num_log_warnings_total
Logged Errors
Rate of logged errors since the router has started. Metric: num_log_errors_total
HTTP Requests
Rate of responses sent to incoming connections. Metric: orc_latency_count
Number Of Active Sessions
Number of sessions opened on router that are still active. Metric: num_sessions
Total Number Of Sessions
Total number of sessions opened on router. Metric: num_sessions
Session Type Counts (Non-Stacked)
Number of active sessions divided by type; see metric documentation linked below for up-to-date list of types. Metric: num_sessions
Prometheus/ACD: Subrunners
Client Connections
Number of currently open client connections per subrunner. Metric: subrunner_client_conns
Asynchronous Queues (Current)
Number of queued events per subrunner, roughly corresponding to load. Metric: subrunner_async_queue
Used <Send/receive> Data Blocks
Number of send or receive data blocks currently in use per subrunner, as decided by the “Send/receive” drop down box. Metric: subrunner_used_send_data_blocks and subrunner_used_receive_data_blocks
Asynchronous Queues (Max)
Maximum number of events waiting in queue. Metric: subrunner_max_async_queue
Total <Send/receive> Data Blocks
Number of send or receive data blocks allocated per subrunner, as decided by the “Send/receive” drop down box. Metric: subrunner_total_send_data_blocks and subrunner_total_receive_data_blocks
Low Queue (Current)
Number of low priority events queued per subrunner. Metric: subrunner_low_queue
Medium Queue (Current)
Number of medium priority events queued per subrunner. Metric: subrunner_medium_queue
High Queue (Current)
Number of high priority events queued per subrunner. Metric: subrunner_high_queue
Low Queue (Max)
Maximum number of events waiting in low priority queue. Metric: subrunner_max_low_queue
Medium Queue (Max)
Maximum number of events waiting in medium priority queue. Metric: subrunner_max_medium_queue
High Queue (Max)
Maximum number of events waiting in high priority queue. Metric: subrunner_max_high_queue
Wakeups
The number of times a subrunner has been waken up from sleep. Metric: subrunner_io_wakeups
Overloaded
The number of times the number of queued events for a subrunner exceeded its maximum. Metric: subrunner_times_worker_overloaded
Autopause
Number of sockets that have been automatically paused. This happens when the work manager is under heavy load. Metric: subrunner_io_autopause_sockets
1.9.5 - Alarms and Alerting
Alerts are generated by the third-party service Prometheus, which sends them to the Alertmanager service. A default containerized instance of Alertmanager is deployed alongside ESB3024 Router. Out of the box, Alertmanager ships with only a sample configuration file, and will require manual configuration prior to enabling the alerting functionality. Due to the many different possible configurations for how alerts are both detected and where they are pushed, the official Alertmanager documentation should be followed for how to configure the service.
The router ships with Alertmanager 0.25, the documentation
for which can be found at prometheus.io.
The Alertmanager configuration file can be found on the host at
/opt/edgeware/acd/alertmanager/alertmanager.yml.
Accessing Alertmanager
Alertmanager has a web interface that is listening for HTTP connections on port 9093. There is no authentication, so anyone who has access to the host that is running Alertmanager can access the interface.
Starting / Stopping Alertmanager
After the service is configured, it can be managed via systemd, under the
service unit acd-alertmanager.
systemctl start acd-alertmanager
Logging
The container logs are automatically published to the system journal, under
the same unit descriptor, and can be viewed using journalctl
journalctl -u acd-alertmanager
1.9.6 - Monitoring multiple routers
By default an instance of Prometheus only monitors the ESB3024 Router that is installed on the same host as where Prometheus is installed. It is possible to make it monitor other router instances and visualize all instances on one Grafana instance.
Configuring of Prometheus
This is configured in the scraping configuration of Prometheus, which is found
in the file /opt/edgeware/acd/prometheus/prometheus.yaml, which typically
looks like this:
global:
scrape_interval: 15s
rule_files:
- recording-rules.yaml
# A scrape configuration for router metrics
scrape_configs:
- job_name: 'router-scraper'
scheme: https
tls_config:
insecure_skip_verify: true
static_configs:
- targets:
- acd-router-1:5001
metrics_path: /m1/v1/metrics
honor_timestamps: true
- job_name: 'edns-proxy-scraper'
scheme: http
static_configs:
- targets:
- acd-router-1:8888
metrics_path: /metrics
honor_timestamps: true
More routers can be added to the scrape configuration by simply adding more
routers under targets in the scraper jobs.
For instance, to monitor acd-router-2 and acd-router-3 along acd-router-1,
the configuration file needs to be modified like this:
global:
scrape_interval: 15s
rule_files:
- recording-rules.yaml
# A scrape configuration for router metrics
scrape_configs:
- job_name: 'router-scraper'
scheme: https
tls_config:
insecure_skip_verify: true
static_configs:
- targets:
- acd-router-1:5001
- acd-router-2:5001
- acd-router-3:5001
metrics_path: /m1/v1/metrics
honor_timestamps: true
- job_name: 'edns-proxy-scraper'
scheme: http
static_configs:
- targets:
- acd-router-1:8888
- acd-router-2:8888
- acd-router-3:8888
metrics_path: /metrics
honor_timestamps: true
After the file has been modified, Prometheus needs to be restarted by typing
systemctl restart acd-prometheus
It is possible to use the same configuration on multiple routers, so that all routers in a deployment can monitor each other.
Selecting router in Grafana
In the top left corner the Grafana dashboards have a drop-down menu labeled “ACD Router”, which allows to choose which router to monitor.
1.9.7 - Routing Rule Evaluation Metrics
ESB3024 Router counts the number of times a node and any of its children is selected in the routing table.
The visit counters can be retrieved with the following end points:
/v1/node_visits
Returns visit counters for each node as a flat list of
host:counterpairs in JSON.Example output:
{ "node1": "1", "node2": "1", "node3": "1", "top": "3" }
/v1/node_visits_graph
Returns a full graph of nodes with their respective visit counters in GraphML.
Example output:
<?xml version="1.0"?> <graphml xmlns="http://graphml.graphdrawing.org/xmlns" xmlns:xsi="http://www.w3.org/2001/XMLSchema-instance" xsi:schemaLocation="http://graphml.graphdrawing.org/xmlns http://graphml.graphdrawing.org/xmlns/1.0/graphml.xsd"> <key id="visits" for="node" attr.name="visits" attr.type="string" /> <graph id="G" edgedefault="directed"> <node id="routing_table"> <data key="visits">5</data> </node> <node id="cdn1"> <data key="visits">1</data> </node> <node id="node1"> <data key="visits">1</data> </node> <node id="cdn2"> <data key="visits">2</data> </node> <node id="node2"> <data key="visits">2</data> </node> <node id="cdn3"> <data key="visits">2</data> </node> <node id="node3"> <data key="visits">2</data> </node> <edge id="e0" source="cdn1" target="node1" /> <edge id="e1" source="routing_table" target="cdn1" /> <edge id="e2" source="cdn2" target="node2" /> <edge id="e3" source="routing_table" target="cdn2" /> <edge id="e4" source="cdn3" target="node3" /> <edge id="e5" source="routing_table" target="cdn3" /> </graph> </graphml>To receive the graph as JSON, specify
Accept:application/jsonin the request headers.Example output:
{ "edges": [ { "source": "cdn1", "target": "node1" }, { "source": "routing_table", "target": "cdn1" }, { "source": "cdn2", "target": "node2" }, { "source": "routing_table", "target": "cdn2" }, { "source": "cdn3", "target": "node3" }, { "source": "routing_table", "target": "cdn3" } ], "nodes": [ { "id": "routing_table", "visits": "5" }, { "id": "cdn1", "visits": "1" }, { "id": "node1", "visits": "1" }, { "id": "cdn2", "visits": "2" }, { "id": "node2", "visits": "2" }, { "id": "cdn3", "visits": "2" }, { "id": "node3", "visits": "2" } ] }
Resetting Visit Counters
A node visit counter with an id not matching any node id of a newly applied
routing table is destroyed.
Reset all counters to zero by momentarily applying a configuration with a
placeholder routing root node, that has unique id and an empty members
list, e.g:
"routing": {
"id": "empty_routing_table",
"members": []
}
… and immediately reapply the desired configuration.
1.9.8 - Metrics
ESB3024 Router collects a large number of metrics that can give insight into
it’s condition at runtime. Those metrics are available in
Prometheus’ text-based exposition format
at endpoint :5001/m1/v1/metrics.
Below is the description of these metrics along with their labels.
client_response_status
Number of responses sent back to incoming requests.
- Type: counter
lua_num_errors
Number of errors encountered when evaluating Lua rules.
- Type:
counter
lua_num_evaluators
Number of Lua rules evaluators (active interpreters).
- Type: gauge
lua_time_spent
Time spent by running Lua evaluators, in microseconds.
- Type:
counter
num_configuration_changes
Number of times configuration has been changed since the router has started.
- Type:
counter
num_endpoint_requests
Number of requests redirected per CDN endpoint.
- Type:
counter - Labels:
endpoint- CDN endpoint address.selector- whether the request was counted duringinitialorinstreamselection.
num_invalid_http_requests
Number of client requests that either use wrong method or wrong URL path. Also number of all requests that cannot be parsed as HTTP.
- Type:
counter - Labels:
source- name of internal filter function that classified request as invalid. Probably not of much use outside debugging.type- whether the request was HTTP (Unencrypted) or HTTPS (SSL).
num_log_errors_total
Number of logged errors since the router has started.
- Type:
counter
num_log_warnings_total
Number of logged warnings since the router has started.
- Type:
counter
num_managed_redirects
Number of redirects to the router itself, which allows session management.
- Type:
counter
num_manifests
Number of cached manifests.
- Type:
gauge - Labels:
count- state of manifest in cache, can be eitherlru,evictedortotal.
num_qoe_losses
Number of “lost” QoE decisions per CDN.
- Type:
counter - Labels:
cdn_id- ID of CDN that loose QoE battle.cdn_name- name of CDN that loose QoE battle.selector- whether the decision was taken duringinitialorinstreamselection.
num_qoe_wins
Number of “won” QoE decisions per CDN.
- Type:
counter - Labels:
cdn_id- ID of CDN that won QoE battle.cdn_name- name of CDN that won QoE battle.selector- whether the decision was taken duringinitialorinstreamselection.
num_rejected_requests
Deprecated, should always be at 0.
- Type:
counter - Labels:
selector- whether the request was counted duringinitialorinstreamselection.
num_requests
Total number of requests received by the router.
- Type:
counter - Labels:
selector- whether the request was counted duringinitialorinstreamselection.
num_sessions
Number of sessions opened on router.
- Type:
gauge - Labels:
state- eitheractiveorinactive.type- one of:initial,instream,qoe_on,qoe_off,qoe_agentorsp_agent.
num_ssl_errors_total
Number of all errors logged during TLS connections, both incoming and outgoing.
- Type:
counter
num_ssl_warnings_total
Number of all warnings logged during TLS connections, both incoming and outgoing.
- Type:
counter - Labels:
category- which kind of TLS connection triggered the warning. Can be one of:cdn,content,generic,repeated_sessionor empty.
num_unhandled_requests
Number of requests for which no CDN could be found.
- Type:
counter - Labels:
selector- whether the request was counted duringinitialorinstreamselection.
num_unmanaged_redirects
Number of redirects to “outside” the router - usually to CDN.
- Type:
counter - Labels:
cdn_id- ID of CDN picked for redirection.cdn_name- name of CDN picked for redirection.selector- whether the redirect was result ofinitialorinstreamselection.
num_valid_http_requests
Number of received requests that were not deemed invalid, see
num_invalid_http_requests.
- Type:
counter - Labels:
source- name of internal filter function that classified request as invalid. Probably not of much use outside debugging.type- whether the request was HTTP (Unencrypted) or HTTPS (SSL).
orc_latency_bucket
Total number of responses sorted into “latency buckets” - labels denoting latency interval.
- Type:
counter - Labels:
le- latency bucket that given response falls into.orc_status_code- HTTP status code of given response.
orc_latency_count
Total number of responses.
- Type:
counter - Labels:
tls- whether the response was sent via SSL/TLS connection or not.orc_status_code- HTTP status code of given response.
ssl_certificate_days_remaining
Number of days until a SSL certificate expires.
- Type:
gauge - Labels:
domain- the common name of the domain that the certificate authenticates.not_valid_after- the expiry time of the certificate.not_valid_before- when the certificate starts being valid.usable- if the certificate is usable to the router, see the ssl_certificate_usable_count metric for an explanation.
ssl_certificate_usable_count
Number of usable SSL certificates. A certificate is usable if it is valid and authenticates a domain name that points to the router.
- Type:
gauge
1.9.8.1 - Internal Metrics
A subrunner is an internal module of ESB3024 Router which handles routing requests. The subrunner metrics are technical and mainly of interest for Agile Content. These metrics will be briefly described here.
subrunner_async_queue
Number of queued events per subrunner, roughly corresponding to load.
- Type:
gauge - Labels:
subrunner_id- ID of given subrunner.
subrunner_client_conns
Number of currently open client connections per subrunner.
- Type:
gauge - Labels:
subrunner_id- ID of given subrunner.
subrunner_high_queue
Number of high priority events queued per subrunner.
- Type:
gauge - Labels:
subrunner_id- ID of given subrunner.
subrunner_io_autopause_sockets
Number of sockets that have been automatically paused. This happens when the work manager is under heavy load.
- Type:
counter - Labels:
subrunner_id- ID of given subrunner.
subrunner_io_send_data_fast_attempts
A fast data path was added that in many cases increases the performance of the router. This metric was added to verify that the fast data path is taken.
- Type:
counter - Labels:
subrunner_id- ID of given subrunner.
subrunner_io_wakeups
The number of times a subrunner has been waken up from sleep.
- Type:
counter - Labels:
subrunner_id- ID of given subrunner.
subrunner_low_queue
Number of low priority events queued per subrunner.
- Type:
gauge - Labels:
subrunner_id- ID of given subrunner.
subrunner_max_async_queue
Maximum number of events waiting in queue.
- Type:
gauge - Labels:
subrunner_id- ID of given subrunner.
subrunner_max_high_queue
Maximum number of events waiting in high priority queue.
- Type:
gauge - Labels:
subrunner_id- ID of given subrunner.
subrunner_max_low_queue
Maximum number of events waiting in low priority queue.
- Type:
gauge - Labels:
subrunner_id- ID of given subrunner.
subrunner_max_medium_queue
Maximum number of events waiting in medium priority queue.
- Type:
gauge - Labels:
subrunner_id- ID of given subrunner.
subrunner_medium_queue
Number of medium priority events queued per subrunner.
- Type:
gauge - Labels:
subrunner_id- ID of given subrunner.
subrunner_times_worker_overloaded
Number of times when queued events for given subrunner exceeded
the tuning.overload_threshold value (defaults to 32).
- Type:
counter - Labels:
subrunner_id- ID of given subrunner.
subrunner_total_receive_data_blocks
Number of receive data blocks allocated per subrunner.
- Type:
gauge - Labels:
subrunner_id- ID of given subrunner.
subrunner_total_send_data_blocks
Number of send data blocks allocated per subrunner.
- Type:
gauge - Labels:
subrunner_id- ID of given subrunner.
subrunner_used_receive_data_blocks
Number of receive data blocks currently in use per subrunner. Same as subrunner_total_receive_data_blocks.
- Type:
gauge - Labels:
subrunner_id- ID of given subrunner.
subrunner_used_send_data_blocks
Number of send data blocks currently in use per subrunner. Same as subrunner_total_send_data_blocks.
- Type:
gauge - Labels:
subrunner_id- ID of given subrunner.
1.10 - Glossary
- ACD
- Agile CDN Director. See “Director”.
- Confd
- A backend service that hosts the service configuration. Comes with an API, a CLI and a GUI.
- Classifier
- A filter that associate a request with a tag that can be used to define session groups.
- Director
- The Agile Delivery OTT router and related services.
- ESB
- A software bundle that can be separately installed and upgraded, and is released as one entity with one change log. Each ESB is identified with a number. Over time, features and functions within an ESB can change.
- Lua
- A widely available scripting language that is often used to extend the capabilities of a piece of software.
- Router
- Unless otherwise specified, an HTTP router that manages an OTT session using HTTP redirect. There are also ways to use DNS instead of HTTP.
- Selection Input API
- Data posted to this API can be accessed by the routing rules and hence influence the routing decisions.
- Subnet API
- An API to define mappings between subnets and names (typically regions) for those subnets. Routing rules can then refer to the names rather than the subnets.
- Session Group
- A handle on a group of requests, defined via classifiers.
2 - ESB3024 Router
2.1 - Release Notes for esb3024-1.18.0
Build date
2025-02-13
Release status
Type: production
Compatibility
This release is compatible with the following product versions:
- Orbit, ESB2001-3.6.2 (see Known limitations below)
- SW-Streamer, ESB3004-1.36.2
- Convoy, ESB3006-3.4.0
- Request Router, ESB3008-3.2.1
Breaking changes from previous release
- Configurations with an invalid entrypoint will be rejected.
Change log
- NEW: Support configuration feedback. concli provides very basic feedback [ESB3024-1165]
- NEW: Send HTTP requests from Lua code [ESB3024-1172]
- NEW: Add
acd-metrics-aggregatorservice [ESB3024-1221] - NEW: Add
acd-telegraf-metrics-databaseservice [ESB3024-1224] - NEW: Make all Lua functions snake_case.
timeToEpochandepochToTimehave been deprecated. [ESB3024-1246] - FIXED: Content popularity parameters can’t be configured [ESB3024-1187]
- FIXED:
acd-edns-proxyreturns CNAME records in brackets. Hostnames were erroneously interpreted as IPv6 addresses. [ESB3024-1276]
Deprecations from previous release
- Lua function
epochToTimehas been deprecated in favor ofepoch_to_time. - Lua function
timeToEpochhas been deprecated in favor oftime_to_epoch. - The session proxy has been deprecated. Its functionality is replaced by the new “Send HTTP requests from Lua code” function.
System requirements
- The ACD Router requires a minimum CPU architecture level of x86-64-v2 due to inclusion of Oracle Linux 9 inside the container. While all modern CPUs support this archetecture level, virtual hypervisors may default to a CPU type that has more compatibility with older processors. If this minimum CPU architecture level is not attained the containers may refuse to start. See Operating System Compatibility and Building Red Hat Enterprise Linux 9 for the x86-64-v2 Microarchitecture Level for more information.
Known limitations
GUI version 3.0.2 or earlier will not work with this release.
When configured to use TLS,
acd-telegraf-metrics-databasemight log the following error message:http: TLS handshake error from <client ip>: client sent an HTTP request to an HTTPS serverwhen receiving metrics from caches even though the Telegraf agents are configured to use TLS. The Telegraf logs on the caches do not show any errors related to this. However, the data is still received over TLS and stored correctly byacd-telegraf-metrics-database. The issue seemingly resolved itself during investigation and is not reproducible. Current hypothesis is a logging bug in Telegraf.The Telegraf metrics agent might not be able to read all relevant network interface data on ESB2001 releases older than 3.6.2. The predictive load balancing function
host_has_bw()and the health check functioninterfaces_online()might therefore not work as expected.- The recommended workaround for
host_has_bw()is to usehost_has_bw_custom(), documented in Built-in Lua functions.host_has_bw_custom()accepts a numeric argument for the host’s network interface capacity which can be used if the data supplied by the Telegraf metrics agents do not contain this information. - It is not recommended to use
interfaces_online()for ESB2001 instances until they are updated to 3.6.2 or later.
- The recommended workaround for
2.2 - Getting Started
The Director serves as a versatile network service designed to redirect incoming HTTP(s) requests to the optimal host or Content Delivery Network (CDN) by evaluating various request properties through a set of rules. Although requests can be generic, the primary focus centers around audio-video content delivery. The rule engine allows users to construct routing configurations using predefined blocks, providing for the creation of intricate routing logic. This modular approach allows the users to tailor and streamline the content delivery process to meet their specific needs. The Director’s flexible rule engine takes into account factors such as geographical location, server load, content type, and other metadata from external sources to intelligently route incoming requests. It supports dynamic adjustments to seamlessly adapt to changing network conditions, ensuring efficient and reliable content delivery. The Director improves the overall user experience by delivering content from the most suitable and responsive sources, thereby reducing latency and enhancing performance.
Requirements
Hardware
The Director is designed to be installed and operated on commodity hardware, ensuring accessibility for a broad range of users. The minimum hardware specifications are as follows:
- CPU: x86-64 AMD or Intel with at least 2 cores.
- Memory: At least 2 GB free at runtime.
Operating System Compatibility
The Director is officially supported on Red Hat Enterprise Linux 8 or 9 or any
compatible operating system. In order to run the service, a minimum CPU
architecture of x86-64-v2 is required. This can be determined by running the
following command. If supported, it will be listed as “(supported)” in the
output.
/usr/lib64/ld-linux-x86-64.so.2 --help | grep x86-64-v2
External Internet access is necessary during the installation process for the installer to download and install additional dependencies. This ensures a seamless setup and optimal functionality of the Director on Red Hat Enterprise Linux 8 or 9. It’s worth noting that, due to the unique workings of the DNF package manager in Red Hat Enterprise Linux with rolling package streams, an air-gapped installation process is not available.
Firewall Recommendations
See Firewall.
Installation
See Installation.
Operations
See Operations.
Configuration Process
Once the router is operational, it requires a valid configuration before it can route incoming requests.
There are currently three methods available for configuring the router, each catering to different levels of complexity. The first is a Web UI, suitable for the most common use-cases, providing an intuitive interface for configuration. The second involves utilizing a confd REST service, complemented by an optional command line tool, confcli, suitable for all but the most advanced scenarios. The third method involves leveraging an internal REST API, ideal for the most intricate cases where using confd proves to be less flexible. It’s essential to note that as the configuration method advances through these levels, both flexibility and complexity increase, providing users with tailored options based on their specific needs and expertise.
API Key Management
Regardless of the method used to configure the system, a unique API key is
crucial for safeguarding the router’s configuration and preventing unauthorized
access to the API. This key must be supplied when interacting with the API.
During the router software installation, an automatically generated API key is
created and can be located on the installed system at
/opt/edgeware/acd/router/cache/rest-api-key.json. The structure of this file
is as follows:
{"api_key": "abc123"}
When accessing the internal configuration API, the key must be included in the
X-API-key header of the request, as shown below:
curl -v -k -H "X-API-Key: abc123" https://<router-host.example>:5001/v2/configuration
Modification to the authentication key and behavior can be done through the
/v2/rest_api_key endpoint. To change the key, a PUT request with a JSON body
of the same structure can be sent to the endpoint:
curl -v -k -X PUT -T new-key.json -H "X-API-Key: abc123" \
-H "Content-Type: application/json" https://<router-host.example>:5001/v2/rest_api_key
Additionally, key authentication can be disabled completely by sending a DELETE
request to the endpoint:
curl -v -k -X DELETE -H "X-API-Key: abc123" \
https://<router-host.example>:5001/v2/rest_api_key
In the event of a lost or forgotten authentication key, it can always be
retrieved at /opt/edgeware/acd/router/cache/rest-api-key.json on the
machine running the router. It is critical to emphasize that the API key should
remain private to prevent unauthorized access to the internal API, as it grants
full access to the router’s configuration.
Configuration Basics
Upon completing the installation process and configuring the API keys, the subsequent section will provide guidance on configuring the router to route all incoming requests to a single host. For straightforward CDN Offload use cases, there is a web based user interface described here.
For further details on configuring the router using confd and confcli, please consult the Confd documentation.
The initial step involves defining the target host group. In this illustration,
a singular group named all will be established, comprising two hosts.
$ confcli services.routing.hostGroups -w
Running wizard for resource 'hostGroups'
Hint: Hitting return will set a value to its default.
Enter '?' to receive the help string
hostGroups : [
hostGroup can be one of
1: dns
2: host
3: redirecting
Choose element index or name: host
Adding a 'host' element
hostGroup : {
name (default: ): all
type (default: host):
httpPort (default: 80):
httpsPort (default: 443):
hosts : [
host : {
name (default: ): host1.example.com
hostname (default: ): host1.example.com
ipv6_address (default: ):
}
Add another 'host' element to array 'hosts'? [y/N]: y
host : {
name (default: ): host2.example.com
hostname (default: ): host2.example.com
ipv6_address (default: ):
}
Add another 'host' element to array 'hosts'? [y/N]: n
]
}
Add another 'hostGroup' element to array 'hostGroups'? [y/N]: n
]
Generated config:
{
"hostGroups": [
{
"name": "all",
"type": "host",
"httpPort": 80,
"httpsPort": 443,
"hosts": [
{
"name": "host1.example.com",
"hostname": "host1.example.com",
"ipv6_address": ""
},
{
"name": "host2.example.com",
"hostname": "host2.example.com",
"ipv6_address": ""
}
]
}
]
}
Merge and apply the config? [y/n]:
After defining the host group, the next step is to establish a rule that directs
incoming requests to the designated host. In this example, a sole rule named
random will be generated, ensuring that all incoming requests are consistently
routed to the previously defined host.
$ confcli services.routing.rules -w
Running wizard for resource 'rules'
Hint: Hitting return will set a value to its default.
Enter '?' to receive the help string
rules : [
rule can be one of
1: allow
2: consistentHashing
3: contentPopularity
4: deny
5: firstMatch
6: random
7: rawGroup
8: rawHost
9: split
10: weighted
Choose element index or name: random
Adding a 'random' element
rule : {
name (default: ): random
type (default: random):
targets : [
target (default: ): host1.example.com
Add another 'target' element to array 'targets'? [y/N]: y
target (default: ): host2.example.com
Add another 'target' element to array 'targets'? [y/N]: n
]
}
Add another 'rule' element to array 'rules'? [y/N]: n
]
Generated config:
{
"rules": [
{
"name": "random",
"type": "random",
"targets": [
"host1.example.com",
"host2.example.com"
]
}
]
}
Merge and apply the config? [y/n]:
The last essential step involves instructing the router on which rule should
serve as the entry point into the routing tree. In this example, we designate
the rule random as the entrypoint for the routing process.
$ confcli services.routing.entrypoint random
services.routing.entrypoint = 'random'
Once this configuration is defined, all incoming requests will initiate their
traversal through the routing rules, starting with the rule named random. This
rule is designed to consistently match for every incoming request, effectively load
balancing evenly between host1.example.com and host2.example.com on port 80
or 443, depending on whether the initial request was made using HTTP or HTTPS.
Integration with Convoy
The router is equipped with the capability to synchronize specific configuration metadata with a separate Convoy installation through the integrated convoy-bridge service. However, this service necessitates additional setup and configuration, and you can find comprehensive details on the process here..
Additional Resources
Additional documentation resources are included with the Director and can be
accessed at the following directory: /opt/edgeware/acd/documentation/. This
directory contains supplementary materials to provide users with comprehensive
information and guidance for optimizing their experience with the Director.
Ready for Production
Once the Director software is completely installed and configured, there are a few additional considerations before moving to a full production environment. See the section Ready for Production for additional information.
2.3 - Installing a 1.18 release
To install ESB3024 Router, one first needs to copy the installation ISO image
to the target node where the router will be run. Due to the way the
installer operates, it is necessary that the host is reachable by
password-less SSH from itself for the user account that will perform the
installation, and that this user has sudo access.
Prerequisites:
Ensure that the current user has
sudoaccess.sudo -lIf the above command fails, you may need to add the user to the
/etc/sudoersfile.Ensure that the installer has password-less SSH access to
localhost.If using the
rootuser, thePermitRootLoginproperty of the/etc/ssh/sshd_configfile must be set to ‘yes’.The local host key must also be included in the
.ssh/authorized_keysfile of the user running the installer. That can be done by issuing the following as the intended user:mkdir -m 0700 -p ~/.ssh ssh-keyscan localhost >> ~/.ssh/authorized_keysNote! The
ssh-keyscanutility will result in the key fingerprint being output on the console. As a security best-practice it is recommended to verify that this host-key matches the machine’s true SSH host key. As an alternative, to thisssh-keyscanapproach, establishing an SSH connection to localhost and accepting the host key will have the same result.Disable SELinux.
The Security-Enhanced Linux Project (SELinux) is designed to add an additional layer of security to the operating system by enforcing a set of rules on processes. Unfortunately out of the box the default configuration is not compatible with the way the installer operates. Before proceeding with the installation, it is recommended to disable SELinux. It can be re-enabled after the installation completes, if desired, but will require manual configuration. Refer to the Red Hat Customer Portal for details.
To check if SELinux is enabled:
getenforceThis will result in one of 3 states, “Enforcing”, “Permissive” or “Disabled”. If the state is “Enforcing” use the following to disable SELinux. Either “Permissive” or “Disabled” is required to continue.
setenforce 0This disables SELinux, but does not make the change persistent across reboots. To do that, edit the
/etc/selinux/configfile and set theSELINUXproperty todisabled.It is recommended to reboot the computer after changing SELinux modes, but the changes should take effect immediately.
Assuming the installation ISO image is in the current working directory,
the following steps need to be executed either by root user or with sudo.
Mount the installation ISO image under
/mnt/acd.Note: The mount-point may be any accessible path, but
/mnt/acdwill be used throughout this document.mkdir -p /mnt/acd mount esb3024-acd-router-1.18.0.iso /mnt/acdRun the installer script.
/mnt/acd/installer
Upgrading From an Earlier ESB3024 Router Release
The following steps can be taken to upgrade the router from a 1.10 or later release to 1.18.0. If upgrading from an earlier release it is recommended to first upgrade to 1.10.1 and then to upgrade to 1.18.0.
The upgrade procedure for the router is performed by taking a backup of the configuration, installing the new release of the router, and applying the saved configuration.
With the router running, save a backup of the configuration.
The exact procedure to accomplish this depends on the current method of configuration, e.g. if
confdis used, then the configuration should be extracted fromconfd, but if the REST API is used directly, then the configuration must be saved by fetching the current configuration snapshot using the REST API.Extracting the configuration using
confdis the recommend approach where available.confcli | tee config_backup.jsonTo extract the configuration from the REST API, the following may be used instead. Depending on the version of the router used, an API-Key may be required to fetch from the REST API.
curl --insecure https://localhost:5001/v2/configuration \ | tee config_backup.jsonIf the API Key is required, it can be found in the file
/opt/edgeware/acd/router/cache/rest-api-key.jsonand can be passed to the API by setting the value of theX-API-Keyheader.curl --insecure -H "X-API-Key: 1234abcd" \ https://localhost:5001/v2/configuration \ | tee config_backup.jsonMount the new installation ISO under
/mnt/acd.Note: The mount-point may be any accessible path, but
/mnt/acdwill be used throughout this document.mkdir -p /mnt/acd mount esb3024-acd-router-1.18.0.iso /mnt/acdStop the router and all associated services.
Before upgrading the router it needs to be stopped, which can be done by typing this:
systemctl stop 'acd-*'Run the installer script.
/mnt/acd/installerPlease note that the installer will install new container images, but it will not remove the old ones. The old images can be removed manually after the upgrade is complete.
Migrate the configuration.
Note that this step only applies if the router is configured using
confd. If it is configured using the REST API, this step is not necessary.The confd configuration used in the previous versions is not directly compatible with 1.18, and may need to be converted. If this is not done, the configuration will not be valid and it will not be possible to make configuration changes.
The
acd-confd-migrationtool will automatically apply any necessary schema migrations. Further details about this tool can be found at Confd Auto Upgrade Tool.The tool takes as input the old configuration file, either by reading the file directly, or by reading from standard input, applies any necessary migrations between the two specified versions, and outputs a new configuration to standard output which is suitable for being applied to the upgraded system. While the tool has the ability to migrate between multiple versions at a time, the earliest supported version is 1.10.1.
The example below shows how to upgrade from 1.10.2. If upgrading from 1.14.0,
--from 1.10.2should be replaced with--from 1.14.0.The command line required to run the tool is different depending on which esb3024 release it is run on. On 1.18.0 it is run like this:
cat config_backup.json | \ podman run -i --rm \ images.edgeware.tv/acd-confd-migration:1.18.0 \ --in - --from 1.10.2 --to 1.18.0 \ | tee config_upgraded.jsonAfter running the above command, apply the new configuration to
confdby runningcat config_upgraded.json | confcli -i.
Troubleshooting
If there is a problem running the installer, additional debug information can
be output by adding -v or -vv or -vvv to the installer command, the
more “v” characters, the more detailed output.
2.3.1 - Configuration changes between 1.16 and 1.18
Confd Configuration Changes
Below are the changes to the confd configuration between versions 1.16 and 1.18 listed.
Added Content Popularity Settings
The services.routing.settings.contentPopularity section has got the following
new settings.
popularityListMaxSizescoreBasedtimeBased
The new settings are described in the content popularity section.
2.4 - Firewall
For security reasons, the ESB3024 Installer does not automatically configure the local firewall to allow incoming traffic. It is the responsibility of the operations person to ensure that the system is protected from external access by placing it behind a suitable firewall solution. The following table describes the set of ports required for operation of the router.
| Application | Port | Protocol | Direction | Source | Description |
|---|---|---|---|---|---|
| Prometheus Alert Manager | 9093 | TCP | IN | internal | Monitoring Services |
| Confd | 5000 | TCP | IN | internal | Configuration Services |
| Router | 80 | TCP | IN | public | Incoming HTTP Requests |
| Router | 443 | TCP | IN | public | Incoming HTTPS Requests |
| Router | 5001 | TCP | IN | localhost | Access to router’s REST API |
| Router | 8000 | TCP | IN | localhost | Internal monitoring port |
| EDNS-Proxy | 8888 | TCP | IN | localhost | Proxy EDNS Requests |
| Grafana | 3000 | TCP | IN | internal | Monitoring Services |
| Grafana-Loki | 3100 | TCP | IN | internal | Log monitoring daemon |
| Prometheus | 9090 | TCP | IN | internal | Monitoring Service |
The “Direction” column represents the direction in which the connection is established.
IN- The connection is originated from an outside serverOUT- The connection is established from the host to an external server.
Once a connection is established through the firewall, bidirectional traffic must be allowed using the established connection.
For the “Source” column, the following terms are used.
internal- Any host or network which is allowed to monitor or operate the system.public- Any host or subnet that can access the router. This includes any customer network that will be making routing requests.localhost- Access can be limited to local connections only.any- All traffic from any source or to any destination.
Additional Ports
Convoy Bridge Integration
The optional convoy-bridge service needs the ability to access the Convoy MariaDB service, which by default runs on port 3306 on all of the Convoy Management servers. To allow this integration to run, port 3306/tcp must be allowed from the router to the configured Convoy Management node.
2.5 - API Overview
ESB3024 Router provides two different types of API:s:
- A content request API that is used by video clients to ask for content, normally using port 80 for HTTP and port 443 for HTTPS.
- A few REST API:s used by administrators to configure and monitor the router installation, using port 5001 over HTTPS by default.
The content API won’t be described further in this document, since it’s a simple HTTP interface serving content as regular files or redirect responses.
Raw configuration – /v2/configuration
Used to check and update the raw configuration of ESB3024 Router. Note that this API is considered an implementation detail and is not documented further.
| REQUEST Method | Content-Type | RESPONSE Result | Status Code | Content-Type |
|---|---|---|---|---|
GET | <N/A> | Success | 200 OK | application/json |
PUT | application/json | Success | 204 No Content | <N/A> |
PUT | application/json | Failure | 400 Bad Request | application/json1 |
Validate Configuration – /v2/validate_configuration
Used to determine if a JSON payload is correctly formatted without actually applying its configuration. A successful return status does not guarantee that the applied configuration will work, it only validates the JSON structure.
| REQUEST Method | Content-Type | RESPONSE Result | Status Code | Content-Type |
|---|---|---|---|---|
PUT | application/json | Success | 204 No Content | <N/A> |
PUT | application/json | Failure | 400 Bad Request | application/json1 |
Example request
When an expected field is missing from the payload, the validation will show which one and return an appropriate error message in its payload:
$ curl -i -X PUT \
-d '{"routing": {"log_level": 3}}' \
-H "Content-Type: application/json" \
https://router.example:5001/v2/validate_configuration
HTTP/1.1 400 Bad Request
Access-Control-Allow-Origin: *
Content-Length: 132
Content-Type: application/json
X-Service-Identity: router.example-5fc78d
"Configuration validation: Configuration parsing failed. \
Exception: [json.exception.out_of_range.403] (/routing) key 'id' not found"
Selection Input – /v1/selection_input
Selection input API can be used to inject external key:value data into the
routing engine, making the data available when making routing decisions. An
arbitrary JSON structure can be pushed to the endpoint. When performing GET or
DELETE requests, specific selection input values can be accessed or deleted by
including a path to the request. Note that not specifying a path will select all
selection input values.
One use case for selection input is to provide data on cache availability. E.g.
If you send {"edge-streamer-2-online": true} to the selection input API,
you can create a routing condition eq('edge-streamer-online', true) to
ensure that no traffic gets routed to the streamer if it’s offline. Note that
sending the same key:value data to the selection input API will overwrite the
previous value.
There is a configurable limit to how many key:value items that can be injected into the router, see the tuning parameter
$ confcli services.routing.tuning.general.selectionInputItemLimit
{
"selectionInputItemLimit": 10000
}
| REQUEST Method | Content-Type | RESPONSE Result | Status Code | Content-Type |
|---|---|---|---|---|
PUT | application/json | Success | 204 No Content | <N/A> |
PUT | application/json | Failure | 400 Bad Request | application/json |
GET | <N/A> | Success | 200 OK | application/json |
DELETE | <N/A> | Success | 204 No Content | <N/A> |
DELETE | <N/A> | Failure | 404 Not Found | <N/A> |
Example successful request (PUT)
$ curl -i -X PUT \
-d '{"host1_bitrate": 13000, "host1_capacity": 50000}' \
-H "Content-Type: application/json" \
https://router.example:5001/v1/selection_input
HTTP/1.1 204 No Content
Access-Control-Allow-Origin: *
Content-Length: 0
X-Service-Identity: router.example-5fc78d
Example unsuccessful request (PUT)
$ curl -i -X PUT \
-d '{"cdn-status": {"session-count": 12345, "load-percent" 98}}' \
-H "Content-Type: application/json" \
https://router.example:5001/v1/selection_input
HTTP/1.1 400 Bad Request
Access-Control-Allow-Origin: *
Content-Length: 169
Content-Type: application/json
X-Service-Identity: router.example-5fc78d
{
"error": "[json.exception.parse_error.101] parse error at line 1, column 57: \
syntax error while parsing object separator - \
unexpected number literal; expected ':'"
}
Example successful request (GET)
curl -i https://router.example:5001/v1/selection_input
HTTP/1.1 200 OK
Access-Control-Allow-Origin: *
Content-Length: 129
Content-Type: application/json
X-Service-Identity: router.example-5fc78d
{
"host1_bitrate": 13000,
"host1_capacity": 50000
}
Example successful specific value request (GET)
curl -i https://router.example:5001/v1/selection_input/path/to/value
HTTP/1.1 200 OK
Access-Control-Allow-Origin: *
Content-Length: 129
Content-Type: application/json
X-Service-Identity: router.example-5fc78d
1
Example successful request (DELETE)
curl -i -X DELETE https://router.example:5001/v1/selection_input
HTTP/1.1 204 OK
Access-Control-Allow-Origin: *
Content-Length: 129
X-Service-Identity: router.example-5fc78d
Example successful specific value request (DELETE)
curl -i -X DELETE https://router.example:5001/v1/selection_input/value/to/delete
HTTP/1.1 204 OK
Access-Control-Allow-Origin: *
Content-Length: 129
X-Service-Identity: router.example-5fc78d
Example unsuccessful request (DELETE)
curl -i -X DELETE https://router.example:5001/v1/selection_input/non/existent/value
HTTP/1.1 404 Not Found
Access-Control-Allow-Origin: *
Content-Length: 129
X-Service-Identity: router.example-5fc78d
Subnets – /v1/subnets
An API for managing named subnets that can be used for routing and block lists. See Subnets for more details.
PUT requests inject key value pairs with the form {<subnet>: <value>}, where
<subnet> is a valid CIDR string, into ACD, e.g.:
$ curl -i -X PUT \
-d '{"255.255.255.255/24": "area1", "1.2.3.4/24": "area2"}' \
-H "Content-Type: application/json" \
https://router.example:5001/v1/subnets
HTTP/1.1 204 No Content
Access-Control-Allow-Origin: *
Content-Length: 0
X-Service-Identity: router.example-5fc78d
GET requests are used to fetch injected subnets, e.g.:
# Fetch all injected subnets
$ curl -i https://router.example:5001/v1/subnets
HTTP/1.1 200 OK
Access-Control-Allow-Origin: *
Content-Length: 411
Content-Type: application/json
X-Service-Identity: router.example-5fc78d
{
"1.2.3.4/16": "area2",
"1.2.3.4/24": "area1",
"1.2.3.4/8": "area3",
"255.255.255.255/16": "area2",
"255.255.255.255/24": "area1",
"255.255.255.255/8": "area3",
"2a02:2e02:9bc0::/16": "area8",
"2a02:2e02:9bc0::/32": "area7",
"2a02:2e02:9bc0::/48": "area6",
"2a02:2e02:9de0::/44": "combined_area",
"2a02:2e02:ada0::/44": "combined_area",
"5.5.0.4/8": "area5",
"90.90.1.3/16": "area4"
}
DELETE requests are used to delete injected subnets, e.g.:
# Delete all injected subnets
$ curl -i https://router.example:5001/v1/subnets -X DELETE
HTTP/1.1 204 No Content
Access-Control-Allow-Origin: *
Content-Length: 0
X-Service-Identity: router.example-5fc78d
Both GET and DELETE requests can be specified with the paths /byKey/ and
/byValue/ to filter which subnets to GET or DELETE.
# Fetch subnet with the CIDR string 1.2.3.4/8 if it exists
$ curl -i https://router.example:5001/v1/subnets/byKey/1.2.3.4/8
HTTP/1.1 200 OK
Access-Control-Allow-Origin: *
Content-Length: 26
Content-Type: application/json
X-Service-Identity: router.example-5fc78d
{
"1.2.3.4/8": "area3"
}
# Fetch all subnets whose CIDR string begins with the IP 1.2.3.4
$ curl -i https://router.example:5001/v1/subnets/byKey/1.2.3.4
HTTP/1.1 200 OK
Access-Control-Allow-Origin: *
Content-Length: 76
Content-Type: application/json
X-Service-Identity: router.example-5fc78d
{
"1.2.3.4/16": "area2",
"1.2.3.4/24": "area1",
"1.2.3.4/8": "area3"
}
# Fetch all subnets whose value equals 'area1'
$ curl -i https://router.example:5001/v1/subnets/byValue/area1
HTTP/1.1 200 OK
Access-Control-Allow-Origin: *
Content-Length: 60
Content-Type: application/json
X-Service-Identity: router.example-5fc78d
{
"1.2.3.4/24": "area1",
"255.255.255.255/24": "area1"
}
# Delete subnet with the CIDR string 1.2.3.4/8 if it exists
$ curl -i https://router.example:5001/v1/subnets/byKey/1.2.3.4/8
HTTP/1.1 204 No Content
Access-Control-Allow-Origin: *
Content-Length: 0
X-Service-Identity: router.example-5fc78d
# Delete all subnets whose CIDR string begins with the IP 1.2.3.4
$ curl -i https://router.example:5001/v1/subnets/byKey/1.2.3.4
HTTP/1.1 204 No Content
Access-Control-Allow-Origin: *
Content-Length: 0
X-Service-Identity: router.example-5fc78d
# Delete all subnets whose value equals 'area1'
$ curl -i https://router.example:5001/v1/subnets/byValue/area1
HTTP/1.1 204 No Content
Access-Control-Allow-Origin: *
Content-Length: 0
X-Service-Identity: router.example-5fc78d
| REQUEST Method | Content-Type | RESPONSE Result | Status Code | Content-Type |
|---|---|---|---|---|
PUT | application/json | Success | 204 No Content | <N/A> |
PUT | application/json | Failure | 400 Bad Request | application/json |
GET | <N/A> | Success | 200 OK | application/json |
GET | <N/A> | Failure | 400 Bad Request | application/json |
DELETE | <N/A> | Success | 204 No Content | application/json |
DELETE | <N/A> | Failure | 400 Bad Request | application/json |
Subrunner Resource Usage – /v1/usage
Used to monitor the load on subrunners, the processes performing those tasks that are possible to run in parallel.
| REQUEST Method | Content-Type | RESPONSE Result | Status Code | Content-Type |
|---|---|---|---|---|
GET | <N/A> | Success | 200 OK | application/json |
Example request
$ curl -i https://router.example:5001/v1/usage
HTTP/1.1 200 OK
Access-Control-Allow-Origin: *
Content-Length: 1234
Content-Type: application/json
X-Service-Identity: router.example-5fc78d
{
"total_usage": {
"content": {
"lru": 0,
"newest": "-",
"oldest": "-",
"total": 0
},
"sessions": 0,
"subrunner_usage": {
[...]
}
},
"usage_per_subrunner": [
{
"subrunner_usage": {
[...]
}
},
[...]
]
}
Metrics – /m1/v1/metrics
An interface intended to be scraped by Prometheus. It is possible to scrape it manually to see current values, but doing so will reset some counters and cause actual Prometheus data to become faulty.
| REQUEST Method | Content-Type | RESPONSE Result | Status Code | Content-Type |
|---|---|---|---|---|
GET | <N/A> | Success | 200 OK | text/plain |
Example request
$ curl -i https://router.example:5001/m1/v1/metrics
HTTP/1.1 200 OK
Access-Control-Allow-Origin: *
Content-Length: 1234
Content-Type: text/plain
X-Service-Identity: router.example-5fc78d
# TYPE num_configuration_changes counter
num_configuration_changes 12
# TYPE num_log_errors_total counter
num_log_errors_total 0
# TYPE num_log_warnings_total counter
num_log_warnings_total{category=""} 123
# TYPE num_log_warnings_total counter
num_log_warnings_total{category="cdn"} 0
# TYPE num_log_warnings_total counter
num_log_warnings_total{category="content"} 0
# TYPE num_log_warnings_total counter
num_log_warnings_total{category="generic"} 10
# TYPE num_log_warnings_total counter
num_log_warnings_total{category="repeated_session"} 0
# TYPE num_ssl_errors_total counter
[...]
Node Visit Counters – /v1/node_visits
Used to gather statistics about the number of visits to each node in the routing tree. The returned value is a JSON object containing node ID names and their corresponding counter values.
| REQUEST Method | Content-Type | RESPONSE Result | Status Code | Content-Type |
|---|---|---|---|---|
GET | <N/A> | Success | 200 OK | application/json |
See Routing Rule Evaluation Metrics for more details.
Example request
$ curl -i https://router.example:5001/v1/node_visits
HTTP/1.1 200 OK
Access-Control-Allow-Origin: *
Content-Length: 73
Content-Type: application/json
X-Service-Identity: router.example-5fc78d
{
"cache1.tv": "99900",
"offload": "100"
"routingtable": "100000"
}
Node Visit Graph – /v1/node_visits_graph
Creates a GraphML representation of the node visitation data that can be rendered into an image to make it easier to understand the data.
| REQUEST Method | Content-Type | RESPONSE Result | Status Code | Content-Type |
|---|---|---|---|---|
GET | <N/A> | Success | 200 OK | application/xml |
See Routing Rule Evaluation Metrics for more details.
Example request
> curl -i -k https://router.example:5001/v1/node_visits_graph
HTTP/1.1 200 OK
Access-Control-Allow-Origin: *
Content-Length: 731
Content-Type: application/xml
X-Service-Identity: router.example-5fc78d
<?xml version="1.0"?>
<graphml xmlns="http://graphml.graphdrawing.org/xmlns"
xmlns:xsi="http://www.w3.org/2001/XMLSchema-instance"
xsi:schemaLocation="http://graphml.graphdrawing.org/xmlns http://graphml.graphdrawing.org/xmlns/1.0/graphml.xsd">
<key id="visits" for="node" attr.name="visits" attr.type="string" />
<graph id="G" edgedefault="directed">
<node id="routingtable">
<data key="visits">100000</data>
</node>
<node id="cache1.tv">
<data key="visits">99900</data>
</node>
<node id="offload">
<data key="visits">100</data>
</node>
<edge id="e0" source="routingtable" target="cache1.tv" />
<edge id="e1" source="routingtable" target="offload" />
</graph>
</graphml>
Session list - /v1/sessions
Used to monitor the load on subrunners, the processes performing those tasks that are possible to run in parallel.
| REQUEST Method | Content-Type | RESPONSE Result | Status Code | Content-Type |
|---|---|---|---|---|
GET | <N/A> | Success | 200 OK | application/json |
Example request
$ curl -k -i https://router.example:5001/v1/sessions
HTTP/1.1 200 OK
Access-Control-Allow-Origin: *
Content-Length: 12345
Content-Type: application/json
X-Service-Identity: router.example-5fc78d
{
"sessions": [
{
"age_seconds": 103,
"cdn": "edgeware",
"cdn_is_redirecting": false,
"client_ip": "1.2.3.4",
"host": "cdn.example:80",
"id": "router.example-5fc78d-00000001",
"idle_seconds": 103,
"last_request_time": "2022-12-02T14:05:05Z",
"latest_request_path": "/__cl/s:storage1/__c/v/f/0/5/v_sintel3v_f05a05f07d352e891d79863131ef4df7/__op/hls-default/__f/index.m3u8",
"no_of_requests": 1,
"requested_bytes": 0,
"requests_redirected": 0,
"requests_served": 0,
"session_groups": [
"all"
],
"session_groups_generation": 2,
"session_path": "/__cl/s:storage1/__c/v/f/0/5/v_sintel3v_f05a05f07d352e891d79863131ef4df7/__op/hls-default/__f/index.m3u8",
"start_time": "2022-12-02T14:05:05Z",
"type": "instream",
"user_agent": "libmpv"
},
[...]
]
}
Session details - /v1/sessions/<id: str>
Used to get details about a specific session from the above session list. The
id part of the URL corresponds to the id field in one of the
returned session entries in the above response.
| REQUEST Method | Content-Type | RESPONSE Result | Status Code | Content-Type |
|---|---|---|---|---|
GET | <N/A> | Success | 200 OK | application/json |
GET | <N/A> | Failure | 404 Not Found | application/json |
Example request
$ curl -k -i https://router.example:5001/v1/sessions/router.example-5fc78d-00000001
HTTP/1.1 200 OK
Access-Control-Allow-Origin: *
Content-Length: 763
Content-Type: application/json
X-Service-Identity: router.example-5fc78d
{
"age_seconds": 183,
"cdn": "edgeware",
"cdn_is_redirecting": false,
"client_ip": "1.2.3.4",
"host": "cdn.example:80",
"id": "router.example-5fc78d-00000001",
"idle_seconds": 183,
"last_request_time": "2022-12-02T14:05:05Z",
"latest_request_path": "/__cl/s:storage1/__c/v/f/0/5/v_sintel3v_f05a05f07d352e891d79863131ef4df7/__op/hls-default/__f/index.m3u8",
"no_of_requests": 1,
"requested_bytes": 0,
"requests_redirected": 0,
"requests_served": 0,
"session_groups": [
"all"
],
"session_groups_generation": 2,
"session_path": "/__cl/s:storage1/__c/v/f/0/5/v_sintel3v_f05a05f07d352e891d79863131ef4df7/__op/hls-default/__f/index.m3u8",
"start_time": "2022-12-02T14:05:05Z",
"type": "instream",
"user_agent": "libmpv"
}
Content List - /v1/content
| REQUEST Method | Content-Type | RESPONSE Result | Status Code | Content-Type |
|---|---|---|---|---|
GET | <N/A> | Success | 200 OK | application/json |
Example request
$ curl -k -i https://router.example:5001/v1/content
HTTP/1.1 200 OK
Access-Control-Allow-Origin: *
Content-Length: 572
Content-Type: application/json
X-Service-Identity: router.example-5fc78d
{
"content": [
[
"/__cl/s:storage1/__c/v/f/0/5/v_sintel3v_f05a05f07d352e891d79863131ef4df7/__op/hls-default/__f/index.m3u8",
{
"cached_count": 0,
"content_requested": false,
"content_set": false,
"expiration_time": "2022-12-02T14:05:05Z",
"key": "/__cl/s:storage1/__c/v/f/0/5/v_sintel3v_f05a05f07d352e891d79863131ef4df7/__op/hls-default/__f/index.m3u8",
"listeners": 0,
"manifest": "",
"request_count": 4,
"state": "HLS:MANIFEST-PENDING",
"wait_count": 0
}
]
]
}
Lua scripts – /v1/lua/<path str>.lua
Used to upload, retrieve and delete custom named Lua scripts on the router.
Global functions in uploaded scripts automatically become available to Lua code
in the configuration (which effectively may be viewed as hooks). Upload a
script by PUTing a application/x-lua to the endpoint, and retrieve it by
GETing the endpoint without payload.
| REQUEST Method | Content-Type | RESPONSE Result | Status Code | Content-Type |
|---|---|---|---|---|
PUT | application/x-lua | Success | 204 No Content | <N/A> |
PUT | application/x-lua | Failure | 400 Bad Request | application/json |
GET | <N/A> | Success | 200 OK | application/x-lua |
GET | <N/A> | Failure | 404 Not Found | application/json |
DELETE | <N/A> | Success | 204 No Content | <N/A> |
DELETE | <N/A> | Failure | 400 Bad Request | application/json |
DELETE | <N/A> | Failure | 404 Not Found | application/json |
Example request (PUT)
Save a Lua script under the name advanced_functions/f1.lua:
$ curl -i -X PUT \
-d 'function fun1() return 1 end' \
-H "Content-Type: application/x-lua" \
https://router.example:5001/v1/lua/advanced_functions/f1.lua
HTTP/1.1 204 Successfully saved Lua file
Access-Control-Allow-Origin: *
Content-Length: 0
X-Service-Identity: router.example-5fc78d
Example request (PUT, from file)
Upload an entire Lua file under the name advanced_functions/f1.lua:
First put your code in a file.
$ cat f1.lua
function fun1()
return 1
end
Then upload it using the --data-binary flag to preserve newlines
$ curl -i -X PUT \
--data-binary @f1.lua \
-H "Content-Type: application/x-lua" \
https://router.example:5001/v1/lua/advanced_functions/f1.lua
HTTP/1.1 204 Successfully saved Lua file
Access-Control-Allow-Origin: *
Content-Length: 0
X-Service-Identity: router.example-5fc78d
Example request (GET)
Request the Lua script named advanced_functions/f1.lua using a GET request:
$ curl -i https://router.example:5001/v1/lua/advanced_functions/f1.lua
HTTP/1.1 200 OK
Access-Control-Allow-Origin: *
Content-Length: 28
Content-Type: application/x-lua
X-Service-Identity: router.example-5fc78d
function fun1() return 1 end
Example request (DELETE)
Delete the Lua script named advanced_functions/f1.lua using a DELETE request:
$ curl -i -X DELETE \
https://router.example:5001/v1/lua/advanced_functions/f1.lua
HTTP/1.1 204 Successfully removed Lua file
Access-Control-Allow-Origin: *
Content-Length: 0
X-Service-Identity: router.example-5fc78d
List Lua scripts – /v1/lua
Used to list previously uploaded custom Lua scripts on the router, retrieving their respective paths and file checksums.
| REQUEST Method | Content-Type | RESPONSE Result | Status Code | Content-Type |
|---|---|---|---|---|
GET | <N/A> | Success | 200 OK | application/json |
Example request
$ curl -k -i https://router.example:5001/v1/lua
HTTP/1.1 200 OK
Access-Control-Allow-Origin: *
Content-Length: 108
Content-Type: application/json
X-Service-Identity: router.example-5fc78d
[
{
"file_checksum": "d41d8cd98f00b204e9800998ecf8427e",
"path": "advanced_functions/f1.lua"
}
]
Debug a Lua expression – /v1/lua/debug
Used to debug an arbitrary Lua expression on the router in a “sandbox” (with no visible side effects to the state of the router), and inspect the result.
The Lua expression in the body is evaluated inside an isolated copy of the
internal Lua environment including selection input. The stdout field of the
resulting JSON body is populated with a concatenation of every string provided
as argument to the Lua print() function during the course of evaluation.
Upon a successful evaluation, as indicated by the success flag,
return.value and return.lua_type_name capture the resulting Lua value.
Otherwise, if valuation was aborted (e.g. due to a Lua exception), error_msg
reflects any error description arising from the Lua environment.
| REQUEST Method | Content-Type | RESPONSE Result | Status Code | Content-Type |
|---|---|---|---|---|
POST | application/x-lua | Success | 200 OK | application/json |
Example successful request
$ curl -i -X POST \
-d 'fun1()' \
-H "Content-Type: application/x-lua" \
https://router.example:5001/v1/lua/debug
HTTP/1.1 200 OK
Access-Control-Allow-Origin: *
Content-Length: 123
Content-Type: application/json
X-Service-Identity: router.example-5fc78d
{
"error_msg": "",
"return": {
"lua_type_name": "number",
"value": 1.0
},
"stdout": "",
"success": true
}
Example unsuccessful request
(attempt to invoke unknown function)
$ curl -i -X POST \
-d 'fun5()' \
-H "Content-Type: application/x-lua" \
https://router.example:5001/v1/lua/debug
HTTP/1.1 200 OK
Access-Control-Allow-Origin: *
Content-Length: 123
Content-Type: application/json
X-Service-Identity: router.example-5fc78d
{
"error_msg": "[string \"function f0() ...\"]:2: attempt to call global 'fun5' (a nil value)",
"return": {
"lua_type_name": "",
"value": null
},
"stdout": "",
"success": false
}
Footnotes
2.6 - Configuration
2.6.1 - WebUI Configuration
The web based user interface is installed as a separate component and can be used to configure many common use cases. After navigating to the UI, a login screen will be presented.

Enter your credentials and log in. In the top left corner is a menu to select what section of the configuration to change. The configuration that will be active on the router is added in the Routing Workflow view. However, basic elements such as classification rules and routing targets, etc must be added first. Hence the following main steps are required to produce a proper configuration:
- Create classifiers serving as basic elements to create session groups.
- Create session groups which, using the classifiers, tag requests/clients for later use in the routing logic. of the incoming traffic.
- Define offload rules.
- Define rules to control behavior of internal traffic.
- Define backup rules to be used if the routing targets in the above step are unavailable.
- Finally, create the desired routing workflow using the elements defined in the previous steps.
A simplified concrete example of the above steps could be:
- Create two classifiers “smartphone” and “off-net”.
- Create a session group “mobile off-net”.
- Offload off-net traffic from mobile phones to a public CDN.
- Route other traffic to a private CDN.
- If the private CDN has an outage, use the public CDN for all traffic.
Hence, to start with, define the classifiers you will need. Those are based on information in the incoming request, optionally in combination with GeoIP databases or subnet information configured via the Subnet API. Here we show how to set up a GeoIP classifier. Note that the Director ships with a compatible snapshot of the GeoIP database, but for a production system a licensed and updated database is required.

Click the plus sign indicated in the picture above to create a new GeoIP classifier. You will be presented with the following view:

Here you can enter the geographical data on which to match, or check the “Inverted” check box to match anything except the entered geographical data.
The other kinds of classifiers are configured in a similar way.
After having added all the classifiers you need, it is time to create the session groups. Those are named filters that group incoming requests, typically video playback sessions in a video streaming CDN, and are defined with the help of the classifiers. For example, a session group “off-net mobile devices” could be composed of the classifiers “off-net traffic” and “mobile devices”.
Open the Session Groups view from the menu and hit the plus sign to add a new session group.


Define the new sessions groups by combining the previously created classifiers. It is often convenient to define an “All” session group that matches any incoming request.
Next go the “CDN Offload” view:
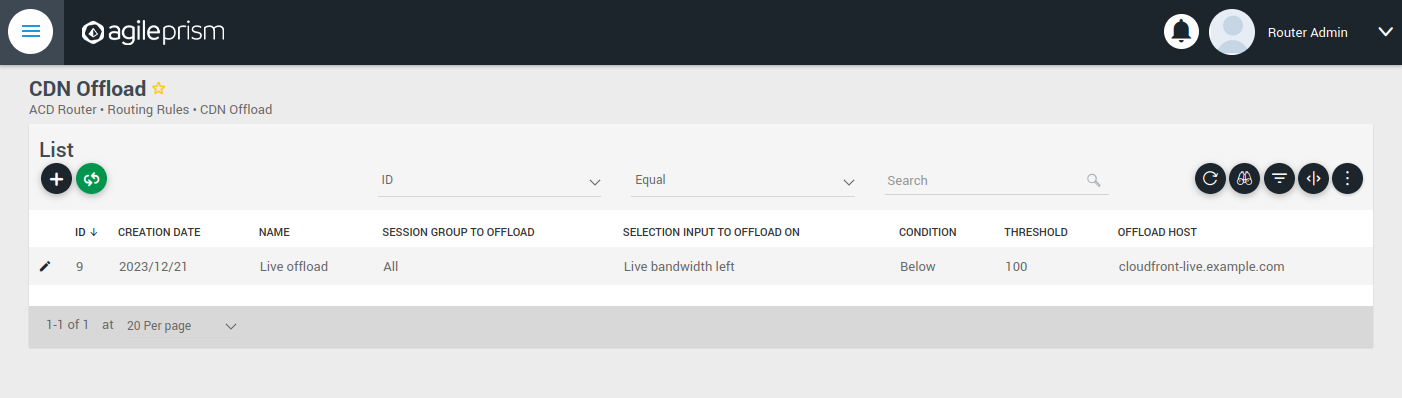
Here you define conditions for CDN offload. Each row defines a rule for offloading a specified session group. The rule makes use of the Selection Input API. This is an integration API that provides a way to supply additional data for use in the routing decision. Common examples are current bitrates or availability status. The selection input variables to use must be defined in the “Selection Input Types” view in the “Administration” section of the menu:

Reach out to the solution engineers from Agile Content in order to perform this integration in the best way. If no external data is required, such that the offload rule can be based solely based on session groups, this is not necessary and the condition field can be set to “Always” or “Disabled”.
When clicking the plus sign to add a new CDN Offload rule, the following view is presented:

The selection input rule is phrased in terms of a variable being above or below a threshold, but also a state such as “available” taking values 0 or 1 can be supported by for instance checking if “available” is below 1.
Moving on, if an incoming request is not offloaded, it will be handled by the Primary CDN section of the routing configuration.

Add all hosts in your primary CDN, together with a weight. A row in this table will be selected by random weighted load balancing. If each weight is the same, each row will be selected with the same probability. Another example would be three rows with weights 100, 100 and 200 which would randomly balance 50% of the load on the last row and the remaining load on the first two rows, i.e. 25% on each of the first and second row. If a Primary CDN host is unavailable, that host will not take part in the random selection.
If all hosts are unavailable, as a final resort the routing evaluation will go to the final Backup CDN step:

Here you can define what to do when all else fail. If not all requests are covered, for example with an “All” session group, then the request will fail with 403 Forbidden.
Now you have defined the basic elements and it is time to define the routing workflow. Select “Routing Workflow” from the menu, as pictured below. Here you can combine the elements previously created to achieve the desired routing behavior.

When everything seems correct, open the “Publish Routing” view from the menu:

Hit “Publish All Changes” and verify that you get a successful result.
2.6.2 - Confd and Confcli
confcli to set up routing rulesConfiguration of a complex routing tree can be difficult. The command line
interface tool called confcli has been developed to make it simpler. It
combines building blocks, representing simple routing decisions, into complex
routing trees capable of satisfying almost any routing requirements.
These blocks are translated into an ESB3024 Router configuration which is automatically sent to the router, overwriting existing routing rules, CDN list and host list.
Installation and Usage
The confcli tools are installed alongside ESB3024 Router, on the same host,
and the confcli command line tool itself is made available on the host machine.
Simply type confcli in a shell on the host to see the current routing
configuration:
$ confcli
{
"services": {
"routing": {
"settings": {
"trustedProxies": [],
"contentPopularity": {
"algorithm": "score_based",
"sessionGroupNames": []
},
"extendedContentIdentifier": {
"enabled": false,
"includedQueryParams": []
},
"instream": {
"dashManifestRewrite": {
"enabled": false,
"sessionGroupNames": []
},
"hlsManifestRewrite": {
"enabled": false,
"sessionGroupNames": []
},
"reversedFilenameComparison": false
},
"usageLog": {
"enabled": false,
"logInterval": 3600000
}
},
"tuning": {
"content": {
"cacheSizeFullManifests": 1000,
"cacheSizeLightManifests": 10000,
"lightCacheTimeMilliseconds": 86400000,
"liveCacheTimeMilliseconds": 100,
"vodCacheTimeMilliseconds": 10000
},
"general": {
"accessLog": false,
"coutFlushRateMilliseconds": 1000,
"cpuLoadWindowSize": 10,
"eagerCdnSwitching": false,
"httpPipeliningEnable": false,
"logLevel": 3,
"maxConnectionsPerHost": 5,
"overloadThreshold": 32,
"readyThreshold": 8,
"redirectingCdnManifestDownloadRetries": 2,
"repeatedSessionStartThresholdSeconds": 30,
"selectionInputMetricsTimeoutSeconds": 30
},
"session": {
"idleDeactivateTimeoutMilliseconds": 20000,
"idleDeleteTimeoutMilliseconds": 1800000
},
"target": {
"responseTimeoutSeconds": 5,
"retryConnectTimeoutSeconds": 2,
"retryResponseTimeoutSeconds": 2,
"connectTimeoutSeconds": 5,
"maxIdleTimeSeconds": 30,
"requestAttempts": 3
}
},
"sessionGroups": [],
"classifiers": [],
"hostGroups": [],
"rules": [],
"entrypoint": "",
"applyConfig": true
}
}
}
The CLI tool can be used to modify, add and delete values by providing it with
the “path” to the object to change. The path is constructed by joining the field
names leading up to the value with a period between each name, e.g. the path to
the entrypoint is services.routing.entrypoint since entrypoint is nested
under the routing object, which in turn is under the services root object.
Lists use an index number in place of a field name, where 0 indicates the very
first element in the list, 1 the second element and so on.
If the list contains objects which have a field with the name name, the
index number can be replaced by the unique name of the object of interest.
Tab completion is supported by confcli. Pressing tab once will complete as far as possible, and pressing tab twice will list all available alternatives at the path constructed so far.
Display the values at a specific path:
$ confcli services.routing.hostGroups
{
"hostGroups": [
{
"name": "internal",
"type": "redirecting",
"httpPort": 80,
"httpsPort": 443,
"hosts": [
{
"name": "rr1",
"hostname": "rr1.example.com",
"ipv6_address": ""
}
]
},
{
"name": "external",
"type": "host",
"httpPort": 80,
"httpsPort": 443,
"hosts": [
{
"name": "offload-streamer1",
"hostname": "streamer1.example.com",
"ipv6_address": ""
},
{
"name": "offload-streamer2",
"hostname": "streamer2.example.com",
"ipv6_address": ""
}
]
}
]
}
Display the values in a specific list index:
$ confcli services.routing.hostGroups.1
{
"1": {
"name": "external",
"type": "host",
"httpPort": 80,
"httpsPort": 443,
"hosts": [
{
"name": "offload-streamer1",
"hostname": "streamer1.example.com",
"ipv6_address": ""
},
{
"name": "offload-streamer2",
"hostname": "streamer2.example.com",
"ipv6_address": ""
}
]
}
}
Display the values in a specific list index using the object’s name:
$ confcli services.routing.hostGroups.1.hosts.offload-streamer2
{
"offload-streamer2": {
"name": "offload-streamer2",
"hostname": "streamer2.example.com",
"ipv6_address": ""
}
}
Modify a single value:
confcli services.routing.hostGroups.1.hosts.offload-streamer2.hostname new-streamer.example.com
services.routing.hostGroups.1.hosts.offload-streamer2.hostname = 'new-streamer.example.com'
Delete an entry:
$ confcli services.routing.sessionGroups.Apple.classifiers.
{
"classifiers": [
"Apple",
""
]
}
$ confcli services.routing.sessionGroups.Apple.classifiers.1 -d
http://localhost:5000/config/__active/services/routing/sessionGroups/Apple/classifiers/1 reset to default/deleted
$ confcli services.routing.sessionGroups.Apple.classifiers.
{
"classifiers": [
"Apple"
]
}
Adding new values in objects and lists is done using a wizard by invoking
confcli with a path and the -w argument. This will be shown extensively in
the examples further down in this document rather than here.
If you have a JSON file with a previously generated confcli configuration
output it can be applied to a system by typing confcli -i <file path>.
CDNs and Hosts
Configuration using confcli has no real concept of CDNs, instead it has groups of hosts that share some common settings such as HTTP(S) port and whether they return a redirection URL, serve content directly or perform a DNS lookup. Of these three variants, the two former share the same parameters, while the DNS variant is slightly different.
Each host belongs to a host group and may itself be an entire CDN using a single public hostname or a single streamer server, all depending on the needs of the user.
Host Health
When creating a host in the confd configuration, you have the option to define a list of health check functions. Each health check function must return true for a host to be selected. This means that the host will only be considered available if all the defined health check functions evaluate to true. If any of the health check functions return false, the host will be considered unavailable and will not be selected for routing. All health check functions are detailed in the section Built-in Lua functions.
$ confcli services.routing.hostGroups -w
Running wizard for resource 'hostGroups'
Hint: Hitting return will set a value to its default.
Enter '?' to receive the help string
hostGroups : [
hostGroup can be one of
1: dns
2: host
3: redirecting
Choose element index or name: redirecting
Adding a 'redirecting' element
hostGroup : {
name (default: ): edgeware
type (default: redirecting): ⏎
httpPort (default: 80): ⏎
httpsPort (default: 443): ⏎
hosts : [
host : {
name (default: ): rr1
hostname (default: ): convoy-rr1.example.com
ipv6_address (default: ): ⏎
healthChecks : [
healthCheck (default: always()): health_check()
Add another 'healthCheck' element to array 'healthChecks'? [y/N]: n
]
}
Add another 'host' element to array 'hosts'? [y/N]: y
host : {
name (default: ): rr2
hostname (default: ): convoy-rr2.example.com
ipv6_address (default: ): ⏎
healthChecks : [
healthCheck (default: always()): ⏎
Add another 'healthCheck' element to array 'healthChecks'? [y/N]: n
]
}
Add another 'host' element to array 'hosts'? [y/N]: ⏎
]
}
Add another 'hostGroup' element to array 'hostGroups'? [y/N]: ⏎
]
Generated config:
{
"hostGroups": [
{
"name": "edgeware",
"type": "redirecting",
"httpPort": 80,
"httpsPort": 443,
"hosts": [
{
"name": "rr1",
"hostname": "convoy-rr1.example.com",
"ipv6_address": "",
"healthChecks": [
"health_check()"
]
},
{
"name": "rr2",
"hostname": "convoy-rr2.example.com",
"ipv6_address": "",
"healthChecks": [
"always()"
]
}
]
}
]
}
Merge and apply the config? [y/n]: y
$ confcli services.routing.hostGroups -w
Running wizard for resource 'hostGroups'
Hint: Hitting return will set a value to its default.
Enter '?' to receive the help string
hostGroups : [
hostGroup can be one of
1: dns
2: host
3: redirecting
Choose element index or name: dns
Adding a 'dns' element
hostGroup : {
name (default: ): external-dns
type (default: dns): ⏎
hosts : [
host : {
name (default: ): dns-host
hostname (default: ): dns.example.com
ipv6_address (default: ): ⏎
healthChecks : [
healthCheck (default: always()): ⏎
Add another 'healthCheck' element to array 'healthChecks'? [y/N]: n
]
}
Add another 'host' element to array 'hosts'? [y/N]: ⏎
]
}
Add another 'hostGroup' element to array 'hostGroups'? [y/N]: ⏎
]
Generated config:
{
"hostGroups": [
{
"name": "external-dns",
"type": "dns",
"hosts": [
{
"name": "dns-host",
"hostname": "dns.example.com",
"ipv6_address": "",
"healthChecks": [
"always()"
]
}
]
}
]
}
Merge and apply the config? [y/n]: y
Rule Blocks
The routing configuration using confcli is done using a combination of logical
building blocks, or rules. Each block evaluates the incoming request in some way
and sends it on to one or more sub-blocks. If the block is of the host type
described above, the client is sent to that host and the evaluation is done.
Existing Blocks
Currently supported blocks are:
allow: Incoming requests, for which a given rule function matches, are immediately sent to the providedonMatchtarget.consistentHashing: Splits incoming requests randomly between preferred hosts, determined by the proprietary consistent hashing algorithm. The amount of hosts to split between is controlled by thespreadFactor.contentPopularity: Splits incoming requests into two sub-blocks depending on how popular the requested content is.deny: Incoming requests, for which a given rule function matches, are immediately denied, and all non-matching requests are sent to theonMisstarget.firstMatch: Incoming requests are matched by an ordered series of rules, where the request will be handled by the first rule for which the condition evaluates to true.random: Splits incoming requests randomly and equally between a list of target sub-blocks. Useful for simple load balancing.split: Splits incoming requests between two sub-blocks depending on how the request is evaluated by a provided function. Can be used for sending clients to different hosts depending on e.g. geographical location or client hardware type.weighted: Randomly splits incoming requests between a list of target sub-blocks, weighted according to each target’s associated weight rule. A higher weight means a higher portion of requests will be routed to a sub-block. Rules can be used to decide whether or not to pick a target.rawGroup: Contains a raw ESB3024 Router configuration routing tree node, to be inserted as is in the generated configuration. This is only meant to be used in the rare cases when it’s impossible to construct the required routing behavior in any other way.rawHost: A host reference for use as endpoints in rawGroup trees.
$ confcli services.routing.rules -w
Running wizard for resource 'rules'
Hint: Hitting return will set a value to its default.
Enter '?' to receive the help string
rules : [
rule can be one of
1: allow
2: consistentHashing
3: contentPopularity
4: deny
5: firstMatch
6: random
7: rawGroup
8: rawHost
9: split
10: weighted
Choose element index or name: allow
Adding a 'allow' element
rule : {
name (default: ): allow
type (default: allow): ⏎
condition (default: ): customFunction()
onMatch (default: ): rr1
}
Add another 'rule' element to array 'rules'? [y/N]: ⏎
]
Generated config:
{
"rules": [
{
"name": "content",
"type": "contentPopularity",
"condition": "customFunction()",
"onMatch": "rr1"
}
]
}
Merge and apply the config? [y/n]: y
$ confcli services.routing.rules -w
Running wizard for resource 'rules'
Hint: Hitting return will set a value to its default.
Enter '?' to receive the help string
rules : [
rule can be one of
1: allow
2: consistentHashing
3: contentPopularity
4: deny
5: firstMatch
6: random
7: rawGroup
8: rawHost
9: split
10: weighted
Choose element index or name: consistentHashing
Adding a 'consistentHashing' element
rule : {
name (default: ): consistentHashingRule
type (default: consistentHashing):
spreadFactor (default: 1): 2
hashAlgorithm (default: MD5):
targets : [
target : {
target (default: ): rr1
enabled (default: True):
}
Add another 'target' element to array 'targets'? [y/N]: y
target : {
target (default: ): rr2
enabled (default: True):
}
Add another 'target' element to array 'targets'? [y/N]: y
target : {
target (default: ): rr3
enabled (default: True):
}
Add another 'target' element to array 'targets'? [y/N]: n
]
}
Add another 'rule' element to array 'rules'? [y/N]: n
]
Generated config:
{
"rules": [
{
"name": "consistentHashingRule",
"type": "consistentHashing",
"spreadFactor": 2,
"hashAlgorithm": "MD5",
"targets": [
{
"target": "rr1",
"enabled": true
},
{
"target": "rr2",
"enabled": true
},
{
"target": "rr3",
"enabled": true
}
]
}
]
}
Merge and apply the config? [y/n]: y
$ confcli services.routing.rules -w
Running wizard for resource 'rules'
Hint: Hitting return will set a value to its default.
Enter '?' to receive the help string
rules : [
rule can be one of
1: allow
2: consistentHashing
3: contentPopularity
4: deny
5: firstMatch
6: random
7: rawGroup
8: rawHost
9: split
10: weighted
Choose element index or name: contentPopularity
Adding a 'contentPopularity' element
rule : {
name (default: ): content
type (default: contentPopularity): ⏎
contentPopularityCutoff (default: 10): 20
onPopular (default: ): rr1
onUnpopular (default: ): rr2
}
Add another 'rule' element to array 'rules'? [y/N]: ⏎
]
Generated config:
{
"rules": [
{
"name": "content",
"type": "contentPopularity",
"contentPopularityCutoff": 20.0,
"onPopular": "rr1",
"onUnpopular": "rr2"
}
]
}
Merge and apply the config? [y/n]: y
$ confcli services.routing.rules -w
Running wizard for resource 'rules'
Hint: Hitting return will set a value to its default.
Enter '?' to receive the help string
rules : [
rule can be one of
1: allow
2: consistentHashing
3: contentPopularity
4: deny
5: firstMatch
6: random
7: rawGroup
8: rawHost
9: split
10: weighted
Choose element index or name: deny
Adding a 'deny' element
rule : {
name (default: ): deny
type (default: deny): ⏎
condition (default: ): customFunction()
onMiss (default: ): rr1
}
Add another 'rule' element to array 'rules'? [y/N]: ⏎
]
Generated config:
{
"rules": [
{
"name": "content",
"type": "contentPopularity",
"condition": "customFunction()",
"onMiss": "rr1"
}
]
}
Merge and apply the config? [y/n]: y
$ confcli services.routing.rules -w
Running wizard for resource 'rules'
Hint: Hitting return will set a value to its default.
Enter '?' to receive the help string
rules : [
rule can be one of
1: allow
2: consistentHashing
3: contentPopularity
4: deny
5: firstMatch
6: random
7: rawGroup
8: rawHost
9: split
10: weighted
Choose element index or name: firstMatch
Adding a 'firstMatch' element
rule : {
name (default: ): firstMatch
type (default: firstMatch): ⏎
targets : [
target : {
onMatch (default: ): rr1
rule (default: ): customFunction()
}
Add another 'target' element to array 'targets'? [y/N]: y
target : {
onMatch (default: ): rr2
rule (default: ): otherCustomFunction()
}
Add another 'target' element to array 'targets'? [y/N]: n
]
}
Add another 'rule' element to array 'rules'? [y/N]: n
]
Generated config:
{
"rules": [
{
"name": "firstMatch",
"type": "firstMatch",
"targets": [
{
"onMatch": "rr1",
"condition": "customFunction()"
},
{
"onMatch": "rr2",
"condition": "otherCustomFunction()"
}
]
}
]
}
Merge and apply the config? [y/n]: y
$ confcli services.routing.rules -w
Running wizard for resource 'rules'
Hint: Hitting return will set a value to its default.
Enter '?' to receive the help string
rules : [
rule can be one of
1: allow
2: consistentHashing
3: contentPopularity
4: deny
5: firstMatch
6: random
7: rawGroup
8: rawHost
9: split
10: weighted
Choose element index or name: random
Adding a 'random' element
rule : {
name (default: ): random
type (default: random): ⏎
targets : [
target (default: ): rr1
Add another 'target' element to array 'targets'? [y/N]: y
target (default: ): rr2
Add another 'target' element to array 'targets'? [y/N]: ⏎
]
}
Add another 'rule' element to array 'rules'? [y/N]: ⏎
]
Generated config:
{
"rules": [
{
"name": "random",
"type": "random",
"targets": [
"rr1",
"rr2"
]
}
]
}
Merge and apply the config? [y/n]: y
$ confcli services.routing.rules -w
Running wizard for resource 'rules'
Hint: Hitting return will set a value to its default.
Enter '?' to receive the help string
rules : [
rule can be one of
1: allow
2: consistentHashing
3: contentPopularity
4: deny
5: firstMatch
6: random
7: rawGroup
8: rawHost
9: split
10: weighted
Choose element index or name: split
Adding a 'split' element
rule : {
name (default: ): split
type (default: split): ⏎
condition (default: ): custom_function()
onMatch (default: ): rr2
onMiss (default: ): rr1
}
Add another 'rule' element to array 'rules'? [y/N]: ⏎
]
Generated config:
{
"rules": [
{
"name": "split",
"type": "split",
"condition": "custom_function()",
"onMatch": "rr2",
"onMiss": "rr1"
}
]
}
Merge and apply the config? [y/n]: y
$ confcli services.routing.rules. -w
Running wizard for resource 'rules'
Hint: Hitting return will set a value to its default.
Enter '?' to receive the help string
rules : [
rule can be one of
1: allow
2: consistentHashing
3: contentPopularity
4: deny
5: firstMatch
6: random
7: rawGroup
8: rawHost
9: split
10: weighted
Choose element index or name: weighted
Adding a 'weighted' element
rule : {
name (default: ): weight
type (default: weighted): ⏎
targets : [
target : {
target (default: ): rr1
weight (default: 100): ⏎
condition (default: always()): always()
}
Add another 'target' element to array 'targets'? [y/N]: y
target : {
target (default: ): rr2
weight (default: 100): si('rr2-input-weight')
condition (default: always()): gt('rr2-bandwidth', 1000000)
}
Add another 'target' element to array 'targets'? [y/N]: y
target : {
target (default: ): rr2
weight (default: 100): custom_func()
condition (default: always()): always()
}
Add another 'target' element to array 'targets'? [y/N]: ⏎
]
}
Add another 'rule' element to array 'rules'? [y/N]: ⏎
]
Generated config:
{
"rules": [
{
"name": "weight",
"type": "weighted",
"targets": [
{
"target": "rr1",
"weight": "100",
"condition": "always()"
},
{
"target": "rr2",
"weight": "si('rr2-input-weight')",
"condition": "gt('rr2-bandwith', 1000000)"
},
{
"target": "rr2",
"weight": "custom_func()",
"condition": "always()"
}
]
}
]
}
Merge and apply the config? [y/n]: y
>> First add a raw host block that refers to a regular host
$ confcli services.routing.rules. -w
Running wizard for resource 'rules'
Hint: Hitting return will set a value to its default.
Enter '?' to receive the help string
rules : [
rule can be one of
1: allow
2: consistentHashing
3: contentPopularity
4: deny
5: firstMatch
6: random
7: rawGroup
8: rawHost
9: split
10: weighted
Choose element index or name: rawHost
Adding a 'rawHost' element
rule : {
name (default: ): raw-host
type (default: rawHost): ⏎
hostId (default: ): rr1
}
Add another 'rule' element to array 'rules'? [y/N]: ⏎
]
Generated config:
{
"rules": [
{
"name": "raw-host",
"type": "rawHost",
"hostId": "rr1"
}
]
}
Merge and apply the config? [y/n]: y
>> And then add a rule using the host node
$ confcli services.routing.rules. -w
Running wizard for resource 'rules'
Hint: Hitting return will set a value to its default.
Enter '?' to receive the help string
rules : [
rule can be one of
1: allow
2: consistentHashing
3: contentPopularity
4: deny
5: firstMatch
6: random
7: rawGroup
8: rawHost
9: split
10: weighted
Choose element index or name: rawGroup
Adding a 'rawGroup' element
rule : {
name (default: ): raw-node
type (default: rawGroup): ⏎
memberOrder (default: sequential): ⏎
members : [
member : {
target (default: ): raw-host
weightFunction (default: ): return 1
}
Add another 'member' element to array 'members'? [y/N]: ⏎
]
}
Add another 'rule' element to array 'rules'? [y/N]: ⏎
]
Generated config:
{
"rules": [
{
"name": "raw-node",
"type": "rawGroup",
"memberOrder": "sequential",
"members": [
{
"target": "raw-host",
"weightFunction": "return 1"
}
]
}
]
}
Merge and apply the config? [y/n]: y
Rule Language
Some blocks, such as the split and firstMatch types, have a rule field that
contains a small function in a very simple programming language. This field is
used to filter any incoming client requests in order to determine how to rule
block should react.
In the case of a split block, the rule is evaluated and if it is true the
client is sent to the onMatch part of the block, otherwise it is sent to the
onMiss part for further evaluation.
In the case of a firstMatch block, the rule for each target will be evaluated
top to bottom in order until either a rule evaluates to true or the list is
exhausted. If a rule evaluates to true, the client will be sent to the onMatch
part of the block, otherwise the next target in the list will be tried. If all
targets have been exhausted, then the entire rule evaluation will fail, and the
routing tree will be restarted with the firstMatch block effectively removed.
Example of Boolean Functions
Let’s say we have an ESB3024 Router set up with a session group that matches Apple
devices (named “Apple”). To route all Apple devices to a specific streamer one
would simply create a split block with the following rule:
in_session_group('Apple')
In order to make more complex rules it’s possible to combine several checks like
this in the same rule. Let’s extend the hypothetical ESB3024 Router above with a
configured subnet with all IP addresses in Europe (named “Europe”). To make a
rule that accepts any clients using an Apple device and living outside of
Europe, but only as long as the reported load on the streamer (as indicated by
the selection input variable
“europe_load_mbps”) is less than 1000 megabits per second one could make an
offload block with the following rule (without linebreaks):
in_session_group('Apple')
and not in_subnet('Europe')
and lt('europe_load_mbps', 1000)
In this example in_session_group('Apple') will be true if the client belongs
to the session group named ‘Apple’. The function call in_subnet('Europe') is
true if the client’s IP belongs to the subnet named ‘Europe’, but the word not
in front of it reverses the value so the entire section ends up being false if
the client is in Europe. Finally lt('europe_load_mbps', 1000) is true if
there is a selection input variable named “europe_load_mbps” and its value is
less than 1000.
Since the three parts are conjoined with the and keyword they must all
be true for the entire rule to match. If the keyword or had been used
instead it would have been enough for any of the parts to be true for the
rule to match.
Example of Numeric Functions
A hypothetical CDN has two streamers with different capacity; Host_1 has
roughly twice the capacity of Host_2. A simple random load balancing would put
undue stress on the second host since it will receive as much traffic as the
more capable Host_1.
This can be solved by using a weighted random distribution rule block with
suitable rules for the two hosts:
{
"targets": [
{
"target": "Host_1",
"condition": "always()",
"weight": "100"
}
{
"target": "Host_2",
"condition": "always()",
"weight": "50"
},
]
}
resulting in Host_1 receiving twice as many requests as Host_2 as its
weight function is double that of Host_2.
If the CDN is capable of reporting the free capacity of the hosts, for example by writing to a selection input variable for each host, it’s easy to write a more intelligent load balancing rule by making the weights correspond to the amount of capacity left on each host:
{
"targets": [
{
"target": "Host_1",
"condition": "always()",
"weight": "si('free_capacity_host_1')"
}
{
"target": "Host_2",
"condition": "always()",
"weight": "si('free_capacity_host_2')"
},
]
}
It is also possible to write custom Lua functions that return suitable weights, perhaps taking the host as an argument:
{
"targets": [
{
"target": "Host_1",
"condition": "always()",
"weight": "intelligent_weight_function('Host_1')"
}
{
"target": "Host_2",
"condition": "always()",
"weight": "intelligent_weight_function('Host_1')"
},
]
}
These different weight rules can of course be combined in the same rule block, with one target having a hard coded number, another using a dynamically updated selection input variable and yet another having a custom-built function.
Due to limitations in the random number generator used to distribute requests, it’s better to use somewhat large values, around 100–1000 or so, than to use small values near 0.
Built-In Functions
The following built-in functions are available when writing rules:
in_session_group(str name): True if session belongs to session group<name>in_all_session_groups(str sg_name, ...): True if session belongs to all specified session groupsin_any_session_group(str sg_name, ...): True if session belongs to any specified session groupin_subnet(str subnet_name): True if client IP belongs to the named subnetgt(str si_var, number value): True if selection_inputs[si_var] > valuegt(str si_var1, str si_var2): True if selection_inputs[si_var1] > selection_inputs[si_var2]ge(str si_var, number value): True if selection_inputs[si_var] >= valuege(str si_var1, str si_var2): True if selection_inputs[si_var1] >= selection_inputs[si_var2]lt(str si_var, number value): True if selection_inputs[si_var] < valuelt(str si_var1, str si_var2): True if selection_inputs[si_var1] < selection_inputs[si_var2]le(str si_var, number value): True if selection_inputs[si_var] <= valuele(str si_var1, str si_var2): True if selection_inputs[si_var1] <= selection_inputs[si_var2]eq(str si_var, number value): True if selection_inputs[si_var] == valueeq(str si_var1, str si_var2): True if selection_inputs[si_var1] == selection_inputs[si_var2]neq(str si_var, number value): True if selection_inputs[si_var] != valueneq(str si_var1, str si_var2): True if selection_inputs[si_var1] != selection_inputs[si_var2]si(str si_var): Returns the value of selection_inputs[si_var] if it is defined and non-negative, otherwise it returns 0.always(): Returns true, useful when creating weighted rule blocks.never(): Returns false, opposite ofalways().
These functions, as well as custom functions written in Lua and uploaded to the ESB3024 Router, can be combined to make suitably precise rules.
Combining Multiple Boolean Functions
In order to make the rule language easy to work with, it is fairly restricted
and simple. One restriction is that it’s only possible to chain multiple
function results together using either and or or, but not a
combination of both conjunctions.
Statements joined with and or or keywords are evaluated one by one,
starting with the left-most statement and moving right. As soon as the end
result of the entire expression is certain, the evaluation ends. This means that
evaluation ends with the first false statement for and expressions since a
single false component means the entire expression must also be false. It
also means that evaluation ends with the first true statement for or
expressions since only one component must be true for the entire statement to
be true as well. This is known as short-circuit or lazy evaluation.
Custom Functions
It is possible to write extremely complex Lua functions that take many parameters or calculations into consideration when evaluating an incoming client request. By writing such functions and making sure that they return only non-negative integer values and uploading them to the router they can be used from the rule language. Simply call them like any of the built-in functions listed above, using strings and numbers as arguments if necessary, and their result will be used to determine the routing path to use.
Formal Syntax
The full syntax of the language can be described in just a few lines of BNF grammar:
<rule> := <weight_rule> | <match_rule> | <value_rule>
<weight_rule> := "if" <compound_predicate> "then" <weight> "else" <weight>
<match_rule> := <compound_predicate>
<value_rule> := <weight>
<compound_predicate> := <logical_predicate> |
<logical_predicate> ["and" <logical_predicate> ...] |
<logical_predicate> ["or" <logical_predicate> ...] |
<logical_predicate> := ["not"] <predicate>
<predicate> := <function_name> "(" ")" |
<function_name> "(" <argument> ["," <argument> ...] ")"
<function_name> := <letter> [<function_name_tail> ...]
<function_name_tail> := empty | <letter> | <digit> | "_"
<argument> := <string> | <number>
<weight> := integer | <predicate>
<number> := float | integer
<string> := "'" [<letter> | <digit> | <symbol> ...] "'"
Building a Routing Configuration
This example sets up an entire routing configuration for a system with a ESB3008 Request Router, two streamers and the Apple devices outside of Europe example used earlier in this document. Any clients not matching the criteria will be sent to an offload CDN with two streamers in a simple uniformly randomized load balancing setup.
Set up Session Group
First make a classifier and a session group that uses it:
$ confcli services.routing.classifiers -w
Running wizard for resource 'classifiers'
Hint: Hitting return will set a value to its default.
Enter '?' to receive the help string
classifiers : [
classifier can be one of
1: anonymousIp
2: asnIds
3: contentUrlPath
4: contentUrlQueryParameters
5: geoip
6: hostName
7: ipranges
8: random
9: regexMatcher
10: requestHeader
11: stringMatcher
12: subnet
13: userAgent
Choose element index or name: userAgent
Adding a 'userAgent' element
classifier : {
name (default: ): Apple
type (default: userAgent): ⏎
inverted (default: False): ⏎
patternType (default: stringMatch): ⏎
pattern (default: ): *apple*
}
Add another 'classifier' element to array 'classifiers'? [y/N]: ⏎
]
Generated config:
{
"classifiers": [
{
"name": "Apple",
"type": "userAgent",
"inverted": false,
"patternType": "stringMatch",
"pattern": "*apple*"
}
]
}
Merge and apply the config? [y/n]: y
$ confcli services.routing.sessionGroups -w
Running wizard for resource 'sessionGroups'
Hint: Hitting return will set a value to its default.
Enter '?' to receive the help string
sessionGroups : [
sessionGroup : {
name (default: ): Apple
classifiers : [
classifier (default: ): Apple
Add another 'classifier' element to array 'classifiers'? [y/N]: ⏎
]
}
Add another 'sessionGroup' element to array 'sessionGroups'? [y/N]: ⏎
]
Generated config:
{
"sessionGroups": [
{
"name": "Apple",
"classifiers": [
"Apple"
]
}
]
}
Merge and apply the config? [y/n]: y
Set up Hosts
Create two host groups and add a Request Router to the first and two streamers to the second, which will be used for offload:
$ confcli services.routing.hostGroups -w
Running wizard for resource 'hostGroups'
Hint: Hitting return will set a value to its default.
Enter '?' to receive the help string
hostGroups : [
hostGroup can be one of
1: dns
2: host
3: redirecting
Choose element index or name: redirecting
Adding a 'redirecting' element
hostGroup : {
name (default: ): internal
type (default: redirecting): ⏎
httpPort (default: 80): ⏎
httpsPort (default: 443): ⏎
hosts : [
host : {
name (default: ): rr1
hostname (default: ): rr1.example.com
ipv6_address (default: ): ⏎
}
Add another 'host' element to array 'hosts'? [y/N]: ⏎
]
}
Add another 'hostGroup' element to array 'hostGroups'? [y/N]: y
hostGroup can be one of
1: dns
2: host
3: redirecting
Choose element index or name: host
Adding a 'host' element
hostGroup : {
name (default: ): external
type (default: host): ⏎
httpPort (default: 80): ⏎
httpsPort (default: 443): ⏎
hosts : [
host : {
name (default: ): offload-streamer1
hostname (default: ): streamer1.example.com
ipv6_address (default: ): ⏎
}
Add another 'host' element to array 'hosts'? [y/N]: y
host : {
name (default: ): offload-streamer2
hostname (default: ): streamer2.example.com
ipv6_address (default: ): ⏎
}
Add another 'host' element to array 'hosts'? [y/N]: ⏎
]
}
Add another 'hostGroup' element to array 'hostGroups'? [y/N]: ⏎
]
Generated config:
{
"hostGroups": [
{
"name": "internal",
"type": "redirecting",
"httpPort": 80,
"httpsPort": 443,
"hosts": [
{
"name": "rr1",
"hostname": "rr1.example.com",
"ipv6_address": ""
}
]
},
{
"name": "external",
"type": "host",
"httpPort": 80,
"httpsPort": 443,
"hosts": [
{
"name": "offload-streamer1",
"hostname": "streamer1.example.com",
"ipv6_address": ""
},
{
"name": "offload-streamer2",
"hostname": "streamer2.example.com",
"ipv6_address": ""
}
]
}
]
}
Merge and apply the config? [y/n]: y
Create Load Balancing and Offload Block
Add both offload streamers as targets in a randomgroup block:
$ confcli services.routing.rules -w
Running wizard for resource 'rules'
Hint: Hitting return will set a value to its default.
Enter '?' to receive the help string
rules : [
rule can be one of
1: allow
2: consistentHashing
3: contentPopularity
4: deny
5: firstMatch
6: random
7: rawGroup
8: rawHost
9: split
10: weighted
Choose element index or name: random
Adding a 'random' element
rule : {
name (default: ): balancer
type (default: random): ⏎
targets : [
target (default: ): offload-streamer1
Add another 'target' element to array 'targets'? [y/N]: y
target (default: ): offload-streamer2
Add another 'target' element to array 'targets'? [y/N]: ⏎
]
}
Add another 'rule' element to array 'rules'? [y/N]: ⏎
]
Generated config:
{
"rules": [
{
"name": "balancer",
"type": "random",
"targets": [
"offload-streamer1",
"offload-streamer2"
]
}
]
}
Merge and apply the config? [y/n]: y
Then create a split block with the request router and the load balanced CDN as targets:
$ confcli services.routing.rules -w
Running wizard for resource 'rules'
Hint: Hitting return will set a value to its default.
Enter '?' to receive the help string
rules : [
rule can be one of
1: allow
2: consistentHashing
3: contentPopularity
4: deny
5: firstMatch
6: random
7: rawGroup
8: rawHost
9: split
10: weighted
Choose element index or name: split
Adding a 'split' element
rule : {
name (default: ): offload
type (default: split): ⏎
rule (default: ): in_session_group('Apple') and not in_subnet('Europe') and lt('europe_load_mbps', 1000)
onMatch (default: ): rr1
onMiss (default: ): balancer
}
Add another 'rule' element to array 'rules'? [y/N]: ⏎
]
Generated config:
{
"rules": [
{
"name": "offload",
"type": "split",
"condition": "in_session_group('Apple') and not in_subnet('Europe') and lt('europe_load_mbps', 1000)",
"onMatch": "rr1",
"onMiss": "balancer"
}
]
}
Merge and apply the config? [y/n]: y
The last step required is to set the entrypoint of the routing tree so the router knows where to start evaluating:
$ confcli services.routing.entrypoint offload
services.routing.entrypoint = 'offload'
Evaluate
Now that all the rules have been set up properly and the router has been reconfigured. The translated configuration can be read from the router’s configuration API:
$ curl -k https://router-host:5001/v2/configuration 2> /dev/null | jq .routing
{
"id": "offload",
"member_order": "sequential",
"members": [
{
"host_id": "rr1",
"id": "offload.rr1",
"weight_function": "return ((in_session_group('Apple') ~= 0) and
(in_subnet('Europe') == 0) and
(lt('europe_load_mbps', 1000) ~= 0) and 1) or 0 "
},
{
"id": "offload.balancer",
"member_order": "weighted",
"members": [
{
"host_id": "offload-streamer1",
"id": "offload.balancer.offload-streamer1",
"weight_function": "return 100"
},
{
"host_id": "offload-streamer2",
"id": "offload.balancer.offload-streamer2",
"weight_function": "return 100"
}
],
"weight_function": "return 1"
}
],
"weight_function": "return 100"
}
Note that the configuration language code has been translated into its Lua equivalent.
2.6.3 - Session Groups and Classification
ESB3024 Router provides a flexible classification engine, allowing the assignment of clients into session groups that can then be used to base routing decisions on.
Session Classification
In order to perform routing it is necessary to classify incoming sessions according to the relevant parameters. This is done through session groups and their associated classifiers.
There are different ways of classifying a request:
Strings with wildcards: Simple case-insensitive string pattern with support for adding asterisks (’*’) in order to match any value at that point in the pattern.String with regular expressions: A complex string matching pattern capable of matching more complicated strings than the simple wildcard matching type.
Valid string matching sources are
content_url_path,content_url_query_params,hostnameanduser_agent, examples of which will be shown below.
GeoIP: Based on the geographic location of the client, supporting wildcard matching. Geographic location data is provided by MaxMind. See Route on GeoIP/ASN for more details. The possible values to match with are any combinations of:- Continent
- Country
- Cities
- ASN
Anonymous IP: Classifies clients using an anonymous IP. Database of anonymous IPs is provided by MaxMind.IP range: Based on whether a client’s IP belongs to any of the listed IP ranges or not.Subnet: Tests if a client’s IP belongs to a named subnet, see Subnets for more details.ASN ID list: Checks to see if a client’s IP belongs to any of the specified ASN IDs.Random: Randomly classifies clients according to a given probability. The classifier is deterministic, meaning that a session will always get the same classification, even if evaluated multiple times.
A session group may have more than one classifier. If it does, all the classifiers must match the incoming client request for it to belong to the session group. It is also possible for a request to belong to multiple session groups, or to none.
To send certain clients to a specific host you first need to create a suitable
classifier using confcli in wizard mode. The wizard will guide you through the
process of creating a new entry, asking you what value to input for each field
and helping you by telling you what inputs are allowed for restricted fields
such as the string comparison source mentioned above:
$ confcli services.routing.classifiers -w
Running wizard for resource 'classifiers'
Hint: Hitting return will set a value to its default.
Enter '?' to receive the help string
classifiers : [
classifier can be one of
1: anonymousIp
2: asnIds
3: contentUrlPath
4: contentUrlQueryParameters
5: geoip
6: hostName
7: ipranges
8: random
9: regexMatcher
10: requestHeader
11: stringMatcher
12: subnet
13: userAgent
Choose element index or name: geoip
Adding a 'geoip' element
classifier : {
name (default: ): sweden_matcher
type (default: geoip): ⏎
inverted (default: False): ⏎
continent (default: ): ⏎
country (default: ): sweden
cities : [
city (default: ): ⏎
Add another 'city' element to array 'cities'? [y/N]: ⏎
]
asn (default: ): ⏎
}
Add another 'classifier' element to array 'classifiers'? [y/N]: ⏎
]
Generated config:
{
"classifiers": [
{
"name": "sweden_matcher",
"type": "geoip",
"inverted": false,
"continent": "",
"country": "sweden",
"cities": [
""
],
"asn": ""
}
]
}
Merge and apply the config? [y/n]: y
$ confcli services.routing.classifiers -w
Running wizard for resource 'classifiers'
Hint: Hitting return will set a value to its default.
Enter '?' to receive the help string
classifiers : [
classifier can be one of
1: anonymousIp
2: asnIds
3: contentUrlPath
4: contentUrlQueryParameters
5: geoip
6: hostName
7: ipranges
8: random
9: regexMatcher
10: requestHeader
11: stringMatcher
12: subnet
13: userAgent
Choose element index or name: ipranges
Adding a 'ipranges' element
classifier : {
name (default: ): company_matcher
type (default: ipranges): ⏎
inverted (default: False): ⏎
ipranges : [
iprange (default: ): 90.128.0.0/12
Add another 'iprange' element to array 'ipranges'? [y/N]: ⏎
]
}
Add another 'classifier' element to array 'classifiers'? [y/N]: ⏎
]
Generated config:
{
"classifiers": [
{
"name": "company_matcher",
"type": "ipranges",
"inverted": false,
"ipranges": [
"90.128.0.0/12"
]
}
]
}
Merge and apply the config? [y/n]: y
$ confcli services.routing.classifiers -w
Running wizard for resource 'classifiers'
Hint: Hitting return will set a value to its default.
Enter '?' to receive the help string
classifiers : [
classifier can be one of
1: anonymousIp
2: asnIds
3: contentUrlPath
4: contentUrlQueryParameters
5: geoip
6: hostName
7: ipranges
8: random
9: regexMatcher
10: requestHeader
11: stringMatcher
12: subnet
13: userAgent
Choose element index or name: stringMatcher
Adding a 'stringMatcher' element
classifier : {
name (default: ): apple_matcher
type (default: stringMatcher): ⏎
inverted (default: False): ⏎
source (default: content_url_path): user_agent
pattern (default: ): *apple*
}
Add another 'classifier' element to array 'classifiers'? [y/N]: ⏎
]
Generated config:
{
"classifiers": [
{
"name": "apple_matcher",
"type": "stringMatcher",
"inverted": false,
"source": "user_agent",
"pattern": "*apple*"
}
]
}
Merge and apply the config? [y/n]: y
$ confcli services.routing.classifiers -w
Running wizard for resource 'classifiers'
Hint: Hitting return will set a value to its default.
Enter '?' to receive the help string
classifiers : [
classifier can be one of
1: anonymousIp
2: asnIds
3: contentUrlPath
4: contentUrlQueryParameters
5: geoip
6: hostName
7: ipranges
8: random
9: regexMatcher
10: requestHeader
11: stringMatcher
12: subnet
13: userAgent
Choose element index or name: regexMatcher
Adding a 'regexMatcher' element
classifier : {
name (default: ): content_matcher
type (default: regexMatcher): ⏎
inverted (default: False): ⏎
source (default: content_url_path): ⏎
pattern (default: ): .*/(live|news_channel)/.*m3u8
}
Add another 'classifier' element to array 'classifiers'? [y/N]: ⏎
]
Generated config:
{
"classifiers": [
{
"name": "content_matcher",
"type": "regexMatcher",
"inverted": false,
"source": "content_url_path",
"pattern": ".*/(live|news_channel)/.*m3u8"
}
]
}
Merge and apply the config? [y/n]: y
$ confcli services.routing.classifiers -w
Running wizard for resource 'classifiers'
Hint: Hitting return will set a value to its default.
Enter '?' to receive the help string
classifiers : [
classifier can be one of
1: anonymousIp
2: asnIds
3: contentUrlPath
4: contentUrlQueryParameters
5: geoip
6: hostName
7: ipranges
8: random
9: regexMatcher
10: requestHeader
11: stringMatcher
12: subnet
13: userAgent
Choose element index or name: subnet
Adding a 'subnet' element
classifier : {
name (default: ): company_matcher
type (default: subnet): ⏎
inverted (default: False): ⏎
pattern (default: ): company
}
Add another 'classifier' element to array 'classifiers'? [y/N]: ⏎
]
Generated config:
{
"classifiers": [
{
"name": "company_matcher",
"type": "subnet",
"inverted": false,
"pattern": "company"
}
]
}
Merge and apply the config? [y/n]: y
$ confcli services.routing.classifiers -w
Running wizard for resource 'classifiers'
Hint: Hitting return will set a value to its default.
Enter '?' to receive the help string
classifiers : [
classifier can be one of
1: anonymousIp
2: asnIds
3: contentUrlPath
4: contentUrlQueryParameters
5: geoip
6: hostName
7: ipranges
8: random
9: regexMatcher
10: requestHeader
11: stringMatcher
12: subnet
13: userAgent
Choose element index or name: hostName
Adding a 'hostName' element
classifier : {
name (default: ): host_name_classifier
type (default: hostName): ⏎
inverted (default: False): ⏎
patternType (default: stringMatch): ⏎
pattern (default: ): *live.example*
}
Add another 'classifier' element to array 'classifiers'? [y/N]: n
]
Generated config:
{
"classifiers": [
{
"name": "host_name_classifier",
"type": "hostName",
"inverted": false,
"patternType": "stringMatch",
"pattern": "*live.example*"
}
]
}
Merge and apply the config? [y/n]: y
$ confcli services.routing.classifiers -w
Running wizard for resource 'classifiers'
Hint: Hitting return will set a value to its default.
Enter '?' to receive the help string
classifiers : [
classifier can be one of
1: anonymousIp
2: asnIds
3: contentUrlPath
4: contentUrlQueryParameters
5: geoip
6: hostName
7: ipranges
8: random
9: regexMatcher
10: requestHeader
11: stringMatcher
12: subnet
13: userAgent
Choose element index or name: contentUrlPath
Adding a 'contentUrlPath' element
classifier : {
name (default: ): vod_matcher
type (default: contentUrlPath): ⏎
inverted (default: False): ⏎
patternType (default: stringMatch): ⏎
pattern (default: ): *vod*
}
Add another 'classifier' element to array 'classifiers'? [y/N]: n
]
Generated config:
{
"classifiers": [
{
"name": "vod_matcher",
"type": "contentUrlPath",
"inverted": false,
"patternType": "stringMatch",
"pattern": "*vod*"
}
]
}
Merge and apply the config? [y/n]: y
$ confcli services.routing.classifiers -w
Running wizard for resource 'classifiers'
Hint: Hitting return will set a value to its default.
Enter '?' to receive the help string
classifiers : [
classifier can be one of
1: anonymousIp
2: asnIds
3: contentUrlPath
4: contentUrlQueryParameters
5: geoip
6: hostName
7: ipranges
8: random
9: regexMatcher
10: requestHeader
11: stringMatcher
12: subnet
13: userAgent
Choose element index or name: contentUrlQueryParameters
Adding a 'contentUrlQueryParameters' element
classifier : {
name (default: ): bitrate_matcher
type (default: contentUrlQueryParameters): ⏎
inverted (default: False): ⏎
patternType (default: stringMatch): regex
pattern (default: ): .*bitrate=100000.*
}
Add another 'classifier' element to array 'classifiers'? [y/N]: n
]
Generated config:
{
"classifiers": [
{
"name": "bitrate_matcher",
"type": "contentUrlQueryParameters",
"inverted": false,
"patternType": "regex",
"pattern": ".*bitrate=100000.*"
}
]
}
Merge and apply the config? [y/n]: y
$ confcli services.routing.classifiers -w
Running wizard for resource 'classifiers'
Hint: Hitting return will set a value to its default.
Enter '?' to receive the help string
classifiers : [
classifier can be one of
1: anonymousIp
2: asnIds
3: contentUrlPath
4: contentUrlQueryParameters
5: geoip
6: hostName
7: ipranges
8: random
9: regexMatcher
10: requestHeader
11: stringMatcher
12: subnet
13: userAgent
Choose element index or name: userAgent
Adding a 'userAgent' element
classifier : {
name (default: ): iphone_matcher
type (default: userAgent): ⏎
inverted (default: False): ⏎
patternType (default: stringMatch): regex
pattern (default: ): i(P|p)hone
}
Add another 'classifier' element to array 'classifiers'? [y/N]: n
]
Generated config:
{
"classifiers": [
{
"name": "iphone_matcher",
"type": "userAgent",
"inverted": false,
"patternType": "regex",
"pattern": "i(P|p)hone"
}
]
}
Merge and apply the config? [y/n]: y
$ confcli services.routing.classifiers -w
Running wizard for resource 'classifiers'
Hint: Hitting return will set a value to its default.
Enter '?' to receive the help string
classifiers : [
classifier can be one of
1: anonymousIp
2: asnIds
3: contentUrlPath
4: contentUrlQueryParameters
5: geoip
6: hostName
7: ipranges
8: random
9: regexMatcher
10: requestHeader
11: stringMatcher
12: subnet
13: userAgent
Choose element index or name: asnIds
Adding a 'asnIds' element
classifier : {
name (default: ): asn_matcher
type (default: asnIds): ⏎
inverted (default: False): ⏎
asnIds <The list of ASN IDs to accept. (default: [])>: [
asnId: 1
Add another 'asnId' element to array 'asnIds'? [y/N]: y
asnId: 2
Add another 'asnId' element to array 'asnIds'? [y/N]: y
asnId: 3
Add another 'asnId' element to array 'asnIds'? [y/N]: ⏎
]
}
Add another 'classifier' element to array 'classifiers'? [y/N]: ⏎
]
Generated config:
{
"classifiers": [
{
"name": "asn_matcher",
"type": "asnIds",
"inverted": false,
"asnIds": [
1,
2,
3
]
}
]
}
Merge and apply the config? [y/n]: y
$ confcli services.routing.classifiers -w
Running wizard for resource 'classifiers'
Hint: Hitting return will set a value to its default.
Enter '?' to receive the help string
classifiers : [
classifier can be one of
1: anonymousIp
2: asnIds
3: contentUrlPath
4: contentUrlQueryParameters
5: geoip
6: hostName
7: ipranges
8: random
9: regexMatcher
10: requestHeader
11: stringMatcher
12: subnet
13: userAgent
Choose element index or name: random
Adding a 'random' element
classifier <A classifier randomly applying to clients based on the provided probability. (default: OrderedDict())>: {
name (default: ): random_matcher
type (default: random):
probability (default: 0.5): 0.7
}
Add another 'classifier' element to array 'classifiers'? [y/N]: n
]
Generated config:
{
"classifiers": [
{
"name": "random_matcher",
"type": "random",
"probability": 0.7
}
]
}
Merge and apply the config? [y/n]: y
$ confcli services.routing.classifiers -w
Running wizard for resource 'classifiers'
Hint: Hitting return will set a value to its default.
Enter '?' to receive the help string
classifiers : [
classifier can be one of
1: anonymousIp
2: asnIds
3: contentUrlPath
4: contentUrlQueryParameters
5: geoip
6: hostName
7: ipranges
8: random
9: regexMatcher
10: requestHeader
11: stringMatcher
12: subnet
13: userAgent
Choose element index or name: anonymousIp
Adding a 'anonymousIp' element
classifier : {
name (default: ): anon_ip_matcher
type (default: anonymousIp):
inverted (default: False):
}
Add another 'classifier' element to array 'classifiers'? [y/N]: n
]
Generated config:
{
"classifiers": [
{
"name": "anon_ip_matcher",
"type": "anonymousIp",
"inverted": false
}
]
}
Merge and apply the config? [y/n]: y
These classifiers can now be used to construct session groups and properly classify clients. Using the examples above, let’s create a session group classifying clients from Sweden using an Apple device:
$ confcli services.routing.sessionGroups -w
Running wizard for resource 'sessionGroups'
Hint: Hitting return will set a value to its default.
Enter '?' to receive the help string
sessionGroups : [
sessionGroup : {
name (default: ): inSwedenUsingAppleDevice
classifiers : [
classifier (default: ): sweden_matcher
Add another 'classifier' element to array 'classifiers'? [y/N]: y
classifier (default: ): apple_matcher
Add another 'classifier' element to array 'classifiers'? [y/N]: ⏎
]
}
Add another 'sessionGroup' element to array 'sessionGroups'? [y/N]: ⏎
]
Generated config:
{
"sessionGroups": [
{
"name": "inSwedenUsingAppleDevice",
"classifiers": [
"sweden_matcher",
"apple_matcher"
]
}
]
}
Merge and apply the config? [y/n]: y
Clients classified by the sweden_matcher and apple_matcher classifiers
will now be put in the session group inSwedenUsingAppleDevice. Using session
groups in routing will be demonstrated later in this document.
Advanced Classification
The above example will simply apply all classifiers in the list, and as long as they all evaluate to true for a session, that session will be tagged with the session group. For situations where this isn’t enough, classifiers can instead be combined using simple logic statements to form complex rules.
A first simple example can be a session group that accepts any viewers in either
ASN 1, 2 or 3 (corresponding to the classifier asn_matcher or living in Sweden.
This can be done by creating a session group, and adding the following logic
statement:
'sweden_matcher' OR 'asn_matcher'
A slightly more advanced case is where a session group should only contain sessions neither in any of the three ASNs nor in Sweden. This is done by negating the previous example:
NOT ('sweden_matcher' OR 'asn_matcher')
A single classifier can also be negated, rather than the whole statement, for example to accept any Swedish viewers except those in the three ASNs:
'sweden_matcher' AND NOT 'asn_matcher'
Arbitrarily complex statements can be created using classifier names, parentheses,
and the keywords AND, OR and NOT.
For example a session group accepting any Swedish viewers except those in the Stockholm region unless they are also Apple users:
'sweden_matcher' AND (NOT 'stockholm_matcher' OR 'apple_matcher')
Note that the classifier names must be enclosed in single quotes when using this syntax.
Applying this kind of complex classifier using confcli is no more difficult than adding a single classifier at a time:
$ confcli services.routing.sessionGroups. -w
Running wizard for resource 'sessionGroups'
Hint: Hitting return will set a value to its default.
Enter '?' to receive the help string
sessionGroups : [
sessionGroup : {
name (default: ): complex_group
classifiers : [
classifier (default: ): 'sweden_matcher' AND (NOT 'stockholm_matcher' OR 'apple_matcher')
Add another 'classifier' element to array 'classifiers'? [y/N]: ⏎
]
}
Add another 'sessionGroup' element to array 'sessionGroups'? [y/N]: ⏎
]
Generated config:
{
"sessionGroups": [
{
"name": "complex_group",
"classifiers": [
"'sweden_matcher' AND (NOT 'stockholm_matcher' OR 'apple_matcher')"
]
}
]
}
Merge and apply the config? [y/n]: y
2.6.4 - Accounts
If accounts are configured, the router will tag sessions as belonging to an
account. Note that if accounts are not configured or a session does not belong to
an account, a session will be tagged with the default account.
Metrics will be tracked separately for each account when applicable.
Configuration
Accounts are configured using session groups, see Classification
for more information. Using confcli, an account is configured by defining an
account name and a list of session groups for which a session must be classified
into to belong to the account. An account called account_1 can be configured by
running the command
confcli services.routing.accounts -w
Running wizard for resource 'accounts'
Hint: Hitting return will set a value to its default.
Enter '?' to receive the help string
accounts : [
account : {
name (default: ): account_1
sessionGroups <A session will be tagged as belonging to this account if it's classified into all of the listed session groups. (default: [])>: [
sessionGroup (default: ): session_group_1
Add another 'sessionGroup' element to array 'sessionGroups'? [y/N]: y
sessionGroup (default: ): session_group_2
Add another 'sessionGroup' element to array 'sessionGroups'? [y/N]: n
]
}
Add another 'account' element to array 'accounts'? [y/N]: n
]
Generated config:
{
"accounts": [
{
"name": "account_1",
"sessionGroups": [
"session_group_1",
"session_group_2"
]
}
]
}
Merge and apply the config? [y/n]: y
A session will belong to the account account_1 if it has been classified into
the two session groups session_group_1 and session_group_2.
Metrics
If using the configuration above, the metrics will be separated per account:
# TYPE num_requests counter
num_requests{account="account_1",selector="initial"} 3
# TYPE num_requests counter
num_requests{account="default",selector="initial"} 3
2.6.5 - Advanced features
2.6.5.1 - Content popularity
ESB3024 Router can make routing decisions based on content popularity. All incoming content requests are tracked to continuously update a content popularity ranking list. The popularity ranking algorithm is designed to let popular content quickly rise to the top while unpopular content decays and sinks towards the bottom.
Routing
A content popularity based routing rule can be created by running
$ confcli services.routing.rules -w
Running wizard for resource 'rules'
Hint: Hitting return will set a value to its default.
Enter '?' to receive the help string
rules : [
rule can be one of
1: allow
2: consistentHashing
3: contentPopularity
4: deny
5: firstMatch
6: random
7: rawGroup
8: rawHost
9: split
10: weighted
Choose element index or name: contentPopularity
Adding a 'contentPopularity' element
rule : {
name (default: ): content_popularity_rule
type (default: contentPopularity):
contentPopularityCutoff (default: 10): 5
onPopular (default: ): edge-streamer
onUnpopular (default: ): offload
}
Add another 'rule' element to array 'rules'? [y/N]: n
]
Generated config:
{
"rules": [
{
"name": "content_popularity_rule",
"type": "contentPopularity",
"contentPopularityCutoff": 5.0,
"onPopular": "edge-streamer",
"onUnpopular": "offload"
}
]
}
Merge and apply the config? [y/n]: y
This rule will route requests for the top 5 most popular content items to
edge-streamer and all other requests to offload.
Some configuration settings attributed to content popularity are available:
$ confcli services.routing.settings.contentPopularity
{
"contentPopularity": {
"enabled": true,
"algorithm": "score_based",
"sessionGroupNames": [],
"popularityListMaxSize": 100000,
"scoreBased": {
"popularityDecayFraction": 0.2,
"popularityPredictionFactor": 2.5,
"requestsBetweenPopularityDecay": 1000
},
"timeBased": {
"intervalsPerHour": 10
}
}
}
enabled: Whether or not to track content popularity. Whenenabledis set tofalse, content popularity will not be tracked. Note that routing on content popularity is possible even ifenabledisfalseand content popularity has been tracked previously.algorithm: Choice of content popularity tracking algorithm. There are two possible choices:score_basedortime_based(detailed below).sessionGroupNames: Names of the session groups for which content popularity should be tracked. If left empty, content popularity will be tracked for all sessions. The content popularity is tracked globally, not per session group, but the popularity metrics is only updated for sessions belonging to these groups.popularityListMaxSize: The maximum amount of unique content items to track for popularity.scoreBased: Configuration parameters unique to the score based algorithm.timeBased: Configuration parameters unique to the time based algorithm.
Size of Popularity List
The size of the popularity list is limited to prevent it growing forever. A single entry in the popularity ranking list will at most consume 180 bytes of memory. E.g. setting the maximum size to 1000 would consume at most 180⋅1,000 = 180,000 B = 0.18 MB. If the content popularity list is full, a request to a new item will replace the least popular item.
Setting a very high maximum size will not impact performance, it will only consume more memory.
Score-Based Algorithm
The requestsBetweenPopularityDecay parameter defines the number of requests
between each popularity decay update, an integral component of this feature.
The popularityPredictionFactor and popularityDecayFraction settings tune
the behaviour of the content popularity ranking algorithm, explained further
below.
Decay Update
To allow for popular content to quickly rise in popularity and unpopular content to sink, a dynamic popularity ranking algorithm is used. The goal of the algorithm is to track content popularity in real time, allowing routing decisions based on the requested content’s popularity. The algorithm is applied every decay update.
The algorithm uses current trending content to predict content popularity. The
popularityPredictionFactor setting regulates how much the algorithm should rely
on predicted popularity. A high prediction factor allows rising content to quickly
rise to high popularity but can also cause unpopular content with a sudden burst
of requests to wrongfully rise to the top. A low prediction factor can cause
stagnation in the popularity ranking, not allowing new popular content to rise
to the top.
Unpopular content decays in popularity, the magnitude of which is regulated by
popularityDecayFraction. A high value will aggressively decay content
popularity on every decay update while a low value will bloat the ranking,
causing stagnation. Once content decays to a trivially low popularity score, it
is pruned from the content popularity list.
When configuring these tuning parameters, the most crucial data to consider is
the size of your asset catalog, i.e. the number of unique contents you offer.
The recommended values, obtained through testing, are presented in the table below.
Note that the popularityPredictionFactor setting is the principal factor in
controlling the algorithm’s behaviour.
| Catalog size n | Popularity prediction factor | Popularity decay fraction |
|---|---|---|
| n < 1000 | 2.2 | 0.2 |
| 1000 < n < 5000 | 2.3 | 0.2 |
| 5000 < n < 10000 | 2.5 | 0.2 |
| n > 10000 | 2.6 | 0.2 |
Time-Based Algorithm
The time based algorithm only requires the configuration parameter
intervalsPerHour. As an example, setting intervalsPerHour to 10
would give 10 six minute intervals per hour. During each interval,
all unique content requests has an associated counter, increasing
by one for each incoming request. After an hour, all intervals have
been cycled through. The counters in the first interval will be reset
and all incoming content requests will increase the counters in the
first interval again. This cycle continues forever.
When determining a single content’s popularity, the sum of each content’s counter in all intervals is used to determine a popularity ranking.
2.6.5.2 - Consistent Hashing
Consistent hashing based routing is a feature that can be used to distribute requests to a set of hosts in a cache friendly manner. By using Agile Content’s consistent distributed hash algorithm, the amount of cache redistribution is minimized within a set of hosts. Requests for a content will always be routed to the same set of hosts, the amount of which is configured by the spread factor, allowing high cache usage. When adding or removing hosts, the algorithm minimizes cache redistribution.
Say you have the host group [s1, s2, s3, s4, s5] and have
configured spreadFactor = 3. A request for a content asset1 would then be
routed to the same three hosts with one of them being selected randomly for each
request. Requests for a different content asset2 would also be routed to one
of three different hosts, most likely a different combination of hosts than
requests for content asset1.
Example routing results with spreadFactor = 3:
- Request for
asset1→ route to one of[s1, s3, s4]. - Request for
asset2→ route to one of[s2, s4, s5]. - Request for
asset3→ route to one of[s1, s2, s5].
Since consistent hashing based routing ensures that requests for a specific content always get routed to the same set of hosts, the risk of cache misses are lowered on the hosts since they will be served the same content requests over and over again.
Note that the maximum value of
spreadFactoris 64. Consequently, the highest amount of hosts you can use in aconsistentHashingrule block is 64.
Three different hashing algorithms are available: MD5, SDBM and Murmur.
The algorithm is chosen during configuration.
Configuration
Configuring consistent hashing based routing is easily done using confcli. Let’s configure the example described above:
confcli services.routing.rules -w
Running wizard for resource 'rules'
Hint: Hitting return will set a value to its default.
Enter '?' to receive the help string
rules : [
rule can be one of
1: allow
2: consistentHashing
3: contentPopularity
4: deny
5: firstMatch
6: random
7: rawGroup
8: rawHost
9: split
10: weighted
Choose element index or name: consistentHashing
Adding a 'consistentHashing' element
rule : {
name (default: ): consistentHashingRule
type (default: consistentHashing):
spreadFactor (default: 1): 3
hashAlgorithm (default: MD5):
targets : [
target : {
target (default: ): s1
enabled (default: True):
}
Add another 'target' element to array 'targets'? [y/N]: y
target : {
target (default: ): s2
enabled (default: True):
}
Add another 'target' element to array 'targets'? [y/N]: y
target : {
target (default: ): s3
enabled (default: True):
}
Add another 'target' element to array 'targets'? [y/N]: y
target : {
target (default: ): s4
enabled (default: True):
}
Add another 'target' element to array 'targets'? [y/N]: y
target : {
target (default: ): s5
enabled (default: True):
}
Add another 'target' element to array 'targets'? [y/N]: n
]
}
Add another 'rule' element to array 'rules'? [y/N]: n
]
Generated config:
{
"rules": [
{
"name": "consistentHashingRule",
"type": "consistentHashing",
"spreadFactor": 3,
"hashAlgorithm": "MD5",
"targets": [
{
"target": "s1",
"enabled": true
},
{
"target": "s2",
"enabled": true
},
{
"target": "s3",
"enabled": true
},
{
"target": "s4",
"enabled": true
},
{
"target": "s5",
"enabled": true
}
]
}
]
}
Adding Hosts
Adding a host to the list will give an additional target for the consistent hashing algorithm to route requests to. This will shift content distribution onto the new host.
confcli services.routing.rules.consistentHashingRule.targets -w
Running wizard for resource 'targets'
Hint: Hitting return will set a value to its default.
Enter '?' to receive the help string
targets : [
target : {
target (default: ): s6
enabled (default: True):
}
Add another 'target' element to array 'targets'? [y/N]: n
]
Generated config:
{
"targets": [
{
"target": "s6",
"enabled": true
}
]
}
Merge and apply the config? [y/n]: y
Removing Hosts
There is one very important caveat of using a consistent hashing rule block. As long as you don’t modify the list of hosts, the consistent hashing algorithm will keep routing requests to the same hosts. However, if you remove a host from the block in any position except the last, the consistent hashing algorithm’s behaviour will change and the algorithm cannot maintain a minimum amount of cache redistribution.
If you’re in a situation where you have to remove a host from the routing
targets but want to keep the same consistent hashing behaviour, e.g. during
very high load, you’ll have to toggle that target’s enabled field to false.
E.g., disabling requests to s2 can be accomplished by:
$ confcli services.routing.rules.consistentHashingRule.targets.1.enabled false
services.routing.rules.consistentHashingRule.targets.1.enabled = False
$ confcli services.routing.rules.consistentHashingRule.targets.1
{
"1": {
"target": "s2",
"enabled": false
}
}
If you modify the list order or remove hosts, it is highly recommended to do so during moments where a higher rate of cache misses are acceptable.
2.6.5.3 - Security token verification
The security token verification feature allows for ESB3024 Router to only process requests that contain a correct security token. The token is generated by the client, for example in the portal, using an algorithm that it shares with the router. The router verifies the token and rejects the request if the token is incorrect.
It is beyond the scope of this document to describe how the token is generated, that is described in the Security Tokens application note that is installed with the ESB3024 Router’s extra documentation.
Setting up a Routing Rule
The token verification is performed by calling the verify_security_token()
function from a routing rule. The function returns 1 if the token is
correct, otherwise it returns 0. It should typically be called from the
first routing rule, to make requests with bad tokens fail as early as possible.
The confcli example assumes that the router already has rules configured, with
an entry point named select_cdn. Token verification is enabled by inserting an
“allow” rule first in the rule list.
confcli services.routing.rules -w
Running wizard for resource 'rules'
Hint: Hitting return will set a value to its default.
Enter '?' to receive the help string
rules : [
rule can be one of
1: allow
2: consistentHashing
3: contentPopularity
4: deny
5: firstMatch
6: random
7: rawGroup
8: rawHost
9: split
10: weighted
Choose element index or name: allow
Adding a 'allow' element
rule : {
name (default: ): token_verification
type (default: allow):
condition (default: always()): verify_security_token()
onMatch (default: ): select_cdn
}
Add another 'rule' element to array 'rules'? [y/N]: n
]
Generated config:
{
"rules": [
{
"name": "token_verification",
"type": "allow",
"condition": "verify_security_token()",
"onMatch": "select_cdn"
}
]
}
Merge and apply the config? [y/n]: y
$ confcli services.routing.entrypoint token_verification
services.routing.entrypoint = 'token_verification'
"routing": {
"id": "token_verification",
"member_order": "sequential",
"members": [
{
"id": "token_verification.0.select_cdn",
"member_order": "weighted",
"members": [
...
],
"weight_function": "return verify_security_token() ~= 0"
},
{
"id": "token_verification.1.rejected",
"member_order": "sequential",
"members": [],
"weight_function": "return 1"
}
],
"weight_function": "return 100"
},Configuring Security Token Options
The secret parameter is not part of the router request, but needs to be
configured separately in the router. That can be done with the host-config
tool that is installed with the router.
Besides configuring the secret, host-config can also configure floating
sessions and a URL prefix. Floating sessions are sessions that are not tied to a
specific IP address. When that is enabled, the token verification will not take
the IP address into account when verifying the token.
The security token verification is configured per host, where a host is the name
of the host that the request was sent to. This makes it possible for a router to
support multiple customer accounts, each with their own secret. If no
configuration is found for a host, a configuration with the name default is
used.
host-config supports three commands: print, set and delete.
The print command prints the current configuration for a host. The following
parameters are supported:
host-config print [-n <host-name>]
By default it prints the configuration for all hosts, but if the optional -n
flag is given it will print the configuration for a single host.
Set
The set command sets the configuration for a host. The configuration is given
as command line parameters. The following parameters are supported:
host-config set
-n <host-name>
[-f floating]
[-p url-prefix]
[-r <secret-to-remove>]
[-s <secret-to-add>]
-n <host-name>- The name of the host to configure.-f floating- A boolean option that specifies if floating sessions are accepted. The parameter accepts the valuestrueandfalse.-p url-prefix- A URL prefix that is used for identifying requests that come from a certain account. This is not used when verifying tokens.-r <secret-to-remove>- A secret that should be removed from the list of secrets.-s <secret-to-add>- A secret that should be added to the list of secrets.
For example, to set the secret “secret-1” and enable floating sessions for the default host, the following command can be used:
host-config set -n default -s secret-1 -f true
The set command only touches the configuration options that are mentioned on
the command line, so the following command line will add a second secret to the
default host without changing the floating session setting:
host-config set -n default -s secret-2
It is possible to set multiple secrets per host. This is useful when updating a secret, then both the old and the new secret can be valid during the transition period. After the transition period the old secret can be removed by typing:
host-config set -n default -r secret-1
Delete
The delete command deletes the configuration for a host. It supports the
following parameters:
host-config delete -n <host-name>
For example, to delete the configuration for example.com, the following
command can be used:
host-config delete -n example.com
Global Options
host-config also has a few global options. They are:
-k <security-key>- The security key that is used when communicating with the router. This is normally retrieved automatically.-h- Print a help message and exit.-r <router>- The router to connect to. This default tolocalhost, but can be changed to connect to a remote router.-v- Verbose output, can be given multiple times.
Debugging Security Token Verification
The security token verification only logs messages when the log level is set to
4 or higher. Then it will only log some errors. It is possible to enable more
verbose logging using the security-token-config that is installed together
with the router.
When verbose logging is enabled, the router will log information about the token verification, including the configured token secrets, so it needs to be used with care.
The logged lines are prefixed with verify_security_token.
The security-token-config tool supports the commands print and set.
The print command prints the current configuration. If nothing is configured
it will not print anything.
Set
The set command sets the configuration. The following parameters are
supported:
security-token-config set
[-d <enabled>]
-d <enabled>- A boolean option that specifies if debug logging should be enabled or not. The parameter accepts the valuestrueandfalse.
2.6.5.4 - Subnets API
ESB3024 Router provides utilities to quickly match clients into subnets. Any combination of IPv4 and IPv6 addresses can be used. To begin, a JSON file is needed, defining all subnets, e.g:
{
"255.255.255.255/24": "area1",
"255.255.255.255/16": "area2",
"255.255.255.255/8": "area3",
"90.90.1.3/16": "area4",
"5.5.0.4/8": "area5",
"2a02:2e02:9bc0::/48": "area6",
"2a02:2e02:9bc0::/32": "area7",
"2a02:2e02:9bc0::/16": "area8",
"2a02:2e02:9de0::/44": "combined_area",
"2a02:2e02:ada0::/44": "combined_area"
}
and PUT it to the endpoint :5001/v1/subnets or :5001/v2/subnets, the
API version doesn’t matter for subnets:
curl -k -T subnets.json -H "Content-Type: application/json" https://router-host:5001/v1/subnets
Note that it is possible for several subnet CIDR strings to share the same label, effectively grouping them together.
The router provides the built-in function in_subnet(subnet_name) that
can to make routing decisions based on a client’s subnet. For more details, see
Built-in Lua functions.
To configure a rule that only allows clients in the area1 subnet, run the
command
$ confcli services.routing.rules -w
Running wizard for resource 'rules'
Hint: Hitting return will set a value to its default.
Enter '?' to receive the help string
rules : [
rule can be one of
1: allow
2: consistentHashing
3: contentPopularity
4: deny
5: firstMatch
6: random
7: rawGroup
8: rawHost
9: split
10: weighted
Choose element index or name: allow
Adding a 'allow' element
rule : {
name (default: ): only_allow_area1
type (default: allow):
condition (default: always()): in_subnet('area1')
onMatch (default: ): example-host
}
Add another 'rule' element to array 'rules'? [y/N]: n
]
Generated config:
{
"rules": [
{
"name": "only_allow_area1",
"type": "allow",
"condition": "in_subnet('area1')",
"onMatch": "example-host"
}
]
}
Merge and apply the config? [y/n]: y
Invalid IP-addresses will be omitted during subnet list construction accompanied by a message in the log displaying the invalid IP address.
2.6.5.5 - Lua Features
2.6.5.5.1 - Built-in Lua Functions
This section details all built-in Lua functions provided by the router.
Logging Functions
The router provides Lua logging functionality that is convenient when creating custom Lua functions. A prefix can be added to the log message which is useful to differentiate log messages from different lua files. At the top of the Lua source file, add the line
local log = log.add_prefix("my_lua_file")
to prepend all log messages with "my_lua_file".
The logging functions support formatting and common log levels:
log.critical('A log message with number %d', 1.5)
log.error('A log message with string %s', 'a string')
log.warning('A log message with integer %i', 1)
log.info('A log message with a local number variable %d', some_local_number)
log.debug('A log message with a local string variable %s', some_local_string)
log.trace('A log message with a local integer variable %i', some_local_integer)
log.message('A log message')
Many of the router’s built-in Lua functions use the logging functions.
Predictive Load-Balancing Functions
Predictive load balancing is a tool that can be used to avoid overloading hosts with traffic. Consider the case where a popular event starts at a certain time, let’s say 12 PM. A spike in traffic will be routed to the hosts that are streaming the content at 12 PM, most of them starting at low bitrates. A host might have sufficient bandwidth left to take on more clients but when the recently connected clients start ramping up in video quality and increase their bitrate, the host can quickly become overloaded, possibly dropping incoming requests or going offline. Predictive load balancing solves this issue by considering how many times a host recently been redirected to.
Four functions for predictive load balancing are provided by the router
that can be used when constructing conditions/weight functions: host_bitrate()
, host_bitrate_custom(), host_has_bw() and host_has_bw_custom().
All require data to be supplied to the selection input API and apply
only to leaf nodes in the routing tree. In order for predictive load balancing
to work properly the data must be updated at regular intervals. The data needs
to be supplied by the target system.
These functions are suitable to used as host health checks. To configure host health checks, see configuring CDNs and hosts.
Note that host_bitrate() and host_has_bw() rely on data supplied by metrics
agents, detailed in Cache hardware metrics: monitoring and routing.
host_bitrate_custom() and host_has_bw_custom() rely on
manually supplied selection input data, detailed in selection input API. The
bitrate unit depends on the data submitted to the selection input API.
Example Metrics
The data supplied to the selection input API by the metrics agents uses the following structure:
{
"streamer-1": {
"hardware_metrics": {
"/": {
"free": 1741596278784,
"total": 1758357934080,
"used": 16761655296,
"used_percent": 0.9532561585516977
},
"cpu_load1": 0.02,
"cpu_load15": 0.12,
"cpu_load5": 0.02,
"mem_available": 4895789056,
"mem_available_percent": 59.551760354263074,
"mem_total": 8221065216,
"mem_used": 2474393600,
"n_cpus": 4
},
"per_interface_metrics": {
"eths1": {
"link": 1,
"interface_up": true,
"megabits_sent": 22322295739.378456,
"megabits_sent_rate": 8085.2523952,
"speed": 100000
}
}
}
}
Note that all built-in functions interacting with selection input values support indexing into nested selection input data. Consider the selection input data in above. The nested values can be accessed by using dots between the keys:
si('streamer-1.per_interface_metrics.eths1.megabits_sent_rate')
Note that the whole selection input variable name must be within single quotes.
The function si() is documented under
general purpose functions.
host_bitrate({})
host_bitrate() returns the predicted bitrate (in megabits per second) of
the host after the recently connected clients start ramping up in streaming
quality. The function accepts an argument table with the following keys:
interface: The name of the interface to use for bitrate prediction.- Optional
avg_bitrate: the average bitrate per client, defaults to 6 megabits per second. - Optional
num_routers: the number of routers that can route to this host, defaults to 1. This is important to accurately predict the incoming load if multiple routers are used. - Optional
host: The name of the host to use for bitrate prediction. Defaults to the current host if not provided.
Required Selection Input Data
This function relies on the field megabits_sent_rate, supplied by the Telegraf
metrics agent, as seen in example metrics. If these fields
are missing from your selection input data, this function will not work.
Examples of usage:
host_bitrate({interface='eths0'})
host_bitrate({avg_bitrate=1, interface='eths0'})
host_bitrate({num_routers=2, interface='eths0'})
host_bitrate({avg_bitrate=1, num_routers=4, interface='eths0'})
host_bitrate({avg_bitrate=1, num_routers=4, host='custom_host', interface='eths0'})
host_bitrate({}) calculates the predicted bitrate as:
predicted_host_bitrate = current_host_bitrate + (recent_connections * avg_bitrate * num_routers)
host_bitrate_custom({})
Same functionality as host_bitrate() but uses a custom selection input
variable as bitrate input instead of accessing hardware metrics. The function
accepts an argument table with the following keys:
custom_bitrate_var: The name of the selection input variable to be used for accessing current host bitrate.- Optional
avg_bitrate: seehost_bitrate()documentation above. - Optional
num_routers: seehost_bitrate()documentation above.
host_bitrate_custom({custom_bitrate_var='host1_current_bitrate'})
host_bitrate_custom({avg_bitrate=1, custom_bitrate_var='host1_current_bitrate'})
host_bitrate_custom({num_routers=4, custom_bitrate_var='host1_current_bitrate'})
host_has_bw({})
Instead of accessing the predicted bitrate of a host through host_bitrate(),
host_has_bw() returns 1 if the host is predicted to have enough
bandwidth left to take on more clients after recent connections ramp up in
bitrate, otherwise it returns 0. The function accepts an argument table with the
following keys:
interface: seehost_bitrate()documentation above.- Optional
avg_bitrate: seehost_bitrate()documentation above. - Optional
num_routers: seehost_bitrate()documentation above. - Optional
host: seehost_bitrate()documentation above. - Optional
margin: the bitrate (megabits per second) headroom that should be taken into account during calculation, defaults to 0.
host_has_bw({}) returns whether or not the following statement is true:
predicted_host_bitrate + margin < host_bitrate_capacity
Required Selection Input Data
host_has_bw({}) relies on the fields megabits_sent_rate and speed,
supplied by the Telegraf metrics agent, as seen in
example metrics. If these fields are missing from your
selection input data, this function will not work.
Examples of usage:
host_has_bw({interface='eths0'})
host_has_bw({margin=10, interface='eth0'})
host_has_bw({avg_bitrate=1, interface='eth0'})
host_has_bw({num_routers=4, interface='eth0'})
host_has_bw({host='custom_host', interface='eth0'})
host_has_bw_custom({})
Same functionality as host_has_bw() but uses a custom selection input
variable as bitrate. It also uses a number or a custom selection input
variable for the capacity. The function accepts an argument table
with the following keys:
custom_capacity_var: a number representing the capacity of the network interface OR the name of the selection input variable to be used for accessing host capacity.custom_bitrate_var: seehost_bitrate_custom()documentation- Optional
margin: seehost_has_bw()documentation above. above. - Optional
avg_bitrate: seehost_bitrate()documentation above. - Optional
num_routers: seehost_bitrate()documentation above.
Examples of usage:
host_has_bw_custom({custom_capacity_var=10000, custom_bitrate_var='streamer-1.per_interface_metrics.eths1.megabits_sent_rate'})
host_has_bw_custom({custom_capacity_var='host1_capacity', custom_bitrate_var='streamer-1.per_interface_metrics.eths1.megabits_sent_rate'})
host_has_bw_custom({margin=10, custom_capacity_var=10000, custom_bitrate_var='streamer-1.per_interface_metrics.eths1.megabits_sent_rate'})
host_has_bw_custom({avg_bitrate=1, custom_capacity_var=10000, custom_bitrate_var='streamer-1.per_interface_metrics.eths1.megabits_sent_rate'})
host_has_bw_custom({num_routers=4, custom_capacity_var=10000, custom_bitrate_var='streamer-1.per_interface_metrics.eths1.megabits_sent_rate'})
Health Check Functions
This section details built-in Lua functions that are meant to be used for host health checks. Note that these functions rely on data supplied by metric agents detailed in Cache hardware metrics: monitoring and routing. Make sure cache hardware metrics are supplied to the router before using any of these functions.
cpu_load_ok({})
The function accepts an optional argument table with the following keys:
- Optional
host: The name of the host. Defaults to the name of the selected host if not provided. - Optional
cpu_load5_limit: The acceptable limit for the 5-minute CPU load. Defaults to 0.9 if not provided.
The function returns 1 if the five minute CPU load average is below their respective limits, and 0 otherwise.
Examples of usage:
cpu_load_ok()
cpu_load_ok({host = 'custom_host'})
cpu_load_ok({cpu_load5_limit = 0.8})
cpu_load_ok({host = 'custom_host', cpu_load5_limit = 0.8})
memory_usage_ok({})
The function accepts an optional argument table with the following keys:
- Optional
host: The name of the host. Defaults to the host of the selected host if not provided. - Optional
memory_usage_limit: The acceptable limit for the memory usage. Defaults to 0.9 if not provided.
The function returns 1 if the memory usage is below the limit, and 0 otherwise.
Examples of usage:
memory_usage_ok()
memory_usage_ok({host = 'custom_host'})
memory_usage_ok({memory_usage_limit = 0.7})
memory_usage_ok({host = 'custom_host', memory_usage_limit = 0.7})
interfaces_online({})
The function accepts an argument table with the following keys:
- Required
interfaces: A string or a table of strings representing the network interfaces to check. - Optional
host: The name of the host. Defaults to the host of the selected host if not provided.
The function returns 1 if all the specified interfaces are online, and 0 otherwise.
Required Selection Input Data
This function relies on the fields link and interface_up, supplied by
the Telegraf metrics agent, as seen in example metrics. If
these fields are missing from your selection input data, this function will not
work.
Examples of usage:
interfaces_online({interfaces = 'eth0'})
interfaces_online({interfaces = {'eth0', 'eth1'}})
interfaces_online({host = 'custom_host', interfaces = 'eth0'})
interfaces_online({host = 'custom_host', interfaces = {'eth0', 'eth1'}})
health_check({})
The function accepts an optional argument table with the following keys:
- Required
interfaces: A string or a table of strings representing the network interfaces to check. - Optional
host: The name of the host. Defaults to the host of the selected host if not provided. - Optional
cpu_load5_limit: The acceptable limit for the 5-minute CPU load. Defaults to 0.9 if not provided. - Optional
memory_usage_limit: The acceptable limit for the memory usage. Defaults to 0.9 if not provided.
The function calls the health check functions cpu_load_ok({}),
memory_usage_ok({}) and interfaces_online({}). The functions returns 1 if
all these functions returned 1, otherwise it returns 0.
Examples of usage:
health_check({interfaces = 'eths0'})
health_check({host = 'custom_host', interfaces = 'eths0'})
health_check({cpu_load5_limit = 0.7, memory_usage_limit = 0.8, interfaces = 'eth0'})
health_check({host = 'custom_host', cpu_load5_limit = 0.7, memory_usage_limit = 0.8, interfaces = {'eth0', 'eth1'}})
General Purpose Functions
The router supplies a number of general purpose Lua functions.
always()
Always returns 1.
never()
Always returns 0. Useful for temporarily disabling caches by using it as a health check.
Examples of usage:
always()
never()
si(si_name)
The function reads the value of the selection input variable si_name and
returns it if it exists, otherwise it returns 0. The function accepts a string
argument for the selection input variable name.
Examples of usage:
si('some_selection_input_variable_name')
si('streamer-1.per_interface_metrics.eths1.megabits_sent_rate')
Comparison functions
All comparison functions use the form function(si_name, value) and compares
the selection input value with the name si_name with value.
ge(si_name, value) - greater than or equal
gt(si_name, value) - greater than
le(si_name, value) - less than or equal
lt(si_name, value) - less than
eq(si_name, value) - equal to
neq(si_name, value) - not equal to
Examples of usage:
ge('streamer-1.hardware_metrics.mem_available_percent', 30)
gt('streamer-1.hardware_metrics./.free', 1000000000)
le('streamer-1.hardware_metrics.cpu_load5', 0.8)
lt('streamer-1.per_interface_metrics.eths1.megabits_sent_rate', 9000)
eq('streamer-1.per_interface_metrics.eths1.link.', 1)
neq('streamer-1.hardware_metrics.n_cpus', 4)
Session Checking Functions
in_subnet(subnet)
Returns 1 if the current session belongs to subnet, otherwise it returns 0.
See Subnets API for more details on how to use
subnets in routing. The function accepts a string argument for the subnet name.
Examples of usage:
in_subnet('stockholm')
in_subnet('unserviced_region')
in_subnet('some_other_subnet')
These functions checks the current session’s session groups.
in_session_group(session_group)
Returns 1 if the current session has been classified into session_group,
otherwise it returns 0. The function accepts a string argument for the session
group name.
in_any_session_group({})
Returns 1 if the current session has been classified into any of
session_groups, otherwise it returns 0. The function accepts a table array of
strings as argument for the session group names.
in_all_session_groups({})
Returns 1 if the current session has been classified into all of
session_groups, otherwise it returns 0. The function accepts a table array of
strings as argument for the session group names.
Examples of usage:
in_session_group('safari_browser')
in_any_session_group({ 'in_europe', 'in_asia'})
in_all_session_group({ 'vod_content', 'in_america'})
Other built-in functions
base64_encode(data)
base64_encode(data) returns the base64 encoded string of data.
Arguments:
data: The data to encode.
Example:
print(base64_encode('Hello world!'))
SGVsbG8gd29ybGQh
base64_decode(data)
base64_decode(data) returns the decoded data of the base64 encoded string, as
a raw binary string.
Arguments:
data: The data to decode.
Example:
print(base64_decode('SGVsbG8gd29ybGQh'))
Hello world!
base64_url_encode(data)
base64_url_encode(data) returns the base64 URL encoded string of data.
Arguments:
data: The data to encode.
Example:
print(base64_url_encode('ab~~'))
YWJ-fg
base64_url_decode(data)
base64_url_decode(data) returns the decoded data of the base64 URL encoded
string, as a raw binary string.
Arguments:
data: The data to decode.
Example:
print(base64_url_decode('YWJ-fg'))
ab~~
to_hex_string(data)
to_hex_string(data) returns a string containing the hexadecimal
representation of the string data.
Arguments:
data: The data to convert.
Example:
print(to_hex_string('Hello world!\n'))
48656c6c6f20776f726c64210a
from_hex_string(data)
from_hex_string(data) returns a string containing the byte representation of
the hexadecimal string data.
Arguments:
data: The data to convert.
Example:
print(from_hex_string('48656c6c6f20776f726c6421'))
Hello world!
empty(table)
empty(table) returns true if table is empty, otherwise it returns false.
Arguments:
table: The table to check.
Examples:
print(tostring(empty({})))
true
print(tostring(empty({1, 2, 3})))
false
md5(data)
md5(data) returns the MD5 hash of data, as a hexstring.
Arguments:
data: The data to hash.
Example:
print(md5('Hello world!'))
86fb269d190d2c85f6e0468ceca42a20
sha256(date)
sha256(data) returns the SHA-256 hash of data, as a hexstring.
Arguments:
data: The data to hash.
Example:
print(sha256('Hello world!'))
c0535e4be2b79ffd93291305436bf889314e4a3faec05ecffcbb7df31ad9e51a
hmac_sha256(key, data)
hmac_sha256(key, data) returns the HMAC-SHA-256 hash of data using key,
as a base64 encoded string.
Note: This function is to be modified to return raw binary data instead of a base64 encoded string.
Arguments:
key: The key to use.data: The data to hash.
Example:
print(hmac_sha256('secret', 'Hello world!'))
pl9M/PX0If8r4FLgZCvMvP6xJu5z68T+OzgZZDAutjI=
hmac_sha384(key, data)
hmac_sha384(key, data) returns the HMAC-SHA-384 hash of data using key,
as a string containing raw binary data.
Arguments:
key: The key to use.data: The data to hash.
Example:
print(to_hex_string(hmac_sha384('secret', 'Hello world!')))
917516d93d3509a371a129ca50933195dd659712652f07ba5792cbd5cade5e6285a841808842cfa0c3c69c8fb234468a
hmac_sha512(key, data)
hmac_sha512(key, data) returns the HMAC-SHA-512 hash of data using key,
as a string containing raw binary data.
Arguments:
key: The key to use.data: The data to hash.
Example:
print(to_hex_string(hmac_sha512('secret', 'Hello world!')))
dff6c00943387f9039566bfee0994de698aa2005eecdbf12d109e17aff5bbb1b022347fbf4bd94ede7c7d51571022525556b64f9d5e4386de99d0025886eaaff
hmac_md5(key, data)
hmac_md5(key, data) returns the HMAC-MD5 hash of data using key,
as a string containing raw binary data.
Arguments:
key: The key to use.data: The data to hash.
Example:
print(to_hex_string(hmac_md5('secret', 'Hello world!')))
444fad0d374d14369d6b595062da5d91
regex_replace
regex_replace(data, pattern, replacement) returns the string data with all
occurrences of the regular expression pattern replaced with replacement.
Arguments:
data: The data to replace.pattern: The regular expression pattern to match.replacement: The replacement string.
Examples:
print(regex_replace('Hello world!', 'world', 'Lua'))
Hello Lua!
print(regex_replace('Hello world!', 'l+', 'lua'))
Heluao worluad!
If the regular expression pattern is invalid, regex_replace() returns an
error message.
Examples:
print(regex_replace('Hello world!', '*', 'lua'))
regex_error caught: regex_error
unixtime()
unixtime() returns the current Unix timestamp, as seconds since midnight,
Janury 1 1970 UTC, as an integer.
Arguments:
- None
Example:
print(unixtime())
1733517373
now()
now() returns the current Unix timestamp, the number of seconds since
midnight, Janury 1 1970 UTC, as an number with decimals.
Arguments:
- None
Example:
print(now())
1733517373.5007
time_to_epoch(time, fmt)
time_to_epoch(time, fmt) returns the Unix timestamp, the number of seconds
since midnight, Janury 1 1970 UTC, of the time string time, which is
formatted according to the format string fmt.
Arguments:
time: The time string to convert.fmt(Optional): The format string of the time string, as specified by the POSIX function strptime(). If not specified, it defaults to “%Y-%m-%dT%TZ”.
Examples:
print(time_to_epoch('1972-04-17T06:10:20Z'))
72339020
print(time_to_epoch('17/04-72 06:20:30', '%d/%m-%y %H:%M:%S'))
72339630
epoch_to_time(time, format)
epoch_to_time(time, format) returns the time string of the Unix timestamp
time, formatted according to format.
Arguments:
time: The Unix timestamp to convert, as a number.format(Optional): The format string of the time string, as specified by the POSIX function strftime(). If not specified, it defaults to “%Y-%m-%dT%TZ”.
Examples:
print(epoch_to_time(123456789))
1973-11-29T21:33:09Z
print(epoch_to_time(1234567890, '%d/%m-%y %H:%M:%S'))
13/02-09 23:31:30
get_consistent_hashing_weight(contentName, nodeIdsString, spreadFactor, hashAlgoritm, nodeId)
get_consistent_hashing_weight(contentName, nodeIdsString, spreadFactor, hashAlgoritm, nodeId)
returns the priority that node nodeId has in the list of preferred nodes,
determined using consistent hashing. The first spreadfactor:th nodes should
have equal weights to randomize requests between them. Remaining nodes should
have decrementally decreasing weights to honor node priority during failover.
Arguments:
contentName: The name of the content to hash.nodeIdsString: A string containing the node IDs to hash, on the format ‘0,1,2,3’.spreadFactor: The number of nodes to spread the requests between.hashAlgorithm: Which hash algorithm to use. Supported algorithms are “MD5”, “SDBM” and “Murmur”. Default is “MD5”.nodeId: The ID of the node to calculate the weight for.
Examples:
print(get_consistent_hashing_weight('/vod/film1', '0,1,2,3,4,5', 3, 'MD5', 3))
6
print(get_consistent_hashing_weight('/vod/film2', '0,1,2,3,4,5', 3, 'MD5', 3))
4
print(get_consistent_hashing_weight('/vod/film2', '0,1,2', 2, 'Murmur', 1))
2
See Consistent Hashing for more information about consistent hashing.
expand_ipv6_address(address)
expand_ipv6_address(address) returns the fully expanded form of the IPv6
address address.
Arguments:
address: The IPv6 address to expand. If the address is not a valid IPv6 address, the function returns the contents ofaddressunmodified. This allows for the function to pass through IPv4 addresses.
Examples:
print(expand_ipv6_address('2001:db8::1'))
2001:0db8:0000:0000:0000:0000:0000:0001
print(expand_ipv6_address('198.51.100.5'))
198.51.100.5
Configuration examples
Many of the functions documented are suitable to use in host health checks. To configure host health checks, see configuring CDNs and hosts. Here are some configuration examples of using the built-in Lua functions, utilizing the example metrics:
"healthChecks": [
"gt('streamer-1.hardware_metrics.mem_available_percent', 20)", // More than 20% memory is left
"lt('streamer-1.per_interface_metrics.eths1.megabits_sent_rate', 9000)" // Current bitrate is lower than 9000 Mbps
"host_has_bw({host='streamer-1', interface='eths1', margin=1000})", // host_has_bw() uses 'streamer-1.per_interface_metrics.eths1.speed' to determine if there is enough bandwidth left with a 1000 Mbps margin
"interfaces_online({host='streamer-1', interfaces='eths1'})",
"memory_usage_ok({host='streamer-1'})",
"cpu_load_ok({host='streamer-1'})",
"health_check({host='streamer-1', interfaces='eths1'})" // Combines interfaces_online(), memory_usage_ok(), cpu_load_ok()
]
2.6.5.5.2 - Global Lua Tables
There are multiple global tables containing important data available while writing Lua code for the router.
selection_input
Contains arbitrary, custom fields fed into the router by clients, see API overview for details on how to inject data into this table.
Note that the selection_input table is iterable.
Usage examples:
print(selection_input['some_value'])
-- Iterate over table
if selection_input then
for k, v in pairs(selection_input) do
print('here is '..'selection_input!')
print(k..'='..v)
end
else
print('selection_input is nil')
end
session_groups
Defines a mapping from session group name to boolean, indicating whether
the session belongs to the session group or not.
Usage examples:
if session_groups.vod then print('vod') else print('not vod') end
if session_groups['vod'] then print('vod') else print('not vod') end
session_count
Provides counters of number of session types per session group. The table
uses the structure qoe_score.<session_type>.<session_group>.
Usage examples:
print(session_count.instream.vod)
print(session_count.initial.vod)
qoe_score
Provides the quality of experience score per host per session group. The table
uses the structure qoe_score.<host>.<session_group>.
Usage examples:
print(qoe_score.host1.vod)
print(qoe_score.host1.live)
request
Contains data related to the HTTP request between the client and the router.
request.method- Description: HTTP request method.
- Type:
string - Example:
'GET','POST'
request.body- Description: HTTP request body string.
- Type:
stringornil - Example:
'{"foo": "bar"}'
request.major_version- Description: Major HTTP version such as
xinHTTP/x.1. - Type:
integer - Example:
1
- Description: Major HTTP version such as
request.minor_version- Description: Minor HTTP version such as
xinHTTP/1.x. - Type:
integer - Example:
1
- Description: Minor HTTP version such as
request.protocol- Description: Transfer protocol variant.
- Type:
string - Example:
'HTTP','HTTPS'
request.client_ip- Description: IP address of the client issuing the request.
- Type:
string - Example:
'172.16.238.128'
request.path_with_query_params- Description: Full request path including query parameters.
- Type:
string - Example:
'/mycontent/superman.m3u8?b=y&c=z&a=x'
request.path- Description: Request path without query parameters.
- Type:
string - Example:
'/mycontent/superman.m3u8'
request.query_params- Description: The query parameter string.
- Type:
string - Example:
'b=y&c=z&a=x'
request.filename- Description: The part of the path following the final slash, if any.
- Type:
string - Example:
'superman.m3u8'
request.subnet- Description: Subnet of
client_ip. - Type:
stringornil - Example:
'all'
- Description: Subnet of
session
Contains data related to the current session.
session.client_ip- Description: Alias for
request.client_ip. See documentation for table request above.
- Description: Alias for
session.path_with_query_params- Description: Alias for
request.path_with_query_params. See documentation for table request above.
- Description: Alias for
session.path- Description: Alias for
request.path. See documentation for table request above.
- Description: Alias for
session.query_params- Description: Alias for
request.query_params. See documentation for table request above.
- Description: Alias for
session.filename- Description: Alias for
request.filename. See documentation for table request above.
- Description: Alias for
session.subnet- Description: Alias for
request.subnet. See documentation for table request above.
- Description: Alias for
session.host- Description: ID of the currently selected host for the session.
- Type:
stringornil - Example:
'host1'
session.id- Description: ID of the session.
- Type:
string - Example:
'8eb2c1bdc106-17d2ff-00000000'
session.session_type- Description: Type of the session.
- Type:
string - Example:
'initial'or'instream'. Identical to the value of theTypeargument of the session translation function.
session.is_managed- Description: Identifies managed sessions.
- Type:
boolean - Example:
trueifType/session.session_typeis'instream'
request_headers
Contains the headers from the request between the client and the router, keyed by name.
Usage example:
print(request_headers['User-Agent'])
request_query_params
Contains the query parameters from the request between the client and the router, keyed by name.
Usage example:
print(request_query_params.a)
session_query_params
Alias for metatable request_query_params.
response
Contains data related to the outgoing response apart from the headers.
response.body- Description: HTTP response body string.
- Type:
stringornil - Example:
'{"foo": "bar"}'
response.code- Description: HTTP response status code.
- Type:
integer - Example:
200,404
response.text- Description: HTTP response status text.
- Type:
string - Example:
'OK','Not found'
response.major_version- Description: Major HTTP version such as
xinHTTP/x.1. - Type:
integer - Example:
1
- Description: Major HTTP version such as
response.minor_version- Description: Minor HTTP version such as
xinHTTP/1.x. - Type:
integer - Example:
1
- Description: Minor HTTP version such as
response.protocol- Description: Transfer protocol variant.
- Type:
string - Example:
'HTTP','HTTPS'
response_headers
Contains the response headers keyed by name.
Usage example:
print(response_headers['User-Agent'])
2.6.5.5.3 - Request Translation Function
Specifies the body of a Lua function that inspects every incoming HTTP request and overwrites individual fields before further processing by the router.
Returns nil when nothing is to be changed, or HTTPRequest(t) where t
is a table with any of the following optional fields:
Method- Description: Replaces the HTTP request method in the request being processed.
- Type:
string - Example:
'GET','POST'
Path- Description: Replaces the request path in the request being processed.
- Type:
string - Example:
'/mycontent/superman.m3u8'
ClientIp- Description: Replaces client IP address in the request being processed.
- Type:
string - Example:
'172.16.238.128'
Body- Description: Replaces body in the request being processed.
- Type:
stringornil - Example:
'{"foo": "bar"}'
QueryParameters- Description: Adds, removes or replaces individual query parameters in the request being processed.
- Type: nested
table(indexed by number) representing an array of query parameters as{[1]='Name',[2]='Value'}pairs that are added to the request being processed, or overwriting existing query parameters with colliding names. To remove a query parameter from the request, specifynilas value, i.e.QueryParameters={..., {[1]='foo',[2]=nil} ...}. Returning a query parameter with a name but no value, such asain the request'/index.m3u8?a&b=22'is currently not supported.
Headers- Description: Adds, removes or replaces individual headers in the request being processed.
- Type: nested
table(indexed by number) representing an array of request headers as{[1]='Name',[2]='Value'}pairs that are added to the request being processed, or overwriting existing request headers with colliding names. To remove a header from the request, specifynilas value, i.e.Headers={..., {[1]='foo',[2]=nil} ...}. Duplicate names are supported. A multi-value header such asFoo: bar1,bar2is defined by specifyingHeaders={..., {[1]='foo',[2]='bar1'}, {[1]='foo',[2]='bar2'}, ...}.
OutgoingRequest: See Sending HTTP requests from translation functions for more information.
Example of a request_translation_function body that sets the request path
to a hardcoded value and adds the hardcoded query parameter a=b:
-- Statements go here
print('Setting hardcoded Path and QueryParameters')
return HTTPRequest({
Path = '/content.mpd',
QueryParameters = {
{'a','b'}
}
})
Arguments
The following (iterable) arguments will be known by the function:
QueryParameters
Type: nested
table(indexed by number).Description: Array of query parameters as
{[1]='Name',[2]='Value'}pairs that were present in the query string of the request. Format identical to theHTTPRequest.QueryParameters-field specified for the return value above.Example usage:
for _, queryParam in pairs(QueryParameters) do print(queryParam[1]..'='..queryParam[2]) end
Headers
Type: nested
table(indexed by number).Description: Array of request headers as
{[1]='Name',[2]='Value'}pairs that were present in the request. Format identical to theHTTPRequest.Headers-field specified for the return value above. A multi-value header such asFoo: bar1,bar2is seen inrequest_translation_functionasHeaders={..., {[1]='foo',[2]='bar1'}, {[1]='foo',[2]='bar1'}, ...}.Example usage:
for _, header in pairs(Headers) do print(header[1]..'='..header[2]) end
Additional Data
In addition to the arguments above, the following Lua tables, documented in Global Lua Tables, provide additional data that is available when executing the request translation function:
If the request translation function modifies the request, the request,
request_query_params and request_headers tables will be updated with the
modified request and made available to the routing rules.
2.6.5.5.4 - Session Translation Function
Specifies the body of a Lua function that inspects a newly created session and may override its suggested type from “initial” to “instream” or vice versa. A number of helper functions are provided to simplify changing the session type.
Returns nil when the session type is to remain unchanged, or Session(t)
where t is a table with a single field:
Type- Description: New type of the session.
- Type:
string - Example:
'instream','initial'
OutgoingRequest: See Sending HTTP requests from translation functions for more information.
Basic Configuration
It is possible to configure the maximum number of simultaneous managed sessions
on the router. If the maximum number is reached, no more managed sessions can be
created. Using confcli, it can be configured by running
$ confcli services.routing.tuning.general.maxActiveManagedSessions
{
"maxActiveManagedSessions": 1000
}
$ confcli services.routing.tuning.general.maxActiveManagedSessions 900
services.routing.tuning.general.maxActiveManagedSessions = 900
Common Arguments
While executing the session translation function, the following arguments are available:
Type: The current type of the session ('instream'or'initial').
Usage examples:
-- Flip session type
local newType = 'initial'
if Type == 'initial' then
newType = 'instream'
end
print('Changing session type from ' .. Type .. ' to ' .. newType)
return Session({['Type'] = newType})
Session Translation Helper Functions
The standard Lua library prodives four helper functions to simplify the configuration of the session translation function:
set_session_type(session_type)
This function will set the session type to the supplied session_type and
the maximum number of sessions of that type has not been reached.
Parameters
session_type: The type of session to create, possible values are ‘initial’ or ‘instream’.
Usage Examples
return set_session_type('instream')
return set_session_type('initial')
set_session_type_if_in_group(session_type, session_group)
This function will set the session type to the supplied session_type if the
session is part of session_group and the maximum number of sessions of that
type has not been reached.
Parameters
session_type: The type of session to create, possible values are ‘initial’ or ‘instream’.session_group: The name of the session group.
Usage Examples
return set_session_type_if_in_group('instream', 'sg1')
set_session_type_if_in_all_groups(session_type, session_groups)
This function will set the session type to the supplied session_type if the
session is part of all session groups given by session_groups and the maximum
number of sessions of that type has not been reached.
Parameters
session_type: The type of session to create, possible values are ‘initial’ or ‘instream’.session_groups: A list of session group names.
Usage Examples
return set_session_type_if_in_all_groups('instream', {'sg1', 'sg2'})
set_session_type_if_in_any_group(session_type)
This function will set the session type to the supplied session_type if the
session is part of one or more of the session groups given by session_groups
and the maximum number of sessions of that type has not been reached.
Parameters
session_type: The type of session to create, possible values are ‘initial’ or ‘instream’.session_groups: A list of session group names.
Usage Examples
return set_session_type_if_in_any_group('instream', {'sg1', 'sg2'})
Configuration
Using confcli, example of how the functions above can be used in the session
translation function can be configured by running any of
$ confcli services.routing.translationFunctions.session "return set_session_type('instream')"
services.routing.translationFunctions.session = "return set_session_type('instream')"
$ confcli services.routing.translationFunctions.session "return set_session_type_if_in_group('instream', 'sg1')"
services.routing.translationFunctions.session = "return set_session_type_if_in_group('instream', 'sg1')"
$ confcli services.routing.translationFunctions.session "return set_session_type_if_in_all_groups('instream', {'sg1', 'sg2'})"
services.routing.translationFunctions.session = "return set_session_type_if_in_all_groups('instream', {'sg1', 'sg2'})"
$ confcli services.routing.translationFunctions.session "return set_session_type_if_in_any_group('instream', {'sg1', 'sg2'})"
services.routing.translationFunctions.session = "return set_session_type_if_in_any_group('instream', {'sg1', 'sg2'})"
Additional Data
In addition to the arguments above, the following Lua tables, documented in Global Lua Tables, provide additional data that is available when executing the response translation function:
The selection_input table will not change while a routing request is handled.
A request_translation_function and the corresponding
response_translation_function will see the same selection_input table, even
if the selection data is updated while the request is being handled.
2.6.5.5.5 - Host Request Translation Function
The host request translation function defines a Lua function that modifies
HTTP requests sent to a host. These hosts are configured in
services.routing.hostGroups.
Hosts can receive requests for a manifest. A regular host will respond with the manifest itself, while a redirecting host and a DNS host will respond with a redirection to a streamer. This function can modify all these types of requests.
The function returns nil when nothing is to be changed, or HTTPRequest(t)
where t is a table with any of the following optional fields:
Method- Description: Replaces the HTTP request method in the request being processed.
- Type:
string - Example:
'GET','POST'
Path- Description: Replaces the request path in the request being processed.
- Type:
string - Example:
'/mycontent/superman.m3u8'
Body- Description: Replaces body in the request being processed.
- Type:
stringornil - Example:
'{"foo": "bar"}'
QueryParameters- Description: Adds, removes or replaces individual query parameters in the request being processed.
- Type: nested
table(indexed by number) representing an array of query parameters as{[1]='Name',[2]='Value'}pairs that are added to the request being processed, or overwriting existing query parameters with colliding names. To remove a query parameter from the request, specifynilas value, i.e.QueryParameters={..., {[1]='foo',[2]=nil} ...}. Returning a query parameter with a name but no value, such asain the request'/index.m3u8?a&b=22'is currently not supported.
Headers- Description: Adds, removes or replaces individual headers in the request being processed.
- Type: nested
table(indexed by number) representing an array of request headers as{[1]='Name',[2]='Value'}pairs that are added to the request being processed, or overwriting existing request headers with colliding names. To remove a header from the request, specifynilas value, i.e.Headers={..., {[1]='foo',[2]=nil} ...}. Duplicate names are supported. A multi-value header such asFoo: bar1,bar2is defined by specifyingHeaders={..., {[1]='foo',[2]='bar1'}, {[1]='foo',[2]='bar2'}, ...}.
Host- Description: Replaces the host that the request is sent to.
- Type:
string - Example:
'new-host.example.com','192.0.2.7'
Port- Description: Replaces the TCP port that the request is sent to.
- Type:
number - Example:
8081
Protocol- Description: Decides which protocol that will be used for sending the
request. Valid protocols are
'HTTP'and'HTTPS'. - Type:
string - Example:
'HTTP','HTTPS'
- Description: Decides which protocol that will be used for sending the
request. Valid protocols are
OutgoingRequest: See Sending HTTP requests from translation functions for more information.
Example of a host_request_translation_function body that sets the request path
to a hardcoded value and adds the hardcoded query parameter a=b:
-- Statements go here
print('Setting hardcoded Path and QueryParameters')
return HTTPRequest({
Path = '/content.mpd',
QueryParameters = {
{'a','b'}
}
})
Arguments
The following (iterable) arguments will be known by the function:
QueryParameters
Type: nested
table(indexed by number).Description: Array of query parameters as
{[1]='Name',[2]='Value'}pairs that are present in the query string of the request from the client to the router. Format identical to theHTTPRequest.QueryParameters-field specified for the return value above.Example usage:
for _, queryParam in pairs(QueryParameters) do print(queryParam[1]..'='..queryParam[2]) end
Headers
Type: nested
table(indexed by number).Description: Array of request headers as
{[1]='Name',[2]='Value'}pairs that are present in the request from the client to the router. Format identical to theHTTPRequest.Headers-field specified for the return value above. A multi-value header such asFoo: bar1,bar2is seen inhost_request_translation_functionasHeaders={..., {[1]='foo',[2]='bar1'}, {[1]='foo',[2]='bar1'}, ...}.Example usage:
for _, header in pairs(Headers) do print(header[1]..'='..header[2]) end
Global Tables
The following non-iterable global tables are available for use by the
host_request_translation_function.
Table outgoing_request
The outgoing_request table contains the request that is to be sent to the
host.
outgoing_request.method- Description: HTTP request method.
- Type:
string - Example:
'GET','POST'
outgoing_request.body- Description: HTTP request body string.
- Type:
stringornil - Example:
'{"foo": "bar"}'
outgoing_request.major_version- Description: Major HTTP version such as
xinHTTP/x.1. - Type:
integer - Example:
1
- Description: Major HTTP version such as
outgoing_request.minor_version- Description: Minor HTTP version such as
xinHTTP/1.x. - Type:
integer - Example:
1
- Description: Minor HTTP version such as
outgoing_request.protocol- Description: Transfer protocol variant.
- Type:
string - Example:
'HTTP','HTTPS'
Table outgoing_request_headers
Contains the request headers from the request that is to be sent to the host, keyed by name.
Example:
print(outgoing_request_headers['X-Forwarded-For'])
Multiple values are separated with a comma.
Additional Data
In addition to the arguments above, the following Lua tables, documented in Global Lua Tables, provide additional data that is available when executing the request translation function:
2.6.5.5.6 - Response Translation Function
Specifies the body of a Lua function that inspects every outgoing HTTP response and overwrites individual fields before being sent to the client.
Returns nil when nothing is to be changed, or HTTPResponse(t) where t
is a table with any of the following optional fields:
Code- Description: Replaces status code in the response being sent.
- Type:
integer - Example:
200,404
Text- Description: Replaces status text in the response being sent.
- Type:
string - Example:
'OK','Not found'
MajorVersion- Description: Replaces major HTTP version such as
xinHTTP/x.1in the response being sent. - Type:
integer - Example:
1
- Description: Replaces major HTTP version such as
MinorVersion- Description: Replaces minor HTTP version such as
xinHTTP/1.xin the response being sent. - Type:
integer - Example:
1
- Description: Replaces minor HTTP version such as
Protocol- Description: Replaces protocol in the response being sent.
- Type:
string - Example:
'HTTP','HTTPS'
Body- Description: Replaces body in the response being sent.
- Type:
stringornil - Example:
'{"foo": "bar"}'
Headers- Description: Adds, removes or replaces individual headers in the response being sent.
- Type: nested
table(indexed by number) representing an array of response headers as{[1]='Name',[2]='Value'}pairs that are added to the response being sent, or overwriting existing request headers with colliding names. To remove a header from the response, specifynilas value, i.e.Headers={..., {[1]='foo',[2]=nil} ...}. Duplicate names are supported. A multi-value header such asFoo: bar1,bar2is defined by specifyingHeaders={..., {[1]='foo',[2]='bar1'}, {[1]='foo',[2]='bar2'}, ...}.
OutgoingRequest: See Sending HTTP requests from translation functions for more information.
Example of a response_translation_function body that sets the Location
header to a hardcoded value:
-- Statements go here
print('Setting hardcoded Location')
return HTTPResponse({
Headers = {
{'Location', 'cdn1.com/content.mpd?a=b'}
}
})
Arguments
The following (iterable) arguments will be known by the function:
Headers
Type: nested
table(indexed by number).Description: Array of response headers as
{[1]='Name',[2]='Value'}pairs that are present in the response being sent. Format identical to theHTTPResponse.Headers-field specified for the return value above. A multi-value header such asFoo: bar1,bar2is seen inresponse_translation_functionasHeaders={..., {[1]='foo',[2]='bar1'}, {[1]='foo',[2]='bar1'}, ...}.Example usage:
for _, header in pairs(Headers) do print(header[1]..'='..header[2]) end
Additional Data
In addition to the arguments above, the following Lua tables, documented in Global Lua Tables, provide additional data that is available when executing the response translation function:
2.6.5.5.7 - Sending HTTP requests from translation functions
It is possible to configure all translation functions to send HTTP requests. If an outgoing request is sent in a translation function, the Director will delay the response to the incoming request until the outgoing request has been completed. Note that the response to the outgoing request is not handled by the Director, it only waits for the outgoing request to complete.
Requests can be sent from any translation function by defining the table
OutgoingRequest in the translation function return value:
{
OutgoingRequest = {
Method = "HEAD",
Protocol = "HTTP",
Host = "example.com",
Port = 8080,
Path = "/example/path",
QueryParameters = {{"param1", "value1"}, {"param2", "value2"}},
Headers = {{"x-header", "header-value"}, {"Authorization", "Basic dXNlcjpwYXNz"}}
}
}
The following fields for OutgoingRequest are supported:
Method: The HTTP method to use. Defaults toHEAD.Protocol: The protocol to use. Defaults to the protocol of the incoming request.Host: The host to send the request to.Port: The port to send the request to. Defaults to 80 ifProtocolisHTTPand 443 ifProtocolisHTTPS.Path: The path to send the request to. Defaults to/.QueryParameters: A list of query parameters to include in the request. Note that the query parameters are defined as two-element lists in Lua.Headers: A Lua table of headers to include in the request. Note that if the header name contains a dash-, it must be defined as a two-element list as seen in the example above.Body: A string containing the body of the request. If this field is not defined, no body will be included in the request. If it is defined, theContent-Lengthheader, with the length of the body, will be added to the request.
All fields except Host are optional.
Using the example above, the following response translation function
will make the Director can send a GET request to
http://example.com:8080/example/path?param1=value1¶m2=value2 with the
headers x-header: x-value and Authorization: Basic dXNlcjpwYXNz:
return HTTPResponse({
OutgoingRequest = {
Method = "HEAD",
Protocol = "HTTP",
Host = "example.com",
Port = 8080,
Path = "/example/path",
QueryParameters = {{"param1", "value1"}, {"param2", "value2"}},
Headers = {{"x-header", "x-value"}, {"Authorization", "Basic dXNlcjpwYXNz"}}
}
})
Using log level 4, the outgoing request can be seen in the Director logs:
DEBUG orc-re-work-0 AsyncRequestSender: Sending request: url=http://example.com/example/path?param1=value1¶m2=value2
DEBUG orc-re-work-0 CDNManager: OutboundContentConn: example.com:8080: Connecting to target CDN example.com:8080
DEBUG orc-re-work-0 ClientConn: 192.168.103.16/28:60201/https: Sent a Lua request: outstanding-requests=1
DEBUG orc-re-work-0 CDNManager: OutboundContentConn: example.com:8080: Target CDN connection established.
DEBUG orc-re-work-0 CDNManager: OutboundContentConn: example.com:8080: Sending request to target CDN:
GET /example/path?param1=value1¶m2=value2 HTTP/1.0
Authorization: Basic dXNlcjpwYXNz
Host: example.com:8080
x-header: x-value
2.6.6 - Trusted proxies
When a request with the header X-Forwarded-For is sent to the router, the
router will check if the client is in the list of trusted proxies. If the client
is not a trusted proxy, the router will drop the connection, returning an empty
reply to the client. If the client is a trusted proxy, the IP address defined
in the X-Forwarded-For will be regarded as the client’s IP address.
The list of trusted proxies can be configured by modifying the configuration
field services.routing.settings.trustedProxies with the IP addresses of
trusted proxies:
$ confcli services.routing.settings.trustedProxies -w
Running wizard for resource 'trustedProxies'
<A list of IP addresses from which the proxy IP address of requests with the X-Forwarded-For header defined are checked. If the IP isn't in this list, the connection is dropped. (default: [])>
Hint: Hitting return will set a value to its default.
Enter '?' to receive the help string
trustedProxies <A list of IP addresses from which the proxy IP address of requests with the X-Forwarded-For header defined are checked. If the IP isn't in this list, the connection is dropped. (default: [])>: [
trustedProxy (default: ): 1.2.3.4
Add another 'trustedProxy' element to array 'trustedProxies'? [y/N]: n
]
Generated config:
{
"trustedProxies": [
"1.2.3.4"
]
}
Merge and apply the config? [y/n]: y
Note that by configuring 0.0.0.0/0 as a trusted proxy, all proxied requests
will be trusted.
2.6.7 - Confd Auto Upgrade Tool
The confd-auto-upgrade tool is a simple utility to automatically migrate the confd
configuration schema between different versions of the Director. Starting with version
1.12.0, it is possible to automatically apply the necessary configuration changes in a
controlled and predictable manner. While this tool is intended to help transition the
configuration format between the different versions, it is not a substitute for proper
backups, and while downgrading to an earlier version, it may not be possible to recover
previously modified or deleted configuration values.
When using the tool, both the “from” and “to” versions must be specified. Internally, the tool will calculate a list of migrations which must be applied to transition between the given versions, and apply them, outputting the final configuration to standard output. The current configuration can either be piped in to the tool via standard input, or supplied as a static file. Providing a “from” version which is later than the “to” version will result in the downgrade migrations being applied in reverse order, effectively downgrading the configuration to the lower version.
For convenience, the tool is deployed to the ACD Nodes automatically at install time as a standard Podman container, however since it is not intended to run as a service, only the image will be present, not a running container.
Performing the Upgrade
In the following example scenario, a system with version 1.10.1 has been upgraded
to 1.14.0. Before upgrading a backup of the configuration was taken and saved to
current_config.json.
Using the image and tag as determined in the above section. Issue the following command:
cat current_config.json | \
podman run -i --rm images.edgeware.tv/acd-confd-migration:1.14.0 \
--in - --from 1.10.1 --to 1.14.0 \
| tee upgraded_config.json
In the above example, the updated configuration is saved to upgraded_config.json.
It is recommended to manually verify the generated configuration, and after
which apply the config to confd by using cat upgraded_config.json | confcli -i.
It is also possible to combine the two commands, by piping the output of the auto-upgrade
tool directly to confcli -i. E.g.
cat current_config.json | podman run ... | tee upgraded_config.json | confcli -i
This will save a backup of the upgraded configuration to upgraded_config.json and
at the same time apply the changes to confd immediately.
Downgrading the Configuration
The steps for downgrading the configuration are exactly the same as for upgrade except for the --from
and --to versions should be swapped. E.g. --from 1.14.0 --to 1.10.1. Keep in mind however,
that during an upgrade some configuration properties may have been deleted or modified, and while
downgrading over those steps, some data loss may occur. In those cases, it may be easier and safer
to simply restore from backup. In most cases where configuration properties are removed during upgrade,
the corresponding downgrade will simply restore the default values of those properties.
2.7 - Operations
This guide describes how to perform day-to-day operations of the ACD Router and its associated services, collectively known as the Director.
Component Overview
To effectively operate the Director software, it is important to understand the composition of the various software components and how they are deployed.
Each Director instance functions as an independent system, comprising multiple containerized services. These containers are managed by a standard container runtime and are seamlessly integrated with the host’s operating system to enhance the overall operator experience.
The containers are managed by the Podman container runtime, which operates without additional daemon services running on the host. Unlike Docker, Podman manages each container as a separate process, eliminating the reliance on a shared daemon and mitigating the risk of a single-point-of-failure scenario.
Although several distinct services make up the Director, the primary component is the router. The router is responsible for listening for incoming requests, processing the request, and redirecting the client to the appropriate host, or CDN to deliver the requested content.
Two additional containers are responsible for configuration management. Those are
confd and confd-transformer. The former manages a local database of configuration
metadata and provides a REST API for managing the configuration. The confd-transformer
simply listens for configuration changes from confd and adapts that configuration
to a format suitable for the router to ingest. For additional information about
setting up and using confd see here..
The next two components, the edns-proxy and the convoy-bridge allow the router
to communicate with an EDNS server for EDNS-based routing, and with synchronization
with Convoy respectively. Additional information about the EDNS-Proxy is available
here.. For the Convoy Bridge
service see here..
The remaining containers are useful for metrics, monitoring, and alerting. These
include prometheus and grafana for monitoring and analytics, and alertmanager
for monitoring and alarms.
2.7.1 - Services
Each container shipped with the Director is fully-integrated with the systemd
service on the host, enabling easy management using standard systemd commands.
The logs for each container are also full-integrated with journald to simplify
troubleshooting.
In order to integrate the Podman containers with systemd, a common prefix
of acd- has been applied to each service name. For example the router
container is managed by the service acd-router, and the confd container
is managed by the service acd-confd. These same prefixed names apply while
fetching logs via journald. This common prefix aids in grouping the related
services as well as provides simpler filtering for tab-completion.
Starting / Stopping Services
Standard systemd commands should be used to start and stop the services.
systemctl start acd-router- Starts theroutercontainer.systemctl stop acd-router- Stops theroutercontainer.systemctl status acd-router- Displays the status of theroutercontainer.
Due to the limitation of needing the acd- prefix, it provides the ability to
work with all ACD services in a group. For example:
systemctl status 'acd-*'- Display the status of all installed ACD components.systemctl start 'acd-*'- Start all ACD components.
Logging
Each ACD component corresponds to a journal entry with the same unit name, with
the acd- prefix. Standard journald commands can be used to view and manage the
logging.
journalctl -u acd-router- Display the logs for theroutercontainer
Access Log
Refer to Access Logging.
Troubleshooting
Some additional logging may be available in the filesystem, the paths of which can
be determined by executing the ew-sysinfo command. See
Diagnostics. for additional details.
2.8 - Convoy Bridge
The convoy-bridge is an optional integration service, pre-installed alongside the router which provides two-way communication between the router and a separate Convoy installation.
The convoy-bridge is designed to allow the Convoy account metadata to be available from within the router for such use-cases as inserting the account specific prefixes in the redirect URL and validating per-account internal security tokens. The service works by periodically polling the Convoy server for changes to the configuration, and when detected, the relevant configuration information is pushed to the router.
In addition, the convoy-bridge has the ability to integrate the router with the Convoy analytics service, such that client sessions started by the router are properly collected by Convoy, and are available in the dashboards.
Configuration
The convoy-bridge service is configured using confcli on the router host.
All configuration for the convoy-bridge exists under the path
integration.convoy.bridge.
{
"logLevel": "info",
"accounts": {
"enabled": true,
"dbUrl": "mysql://convoy:eith7jee@convoy:3306",
"dbPollInterval": 60
},
"analytics": {
"enabled": true,
"brokers": ["broker1:9092", "broker2:9092"],
"batchInterval": 10,
"maxBatchSize": 500
},
"otherRouters": [
{
"url": "https://router2:5001",
"apiKey": "key1",
"validateCerts": true
}
]
}
In the above configuration block, there are three main sections. The accounts
section enables fetching account metadata from Convoy towards the router. The
analytics section controls the integration between the router and the Convoy
analytics service. The otherRouters section is used to synchronize additional
router instances. The local router instance will always be implicitly included.
Additional routers listed in this section will be handled by this instance of
the convoy-bridge service.
Logging
The logs are available in the system journal and can be viewed using:
journalctl -u acd-convoy-bridge
2.9 - Monitoring
2.9.1 - Access logging
Access logging is activated by default and can be enabled/disabled by running
$ confcli services.routing.tuning.general.accessLog true
$ confcli services.routing.tuning.general.accessLog false
Requests are logged in the combined log format and can be found at
/var/log/acd-router/access.log. Additionally, the symbolic link
/opt/edgeware/acd/router/log points to /var/log/acd-router, allowing
the access logs to also be found at /opt/edgeware/acd/router/log/access.log.
Example Output
$ cat /var/log/acd-router/access.log
May 29 07:20:00 router[52236]: ::1 - - [29/May/2023:07:20:00 +0000] "GET /vod/batman.m3u8 HTTP/1.1" 302 0 "-" "curl/7.61.1"
Access Log Rotation
Access logs are rotated and compressed once the access log file reaches a size of 100 MB. By default, 10 rotated logs are stored before being rotated out. These rotation parameters can be reconfigured by editing the lines
size 100M
rotate 10
in /etc/logrotate.d/acd-router-access-log. For more log rotation configuration
possibilites, refer to the
Logrotate documentation.
2.9.2 - System troubleshooting
ESB3024 contains the tool ew-sysinfo that gives an overview of how the
system is doing. Simply use the command and the tool will output information
about the system and the installed ESB3024 services.
The output format can be changed using the --format flag, possible values
are human (default) and json, e.g.:
$ ew-sysinfo
system:
os: ['5.4.17-2136.321.4.el8uek.x86_64', 'Oracle Linux Server 8.8']
cpu_cores: 2
cpu_load_average: [0.03, 0.03, 0.0]
memory_usage: 478 MB
memory_load_average: [0.03, 0.03, 0.0]
boot_time: 2023-09-08T08:30:57Z
uptime: 6 days, 3:43:44.640665
processes: 122
open_sockets:
ipv4: 12
ipv6: 18
ip_total: 30
tcp_over_ipv4: 9
tcp_over_ipv6: 16
tcp_total: 25
udp_over_ipv4: 3
udp_over_ipv6: 2
udp_total: 5
total: 145
system_disk (/):
total: 33271 MB
used: 7978 MB (24.00%)
free: 25293 MB
journal_disk (/run/log/journal):
total: 1954 MB
used: 217 MB (11.10%)
free: 1736 MB
vulnerabilities:
meltdown: Mitigation: PTI
spectre_v1: Mitigation: usercopy/swapgs barriers and __user pointer sanitization
spectre_v2: Mitigation: Retpolines, STIBP: disabled, RSB filling, PBRSB-eIBRS: Not affected
processes:
orc-re:
pid: 177199
status: sleeping
cpu_usage_percent: 1.0%
cpu_load_average: 131.11%
memory_usage: 14 MB (0.38%)
num_threads: 10
hints:
get_raw_router_config: cat /opt/edgeware/acd/router/cache/config.json
get_confd_config: cat /opt/edgeware/acd/confd/store/__active
get_router_logs: journalctl -u acd-router
get_edns_proxy_logs: journalctl -u acd-edns-proxy
check_firewall_status: systemctl status firewalld
check_firewall_config: iptables -nvL# For --format=json, it's recommended to pipe the output to a JSON interpreter
# such as jq
$ ew-sysinfo --format=json | jq
{
"system": {
"os": [
"5.4.17-2136.321.4.el8uek.x86_64",
"Oracle Linux Server 8.8"
],
"cpu_cores": 2,
"cpu_load_average": [
0.01,
0.0,
0.0
],
"memory_usage": "479 MB",
"memory_load_average": [
0.01,
0.0,
0.0
],
"boot_time": "2023-09-08 08:30:57",
"uptime": "6 days, 5:12:24.617114",
"processes": 123,
"open_sockets": {
"ipv4": 13,
"ipv6": 18,
"ip_total": 31,
"tcp_over_ipv4": 10,
"tcp_over_ipv6": 16,
"tcp_total": 26,
"udp_over_ipv4": 3,
"udp_over_ipv6": 2,
"udp_total": 5,
"total": 146
}
},
"system_disk (/)": {
"total": "33271 MB",
"used": "7977 MB (24.00%)",
"free": "25293 MB"
},
"journal_disk (/run/log/journal)": {
"total": "1954 MB",
"used": "225 MB (11.50%)",
"free": "1728 MB"
},
"vulnerabilities": {
"meltdown": "Mitigation: PTI",
"spectre_v1": "Mitigation: usercopy/swapgs barriers and __user pointer sanitization",
"spectre_v2": "Mitigation: Retpolines, STIBP: disabled, RSB filling, PBRSB-eIBRS: Not affected"
},
"processes": {
"orc-re": {
"pid": 177199,
"status": "sleeping",
"cpu_usage_percent": "0.0%",
"cpu_load_average": "137.63%",
"memory_usage": "14 MB (0.38%)",
"num_threads": 10
}
}
}Note that your system might have different monitored processes and field names.
The field hints is different from the rest. It lists common commands
that can be used to further monitor system performance, useful for
quickly troubleshooting a faulty system.
2.9.3 - Scraping data with Prometheus
Prometheus is a third-party data scraper which is installed as a containerized service in the default installation of ESB3024 Router. It periodically reads metrics data from different services, such as acd-router, aggregates it and makes it available to other services that visualize the data. Those services include Grafana and Alertmanager.
The Prometheus configuration file can be found on the host at
/opt/edgeware/acd/prometheus/prometheus.yaml.
Accessing Prometheus
Prometheus has a web interface that is listening for HTTP connections on port 9090. There is no authentication, so anyone who has access to the host that is running Prometheus can access the interface.
Starting / Stopping Prometheus
After the service is configured, it can be managed via systemd, under the
service unit acd-prometheus.
systemctl start acd-prometheus
Logging
The container logs are automatically published to the system journal, under
the same unit descriptor, and can be viewed using journalctl
journalctl -u acd-prometheus
2.9.4 - Visualizing data with Grafana
2.9.4.1 - Managing Grafana
Grafana displays graphs based on data from Prometheus. A default deployment of Grafana is running in a container alongside ESB3024 Router.
Grafana’s configuration and runtime files are stored under
/opt/edgeware/acd/grafana. It comes with default dashboards that are
documented at Grafana dashboards.
Accessing Grafana
Grafana’s web interface is listening for HTTP connections on port
3000. It has two default accounts, edgeware and admin.
The edgeware account can only view graphs, while the admin account can also
edit graphs. The accounts with default passwords are shown in the table below.
| Account | Default password |
|---|---|
edgeware | edgeware |
admin | edgeware |
Starting / Stopping Grafana
Grafana can be managed via systemd, under the service unit acd-grafana.
systemctl start acd-grafana
Logging
The container logs are automatically published to the system journal, under
the same unit descriptor, and can be viewed using journalctl
journalctl -u acd-grafana
2.9.4.2 - Grafana Dashboards
Grafana will be populated with pre-configured graphs which present some metrics on a time scale. Below is a comprehensive list of those dashboards, along with short descriptions.
Router Monitoring dashboard
This dashboard is by default set as home directory - it’s what user will see
after logging in.
Number Of Initial Routing Decisions
HTTP Status Codes
Total number of responses sent back to incoming requests, shown by their status codes. Metric: client-response-status
Incoming HTTP and HTTPS Requests
Total number of incoming requests that were deemed valid, divided into SSL
and Unencrypted categories.
Metric: num_valid_http_requests
Debugging Information dashboard
Number of Lua Exceptions
Number of exceptions encountered so far while evaluating Lua rules. Metric: lua_num_errors
Number of Lua Contexts
Number of active Lua interpreters, both running and idle. Metric: lua_num_evaluators
Time Spent In Lua
Number of microseconds the Lua interpreters were running. Metric: lua_time_spent
Router Latencies
Histogram-like graph showing how many responses were sent within the given latency interval. Metric: orc_latency_bucket
Internal debugging
A folder that contains dashboards intended for internal use.
ACD: Incoming Internet Connections dashboard
SSL Warnings
Rate of warnings logged during TLS connections Metric: num_ssl_warnings_total
SSL Errors
Rate of errors logged during TLS connections Metric: num_ssl_errors_total
Valid Internet HTTPS Requests
Rate of incoming requests that were deemed valid, HTTPS only. Metric: num_valid_http_requests
Invalid Internet HTTPS Requests
Rate of incoming requests that were deemed invalid, HTTPS only. Metric: num_invalid_http_requests
Valid Internet HTTP Requests
Rate of incoming requests that were deemed valid, HTTP only. Metric: num_valid_http_requests
Invalid Internet HTTP Requests
Rate of incoming requests that were deemed invalid, HTTP only. Metric: num_invalid_http_requests
Prometheus: ACD dashboard
Logged Warnings
Rate of logged warnings since the router has started, divided into CDN-related and CDN-unrelated. Metric: num_log_warnings_total
Logged Errors
Rate of logged errors since the router has started. Metric: num_log_errors_total
HTTP Requests
Rate of responses sent to incoming connections. Metric: orc_latency_count
Number Of Active Sessions
Number of sessions opened on router that are still active. Metric: num_sessions
Total Number Of Sessions
Total number of sessions opened on router. Metric: num_sessions
Session Type Counts (Non-Stacked)
Number of active sessions divided by type; see metric documentation linked below for up-to-date list of types. Metric: num_sessions
Prometheus/ACD: Subrunners
Client Connections
Number of currently open client connections per subrunner. Metric: subrunner_client_conns
Asynchronous Queues (Current)
Number of queued events per subrunner, roughly corresponding to load. Metric: subrunner_async_queue
Used <Send/receive> Data Blocks
Number of send or receive data blocks currently in use per subrunner, as decided by the “Send/receive” drop down box. Metric: subrunner_used_send_data_blocks and subrunner_used_receive_data_blocks
Asynchronous Queues (Max)
Maximum number of events waiting in queue. Metric: subrunner_max_async_queue
Total <Send/receive> Data Blocks
Number of send or receive data blocks allocated per subrunner, as decided by the “Send/receive” drop down box. Metric: subrunner_total_send_data_blocks and subrunner_total_receive_data_blocks
Low Queue (Current)
Number of low priority events queued per subrunner. Metric: subrunner_low_queue
Medium Queue (Current)
Number of medium priority events queued per subrunner. Metric: subrunner_medium_queue
High Queue (Current)
Number of high priority events queued per subrunner. Metric: subrunner_high_queue
Low Queue (Max)
Maximum number of events waiting in low priority queue. Metric: subrunner_max_low_queue
Medium Queue (Max)
Maximum number of events waiting in medium priority queue. Metric: subrunner_max_medium_queue
High Queue (Max)
Maximum number of events waiting in high priority queue. Metric: subrunner_max_high_queue
Wakeups
The number of times a subrunner has been waken up from sleep. Metric: subrunner_io_wakeups
Overloaded
The number of times the number of queued events for a subrunner exceeded its maximum. Metric: subrunner_times_worker_overloaded
Autopause
Number of sockets that have been automatically paused. This happens when the work manager is under heavy load. Metric: subrunner_io_autopause_sockets
2.9.5 - Alarms and Alerting
Alerts are generated by the third-party service Prometheus, which sends them to the Alertmanager service. A default containerized instance of Alertmanager is deployed alongside ESB3024 Router. Out of the box, Alertmanager ships with only a sample configuration file, and will require manual configuration prior to enabling the alerting functionality. Due to the many different possible configurations for how alerts are both detected and where they are pushed, the official Alertmanager documentation should be followed for how to configure the service.
The router ships with Alertmanager 0.25, the documentation
for which can be found at prometheus.io.
The Alertmanager configuration file can be found on the host at
/opt/edgeware/acd/alertmanager/alertmanager.yml.
Accessing Alertmanager
Alertmanager has a web interface that is listening for HTTP connections on port 9093. There is no authentication, so anyone who has access to the host that is running Alertmanager can access the interface.
Starting / Stopping Alertmanager
After the service is configured, it can be managed via systemd, under the
service unit acd-alertmanager.
systemctl start acd-alertmanager
Logging
The container logs are automatically published to the system journal, under
the same unit descriptor, and can be viewed using journalctl
journalctl -u acd-alertmanager
2.9.6 - Monitoring multiple routers
By default an instance of Prometheus only monitors the ESB3024 Router that is installed on the same host as where Prometheus is installed. It is possible to make it monitor other router instances and visualize all instances on one Grafana instance.
Configuring of Prometheus
This is configured in the scraping configuration of Prometheus, which is found
in the file /opt/edgeware/acd/prometheus/prometheus.yaml, which typically
looks like this:
global:
scrape_interval: 15s
rule_files:
- recording-rules.yaml
# A scrape configuration for router metrics
scrape_configs:
- job_name: 'router-scraper'
scheme: https
tls_config:
insecure_skip_verify: true
static_configs:
- targets:
- acd-router-1:5001
metrics_path: /m1/v1/metrics
honor_timestamps: true
- job_name: 'edns-proxy-scraper'
scheme: http
static_configs:
- targets:
- acd-router-1:8888
metrics_path: /metrics
honor_timestamps: true
More routers can be added to the scrape configuration by simply adding more
routers under targets in the scraper jobs.
For instance, to monitor acd-router-2 and acd-router-3 along acd-router-1,
the configuration file needs to be modified like this:
global:
scrape_interval: 15s
rule_files:
- recording-rules.yaml
# A scrape configuration for router metrics
scrape_configs:
- job_name: 'router-scraper'
scheme: https
tls_config:
insecure_skip_verify: true
static_configs:
- targets:
- acd-router-1:5001
- acd-router-2:5001
- acd-router-3:5001
metrics_path: /m1/v1/metrics
honor_timestamps: true
- job_name: 'edns-proxy-scraper'
scheme: http
static_configs:
- targets:
- acd-router-1:8888
- acd-router-2:8888
- acd-router-3:8888
metrics_path: /metrics
honor_timestamps: true
After the file has been modified, Prometheus needs to be restarted by typing
systemctl restart acd-prometheus
It is possible to use the same configuration on multiple routers, so that all routers in a deployment can monitor each other.
Selecting Router in Grafana
In the top left corner the Grafana dashboards have a drop-down menu labeled “ACD Router”, which allows to choose which router to monitor.
2.9.7 - Routing Rule Evaluation Metrics
ESB3024 Router counts the number of times a node and any of its children is selected in the routing table.
The visit counters can be retrieved with the following end points:
/v1/node_visits
Returns visit counters for each node as a flat list of
host:counterpairs in JSON.Example output:
{ "node1": "1", "node2": "1", "node3": "1", "top": "3" }
/v1/node_visits_graph
Returns a full graph of nodes with their respective visit counters in GraphML.
Example output:
<?xml version="1.0"?> <graphml xmlns="http://graphml.graphdrawing.org/xmlns" xmlns:xsi="http://www.w3.org/2001/XMLSchema-instance" xsi:schemaLocation="http://graphml.graphdrawing.org/xmlns http://graphml.graphdrawing.org/xmlns/1.0/graphml.xsd"> <key id="visits" for="node" attr.name="visits" attr.type="string" /> <graph id="G" edgedefault="directed"> <node id="routing_table"> <data key="visits">5</data> </node> <node id="cdn1"> <data key="visits">1</data> </node> <node id="node1"> <data key="visits">1</data> </node> <node id="cdn2"> <data key="visits">2</data> </node> <node id="node2"> <data key="visits">2</data> </node> <node id="cdn3"> <data key="visits">2</data> </node> <node id="node3"> <data key="visits">2</data> </node> <edge id="e0" source="cdn1" target="node1" /> <edge id="e1" source="routing_table" target="cdn1" /> <edge id="e2" source="cdn2" target="node2" /> <edge id="e3" source="routing_table" target="cdn2" /> <edge id="e4" source="cdn3" target="node3" /> <edge id="e5" source="routing_table" target="cdn3" /> </graph> </graphml>To receive the graph as JSON, specify
Accept:application/jsonin the request headers.Example output:
{ "edges": [ { "source": "cdn1", "target": "node1" }, { "source": "routing_table", "target": "cdn1" }, { "source": "cdn2", "target": "node2" }, { "source": "routing_table", "target": "cdn2" }, { "source": "cdn3", "target": "node3" }, { "source": "routing_table", "target": "cdn3" } ], "nodes": [ { "id": "routing_table", "visits": "5" }, { "id": "cdn1", "visits": "1" }, { "id": "node1", "visits": "1" }, { "id": "cdn2", "visits": "2" }, { "id": "node2", "visits": "2" }, { "id": "cdn3", "visits": "2" }, { "id": "node3", "visits": "2" } ] }
Resetting Visit Counters
A node visit counter with an id not matching any node id of a newly applied
routing table is destroyed.
Reset all counters to zero by momentarily applying a configuration with a
placeholder routing root node, that has unique id and an empty members
list, e.g:
"routing": {
"id": "empty_routing_table",
"members": []
}
… and immediately reapply the desired configuration.
2.9.8 - Metrics
ESB3024 Router collects a large number of metrics that can give insight into
it’s condition at runtime. Those metrics are available in
Prometheus’ text-based exposition format
at endpoint :5001/m1/v1/metrics.
Below is the description of these metrics along with their labels.
client_response_status
Number of responses sent back to incoming requests.
- Type: counter
lua_num_errors
Number of errors encountered when evaluating Lua rules.
- Type:
counter
lua_num_evaluators
Number of Lua rules evaluators (active interpreters).
- Type: gauge
lua_time_spent
Time spent by running Lua evaluators, in microseconds.
- Type:
counter
num_configuration_changes
Number of times configuration has been changed since the router has started.
- Type:
counter
num_endpoint_requests
Number of requests redirected per CDN endpoint.
- Type:
counter - Labels:
endpoint- CDN endpoint address.selector- whether the request was counted duringinitialorinstreamselection.
num_invalid_http_requests
Number of client requests that either use wrong method or wrong URL path. Also number of all requests that cannot be parsed as HTTP.
- Type:
counter - Labels:
source- name of internal filter function that classified request as invalid. Probably not of much use outside debugging.type- whether the request was HTTP (Unencrypted) or HTTPS (SSL).
num_log_errors_total
Number of logged errors since the router has started.
- Type:
counter
num_log_warnings_total
Number of logged warnings since the router has started.
- Type:
counter
num_managed_redirects
Number of redirects to the router itself, which allows session management.
- Type:
counter
num_manifests
Number of cached manifests.
- Type:
gauge - Labels:
count- state of manifest in cache, can be eitherlru,evictedortotal.
num_qoe_losses
Number of “lost” QoE decisions per CDN.
- Type:
counter - Labels:
cdn_id- ID of CDN that loose QoE battle.cdn_name- name of CDN that loose QoE battle.selector- whether the decision was taken duringinitialorinstreamselection.
num_qoe_wins
Number of “won” QoE decisions per CDN.
- Type:
counter - Labels:
cdn_id- ID of CDN that won QoE battle.cdn_name- name of CDN that won QoE battle.selector- whether the decision was taken duringinitialorinstreamselection.
num_rejected_requests
Deprecated, should always be at 0.
- Type:
counter - Labels:
selector- whether the request was counted duringinitialorinstreamselection.
num_requests
Total number of requests received by the router.
- Type:
counter - Labels:
selector- whether the request was counted duringinitialorinstreamselection.
num_sessions
Number of sessions opened on router.
- Type:
gauge - Labels:
state- eitheractiveorinactive.type- one of:initial,instream,qoe_on,qoe_off,qoe_agentorsp_agent.
num_ssl_errors_total
Number of all errors logged during TLS connections, both incoming and outgoing.
- Type:
counter
num_ssl_warnings_total
Number of all warnings logged during TLS connections, both incoming and outgoing.
- Type:
counter - Labels:
category- which kind of TLS connection triggered the warning. Can be one of:cdn,content,generic,repeated_sessionor empty.
num_unhandled_requests
Number of requests for which no CDN could be found.
- Type:
counter - Labels:
selector- whether the request was counted duringinitialorinstreamselection.
num_unmanaged_redirects
Number of redirects to “outside” the router - usually to CDN.
- Type:
counter - Labels:
cdn_id- ID of CDN picked for redirection.cdn_name- name of CDN picked for redirection.selector- whether the redirect was result ofinitialorinstreamselection.
num_valid_http_requests
Number of received requests that were not deemed invalid, see
num_invalid_http_requests.
- Type:
counter - Labels:
source- name of internal filter function that classified request as invalid. Probably not of much use outside debugging.type- whether the request was HTTP (Unencrypted) or HTTPS (SSL).
orc_latency_bucket
Total number of responses sorted into “latency buckets” - labels denoting latency interval.
- Type:
counter - Labels:
le- latency bucket that given response falls into.orc_status_code- HTTP status code of given response.
orc_latency_count
Total number of responses.
- Type:
counter - Labels:
tls- whether the response was sent via SSL/TLS connection or not.orc_status_code- HTTP status code of given response.
ssl_certificate_days_remaining
Number of days until a SSL certificate expires.
- Type:
gauge - Labels:
domain- the common name of the domain that the certificate authenticates.not_valid_after- the expiry time of the certificate.not_valid_before- when the certificate starts being valid.usable- if the certificate is usable to the router, see the ssl_certificate_usable_count metric for an explanation.
ssl_certificate_usable_count
Number of usable SSL certificates. A certificate is usable if it is valid and authenticates a domain name that points to the router.
- Type:
gauge
2.9.8.1 - Internal Metrics
A subrunner is an internal module of ESB3024 Router which handles routing requests. The subrunner metrics are technical and mainly of interest for Agile Content. These metrics will be briefly described here.
subrunner_async_queue
Number of queued events per subrunner, roughly corresponding to load.
- Type:
gauge - Labels:
subrunner_id- ID of given subrunner.
subrunner_client_conns
Number of currently open client connections per subrunner.
- Type:
gauge - Labels:
subrunner_id- ID of given subrunner.
subrunner_high_queue
Number of high priority events queued per subrunner.
- Type:
gauge - Labels:
subrunner_id- ID of given subrunner.
subrunner_io_autopause_sockets
Number of sockets that have been automatically paused. This happens when the work manager is under heavy load.
- Type:
counter - Labels:
subrunner_id- ID of given subrunner.
subrunner_io_send_data_fast_attempts
A fast data path was added that in many cases increases the performance of the router. This metric was added to verify that the fast data path is taken.
- Type:
counter - Labels:
subrunner_id- ID of given subrunner.
subrunner_io_wakeups
The number of times a subrunner has been waken up from sleep.
- Type:
counter - Labels:
subrunner_id- ID of given subrunner.
subrunner_low_queue
Number of low priority events queued per subrunner.
- Type:
gauge - Labels:
subrunner_id- ID of given subrunner.
subrunner_max_async_queue
Maximum number of events waiting in queue.
- Type:
gauge - Labels:
subrunner_id- ID of given subrunner.
subrunner_max_high_queue
Maximum number of events waiting in high priority queue.
- Type:
gauge - Labels:
subrunner_id- ID of given subrunner.
subrunner_max_low_queue
Maximum number of events waiting in low priority queue.
- Type:
gauge - Labels:
subrunner_id- ID of given subrunner.
subrunner_max_medium_queue
Maximum number of events waiting in medium priority queue.
- Type:
gauge - Labels:
subrunner_id- ID of given subrunner.
subrunner_medium_queue
Number of medium priority events queued per subrunner.
- Type:
gauge - Labels:
subrunner_id- ID of given subrunner.
subrunner_times_worker_overloaded
Number of times when queued events for given subrunner exceeded
the tuning.overload_threshold value (defaults to 32).
- Type:
counter - Labels:
subrunner_id- ID of given subrunner.
subrunner_total_receive_data_blocks
Number of receive data blocks allocated per subrunner.
- Type:
gauge - Labels:
subrunner_id- ID of given subrunner.
subrunner_total_send_data_blocks
Number of send data blocks allocated per subrunner.
- Type:
gauge - Labels:
subrunner_id- ID of given subrunner.
subrunner_used_receive_data_blocks
Number of receive data blocks currently in use per subrunner. Same as subrunner_total_receive_data_blocks.
- Type:
gauge - Labels:
subrunner_id- ID of given subrunner.
subrunner_used_send_data_blocks
Number of send data blocks currently in use per subrunner. Same as subrunner_total_send_data_blocks.
- Type:
gauge - Labels:
subrunner_id- ID of given subrunner.
2.10 - Glossary
- ACD
- Agile CDN Director. See “Director”.
- Confd
- A backend service that hosts the service configuration. Comes with an API, a CLI and a GUI.
- Classifier
- A filter that associate a request with a tag that can be used to define session groups.
- Director
- The Agile Delivery OTT router and related services.
- ESB
- A software bundle that can be separately installed and upgraded, and is released as one entity with one change log. Each ESB is identified with a number. Over time, features and functions within an ESB can change.
- Lua
- A widely available scripting language that is often used to extend the capabilities of a piece of software.
- Router
- Unless otherwise specified, an HTTP router that manages an OTT session using HTTP redirect. There are also ways to use DNS instead of HTTP.
- Selection Input API
- Data posted to this API can be accessed by the routing rules and hence influence the routing decisions.
- Subnet API
- An API to define mappings between subnets and names (typically regions) for those subnets. Routing rules can then refer to the names rather than the subnets.
- Session Group
- A handle on a group of requests, defined via classifiers.
3 - AgileTV CDN Director (esb3024)
3.1 - Release Notes for esb3024-1.20.1
Build date
2025-05-14
Release status
Type: production
Compatibility
This release has been tested with the following product versions:
- AgileTV CDN Manager, ESB3027-1.2.0
- Orbit, ESB2001-3.6.3 (see Known limitations below)
- SW-Streamer, ESB3004-1.36.2
- Convoy, ESB3006-3.4.0
- Request Router, ESB3008-3.2.1
Breaking changes from previous release
- There are no breaking changes in this release.
Change log
- NEW: Support any 3xx response from redirecting CDNs [ESB3024-1271]
- NEW: Support blocking of previously used tokens [ESB3024-1277]
- NEW: Set and get selection input over Kafka. The new configuration field
dataStreamsintroduces support to interface with Kafka. [ESB3024-1278] - NEW: Support TTL in selection input over Kafka [ESB3024-1286]
- NEW: Add option to disable URL encoding on outgoing requests from Lua [ESB3024-1306]
- NEW: Add Lua function for populating metrics [ESB3024-1334]
- FIXED: Improve selection input performance [ESB3024-1290]
- FIXED: Wildcard certificates wrongly documented as being unsupported [ESB3024-1324]
- FIXED: Selection input items with empty keys are not rejected [ESB3024-1328]
- FIXED: IP addresses wrongly classified as anonymous [ESB3024-1331]
- FIXED: Some selection input payloads are erroneously rejected [ESB3024-1344]
Deprecated functionality
- Lua function
epochToTimehas been deprecated in favor ofepoch_to_time. - Lua function
timeToEpochhas been deprecated in favor oftime_to_epoch. - The session proxy has been deprecated. Its functionality is replaced by the new “Send HTTP requests from Lua code” function.
System requirements
- The ACD Router requires a minimum CPU architecture level of x86-64-v2 due to inclusion of Oracle Linux 9 inside the container. While all modern CPUs support this archetecture level, virtual hypervisors may default to a CPU type that has more compatibility with older processors. If this minimum CPU architecture level is not attained the containers may refuse to start. See Operating System Compatibility and Building Red Hat Enterprise Linux 9 for the x86-64-v2 Microarchitecture Level for more information.
Known limitations
When configured to use TLS,
acd-telegraf-metrics-databasemight log the following error message:http: TLS handshake error from <client ip>: client sent an HTTP request to an HTTPS serverwhen receiving metrics from caches even though the Telegraf agents are configured to use TLS. The Telegraf logs on the caches do not show any errors related to this. However, the data is still received over TLS and stored correctly byacd-telegraf-metrics-database. The issue seemingly resolved itself during investigation and is not reproducible. Current hypothesis is a logging bug in Telegraf.The Telegraf metrics agent might not be able to read all relevant network interface data on ESB2001 releases older than 3.6.2. The predictive load balancing function
host_has_bw()and the health check functioninterfaces_online()might therefore not work as expected.- The recommended workaround for
host_has_bw()is to usehost_has_bw_custom(), documented in Built-in Lua functions.host_has_bw_custom()accepts a numeric argument for the host’s network interface capacity which can be used if the data supplied by the Telegraf metrics agents do not contain this information. - It is not recommended to use
interfaces_online()for ESB2001 instances until they are updated to 3.6.2 or later.
- The recommended workaround for
3.2 - Getting Started
The Director serves as a versatile network service designed to redirect incoming HTTP(s) requests to the optimal host or Content Delivery Network (CDN) by evaluating various request properties through a set of rules. Although requests can be generic, the primary focus centers around audio-video content delivery. The rule engine allows users to construct routing configurations using predefined blocks, providing for the creation of intricate routing logic. This modular approach allows the users to tailor and streamline the content delivery process to meet their specific needs. The Director’s flexible rule engine takes into account factors such as geographical location, server load, content type, and other metadata from external sources to intelligently route incoming requests. It supports dynamic adjustments to seamlessly adapt to changing network conditions, ensuring efficient and reliable content delivery. The Director improves the overall user experience by delivering content from the most suitable and responsive sources, thereby reducing latency and enhancing performance.
Requirements
Hardware
The Director is designed to be installed and operated on commodity hardware, ensuring accessibility for a broad range of users. The minimum hardware specifications are as follows:
- CPU: x86-64 AMD or Intel with at least 2 cores.
- Memory: At least 2 GB free at runtime.
Operating System Compatibility
The Director is officially supported on Red Hat Enterprise Linux 8 or 9 or any
compatible operating system. In order to run the service, a minimum CPU
architecture of x86-64-v2 is required. This can be determined by running the
following command. If supported, it will be listed as “(supported)” in the
output.
/usr/lib64/ld-linux-x86-64.so.2 --help | grep x86-64-v2
External Internet access is necessary during the installation process for the installer to download and install additional dependencies. This ensures a seamless setup and optimal functionality of the Director on Red Hat Enterprise Linux 8 or 9. It’s worth noting that, due to the unique workings of the DNF package manager in Red Hat Enterprise Linux with rolling package streams, an air-gapped installation process is not available.
Firewall Recommendations
See Firewall.
Installation
See Installation.
Operations
See Operations.
Configuration Process
Once the router is operational, it requires a valid configuration before it can route incoming requests.
There are currently three methods available for configuring the router, each catering to different levels of complexity. The first is a Web UI, suitable for the most common use-cases, providing an intuitive interface for configuration. The second involves utilizing a confd REST service, complemented by an optional command line tool, confcli, suitable for all but the most advanced scenarios. The third method involves leveraging an internal REST API, ideal for the most intricate cases where using confd proves to be less flexible. It’s essential to note that as the configuration method advances through these levels, both flexibility and complexity increase, providing users with tailored options based on their specific needs and expertise.
API Key Management
Regardless of the method used to configure the system, a unique API key is
crucial for safeguarding the router’s configuration and preventing unauthorized
access to the API. This key must be supplied when interacting with the API.
During the router software installation, an automatically generated API key is
created and can be located on the installed system at
/opt/edgeware/acd/router/cache/rest-api-key.json. The structure of this file
is as follows:
{"api_key": "abc123"}
When accessing the internal configuration API, the key must be included in the
X-API-key header of the request, as shown below:
curl -v -k -H "X-API-Key: abc123" https://<router-host.example>:5001/v2/configuration
Modification to the authentication key and behavior can be done through the
/v2/rest_api_key endpoint. To change the key, a PUT request with a JSON body
of the same structure can be sent to the endpoint:
curl -v -k -X PUT -T new-key.json -H "X-API-Key: abc123" \
-H "Content-Type: application/json" https://<router-host.example>:5001/v2/rest_api_key
Additionally, key authentication can be disabled completely by sending a DELETE
request to the endpoint:
curl -v -k -X DELETE -H "X-API-Key: abc123" \
https://<router-host.example>:5001/v2/rest_api_key
In the event of a lost or forgotten authentication key, it can always be
retrieved at /opt/edgeware/acd/router/cache/rest-api-key.json on the
machine running the router. It is critical to emphasize that the API key should
remain private to prevent unauthorized access to the internal API, as it grants
full access to the router’s configuration.
Configuration Basics
Upon completing the installation process and configuring the API keys, the subsequent section will provide guidance on configuring the router to route all incoming requests to a single host. For straightforward CDN Offload use cases, there is a web based user interface described here.
For further details on configuring the router using confd and confcli, please consult the Confd documentation.
The initial step involves defining the target host group. In this illustration,
a singular group named all will be established, comprising two hosts.
$ confcli services.routing.hostGroups -w
Running wizard for resource 'hostGroups'
Hint: Hitting return will set a value to its default.
Enter '?' to receive the help string
hostGroups : [
hostGroup can be one of
1: dns
2: host
3: redirecting
Choose element index or name: host
Adding a 'host' element
hostGroup : {
name (default: ): all
type (default: host):
httpPort (default: 80):
httpsPort (default: 443):
hosts : [
host : {
name (default: ): host1.example.com
hostname (default: ): host1.example.com
ipv6_address (default: ):
}
Add another 'host' element to array 'hosts'? [y/N]: y
host : {
name (default: ): host2.example.com
hostname (default: ): host2.example.com
ipv6_address (default: ):
}
Add another 'host' element to array 'hosts'? [y/N]: n
]
}
Add another 'hostGroup' element to array 'hostGroups'? [y/N]: n
]
Generated config:
{
"hostGroups": [
{
"name": "all",
"type": "host",
"httpPort": 80,
"httpsPort": 443,
"hosts": [
{
"name": "host1.example.com",
"hostname": "host1.example.com",
"ipv6_address": ""
},
{
"name": "host2.example.com",
"hostname": "host2.example.com",
"ipv6_address": ""
}
]
}
]
}
Merge and apply the config? [y/n]:
After defining the host group, the next step is to establish a rule that directs
incoming requests to the designated host. In this example, a sole rule named
random will be generated, ensuring that all incoming requests are consistently
routed to the previously defined host.
$ confcli services.routing.rules -w
Running wizard for resource 'rules'
Hint: Hitting return will set a value to its default.
Enter '?' to receive the help string
rules : [
rule can be one of
1: allow
2: consistentHashing
3: contentPopularity
4: deny
5: firstMatch
6: random
7: rawGroup
8: rawHost
9: split
10: weighted
Choose element index or name: random
Adding a 'random' element
rule : {
name (default: ): random
type (default: random):
targets : [
target (default: ): host1.example.com
Add another 'target' element to array 'targets'? [y/N]: y
target (default: ): host2.example.com
Add another 'target' element to array 'targets'? [y/N]: n
]
}
Add another 'rule' element to array 'rules'? [y/N]: n
]
Generated config:
{
"rules": [
{
"name": "random",
"type": "random",
"targets": [
"host1.example.com",
"host2.example.com"
]
}
]
}
Merge and apply the config? [y/n]:
The last essential step involves instructing the router on which rule should
serve as the entry point into the routing tree. In this example, we designate
the rule random as the entrypoint for the routing process.
$ confcli services.routing.entrypoint random
services.routing.entrypoint = 'random'
Once this configuration is defined, all incoming requests will initiate their
traversal through the routing rules, starting with the rule named random. This
rule is designed to consistently match for every incoming request, effectively load
balancing evenly between host1.example.com and host2.example.com on port 80
or 443, depending on whether the initial request was made using HTTP or HTTPS.
Integration with Convoy
The router is equipped with the capability to synchronize specific configuration metadata with a separate Convoy installation through the integrated convoy-bridge service. However, this service necessitates additional setup and configuration, and you can find comprehensive details on the process here..
Additional Resources
Additional documentation resources are included with the Director and can be
accessed at the following directory: /opt/edgeware/acd/documentation/. This
directory contains supplementary materials to provide users with comprehensive
information and guidance for optimizing their experience with the Director.
Ready for Production
Once the Director software is completely installed and configured, there are a few additional considerations before moving to a full production environment. See the section Ready for Production for additional information.
3.3 - Installing a 1.20 release
To install ESB3024 Router, you first need to copy the installation ISO image
to the target node where the router will be run. Due to the way the
installer operates, it is necessary that the host is reachable by
password-less SSH from itself for the user account that will perform the
installation, and that this user has sudo access.
Prerequisites:
Ensure that the current user has
sudoaccess.sudo -lIf the above command fails, you may need to add the user to the
/etc/sudoersfile.Ensure that the installer has password-less SSH access to
localhost.If using the
rootuser, thePermitRootLoginproperty of the/etc/ssh/sshd_configfile must be set to ‘yes’.The local host key must also be included in the
.ssh/authorized_keysfile of the user running the installer. That can be done by issuing the following as the intended user:mkdir -m 0700 -p ~/.ssh ssh-keyscan localhost >> ~/.ssh/authorized_keysNote! The
ssh-keyscanutility will result in the key fingerprint being output on the console. As a security best-practice it is recommended to verify that this host-key matches the machine’s true SSH host key. As an alternative, to thisssh-keyscanapproach, establishing an SSH connection to localhost and accepting the host key will have the same result.Disable SELinux.
The Security-Enhanced Linux Project (SELinux) is designed to add an additional layer of security to the operating system by enforcing a set of rules on processes. Unfortunately out of the box the default configuration is not compatible with the way the installer operates. Before proceeding with the installation, it is recommended to disable SELinux. It can be re-enabled after the installation completes, if desired, but will require manual configuration. Refer to the Red Hat Customer Portal for details.
To check if SELinux is enabled:
getenforceThis will result in one of 3 states, “Enforcing”, “Permissive” or “Disabled”. If the state is “Enforcing” use the following to disable SELinux. Either “Permissive” or “Disabled” is required to continue.
setenforce 0This disables SELinux, but does not make the change persistent across reboots. To do that, edit the
/etc/selinux/configfile and set theSELINUXproperty todisabled.It is recommended to reboot the computer after changing SELinux modes, but the changes should take effect immediately.
Assuming the installation ISO image is in the current working directory,
the following steps need to be executed either by root user or with sudo.
Mount the installation ISO image under
/mnt/acd.Note: The mount-point may be any accessible path, but
/mnt/acdwill be used throughout this document.mkdir -p /mnt/acd mount esb3024-acd-router-1.20.1.iso /mnt/acdRun the installer script.
/mnt/acd/installer
Upgrading From an Earlier ESB3024 Router Release
The following steps can be taken to upgrade the router from a 1.10 or later release to 1.20.1. If upgrading from an earlier release it is recommended to first upgrade to 1.10.1 and then to upgrade to 1.20.1.
The upgrade procedure for the router is performed by taking a backup of the configuration, installing the new release of the router, and applying the saved configuration.
With the router running, save a backup of the configuration.
The exact procedure to accomplish this depends on the current method of configuration, e.g. if
confdis used, then the configuration should be extracted fromconfd, but if the REST API is used directly, then the configuration must be saved by fetching the current configuration snapshot using the REST API.Extracting the configuration using
confdis the recommend approach where available.confcli | tee config_backup.jsonTo extract the configuration from the REST API, the following may be used instead. Depending on the version of the router used, an API-Key may be required to fetch from the REST API.
curl --insecure https://localhost:5001/v2/configuration \ | tee config_backup.jsonIf the API Key is required, it can be found in the file
/opt/edgeware/acd/router/cache/rest-api-key.jsonand can be passed to the API by setting the value of theX-API-Keyheader.curl --insecure -H "X-API-Key: 1234abcd" \ https://localhost:5001/v2/configuration \ | tee config_backup.jsonMount the new installation ISO under
/mnt/acd.Note: The mount-point may be any accessible path, but
/mnt/acdwill be used throughout this document.mkdir -p /mnt/acd mount esb3024-acd-router-1.20.1.iso /mnt/acdStop the router and all associated services.
Before upgrading the router it needs to be stopped, which can be done by typing this:
systemctl stop 'acd-*'Run the installer script.
/mnt/acd/installerPlease note that the installer will install new container images, but it will not remove the old ones. The old images can be removed manually after the upgrade is complete.
Migrate the configuration.
Note that this step only applies if the router is configured using
confd. If it is configured using the REST API, this step is not necessary.The confd configuration used in the previous versions is not directly compatible with 1.20, and may need to be converted. If this is not done, the configuration will not be valid and it will not be possible to make configuration changes.
The
acd-confd-migrationtool will automatically apply any necessary schema migrations. Further details about this tool can be found at Confd Auto Upgrade Tool.The tool takes as input the old configuration file, either by reading the file directly, or by reading from standard input, applies any necessary migrations between the two specified versions, and outputs a new configuration to standard output which is suitable for being applied to the upgraded system. While the tool has the ability to migrate between multiple versions at a time, the earliest supported version is 1.10.1.
The example below shows how to upgrade from 1.10.2. If upgrading from 1.14.0,
--from 1.10.2should be replaced with--from 1.14.0.The command line required to run the tool is different depending on which esb3024 release it is run on. On 1.20.1 it is run like this:
cat config_backup.json | \ podman run -i --rm \ images.edgeware.tv/acd-confd-migration:1.20.1 \ --in - --from 1.10.2 --to 1.20.1 \ | tee config_upgraded.jsonAfter running the above command, apply the new configuration to
confdby runningcat config_upgraded.json | confcli -i.
Troubleshooting
If there is a problem running the installer, additional debug information can
be output by adding -v or -vv or -vvv to the installer command, the
more “v” characters, the more detailed output.
3.3.1 - Configuration changes between 1.18 and 1.20
Confd configuration changes
Below are the changes to the confd configuration between versions 1.18 and 1.20 listed.
Added Kafka bootstrap server settings
The integration.kafka section has been added. It only contains
bootstrapServers, which is a list of Kafka bootstrap servers that the router
may connect to. The Kafka settings are described in the Data streams
section.
Added data streams settings
The services.routing.dataStreams section has been added. It contains
configuration for incoming and outgoing data streams in the incoming and
outgoing sections. See Data streams
for more information.
Added allowAnyRedirectType setting
A new setting, services.routing.hostGroups.<name>.allowAnyRedirectType, has
been added. It makes the Director interpret any 3xx response from a redirecting
as a redirect. See
CDNs and Hosts for more
information.
3.4 - Firewall
For security reasons, the ESB3024 Installer does not automatically configure the local firewall to allow incoming traffic. It is the responsibility of the operations person to ensure that the system is protected from external access by placing it behind a suitable firewall solution. The following table describes the set of ports required for operation of the router.
| Application | Port | Protocol | Direction | Source | Description |
|---|---|---|---|---|---|
| Prometheus Alert Manager | 9093 | TCP | IN | internal | Monitoring Services |
| Confd | 5000 | TCP | IN | internal | Configuration Services |
| Router | 80 | TCP | IN | public | Incoming HTTP Requests |
| Router | 443 | TCP | IN | public | Incoming HTTPS Requests |
| Router | 5001 | TCP | IN | localhost | Access to router’s REST API |
| Router | 8000 | TCP | IN | localhost | Internal monitoring port |
| EDNS-Proxy | 8888 | TCP | IN | localhost | Proxy EDNS Requests |
| Grafana | 3000 | TCP | IN | internal | Monitoring Services |
| Grafana-Loki | 3100 | TCP | IN | internal | Log monitoring daemon |
| Prometheus | 9090 | TCP | IN | internal | Monitoring Service |
The “Direction” column represents the direction in which the connection is established.
IN- The connection is originated from an outside serverOUT- The connection is established from the host to an external server.
Once a connection is established through the firewall, bidirectional traffic must be allowed using the established connection.
For the “Source” column, the following terms are used.
internal- Any host or network which is allowed to monitor or operate the system.public- Any host or subnet that can access the router. This includes any customer network that will be making routing requests.localhost- Access can be limited to local connections only.any- All traffic from any source or to any destination.
Additional Ports
Convoy Bridge Integration
The optional convoy-bridge service needs the ability to access the Convoy MariaDB service, which by default runs on port 3306 on all of the Convoy Management servers. To allow this integration to run, port 3306/tcp must be allowed from the router to the configured Convoy Management node.
3.5 - API Overview
ESB3024 Router provides two different types of API:s:
- A content request API that is used by video clients to ask for content, normally using port 80 for HTTP and port 443 for HTTPS.
- A few REST API:s used by administrators to configure and monitor the router installation, using port 5001 over HTTPS by default.
The content API won’t be described further in this document, since it’s a simple HTTP interface serving content as regular files or redirect responses.
Raw configuration – /v2/configuration
Used to check and update the raw configuration of ESB3024 Router. Note that this API is considered an implementation detail and is not documented further.
| REQUEST Method | Content-Type | RESPONSE Result | Status Code | Content-Type |
|---|---|---|---|---|
GET | <N/A> | Success | 200 OK | application/json |
PUT | application/json | Success | 204 No Content | <N/A> |
PUT | application/json | Failure | 400 Bad Request | application/json1 |
Validate Configuration – /v2/validate_configuration
Used to determine if a JSON payload is correctly formatted without actually applying its configuration. A successful return status does not guarantee that the applied configuration will work, it only validates the JSON structure.
| REQUEST Method | Content-Type | RESPONSE Result | Status Code | Content-Type |
|---|---|---|---|---|
PUT | application/json | Success | 204 No Content | <N/A> |
PUT | application/json | Failure | 400 Bad Request | application/json1 |
Example request
When an expected field is missing from the payload, the validation will show which one and return an appropriate error message in its payload:
$ curl -i -X PUT \
-d '{"routing": {"log_level": 3}}' \
-H "Content-Type: application/json" \
https://router.example:5001/v2/validate_configuration
HTTP/1.1 400 Bad Request
Access-Control-Allow-Origin: *
Content-Length: 132
Content-Type: application/json
X-Service-Identity: router.example-5fc78d
"Configuration validation: Configuration parsing failed. \
Exception: [json.exception.out_of_range.403] (/routing) key 'id' not found"
Selection Input – /v1/selection_input
Selection input API can be used to inject external key:value data into the
routing engine, making the data available when making routing decisions. An
arbitrary JSON structure can be pushed to the endpoint. When performing GET or
DELETE requests, specific selection input values can be accessed or deleted by
including a path to the request. Note that not specifying a path will select all
selection input values.
One use case for selection input is to provide data on cache availability. E.g.
If you send {"edge-streamer-2-online": true} to the selection input API,
you can create a routing condition eq('edge-streamer-online', true) to
ensure that no traffic gets routed to the streamer if it’s offline. Note that
sending the same key:value data to the selection input API will overwrite the
previous value.
There is a configurable limit to how many key:value items that can be injected into the router, see the tuning parameter
$ confcli services.routing.tuning.general.selectionInputItemLimit
{
"selectionInputItemLimit": 10000
}
| REQUEST Method | Content-Type | RESPONSE Result | Status Code | Content-Type |
|---|---|---|---|---|
PUT | application/json | Success | 204 No Content | <N/A> |
PUT | application/json | Failure | 400 Bad Request | application/json |
GET | <N/A> | Success | 200 OK | application/json |
DELETE | <N/A> | Success | 204 No Content | <N/A> |
DELETE | <N/A> | Failure | 404 Not Found | <N/A> |
Example successful request (PUT)
$ curl -i -X PUT \
-d '{"host1_bitrate": 13000, "host1_capacity": 50000}' \
-H "Content-Type: application/json" \
https://router.example:5001/v1/selection_input
HTTP/1.1 204 No Content
Access-Control-Allow-Origin: *
Content-Length: 0
X-Service-Identity: router.example-5fc78d
Example unsuccessful request (PUT)
$ curl -i -X PUT \
-d '{"cdn-status": {"session-count": 12345, "load-percent" 98}}' \
-H "Content-Type: application/json" \
https://router.example:5001/v1/selection_input
HTTP/1.1 400 Bad Request
Access-Control-Allow-Origin: *
Content-Length: 169
Content-Type: application/json
X-Service-Identity: router.example-5fc78d
{
"error": "[json.exception.parse_error.101] parse error at line 1, column 57: \
syntax error while parsing object separator - \
unexpected number literal; expected ':'"
}
Example successful request (GET)
curl -i https://router.example:5001/v1/selection_input
HTTP/1.1 200 OK
Access-Control-Allow-Origin: *
Content-Length: 129
Content-Type: application/json
X-Service-Identity: router.example-5fc78d
{
"host1_bitrate": 13000,
"host1_capacity": 50000
}
Example successful specific value request (GET)
curl -i https://router.example:5001/v1/selection_input/path/to/value
HTTP/1.1 200 OK
Access-Control-Allow-Origin: *
Content-Length: 129
Content-Type: application/json
X-Service-Identity: router.example-5fc78d
1
Example successful request (DELETE)
curl -i -X DELETE https://router.example:5001/v1/selection_input
HTTP/1.1 204 OK
Access-Control-Allow-Origin: *
Content-Length: 129
X-Service-Identity: router.example-5fc78d
Example successful specific value request (DELETE)
curl -i -X DELETE https://router.example:5001/v1/selection_input/value/to/delete
HTTP/1.1 204 OK
Access-Control-Allow-Origin: *
Content-Length: 129
X-Service-Identity: router.example-5fc78d
Example unsuccessful request (DELETE)
curl -i -X DELETE https://router.example:5001/v1/selection_input/non/existent/value
HTTP/1.1 404 Not Found
Access-Control-Allow-Origin: *
Content-Length: 129
X-Service-Identity: router.example-5fc78d
Subnets – /v1/subnets
An API for managing named subnets that can be used for routing and block lists. See Subnets for more details.
PUT requests inject key value pairs with the form {<subnet>: <value>}, where
<subnet> is a valid CIDR string, into ACD, e.g.:
$ curl -i -X PUT \
-d '{"255.255.255.255/24": "area1", "1.2.3.4/24": "area2"}' \
-H "Content-Type: application/json" \
https://router.example:5001/v1/subnets
HTTP/1.1 204 No Content
Access-Control-Allow-Origin: *
Content-Length: 0
X-Service-Identity: router.example-5fc78d
GET requests are used to fetch injected subnets, e.g.:
# Fetch all injected subnets
$ curl -i https://router.example:5001/v1/subnets
HTTP/1.1 200 OK
Access-Control-Allow-Origin: *
Content-Length: 411
Content-Type: application/json
X-Service-Identity: router.example-5fc78d
{
"1.2.3.4/16": "area2",
"1.2.3.4/24": "area1",
"1.2.3.4/8": "area3",
"255.255.255.255/16": "area2",
"255.255.255.255/24": "area1",
"255.255.255.255/8": "area3",
"2a02:2e02:9bc0::/16": "area8",
"2a02:2e02:9bc0::/32": "area7",
"2a02:2e02:9bc0::/48": "area6",
"2a02:2e02:9de0::/44": "combined_area",
"2a02:2e02:ada0::/44": "combined_area",
"5.5.0.4/8": "area5",
"90.90.1.3/16": "area4"
}
DELETE requests are used to delete injected subnets, e.g.:
# Delete all injected subnets
$ curl -i https://router.example:5001/v1/subnets -X DELETE
HTTP/1.1 204 No Content
Access-Control-Allow-Origin: *
Content-Length: 0
X-Service-Identity: router.example-5fc78d
Both GET and DELETE requests can be specified with the paths /byKey/ and
/byValue/ to filter which subnets to GET or DELETE.
# Fetch subnet with the CIDR string 1.2.3.4/8 if it exists
$ curl -i https://router.example:5001/v1/subnets/byKey/1.2.3.4/8
HTTP/1.1 200 OK
Access-Control-Allow-Origin: *
Content-Length: 26
Content-Type: application/json
X-Service-Identity: router.example-5fc78d
{
"1.2.3.4/8": "area3"
}
# Fetch all subnets whose CIDR string begins with the IP 1.2.3.4
$ curl -i https://router.example:5001/v1/subnets/byKey/1.2.3.4
HTTP/1.1 200 OK
Access-Control-Allow-Origin: *
Content-Length: 76
Content-Type: application/json
X-Service-Identity: router.example-5fc78d
{
"1.2.3.4/16": "area2",
"1.2.3.4/24": "area1",
"1.2.3.4/8": "area3"
}
# Fetch all subnets whose value equals 'area1'
$ curl -i https://router.example:5001/v1/subnets/byValue/area1
HTTP/1.1 200 OK
Access-Control-Allow-Origin: *
Content-Length: 60
Content-Type: application/json
X-Service-Identity: router.example-5fc78d
{
"1.2.3.4/24": "area1",
"255.255.255.255/24": "area1"
}
# Delete subnet with the CIDR string 1.2.3.4/8 if it exists
$ curl -i https://router.example:5001/v1/subnets/byKey/1.2.3.4/8
HTTP/1.1 204 No Content
Access-Control-Allow-Origin: *
Content-Length: 0
X-Service-Identity: router.example-5fc78d
# Delete all subnets whose CIDR string begins with the IP 1.2.3.4
$ curl -i https://router.example:5001/v1/subnets/byKey/1.2.3.4
HTTP/1.1 204 No Content
Access-Control-Allow-Origin: *
Content-Length: 0
X-Service-Identity: router.example-5fc78d
# Delete all subnets whose value equals 'area1'
$ curl -i https://router.example:5001/v1/subnets/byValue/area1
HTTP/1.1 204 No Content
Access-Control-Allow-Origin: *
Content-Length: 0
X-Service-Identity: router.example-5fc78d
| REQUEST Method | Content-Type | RESPONSE Result | Status Code | Content-Type |
|---|---|---|---|---|
PUT | application/json | Success | 204 No Content | <N/A> |
PUT | application/json | Failure | 400 Bad Request | application/json |
GET | <N/A> | Success | 200 OK | application/json |
GET | <N/A> | Failure | 400 Bad Request | application/json |
DELETE | <N/A> | Success | 204 No Content | application/json |
DELETE | <N/A> | Failure | 400 Bad Request | application/json |
Subrunner Resource Usage – /v1/usage
Used to monitor the load on subrunners, the processes performing those tasks that are possible to run in parallel.
| REQUEST Method | Content-Type | RESPONSE Result | Status Code | Content-Type |
|---|---|---|---|---|
GET | <N/A> | Success | 200 OK | application/json |
Example request
$ curl -i https://router.example:5001/v1/usage
HTTP/1.1 200 OK
Access-Control-Allow-Origin: *
Content-Length: 1234
Content-Type: application/json
X-Service-Identity: router.example-5fc78d
{
"total_usage": {
"content": {
"lru": 0,
"newest": "-",
"oldest": "-",
"total": 0
},
"sessions": 0,
"subrunner_usage": {
[...]
}
},
"usage_per_subrunner": [
{
"subrunner_usage": {
[...]
}
},
[...]
]
}
Metrics – /m1/v1/metrics
An interface intended to be scraped by Prometheus. It is possible to scrape it manually to see current values, but doing so will reset some counters and cause actual Prometheus data to become faulty.
| REQUEST Method | Content-Type | RESPONSE Result | Status Code | Content-Type |
|---|---|---|---|---|
GET | <N/A> | Success | 200 OK | text/plain |
Example request
$ curl -i https://router.example:5001/m1/v1/metrics
HTTP/1.1 200 OK
Access-Control-Allow-Origin: *
Content-Length: 1234
Content-Type: text/plain
X-Service-Identity: router.example-5fc78d
# TYPE num_configuration_changes counter
num_configuration_changes 12
# TYPE num_log_errors_total counter
num_log_errors_total 0
# TYPE num_log_warnings_total counter
num_log_warnings_total{category=""} 123
# TYPE num_log_warnings_total counter
num_log_warnings_total{category="cdn"} 0
# TYPE num_log_warnings_total counter
num_log_warnings_total{category="content"} 0
# TYPE num_log_warnings_total counter
num_log_warnings_total{category="generic"} 10
# TYPE num_log_warnings_total counter
num_log_warnings_total{category="repeated_session"} 0
# TYPE num_ssl_errors_total counter
[...]
Node Visit Counters – /v1/node_visits
Used to gather statistics about the number of visits to each node in the routing tree. The returned value is a JSON object containing node ID names and their corresponding counter values.
| REQUEST Method | Content-Type | RESPONSE Result | Status Code | Content-Type |
|---|---|---|---|---|
GET | <N/A> | Success | 200 OK | application/json |
See Routing Rule Evaluation Metrics for more details.
Example request
$ curl -i https://router.example:5001/v1/node_visits
HTTP/1.1 200 OK
Access-Control-Allow-Origin: *
Content-Length: 73
Content-Type: application/json
X-Service-Identity: router.example-5fc78d
{
"cache1.tv": "99900",
"offload": "100"
"routingtable": "100000"
}
Node Visit Graph – /v1/node_visits_graph
Creates a GraphML representation of the node visitation data that can be rendered into an image to make it easier to understand the data.
| REQUEST Method | Content-Type | RESPONSE Result | Status Code | Content-Type |
|---|---|---|---|---|
GET | <N/A> | Success | 200 OK | application/xml |
See Routing Rule Evaluation Metrics for more details.
Example request
> curl -i -k https://router.example:5001/v1/node_visits_graph
HTTP/1.1 200 OK
Access-Control-Allow-Origin: *
Content-Length: 731
Content-Type: application/xml
X-Service-Identity: router.example-5fc78d
<?xml version="1.0"?>
<graphml xmlns="http://graphml.graphdrawing.org/xmlns"
xmlns:xsi="http://www.w3.org/2001/XMLSchema-instance"
xsi:schemaLocation="http://graphml.graphdrawing.org/xmlns http://graphml.graphdrawing.org/xmlns/1.0/graphml.xsd">
<key id="visits" for="node" attr.name="visits" attr.type="string" />
<graph id="G" edgedefault="directed">
<node id="routingtable">
<data key="visits">100000</data>
</node>
<node id="cache1.tv">
<data key="visits">99900</data>
</node>
<node id="offload">
<data key="visits">100</data>
</node>
<edge id="e0" source="routingtable" target="cache1.tv" />
<edge id="e1" source="routingtable" target="offload" />
</graph>
</graphml>
Session list - /v1/sessions
Used to monitor the load on subrunners, the processes performing those tasks that are possible to run in parallel.
| REQUEST Method | Content-Type | RESPONSE Result | Status Code | Content-Type |
|---|---|---|---|---|
GET | <N/A> | Success | 200 OK | application/json |
Example request
$ curl -k -i https://router.example:5001/v1/sessions
HTTP/1.1 200 OK
Access-Control-Allow-Origin: *
Content-Length: 12345
Content-Type: application/json
X-Service-Identity: router.example-5fc78d
{
"sessions": [
{
"age_seconds": 103,
"cdn": "edgeware",
"cdn_is_redirecting": false,
"client_ip": "1.2.3.4",
"host": "cdn.example:80",
"id": "router.example-5fc78d-00000001",
"idle_seconds": 103,
"last_request_time": "2022-12-02T14:05:05Z",
"latest_request_path": "/__cl/s:storage1/__c/v/f/0/5/v_sintel3v_f05a05f07d352e891d79863131ef4df7/__op/hls-default/__f/index.m3u8",
"no_of_requests": 1,
"requested_bytes": 0,
"requests_redirected": 0,
"requests_served": 0,
"session_groups": [
"all"
],
"session_groups_generation": 2,
"session_path": "/__cl/s:storage1/__c/v/f/0/5/v_sintel3v_f05a05f07d352e891d79863131ef4df7/__op/hls-default/__f/index.m3u8",
"start_time": "2022-12-02T14:05:05Z",
"type": "instream",
"user_agent": "libmpv"
},
[...]
]
}
Session details - /v1/sessions/<id: str>
Used to get details about a specific session from the above session list. The
id part of the URL corresponds to the id field in one of the
returned session entries in the above response.
| REQUEST Method | Content-Type | RESPONSE Result | Status Code | Content-Type |
|---|---|---|---|---|
GET | <N/A> | Success | 200 OK | application/json |
GET | <N/A> | Failure | 404 Not Found | application/json |
Example request
$ curl -k -i https://router.example:5001/v1/sessions/router.example-5fc78d-00000001
HTTP/1.1 200 OK
Access-Control-Allow-Origin: *
Content-Length: 763
Content-Type: application/json
X-Service-Identity: router.example-5fc78d
{
"age_seconds": 183,
"cdn": "edgeware",
"cdn_is_redirecting": false,
"client_ip": "1.2.3.4",
"host": "cdn.example:80",
"id": "router.example-5fc78d-00000001",
"idle_seconds": 183,
"last_request_time": "2022-12-02T14:05:05Z",
"latest_request_path": "/__cl/s:storage1/__c/v/f/0/5/v_sintel3v_f05a05f07d352e891d79863131ef4df7/__op/hls-default/__f/index.m3u8",
"no_of_requests": 1,
"requested_bytes": 0,
"requests_redirected": 0,
"requests_served": 0,
"session_groups": [
"all"
],
"session_groups_generation": 2,
"session_path": "/__cl/s:storage1/__c/v/f/0/5/v_sintel3v_f05a05f07d352e891d79863131ef4df7/__op/hls-default/__f/index.m3u8",
"start_time": "2022-12-02T14:05:05Z",
"type": "instream",
"user_agent": "libmpv"
}
Content List - /v1/content
| REQUEST Method | Content-Type | RESPONSE Result | Status Code | Content-Type |
|---|---|---|---|---|
GET | <N/A> | Success | 200 OK | application/json |
Example request
$ curl -k -i https://router.example:5001/v1/content
HTTP/1.1 200 OK
Access-Control-Allow-Origin: *
Content-Length: 572
Content-Type: application/json
X-Service-Identity: router.example-5fc78d
{
"content": [
[
"/__cl/s:storage1/__c/v/f/0/5/v_sintel3v_f05a05f07d352e891d79863131ef4df7/__op/hls-default/__f/index.m3u8",
{
"cached_count": 0,
"content_requested": false,
"content_set": false,
"expiration_time": "2022-12-02T14:05:05Z",
"key": "/__cl/s:storage1/__c/v/f/0/5/v_sintel3v_f05a05f07d352e891d79863131ef4df7/__op/hls-default/__f/index.m3u8",
"listeners": 0,
"manifest": "",
"request_count": 4,
"state": "HLS:MANIFEST-PENDING",
"wait_count": 0
}
]
]
}
Lua scripts – /v1/lua/<path str>.lua
Used to upload, retrieve and delete custom named Lua scripts on the router.
Global functions in uploaded scripts automatically become available to Lua code
in the configuration (which effectively may be viewed as hooks). Upload a
script by PUTing a application/x-lua to the endpoint, and retrieve it by
GETing the endpoint without payload.
| REQUEST Method | Content-Type | RESPONSE Result | Status Code | Content-Type |
|---|---|---|---|---|
PUT | application/x-lua | Success | 204 No Content | <N/A> |
PUT | application/x-lua | Failure | 400 Bad Request | application/json |
GET | <N/A> | Success | 200 OK | application/x-lua |
GET | <N/A> | Failure | 404 Not Found | application/json |
DELETE | <N/A> | Success | 204 No Content | <N/A> |
DELETE | <N/A> | Failure | 400 Bad Request | application/json |
DELETE | <N/A> | Failure | 404 Not Found | application/json |
Example request (PUT)
Save a Lua script under the name advanced_functions/f1.lua:
$ curl -i -X PUT \
-d 'function fun1() return 1 end' \
-H "Content-Type: application/x-lua" \
https://router.example:5001/v1/lua/advanced_functions/f1.lua
HTTP/1.1 204 Successfully saved Lua file
Access-Control-Allow-Origin: *
Content-Length: 0
X-Service-Identity: router.example-5fc78d
Example request (PUT, from file)
Upload an entire Lua file under the name advanced_functions/f1.lua:
First put your code in a file.
$ cat f1.lua
function fun1()
return 1
end
Then upload it using the --data-binary flag to preserve newlines
$ curl -i -X PUT \
--data-binary @f1.lua \
-H "Content-Type: application/x-lua" \
https://router.example:5001/v1/lua/advanced_functions/f1.lua
HTTP/1.1 204 Successfully saved Lua file
Access-Control-Allow-Origin: *
Content-Length: 0
X-Service-Identity: router.example-5fc78d
Example request (GET)
Request the Lua script named advanced_functions/f1.lua using a GET request:
$ curl -i https://router.example:5001/v1/lua/advanced_functions/f1.lua
HTTP/1.1 200 OK
Access-Control-Allow-Origin: *
Content-Length: 28
Content-Type: application/x-lua
X-Service-Identity: router.example-5fc78d
function fun1() return 1 end
Example request (DELETE)
Delete the Lua script named advanced_functions/f1.lua using a DELETE request:
$ curl -i -X DELETE \
https://router.example:5001/v1/lua/advanced_functions/f1.lua
HTTP/1.1 204 Successfully removed Lua file
Access-Control-Allow-Origin: *
Content-Length: 0
X-Service-Identity: router.example-5fc78d
List Lua scripts – /v1/lua
Used to list previously uploaded custom Lua scripts on the router, retrieving their respective paths and file checksums.
| REQUEST Method | Content-Type | RESPONSE Result | Status Code | Content-Type |
|---|---|---|---|---|
GET | <N/A> | Success | 200 OK | application/json |
Example request
$ curl -k -i https://router.example:5001/v1/lua
HTTP/1.1 200 OK
Access-Control-Allow-Origin: *
Content-Length: 108
Content-Type: application/json
X-Service-Identity: router.example-5fc78d
[
{
"file_checksum": "d41d8cd98f00b204e9800998ecf8427e",
"path": "advanced_functions/f1.lua"
}
]
Debug a Lua expression – /v1/lua/debug
Used to debug an arbitrary Lua expression on the router in a “sandbox” (with no visible side effects to the state of the router), and inspect the result.
The Lua expression in the body is evaluated inside an isolated copy of the
internal Lua environment including selection input. The stdout field of the
resulting JSON body is populated with a concatenation of every string provided
as argument to the Lua print() function during the course of evaluation.
Upon a successful evaluation, as indicated by the success flag,
return.value and return.lua_type_name capture the resulting Lua value.
Otherwise, if valuation was aborted (e.g. due to a Lua exception), error_msg
reflects any error description arising from the Lua environment.
| REQUEST Method | Content-Type | RESPONSE Result | Status Code | Content-Type |
|---|---|---|---|---|
POST | application/x-lua | Success | 200 OK | application/json |
Example successful request
$ curl -i -X POST \
-d 'fun1()' \
-H "Content-Type: application/x-lua" \
https://router.example:5001/v1/lua/debug
HTTP/1.1 200 OK
Access-Control-Allow-Origin: *
Content-Length: 123
Content-Type: application/json
X-Service-Identity: router.example-5fc78d
{
"error_msg": "",
"return": {
"lua_type_name": "number",
"value": 1.0
},
"stdout": "",
"success": true
}
Example unsuccessful request
(attempt to invoke unknown function)
$ curl -i -X POST \
-d 'fun5()' \
-H "Content-Type: application/x-lua" \
https://router.example:5001/v1/lua/debug
HTTP/1.1 200 OK
Access-Control-Allow-Origin: *
Content-Length: 123
Content-Type: application/json
X-Service-Identity: router.example-5fc78d
{
"error_msg": "[string \"function f0() ...\"]:2: attempt to call global 'fun5' (a nil value)",
"return": {
"lua_type_name": "",
"value": null
},
"stdout": "",
"success": false
}
Footnotes
3.6 - Configuration
3.6.1 - WebUI Configuration
The web based user interface is installed as a separate component and can be used to configure many common use cases. After navigating to the UI, a login screen will be presented.

Enter your credentials and log in. In the top left corner is a menu to select what section of the configuration to change. The configuration that will be active on the router is added in the Routing Workflow view. However, basic elements such as classification rules and routing targets, etc must be added first. Hence the following main steps are required to produce a proper configuration:
- Create classifiers serving as basic elements to create session groups.
- Create session groups which, using the classifiers, tag requests/clients for later use in the routing logic. of the incoming traffic.
- Define offload rules.
- Define rules to control behavior of internal traffic.
- Define backup rules to be used if the routing targets in the above step are unavailable.
- Finally, create the desired routing workflow using the elements defined in the previous steps.
A simplified concrete example of the above steps could be:
- Create two classifiers “smartphone” and “off-net”.
- Create a session group “mobile off-net”.
- Offload off-net traffic from mobile phones to a public CDN.
- Route other traffic to a private CDN.
- If the private CDN has an outage, use the public CDN for all traffic.
Hence, to start with, define the classifiers you will need. Those are based on information in the incoming request, optionally in combination with GeoIP databases or subnet information configured via the Subnet API. Here we show how to set up a GeoIP classifier. Note that the Director ships with a compatible snapshot of the GeoIP database, but for a production system a licensed and updated database is required.

Click the plus sign indicated in the picture above to create a new GeoIP classifier. You will be presented with the following view:

Here you can enter the geographical data on which to match, or check the “Inverted” check box to match anything except the entered geographical data.
The other kinds of classifiers are configured in a similar way.
After having added all the classifiers you need, it is time to create the session groups. Those are named filters that group incoming requests, typically video playback sessions in a video streaming CDN, and are defined with the help of the classifiers. For example, a session group “off-net mobile devices” could be composed of the classifiers “off-net traffic” and “mobile devices”.
Open the Session Groups view from the menu and hit the plus sign to add a new session group.


Define the new sessions groups by combining the previously created classifiers. It is often convenient to define an “All” session group that matches any incoming request.
Next go the “CDN Offload” view:

Here you define conditions for CDN offload. Each row defines a rule for offloading a specified session group. The rule makes use of the Selection Input API. This is an integration API that provides a way to supply additional data for use in the routing decision. Common examples are current bitrates or availability status. The selection input variables to use must be defined in the “Selection Input Types” view in the “Administration” section of the menu:

Reach out to the solution engineers from AgileTV in order to perform this integration in the best way. If no external data is required, such that the offload rule can be based solely based on session groups, this is not necessary and the condition field can be set to “Always” or “Disabled”.
When clicking the plus sign to add a new CDN Offload rule, the following view is presented:

The selection input rule is phrased in terms of a variable being above or below a threshold, but also a state such as “available” taking values 0 or 1 can be supported by for instance checking if “available” is below 1.
Moving on, if an incoming request is not offloaded, it will be handled by the Primary CDN section of the routing configuration.

Add all hosts in your primary CDN, together with a weight. A row in this table will be selected by random weighted load balancing. If each weight is the same, each row will be selected with the same probability. Another example would be three rows with weights 100, 100 and 200 which would randomly balance 50% of the load on the last row and the remaining load on the first two rows, i.e. 25% on each of the first and second row. If a Primary CDN host is unavailable, that host will not take part in the random selection.
If all hosts are unavailable, as a final resort the routing evaluation will go to the final Backup CDN step:

Here you can define what to do when all else fail. If not all requests are covered, for example with an “All” session group, then the request will fail with 403 Forbidden.
Now you have defined the basic elements and it is time to define the routing workflow. Select “Routing Workflow” from the menu, as pictured below. Here you can combine the elements previously created to achieve the desired routing behavior.

When everything seems correct, open the “Publish Routing” view from the menu:

Hit “Publish All Changes” and verify that you get a successful result.
3.6.2 - Confd and Confcli
confcli to set up routing rulesConfiguration of a complex routing tree can be difficult. The command line
interface tool called confcli has been developed to make it simpler. It
combines building blocks, representing simple routing decisions, into complex
routing trees capable of satisfying almost any routing requirements.
These blocks are translated into an ESB3024 Router configuration which is automatically sent to the router, overwriting existing routing rules, CDN list and host list.
Installation and Usage
The confcli tools are installed alongside ESB3024 Router, on the same host,
and the confcli command line tool itself is made available on the host machine.
Simply type confcli in a shell on the host to see the current routing
configuration:
$ confcli
{
"services": {
"routing": {
"settings": {
"trustedProxies": [],
"contentPopularity": {
"algorithm": "score_based",
"sessionGroupNames": []
},
"extendedContentIdentifier": {
"enabled": false,
"includedQueryParams": []
},
"instream": {
"dashManifestRewrite": {
"enabled": false,
"sessionGroupNames": []
},
"hlsManifestRewrite": {
"enabled": false,
"sessionGroupNames": []
},
"reversedFilenameComparison": false
},
"usageLog": {
"enabled": false,
"logInterval": 3600000
}
},
"tuning": {
"content": {
"cacheSizeFullManifests": 1000,
"cacheSizeLightManifests": 10000,
"lightCacheTimeMilliseconds": 86400000,
"liveCacheTimeMilliseconds": 100,
"vodCacheTimeMilliseconds": 10000
},
"general": {
"accessLog": false,
"coutFlushRateMilliseconds": 1000,
"cpuLoadWindowSize": 10,
"eagerCdnSwitching": false,
"httpPipeliningEnable": false,
"logLevel": 3,
"maxConnectionsPerHost": 5,
"overloadThreshold": 32,
"readyThreshold": 8,
"redirectingCdnManifestDownloadRetries": 2,
"repeatedSessionStartThresholdSeconds": 30,
"selectionInputMetricsTimeoutSeconds": 30
},
"session": {
"idleDeactivateTimeoutMilliseconds": 20000,
"idleDeleteTimeoutMilliseconds": 1800000
},
"target": {
"responseTimeoutSeconds": 5,
"retryConnectTimeoutSeconds": 2,
"retryResponseTimeoutSeconds": 2,
"connectTimeoutSeconds": 5,
"maxIdleTimeSeconds": 30,
"requestAttempts": 3
}
},
"sessionGroups": [],
"classifiers": [],
"hostGroups": [],
"rules": [],
"entrypoint": "",
"applyConfig": true
}
}
}
The CLI tool can be used to modify, add and delete values by providing it with
the “path” to the object to change. The path is constructed by joining the field
names leading up to the value with a period between each name, e.g. the path to
the entrypoint is services.routing.entrypoint since entrypoint is nested
under the routing object, which in turn is under the services root object.
Lists use an index number in place of a field name, where 0 indicates the very
first element in the list, 1 the second element and so on.
If the list contains objects which have a field with the name name, the
index number can be replaced by the unique name of the object of interest.
Tab completion is supported by confcli. Pressing tab once will complete as far as possible, and pressing tab twice will list all available alternatives at the path constructed so far.
Display the values at a specific path:
$ confcli services.routing.hostGroups
{
"hostGroups": [
{
"name": "internal",
"type": "redirecting",
"httpPort": 80,
"httpsPort": 443,
"hosts": [
{
"name": "rr1",
"hostname": "rr1.example.com",
"ipv6_address": ""
}
]
},
{
"name": "external",
"type": "host",
"httpPort": 80,
"httpsPort": 443,
"hosts": [
{
"name": "offload-streamer1",
"hostname": "streamer1.example.com",
"ipv6_address": ""
},
{
"name": "offload-streamer2",
"hostname": "streamer2.example.com",
"ipv6_address": ""
}
]
}
]
}
Display the values in a specific list index:
$ confcli services.routing.hostGroups.1
{
"1": {
"name": "external",
"type": "host",
"httpPort": 80,
"httpsPort": 443,
"hosts": [
{
"name": "offload-streamer1",
"hostname": "streamer1.example.com",
"ipv6_address": ""
},
{
"name": "offload-streamer2",
"hostname": "streamer2.example.com",
"ipv6_address": ""
}
]
}
}
Display the values in a specific list index using the object’s name:
$ confcli services.routing.hostGroups.1.hosts.offload-streamer2
{
"offload-streamer2": {
"name": "offload-streamer2",
"hostname": "streamer2.example.com",
"ipv6_address": ""
}
}
Modify a single value:
confcli services.routing.hostGroups.1.hosts.offload-streamer2.hostname new-streamer.example.com
services.routing.hostGroups.1.hosts.offload-streamer2.hostname = 'new-streamer.example.com'
Delete an entry:
$ confcli services.routing.sessionGroups.Apple.classifiers.
{
"classifiers": [
"Apple",
""
]
}
$ confcli services.routing.sessionGroups.Apple.classifiers.1 -d
http://localhost:5000/config/__active/services/routing/sessionGroups/Apple/classifiers/1 reset to default/deleted
$ confcli services.routing.sessionGroups.Apple.classifiers.
{
"classifiers": [
"Apple"
]
}
Adding new values in objects and lists is done using a wizard by invoking
confcli with a path and the -w argument. This will be shown extensively in
the examples further down in this document rather than here.
If you have a JSON file with a previously generated confcli configuration
output it can be applied to a system by typing confcli -i <file path>.
CDNs and Hosts
Configuration using confcli has no real concept of CDNs, instead it has groups of hosts that share some common settings such as HTTP(S) port and whether they return a redirection URL, serve content directly or perform a DNS lookup. Of these three variants, the two former share the same parameters, while the DNS variant is slightly different.
Note that by default, the Director expects redirecting CDNs to redirect with
response code 302. If the CDN returns a redirection URL with another HTTP
response code, the field allowAnyRedirectType must be set to true in the
hostGroup configuration. Then any 3xx response code will result in a 302
response code being sent to the client.
Each host belongs to a host group and may itself be an entire CDN using a single public hostname or a single streamer server, all depending on the needs of the user.
Host Health
When creating a host in the confd configuration, you have the option to define a list of health check functions. Each health check function must return true for a host to be selected. This means that the host will only be considered available if all the defined health check functions evaluate to true. If any of the health check functions return false, the host will be considered unavailable and will not be selected for routing. All health check functions are detailed in the section Built-in Lua functions.
$ confcli services.routing.hostGroups -w
Running wizard for resource 'hostGroups'
Hint: Hitting return will set a value to its default.
Enter '?' to receive the help string
hostGroups : [
hostGroup can be one of
1: dns
2: host
3: redirecting
Choose element index or name: redirecting
Adding a 'redirecting' element
hostGroup : {
name (default: ): edgeware
type (default: redirecting): ⏎
httpPort (default: 80): ⏎
httpsPort (default: 443): ⏎
forwardHostHeader (default: False): ⏎
allowAnyRedirectType (default: False): ⏎
hosts : [
host : {
name (default: ): rr1
hostname (default: ): convoy-rr1.example.com
ipv6_address (default: ): ⏎
healthChecks : [
healthCheck (default: always()): health_check()
Add another 'healthCheck' element to array 'healthChecks'? [y/N]: n
]
}
Add another 'host' element to array 'hosts'? [y/N]: y
host : {
name (default: ): rr2
hostname (default: ): convoy-rr2.example.com
ipv6_address (default: ): ⏎
healthChecks : [
healthCheck (default: always()): ⏎
Add another 'healthCheck' element to array 'healthChecks'? [y/N]: n
]
}
Add another 'host' element to array 'hosts'? [y/N]: ⏎
]
}
Add another 'hostGroup' element to array 'hostGroups'? [y/N]: ⏎
]
Generated config:
{
"hostGroups": [
{
"name": "edgeware",
"type": "redirecting",
"httpPort": 80,
"httpsPort": 443,
"forwardHostHeader": false,
"allowAnyRedirectType": false,
"hosts": [
{
"name": "rr1",
"hostname": "convoy-rr1.example.com",
"ipv6_address": "",
"healthChecks": [
"health_check()"
]
},
{
"name": "rr2",
"hostname": "convoy-rr2.example.com",
"ipv6_address": "",
"healthChecks": [
"always()"
]
}
]
}
]
}
Merge and apply the config? [y/n]: y
$ confcli services.routing.hostGroups -w
Running wizard for resource 'hostGroups'
Hint: Hitting return will set a value to its default.
Enter '?' to receive the help string
hostGroups : [
hostGroup can be one of
1: dns
2: host
3: redirecting
Choose element index or name: dns
Adding a 'dns' element
hostGroup : {
name (default: ): external-dns
type (default: dns): ⏎
hosts : [
host : {
name (default: ): dns-host
hostname (default: ): dns.example.com
ipv6_address (default: ): ⏎
healthChecks : [
healthCheck (default: always()): ⏎
Add another 'healthCheck' element to array 'healthChecks'? [y/N]: n
]
}
Add another 'host' element to array 'hosts'? [y/N]: ⏎
]
}
Add another 'hostGroup' element to array 'hostGroups'? [y/N]: ⏎
]
Generated config:
{
"hostGroups": [
{
"name": "external-dns",
"type": "dns",
"hosts": [
{
"name": "dns-host",
"hostname": "dns.example.com",
"ipv6_address": "",
"healthChecks": [
"always()"
]
}
]
}
]
}
Merge and apply the config? [y/n]: y
Rule Blocks
The routing configuration using confcli is done using a combination of logical
building blocks, or rules. Each block evaluates the incoming request in some way
and sends it on to one or more sub-blocks. If the block is of the host type
described above, the client is sent to that host and the evaluation is done.
Existing Blocks
Currently supported blocks are:
allow: Incoming requests, for which a given rule function matches, are immediately sent to the providedonMatchtarget.consistentHashing: Splits incoming requests randomly between preferred hosts, determined by the proprietary consistent hashing algorithm. The amount of hosts to split between is controlled by thespreadFactor.contentPopularity: Splits incoming requests into two sub-blocks depending on how popular the requested content is.deny: Incoming requests, for which a given rule function matches, are immediately denied, and all non-matching requests are sent to theonMisstarget.firstMatch: Incoming requests are matched by an ordered series of rules, where the request will be handled by the first rule for which the condition evaluates to true.random: Splits incoming requests randomly and equally between a list of target sub-blocks. Useful for simple load balancing.split: Splits incoming requests between two sub-blocks depending on how the request is evaluated by a provided function. Can be used for sending clients to different hosts depending on e.g. geographical location or client hardware type.weighted: Randomly splits incoming requests between a list of target sub-blocks, weighted according to each target’s associated weight rule. A higher weight means a higher portion of requests will be routed to a sub-block. Rules can be used to decide whether or not to pick a target.rawGroup: Contains a raw ESB3024 Router configuration routing tree node, to be inserted as is in the generated configuration. This is only meant to be used in the rare cases when it’s impossible to construct the required routing behavior in any other way.rawHost: A host reference for use as endpoints in rawGroup trees.
$ confcli services.routing.rules -w
Running wizard for resource 'rules'
Hint: Hitting return will set a value to its default.
Enter '?' to receive the help string
rules : [
rule can be one of
1: allow
2: consistentHashing
3: contentPopularity
4: deny
5: firstMatch
6: random
7: rawGroup
8: rawHost
9: split
10: weighted
Choose element index or name: allow
Adding a 'allow' element
rule : {
name (default: ): allow
type (default: allow): ⏎
condition (default: ): customFunction()
onMatch (default: ): rr1
}
Add another 'rule' element to array 'rules'? [y/N]: ⏎
]
Generated config:
{
"rules": [
{
"name": "content",
"type": "contentPopularity",
"condition": "customFunction()",
"onMatch": "rr1"
}
]
}
Merge and apply the config? [y/n]: y
$ confcli services.routing.rules -w
Running wizard for resource 'rules'
Hint: Hitting return will set a value to its default.
Enter '?' to receive the help string
rules : [
rule can be one of
1: allow
2: consistentHashing
3: contentPopularity
4: deny
5: firstMatch
6: random
7: rawGroup
8: rawHost
9: split
10: weighted
Choose element index or name: consistentHashing
Adding a 'consistentHashing' element
rule : {
name (default: ): consistentHashingRule
type (default: consistentHashing):
spreadFactor (default: 1): 2
hashAlgorithm (default: MD5):
targets : [
target : {
target (default: ): rr1
enabled (default: True):
}
Add another 'target' element to array 'targets'? [y/N]: y
target : {
target (default: ): rr2
enabled (default: True):
}
Add another 'target' element to array 'targets'? [y/N]: y
target : {
target (default: ): rr3
enabled (default: True):
}
Add another 'target' element to array 'targets'? [y/N]: n
]
}
Add another 'rule' element to array 'rules'? [y/N]: n
]
Generated config:
{
"rules": [
{
"name": "consistentHashingRule",
"type": "consistentHashing",
"spreadFactor": 2,
"hashAlgorithm": "MD5",
"targets": [
{
"target": "rr1",
"enabled": true
},
{
"target": "rr2",
"enabled": true
},
{
"target": "rr3",
"enabled": true
}
]
}
]
}
Merge and apply the config? [y/n]: y
$ confcli services.routing.rules -w
Running wizard for resource 'rules'
Hint: Hitting return will set a value to its default.
Enter '?' to receive the help string
rules : [
rule can be one of
1: allow
2: consistentHashing
3: contentPopularity
4: deny
5: firstMatch
6: random
7: rawGroup
8: rawHost
9: split
10: weighted
Choose element index or name: contentPopularity
Adding a 'contentPopularity' element
rule : {
name (default: ): content
type (default: contentPopularity): ⏎
contentPopularityCutoff (default: 10): 20
onPopular (default: ): rr1
onUnpopular (default: ): rr2
}
Add another 'rule' element to array 'rules'? [y/N]: ⏎
]
Generated config:
{
"rules": [
{
"name": "content",
"type": "contentPopularity",
"contentPopularityCutoff": 20.0,
"onPopular": "rr1",
"onUnpopular": "rr2"
}
]
}
Merge and apply the config? [y/n]: y
$ confcli services.routing.rules -w
Running wizard for resource 'rules'
Hint: Hitting return will set a value to its default.
Enter '?' to receive the help string
rules : [
rule can be one of
1: allow
2: consistentHashing
3: contentPopularity
4: deny
5: firstMatch
6: random
7: rawGroup
8: rawHost
9: split
10: weighted
Choose element index or name: deny
Adding a 'deny' element
rule : {
name (default: ): deny
type (default: deny): ⏎
condition (default: ): customFunction()
onMiss (default: ): rr1
}
Add another 'rule' element to array 'rules'? [y/N]: ⏎
]
Generated config:
{
"rules": [
{
"name": "content",
"type": "contentPopularity",
"condition": "customFunction()",
"onMiss": "rr1"
}
]
}
Merge and apply the config? [y/n]: y
$ confcli services.routing.rules -w
Running wizard for resource 'rules'
Hint: Hitting return will set a value to its default.
Enter '?' to receive the help string
rules : [
rule can be one of
1: allow
2: consistentHashing
3: contentPopularity
4: deny
5: firstMatch
6: random
7: rawGroup
8: rawHost
9: split
10: weighted
Choose element index or name: firstMatch
Adding a 'firstMatch' element
rule : {
name (default: ): firstMatch
type (default: firstMatch): ⏎
targets : [
target : {
onMatch (default: ): rr1
rule (default: ): customFunction()
}
Add another 'target' element to array 'targets'? [y/N]: y
target : {
onMatch (default: ): rr2
rule (default: ): otherCustomFunction()
}
Add another 'target' element to array 'targets'? [y/N]: n
]
}
Add another 'rule' element to array 'rules'? [y/N]: n
]
Generated config:
{
"rules": [
{
"name": "firstMatch",
"type": "firstMatch",
"targets": [
{
"onMatch": "rr1",
"condition": "customFunction()"
},
{
"onMatch": "rr2",
"condition": "otherCustomFunction()"
}
]
}
]
}
Merge and apply the config? [y/n]: y
$ confcli services.routing.rules -w
Running wizard for resource 'rules'
Hint: Hitting return will set a value to its default.
Enter '?' to receive the help string
rules : [
rule can be one of
1: allow
2: consistentHashing
3: contentPopularity
4: deny
5: firstMatch
6: random
7: rawGroup
8: rawHost
9: split
10: weighted
Choose element index or name: random
Adding a 'random' element
rule : {
name (default: ): random
type (default: random): ⏎
targets : [
target (default: ): rr1
Add another 'target' element to array 'targets'? [y/N]: y
target (default: ): rr2
Add another 'target' element to array 'targets'? [y/N]: ⏎
]
}
Add another 'rule' element to array 'rules'? [y/N]: ⏎
]
Generated config:
{
"rules": [
{
"name": "random",
"type": "random",
"targets": [
"rr1",
"rr2"
]
}
]
}
Merge and apply the config? [y/n]: y
$ confcli services.routing.rules -w
Running wizard for resource 'rules'
Hint: Hitting return will set a value to its default.
Enter '?' to receive the help string
rules : [
rule can be one of
1: allow
2: consistentHashing
3: contentPopularity
4: deny
5: firstMatch
6: random
7: rawGroup
8: rawHost
9: split
10: weighted
Choose element index or name: split
Adding a 'split' element
rule : {
name (default: ): split
type (default: split): ⏎
condition (default: ): custom_function()
onMatch (default: ): rr2
onMiss (default: ): rr1
}
Add another 'rule' element to array 'rules'? [y/N]: ⏎
]
Generated config:
{
"rules": [
{
"name": "split",
"type": "split",
"condition": "custom_function()",
"onMatch": "rr2",
"onMiss": "rr1"
}
]
}
Merge and apply the config? [y/n]: y
$ confcli services.routing.rules. -w
Running wizard for resource 'rules'
Hint: Hitting return will set a value to its default.
Enter '?' to receive the help string
rules : [
rule can be one of
1: allow
2: consistentHashing
3: contentPopularity
4: deny
5: firstMatch
6: random
7: rawGroup
8: rawHost
9: split
10: weighted
Choose element index or name: weighted
Adding a 'weighted' element
rule : {
name (default: ): weight
type (default: weighted): ⏎
targets : [
target : {
target (default: ): rr1
weight (default: 100): ⏎
condition (default: always()): always()
}
Add another 'target' element to array 'targets'? [y/N]: y
target : {
target (default: ): rr2
weight (default: 100): si('rr2-input-weight')
condition (default: always()): gt('rr2-bandwidth', 1000000)
}
Add another 'target' element to array 'targets'? [y/N]: y
target : {
target (default: ): rr2
weight (default: 100): custom_func()
condition (default: always()): always()
}
Add another 'target' element to array 'targets'? [y/N]: ⏎
]
}
Add another 'rule' element to array 'rules'? [y/N]: ⏎
]
Generated config:
{
"rules": [
{
"name": "weight",
"type": "weighted",
"targets": [
{
"target": "rr1",
"weight": "100",
"condition": "always()"
},
{
"target": "rr2",
"weight": "si('rr2-input-weight')",
"condition": "gt('rr2-bandwith', 1000000)"
},
{
"target": "rr2",
"weight": "custom_func()",
"condition": "always()"
}
]
}
]
}
Merge and apply the config? [y/n]: y
>> First add a raw host block that refers to a regular host
$ confcli services.routing.rules. -w
Running wizard for resource 'rules'
Hint: Hitting return will set a value to its default.
Enter '?' to receive the help string
rules : [
rule can be one of
1: allow
2: consistentHashing
3: contentPopularity
4: deny
5: firstMatch
6: random
7: rawGroup
8: rawHost
9: split
10: weighted
Choose element index or name: rawHost
Adding a 'rawHost' element
rule : {
name (default: ): raw-host
type (default: rawHost): ⏎
hostId (default: ): rr1
}
Add another 'rule' element to array 'rules'? [y/N]: ⏎
]
Generated config:
{
"rules": [
{
"name": "raw-host",
"type": "rawHost",
"hostId": "rr1"
}
]
}
Merge and apply the config? [y/n]: y
>> And then add a rule using the host node
$ confcli services.routing.rules. -w
Running wizard for resource 'rules'
Hint: Hitting return will set a value to its default.
Enter '?' to receive the help string
rules : [
rule can be one of
1: allow
2: consistentHashing
3: contentPopularity
4: deny
5: firstMatch
6: random
7: rawGroup
8: rawHost
9: split
10: weighted
Choose element index or name: rawGroup
Adding a 'rawGroup' element
rule : {
name (default: ): raw-node
type (default: rawGroup): ⏎
memberOrder (default: sequential): ⏎
members : [
member : {
target (default: ): raw-host
weightFunction (default: ): return 1
}
Add another 'member' element to array 'members'? [y/N]: ⏎
]
}
Add another 'rule' element to array 'rules'? [y/N]: ⏎
]
Generated config:
{
"rules": [
{
"name": "raw-node",
"type": "rawGroup",
"memberOrder": "sequential",
"members": [
{
"target": "raw-host",
"weightFunction": "return 1"
}
]
}
]
}
Merge and apply the config? [y/n]: y
Rule Language
Some blocks, such as the split and firstMatch types, have a rule field that
contains a small function in a very simple programming language. This field is
used to filter any incoming client requests in order to determine how to rule
block should react.
In the case of a split block, the rule is evaluated and if it is true the
client is sent to the onMatch part of the block, otherwise it is sent to the
onMiss part for further evaluation.
In the case of a firstMatch block, the rule for each target will be evaluated
top to bottom in order until either a rule evaluates to true or the list is
exhausted. If a rule evaluates to true, the client will be sent to the onMatch
part of the block, otherwise the next target in the list will be tried. If all
targets have been exhausted, then the entire rule evaluation will fail, and the
routing tree will be restarted with the firstMatch block effectively removed.
Example of Boolean Functions
Let’s say we have an ESB3024 Router set up with a session group that matches Apple
devices (named “Apple”). To route all Apple devices to a specific streamer one
would simply create a split block with the following rule:
in_session_group('Apple')
In order to make more complex rules it’s possible to combine several checks like
this in the same rule. Let’s extend the hypothetical ESB3024 Router above with a
configured subnet with all IP addresses in Europe (named “Europe”). To make a
rule that accepts any clients using an Apple device and living outside of
Europe, but only as long as the reported load on the streamer (as indicated by
the selection input variable
“europe_load_mbps”) is less than 1000 megabits per second one could make an
offload block with the following rule (without linebreaks):
in_session_group('Apple')
and not in_subnet('Europe')
and lt('europe_load_mbps', 1000)
In this example in_session_group('Apple') will be true if the client belongs
to the session group named ‘Apple’. The function call in_subnet('Europe') is
true if the client’s IP belongs to the subnet named ‘Europe’, but the word not
in front of it reverses the value so the entire section ends up being false if
the client is in Europe. Finally lt('europe_load_mbps', 1000) is true if
there is a selection input variable named “europe_load_mbps” and its value is
less than 1000.
Since the three parts are conjoined with the and keyword they must all
be true for the entire rule to match. If the keyword or had been used
instead it would have been enough for any of the parts to be true for the
rule to match.
Example of Numeric Functions
A hypothetical CDN has two streamers with different capacity; Host_1 has
roughly twice the capacity of Host_2. A simple random load balancing would put
undue stress on the second host since it will receive as much traffic as the
more capable Host_1.
This can be solved by using a weighted random distribution rule block with
suitable rules for the two hosts:
{
"targets": [
{
"target": "Host_1",
"condition": "always()",
"weight": "100"
}
{
"target": "Host_2",
"condition": "always()",
"weight": "50"
},
]
}
resulting in Host_1 receiving twice as many requests as Host_2 as its
weight function is double that of Host_2.
If the CDN is capable of reporting the free capacity of the hosts, for example by writing to a selection input variable for each host, it’s easy to write a more intelligent load balancing rule by making the weights correspond to the amount of capacity left on each host:
{
"targets": [
{
"target": "Host_1",
"condition": "always()",
"weight": "si('free_capacity_host_1')"
}
{
"target": "Host_2",
"condition": "always()",
"weight": "si('free_capacity_host_2')"
},
]
}
It is also possible to write custom Lua functions that return suitable weights, perhaps taking the host as an argument:
{
"targets": [
{
"target": "Host_1",
"condition": "always()",
"weight": "intelligent_weight_function('Host_1')"
}
{
"target": "Host_2",
"condition": "always()",
"weight": "intelligent_weight_function('Host_1')"
},
]
}
These different weight rules can of course be combined in the same rule block, with one target having a hard coded number, another using a dynamically updated selection input variable and yet another having a custom-built function.
Due to limitations in the random number generator used to distribute requests, it’s better to use somewhat large values, around 100–1000 or so, than to use small values near 0.
Built-In Functions
The following built-in functions are available when writing rules:
in_session_group(str name): True if session belongs to session group<name>in_all_session_groups(str sg_name, ...): True if session belongs to all specified session groupsin_any_session_group(str sg_name, ...): True if session belongs to any specified session groupin_subnet(str subnet_name): True if client IP belongs to the named subnetgt(str si_var, number value): True if selection_inputs[si_var] > valuegt(str si_var1, str si_var2): True if selection_inputs[si_var1] > selection_inputs[si_var2]ge(str si_var, number value): True if selection_inputs[si_var] >= valuege(str si_var1, str si_var2): True if selection_inputs[si_var1] >= selection_inputs[si_var2]lt(str si_var, number value): True if selection_inputs[si_var] < valuelt(str si_var1, str si_var2): True if selection_inputs[si_var1] < selection_inputs[si_var2]le(str si_var, number value): True if selection_inputs[si_var] <= valuele(str si_var1, str si_var2): True if selection_inputs[si_var1] <= selection_inputs[si_var2]eq(str si_var, number value): True if selection_inputs[si_var] == valueeq(str si_var1, str si_var2): True if selection_inputs[si_var1] == selection_inputs[si_var2]neq(str si_var, number value): True if selection_inputs[si_var] != valueneq(str si_var1, str si_var2): True if selection_inputs[si_var1] != selection_inputs[si_var2]si(str si_var): Returns the value of selection_inputs[si_var] if it is defined and non-negative, otherwise it returns 0.always(): Returns true, useful when creating weighted rule blocks.never(): Returns false, opposite ofalways().
These functions, as well as custom functions written in Lua and uploaded to the ESB3024 Router, can be combined to make suitably precise rules.
Combining Multiple Boolean Functions
In order to make the rule language easy to work with, it is fairly restricted
and simple. One restriction is that it’s only possible to chain multiple
function results together using either and or or, but not a
combination of both conjunctions.
Statements joined with and or or keywords are evaluated one by one,
starting with the left-most statement and moving right. As soon as the end
result of the entire expression is certain, the evaluation ends. This means that
evaluation ends with the first false statement for and expressions since a
single false component means the entire expression must also be false. It
also means that evaluation ends with the first true statement for or
expressions since only one component must be true for the entire statement to
be true as well. This is known as short-circuit or lazy evaluation.
Custom Functions
It is possible to write extremely complex Lua functions that take many parameters or calculations into consideration when evaluating an incoming client request. By writing such functions and making sure that they return only non-negative integer values and uploading them to the router they can be used from the rule language. Simply call them like any of the built-in functions listed above, using strings and numbers as arguments if necessary, and their result will be used to determine the routing path to use.
Formal Syntax
The full syntax of the language can be described in just a few lines of BNF grammar:
<rule> := <weight_rule> | <match_rule> | <value_rule>
<weight_rule> := "if" <compound_predicate> "then" <weight> "else" <weight>
<match_rule> := <compound_predicate>
<value_rule> := <weight>
<compound_predicate> := <logical_predicate> |
<logical_predicate> ["and" <logical_predicate> ...] |
<logical_predicate> ["or" <logical_predicate> ...] |
<logical_predicate> := ["not"] <predicate>
<predicate> := <function_name> "(" ")" |
<function_name> "(" <argument> ["," <argument> ...] ")"
<function_name> := <letter> [<function_name_tail> ...]
<function_name_tail> := empty | <letter> | <digit> | "_"
<argument> := <string> | <number>
<weight> := integer | <predicate>
<number> := float | integer
<string> := "'" [<letter> | <digit> | <symbol> ...] "'"
Building a Routing Configuration
This example sets up an entire routing configuration for a system with a ESB3008 Request Router, two streamers and the Apple devices outside of Europe example used earlier in this document. Any clients not matching the criteria will be sent to an offload CDN with two streamers in a simple uniformly randomized load balancing setup.
Set up Session Group
First make a classifier and a session group that uses it:
$ confcli services.routing.classifiers -w
Running wizard for resource 'classifiers'
Hint: Hitting return will set a value to its default.
Enter '?' to receive the help string
classifiers : [
classifier can be one of
1: anonymousIp
2: asnIds
3: contentUrlPath
4: contentUrlQueryParameters
5: geoip
6: hostName
7: ipranges
8: random
9: regexMatcher
10: requestHeader
11: stringMatcher
12: subnet
13: userAgent
Choose element index or name: userAgent
Adding a 'userAgent' element
classifier : {
name (default: ): Apple
type (default: userAgent): ⏎
inverted (default: False): ⏎
patternType (default: stringMatch): ⏎
pattern (default: ): *apple*
}
Add another 'classifier' element to array 'classifiers'? [y/N]: ⏎
]
Generated config:
{
"classifiers": [
{
"name": "Apple",
"type": "userAgent",
"inverted": false,
"patternType": "stringMatch",
"pattern": "*apple*"
}
]
}
Merge and apply the config? [y/n]: y
$ confcli services.routing.sessionGroups -w
Running wizard for resource 'sessionGroups'
Hint: Hitting return will set a value to its default.
Enter '?' to receive the help string
sessionGroups : [
sessionGroup : {
name (default: ): Apple
classifiers : [
classifier (default: ): Apple
Add another 'classifier' element to array 'classifiers'? [y/N]: ⏎
]
}
Add another 'sessionGroup' element to array 'sessionGroups'? [y/N]: ⏎
]
Generated config:
{
"sessionGroups": [
{
"name": "Apple",
"classifiers": [
"Apple"
]
}
]
}
Merge and apply the config? [y/n]: y
Set up Hosts
Create two host groups and add a Request Router to the first and two streamers to the second, which will be used for offload:
$ confcli services.routing.hostGroups -w
Running wizard for resource 'hostGroups'
Hint: Hitting return will set a value to its default.
Enter '?' to receive the help string
hostGroups : [
hostGroup can be one of
1: dns
2: host
3: redirecting
Choose element index or name: redirecting
Adding a 'redirecting' element
hostGroup : {
name (default: ): internal
type (default: redirecting): ⏎
httpPort (default: 80): ⏎
httpsPort (default: 443): ⏎
forwardHostHeader (default: False): ⏎
allowAnyRedirectType (default: False): ⏎
hosts : [
host : {
name (default: ): rr1
hostname (default: ): rr1.example.com
ipv6_address (default: ): ⏎
}
Add another 'host' element to array 'hosts'? [y/N]: ⏎
]
}
Add another 'hostGroup' element to array 'hostGroups'? [y/N]: y
hostGroup can be one of
1: dns
2: host
3: redirecting
Choose element index or name: host
Adding a 'host' element
hostGroup : {
name (default: ): external
type (default: host): ⏎
httpPort (default: 80): ⏎
httpsPort (default: 443): ⏎
hosts : [
host : {
name (default: ): offload-streamer1
hostname (default: ): streamer1.example.com
ipv6_address (default: ): ⏎
}
Add another 'host' element to array 'hosts'? [y/N]: y
host : {
name (default: ): offload-streamer2
hostname (default: ): streamer2.example.com
ipv6_address (default: ): ⏎
}
Add another 'host' element to array 'hosts'? [y/N]: ⏎
]
}
Add another 'hostGroup' element to array 'hostGroups'? [y/N]: ⏎
]
Generated config:
{
"hostGroups": [
{
"name": "internal",
"type": "redirecting",
"httpPort": 80,
"httpsPort": 443,
"forwardHostHeader": false,
"allowAnyRedirectType": false,
"hosts": [
{
"name": "rr1",
"hostname": "rr1.example.com",
"ipv6_address": ""
}
]
},
{
"name": "external",
"type": "host",
"httpPort": 80,
"httpsPort": 443,
"hosts": [
{
"name": "offload-streamer1",
"hostname": "streamer1.example.com",
"ipv6_address": ""
},
{
"name": "offload-streamer2",
"hostname": "streamer2.example.com",
"ipv6_address": ""
}
]
}
]
}
Merge and apply the config? [y/n]: y
Create Load Balancing and Offload Block
Add both offload streamers as targets in a randomgroup block:
$ confcli services.routing.rules -w
Running wizard for resource 'rules'
Hint: Hitting return will set a value to its default.
Enter '?' to receive the help string
rules : [
rule can be one of
1: allow
2: consistentHashing
3: contentPopularity
4: deny
5: firstMatch
6: random
7: rawGroup
8: rawHost
9: split
10: weighted
Choose element index or name: random
Adding a 'random' element
rule : {
name (default: ): balancer
type (default: random): ⏎
targets : [
target (default: ): offload-streamer1
Add another 'target' element to array 'targets'? [y/N]: y
target (default: ): offload-streamer2
Add another 'target' element to array 'targets'? [y/N]: ⏎
]
}
Add another 'rule' element to array 'rules'? [y/N]: ⏎
]
Generated config:
{
"rules": [
{
"name": "balancer",
"type": "random",
"targets": [
"offload-streamer1",
"offload-streamer2"
]
}
]
}
Merge and apply the config? [y/n]: y
Then create a split block with the request router and the load balanced CDN as targets:
$ confcli services.routing.rules -w
Running wizard for resource 'rules'
Hint: Hitting return will set a value to its default.
Enter '?' to receive the help string
rules : [
rule can be one of
1: allow
2: consistentHashing
3: contentPopularity
4: deny
5: firstMatch
6: random
7: rawGroup
8: rawHost
9: split
10: weighted
Choose element index or name: split
Adding a 'split' element
rule : {
name (default: ): offload
type (default: split): ⏎
rule (default: ): in_session_group('Apple') and not in_subnet('Europe') and lt('europe_load_mbps', 1000)
onMatch (default: ): rr1
onMiss (default: ): balancer
}
Add another 'rule' element to array 'rules'? [y/N]: ⏎
]
Generated config:
{
"rules": [
{
"name": "offload",
"type": "split",
"condition": "in_session_group('Apple') and not in_subnet('Europe') and lt('europe_load_mbps', 1000)",
"onMatch": "rr1",
"onMiss": "balancer"
}
]
}
Merge and apply the config? [y/n]: y
The last step required is to set the entrypoint of the routing tree so the router knows where to start evaluating:
$ confcli services.routing.entrypoint offload
services.routing.entrypoint = 'offload'
Evaluate
Now that all the rules have been set up properly and the router has been reconfigured. The translated configuration can be read from the router’s configuration API:
$ curl -k https://router-host:5001/v2/configuration 2> /dev/null | jq .routing
{
"id": "offload",
"member_order": "sequential",
"members": [
{
"host_id": "rr1",
"id": "offload.rr1",
"weight_function": "return ((in_session_group('Apple') ~= 0) and
(in_subnet('Europe') == 0) and
(lt('europe_load_mbps', 1000) ~= 0) and 1) or 0 "
},
{
"id": "offload.balancer",
"member_order": "weighted",
"members": [
{
"host_id": "offload-streamer1",
"id": "offload.balancer.offload-streamer1",
"weight_function": "return 100"
},
{
"host_id": "offload-streamer2",
"id": "offload.balancer.offload-streamer2",
"weight_function": "return 100"
}
],
"weight_function": "return 1"
}
],
"weight_function": "return 100"
}
Note that the configuration language code has been translated into its Lua equivalent.
3.6.3 - Session Groups and Classification
ESB3024 Router provides a flexible classification engine, allowing the assignment of clients into session groups that can then be used to base routing decisions on.
Session Classification
In order to perform routing it is necessary to classify incoming sessions according to the relevant parameters. This is done through session groups and their associated classifiers.
There are different ways of classifying a request:
Strings with wildcards: Simple case-insensitive string pattern with support for adding asterisks (’*’) in order to match any value at that point in the pattern.String with regular expressions: A complex string matching pattern capable of matching more complicated strings than the simple wildcard matching type.
Valid string matching sources are
content_url_path,content_url_query_params,hostnameanduser_agent, examples of which will be shown below.
GeoIP: Based on the geographic location of the client, supporting wildcard matching. Geographic location data is provided by MaxMind. See Route on GeoIP/ASN for more details. The possible values to match with are any combinations of:- Continent
- Country
- Cities
- ASN
Anonymous IP: Classifies clients using an anonymous IP. Database of anonymous IPs is provided by MaxMind.IP range: Based on whether a client’s IP belongs to any of the listed IP ranges or not.Subnet: Tests if a client’s IP belongs to a named subnet, see Subnets for more details.ASN ID list: Checks to see if a client’s IP belongs to any of the specified ASN IDs.Random: Randomly classifies clients according to a given probability. The classifier is deterministic, meaning that a session will always get the same classification, even if evaluated multiple times.
A session group may have more than one classifier. If it does, all the classifiers must match the incoming client request for it to belong to the session group. It is also possible for a request to belong to multiple session groups, or to none.
To send certain clients to a specific host you first need to create a suitable
classifier using confcli in wizard mode. The wizard will guide you through the
process of creating a new entry, asking you what value to input for each field
and helping you by telling you what inputs are allowed for restricted fields
such as the string comparison source mentioned above:
$ confcli services.routing.classifiers -w
Running wizard for resource 'classifiers'
Hint: Hitting return will set a value to its default.
Enter '?' to receive the help string
classifiers : [
classifier can be one of
1: anonymousIp
2: asnIds
3: contentUrlPath
4: contentUrlQueryParameters
5: geoip
6: hostName
7: ipranges
8: random
9: regexMatcher
10: requestHeader
11: stringMatcher
12: subnet
13: userAgent
Choose element index or name: geoip
Adding a 'geoip' element
classifier : {
name (default: ): sweden_matcher
type (default: geoip): ⏎
inverted (default: False): ⏎
continent (default: ): ⏎
country (default: ): sweden
cities : [
city (default: ): ⏎
Add another 'city' element to array 'cities'? [y/N]: ⏎
]
asn (default: ): ⏎
}
Add another 'classifier' element to array 'classifiers'? [y/N]: ⏎
]
Generated config:
{
"classifiers": [
{
"name": "sweden_matcher",
"type": "geoip",
"inverted": false,
"continent": "",
"country": "sweden",
"cities": [
""
],
"asn": ""
}
]
}
Merge and apply the config? [y/n]: y
$ confcli services.routing.classifiers -w
Running wizard for resource 'classifiers'
Hint: Hitting return will set a value to its default.
Enter '?' to receive the help string
classifiers : [
classifier can be one of
1: anonymousIp
2: asnIds
3: contentUrlPath
4: contentUrlQueryParameters
5: geoip
6: hostName
7: ipranges
8: random
9: regexMatcher
10: requestHeader
11: stringMatcher
12: subnet
13: userAgent
Choose element index or name: ipranges
Adding a 'ipranges' element
classifier : {
name (default: ): company_matcher
type (default: ipranges): ⏎
inverted (default: False): ⏎
ipranges : [
iprange (default: ): 90.128.0.0/12
Add another 'iprange' element to array 'ipranges'? [y/N]: ⏎
]
}
Add another 'classifier' element to array 'classifiers'? [y/N]: ⏎
]
Generated config:
{
"classifiers": [
{
"name": "company_matcher",
"type": "ipranges",
"inverted": false,
"ipranges": [
"90.128.0.0/12"
]
}
]
}
Merge and apply the config? [y/n]: y
$ confcli services.routing.classifiers -w
Running wizard for resource 'classifiers'
Hint: Hitting return will set a value to its default.
Enter '?' to receive the help string
classifiers : [
classifier can be one of
1: anonymousIp
2: asnIds
3: contentUrlPath
4: contentUrlQueryParameters
5: geoip
6: hostName
7: ipranges
8: random
9: regexMatcher
10: requestHeader
11: stringMatcher
12: subnet
13: userAgent
Choose element index or name: stringMatcher
Adding a 'stringMatcher' element
classifier : {
name (default: ): apple_matcher
type (default: stringMatcher): ⏎
inverted (default: False): ⏎
source (default: content_url_path): user_agent
pattern (default: ): *apple*
}
Add another 'classifier' element to array 'classifiers'? [y/N]: ⏎
]
Generated config:
{
"classifiers": [
{
"name": "apple_matcher",
"type": "stringMatcher",
"inverted": false,
"source": "user_agent",
"pattern": "*apple*"
}
]
}
Merge and apply the config? [y/n]: y
$ confcli services.routing.classifiers -w
Running wizard for resource 'classifiers'
Hint: Hitting return will set a value to its default.
Enter '?' to receive the help string
classifiers : [
classifier can be one of
1: anonymousIp
2: asnIds
3: contentUrlPath
4: contentUrlQueryParameters
5: geoip
6: hostName
7: ipranges
8: random
9: regexMatcher
10: requestHeader
11: stringMatcher
12: subnet
13: userAgent
Choose element index or name: regexMatcher
Adding a 'regexMatcher' element
classifier : {
name (default: ): content_matcher
type (default: regexMatcher): ⏎
inverted (default: False): ⏎
source (default: content_url_path): ⏎
pattern (default: ): .*/(live|news_channel)/.*m3u8
}
Add another 'classifier' element to array 'classifiers'? [y/N]: ⏎
]
Generated config:
{
"classifiers": [
{
"name": "content_matcher",
"type": "regexMatcher",
"inverted": false,
"source": "content_url_path",
"pattern": ".*/(live|news_channel)/.*m3u8"
}
]
}
Merge and apply the config? [y/n]: y
$ confcli services.routing.classifiers -w
Running wizard for resource 'classifiers'
Hint: Hitting return will set a value to its default.
Enter '?' to receive the help string
classifiers : [
classifier can be one of
1: anonymousIp
2: asnIds
3: contentUrlPath
4: contentUrlQueryParameters
5: geoip
6: hostName
7: ipranges
8: random
9: regexMatcher
10: requestHeader
11: stringMatcher
12: subnet
13: userAgent
Choose element index or name: subnet
Adding a 'subnet' element
classifier : {
name (default: ): company_matcher
type (default: subnet): ⏎
inverted (default: False): ⏎
pattern (default: ): company
}
Add another 'classifier' element to array 'classifiers'? [y/N]: ⏎
]
Generated config:
{
"classifiers": [
{
"name": "company_matcher",
"type": "subnet",
"inverted": false,
"pattern": "company"
}
]
}
Merge and apply the config? [y/n]: y
$ confcli services.routing.classifiers -w
Running wizard for resource 'classifiers'
Hint: Hitting return will set a value to its default.
Enter '?' to receive the help string
classifiers : [
classifier can be one of
1: anonymousIp
2: asnIds
3: contentUrlPath
4: contentUrlQueryParameters
5: geoip
6: hostName
7: ipranges
8: random
9: regexMatcher
10: requestHeader
11: stringMatcher
12: subnet
13: userAgent
Choose element index or name: hostName
Adding a 'hostName' element
classifier : {
name (default: ): host_name_classifier
type (default: hostName): ⏎
inverted (default: False): ⏎
patternType (default: stringMatch): ⏎
pattern (default: ): *live.example*
}
Add another 'classifier' element to array 'classifiers'? [y/N]: n
]
Generated config:
{
"classifiers": [
{
"name": "host_name_classifier",
"type": "hostName",
"inverted": false,
"patternType": "stringMatch",
"pattern": "*live.example*"
}
]
}
Merge and apply the config? [y/n]: y
$ confcli services.routing.classifiers -w
Running wizard for resource 'classifiers'
Hint: Hitting return will set a value to its default.
Enter '?' to receive the help string
classifiers : [
classifier can be one of
1: anonymousIp
2: asnIds
3: contentUrlPath
4: contentUrlQueryParameters
5: geoip
6: hostName
7: ipranges
8: random
9: regexMatcher
10: requestHeader
11: stringMatcher
12: subnet
13: userAgent
Choose element index or name: contentUrlPath
Adding a 'contentUrlPath' element
classifier : {
name (default: ): vod_matcher
type (default: contentUrlPath): ⏎
inverted (default: False): ⏎
patternType (default: stringMatch): ⏎
pattern (default: ): *vod*
}
Add another 'classifier' element to array 'classifiers'? [y/N]: n
]
Generated config:
{
"classifiers": [
{
"name": "vod_matcher",
"type": "contentUrlPath",
"inverted": false,
"patternType": "stringMatch",
"pattern": "*vod*"
}
]
}
Merge and apply the config? [y/n]: y
$ confcli services.routing.classifiers -w
Running wizard for resource 'classifiers'
Hint: Hitting return will set a value to its default.
Enter '?' to receive the help string
classifiers : [
classifier can be one of
1: anonymousIp
2: asnIds
3: contentUrlPath
4: contentUrlQueryParameters
5: geoip
6: hostName
7: ipranges
8: random
9: regexMatcher
10: requestHeader
11: stringMatcher
12: subnet
13: userAgent
Choose element index or name: contentUrlQueryParameters
Adding a 'contentUrlQueryParameters' element
classifier : {
name (default: ): bitrate_matcher
type (default: contentUrlQueryParameters): ⏎
inverted (default: False): ⏎
patternType (default: stringMatch): regex
pattern (default: ): .*bitrate=100000.*
}
Add another 'classifier' element to array 'classifiers'? [y/N]: n
]
Generated config:
{
"classifiers": [
{
"name": "bitrate_matcher",
"type": "contentUrlQueryParameters",
"inverted": false,
"patternType": "regex",
"pattern": ".*bitrate=100000.*"
}
]
}
Merge and apply the config? [y/n]: y
$ confcli services.routing.classifiers -w
Running wizard for resource 'classifiers'
Hint: Hitting return will set a value to its default.
Enter '?' to receive the help string
classifiers : [
classifier can be one of
1: anonymousIp
2: asnIds
3: contentUrlPath
4: contentUrlQueryParameters
5: geoip
6: hostName
7: ipranges
8: random
9: regexMatcher
10: requestHeader
11: stringMatcher
12: subnet
13: userAgent
Choose element index or name: userAgent
Adding a 'userAgent' element
classifier : {
name (default: ): iphone_matcher
type (default: userAgent): ⏎
inverted (default: False): ⏎
patternType (default: stringMatch): regex
pattern (default: ): i(P|p)hone
}
Add another 'classifier' element to array 'classifiers'? [y/N]: n
]
Generated config:
{
"classifiers": [
{
"name": "iphone_matcher",
"type": "userAgent",
"inverted": false,
"patternType": "regex",
"pattern": "i(P|p)hone"
}
]
}
Merge and apply the config? [y/n]: y
$ confcli services.routing.classifiers -w
Running wizard for resource 'classifiers'
Hint: Hitting return will set a value to its default.
Enter '?' to receive the help string
classifiers : [
classifier can be one of
1: anonymousIp
2: asnIds
3: contentUrlPath
4: contentUrlQueryParameters
5: geoip
6: hostName
7: ipranges
8: random
9: regexMatcher
10: requestHeader
11: stringMatcher
12: subnet
13: userAgent
Choose element index or name: asnIds
Adding a 'asnIds' element
classifier : {
name (default: ): asn_matcher
type (default: asnIds): ⏎
inverted (default: False): ⏎
asnIds <The list of ASN IDs to accept. (default: [])>: [
asnId: 1
Add another 'asnId' element to array 'asnIds'? [y/N]: y
asnId: 2
Add another 'asnId' element to array 'asnIds'? [y/N]: y
asnId: 3
Add another 'asnId' element to array 'asnIds'? [y/N]: ⏎
]
}
Add another 'classifier' element to array 'classifiers'? [y/N]: ⏎
]
Generated config:
{
"classifiers": [
{
"name": "asn_matcher",
"type": "asnIds",
"inverted": false,
"asnIds": [
1,
2,
3
]
}
]
}
Merge and apply the config? [y/n]: y
$ confcli services.routing.classifiers -w
Running wizard for resource 'classifiers'
Hint: Hitting return will set a value to its default.
Enter '?' to receive the help string
classifiers : [
classifier can be one of
1: anonymousIp
2: asnIds
3: contentUrlPath
4: contentUrlQueryParameters
5: geoip
6: hostName
7: ipranges
8: random
9: regexMatcher
10: requestHeader
11: stringMatcher
12: subnet
13: userAgent
Choose element index or name: random
Adding a 'random' element
classifier <A classifier randomly applying to clients based on the provided probability. (default: OrderedDict())>: {
name (default: ): random_matcher
type (default: random):
probability (default: 0.5): 0.7
}
Add another 'classifier' element to array 'classifiers'? [y/N]: n
]
Generated config:
{
"classifiers": [
{
"name": "random_matcher",
"type": "random",
"probability": 0.7
}
]
}
Merge and apply the config? [y/n]: y
$ confcli services.routing.classifiers -w
Running wizard for resource 'classifiers'
Hint: Hitting return will set a value to its default.
Enter '?' to receive the help string
classifiers : [
classifier can be one of
1: anonymousIp
2: asnIds
3: contentUrlPath
4: contentUrlQueryParameters
5: geoip
6: hostName
7: ipranges
8: random
9: regexMatcher
10: requestHeader
11: stringMatcher
12: subnet
13: userAgent
Choose element index or name: anonymousIp
Adding a 'anonymousIp' element
classifier : {
name (default: ): anon_ip_matcher
type (default: anonymousIp):
inverted (default: False):
}
Add another 'classifier' element to array 'classifiers'? [y/N]: n
]
Generated config:
{
"classifiers": [
{
"name": "anon_ip_matcher",
"type": "anonymousIp",
"inverted": false
}
]
}
Merge and apply the config? [y/n]: y
These classifiers can now be used to construct session groups and properly classify clients. Using the examples above, let’s create a session group classifying clients from Sweden using an Apple device:
$ confcli services.routing.sessionGroups -w
Running wizard for resource 'sessionGroups'
Hint: Hitting return will set a value to its default.
Enter '?' to receive the help string
sessionGroups : [
sessionGroup : {
name (default: ): inSwedenUsingAppleDevice
classifiers : [
classifier (default: ): sweden_matcher
Add another 'classifier' element to array 'classifiers'? [y/N]: y
classifier (default: ): apple_matcher
Add another 'classifier' element to array 'classifiers'? [y/N]: ⏎
]
}
Add another 'sessionGroup' element to array 'sessionGroups'? [y/N]: ⏎
]
Generated config:
{
"sessionGroups": [
{
"name": "inSwedenUsingAppleDevice",
"classifiers": [
"sweden_matcher",
"apple_matcher"
]
}
]
}
Merge and apply the config? [y/n]: y
Clients classified by the sweden_matcher and apple_matcher classifiers
will now be put in the session group inSwedenUsingAppleDevice. Using session
groups in routing will be demonstrated later in this document.
Advanced Classification
The above example will simply apply all classifiers in the list, and as long as they all evaluate to true for a session, that session will be tagged with the session group. For situations where this isn’t enough, classifiers can instead be combined using simple logic statements to form complex rules.
A first simple example can be a session group that accepts any viewers in either
ASN 1, 2 or 3 (corresponding to the classifier asn_matcher or living in Sweden.
This can be done by creating a session group, and adding the following logic
statement:
'sweden_matcher' OR 'asn_matcher'
A slightly more advanced case is where a session group should only contain sessions neither in any of the three ASNs nor in Sweden. This is done by negating the previous example:
NOT ('sweden_matcher' OR 'asn_matcher')
A single classifier can also be negated, rather than the whole statement, for example to accept any Swedish viewers except those in the three ASNs:
'sweden_matcher' AND NOT 'asn_matcher'
Arbitrarily complex statements can be created using classifier names, parentheses,
and the keywords AND, OR and NOT.
For example a session group accepting any Swedish viewers except those in the Stockholm region unless they are also Apple users:
'sweden_matcher' AND (NOT 'stockholm_matcher' OR 'apple_matcher')
Note that the classifier names must be enclosed in single quotes when using this syntax.
Applying this kind of complex classifier using confcli is no more difficult than adding a single classifier at a time:
$ confcli services.routing.sessionGroups. -w
Running wizard for resource 'sessionGroups'
Hint: Hitting return will set a value to its default.
Enter '?' to receive the help string
sessionGroups : [
sessionGroup : {
name (default: ): complex_group
classifiers : [
classifier (default: ): 'sweden_matcher' AND (NOT 'stockholm_matcher' OR 'apple_matcher')
Add another 'classifier' element to array 'classifiers'? [y/N]: ⏎
]
}
Add another 'sessionGroup' element to array 'sessionGroups'? [y/N]: ⏎
]
Generated config:
{
"sessionGroups": [
{
"name": "complex_group",
"classifiers": [
"'sweden_matcher' AND (NOT 'stockholm_matcher' OR 'apple_matcher')"
]
}
]
}
Merge and apply the config? [y/n]: y
3.6.4 - Accounts
If accounts are configured, the router will tag sessions as belonging to an
account. Note that if accounts are not configured or a session does not belong to
an account, a session will be tagged with the default account.
Metrics will be tracked separately for each account when applicable.
Configuration
Accounts are configured using session groups, see Classification
for more information. Using confcli, an account is configured by defining an
account name and a list of session groups for which a session must be classified
into to belong to the account. An account called account_1 can be configured by
running the command
confcli services.routing.accounts -w
Running wizard for resource 'accounts'
Hint: Hitting return will set a value to its default.
Enter '?' to receive the help string
accounts : [
account : {
name (default: ): account_1
sessionGroups <A session will be tagged as belonging to this account if it's classified into all of the listed session groups. (default: [])>: [
sessionGroup (default: ): session_group_1
Add another 'sessionGroup' element to array 'sessionGroups'? [y/N]: y
sessionGroup (default: ): session_group_2
Add another 'sessionGroup' element to array 'sessionGroups'? [y/N]: n
]
}
Add another 'account' element to array 'accounts'? [y/N]: n
]
Generated config:
{
"accounts": [
{
"name": "account_1",
"sessionGroups": [
"session_group_1",
"session_group_2"
]
}
]
}
Merge and apply the config? [y/n]: y
A session will belong to the account account_1 if it has been classified into
the two session groups session_group_1 and session_group_2.
Metrics
If using the configuration above, the metrics will be separated per account:
# TYPE num_requests counter
num_requests{account="account_1",selector="initial"} 3
# TYPE num_requests counter
num_requests{account="default",selector="initial"} 3
3.6.5 - Data streams
Data streams can be used to produce and consume data to and from external data sources. This is useful for integrating with other systems, such as Kafka, to allow data synchronization between different instances of the Director or to read external selection input data.
Configuration
Currently, only Kafka data streams are supported. The addresses of the Kafka
brokers to connect to are configured in integration.kafka.bootstrapServers:
confcli integration.kafka.bootstrapServers
{
"bootstrapServers": [
"kafka-broker-host:9096"
]
}
These Kafka brokers can then be interacted with by configuring data streams in
the services.routing.dataStreams section of the configuration:
confcli services.routing.dataStreams
{
"dataStreams": {
"incoming": [],
"outgoing": []
}
}
Incoming data streams
incoming is a list of data streams that the Director will consume data from.
An incoming data stream defines the following properties:
name: The name of the data stream. This is used to identify the data stream in the configuration and in the logs.source: The source of the data stream. Currently, the only supported source iskafka, which means that the data will be consumed from the Kafka broker configured inintegration.kafka.bootstrapServers.target: The target of the data consumed from the stream. Currently, the only supported target isselectionInput, which means that the consumed data will be stored as selection input data.kafkaTopics: A list of Kafka topics to consume data from.
The following configuration will make the Director consume data from the Kafka
topic selection_input from the Kafka broker configured in
integration.kafka.bootstrapServers and store it as selection input data.
confcli services.routing.dataStreams.incoming
{
"incoming": [
{
"name": "incomingDataStream",
"source": "kafka",
"kafkaTopics": [
"selection_input"
],
"target": "selectionInput"
}
]
}
Outgoing data streams
outgoing is a list of data streams that the Director will produce data to.
An outgoing data stream defines the following properties:
name: The name of the data stream. This is used to identify the data stream in the configuration, in a Lua context and in the logs.type: The type of the data stream. Currently, the only supported type iskafka, which means that the data will be produced to the Kafka broker configured inintegration.kafka.bootstrapServers.kafkaTopic: The Kafka topic to produce data to.
Example of an outgoing data stream that produces to the Kafka topic selection_input:
confcli services.routing.dataStreams.outgoing
{
"outgoing": [
{
"name": "outgoingDataStream",
"type": "kafka",
"kafkaTopic": "selection_input"
}
]
}
Data can be sent to outgoing data streams from a Lua function, see Data stream related functions for more information.
3.6.6 - Advanced features
3.6.6.1 - Content popularity
ESB3024 Router can make routing decisions based on content popularity. All incoming content requests are tracked to continuously update a content popularity ranking list. The popularity ranking algorithm is designed to let popular content quickly rise to the top while unpopular content decays and sinks towards the bottom.
Routing
A content popularity based routing rule can be created by running
$ confcli services.routing.rules -w
Running wizard for resource 'rules'
Hint: Hitting return will set a value to its default.
Enter '?' to receive the help string
rules : [
rule can be one of
1: allow
2: consistentHashing
3: contentPopularity
4: deny
5: firstMatch
6: random
7: rawGroup
8: rawHost
9: split
10: weighted
Choose element index or name: contentPopularity
Adding a 'contentPopularity' element
rule : {
name (default: ): content_popularity_rule
type (default: contentPopularity):
contentPopularityCutoff (default: 10): 5
onPopular (default: ): edge-streamer
onUnpopular (default: ): offload
}
Add another 'rule' element to array 'rules'? [y/N]: n
]
Generated config:
{
"rules": [
{
"name": "content_popularity_rule",
"type": "contentPopularity",
"contentPopularityCutoff": 5.0,
"onPopular": "edge-streamer",
"onUnpopular": "offload"
}
]
}
Merge and apply the config? [y/n]: y
This rule will route requests for the top 5 most popular content items to
edge-streamer and all other requests to offload.
Some configuration settings attributed to content popularity are available:
$ confcli services.routing.settings.contentPopularity
{
"contentPopularity": {
"enabled": true,
"algorithm": "score_based",
"sessionGroupNames": [],
"popularityListMaxSize": 100000,
"scoreBased": {
"popularityDecayFraction": 0.2,
"popularityPredictionFactor": 2.5,
"requestsBetweenPopularityDecay": 1000
},
"timeBased": {
"intervalsPerHour": 10
}
}
}
enabled: Whether or not to track content popularity. Whenenabledis set tofalse, content popularity will not be tracked. Note that routing on content popularity is possible even ifenabledisfalseand content popularity has been tracked previously.algorithm: Choice of content popularity tracking algorithm. There are two possible choices:score_basedortime_based(detailed below).sessionGroupNames: Names of the session groups for which content popularity should be tracked. If left empty, content popularity will be tracked for all sessions. The content popularity is tracked globally, not per session group, but the popularity metrics is only updated for sessions belonging to these groups.popularityListMaxSize: The maximum amount of unique content items to track for popularity.scoreBased: Configuration parameters unique to the score based algorithm.timeBased: Configuration parameters unique to the time based algorithm.
Size of Popularity List
The size of the popularity list is limited to prevent it growing forever. A single entry in the popularity ranking list will at most consume 180 bytes of memory. E.g. setting the maximum size to 1000 would consume at most 180⋅1,000 = 180,000 B = 0.18 MB. If the content popularity list is full, a request to a new item will replace the least popular item.
Setting a very high maximum size will not impact performance, it will only consume more memory.
Score-Based Algorithm
The requestsBetweenPopularityDecay parameter defines the number of requests
between each popularity decay update, an integral component of this feature.
The popularityPredictionFactor and popularityDecayFraction settings tune
the behaviour of the content popularity ranking algorithm, explained further
below.
Decay Update
To allow for popular content to quickly rise in popularity and unpopular content to sink, a dynamic popularity ranking algorithm is used. The goal of the algorithm is to track content popularity in real time, allowing routing decisions based on the requested content’s popularity. The algorithm is applied every decay update.
The algorithm uses current trending content to predict content popularity. The
popularityPredictionFactor setting regulates how much the algorithm should rely
on predicted popularity. A high prediction factor allows rising content to quickly
rise to high popularity but can also cause unpopular content with a sudden burst
of requests to wrongfully rise to the top. A low prediction factor can cause
stagnation in the popularity ranking, not allowing new popular content to rise
to the top.
Unpopular content decays in popularity, the magnitude of which is regulated by
popularityDecayFraction. A high value will aggressively decay content
popularity on every decay update while a low value will bloat the ranking,
causing stagnation. Once content decays to a trivially low popularity score, it
is pruned from the content popularity list.
When configuring these tuning parameters, the most crucial data to consider is
the size of your asset catalog, i.e. the number of unique contents you offer.
The recommended values, obtained through testing, are presented in the table below.
Note that the popularityPredictionFactor setting is the principal factor in
controlling the algorithm’s behaviour.
| Catalog size n | Popularity prediction factor | Popularity decay fraction |
|---|---|---|
| n < 1000 | 2.2 | 0.2 |
| 1000 < n < 5000 | 2.3 | 0.2 |
| 5000 < n < 10000 | 2.5 | 0.2 |
| n > 10000 | 2.6 | 0.2 |
Time-Based Algorithm
The time based algorithm only requires the configuration parameter
intervalsPerHour. As an example, setting intervalsPerHour to 10
would give 10 six minute intervals per hour. During each interval,
all unique content requests has an associated counter, increasing
by one for each incoming request. After an hour, all intervals have
been cycled through. The counters in the first interval will be reset
and all incoming content requests will increase the counters in the
first interval again. This cycle continues forever.
When determining a single content’s popularity, the sum of each content’s counter in all intervals is used to determine a popularity ranking.
3.6.6.2 - Consistent Hashing
Consistent hashing based routing is a feature that can be used to distribute requests to a set of hosts in a cache friendly manner. By using AgileTV’s consistent distributed hash algorithm, the amount of cache redistribution is minimized within a set of hosts. Requests for a content will always be routed to the same set of hosts, the amount of which is configured by the spread factor, allowing high cache usage. When adding or removing hosts, the algorithm minimizes cache redistribution.
Say you have the host group [s1, s2, s3, s4, s5] and have
configured spreadFactor = 3. A request for a content asset1 would then be
routed to the same three hosts with one of them being selected randomly for each
request. Requests for a different content asset2 would also be routed to one
of three different hosts, most likely a different combination of hosts than
requests for content asset1.
Example routing results with spreadFactor = 3:
- Request for
asset1→ route to one of[s1, s3, s4]. - Request for
asset2→ route to one of[s2, s4, s5]. - Request for
asset3→ route to one of[s1, s2, s5].
Since consistent hashing based routing ensures that requests for a specific content always get routed to the same set of hosts, the risk of cache misses are lowered on the hosts since they will be served the same content requests over and over again.
Note that the maximum value of
spreadFactoris 64. Consequently, the highest amount of hosts you can use in aconsistentHashingrule block is 64.
Three different hashing algorithms are available: MD5, SDBM and Murmur.
The algorithm is chosen during configuration.
Configuration
Configuring consistent hashing based routing is easily done using confcli. Let’s configure the example described above:
confcli services.routing.rules -w
Running wizard for resource 'rules'
Hint: Hitting return will set a value to its default.
Enter '?' to receive the help string
rules : [
rule can be one of
1: allow
2: consistentHashing
3: contentPopularity
4: deny
5: firstMatch
6: random
7: rawGroup
8: rawHost
9: split
10: weighted
Choose element index or name: consistentHashing
Adding a 'consistentHashing' element
rule : {
name (default: ): consistentHashingRule
type (default: consistentHashing):
spreadFactor (default: 1): 3
hashAlgorithm (default: MD5):
targets : [
target : {
target (default: ): s1
enabled (default: True):
}
Add another 'target' element to array 'targets'? [y/N]: y
target : {
target (default: ): s2
enabled (default: True):
}
Add another 'target' element to array 'targets'? [y/N]: y
target : {
target (default: ): s3
enabled (default: True):
}
Add another 'target' element to array 'targets'? [y/N]: y
target : {
target (default: ): s4
enabled (default: True):
}
Add another 'target' element to array 'targets'? [y/N]: y
target : {
target (default: ): s5
enabled (default: True):
}
Add another 'target' element to array 'targets'? [y/N]: n
]
}
Add another 'rule' element to array 'rules'? [y/N]: n
]
Generated config:
{
"rules": [
{
"name": "consistentHashingRule",
"type": "consistentHashing",
"spreadFactor": 3,
"hashAlgorithm": "MD5",
"targets": [
{
"target": "s1",
"enabled": true
},
{
"target": "s2",
"enabled": true
},
{
"target": "s3",
"enabled": true
},
{
"target": "s4",
"enabled": true
},
{
"target": "s5",
"enabled": true
}
]
}
]
}
Adding Hosts
Adding a host to the list will give an additional target for the consistent hashing algorithm to route requests to. This will shift content distribution onto the new host.
confcli services.routing.rules.consistentHashingRule.targets -w
Running wizard for resource 'targets'
Hint: Hitting return will set a value to its default.
Enter '?' to receive the help string
targets : [
target : {
target (default: ): s6
enabled (default: True):
}
Add another 'target' element to array 'targets'? [y/N]: n
]
Generated config:
{
"targets": [
{
"target": "s6",
"enabled": true
}
]
}
Merge and apply the config? [y/n]: y
Removing Hosts
There is one very important caveat of using a consistent hashing rule block. As long as you don’t modify the list of hosts, the consistent hashing algorithm will keep routing requests to the same hosts. However, if you remove a host from the block in any position except the last, the consistent hashing algorithm’s behaviour will change and the algorithm cannot maintain a minimum amount of cache redistribution.
If you’re in a situation where you have to remove a host from the routing
targets but want to keep the same consistent hashing behaviour, e.g. during
very high load, you’ll have to toggle that target’s enabled field to false.
E.g., disabling requests to s2 can be accomplished by:
$ confcli services.routing.rules.consistentHashingRule.targets.1.enabled false
services.routing.rules.consistentHashingRule.targets.1.enabled = False
$ confcli services.routing.rules.consistentHashingRule.targets.1
{
"1": {
"target": "s2",
"enabled": false
}
}
If you modify the list order or remove hosts, it is highly recommended to do so during moments where a higher rate of cache misses are acceptable.
3.6.6.3 - Security token verification
The security token verification feature allows for ESB3024 Router to only process requests that contain a correct security token. The token is generated by the client, for example in the portal, using an algorithm that it shares with the router. The router verifies the token and rejects the request if the token is incorrect.
It is beyond the scope of this document to describe how the token is generated, that is described in the Security Tokens application note that is installed with the ESB3024 Router’s extra documentation.
Setting up a Routing Rule
The token verification is performed by calling the verify_security_token()
function from a routing rule. The function returns 1 if the token is
correct, otherwise it returns 0. It should typically be called from the
first routing rule, to make requests with bad tokens fail as early as possible.
The confcli example assumes that the router already has rules configured, with
an entry point named select_cdn. Token verification is enabled by inserting an
“allow” rule first in the rule list.
confcli services.routing.rules -w
Running wizard for resource 'rules'
Hint: Hitting return will set a value to its default.
Enter '?' to receive the help string
rules : [
rule can be one of
1: allow
2: consistentHashing
3: contentPopularity
4: deny
5: firstMatch
6: random
7: rawGroup
8: rawHost
9: split
10: weighted
Choose element index or name: allow
Adding a 'allow' element
rule : {
name (default: ): token_verification
type (default: allow):
condition (default: always()): verify_security_token()
onMatch (default: ): select_cdn
}
Add another 'rule' element to array 'rules'? [y/N]: n
]
Generated config:
{
"rules": [
{
"name": "token_verification",
"type": "allow",
"condition": "verify_security_token()",
"onMatch": "select_cdn"
}
]
}
Merge and apply the config? [y/n]: y
$ confcli services.routing.entrypoint token_verification
services.routing.entrypoint = 'token_verification'
"routing": {
"id": "token_verification",
"member_order": "sequential",
"members": [
{
"id": "token_verification.0.select_cdn",
"member_order": "weighted",
"members": [
...
],
"weight_function": "return verify_security_token() ~= 0"
},
{
"id": "token_verification.1.rejected",
"member_order": "sequential",
"members": [],
"weight_function": "return 1"
}
],
"weight_function": "return 100"
},Configuring Security Token Options
The secret parameter is not part of the router request, but needs to be
configured separately in the router. That can be done with the host-config
tool that is installed with the router.
Besides configuring the secret, host-config can also configure floating
sessions and a URL prefix. Floating sessions are sessions that are not tied to a
specific IP address. When that is enabled, the token verification will not take
the IP address into account when verifying the token.
The security token verification is configured per host, where a host is the name
of the host that the request was sent to. This makes it possible for a router to
support multiple customer accounts, each with their own secret. If no
configuration is found for a host, a configuration with the name default is
used.
host-config supports three commands: print, set and delete.
The print command prints the current configuration for a host. The following
parameters are supported:
host-config print [-n <host-name>]
By default it prints the configuration for all hosts, but if the optional -n
flag is given it will print the configuration for a single host.
Set
The set command sets the configuration for a host. The configuration is given
as command line parameters. The following parameters are supported:
host-config set
-n <host-name>
[-f floating]
[-p url-prefix]
[-r <secret-to-remove>]
[-s <secret-to-add>]
-n <host-name>- The name of the host to configure.-f floating- A boolean option that specifies if floating sessions are accepted. The parameter accepts the valuestrueandfalse.-p url-prefix- A URL prefix that is used for identifying requests that come from a certain account. This is not used when verifying tokens.-r <secret-to-remove>- A secret that should be removed from the list of secrets.-s <secret-to-add>- A secret that should be added to the list of secrets.
For example, to set the secret “secret-1” and enable floating sessions for the default host, the following command can be used:
host-config set -n default -s secret-1 -f true
The set command only touches the configuration options that are mentioned on
the command line, so the following command line will add a second secret to the
default host without changing the floating session setting:
host-config set -n default -s secret-2
It is possible to set multiple secrets per host. This is useful when updating a secret, then both the old and the new secret can be valid during the transition period. After the transition period the old secret can be removed by typing:
host-config set -n default -r secret-1
Delete
The delete command deletes the configuration for a host. It supports the
following parameters:
host-config delete -n <host-name>
For example, to delete the configuration for example.com, the following
command can be used:
host-config delete -n example.com
Global Options
host-config also has a few global options. They are:
-k <security-key>- The security key that is used when communicating with the router. This is normally retrieved automatically.-h- Print a help message and exit.-r <router>- The router to connect to. This default tolocalhost, but can be changed to connect to a remote router.-v- Verbose output, can be given multiple times.
Debugging Security Token Verification
The security token verification only logs messages when the log level is set to
4 or higher. Then it will only log some errors. It is possible to enable more
verbose logging using the security-token-config that is installed together
with the router.
When verbose logging is enabled, the router will log information about the token verification, including the configured token secrets, so it needs to be used with care.
The logged lines are prefixed with verify_security_token.
The security-token-config tool supports the commands print and set.
The print command prints the current configuration. If nothing is configured
it will not print anything.
Set
The set command sets the configuration. The following parameters are
supported:
security-token-config set
[-d <enabled>]
-d <enabled>- A boolean option that specifies if debug logging should be enabled or not. The parameter accepts the valuestrueandfalse.
3.6.6.4 - Subnets API
ESB3024 Router provides utilities to quickly match clients into subnets. Any combination of IPv4 and IPv6 addresses can be used. To begin, a JSON file is needed, defining all subnets, e.g:
{
"255.255.255.255/24": "area1",
"255.255.255.255/16": "area2",
"255.255.255.255/8": "area3",
"90.90.1.3/16": "area4",
"5.5.0.4/8": "area5",
"2a02:2e02:9bc0::/48": "area6",
"2a02:2e02:9bc0::/32": "area7",
"2a02:2e02:9bc0::/16": "area8",
"2a02:2e02:9de0::/44": "combined_area",
"2a02:2e02:ada0::/44": "combined_area"
}
and PUT it to the endpoint :5001/v1/subnets or :5001/v2/subnets, the
API version doesn’t matter for subnets:
curl -k -T subnets.json -H "Content-Type: application/json" https://router-host:5001/v1/subnets
Note that it is possible for several subnet CIDR strings to share the same label, effectively grouping them together.
The router provides the built-in function in_subnet(subnet_name) that
can to make routing decisions based on a client’s subnet. For more details, see
Built-in Lua functions.
To configure a rule that only allows clients in the area1 subnet, run the
command
$ confcli services.routing.rules -w
Running wizard for resource 'rules'
Hint: Hitting return will set a value to its default.
Enter '?' to receive the help string
rules : [
rule can be one of
1: allow
2: consistentHashing
3: contentPopularity
4: deny
5: firstMatch
6: random
7: rawGroup
8: rawHost
9: split
10: weighted
Choose element index or name: allow
Adding a 'allow' element
rule : {
name (default: ): only_allow_area1
type (default: allow):
condition (default: always()): in_subnet('area1')
onMatch (default: ): example-host
}
Add another 'rule' element to array 'rules'? [y/N]: n
]
Generated config:
{
"rules": [
{
"name": "only_allow_area1",
"type": "allow",
"condition": "in_subnet('area1')",
"onMatch": "example-host"
}
]
}
Merge and apply the config? [y/n]: y
Invalid IP-addresses will be omitted during subnet list construction accompanied by a message in the log displaying the invalid IP address.
3.6.6.5 - Lua Features
3.6.6.5.1 - Built-in Lua Functions
This section details all built-in Lua functions provided by the router.
Logging Functions
The router provides Lua logging functionality that is convenient when creating custom Lua functions. A prefix can be added to the log message which is useful to differentiate log messages from different lua files. At the top of the Lua source file, add the line
local log = log.add_prefix("my_lua_file")
to prepend all log messages with "my_lua_file".
The logging functions support formatting and common log levels:
log.critical('A log message with number %d', 1.5)
log.error('A log message with string %s', 'a string')
log.warning('A log message with integer %i', 1)
log.info('A log message with a local number variable %d', some_local_number)
log.debug('A log message with a local string variable %s', some_local_string)
log.trace('A log message with a local integer variable %i', some_local_integer)
log.message('A log message')
Many of the router’s built-in Lua functions use the logging functions.
Predictive Load-Balancing Functions
Predictive load balancing is a tool that can be used to avoid overloading hosts with traffic. Consider the case where a popular event starts at a certain time, let’s say 12 PM. A spike in traffic will be routed to the hosts that are streaming the content at 12 PM, most of them starting at low bitrates. A host might have sufficient bandwidth left to take on more clients but when the recently connected clients start ramping up in video quality and increase their bitrate, the host can quickly become overloaded, possibly dropping incoming requests or going offline. Predictive load balancing solves this issue by considering how many times a host recently been redirected to.
Four functions for predictive load balancing are provided by the router
that can be used when constructing conditions/weight functions: host_bitrate()
, host_bitrate_custom(), host_has_bw() and host_has_bw_custom().
All require data to be supplied to the selection input API and apply
only to leaf nodes in the routing tree. In order for predictive load balancing
to work properly the data must be updated at regular intervals. The data needs
to be supplied by the target system.
These functions are suitable to used as host health checks. To configure host health checks, see configuring CDNs and hosts.
Note that host_bitrate() and host_has_bw() rely on data supplied by metrics
agents, detailed in Cache hardware metrics: monitoring and routing.
host_bitrate_custom() and host_has_bw_custom() rely on
manually supplied selection input data, detailed in selection input API. The
bitrate unit depends on the data submitted to the selection input API.
Example Metrics
The data supplied to the selection input API by the metrics agents uses the following structure:
{
"streamer-1": {
"hardware_metrics": {
"/": {
"free": 1741596278784,
"total": 1758357934080,
"used": 16761655296,
"used_percent": 0.9532561585516977
},
"cpu_load1": 0.02,
"cpu_load15": 0.12,
"cpu_load5": 0.02,
"mem_available": 4895789056,
"mem_available_percent": 59.551760354263074,
"mem_total": 8221065216,
"mem_used": 2474393600,
"n_cpus": 4
},
"per_interface_metrics": {
"eths1": {
"link": 1,
"interface_up": true,
"megabits_sent": 22322295739.378456,
"megabits_sent_rate": 8085.2523952,
"speed": 100000
}
}
}
}
Note that all built-in functions interacting with selection input values support indexing into nested selection input data. Consider the selection input data in above. The nested values can be accessed by using dots between the keys:
si('streamer-1.per_interface_metrics.eths1.megabits_sent_rate')
Note that the whole selection input variable name must be within single quotes.
The function si() is documented under
general purpose functions.
host_bitrate({})
host_bitrate() returns the predicted bitrate (in megabits per second) of
the host after the recently connected clients start ramping up in streaming
quality. The function accepts an argument table with the following keys:
interface: The name of the interface to use for bitrate prediction.- Optional
avg_bitrate: the average bitrate per client, defaults to 6 megabits per second. - Optional
num_routers: the number of routers that can route to this host, defaults to 1. This is important to accurately predict the incoming load if multiple routers are used. - Optional
host: The name of the host to use for bitrate prediction. Defaults to the current host if not provided.
Required Selection Input Data
This function relies on the field megabits_sent_rate, supplied by the Telegraf
metrics agent, as seen in example metrics. If these fields
are missing from your selection input data, this function will not work.
Examples of usage:
host_bitrate({interface='eths0'})
host_bitrate({avg_bitrate=1, interface='eths0'})
host_bitrate({num_routers=2, interface='eths0'})
host_bitrate({avg_bitrate=1, num_routers=4, interface='eths0'})
host_bitrate({avg_bitrate=1, num_routers=4, host='custom_host', interface='eths0'})
host_bitrate({}) calculates the predicted bitrate as:
predicted_host_bitrate = current_host_bitrate + (recent_connections * avg_bitrate * num_routers)
host_bitrate_custom({})
Same functionality as host_bitrate() but uses a custom selection input
variable as bitrate input instead of accessing hardware metrics. The function
accepts an argument table with the following keys:
custom_bitrate_var: The name of the selection input variable to be used for accessing current host bitrate.- Optional
avg_bitrate: seehost_bitrate()documentation above. - Optional
num_routers: seehost_bitrate()documentation above.
host_bitrate_custom({custom_bitrate_var='host1_current_bitrate'})
host_bitrate_custom({avg_bitrate=1, custom_bitrate_var='host1_current_bitrate'})
host_bitrate_custom({num_routers=4, custom_bitrate_var='host1_current_bitrate'})
host_has_bw({})
Instead of accessing the predicted bitrate of a host through host_bitrate(),
host_has_bw() returns 1 if the host is predicted to have enough
bandwidth left to take on more clients after recent connections ramp up in
bitrate, otherwise it returns 0. The function accepts an argument table with the
following keys:
interface: seehost_bitrate()documentation above.- Optional
avg_bitrate: seehost_bitrate()documentation above. - Optional
num_routers: seehost_bitrate()documentation above. - Optional
host: seehost_bitrate()documentation above. - Optional
margin: the bitrate (megabits per second) headroom that should be taken into account during calculation, defaults to 0.
host_has_bw({}) returns whether or not the following statement is true:
predicted_host_bitrate + margin < host_bitrate_capacity
Required Selection Input Data
host_has_bw({}) relies on the fields megabits_sent_rate and speed,
supplied by the Telegraf metrics agent, as seen in
example metrics. If these fields are missing from your
selection input data, this function will not work.
Examples of usage:
host_has_bw({interface='eths0'})
host_has_bw({margin=10, interface='eth0'})
host_has_bw({avg_bitrate=1, interface='eth0'})
host_has_bw({num_routers=4, interface='eth0'})
host_has_bw({host='custom_host', interface='eth0'})
host_has_bw_custom({})
Same functionality as host_has_bw() but uses a custom selection input
variable as bitrate. It also uses a number or a custom selection input
variable for the capacity. The function accepts an argument table
with the following keys:
custom_capacity_var: a number representing the capacity of the network interface OR the name of the selection input variable to be used for accessing host capacity.custom_bitrate_var: seehost_bitrate_custom()documentation- Optional
margin: seehost_has_bw()documentation above. above. - Optional
avg_bitrate: seehost_bitrate()documentation above. - Optional
num_routers: seehost_bitrate()documentation above.
Examples of usage:
host_has_bw_custom({custom_capacity_var=10000, custom_bitrate_var='streamer-1.per_interface_metrics.eths1.megabits_sent_rate'})
host_has_bw_custom({custom_capacity_var='host1_capacity', custom_bitrate_var='streamer-1.per_interface_metrics.eths1.megabits_sent_rate'})
host_has_bw_custom({margin=10, custom_capacity_var=10000, custom_bitrate_var='streamer-1.per_interface_metrics.eths1.megabits_sent_rate'})
host_has_bw_custom({avg_bitrate=1, custom_capacity_var=10000, custom_bitrate_var='streamer-1.per_interface_metrics.eths1.megabits_sent_rate'})
host_has_bw_custom({num_routers=4, custom_capacity_var=10000, custom_bitrate_var='streamer-1.per_interface_metrics.eths1.megabits_sent_rate'})
Health Check Functions
This section details built-in Lua functions that are meant to be used for host health checks. Note that these functions rely on data supplied by metric agents detailed in Cache hardware metrics: monitoring and routing. Make sure cache hardware metrics are supplied to the router before using any of these functions.
cpu_load_ok({})
The function accepts an optional argument table with the following keys:
- Optional
host: The name of the host. Defaults to the name of the selected host if not provided. - Optional
cpu_load5_limit: The acceptable limit for the 5-minute CPU load. Defaults to 0.9 if not provided.
The function returns 1 if the five minute CPU load average is below their respective limits, and 0 otherwise.
Examples of usage:
cpu_load_ok()
cpu_load_ok({host = 'custom_host'})
cpu_load_ok({cpu_load5_limit = 0.8})
cpu_load_ok({host = 'custom_host', cpu_load5_limit = 0.8})
memory_usage_ok({})
The function accepts an optional argument table with the following keys:
- Optional
host: The name of the host. Defaults to the host of the selected host if not provided. - Optional
memory_usage_limit: The acceptable limit for the memory usage. Defaults to 0.9 if not provided.
The function returns 1 if the memory usage is below the limit, and 0 otherwise.
Examples of usage:
memory_usage_ok()
memory_usage_ok({host = 'custom_host'})
memory_usage_ok({memory_usage_limit = 0.7})
memory_usage_ok({host = 'custom_host', memory_usage_limit = 0.7})
interfaces_online({})
The function accepts an argument table with the following keys:
- Required
interfaces: A string or a table of strings representing the network interfaces to check. - Optional
host: The name of the host. Defaults to the host of the selected host if not provided.
The function returns 1 if all the specified interfaces are online, and 0 otherwise.
Required Selection Input Data
This function relies on the fields link and interface_up, supplied by
the Telegraf metrics agent, as seen in example metrics. If
these fields are missing from your selection input data, this function will not
work.
Examples of usage:
interfaces_online({interfaces = 'eth0'})
interfaces_online({interfaces = {'eth0', 'eth1'}})
interfaces_online({host = 'custom_host', interfaces = 'eth0'})
interfaces_online({host = 'custom_host', interfaces = {'eth0', 'eth1'}})
health_check({})
The function accepts an optional argument table with the following keys:
- Required
interfaces: A string or a table of strings representing the network interfaces to check. - Optional
host: The name of the host. Defaults to the host of the selected host if not provided. - Optional
cpu_load5_limit: The acceptable limit for the 5-minute CPU load. Defaults to 0.9 if not provided. - Optional
memory_usage_limit: The acceptable limit for the memory usage. Defaults to 0.9 if not provided.
The function calls the health check functions cpu_load_ok({}),
memory_usage_ok({}) and interfaces_online({}). The functions returns 1 if
all these functions returned 1, otherwise it returns 0.
Examples of usage:
health_check({interfaces = 'eths0'})
health_check({host = 'custom_host', interfaces = 'eths0'})
health_check({cpu_load5_limit = 0.7, memory_usage_limit = 0.8, interfaces = 'eth0'})
health_check({host = 'custom_host', cpu_load5_limit = 0.7, memory_usage_limit = 0.8, interfaces = {'eth0', 'eth1'}})
General Purpose Functions
The router supplies a number of general purpose Lua functions.
always()
Always returns 1.
never()
Always returns 0. Useful for temporarily disabling caches by using it as a health check.
Examples of usage:
always()
never()
si(si_name)
The function reads the value of the selection input variable si_name and
returns it if it exists, otherwise it returns 0. The function accepts a string
argument for the selection input variable name.
Examples of usage:
si('some_selection_input_variable_name')
si('streamer-1.per_interface_metrics.eths1.megabits_sent_rate')
Comparison functions
All comparison functions use the form function(si_name, value) and compares
the selection input value with the name si_name with value.
ge(si_name, value) - greater than or equal
gt(si_name, value) - greater than
le(si_name, value) - less than or equal
lt(si_name, value) - less than
eq(si_name, value) - equal to
neq(si_name, value) - not equal to
Examples of usage:
ge('streamer-1.hardware_metrics.mem_available_percent', 30)
gt('streamer-1.hardware_metrics./.free', 1000000000)
le('streamer-1.hardware_metrics.cpu_load5', 0.8)
lt('streamer-1.per_interface_metrics.eths1.megabits_sent_rate', 9000)
eq('streamer-1.per_interface_metrics.eths1.link.', 1)
neq('streamer-1.hardware_metrics.n_cpus', 4)
Session Checking Functions
in_subnet(subnet)
Returns 1 if the current session belongs to subnet, otherwise it returns 0.
See Subnets API for more details on how to use
subnets in routing. The function accepts a string argument for the subnet name.
Examples of usage:
in_subnet('stockholm')
in_subnet('unserviced_region')
in_subnet('some_other_subnet')
These functions checks the current session’s session groups.
in_session_group(session_group)
Returns 1 if the current session has been classified into session_group,
otherwise it returns 0. The function accepts a string argument for the session
group name.
in_any_session_group({})
Returns 1 if the current session has been classified into any of
session_groups, otherwise it returns 0. The function accepts a table array of
strings as argument for the session group names.
in_all_session_groups({})
Returns 1 if the current session has been classified into all of
session_groups, otherwise it returns 0. The function accepts a table array of
strings as argument for the session group names.
Examples of usage:
in_session_group('safari_browser')
in_any_session_group({ 'in_europe', 'in_asia'})
in_all_session_group({ 'vod_content', 'in_america'})
Other built-in functions
base64_encode(data)
base64_encode(data) returns the base64 encoded string of data.
Arguments:
data: The data to encode.
Example:
print(base64_encode('Hello world!'))
SGVsbG8gd29ybGQh
base64_decode(data)
base64_decode(data) returns the decoded data of the base64 encoded string, as
a raw binary string.
Arguments:
data: The data to decode.
Example:
print(base64_decode('SGVsbG8gd29ybGQh'))
Hello world!
base64_url_encode(data)
base64_url_encode(data) returns the base64 URL encoded string of data.
Arguments:
data: The data to encode.
Example:
print(base64_url_encode('ab~~'))
YWJ-fg
base64_url_decode(data)
base64_url_decode(data) returns the decoded data of the base64 URL encoded
string, as a raw binary string.
Arguments:
data: The data to decode.
Example:
print(base64_url_decode('YWJ-fg'))
ab~~
to_hex_string(data)
to_hex_string(data) returns a string containing the hexadecimal
representation of the string data.
Arguments:
data: The data to convert.
Example:
print(to_hex_string('Hello world!\n'))
48656c6c6f20776f726c64210a
from_hex_string(data)
from_hex_string(data) returns a string containing the byte representation of
the hexadecimal string data.
Arguments:
data: The data to convert.
Example:
print(from_hex_string('48656c6c6f20776f726c6421'))
Hello world!
empty(table)
empty(table) returns true if table is empty, otherwise it returns false.
Arguments:
table: The table to check.
Examples:
print(tostring(empty({})))
true
print(tostring(empty({1, 2, 3})))
false
md5(data)
md5(data) returns the MD5 hash of data, as a hexstring.
Arguments:
data: The data to hash.
Example:
print(md5('Hello world!'))
86fb269d190d2c85f6e0468ceca42a20
sha256(date)
sha256(data) returns the SHA-256 hash of data, as a hexstring.
Arguments:
data: The data to hash.
Example:
print(sha256('Hello world!'))
c0535e4be2b79ffd93291305436bf889314e4a3faec05ecffcbb7df31ad9e51a
hmac_sha256(key, data)
hmac_sha256(key, data) returns the HMAC-SHA-256 hash of data using key,
as a base64 encoded string.
Note: This function is to be modified to return raw binary data instead of a base64 encoded string.
Arguments:
key: The key to use.data: The data to hash.
Example:
print(hmac_sha256('secret', 'Hello world!'))
pl9M/PX0If8r4FLgZCvMvP6xJu5z68T+OzgZZDAutjI=
hmac_sha384(key, data)
hmac_sha384(key, data) returns the HMAC-SHA-384 hash of data using key,
as a string containing raw binary data.
Arguments:
key: The key to use.data: The data to hash.
Example:
print(to_hex_string(hmac_sha384('secret', 'Hello world!')))
917516d93d3509a371a129ca50933195dd659712652f07ba5792cbd5cade5e6285a841808842cfa0c3c69c8fb234468a
hmac_sha512(key, data)
hmac_sha512(key, data) returns the HMAC-SHA-512 hash of data using key,
as a string containing raw binary data.
Arguments:
key: The key to use.data: The data to hash.
Example:
print(to_hex_string(hmac_sha512('secret', 'Hello world!')))
dff6c00943387f9039566bfee0994de698aa2005eecdbf12d109e17aff5bbb1b022347fbf4bd94ede7c7d51571022525556b64f9d5e4386de99d0025886eaaff
hmac_md5(key, data)
hmac_md5(key, data) returns the HMAC-MD5 hash of data using key,
as a string containing raw binary data.
Arguments:
key: The key to use.data: The data to hash.
Example:
print(to_hex_string(hmac_md5('secret', 'Hello world!')))
444fad0d374d14369d6b595062da5d91
regex_replace
regex_replace(data, pattern, replacement) returns the string data with all
occurrences of the regular expression pattern replaced with replacement.
Arguments:
data: The data to replace.pattern: The regular expression pattern to match.replacement: The replacement string.
Examples:
print(regex_replace('Hello world!', 'world', 'Lua'))
Hello Lua!
print(regex_replace('Hello world!', 'l+', 'lua'))
Heluao worluad!
If the regular expression pattern is invalid, regex_replace() returns an
error message.
Examples:
print(regex_replace('Hello world!', '*', 'lua'))
regex_error caught: regex_error
unixtime()
unixtime() returns the current Unix timestamp, as seconds since midnight,
Janury 1 1970 UTC, as an integer.
Arguments:
- None
Example:
print(unixtime())
1733517373
now()
now() returns the current Unix timestamp, the number of seconds since
midnight, Janury 1 1970 UTC, as an number with decimals.
Arguments:
- None
Example:
print(now())
1733517373.5007
time_to_epoch(time, fmt)
time_to_epoch(time, fmt) returns the Unix timestamp, the number of seconds
since midnight, Janury 1 1970 UTC, of the time string time, which is
formatted according to the format string fmt.
Arguments:
time: The time string to convert.fmt(Optional): The format string of the time string, as specified by the POSIX function strptime(). If not specified, it defaults to “%Y-%m-%dT%TZ”.
Examples:
print(time_to_epoch('1972-04-17T06:10:20Z'))
72339020
print(time_to_epoch('17/04-72 06:20:30', '%d/%m-%y %H:%M:%S'))
72339630
epoch_to_time(time, format)
epoch_to_time(time, format) returns the time string of the Unix timestamp
time, formatted according to format.
Arguments:
time: The Unix timestamp to convert, as a number.format(Optional): The format string of the time string, as specified by the POSIX function strftime(). If not specified, it defaults to “%Y-%m-%dT%TZ”.
Examples:
print(epoch_to_time(123456789))
1973-11-29T21:33:09Z
print(epoch_to_time(1234567890, '%d/%m-%y %H:%M:%S'))
13/02-09 23:31:30
get_consistent_hashing_weight(contentName, nodeIdsString, spreadFactor, hashAlgoritm, nodeId)
get_consistent_hashing_weight(contentName, nodeIdsString, spreadFactor, hashAlgoritm, nodeId)
returns the priority that node nodeId has in the list of preferred nodes,
determined using consistent hashing. The first spreadfactor:th nodes should
have equal weights to randomize requests between them. Remaining nodes should
have decrementally decreasing weights to honor node priority during failover.
Arguments:
contentName: The name of the content to hash.nodeIdsString: A string containing the node IDs to hash, on the format ‘0,1,2,3’.spreadFactor: The number of nodes to spread the requests between.hashAlgorithm: Which hash algorithm to use. Supported algorithms are “MD5”, “SDBM” and “Murmur”. Default is “MD5”.nodeId: The ID of the node to calculate the weight for.
Examples:
print(get_consistent_hashing_weight('/vod/film1', '0,1,2,3,4,5', 3, 'MD5', 3))
6
print(get_consistent_hashing_weight('/vod/film2', '0,1,2,3,4,5', 3, 'MD5', 3))
4
print(get_consistent_hashing_weight('/vod/film2', '0,1,2', 2, 'Murmur', 1))
2
See Consistent Hashing for more information about consistent hashing.
expand_ipv6_address(address)
expand_ipv6_address(address) returns the fully expanded form of the IPv6
address address.
Arguments:
address: The IPv6 address to expand. If the address is not a valid IPv6 address, the function returns the contents ofaddressunmodified. This allows for the function to pass through IPv4 addresses.
Examples:
print(expand_ipv6_address('2001:db8::1'))
2001:0db8:0000:0000:0000:0000:0000:0001
print(expand_ipv6_address('198.51.100.5'))
198.51.100.5
Data stream related functions
The router provides a number of functions that are useful when working with
data streams. These functions are used to write data to the data stream
configured in the services.routing.dataStreams.outgoing section of the
configuration. See data streams for more information.
send_to_data_stream
send_to_data_stream(data_stream, message) sends the string message to the
outgoing data stream data_stream. Note that message is sent verbatim,
without any formatting.
Arguments:
data_stream: The name of the data stream to send to.message: The message to send.
Example:
-- Sends the message "Hello world!" to the data stream 'token_stream'
send_to_data_stream('token_stream', 'Hello world!')
data_streams.post_selection_key_value
data_streams.post_selection_key_value(data_stream, path, key, value, ttl_s)
posts the key-value pair key=value on the path path to the data stream
data_stream. The key-value is formatted as a selection input value
{key: value}, will be stored in path and will persist for ttl_s seconds.
This is the same format that is expected when parsing data from incoming data
streams of the type "selectionInput" to read selection input data from
external data streams. This means that this function can be used to post
selection input data to an external data stream, which can then be read by
other Director instances.
Arguments:
data_stream: The name of the data stream to post to.path: The path to post the key-value pair to. Note that the path is automatically prefixed with"/v2/selection_input".key: The key to post.value: The value to post.- Optional
ttl_s: The time to live of the key-value pair, in seconds. If not specified, it will persist forever.
Example:
-- Posts the selection input value {"si_var": 1337} on the path "/v2/selection_input/path"
-- to the data stream 'outgoingDataStream' with a TTL of 60 seconds
data_streams.post_selection_key_value('outgoingDataStream', '/path', 'si_var', 1337, 60)
Token blocking functions
The router provides a number of functions that are useful when working with token blocking to control CDN access.
blocked_tokens.augment_token(token, customer_id)
Returns an augmented token string formatted like <customer_id>__<token>. This
function is useful when additional information is needed for token blocking,
such as customer ID.
Arguments:
token: The token to augment.customer_id: The customer ID to augment the token with.
Example:
-- Augments the token eyJhbG213 with the customer ID 12345
local augmented_token = blocked_tokens.augment_token('eyJhbG213', '12345')
print(augmented_token)
12345__eyJhbG213
blocked_tokens.add(stream_name, token, ttl_s)
blocked_tokens.add() is a specialized version of
data_streams.post_selection_key_value() that is commonly used to synchronize
blocked tokens between multiple Directors to deny unpermitted access into a CDN.
It posts selection input data to the data stream stream_name which is consumed
into selection input by all connected Director instances so that the blocked
token can easily be checked during routing by calling blocked_tokens.is_blocked(token).
Arguments:
stream_name: The name of the data stream to post to.token: The token to post.- Optional
ttl_s: The time to live of the token, in seconds. Defaults to 3 hours (10800 seconds) if not specified.
Example:
-- Posts the token eyJhbG213 with a TTL of 3 hours
blocked_tokens.add('token_stream', 'eyJhbG213')
-- Posts the token R5cCI6Ik with a TTL of 60 seconds
blocked_tokens.add('token_stream', 'R5cCI6Ik', 60)
blocked_tokens.is_blocked(token)
blocked_tokens.is_blocked(token) checks if the token token has been blocked
by checking if it is stored in selection input. It returns true if the token is
blocked, otherwise it returns false.
Arguments:
token: The token to check.
Example:
-- Checks if the token eyJhbG213 is blocked
blocked_tokens.is_blocked('eyJhbG213')
-- Checks if the augmented token 12345__eyJhbG213 is blocked
blocked_tokens.is_blocked(blocked_tokens.augment_token('eyJhbG213', '12345'))
blocked_tokens.is_blocked('12345__eyJhbG213')
Custom Lua Metrics functions
The router provides functions for managing custom metrics counters that will be available in the OpenMetrics format on the router’s metrics API.
increase_metrics_counter(counter_name, label_table, amount)
increase_metrics_counter(counter_name, label_table, amount) increases the
custom metrics counter counter_name by amount. The counter is identified by
the label_table which is a table of key-value pairs.
Arguments:
counter_name: The name of the counter to increase.label_table: A table of key-value pairs to identify the counter.- Optional
amount: The amount to increase the counter by. Defaults to 1 if not defined.
Example:
-- Increases the counter 'my_counter' by 1
increase_metrics_counter('my_counter', {label='foo'})
-- Increases the counter 'another_counter' by 5
increase_metrics_counter('another_counter', {label1='value1', label2='value2'}, 5)
These examples will create the following metrics:
# TYPE my_counter counter
my_counter{label="foo"} 1
# TYPE another_counter counter
another_counter{label1="value1", label2="value2"} 5
reset_metrics_counter(counter_name, label_table)
reset_metrics_counter(counter_name, label_table) removes the custom metrics
counter counter_name with the labels defined in label_table.
Arguments:
counter_name: The name of the counter to remove.label_table: A table of key-value pairs to identify the counter.
Example:
-- Removes the counter 'my_counter'
reset_metrics_counter('my_counter', {label='foo'})
-- Removes the counter 'another_counter'
reset_metrics_counter('another_counter', {label1='value1', label2='value2'})
Configuration examples
Many of the functions documented are suitable to use in host health checks. To configure host health checks, see configuring CDNs and hosts. Here are some configuration examples of using the built-in Lua functions, utilizing the example metrics:
"healthChecks": [
"gt('streamer-1.hardware_metrics.mem_available_percent', 20)", // More than 20% memory is left
"lt('streamer-1.per_interface_metrics.eths1.megabits_sent_rate', 9000)" // Current bitrate is lower than 9000 Mbps
"host_has_bw({host='streamer-1', interface='eths1', margin=1000})", // host_has_bw() uses 'streamer-1.per_interface_metrics.eths1.speed' to determine if there is enough bandwidth left with a 1000 Mbps margin
"interfaces_online({host='streamer-1', interfaces='eths1'})",
"memory_usage_ok({host='streamer-1'})",
"cpu_load_ok({host='streamer-1'})",
"health_check({host='streamer-1', interfaces='eths1'})" // Combines interfaces_online(), memory_usage_ok(), cpu_load_ok()
]
3.6.6.5.2 - Global Lua Tables
There are multiple global tables containing important data available while writing Lua code for the router.
selection_input
Contains arbitrary, custom fields fed into the router by clients, see API overview for details on how to inject data into this table.
Note that the selection_input table is iterable.
Usage examples:
print(selection_input['some_value'])
-- Iterate over table
if selection_input then
for k, v in pairs(selection_input) do
print('here is '..'selection_input!')
print(k..'='..v)
end
else
print('selection_input is nil')
end
session_groups
Defines a mapping from session group name to boolean, indicating whether
the session belongs to the session group or not.
Usage examples:
if session_groups.vod then print('vod') else print('not vod') end
if session_groups['vod'] then print('vod') else print('not vod') end
session_count
Provides counters of number of session types per session group. The table
uses the structure qoe_score.<session_type>.<session_group>.
Usage examples:
print(session_count.instream.vod)
print(session_count.initial.vod)
qoe_score
Provides the quality of experience score per host per session group. The table
uses the structure qoe_score.<host>.<session_group>.
Usage examples:
print(qoe_score.host1.vod)
print(qoe_score.host1.live)
request
Contains data related to the HTTP request between the client and the router.
request.method- Description: HTTP request method.
- Type:
string - Example:
'GET','POST'
request.body- Description: HTTP request body string.
- Type:
stringornil - Example:
'{"foo": "bar"}'
request.major_version- Description: Major HTTP version such as
xinHTTP/x.1. - Type:
integer - Example:
1
- Description: Major HTTP version such as
request.minor_version- Description: Minor HTTP version such as
xinHTTP/1.x. - Type:
integer - Example:
1
- Description: Minor HTTP version such as
request.protocol- Description: Transfer protocol variant.
- Type:
string - Example:
'HTTP','HTTPS'
request.client_ip- Description: IP address of the client issuing the request.
- Type:
string - Example:
'172.16.238.128'
request.path_with_query_params- Description: Full request path including query parameters.
- Type:
string - Example:
'/mycontent/superman.m3u8?b=y&c=z&a=x'
request.path- Description: Request path without query parameters.
- Type:
string - Example:
'/mycontent/superman.m3u8'
request.query_params- Description: The query parameter string.
- Type:
string - Example:
'b=y&c=z&a=x'
request.filename- Description: The part of the path following the final slash, if any.
- Type:
string - Example:
'superman.m3u8'
request.subnet- Description: Subnet of
client_ip. - Type:
stringornil - Example:
'all'
- Description: Subnet of
session
Contains data related to the current session.
session.client_ip- Description: Alias for
request.client_ip. See documentation for table request above.
- Description: Alias for
session.path_with_query_params- Description: Alias for
request.path_with_query_params. See documentation for table request above.
- Description: Alias for
session.path- Description: Alias for
request.path. See documentation for table request above.
- Description: Alias for
session.query_params- Description: Alias for
request.query_params. See documentation for table request above.
- Description: Alias for
session.filename- Description: Alias for
request.filename. See documentation for table request above.
- Description: Alias for
session.subnet- Description: Alias for
request.subnet. See documentation for table request above.
- Description: Alias for
session.host- Description: ID of the currently selected host for the session.
- Type:
stringornil - Example:
'host1'
session.id- Description: ID of the session.
- Type:
string - Example:
'8eb2c1bdc106-17d2ff-00000000'
session.session_type- Description: Type of the session.
- Type:
string - Example:
'initial'or'instream'. Identical to the value of theTypeargument of the session translation function.
session.is_managed- Description: Identifies managed sessions.
- Type:
boolean - Example:
trueifType/session.session_typeis'instream'
request_headers
Contains the headers from the request between the client and the router, keyed by name.
Usage example:
print(request_headers['User-Agent'])
request_query_params
Contains the query parameters from the request between the client and the router, keyed by name.
Usage example:
print(request_query_params.a)
session_query_params
Alias for metatable request_query_params.
response
Contains data related to the outgoing response apart from the headers.
response.body- Description: HTTP response body string.
- Type:
stringornil - Example:
'{"foo": "bar"}'
response.code- Description: HTTP response status code.
- Type:
integer - Example:
200,404
response.text- Description: HTTP response status text.
- Type:
string - Example:
'OK','Not found'
response.major_version- Description: Major HTTP version such as
xinHTTP/x.1. - Type:
integer - Example:
1
- Description: Major HTTP version such as
response.minor_version- Description: Minor HTTP version such as
xinHTTP/1.x. - Type:
integer - Example:
1
- Description: Minor HTTP version such as
response.protocol- Description: Transfer protocol variant.
- Type:
string - Example:
'HTTP','HTTPS'
response_headers
Contains the response headers keyed by name.
Usage example:
print(response_headers['User-Agent'])
3.6.6.5.3 - Request Translation Function
Specifies the body of a Lua function that inspects every incoming HTTP request and overwrites individual fields before further processing by the router.
Returns nil when nothing is to be changed, or HTTPRequest(t) where t
is a table with any of the following optional fields:
Method- Description: Replaces the HTTP request method in the request being processed.
- Type:
string - Example:
'GET','POST'
Path- Description: Replaces the request path in the request being processed.
- Type:
string - Example:
'/mycontent/superman.m3u8'
ClientIp- Description: Replaces client IP address in the request being processed.
- Type:
string - Example:
'172.16.238.128'
Body- Description: Replaces body in the request being processed.
- Type:
stringornil - Example:
'{"foo": "bar"}'
QueryParameters- Description: Adds, removes or replaces individual query parameters in the request being processed.
- Type: nested
table(indexed by number) representing an array of query parameters as{[1]='Name',[2]='Value'}pairs that are added to the request being processed, or overwriting existing query parameters with colliding names. To remove a query parameter from the request, specifynilas value, i.e.QueryParameters={..., {[1]='foo',[2]=nil} ...}. Returning a query parameter with a name but no value, such asain the request'/index.m3u8?a&b=22'is currently not supported.
Headers- Description: Adds, removes or replaces individual headers in the request being processed.
- Type: nested
table(indexed by number) representing an array of request headers as{[1]='Name',[2]='Value'}pairs that are added to the request being processed, or overwriting existing request headers with colliding names. To remove a header from the request, specifynilas value, i.e.Headers={..., {[1]='foo',[2]=nil} ...}. Duplicate names are supported. A multi-value header such asFoo: bar1,bar2is defined by specifyingHeaders={..., {[1]='foo',[2]='bar1'}, {[1]='foo',[2]='bar2'}, ...}.
OutgoingRequest: See Sending HTTP requests from translation functions for more information.
Example of a request_translation_function body that sets the request path
to a hardcoded value and adds the hardcoded query parameter a=b:
-- Statements go here
print('Setting hardcoded Path and QueryParameters')
return HTTPRequest({
Path = '/content.mpd',
QueryParameters = {
{'a','b'}
}
})
Arguments
The following (iterable) arguments will be known by the function:
QueryParameters
Type: nested
table(indexed by number).Description: Array of query parameters as
{[1]='Name',[2]='Value'}pairs that were present in the query string of the request. Format identical to theHTTPRequest.QueryParameters-field specified for the return value above.Example usage:
for _, queryParam in pairs(QueryParameters) do print(queryParam[1]..'='..queryParam[2]) end
Headers
Type: nested
table(indexed by number).Description: Array of request headers as
{[1]='Name',[2]='Value'}pairs that were present in the request. Format identical to theHTTPRequest.Headers-field specified for the return value above. A multi-value header such asFoo: bar1,bar2is seen inrequest_translation_functionasHeaders={..., {[1]='foo',[2]='bar1'}, {[1]='foo',[2]='bar1'}, ...}.Example usage:
for _, header in pairs(Headers) do print(header[1]..'='..header[2]) end
Additional Data
In addition to the arguments above, the following Lua tables, documented in Global Lua Tables, provide additional data that is available when executing the request translation function:
If the request translation function modifies the request, the request,
request_query_params and request_headers tables will be updated with the
modified request and made available to the routing rules.
3.6.6.5.4 - Session Translation Function
Specifies the body of a Lua function that inspects a newly created session and may override its suggested type from “initial” to “instream” or vice versa. A number of helper functions are provided to simplify changing the session type.
Returns nil when the session type is to remain unchanged, or Session(t)
where t is a table with a single field:
Type- Description: New type of the session.
- Type:
string - Example:
'instream','initial'
OutgoingRequest: See Sending HTTP requests from translation functions for more information.
Basic Configuration
It is possible to configure the maximum number of simultaneous managed sessions
on the router. If the maximum number is reached, no more managed sessions can be
created. Using confcli, it can be configured by running
$ confcli services.routing.tuning.general.maxActiveManagedSessions
{
"maxActiveManagedSessions": 1000
}
$ confcli services.routing.tuning.general.maxActiveManagedSessions 900
services.routing.tuning.general.maxActiveManagedSessions = 900
Common Arguments
While executing the session translation function, the following arguments are available:
Type: The current type of the session ('instream'or'initial').
Usage examples:
-- Flip session type
local newType = 'initial'
if Type == 'initial' then
newType = 'instream'
end
print('Changing session type from ' .. Type .. ' to ' .. newType)
return Session({['Type'] = newType})
Session Translation Helper Functions
The standard Lua library prodives four helper functions to simplify the configuration of the session translation function:
set_session_type(session_type)
This function will set the session type to the supplied session_type and
the maximum number of sessions of that type has not been reached.
Parameters
session_type: The type of session to create, possible values are ‘initial’ or ‘instream’.
Usage Examples
return set_session_type('instream')
return set_session_type('initial')
set_session_type_if_in_group(session_type, session_group)
This function will set the session type to the supplied session_type if the
session is part of session_group and the maximum number of sessions of that
type has not been reached.
Parameters
session_type: The type of session to create, possible values are ‘initial’ or ‘instream’.session_group: The name of the session group.
Usage Examples
return set_session_type_if_in_group('instream', 'sg1')
set_session_type_if_in_all_groups(session_type, session_groups)
This function will set the session type to the supplied session_type if the
session is part of all session groups given by session_groups and the maximum
number of sessions of that type has not been reached.
Parameters
session_type: The type of session to create, possible values are ‘initial’ or ‘instream’.session_groups: A list of session group names.
Usage Examples
return set_session_type_if_in_all_groups('instream', {'sg1', 'sg2'})
set_session_type_if_in_any_group(session_type)
This function will set the session type to the supplied session_type if the
session is part of one or more of the session groups given by session_groups
and the maximum number of sessions of that type has not been reached.
Parameters
session_type: The type of session to create, possible values are ‘initial’ or ‘instream’.session_groups: A list of session group names.
Usage Examples
return set_session_type_if_in_any_group('instream', {'sg1', 'sg2'})
Configuration
Using confcli, example of how the functions above can be used in the session
translation function can be configured by running any of
$ confcli services.routing.translationFunctions.session "return set_session_type('instream')"
services.routing.translationFunctions.session = "return set_session_type('instream')"
$ confcli services.routing.translationFunctions.session "return set_session_type_if_in_group('instream', 'sg1')"
services.routing.translationFunctions.session = "return set_session_type_if_in_group('instream', 'sg1')"
$ confcli services.routing.translationFunctions.session "return set_session_type_if_in_all_groups('instream', {'sg1', 'sg2'})"
services.routing.translationFunctions.session = "return set_session_type_if_in_all_groups('instream', {'sg1', 'sg2'})"
$ confcli services.routing.translationFunctions.session "return set_session_type_if_in_any_group('instream', {'sg1', 'sg2'})"
services.routing.translationFunctions.session = "return set_session_type_if_in_any_group('instream', {'sg1', 'sg2'})"
Additional Data
In addition to the arguments above, the following Lua tables, documented in Global Lua Tables, provide additional data that is available when executing the response translation function:
The selection_input table will not change while a routing request is handled.
A request_translation_function and the corresponding
response_translation_function will see the same selection_input table, even
if the selection data is updated while the request is being handled.
3.6.6.5.5 - Host Request Translation Function
The host request translation function defines a Lua function that modifies
HTTP requests sent to a host. These hosts are configured in
services.routing.hostGroups.
Hosts can receive requests for a manifest. A regular host will respond with the manifest itself, while a redirecting host and a DNS host will respond with a redirection to a streamer. This function can modify all these types of requests.
The function returns nil when nothing is to be changed, or HTTPRequest(t)
where t is a table with any of the following optional fields:
Method- Description: Replaces the HTTP request method in the request being processed.
- Type:
string - Example:
'GET','POST'
Path- Description: Replaces the request path in the request being processed.
- Type:
string - Example:
'/mycontent/superman.m3u8'
Body- Description: Replaces body in the request being processed.
- Type:
stringornil - Example:
'{"foo": "bar"}'
QueryParameters- Description: Adds, removes or replaces individual query parameters in the request being processed.
- Type: nested
table(indexed by number) representing an array of query parameters as{[1]='Name',[2]='Value'}pairs that are added to the request being processed, or overwriting existing query parameters with colliding names. To remove a query parameter from the request, specifynilas value, i.e.QueryParameters={..., {[1]='foo',[2]=nil} ...}. Returning a query parameter with a name but no value, such asain the request'/index.m3u8?a&b=22'is currently not supported.
Headers- Description: Adds, removes or replaces individual headers in the request being processed.
- Type: nested
table(indexed by number) representing an array of request headers as{[1]='Name',[2]='Value'}pairs that are added to the request being processed, or overwriting existing request headers with colliding names. To remove a header from the request, specifynilas value, i.e.Headers={..., {[1]='foo',[2]=nil} ...}. Duplicate names are supported. A multi-value header such asFoo: bar1,bar2is defined by specifyingHeaders={..., {[1]='foo',[2]='bar1'}, {[1]='foo',[2]='bar2'}, ...}.
Host- Description: Replaces the host that the request is sent to.
- Type:
string - Example:
'new-host.example.com','192.0.2.7'
Port- Description: Replaces the TCP port that the request is sent to.
- Type:
number - Example:
8081
Protocol- Description: Decides which protocol that will be used for sending the
request. Valid protocols are
'HTTP'and'HTTPS'. - Type:
string - Example:
'HTTP','HTTPS'
- Description: Decides which protocol that will be used for sending the
request. Valid protocols are
OutgoingRequest: See Sending HTTP requests from translation functions for more information.
Example of a host_request_translation_function body that sets the request path
to a hardcoded value and adds the hardcoded query parameter a=b:
-- Statements go here
print('Setting hardcoded Path and QueryParameters')
return HTTPRequest({
Path = '/content.mpd',
QueryParameters = {
{'a','b'}
}
})
Arguments
The following (iterable) arguments will be known by the function:
QueryParameters
Type: nested
table(indexed by number).Description: Array of query parameters as
{[1]='Name',[2]='Value'}pairs that are present in the query string of the request from the client to the router. Format identical to theHTTPRequest.QueryParameters-field specified for the return value above.Example usage:
for _, queryParam in pairs(QueryParameters) do print(queryParam[1]..'='..queryParam[2]) end
Headers
Type: nested
table(indexed by number).Description: Array of request headers as
{[1]='Name',[2]='Value'}pairs that are present in the request from the client to the router. Format identical to theHTTPRequest.Headers-field specified for the return value above. A multi-value header such asFoo: bar1,bar2is seen inhost_request_translation_functionasHeaders={..., {[1]='foo',[2]='bar1'}, {[1]='foo',[2]='bar1'}, ...}.Example usage:
for _, header in pairs(Headers) do print(header[1]..'='..header[2]) end
Global Tables
The following non-iterable global tables are available for use by the
host_request_translation_function.
Table outgoing_request
The outgoing_request table contains the request that is to be sent to the
host.
outgoing_request.method- Description: HTTP request method.
- Type:
string - Example:
'GET','POST'
outgoing_request.body- Description: HTTP request body string.
- Type:
stringornil - Example:
'{"foo": "bar"}'
outgoing_request.major_version- Description: Major HTTP version such as
xinHTTP/x.1. - Type:
integer - Example:
1
- Description: Major HTTP version such as
outgoing_request.minor_version- Description: Minor HTTP version such as
xinHTTP/1.x. - Type:
integer - Example:
1
- Description: Minor HTTP version such as
outgoing_request.protocol- Description: Transfer protocol variant.
- Type:
string - Example:
'HTTP','HTTPS'
Table outgoing_request_headers
Contains the request headers from the request that is to be sent to the host, keyed by name.
Example:
print(outgoing_request_headers['X-Forwarded-For'])
Multiple values are separated with a comma.
Additional Data
In addition to the arguments above, the following Lua tables, documented in Global Lua Tables, provide additional data that is available when executing the request translation function:
3.6.6.5.6 - Response Translation Function
Specifies the body of a Lua function that inspects every outgoing HTTP response and overwrites individual fields before being sent to the client.
Returns nil when nothing is to be changed, or HTTPResponse(t) where t
is a table with any of the following optional fields:
Code- Description: Replaces status code in the response being sent.
- Type:
integer - Example:
200,404
Text- Description: Replaces status text in the response being sent.
- Type:
string - Example:
'OK','Not found'
MajorVersion- Description: Replaces major HTTP version such as
xinHTTP/x.1in the response being sent. - Type:
integer - Example:
1
- Description: Replaces major HTTP version such as
MinorVersion- Description: Replaces minor HTTP version such as
xinHTTP/1.xin the response being sent. - Type:
integer - Example:
1
- Description: Replaces minor HTTP version such as
Protocol- Description: Replaces protocol in the response being sent.
- Type:
string - Example:
'HTTP','HTTPS'
Body- Description: Replaces body in the response being sent.
- Type:
stringornil - Example:
'{"foo": "bar"}'
Headers- Description: Adds, removes or replaces individual headers in the response being sent.
- Type: nested
table(indexed by number) representing an array of response headers as{[1]='Name',[2]='Value'}pairs that are added to the response being sent, or overwriting existing request headers with colliding names. To remove a header from the response, specifynilas value, i.e.Headers={..., {[1]='foo',[2]=nil} ...}. Duplicate names are supported. A multi-value header such asFoo: bar1,bar2is defined by specifyingHeaders={..., {[1]='foo',[2]='bar1'}, {[1]='foo',[2]='bar2'}, ...}.
OutgoingRequest: See Sending HTTP requests from translation functions for more information.
Example of a response_translation_function body that sets the Location
header to a hardcoded value:
-- Statements go here
print('Setting hardcoded Location')
return HTTPResponse({
Headers = {
{'Location', 'cdn1.com/content.mpd?a=b'}
}
})
Arguments
The following (iterable) arguments will be known by the function:
Headers
Type: nested
table(indexed by number).Description: Array of response headers as
{[1]='Name',[2]='Value'}pairs that are present in the response being sent. Format identical to theHTTPResponse.Headers-field specified for the return value above. A multi-value header such asFoo: bar1,bar2is seen inresponse_translation_functionasHeaders={..., {[1]='foo',[2]='bar1'}, {[1]='foo',[2]='bar1'}, ...}.Example usage:
for _, header in pairs(Headers) do print(header[1]..'='..header[2]) end
Additional Data
In addition to the arguments above, the following Lua tables, documented in Global Lua Tables, provide additional data that is available when executing the response translation function:
3.6.6.5.7 - Sending HTTP requests from translation functions
It is possible to configure all translation functions to send HTTP requests. If an outgoing request is sent in a translation function, the Director will delay the response to the incoming request until the outgoing request has been completed. Note that the response to the outgoing request is not handled by the Director, it only waits for the outgoing request to complete.
Requests can be sent from any translation function by defining the table
OutgoingRequest in the translation function return value:
{
OutgoingRequest = {
Method = "HEAD",
Protocol = "HTTP",
Host = "example.com",
Port = 8080,
Path = "/example/path",
EncodeURL = true,
QueryParameters = {{"param1", "value1"}, {"param2", "value2"}},
Headers = {{"x-header", "header-value"}, {"Authorization", "Basic dXNlcjpwYXNz"}}
}
}
The following fields for OutgoingRequest are supported:
Method: The HTTP method to use. Defaults toHEAD.Protocol: The protocol to use. Defaults to the protocol of the incoming request.Host: The host to send the request to.Port: The port to send the request to. Defaults to 80 ifProtocolisHTTPand 443 ifProtocolisHTTPS.Path: The path to send the request to. Defaults to/.EncodeURL: A boolean value that determines if the URL should be percent-encoded. Defaults totrue. WARNING: Not encoding the URL is not HTTP compliant and might cause issues with some servers. Use with caution. See RFC 1738 for more information.QueryParameters: A list of query parameters to include in the request. Note that the query parameters are defined as two-element lists in Lua.Headers: A Lua table of headers to include in the request. Note that if the header name contains a dash-, it must be defined as a two-element list as seen in the example above.Body: A string containing the body of the request. If this field is not defined, no body will be included in the request. If it is defined, theContent-Lengthheader, with the length of the body, will be added to the request.
All fields except Host are optional.
Using the example above, the following response translation function
will make the Director can send a GET request to
http://example.com:8080/example/path?param1=value1¶m2=value2 with the
headers x-header: x-value and Authorization: Basic dXNlcjpwYXNz:
return HTTPResponse({
OutgoingRequest = {
Method = "HEAD",
Protocol = "HTTP",
Host = "example.com",
Port = 8080,
Path = "/example/path",
QueryParameters = {{"param1", "value1"}, {"param2", "value2"}},
Headers = {{"x-header", "x-value"}, {"Authorization", "Basic dXNlcjpwYXNz"}}
}
})
Using log level 4, the outgoing request can be seen in the Director logs:
DEBUG orc-re-work-0 AsyncRequestSender: Sending request: url=http://example.com/example/path?param1=value1¶m2=value2
DEBUG orc-re-work-0 CDNManager: OutboundContentConn: example.com:8080: Connecting to target CDN example.com:8080
DEBUG orc-re-work-0 ClientConn: 192.168.103.16/28:60201/https: Sent a Lua request: outstanding-requests=1
DEBUG orc-re-work-0 CDNManager: OutboundContentConn: example.com:8080: Target CDN connection established.
DEBUG orc-re-work-0 CDNManager: OutboundContentConn: example.com:8080: Sending request to target CDN:
GET /example/path?param1=value1¶m2=value2 HTTP/1.0
Authorization: Basic dXNlcjpwYXNz
Host: example.com:8080
x-header: x-value
3.6.7 - Trusted proxies
When a request with the header X-Forwarded-For is sent to the router, the
router will check if the client is in the list of trusted proxies. If the client
is not a trusted proxy, the router will drop the connection, returning an empty
reply to the client. If the client is a trusted proxy, the IP address defined
in the X-Forwarded-For will be regarded as the client’s IP address.
The list of trusted proxies can be configured by modifying the configuration
field services.routing.settings.trustedProxies with the IP addresses of
trusted proxies:
$ confcli services.routing.settings.trustedProxies -w
Running wizard for resource 'trustedProxies'
<A list of IP addresses from which the proxy IP address of requests with the X-Forwarded-For header defined are checked. If the IP isn't in this list, the connection is dropped. (default: [])>
Hint: Hitting return will set a value to its default.
Enter '?' to receive the help string
trustedProxies <A list of IP addresses from which the proxy IP address of requests with the X-Forwarded-For header defined are checked. If the IP isn't in this list, the connection is dropped. (default: [])>: [
trustedProxy (default: ): 1.2.3.4
Add another 'trustedProxy' element to array 'trustedProxies'? [y/N]: n
]
Generated config:
{
"trustedProxies": [
"1.2.3.4"
]
}
Merge and apply the config? [y/n]: y
Note that by configuring 0.0.0.0/0 as a trusted proxy, all proxied requests
will be trusted.
3.6.8 - Confd Auto Upgrade Tool
The confd-auto-upgrade tool is a simple utility to automatically migrate the confd
configuration schema between different versions of the Director. Starting with version
1.12.0, it is possible to automatically apply the necessary configuration changes in a
controlled and predictable manner. While this tool is intended to help transition the
configuration format between the different versions, it is not a substitute for proper
backups, and while downgrading to an earlier version, it may not be possible to recover
previously modified or deleted configuration values.
When using the tool, both the “from” and “to” versions must be specified. Internally, the tool will calculate a list of migrations which must be applied to transition between the given versions, and apply them, outputting the final configuration to standard output. The current configuration can either be piped in to the tool via standard input, or supplied as a static file. Providing a “from” version which is later than the “to” version will result in the downgrade migrations being applied in reverse order, effectively downgrading the configuration to the lower version.
For convenience, the tool is deployed to the ACD Nodes automatically at install time as a standard Podman container, however since it is not intended to run as a service, only the image will be present, not a running container.
Performing the Upgrade
In the following example scenario, a system with version 1.10.1 has been upgraded
to 1.14.0. Before upgrading a backup of the configuration was taken and saved to
current_config.json.
Using the image and tag as determined in the above section. Issue the following command:
cat current_config.json | \
podman run -i --rm images.edgeware.tv/acd-confd-migration:1.14.0 \
--in - --from 1.10.1 --to 1.14.0 \
| tee upgraded_config.json
In the above example, the updated configuration is saved to upgraded_config.json.
It is recommended to manually verify the generated configuration, and after
which apply the config to confd by using cat upgraded_config.json | confcli -i.
It is also possible to combine the two commands, by piping the output of the auto-upgrade
tool directly to confcli -i. E.g.
cat current_config.json | podman run ... | tee upgraded_config.json | confcli -i
This will save a backup of the upgraded configuration to upgraded_config.json and
at the same time apply the changes to confd immediately.
Downgrading the Configuration
The steps for downgrading the configuration are exactly the same as for upgrade except for the --from
and --to versions should be swapped. E.g. --from 1.14.0 --to 1.10.1. Keep in mind however,
that during an upgrade some configuration properties may have been deleted or modified, and while
downgrading over those steps, some data loss may occur. In those cases, it may be easier and safer
to simply restore from backup. In most cases where configuration properties are removed during upgrade,
the corresponding downgrade will simply restore the default values of those properties.
3.7 - Operations
This guide describes how to perform day-to-day operations of the ACD Router and its associated services, collectively known as the Director.
Component Overview
To effectively operate the Director software, it is important to understand the composition of the various software components and how they are deployed.
Each Director instance functions as an independent system, comprising multiple containerized services. These containers are managed by a standard container runtime and are seamlessly integrated with the host’s operating system to enhance the overall operator experience.
The containers are managed by the Podman container runtime, which operates without additional daemon services running on the host. Unlike Docker, Podman manages each container as a separate process, eliminating the reliance on a shared daemon and mitigating the risk of a single-point-of-failure scenario.
Although several distinct services make up the Director, the primary component is the router. The router is responsible for listening for incoming requests, processing the request, and redirecting the client to the appropriate host, or CDN to deliver the requested content.
Two additional containers are responsible for configuration management. Those are
confd and confd-transformer. The former manages a local database of configuration
metadata and provides a REST API for managing the configuration. The confd-transformer
simply listens for configuration changes from confd and adapts that configuration
to a format suitable for the router to ingest. For additional information about
setting up and using confd see here..
The next two components, the edns-proxy and the convoy-bridge allow the router
to communicate with an EDNS server for EDNS-based routing, and with synchronization
with Convoy respectively. Additional information about the EDNS-Proxy is available
here.. For the Convoy Bridge
service see here..
The remaining containers are useful for metrics, monitoring, and alerting. These
include prometheus and grafana for monitoring and analytics, and alertmanager
for monitoring and alarms.
3.7.1 - Services
Each container shipped with the Director is fully-integrated with the systemd
service on the host, enabling easy management using standard systemd commands.
The logs for each container are also full-integrated with journald to simplify
troubleshooting.
In order to integrate the Podman containers with systemd, a common prefix
of acd- has been applied to each service name. For example the router
container is managed by the service acd-router, and the confd container
is managed by the service acd-confd. These same prefixed names apply while
fetching logs via journald. This common prefix aids in grouping the related
services as well as provides simpler filtering for tab-completion.
Starting / Stopping Services
Standard systemd commands should be used to start and stop the services.
systemctl start acd-router- Starts theroutercontainer.systemctl stop acd-router- Stops theroutercontainer.systemctl status acd-router- Displays the status of theroutercontainer.
Due to the limitation of needing the acd- prefix, it provides the ability to
work with all ACD services in a group. For example:
systemctl status 'acd-*'- Display the status of all installed ACD components.systemctl start 'acd-*'- Start all ACD components.
Logging
Each ACD component corresponds to a journal entry with the same unit name, with
the acd- prefix. Standard journald commands can be used to view and manage the
logging.
journalctl -u acd-router- Display the logs for theroutercontainer
Access Log
Refer to Access Logging.
Troubleshooting
Some additional logging may be available in the filesystem, the paths of which can
be determined by executing the ew-sysinfo command. See
Diagnostics. for additional details.
3.8 - Convoy Bridge
The convoy-bridge is an optional integration service, pre-installed alongside the router which provides two-way communication between the router and a separate Convoy installation.
The convoy-bridge is designed to allow the Convoy account metadata to be available from within the router for such use-cases as inserting the account specific prefixes in the redirect URL and validating per-account internal security tokens. The service works by periodically polling the Convoy server for changes to the configuration, and when detected, the relevant configuration information is pushed to the router.
In addition, the convoy-bridge has the ability to integrate the router with the Convoy analytics service, such that client sessions started by the router are properly collected by Convoy, and are available in the dashboards.
Configuration
The convoy-bridge service is configured using confcli on the router host.
All configuration for the convoy-bridge exists under the path
integration.convoy.bridge.
{
"logLevel": "info",
"accounts": {
"enabled": true,
"dbUrl": "mysql://convoy:eith7jee@convoy:3306",
"dbPollInterval": 60
},
"analytics": {
"enabled": true,
"brokers": ["broker1:9092", "broker2:9092"],
"batchInterval": 10,
"maxBatchSize": 500
},
"otherRouters": [
{
"url": "https://router2:5001",
"apiKey": "key1",
"validateCerts": true
}
]
}
In the above configuration block, there are three main sections. The accounts
section enables fetching account metadata from Convoy towards the router. The
analytics section controls the integration between the router and the Convoy
analytics service. The otherRouters section is used to synchronize additional
router instances. The local router instance will always be implicitly included.
Additional routers listed in this section will be handled by this instance of
the convoy-bridge service.
Logging
The logs are available in the system journal and can be viewed using:
journalctl -u acd-convoy-bridge
3.9 - Monitoring
3.9.1 - Access logging
Access logging is activated by default and can be enabled/disabled by running
$ confcli services.routing.tuning.general.accessLog true
$ confcli services.routing.tuning.general.accessLog false
Requests are logged in the combined log format and can be found at
/var/log/acd-router/access.log. Additionally, the symbolic link
/opt/edgeware/acd/router/log points to /var/log/acd-router, allowing
the access logs to also be found at /opt/edgeware/acd/router/log/access.log.
Example Output
$ cat /var/log/acd-router/access.log
May 29 07:20:00 router[52236]: ::1 - - [29/May/2023:07:20:00 +0000] "GET /vod/batman.m3u8 HTTP/1.1" 302 0 "-" "curl/7.61.1"
Access Log Rotation
Access logs are rotated and compressed once the access log file reaches a size of 100 MB. By default, 10 rotated logs are stored before being rotated out. These rotation parameters can be reconfigured by editing the lines
size 100M
rotate 10
in /etc/logrotate.d/acd-router-access-log. For more log rotation configuration
possibilites, refer to the
Logrotate documentation.
3.9.2 - System troubleshooting
ESB3024 contains the tool ew-sysinfo that gives an overview of how the
system is doing. Simply use the command and the tool will output information
about the system and the installed ESB3024 services.
The output format can be changed using the --format flag, possible values
are human (default) and json, e.g.:
$ ew-sysinfo
system:
os: ['5.4.17-2136.321.4.el8uek.x86_64', 'Oracle Linux Server 8.8']
cpu_cores: 2
cpu_load_average: [0.03, 0.03, 0.0]
memory_usage: 478 MB
memory_load_average: [0.03, 0.03, 0.0]
boot_time: 2023-09-08T08:30:57Z
uptime: 6 days, 3:43:44.640665
processes: 122
open_sockets:
ipv4: 12
ipv6: 18
ip_total: 30
tcp_over_ipv4: 9
tcp_over_ipv6: 16
tcp_total: 25
udp_over_ipv4: 3
udp_over_ipv6: 2
udp_total: 5
total: 145
system_disk (/):
total: 33271 MB
used: 7978 MB (24.00%)
free: 25293 MB
journal_disk (/run/log/journal):
total: 1954 MB
used: 217 MB (11.10%)
free: 1736 MB
vulnerabilities:
meltdown: Mitigation: PTI
spectre_v1: Mitigation: usercopy/swapgs barriers and __user pointer sanitization
spectre_v2: Mitigation: Retpolines, STIBP: disabled, RSB filling, PBRSB-eIBRS: Not affected
processes:
orc-re:
pid: 177199
status: sleeping
cpu_usage_percent: 1.0%
cpu_load_average: 131.11%
memory_usage: 14 MB (0.38%)
num_threads: 10
hints:
get_raw_router_config: cat /opt/edgeware/acd/router/cache/config.json
get_confd_config: cat /opt/edgeware/acd/confd/store/__active
get_router_logs: journalctl -u acd-router
get_edns_proxy_logs: journalctl -u acd-edns-proxy
check_firewall_status: systemctl status firewalld
check_firewall_config: iptables -nvL# For --format=json, it's recommended to pipe the output to a JSON interpreter
# such as jq
$ ew-sysinfo --format=json | jq
{
"system": {
"os": [
"5.4.17-2136.321.4.el8uek.x86_64",
"Oracle Linux Server 8.8"
],
"cpu_cores": 2,
"cpu_load_average": [
0.01,
0.0,
0.0
],
"memory_usage": "479 MB",
"memory_load_average": [
0.01,
0.0,
0.0
],
"boot_time": "2023-09-08 08:30:57",
"uptime": "6 days, 5:12:24.617114",
"processes": 123,
"open_sockets": {
"ipv4": 13,
"ipv6": 18,
"ip_total": 31,
"tcp_over_ipv4": 10,
"tcp_over_ipv6": 16,
"tcp_total": 26,
"udp_over_ipv4": 3,
"udp_over_ipv6": 2,
"udp_total": 5,
"total": 146
}
},
"system_disk (/)": {
"total": "33271 MB",
"used": "7977 MB (24.00%)",
"free": "25293 MB"
},
"journal_disk (/run/log/journal)": {
"total": "1954 MB",
"used": "225 MB (11.50%)",
"free": "1728 MB"
},
"vulnerabilities": {
"meltdown": "Mitigation: PTI",
"spectre_v1": "Mitigation: usercopy/swapgs barriers and __user pointer sanitization",
"spectre_v2": "Mitigation: Retpolines, STIBP: disabled, RSB filling, PBRSB-eIBRS: Not affected"
},
"processes": {
"orc-re": {
"pid": 177199,
"status": "sleeping",
"cpu_usage_percent": "0.0%",
"cpu_load_average": "137.63%",
"memory_usage": "14 MB (0.38%)",
"num_threads": 10
}
}
}Note that your system might have different monitored processes and field names.
The field hints is different from the rest. It lists common commands
that can be used to further monitor system performance, useful for
quickly troubleshooting a faulty system.
3.9.3 - Scraping data with Prometheus
Prometheus is a third-party data scraper which is installed as a containerized service in the default installation of ESB3024 Router. It periodically reads metrics data from different services, such as acd-router, aggregates it and makes it available to other services that visualize the data. Those services include Grafana and Alertmanager.
The Prometheus configuration file can be found on the host at
/opt/edgeware/acd/prometheus/prometheus.yaml.
Accessing Prometheus
Prometheus has a web interface that is listening for HTTP connections on port 9090. There is no authentication, so anyone who has access to the host that is running Prometheus can access the interface.
Starting / Stopping Prometheus
After the service is configured, it can be managed via systemd, under the
service unit acd-prometheus.
systemctl start acd-prometheus
Logging
The container logs are automatically published to the system journal, under
the same unit descriptor, and can be viewed using journalctl
journalctl -u acd-prometheus
3.9.4 - Visualizing data with Grafana
3.9.4.1 - Managing Grafana
Grafana displays graphs based on data from Prometheus. A default deployment of Grafana is running in a container alongside ESB3024 Router.
Grafana’s configuration and runtime files are stored under
/opt/edgeware/acd/grafana. It comes with default dashboards that are
documented at Grafana dashboards.
Accessing Grafana
Grafana’s web interface is listening for HTTP connections on port
3000. It has two default accounts, edgeware and admin.
The edgeware account can only view graphs, while the admin account can also
edit graphs. The accounts with default passwords are shown in the table below.
| Account | Default password |
|---|---|
edgeware | edgeware |
admin | edgeware |
Starting / Stopping Grafana
Grafana can be managed via systemd, under the service unit acd-grafana.
systemctl start acd-grafana
Logging
The container logs are automatically published to the system journal, under
the same unit descriptor, and can be viewed using journalctl
journalctl -u acd-grafana
3.9.4.2 - Grafana Dashboards
Grafana will be populated with pre-configured graphs which present some metrics on a time scale. Below is a comprehensive list of those dashboards, along with short descriptions.
Router Monitoring dashboard
This dashboard is by default set as home directory - it’s what user will see
after logging in.
Number Of Initial Routing Decisions
HTTP Status Codes
Total number of responses sent back to incoming requests, shown by their status codes. Metric: client-response-status
Incoming HTTP and HTTPS Requests
Total number of incoming requests that were deemed valid, divided into SSL
and Unencrypted categories.
Metric: num_valid_http_requests
Debugging Information dashboard
Number of Lua Exceptions
Number of exceptions encountered so far while evaluating Lua rules. Metric: lua_num_errors
Number of Lua Contexts
Number of active Lua interpreters, both running and idle. Metric: lua_num_evaluators
Time Spent In Lua
Number of microseconds the Lua interpreters were running. Metric: lua_time_spent
Router Latencies
Histogram-like graph showing how many responses were sent within the given latency interval. Metric: orc_latency_bucket
Internal debugging
A folder that contains dashboards intended for internal use.
ACD: Incoming Internet Connections dashboard
SSL Warnings
Rate of warnings logged during TLS connections Metric: num_ssl_warnings_total
SSL Errors
Rate of errors logged during TLS connections Metric: num_ssl_errors_total
Valid Internet HTTPS Requests
Rate of incoming requests that were deemed valid, HTTPS only. Metric: num_valid_http_requests
Invalid Internet HTTPS Requests
Rate of incoming requests that were deemed invalid, HTTPS only. Metric: num_invalid_http_requests
Valid Internet HTTP Requests
Rate of incoming requests that were deemed valid, HTTP only. Metric: num_valid_http_requests
Invalid Internet HTTP Requests
Rate of incoming requests that were deemed invalid, HTTP only. Metric: num_invalid_http_requests
Prometheus: ACD dashboard
Logged Warnings
Rate of logged warnings since the router has started, divided into CDN-related and CDN-unrelated. Metric: num_log_warnings_total
Logged Errors
Rate of logged errors since the router has started. Metric: num_log_errors_total
HTTP Requests
Rate of responses sent to incoming connections. Metric: orc_latency_count
Number Of Active Sessions
Number of sessions opened on router that are still active. Metric: num_sessions
Total Number Of Sessions
Total number of sessions opened on router. Metric: num_sessions
Session Type Counts (Non-Stacked)
Number of active sessions divided by type; see metric documentation linked below for up-to-date list of types. Metric: num_sessions
Prometheus/ACD: Subrunners
Client Connections
Number of currently open client connections per subrunner. Metric: subrunner_client_conns
Asynchronous Queues (Current)
Number of queued events per subrunner, roughly corresponding to load. Metric: subrunner_async_queue
Used <Send/receive> Data Blocks
Number of send or receive data blocks currently in use per subrunner, as decided by the “Send/receive” drop down box. Metric: subrunner_used_send_data_blocks and subrunner_used_receive_data_blocks
Asynchronous Queues (Max)
Maximum number of events waiting in queue. Metric: subrunner_max_async_queue
Total <Send/receive> Data Blocks
Number of send or receive data blocks allocated per subrunner, as decided by the “Send/receive” drop down box. Metric: subrunner_total_send_data_blocks and subrunner_total_receive_data_blocks
Low Queue (Current)
Number of low priority events queued per subrunner. Metric: subrunner_low_queue
Medium Queue (Current)
Number of medium priority events queued per subrunner. Metric: subrunner_medium_queue
High Queue (Current)
Number of high priority events queued per subrunner. Metric: subrunner_high_queue
Low Queue (Max)
Maximum number of events waiting in low priority queue. Metric: subrunner_max_low_queue
Medium Queue (Max)
Maximum number of events waiting in medium priority queue. Metric: subrunner_max_medium_queue
High Queue (Max)
Maximum number of events waiting in high priority queue. Metric: subrunner_max_high_queue
Wakeups
The number of times a subrunner has been waken up from sleep. Metric: subrunner_io_wakeups
Overloaded
The number of times the number of queued events for a subrunner exceeded its maximum. Metric: subrunner_times_worker_overloaded
Autopause
Number of sockets that have been automatically paused. This happens when the work manager is under heavy load. Metric: subrunner_io_autopause_sockets
3.9.5 - Alarms and Alerting
Alerts are generated by the third-party service Prometheus, which sends them to the Alertmanager service. A default containerized instance of Alertmanager is deployed alongside ESB3024 Router. Out of the box, Alertmanager ships with only a sample configuration file, and will require manual configuration prior to enabling the alerting functionality. Due to the many different possible configurations for how alerts are both detected and where they are pushed, the official Alertmanager documentation should be followed for how to configure the service.
The router ships with Alertmanager 0.25, the documentation
for which can be found at prometheus.io.
The Alertmanager configuration file can be found on the host at
/opt/edgeware/acd/alertmanager/alertmanager.yml.
Accessing Alertmanager
Alertmanager has a web interface that is listening for HTTP connections on port 9093. There is no authentication, so anyone who has access to the host that is running Alertmanager can access the interface.
Starting / Stopping Alertmanager
After the service is configured, it can be managed via systemd, under the
service unit acd-alertmanager.
systemctl start acd-alertmanager
Logging
The container logs are automatically published to the system journal, under
the same unit descriptor, and can be viewed using journalctl
journalctl -u acd-alertmanager
3.9.6 - Monitoring multiple routers
By default an instance of Prometheus only monitors the ESB3024 Router that is installed on the same host as where Prometheus is installed. It is possible to make it monitor other router instances and visualize all instances on one Grafana instance.
Configuring of Prometheus
This is configured in the scraping configuration of Prometheus, which is found
in the file /opt/edgeware/acd/prometheus/prometheus.yaml, which typically
looks like this:
global:
scrape_interval: 15s
rule_files:
- recording-rules.yaml
# A scrape configuration for router metrics
scrape_configs:
- job_name: 'router-scraper'
scheme: https
tls_config:
insecure_skip_verify: true
static_configs:
- targets:
- acd-router-1:5001
metrics_path: /m1/v1/metrics
honor_timestamps: true
- job_name: 'edns-proxy-scraper'
scheme: http
static_configs:
- targets:
- acd-router-1:8888
metrics_path: /metrics
honor_timestamps: true
More routers can be added to the scrape configuration by simply adding more
routers under targets in the scraper jobs.
For instance, to monitor acd-router-2 and acd-router-3 along acd-router-1,
the configuration file needs to be modified like this:
global:
scrape_interval: 15s
rule_files:
- recording-rules.yaml
# A scrape configuration for router metrics
scrape_configs:
- job_name: 'router-scraper'
scheme: https
tls_config:
insecure_skip_verify: true
static_configs:
- targets:
- acd-router-1:5001
- acd-router-2:5001
- acd-router-3:5001
metrics_path: /m1/v1/metrics
honor_timestamps: true
- job_name: 'edns-proxy-scraper'
scheme: http
static_configs:
- targets:
- acd-router-1:8888
- acd-router-2:8888
- acd-router-3:8888
metrics_path: /metrics
honor_timestamps: true
After the file has been modified, Prometheus needs to be restarted by typing
systemctl restart acd-prometheus
It is possible to use the same configuration on multiple routers, so that all routers in a deployment can monitor each other.
Selecting Router in Grafana
In the top left corner the Grafana dashboards have a drop-down menu labeled “ACD Router”, which allows to choose which router to monitor.
3.9.7 - Routing Rule Evaluation Metrics
ESB3024 Router counts the number of times a node and any of its children is selected in the routing table.
The visit counters can be retrieved with the following end points:
/v1/node_visits
Returns visit counters for each node as a flat list of
host:counterpairs in JSON.Example output:
{ "node1": "1", "node2": "1", "node3": "1", "top": "3" }
/v1/node_visits_graph
Returns a full graph of nodes with their respective visit counters in GraphML.
Example output:
<?xml version="1.0"?> <graphml xmlns="http://graphml.graphdrawing.org/xmlns" xmlns:xsi="http://www.w3.org/2001/XMLSchema-instance" xsi:schemaLocation="http://graphml.graphdrawing.org/xmlns http://graphml.graphdrawing.org/xmlns/1.0/graphml.xsd"> <key id="visits" for="node" attr.name="visits" attr.type="string" /> <graph id="G" edgedefault="directed"> <node id="routing_table"> <data key="visits">5</data> </node> <node id="cdn1"> <data key="visits">1</data> </node> <node id="node1"> <data key="visits">1</data> </node> <node id="cdn2"> <data key="visits">2</data> </node> <node id="node2"> <data key="visits">2</data> </node> <node id="cdn3"> <data key="visits">2</data> </node> <node id="node3"> <data key="visits">2</data> </node> <edge id="e0" source="cdn1" target="node1" /> <edge id="e1" source="routing_table" target="cdn1" /> <edge id="e2" source="cdn2" target="node2" /> <edge id="e3" source="routing_table" target="cdn2" /> <edge id="e4" source="cdn3" target="node3" /> <edge id="e5" source="routing_table" target="cdn3" /> </graph> </graphml>To receive the graph as JSON, specify
Accept:application/jsonin the request headers.Example output:
{ "edges": [ { "source": "cdn1", "target": "node1" }, { "source": "routing_table", "target": "cdn1" }, { "source": "cdn2", "target": "node2" }, { "source": "routing_table", "target": "cdn2" }, { "source": "cdn3", "target": "node3" }, { "source": "routing_table", "target": "cdn3" } ], "nodes": [ { "id": "routing_table", "visits": "5" }, { "id": "cdn1", "visits": "1" }, { "id": "node1", "visits": "1" }, { "id": "cdn2", "visits": "2" }, { "id": "node2", "visits": "2" }, { "id": "cdn3", "visits": "2" }, { "id": "node3", "visits": "2" } ] }
Resetting Visit Counters
A node visit counter with an id not matching any node id of a newly applied
routing table is destroyed.
Reset all counters to zero by momentarily applying a configuration with a
placeholder routing root node, that has unique id and an empty members
list, e.g:
"routing": {
"id": "empty_routing_table",
"members": []
}
… and immediately reapply the desired configuration.
3.9.8 - Metrics
ESB3024 Router collects a large number of metrics that can give insight into
it’s condition at runtime. Those metrics are available in
Prometheus’ text-based exposition format
at endpoint :5001/m1/v1/metrics.
Below is the description of these metrics along with their labels.
client_response_status
Number of responses sent back to incoming requests.
- Type: counter
lua_num_errors
Number of errors encountered when evaluating Lua rules.
- Type:
counter
lua_num_evaluators
Number of Lua rules evaluators (active interpreters).
- Type: gauge
lua_time_spent
Time spent by running Lua evaluators, in microseconds.
- Type:
counter
num_configuration_changes
Number of times configuration has been changed since the router has started.
- Type:
counter
num_endpoint_requests
Number of requests redirected per CDN endpoint.
- Type:
counter - Labels:
endpoint- CDN endpoint address.selector- whether the request was counted duringinitialorinstreamselection.
num_invalid_http_requests
Number of client requests that either use wrong method or wrong URL path. Also number of all requests that cannot be parsed as HTTP.
- Type:
counter - Labels:
source- name of internal filter function that classified request as invalid. Probably not of much use outside debugging.type- whether the request was HTTP (Unencrypted) or HTTPS (SSL).
num_log_errors_total
Number of logged errors since the router has started.
- Type:
counter
num_log_warnings_total
Number of logged warnings since the router has started.
- Type:
counter
num_managed_redirects
Number of redirects to the router itself, which allows session management.
- Type:
counter
num_manifests
Number of cached manifests.
- Type:
gauge - Labels:
count- state of manifest in cache, can be eitherlru,evictedortotal.
num_qoe_losses
Number of “lost” QoE decisions per CDN.
- Type:
counter - Labels:
cdn_id- ID of CDN that loose QoE battle.cdn_name- name of CDN that loose QoE battle.selector- whether the decision was taken duringinitialorinstreamselection.
num_qoe_wins
Number of “won” QoE decisions per CDN.
- Type:
counter - Labels:
cdn_id- ID of CDN that won QoE battle.cdn_name- name of CDN that won QoE battle.selector- whether the decision was taken duringinitialorinstreamselection.
num_rejected_requests
Deprecated, should always be at 0.
- Type:
counter - Labels:
selector- whether the request was counted duringinitialorinstreamselection.
num_requests
Total number of requests received by the router.
- Type:
counter - Labels:
selector- whether the request was counted duringinitialorinstreamselection.
num_sessions
Number of sessions opened on router.
- Type:
gauge - Labels:
state- eitheractiveorinactive.type- one of:initial,instream,qoe_on,qoe_off,qoe_agentorsp_agent.
num_ssl_errors_total
Number of all errors logged during TLS connections, both incoming and outgoing.
- Type:
counter
num_ssl_warnings_total
Number of all warnings logged during TLS connections, both incoming and outgoing.
- Type:
counter - Labels:
category- which kind of TLS connection triggered the warning. Can be one of:cdn,content,generic,repeated_sessionor empty.
num_unhandled_requests
Number of requests for which no CDN could be found.
- Type:
counter - Labels:
selector- whether the request was counted duringinitialorinstreamselection.
num_unmanaged_redirects
Number of redirects to “outside” the router - usually to CDN.
- Type:
counter - Labels:
cdn_id- ID of CDN picked for redirection.cdn_name- name of CDN picked for redirection.selector- whether the redirect was result ofinitialorinstreamselection.
num_valid_http_requests
Number of received requests that were not deemed invalid, see
num_invalid_http_requests.
- Type:
counter - Labels:
source- name of internal filter function that classified request as invalid. Probably not of much use outside debugging.type- whether the request was HTTP (Unencrypted) or HTTPS (SSL).
orc_latency_bucket
Total number of responses sorted into “latency buckets” - labels denoting latency interval.
- Type:
counter - Labels:
le- latency bucket that given response falls into.orc_status_code- HTTP status code of given response.
orc_latency_count
Total number of responses.
- Type:
counter - Labels:
tls- whether the response was sent via SSL/TLS connection or not.orc_status_code- HTTP status code of given response.
ssl_certificate_days_remaining
Number of days until a SSL certificate expires.
- Type:
gauge - Labels:
domain- the common name of the domain that the certificate authenticates.not_valid_after- the expiry time of the certificate.not_valid_before- when the certificate starts being valid.usable- if the certificate is usable to the router, see the ssl_certificate_usable_count metric for an explanation.
ssl_certificate_usable_count
Number of usable SSL certificates. A certificate is usable if it is valid and authenticates a domain name that points to the router.
- Type:
gauge
3.9.8.1 - Internal Metrics
A subrunner is an internal module of ESB3024 Router which handles routing requests. The subrunner metrics are technical and mainly of interest for AgileTV. These metrics will be briefly described here.
subrunner_async_queue
Number of queued events per subrunner, roughly corresponding to load.
- Type:
gauge - Labels:
subrunner_id- ID of given subrunner.
subrunner_client_conns
Number of currently open client connections per subrunner.
- Type:
gauge - Labels:
subrunner_id- ID of given subrunner.
subrunner_high_queue
Number of high priority events queued per subrunner.
- Type:
gauge - Labels:
subrunner_id- ID of given subrunner.
subrunner_io_autopause_sockets
Number of sockets that have been automatically paused. This happens when the work manager is under heavy load.
- Type:
counter - Labels:
subrunner_id- ID of given subrunner.
subrunner_io_send_data_fast_attempts
A fast data path was added that in many cases increases the performance of the router. This metric was added to verify that the fast data path is taken.
- Type:
counter - Labels:
subrunner_id- ID of given subrunner.
subrunner_io_wakeups
The number of times a subrunner has been waken up from sleep.
- Type:
counter - Labels:
subrunner_id- ID of given subrunner.
subrunner_low_queue
Number of low priority events queued per subrunner.
- Type:
gauge - Labels:
subrunner_id- ID of given subrunner.
subrunner_max_async_queue
Maximum number of events waiting in queue.
- Type:
gauge - Labels:
subrunner_id- ID of given subrunner.
subrunner_max_high_queue
Maximum number of events waiting in high priority queue.
- Type:
gauge - Labels:
subrunner_id- ID of given subrunner.
subrunner_max_low_queue
Maximum number of events waiting in low priority queue.
- Type:
gauge - Labels:
subrunner_id- ID of given subrunner.
subrunner_max_medium_queue
Maximum number of events waiting in medium priority queue.
- Type:
gauge - Labels:
subrunner_id- ID of given subrunner.
subrunner_medium_queue
Number of medium priority events queued per subrunner.
- Type:
gauge - Labels:
subrunner_id- ID of given subrunner.
subrunner_times_worker_overloaded
Number of times when queued events for given subrunner exceeded
the tuning.overload_threshold value (defaults to 32).
- Type:
counter - Labels:
subrunner_id- ID of given subrunner.
subrunner_total_receive_data_blocks
Number of receive data blocks allocated per subrunner.
- Type:
gauge - Labels:
subrunner_id- ID of given subrunner.
subrunner_total_send_data_blocks
Number of send data blocks allocated per subrunner.
- Type:
gauge - Labels:
subrunner_id- ID of given subrunner.
subrunner_used_receive_data_blocks
Number of receive data blocks currently in use per subrunner. Same as subrunner_total_receive_data_blocks.
- Type:
gauge - Labels:
subrunner_id- ID of given subrunner.
subrunner_used_send_data_blocks
Number of send data blocks currently in use per subrunner. Same as subrunner_total_send_data_blocks.
- Type:
gauge - Labels:
subrunner_id- ID of given subrunner.
3.10 - Glossary
- ACD
- Agile CDN Director. See “Director”.
- Confd
- A backend service that hosts the service configuration. Comes with an API, a CLI and a GUI.
- Classifier
- A filter that associate a request with a tag that can be used to define session groups.
- Director
- The Agile Delivery OTT router and related services.
- ESB
- A software bundle that can be separately installed and upgraded, and is released as one entity with one change log. Each ESB is identified with a number. Over time, features and functions within an ESB can change.
- Lua
- A widely available scripting language that is often used to extend the capabilities of a piece of software.
- Router
- Unless otherwise specified, an HTTP router that manages an OTT session using HTTP redirect. There are also ways to use DNS instead of HTTP.
- Selection Input API
- Data posted to this API can be accessed by the routing rules and hence influence the routing decisions.
- Subnet API
- An API to define mappings between subnets and names (typically regions) for those subnets. Routing rules can then refer to the names rather than the subnets.
- Session Group
- A handle on a group of requests, defined via classifiers.
4 - AgileTV CDN Director (esb3024)
4.1 - Release Notes for esb3024-1.22.0
Build date
2025-10-23
Release status
Type: production
Compatibility
This release has been tested with the following product versions:
- AgileTV CDN Manager, ESB3027-1.4.0
- Orbit, ESB2001-4.2.0 (see Known limitations below)
- SW-Streamer, ESB3004-2.6.0
- Convoy, ESB3006-3.6.1
- Request Router, ESB3008-3.8.0
Breaking changes from previous release
- Requires CDN Manager ESB3027-1.4.0
- Does not work with older GUI versions (3.2.8 or older)
- Lua hmac_sha256 function now returns a binary string [ESB3024-1245]
Change log
- NEW: Add support for UTF-8 to configuration [ESB3024-489]
- NEW: Add classifier type for HTTP headers [ESB3024-1177]
- NEW: Make Lua
hmac_sha256function return a binary string [ESB3024-1245] - NEW: Limit which headers are forwarded to a host [ESB3024-1387]
- NEW: Reload GeoIP databases without restarting the router service [ESB3024-1429]
- NEW: [ANSSI-BP-028] System Settings - Network Configuration and Firewalls [ESB3024-1450]
- NEW: [ANSSI-BP-028] System Settings - SELinux [ESB3024-1452]
- NEW: [ANSSI-BP-028] Services - SSH Server [ESB3024-1456]
- NEW: Improved classifiers [ESB3024-1492]
- NEW: Improved Selection Input Rest API [ESB3024-1511]
- FIXED: trustedProxies does not support CIDR [ESB3024-1136]
- FIXED: Some valid configurations are rejected [ESB3024-1191]
- FIXED: Lua
print()does not behave according to the documentation [ESB3024-1248] - FIXED: Session translation function only applies to initial sessions [ESB3024-1379]
- FIXED: It is not possible to change the configuration port [ESB3024-1381]
- FIXED: Invalid metrics endpoint response [ESB3024-1388]
- FIXED: Slow CDN response can prevent manifest from being downloaded [ESB3024-1424]
- FIXED: CORS error in select input handler response [ESB3024-1426]
- FIXED: Expired selection input entries are not always deleted [ESB3024-1485]
- FIXED: The Director blocks when loading messages from Kafka [ESB3024-1490]
Deprecated functionality
Deprecated since ESB3024-1.18.0:
- Lua function
epochToTimehas been deprecated in favor ofepoch_to_time. - Lua function
timeToEpochhas been deprecated in favor oftime_to_epoch. - The session proxy has been deprecated. Its functionality is replaced by the new “Send HTTP requests from Lua code” function.
System requirements
See the current system requirements in Getting Started.
Known limitations
When configured to use TLS,
acd-telegraf-metrics-databasemight log the following error message:http: TLS handshake error from <client ip>: client sent an HTTP request to an HTTPS serverwhen receiving metrics from caches even though the Telegraf agents are configured to use TLS. The Telegraf logs on the caches do not show any errors related to this. However, the data is still received over TLS and stored correctly byacd-telegraf-metrics-database. The issue seemingly resolved itself during investigation and is not reproducible. Current hypothesis is a logging bug in Telegraf.The Telegraf metrics agent might not be able to read all relevant network interface data on ESB2001 releases older than 3.6.2. The predictive load balancing function
host_has_bw()and the health check functioninterfaces_online()might therefore not work as expected.- The recommended workaround for
host_has_bw()is to usehost_has_bw_custom(), documented in Built-in Lua functions.host_has_bw_custom()accepts a numeric argument for the host’s network interface capacity which can be used if the data supplied by the Telegraf metrics agents do not contain this information. - It is not recommended to use
interfaces_online()for ESB2001 instances until they are updated to 3.6.2 or later.
- The recommended workaround for
4.2 - Getting Started
The Director serves as a versatile network service designed to redirect incoming HTTP(s) requests to the optimal host or Content Delivery Network (CDN) by evaluating various request properties through a set of rules. Although requests can be generic, the primary focus centers around audio-video content delivery. The rule engine allows users to construct routing configurations using predefined blocks, providing for the creation of intricate routing logic. This modular approach allows the users to tailor and streamline the content delivery process to meet their specific needs. The Director’s flexible rule engine takes into account factors such as geographical location, server load, content type, and other metadata from external sources to intelligently route incoming requests. It supports dynamic adjustments to seamlessly adapt to changing network conditions, ensuring efficient and reliable content delivery. The Director improves the overall user experience by delivering content from the most suitable and responsive sources, thereby reducing latency and enhancing performance.
Requirements
Hardware
The Director is designed to be installed and operated on commodity hardware, ensuring accessibility for a broad range of users. The minimum hardware specifications are as follows:
- CPU: x86-64 AMD or Intel with at least 2 cores.
- Memory: At least 2 GB free at runtime.
Operating System Compatibility
The Director is officially supported on Red Hat Enterprise Linux 8 or 9 or any
compatible operating system. In order to run the service, a minimum CPU
architecture of x86-64-v2 is required. This can be determined by running the
following command. If supported, it will be listed as “(supported)” in the
output.
/usr/lib64/ld-linux-x86-64.so.2 --help | grep x86-64-v2
External Internet access is necessary during the installation process for the installer to download and install additional dependencies. This ensures a seamless setup and optimal functionality of the Director on Red Hat Enterprise Linux 8 or 9. It’s worth noting that, due to the unique workings of the DNF package manager in Red Hat Enterprise Linux with rolling package streams, an air-gapped installation process is not available.
Firewall Recommendations
See Firewall.
Installation
See Installation.
Operations
See Operations.
Configuration Process
Once the router is operational, it requires a valid configuration before it can route incoming requests.
There are currently three methods available for configuring the router, each catering to different levels of complexity. The first is a Web UI, suitable for the most common use-cases, providing an intuitive interface for configuration. The second involves utilizing a confd REST service, complemented by an optional command line tool, confcli, suitable for all but the most advanced scenarios. The third method involves leveraging an internal REST API, ideal for the most intricate cases where using confd proves to be less flexible. It’s essential to note that as the configuration method advances through these levels, both flexibility and complexity increase, providing users with tailored options based on their specific needs and expertise.
API Key Management
Regardless of the method used to configure the system, a unique API key is
crucial for safeguarding the router’s configuration and preventing unauthorized
access to the API. This key must be supplied when interacting with the API.
During the router software installation, an automatically generated API key is
created and can be located on the installed system at
/opt/edgeware/acd/router/cache/rest-api-key.json. The structure of this file
is as follows:
{"api_key": "abc123"}
When accessing the internal configuration API, the key must be included in the
X-API-key header of the request, as shown below:
curl -v -k -H "X-API-Key: abc123" https://<router-host.example>:5001/v2/configuration
Modification to the authentication key and behavior can be done through the
/v2/rest_api_key endpoint. To change the key, a PUT request with a JSON body
of the same structure can be sent to the endpoint:
curl -v -k -X PUT -T new-key.json -H "X-API-Key: abc123" \
-H "Content-Type: application/json" https://<router-host.example>:5001/v2/rest_api_key
Additionally, key authentication can be disabled completely by sending a DELETE
request to the endpoint:
curl -v -k -X DELETE -H "X-API-Key: abc123" \
https://<router-host.example>:5001/v2/rest_api_key
In the event of a lost or forgotten authentication key, it can always be
retrieved at /opt/edgeware/acd/router/cache/rest-api-key.json on the
machine running the router. It is critical to emphasize that the API key should
remain private to prevent unauthorized access to the internal API, as it grants
full access to the router’s configuration.
Configuration Basics
Upon completing the installation process and configuring the API keys, the subsequent section will provide guidance on configuring the router to route all incoming requests to a single host. For straightforward CDN Offload use cases, there is a web based user interface described here.
For further details on configuring the router using confd and confcli, please consult the Confd documentation.
The initial step involves defining the target host group. In this illustration,
a singular group named all will be established, comprising two hosts.
$ confcli services.routing.hostGroups -w
Running wizard for resource 'hostGroups'
Hint: Hitting return will set a value to its default.
Enter '?' to receive the help string
hostGroups : [
hostGroup can be one of
1: dns
2: host
3: redirecting
Choose element index or name: host
Adding a 'host' element
hostGroup : {
name (default: ): all
type (default: host):
httpPort (default: 80):
httpsPort (default: 443):
hosts : [
host : {
name (default: ): host1.example.com
hostname (default: ): host1.example.com
ipv6_address (default: ):
}
Add another 'host' element to array 'hosts'? [y/N]: y
host : {
name (default: ): host2.example.com
hostname (default: ): host2.example.com
ipv6_address (default: ):
}
Add another 'host' element to array 'hosts'? [y/N]: n
]
}
Add another 'hostGroup' element to array 'hostGroups'? [y/N]: n
]
Generated config:
{
"hostGroups": [
{
"name": "all",
"type": "host",
"httpPort": 80,
"httpsPort": 443,
"hosts": [
{
"name": "host1.example.com",
"hostname": "host1.example.com",
"ipv6_address": ""
},
{
"name": "host2.example.com",
"hostname": "host2.example.com",
"ipv6_address": ""
}
]
}
]
}
Merge and apply the config? [y/n]:
After defining the host group, the next step is to establish a rule that directs
incoming requests to the designated host. In this example, a sole rule named
random will be generated, ensuring that all incoming requests are consistently
routed to the previously defined host.
$ confcli services.routing.rules -w
Running wizard for resource 'rules'
Hint: Hitting return will set a value to its default.
Enter '?' to receive the help string
rules : [
rule can be one of
1: allow
2: consistentHashing
3: contentPopularity
4: deny
5: firstMatch
6: random
7: rawGroup
8: rawHost
9: split
10: weighted
Choose element index or name: random
Adding a 'random' element
rule : {
name (default: ): random
type (default: random):
targets : [
target (default: ): host1.example.com
Add another 'target' element to array 'targets'? [y/N]: y
target (default: ): host2.example.com
Add another 'target' element to array 'targets'? [y/N]: n
]
}
Add another 'rule' element to array 'rules'? [y/N]: n
]
Generated config:
{
"rules": [
{
"name": "random",
"type": "random",
"targets": [
"host1.example.com",
"host2.example.com"
]
}
]
}
Merge and apply the config? [y/n]:
The last essential step involves instructing the router on which rule should
serve as the entry point into the routing tree. In this example, we designate
the rule random as the entrypoint for the routing process.
$ confcli services.routing.entrypoint random
services.routing.entrypoint = 'random'
Once this configuration is defined, all incoming requests will initiate their
traversal through the routing rules, starting with the rule named random. This
rule is designed to consistently match for every incoming request, effectively load
balancing evenly between host1.example.com and host2.example.com on port 80
or 443, depending on whether the initial request was made using HTTP or HTTPS.
Integration with Convoy
The router is equipped with the capability to synchronize specific configuration metadata with a separate Convoy installation through the integrated convoy-bridge service. However, this service necessitates additional setup and configuration, and you can find comprehensive details on the process here..
Additional Resources
Additional documentation resources are included with the Director and can be
accessed at the following directory: /opt/edgeware/acd/documentation/. This
directory contains supplementary materials to provide users with comprehensive
information and guidance for optimizing their experience with the Director.
Ready for Production
Once the Director software is completely installed and configured, there are a few additional considerations before moving to a full production environment. See the section Ready for Production for additional information.
4.3 - Installing a 1.22 release
To install ESB3024 Router, you first need to copy the installation ISO image to
the target node where the router will be run. Due to the way the installer
operates, it is necessary that the host is reachable by ssh from itself for
the user account that will perform the installation, and that this user has
sudo access.
Prerequisites:
Ensure that the current user has
sudoaccess.sudo -lIf the above command fails, you may need to add the user to the
/etc/sudoersfile.Ensure that the installer has ssh access to
localhost.If using the
rootuser, thePermitRootLoginproperty of the/etc/ssh/sshd_configfile must be set to ‘yes’.Ensure that
sshpassis installed.If the installer is run by the root user, this step is not necessary.
sshpassis installed by typing this:sudo dnf install -y sshpass
Assuming the installation ISO image is in the current working directory,
the following steps need to be executed either by root user or with sudo.
Mount the installation ISO image under
/mnt/acd.Note: The mount-point may be any accessible path, but
/mnt/acdwill be used throughout this document.mkdir -p /mnt/acd mount esb3024-acd-router-1.22.1.iso /mnt/acdRun the installer script.
/mnt/acd/installerIf it is not running as root, the installer will ask both for the “SSH password” and the “BECOME password”. The “SSH password” is the password that the user running the installer uses to log in to the local machine, and the “BECOME password” is the password for the user to gain
sudoaccess. They are usually the same.
Upgrading From an Earlier ESB3024 Router Release
The following steps can be taken to upgrade the router from a 1.10 or later release to 1.22.1. If upgrading from an earlier release it is recommended to first upgrade to 1.10.1 and then to upgrade to 1.22.1.
The upgrade procedure for the router is performed by taking a backup of the configuration, installing the new release of the router, and applying the saved configuration.
With the router running, save a backup of the configuration.
The exact procedure to accomplish this depends on the current method of configuration, e.g. if
confdis used, then the configuration should be extracted fromconfd, but if the REST API is used directly, then the configuration must be saved by fetching the current configuration snapshot using the REST API.Extracting the configuration using
confdis the recommend approach where available.confcli | tee config_backup.jsonTo extract the configuration from the REST API, the following may be used instead. Depending on the version of the router used, an API-Key may be required to fetch from the REST API.
curl --insecure https://localhost:5001/v2/configuration \ | tee config_backup.jsonIf the API Key is required, it can be found in the file
/opt/edgeware/acd/router/cache/rest-api-key.jsonand can be passed to the API by setting the value of theX-API-Keyheader.curl --insecure -H "X-API-Key: 1234abcd" \ https://localhost:5001/v2/configuration \ | tee config_backup.jsonMount the new installation ISO under
/mnt/acd.Note: The mount-point may be any accessible path, but
/mnt/acdwill be used throughout this document.mkdir -p /mnt/acd mount esb3024-acd-router-1.22.1.iso /mnt/acdStop the router and all associated services.
Before upgrading the router it needs to be stopped, which can be done by typing this:
systemctl stop 'acd-*'Run the installer script.
/mnt/acd/installerPlease note that the installer will install new container images, but it will not remove the old ones. The old images can be removed manually after the upgrade is complete.
Migrate the configuration.
Note that this step only applies if the router is configured using
confd. If it is configured using the REST API, this step is not necessary.The confd configuration used in the previous versions is not directly compatible with 1.22, and may need to be converted. If this is not done, the configuration will not be valid and it will not be possible to make configuration changes.
The
acd-confd-migrationtool will automatically apply any necessary schema migrations. Further details about this tool can be found at Confd Auto Upgrade Tool.The tool takes as input the old configuration file, either by reading the file directly, or by reading from standard input, applies any necessary migrations between the two specified versions, and outputs a new configuration to standard output which is suitable for being applied to the upgraded system. While the tool has the ability to migrate between multiple versions at a time, the earliest supported version is 1.10.1.
The example below shows how to upgrade from 1.20.1. If upgrading from 1.18.0,
--from 1.20.1should be replaced with--from 1.18.0.The command line required to run the tool is different depending on which esb3024 release it is run on. On 1.22.1 it is run like this:
cat config_backup.json | \ podman run -i --rm \ images.edgeware.tv/acd-confd-migration:1.22.1 \ --in - --from 1.20.1 --to 1.22.1 \ | tee config_upgraded.jsonAfter running the above command, apply the new configuration to
confdby runningcat config_upgraded.json | confcli -i.
Troubleshooting
If there is a problem running the installer, additional debug information can
be output by adding -v or -vv or -vvv to the installer command, the
more “v” characters, the more detailed output.
4.3.1 - Configuration changes between 1.20 and 1.22
Confd configuration changes
Below are the changes to the confd configuration between versions 1.20 and 1.22 listed.
Removed services.routing.settings.usageLog.enabled
The services.routing.settings.usageLog.enabled setting has been removed. The
usage log is always enabled and this setting is no longer necessary.
Replaced forwardHostHeader with headersToForward
The services.routing.hostGroups.<name>.forwardHostHeader setting has been
replaced with services.routing.hostGroups.<name>.headersToForward, which is a
list of headers to forward to the origin server.
See CDNs and Hosts for more information.
Added selectionInputFetchBase
The integration.manager.selectionInputFetchBase setting has been added. It is
used to configure the base URL for fetching initial selection input from the
manager. See Selection Input Configurations for more information.
Added the requestHeader classifier
A new classifier, requestHeader, has been added. See Session
Classification for more
information.
Added patternSource to the subnet classifier
The subnet classifier has been extended with a new setting, patternSource.
See Session Classification for more
information.
4.4 - Firewall
For security reasons, the ESB3024 Installer does not automatically configure the local firewall to allow incoming traffic. It is the responsibility of the operations person to ensure that the system is protected from external access by placing it behind a suitable firewall solution. The following table describes the set of ports required for operation of the router.
| Application | Port | Protocol | Direction | Source | Description |
|---|---|---|---|---|---|
| Prometheus Alert Manager | 9093 | TCP | IN | internal | Monitoring Services |
| Confd | 5000 | TCP | IN | internal | Configuration Services |
| Router | 80 | TCP | IN | public | Incoming HTTP Requests |
| Router | 443 | TCP | IN | public | Incoming HTTPS Requests |
| Router | 5001 | TCP | IN | localhost | Access to router’s REST API |
| Router | 8000 | TCP | IN | localhost | Internal monitoring port |
| EDNS-Proxy | 8888 | TCP | IN | localhost | Proxy EDNS Requests |
| Grafana | 3000 | TCP | IN | internal | Monitoring Services |
| Grafana-Loki | 3100 | TCP | IN | internal | Log monitoring daemon |
| Prometheus | 9090 | TCP | IN | internal | Monitoring Service |
The “Direction” column represents the direction in which the connection is established.
IN- The connection is originated from an outside serverOUT- The connection is established from the host to an external server.
Once a connection is established through the firewall, bidirectional traffic must be allowed using the established connection.
For the “Source” column, the following terms are used.
internal- Any host or network which is allowed to monitor or operate the system.public- Any host or subnet that can access the router. This includes any customer network that will be making routing requests.localhost- Access can be limited to local connections only.any- All traffic from any source or to any destination.
Additional Ports
Convoy Bridge Integration
The optional convoy-bridge service needs the ability to access the Convoy MariaDB service, which by default runs on port 3306 on all of the Convoy Management servers. To allow this integration to run, port 3306/tcp must be allowed from the router to the configured Convoy Management node.
4.5 - Selection Input API
The selection input API is used to inject user-defined data into the routing engine, making the data available for making routing decisions. Any JSON structures can be stored in the selection input.
One use case for selection input is to provide data on cache availability. For
example, if {"edge-streamer-2-online": true} is sent to the selection
input API, the routing condition eq('edge-streamer-2-online', true) can
be used to ensure that no traffic gets routed to the streamer if it’s offline.
Details on how to store data in the selection input can be found in the API overview.
Configuration
There is a configurable limit to the number of items that the selection input
can hold. This is controlled by the selectionInputItemLimit tuning parameter,
which sets the maximum number of leaf items that can be stored in the selection
input. The reason for this configuration is to prevent the selection input to
grow indefinitely. There is no harm in increasing it if needed.
$ confcli services.routing.tuning.general.selectionInputItemLimit
{
"selectionInputItemLimit": 10000
}
Some classifiers can take their
patterns from the selection input. In order for them to have the latest data in
a system with multiple instances of the Director, their selection input data
can be fetched from the AgileTV CDN Manager. This is configured with the
selectionInputFetchBase parameter:
$ confcli integration.manager.selectionInputFetchBase
{
"selectionInputFetchBase": "https://acd-manager.example.com/api/selection-input/"
}
4.6 - API Overview
ESB3024 Router provides two different types of API:s:
- A content request API that is used by video clients to ask for content, normally using port 80 for HTTP and port 443 for HTTPS.
- A few REST API:s used by administrators to configure and monitor the router installation, using port 5001 over HTTPS by default.
The content API won’t be described further in this document, since it’s a simple HTTP interface serving content as regular files or redirect responses.
Raw configuration – /v2/configuration
Used to check and update the raw configuration of ESB3024 Router. Note that this API is considered an implementation detail and is not documented further.
| REQUEST Method | Content-Type | RESPONSE Result | Status Code | Content-Type |
|---|---|---|---|---|
GET | <N/A> | Success | 200 OK | application/json |
PUT | application/json | Success | 204 No Content | <N/A> |
PUT | application/json | Failure | 400 Bad Request | application/json1 |
Validate Configuration – /v2/validate_configuration
Used to determine if a JSON payload is correctly formatted without actually applying its configuration. A successful return status does not guarantee that the applied configuration will work, it only validates the JSON structure.
| REQUEST Method | Content-Type | RESPONSE Result | Status Code | Content-Type |
|---|---|---|---|---|
PUT | application/json | Success | 204 No Content | <N/A> |
PUT | application/json | Failure | 400 Bad Request | application/json1 |
Example request
When an expected field is missing from the payload, the validation will show which one and return an appropriate error message in its payload:
$ curl -i -X PUT \
-d '{"routing": {"log_level": 3}}' \
-H "Content-Type: application/json" \
https://router.example:5001/v2/validate_configuration
HTTP/1.1 400 Bad Request
Access-Control-Allow-Origin: *
Content-Length: 132
Content-Type: application/json
X-Service-Identity: router.example-5fc78d
"Configuration validation: Configuration parsing failed. \
Exception: [json.exception.out_of_range.403] (/routing) key 'id' not found"
Selection Input
There are two versions of the selection input API, /v1/selection_input and
/v3/selection_input. The former is the legacy version and the latter is the
new version. It is recommended that all new integrations use the
/v3/selection_input API.
/v3/selection_input
The /v3/selection_input API supports the GET, POST, PUT, and DELETE
methods.
PUTreplaces the data at the specified path with the provided data. If the path does not exist, it will be created.POSTis only used for appending data to arrays. The last element in the path must be an array. If the path does not exist, it will be created, with the last segment as an array.GETrequests fetch the current selection input data at the given path.DELETErequests remove the data at the given path.
Example PUT request
$ curl -i -X PUT \
-d '{"bitrate": 13000, "capacity": 50000}' \
-H "Content-Type: application/json" \
https://router.example.com:5001/v3/selection_input/hosts/host1
HTTP/1.1 201 Created
Access-Control-Allow-Headers: Content-Type, Authorization
Access-Control-Allow-Methods: GET, POST, PUT, DELETE, OPTIONS
Access-Control-Allow-Origin: *
Content-Length: 0
X-Service-Identity: router.example.com-5fc78d
Example POST request
$ curl -i -X POST \
-d '"server1"' \
-H "Content-Type: application/json" \
https://router.example.com:5001/v3/selection_input/modules/allowed_servers
HTTP/1.1 201 Created
Access-Control-Allow-Headers: Content-Type, Authorization
Access-Control-Allow-Methods: GET, POST, PUT, DELETE, OPTIONS
Access-Control-Allow-Origin: *
Content-Length: 0
X-Service-Identity: router.example.com-5fc78d
Example GET request
$ curl -i https://router.example.com:5001/v3/selection_input
HTTP/1.1 200 OK
Access-Control-Allow-Headers: Content-Type, Authorization
Access-Control-Allow-Methods: GET, POST, PUT, DELETE, OPTIONS
Access-Control-Allow-Origin: *
Content-Length: 156
Content-Type: application/json
X-Service-Identity: router.example.com-5fc78d
{
"hosts": {
"host1": {
"bitrate": 13000,
"capacity": 50000
}
},
"modules": {
"allowed_servers": [
"server1"
]
}
}
Example DELETE request
$ curl -i -X DELETE \
https://router.example.com:5001/v3/selection_input/modules/allowed_servers
HTTP/1.1 204 No Content
Access-Control-Allow-Headers: Content-Type, Authorization
Access-Control-Allow-Methods: GET, POST, PUT, DELETE, OPTIONS
Access-Control-Allow-Origin: *
Content-Length: 0
X-Service-Identity: router.example.com-5fc78d
/v1/selection_input
The /v1/selection_input API supports the GET, PUT, and DELETE methods.
When performing GET or DELETE requests, specific selection input values can
be accessed or deleted by including a path to the request. Note that not
specifying a path will select all selection input values. PUT requests do not
support supplying paths, the path to the element to be modified is deduced by
the keys in the provided JSON object.
| REQUEST Method | Content-Type | RESPONSE Result | Status Code | Content-Type |
|---|---|---|---|---|
PUT | application/json | Success | 204 No Content | <N/A> |
PUT | application/json | Failure | 400 Bad Request | application/json |
GET | <N/A> | Success | 200 OK | application/json |
DELETE | <N/A> | Success | 204 No Content | <N/A> |
DELETE | <N/A> | Failure | 404 Not Found | <N/A> |
Example successful request (PUT)
$ curl -i -X PUT \
-d '{"host1_bitrate": 13000, "host1_capacity": 50000}' \
-H "Content-Type: application/json" \
https://router.example.com:5001/v1/selection_input
HTTP/1.1 204 No Content
Access-Control-Allow-Origin: *
Content-Length: 0
X-Service-Identity: router.example.com-5fc78d
Example unsuccessful request (PUT)
$ curl -i -X PUT \
-d '{"cdn-status": {"session-count": 12345, "load-percent" 98}}' \
-H "Content-Type: application/json" \
https://router.example.com:5001/v1/selection_input
HTTP/1.1 400 Bad Request
Access-Control-Allow-Origin: *
Content-Length: 169
Content-Type: application/json
X-Service-Identity: router.example.com-5fc78d
{
"error": "[json.exception.parse_error.101] parse error at line 1, column 57: \
syntax error while parsing object separator - \
unexpected number literal; expected ':'"
}
Example successful request (GET)
curl -i https://router.example.com:5001/v1/selection_input
HTTP/1.1 200 OK
Access-Control-Allow-Origin: *
Content-Length: 129
Content-Type: application/json
X-Service-Identity: router.example.com-5fc78d
{
"host1_bitrate": 13000,
"host1_capacity": 50000
}
Example successful specific value request (GET)
curl -i https://router.example.com:5001/v1/selection_input/path/to/value
HTTP/1.1 200 OK
Access-Control-Allow-Origin: *
Content-Length: 129
Content-Type: application/json
X-Service-Identity: router.example.com-5fc78d
1
Example successful request (DELETE)
curl -i -X DELETE https://router.example.com:5001/v1/selection_input
HTTP/1.1 204 OK
Access-Control-Allow-Origin: *
Content-Length: 129
X-Service-Identity: router.example.com-5fc78d
Example successful specific value request (DELETE)
curl -i -X DELETE https://router.example.com:5001/v1/selection_input/value/to/delete
HTTP/1.1 204 OK
Access-Control-Allow-Origin: *
Content-Length: 129
X-Service-Identity: router.example.com-5fc78d
Example unsuccessful request (DELETE)
curl -i -X DELETE https://router.example.com:5001/v1/selection_input/non/existent/value
HTTP/1.1 404 Not Found
Access-Control-Allow-Origin: *
Content-Length: 129
X-Service-Identity: router.example.com-5fc78d
Subnets – /v1/subnets
An API for managing named subnets that can be used for routing and block lists. See Subnets for more details.
PUT requests inject key value pairs with the form {<subnet>: <value>}, where
<subnet> is a valid CIDR string, into ACD, e.g.:
$ curl -i -X PUT \
-d '{"255.255.255.255/24": "area1", "1.2.3.4/24": "area2"}' \
-H "Content-Type: application/json" \
https://router.example:5001/v1/subnets
HTTP/1.1 204 No Content
Access-Control-Allow-Origin: *
Content-Length: 0
X-Service-Identity: router.example-5fc78d
GET requests are used to fetch injected subnets, e.g.:
# Fetch all injected subnets
$ curl -i https://router.example:5001/v1/subnets
HTTP/1.1 200 OK
Access-Control-Allow-Origin: *
Content-Length: 411
Content-Type: application/json
X-Service-Identity: router.example-5fc78d
{
"1.2.3.4/16": "area2",
"1.2.3.4/24": "area1",
"1.2.3.4/8": "area3",
"255.255.255.255/16": "area2",
"255.255.255.255/24": "area1",
"255.255.255.255/8": "area3",
"2a02:2e02:9bc0::/16": "area8",
"2a02:2e02:9bc0::/32": "area7",
"2a02:2e02:9bc0::/48": "area6",
"2a02:2e02:9de0::/44": "combined_area",
"2a02:2e02:ada0::/44": "combined_area",
"5.5.0.4/8": "area5",
"90.90.1.3/16": "area4"
}
DELETE requests are used to delete injected subnets, e.g.:
# Delete all injected subnets
$ curl -i https://router.example:5001/v1/subnets -X DELETE
HTTP/1.1 204 No Content
Access-Control-Allow-Origin: *
Content-Length: 0
X-Service-Identity: router.example-5fc78d
Both GET and DELETE requests can be specified with the paths /byKey/ and
/byValue/ to filter which subnets to GET or DELETE.
# Fetch subnet with the CIDR string 1.2.3.4/8 if it exists
$ curl -i https://router.example:5001/v1/subnets/byKey/1.2.3.4/8
HTTP/1.1 200 OK
Access-Control-Allow-Origin: *
Content-Length: 26
Content-Type: application/json
X-Service-Identity: router.example-5fc78d
{
"1.2.3.4/8": "area3"
}
# Fetch all subnets whose CIDR string begins with the IP 1.2.3.4
$ curl -i https://router.example:5001/v1/subnets/byKey/1.2.3.4
HTTP/1.1 200 OK
Access-Control-Allow-Origin: *
Content-Length: 76
Content-Type: application/json
X-Service-Identity: router.example-5fc78d
{
"1.2.3.4/16": "area2",
"1.2.3.4/24": "area1",
"1.2.3.4/8": "area3"
}
# Fetch all subnets whose value equals 'area1'
$ curl -i https://router.example:5001/v1/subnets/byValue/area1
HTTP/1.1 200 OK
Access-Control-Allow-Origin: *
Content-Length: 60
Content-Type: application/json
X-Service-Identity: router.example-5fc78d
{
"1.2.3.4/24": "area1",
"255.255.255.255/24": "area1"
}
# Delete subnet with the CIDR string 1.2.3.4/8 if it exists
$ curl -i https://router.example:5001/v1/subnets/byKey/1.2.3.4/8
HTTP/1.1 204 No Content
Access-Control-Allow-Origin: *
Content-Length: 0
X-Service-Identity: router.example-5fc78d
# Delete all subnets whose CIDR string begins with the IP 1.2.3.4
$ curl -i https://router.example:5001/v1/subnets/byKey/1.2.3.4
HTTP/1.1 204 No Content
Access-Control-Allow-Origin: *
Content-Length: 0
X-Service-Identity: router.example-5fc78d
# Delete all subnets whose value equals 'area1'
$ curl -i https://router.example:5001/v1/subnets/byValue/area1
HTTP/1.1 204 No Content
Access-Control-Allow-Origin: *
Content-Length: 0
X-Service-Identity: router.example-5fc78d
| REQUEST Method | Content-Type | RESPONSE Result | Status Code | Content-Type |
|---|---|---|---|---|
PUT | application/json | Success | 204 No Content | <N/A> |
PUT | application/json | Failure | 400 Bad Request | application/json |
GET | <N/A> | Success | 200 OK | application/json |
GET | <N/A> | Failure | 400 Bad Request | application/json |
DELETE | <N/A> | Success | 204 No Content | application/json |
DELETE | <N/A> | Failure | 400 Bad Request | application/json |
Subrunner Resource Usage – /v1/usage
Used to monitor the load on subrunners, the processes performing those tasks that are possible to run in parallel.
| REQUEST Method | Content-Type | RESPONSE Result | Status Code | Content-Type |
|---|---|---|---|---|
GET | <N/A> | Success | 200 OK | application/json |
Example request
$ curl -i https://router.example:5001/v1/usage
HTTP/1.1 200 OK
Access-Control-Allow-Origin: *
Content-Length: 1234
Content-Type: application/json
X-Service-Identity: router.example-5fc78d
{
"total_usage": {
"content": {
"lru": 0,
"newest": "-",
"oldest": "-",
"total": 0
},
"sessions": 0,
"subrunner_usage": {
[...]
}
},
"usage_per_subrunner": [
{
"subrunner_usage": {
[...]
}
},
[...]
]
}
Metrics – /m1/v1/metrics
An interface intended to be scraped by Prometheus. It is possible to scrape it manually to see current values, but doing so will reset some counters and cause actual Prometheus data to become faulty.
| REQUEST Method | Content-Type | RESPONSE Result | Status Code | Content-Type |
|---|---|---|---|---|
GET | <N/A> | Success | 200 OK | text/plain |
Example request
$ curl -i https://router.example:5001/m1/v1/metrics
HTTP/1.1 200 OK
Access-Control-Allow-Origin: *
Content-Length: 1234
Content-Type: text/plain
X-Service-Identity: router.example-5fc78d
# TYPE num_configuration_changes counter
num_configuration_changes 12
# TYPE num_log_errors_total counter
num_log_errors_total 0
# TYPE num_log_warnings_total counter
num_log_warnings_total{category=""} 123
# TYPE num_log_warnings_total counter
num_log_warnings_total{category="cdn"} 0
# TYPE num_log_warnings_total counter
num_log_warnings_total{category="content"} 0
# TYPE num_log_warnings_total counter
num_log_warnings_total{category="generic"} 10
# TYPE num_log_warnings_total counter
num_log_warnings_total{category="repeated_session"} 0
# TYPE num_ssl_errors_total counter
[...]
Node Visit Counters – /v1/node_visits
Used to gather statistics about the number of visits to each node in the routing tree. The returned value is a JSON object containing node ID names and their corresponding counter values.
| REQUEST Method | Content-Type | RESPONSE Result | Status Code | Content-Type |
|---|---|---|---|---|
GET | <N/A> | Success | 200 OK | application/json |
See Routing Rule Evaluation Metrics for more details.
Example request
$ curl -i https://router.example:5001/v1/node_visits
HTTP/1.1 200 OK
Access-Control-Allow-Origin: *
Content-Length: 73
Content-Type: application/json
X-Service-Identity: router.example-5fc78d
{
"cache1.tv": "99900",
"offload": "100"
"routingtable": "100000"
}
Node Visit Graph – /v1/node_visits_graph
Creates a GraphML representation of the node visitation data that can be rendered into an image to make it easier to understand the data.
| REQUEST Method | Content-Type | RESPONSE Result | Status Code | Content-Type |
|---|---|---|---|---|
GET | <N/A> | Success | 200 OK | application/xml |
See Routing Rule Evaluation Metrics for more details.
Example request
> curl -i -k https://router.example:5001/v1/node_visits_graph
HTTP/1.1 200 OK
Access-Control-Allow-Origin: *
Content-Length: 731
Content-Type: application/xml
X-Service-Identity: router.example-5fc78d
<?xml version="1.0"?>
<graphml xmlns="http://graphml.graphdrawing.org/xmlns"
xmlns:xsi="http://www.w3.org/2001/XMLSchema-instance"
xsi:schemaLocation="http://graphml.graphdrawing.org/xmlns http://graphml.graphdrawing.org/xmlns/1.0/graphml.xsd">
<key id="visits" for="node" attr.name="visits" attr.type="string" />
<graph id="G" edgedefault="directed">
<node id="routingtable">
<data key="visits">100000</data>
</node>
<node id="cache1.tv">
<data key="visits">99900</data>
</node>
<node id="offload">
<data key="visits">100</data>
</node>
<edge id="e0" source="routingtable" target="cache1.tv" />
<edge id="e1" source="routingtable" target="offload" />
</graph>
</graphml>
Session list - /v1/sessions
Used to monitor the load on subrunners, the processes performing those tasks that are possible to run in parallel.
| REQUEST Method | Content-Type | RESPONSE Result | Status Code | Content-Type |
|---|---|---|---|---|
GET | <N/A> | Success | 200 OK | application/json |
Example request
$ curl -k -i https://router.example:5001/v1/sessions
HTTP/1.1 200 OK
Access-Control-Allow-Origin: *
Content-Length: 12345
Content-Type: application/json
X-Service-Identity: router.example-5fc78d
{
"sessions": [
{
"age_seconds": 103,
"cdn": "edgeware",
"cdn_is_redirecting": false,
"client_ip": "1.2.3.4",
"host": "cdn.example:80",
"id": "router.example-5fc78d-00000001",
"idle_seconds": 103,
"last_request_time": "2022-12-02T14:05:05Z",
"latest_request_path": "/__cl/s:storage1/__c/v/f/0/5/v_sintel3v_f05a05f07d352e891d79863131ef4df7/__op/hls-default/__f/index.m3u8",
"no_of_requests": 1,
"requested_bytes": 0,
"requests_redirected": 0,
"requests_served": 0,
"session_groups": [
"all"
],
"session_groups_generation": 2,
"session_path": "/__cl/s:storage1/__c/v/f/0/5/v_sintel3v_f05a05f07d352e891d79863131ef4df7/__op/hls-default/__f/index.m3u8",
"start_time": "2022-12-02T14:05:05Z",
"type": "instream",
"user_agent": "libmpv"
},
[...]
]
}
Session details - /v1/sessions/<id: str>
Used to get details about a specific session from the above session list. The
id part of the URL corresponds to the id field in one of the
returned session entries in the above response.
| REQUEST Method | Content-Type | RESPONSE Result | Status Code | Content-Type |
|---|---|---|---|---|
GET | <N/A> | Success | 200 OK | application/json |
GET | <N/A> | Failure | 404 Not Found | application/json |
Example request
$ curl -k -i https://router.example:5001/v1/sessions/router.example-5fc78d-00000001
HTTP/1.1 200 OK
Access-Control-Allow-Origin: *
Content-Length: 763
Content-Type: application/json
X-Service-Identity: router.example-5fc78d
{
"age_seconds": 183,
"cdn": "edgeware",
"cdn_is_redirecting": false,
"client_ip": "1.2.3.4",
"host": "cdn.example:80",
"id": "router.example-5fc78d-00000001",
"idle_seconds": 183,
"last_request_time": "2022-12-02T14:05:05Z",
"latest_request_path": "/__cl/s:storage1/__c/v/f/0/5/v_sintel3v_f05a05f07d352e891d79863131ef4df7/__op/hls-default/__f/index.m3u8",
"no_of_requests": 1,
"requested_bytes": 0,
"requests_redirected": 0,
"requests_served": 0,
"session_groups": [
"all"
],
"session_groups_generation": 2,
"session_path": "/__cl/s:storage1/__c/v/f/0/5/v_sintel3v_f05a05f07d352e891d79863131ef4df7/__op/hls-default/__f/index.m3u8",
"start_time": "2022-12-02T14:05:05Z",
"type": "instream",
"user_agent": "libmpv"
}
Content List - /v1/content
| REQUEST Method | Content-Type | RESPONSE Result | Status Code | Content-Type |
|---|---|---|---|---|
GET | <N/A> | Success | 200 OK | application/json |
Example request
$ curl -k -i https://router.example:5001/v1/content
HTTP/1.1 200 OK
Access-Control-Allow-Origin: *
Content-Length: 572
Content-Type: application/json
X-Service-Identity: router.example-5fc78d
{
"content": [
[
"/__cl/s:storage1/__c/v/f/0/5/v_sintel3v_f05a05f07d352e891d79863131ef4df7/__op/hls-default/__f/index.m3u8",
{
"cached_count": 0,
"content_requested": false,
"content_set": false,
"expiration_time": "2022-12-02T14:05:05Z",
"key": "/__cl/s:storage1/__c/v/f/0/5/v_sintel3v_f05a05f07d352e891d79863131ef4df7/__op/hls-default/__f/index.m3u8",
"listeners": 0,
"manifest": "",
"request_count": 4,
"state": "HLS:MANIFEST-PENDING",
"wait_count": 0
}
]
]
}
Lua scripts – /v1/lua/<path str>.lua
Used to upload, retrieve and delete custom named Lua scripts on the router.
Global functions in uploaded scripts automatically become available to Lua code
in the configuration (which effectively may be viewed as hooks). Upload a
script by PUTing a application/x-lua to the endpoint, and retrieve it by
GETing the endpoint without payload.
| REQUEST Method | Content-Type | RESPONSE Result | Status Code | Content-Type |
|---|---|---|---|---|
PUT | application/x-lua | Success | 204 No Content | <N/A> |
PUT | application/x-lua | Failure | 400 Bad Request | application/json |
GET | <N/A> | Success | 200 OK | application/x-lua |
GET | <N/A> | Failure | 404 Not Found | application/json |
DELETE | <N/A> | Success | 204 No Content | <N/A> |
DELETE | <N/A> | Failure | 400 Bad Request | application/json |
DELETE | <N/A> | Failure | 404 Not Found | application/json |
Example request (PUT)
Save a Lua script under the name advanced_functions/f1.lua:
$ curl -i -X PUT \
-d 'function fun1() return 1 end' \
-H "Content-Type: application/x-lua" \
https://router.example:5001/v1/lua/advanced_functions/f1.lua
HTTP/1.1 204 Successfully saved Lua file
Access-Control-Allow-Origin: *
Content-Length: 0
X-Service-Identity: router.example-5fc78d
Example request (PUT, from file)
Upload an entire Lua file under the name advanced_functions/f1.lua:
First put your code in a file.
$ cat f1.lua
function fun1()
return 1
end
Then upload it using the --data-binary flag to preserve newlines
$ curl -i -X PUT \
--data-binary @f1.lua \
-H "Content-Type: application/x-lua" \
https://router.example:5001/v1/lua/advanced_functions/f1.lua
HTTP/1.1 204 Successfully saved Lua file
Access-Control-Allow-Origin: *
Content-Length: 0
X-Service-Identity: router.example-5fc78d
Example request (GET)
Request the Lua script named advanced_functions/f1.lua using a GET request:
$ curl -i https://router.example:5001/v1/lua/advanced_functions/f1.lua
HTTP/1.1 200 OK
Access-Control-Allow-Origin: *
Content-Length: 28
Content-Type: application/x-lua
X-Service-Identity: router.example-5fc78d
function fun1() return 1 end
Example request (DELETE)
Delete the Lua script named advanced_functions/f1.lua using a DELETE request:
$ curl -i -X DELETE \
https://router.example:5001/v1/lua/advanced_functions/f1.lua
HTTP/1.1 204 Successfully removed Lua file
Access-Control-Allow-Origin: *
Content-Length: 0
X-Service-Identity: router.example-5fc78d
List Lua scripts – /v1/lua
Used to list previously uploaded custom Lua scripts on the router, retrieving their respective paths and file checksums.
| REQUEST Method | Content-Type | RESPONSE Result | Status Code | Content-Type |
|---|---|---|---|---|
GET | <N/A> | Success | 200 OK | application/json |
Example request
$ curl -k -i https://router.example:5001/v1/lua
HTTP/1.1 200 OK
Access-Control-Allow-Origin: *
Content-Length: 108
Content-Type: application/json
X-Service-Identity: router.example-5fc78d
[
{
"file_checksum": "d41d8cd98f00b204e9800998ecf8427e",
"path": "advanced_functions/f1.lua"
}
]
Debug a Lua expression – /v1/lua/debug
Used to debug an arbitrary Lua expression on the router in a “sandbox” (with no visible side effects to the state of the router), and inspect the result.
The Lua expression in the body is evaluated inside an isolated copy of the
internal Lua environment including selection input. The stdout field of the
resulting JSON body is populated with a concatenation of every string provided
as argument to the Lua print() function during the course of evaluation.
Upon a successful evaluation, as indicated by the success flag,
return.value and return.lua_type_name capture the resulting Lua value.
Otherwise, if valuation was aborted (e.g. due to a Lua exception), error_msg
reflects any error description arising from the Lua environment.
| REQUEST Method | Content-Type | RESPONSE Result | Status Code | Content-Type |
|---|---|---|---|---|
POST | application/x-lua | Success | 200 OK | application/json |
Example successful request
$ curl -i -X POST \
-d 'fun1()' \
-H "Content-Type: application/x-lua" \
https://router.example:5001/v1/lua/debug
HTTP/1.1 200 OK
Access-Control-Allow-Origin: *
Content-Length: 123
Content-Type: application/json
X-Service-Identity: router.example-5fc78d
{
"error_msg": "",
"return": {
"lua_type_name": "number",
"value": 1.0
},
"stdout": "",
"success": true
}
Example unsuccessful request
(attempt to invoke unknown function)
$ curl -i -X POST \
-d 'fun5()' \
-H "Content-Type: application/x-lua" \
https://router.example:5001/v1/lua/debug
HTTP/1.1 200 OK
Access-Control-Allow-Origin: *
Content-Length: 123
Content-Type: application/json
X-Service-Identity: router.example-5fc78d
{
"error_msg": "[string \"function f0() ...\"]:2: attempt to call global 'fun5' (a nil value)",
"return": {
"lua_type_name": "",
"value": null
},
"stdout": "",
"success": false
}
Footnotes
4.7 - Configuration
4.7.1 - WebUI Configuration
The web-based user interface can be used to configure many common use cases for the CDN Director.
Normally the GUI is accessible from the CDN Manager at an address like
https://cdn-manager/gui/. After navigating to the UI, a login screen will be
presented:
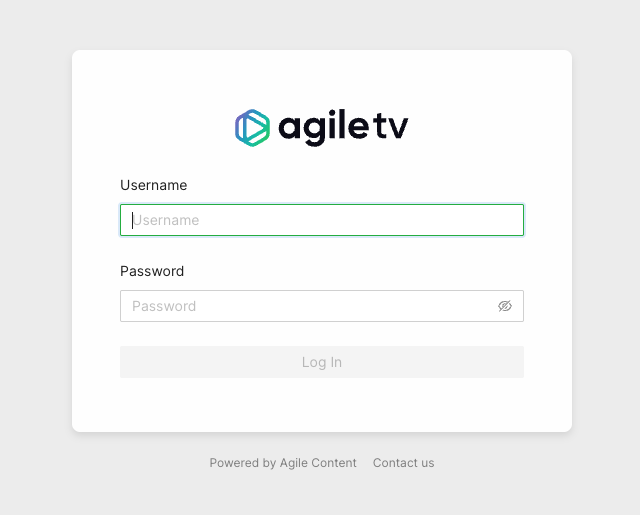
Enter your credentials and log in.
Once logged in, the middle of the screen will present a few sections. Depending on your user’s permissions and licensed features, different options will be made available.
In the general case, two options will be presented:
- CDN Director
- Configuration Panel
At the top right corner is a user menu with an option to log out.
The left-hand side of the page shows a collapsible menu with a few icons:
 filters the menu options
 used to return to the landing page
 link to the
Director Routing rule configuration view
link to the
Director Routing rule configuration view link
to the Director configuration panel view
link
to the Director configuration panel view
CDN Director Routing
This view provides a graphical tree-based model for configuring how the Director should classify and route incoming content requests.
Menu Options
After navigating to the CDN Director Routing page, the left side will show a list of routing rule block types and host group variants. The user can drag and drop items from this list onto the main canvas in order to design a routing solution.

The Search component input field at the top can be used to search and filter
among the available components. Clicking the question mark next to a component
shows a description popup.

Title Bar
Above the main canvas is the title bar. On the left side is the name of the currently selected routing configuration and its creation date:

To the right are a series of buttons, from left to right:

Creates a grouping rectangle on the canvas. Any routing rules placed on this rectangle can be moved around together, making it easier to construct logical units. This is only a visual and practical effect, it doesn’t in any way change the generated configuration.

Opens a popup menu on the right-hand side of the canvas where various configuration options can be changed. A list of CDN Director instances to apply the configuration to can be found and modified here, as well as the general look and feel of the GUI.

Opens a display of the configuration JSON generated from the graphical representation and allows for editing the text directly. Any changes made will automatically be loaded into the graphical representation.

Automatically arranges all the blocks in the canvas, hopefully making it less messy. Routing decision flow begins from the top left and moves rightwards.

Pushes the currently active configuration onto all the configured CDN Director instances. Changes take effect immediately assuming they do not contain any errors and the GUI will display a dialog with the update results.

Saves the configuration to the listed CDN Director targets, with a name provided by the user. Previously saved configurations can be accessed by clicking the house icon next to the configuration title at the middle top of the canvas.
Note that merely saving a configuration does not make it take effect, it is just for making backups or alternative configurations.
To make a configuration take effect, you have to
Publishit.
Saved Configurations
Clicking the  icon in the title bar
navigates to the saved configurations section.
icon in the title bar
navigates to the saved configurations section.
The upper part of this section is a template list allowing the user to either start a new configuration from scratch by selecting “New configuration” or start from a skeleton configuration by selecting one of the available template tiles.

The lower part contains all stored configurations. First in the list is always the currently published configuration, followed by any user-created configurations that have been saved.
Each entry in the list contain information about its name, who created it and when it was last saved. Next to each saved configuration is a trash can button used to delete it.

Configuration Options
Clicking the icon opens a
panel with configuration options and settings on the right-hand side of the
screen. This panel has the two tabs Configurations and Style.
Configuration
The configuration tab allows the user to manage the CDN Director instances that are to be configured by the GUI.
Whenever a user pushes either Publish or Save version, the configuration
will be sent to routers configured in this list.

Each entry has a name, an address and a radio button to disable publication to specific instances that are e.g. taken out for maintenance. Turning a Director off won’t affect the current running status of that instance, it will only disable pushing any new configuration to it.
As seen above, the address can be either a full URL with scheme, hostname, port
and path such as http://router1.example.com:5000/config or a relative path
used e.g. to push configurations through an CDN Manager node:
/confd/router1/config.
Style Options
This pane contains various settings for the look and feel of the routing configuration view. The user can change line width and stroke type as well as colors associated with different node types.

Arrange Button
This button will automatically arrange the routing nodes in the canvas, trying to make the connections easier to follow.
Imagine a user has designed the routing flow organically, placing components anywhere on the screen as their need arose. This can make it difficult to get an overview.

Clicking the Arrange button makes the GUI suggest a more structured
arrangement:
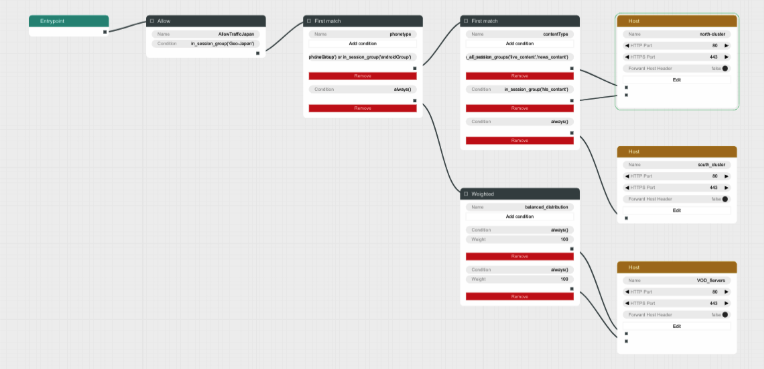
Save Version Button
Sometimes it can be useful to save a copy of a configuration, either because you need to try an entirely different design, or because you want to store a working setup before tweaking it to make sure you can revert to a working state in case anything goes wrong.
Clicking the Save version button opens a dialog box allowing you to pick a
name and save the currently displayed configuration to all the linked CDN
Director instances without activating it.
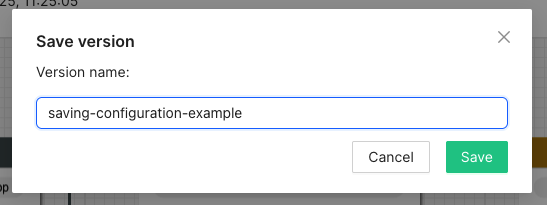

Going back to the saved configurations list, the new entry has appeared:
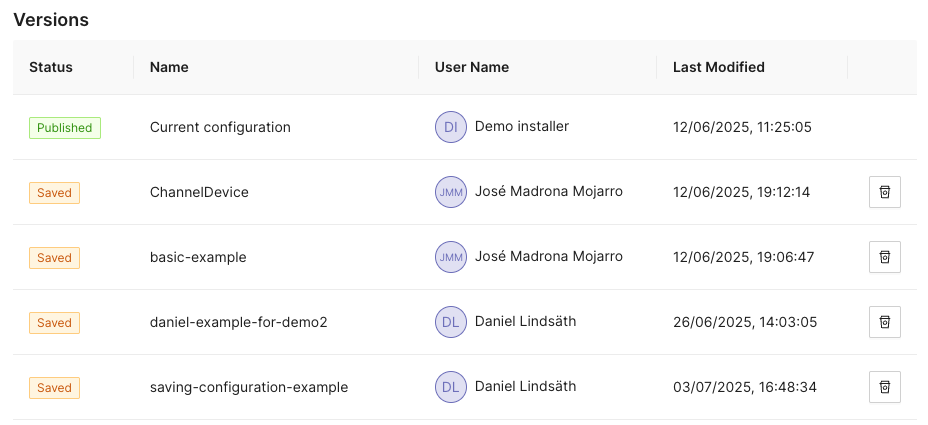
Publish Button
Clicking the Publish button sends the currently displayed configuration to be
sent to all enabled CDN Director instances. If it contains a complete and valid
configuration the Directors will then apply any changes.
A dialog box will display the publish status for each configured Director:

Configuration Panel
The configuration panel view allows for configuring routing-adjacent features, such as blocked/allowed referral addresses, blocked/allowed user agent strings or CDN host capacity values.

At the moment there are two supported configurations: Blocked tokens and blocked referrers.
Tokens
Selecting Tokens allows the user to observe and edit a list of currently
blocked tokens:

Several actions are available at this point:

Add a new token string to be blocked, along with a corresponding time-to-live (TTL) value in seconds.

A newly added token will automatically be removed after TTL seconds, to avoid filling up the database with outdated or stale values.

In order to avoid performance hits when there are many tokens, nothing is shown in this list until a search string is entered manually by the operator. This is because a token is added to the list every time a valid token request is made and the database can grow to millions of entries.
At least three characters must be entered for searching to begin. A maximum of 100 results are shown. Write more specific search strings to filter out irrelevant token entries.
Note that token-reuse blocking depends on there being a Routing node, e.g. a
Denyblock, with a suitable condition function that performs the token extraction and blocking.
Referrers
This section allows for blocking specific referrer addresses. Unlike the token list, this table will display entries immediately since it is not anticipated to contain nearly as many entries.
Like with the token list, at most 100 entries are shown at a time. Use the search box to find the relevant referrers if the list is full.

Clicking the button will open a window to add a new referrer string to the block list. Clicking the ‘X’ closes the window without adding a new entry.

The search box filters which already-added referrer strings are displayed in the list. At least three characters must be written for filtering to begin, and regardless of how many matching results there are, only 100 will be displayed in the list so it is recommended to be as specific as necessary when searching.

Clicking the trash can next to a referrer removes it from the list of blocked referrers.
Example Routing Configuration
The following text will describe how to set up a simple routing system that has an internal CDN with two streaming servers and one external CDN.
The internal CDN is meant for serving live TV with low latency as well as VOD traffic provided there is enough capacity left without overloading the servers and affect live traffic latency.
In order to demonstrate the Director’s traffic filtering capability the setup will also send any mobile traffic from outside of Stockholm, Sweden to the external CDN.
Finally, a load balancing node is added to split the remaining incoming requests equally between the two internal hosts.
In summary, the configuration will:
- Route off-net traffic from mobile phones to the external CDN.
- Route Live traffic to the external CDN if the internal CDN is overloaded.
- Route any remaining traffic to the internal CDN.
Step-by-Step Walkthrough
When creating a new configuration the only thing that exists is an Entrypoint
node. This node is used to indicate where the routing engine should begin
traversing the routing tree for a new incoming request.

Begin by dragging a Split node onto the canvas and connect it to the
Entrypoint.

A Split node splits the incoming traffic into two separate streams based on
a condition. The default condition is a function called always() that
evaulates as true for any request. This is not very useful for this example,
replace it by clicking on the Condition input field in the node.
This brings us to a dialog box where we can simply replace the condition with
another string or go to a graphical representation of the condition to help
guide us through the steps to getting the Split node to do what we need.

Graphical Condition Builder
Clicking the Graphical View button opens up the graphical representation which
currently shows two condition nodes connected together, one representing the
default condition always() previously mentioned, and one called Condition Output which is a target placeholder for the end result of the entire graph.
Output from one condition node is connected to the input of another node until
the entire chain ends up with the Condition Output node.

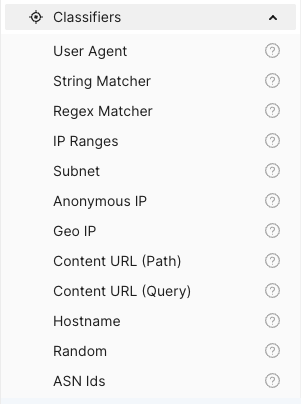
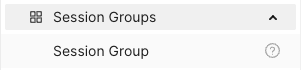
On the left-hand side is a menu with the items Session Groups, Conditions
and Classifiers. The Conditions section contains different condition
components whose outputs can be connected to either other condition nodes or
the Condition Output.

Delete the Always node and replace it with one from the Conditions menu,
specifically In Session Group, and connect its output to Condition Output.
The new condition node takes a Session Group as its input. Drag one of those
from the menu onto the canvas and connect its output to the input labeled
“Session Group”. Give the Session Group node the name “mobile-off-net” since
it is going to contain requests from mobile units outside of the main network.
The Session Group takes a number of classifiers as inputs. Open the
Classifiers section of the menu and drag a Geo IP and a User Agent node
onto the canvas and connect their outputs to the Session Group. Note that
when one classifier is connected, the connection label is updated with its name
and a new empty connection slot is added.
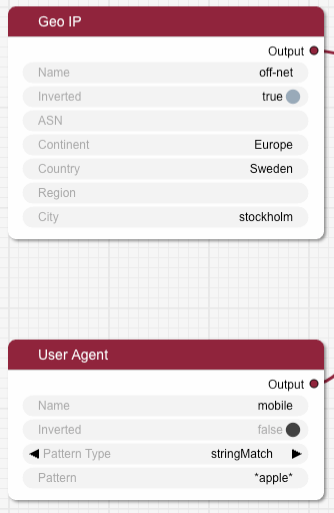
Fill in the two classifier nodes with appropriate values:
Give the Geo IP node the name “off-net”, set Continent to “Europe”,
Country to “Sweden” and City to “Stockholm”. Finally, change the Inverted
toggle to true since we want this condition to match any traffic that comes
from anywhere but Stockholm.
The User Agent node is meant to match mobile devices, but for simplicity’s
sake this classifier is limited to Apple devices for this example. Set the name
to “mobile”, make sure Pattern Type is “stringMatch” and set the pattern to
“apple”. The asterisks will match against any strings at the beginning and end
of the user agent string, and “apple” is case insensitive.
The resulting graph should look like this:

Click Save to return to the routing tree configuration view. Note that
"always()" has been replaced with "in_session_group('mobile-off-net')".

It is time to add a node for the external CDN. Open up the Hosts section in
the left-hand side menu if it is closed. Then drag a Host node onto the
canvas and name it “OffloadCDN”.
This creates a host group which contains hosts which belong together and share common settings such as ports.

Click the Edit button to open a dialog where the actual hosts can be added to
the host group by clicking the icon with a new document on it. Add a host with
the name “offload-host-1” and address “offload-1.example.com”. The IPv6 address field can be left empty.
Click Save to return to the canvas view and connect the Split node’s
onMatch slot to the newly created host. Now any request that matches the
condition we added to the Split node will be sent to the external host.

The next step is to add an offload in case the internal CDN is overloaded. Add
another Split node, call it “LiveOffload” and connect it to the previous
Split node’s onMiss slot. We will use a Selection Input
value named "live_bandwidth_left" to determine whether or not the internal CDN
is overloaded.
Click the Condition field and bring up the graphical view. Remove the
default Always node and replace it with a Less Than node. Set its Selection Input string to “live_bandwidth_left” and the Value to 100 in order to send
traffic to the offload CDN whenever the internal CDN reports less than 100
capacity left.
Save the condition and connect the Split node’s onMatch output to the
“offload-host-1” Host.

In order to balance the incoming Live traffic between the two internal CDN nodes
we create a Random node, which simply splits the traffic equally among its
targets.

Finally we create another Host node and give it two hosts called
“private-host-1” and “private-host-2”. Connect the Random node to the two
hosts and the routing configuration is finished.

4.7.2 - OLD WebUI Configuration
The web based user interface is installed as a separate component and can be used to configure many common use cases. After navigating to the UI, a login screen will be presented.

Enter your credentials and log in. In the top left corner is a menu to select what section of the configuration to change. The configuration that will be active on the router is added in the Routing Workflow view. However, basic elements such as classification rules and routing targets, etc must be added first. Hence the following main steps are required to produce a proper configuration:
- Create classifiers serving as basic elements to create session groups.
- Create session groups which, using the classifiers, tag requests/clients for later use in the routing logic. of the incoming traffic.
- Define offload rules.
- Define rules to control behavior of internal traffic.
- Define backup rules to be used if the routing targets in the above step are unavailable.
- Finally, create the desired routing workflow using the elements defined in the previous steps.
A simplified concrete example of the above steps could be:
- Create two classifiers “smartphone” and “off-net”.
- Create a session group “mobile off-net”.
- Offload off-net traffic from mobile phones to a public CDN.
- Route other traffic to a private CDN.
- If the private CDN has an outage, use the public CDN for all traffic.
Hence, to start with, define the classifiers you will need. Those are based on information in the incoming request, optionally in combination with GeoIP databases or subnet information configured via the Subnet API. Here we show how to set up a GeoIP classifier. Note that the Director ships with a compatible snapshot of the GeoIP database, but for a production system a licensed and updated database is required.

Click the plus sign indicated in the picture above to create a new GeoIP classifier. You will be presented with the following view:

Here you can enter the geographical data on which to match, or check the “Inverted” check box to match anything except the entered geographical data.
The other kinds of classifiers are configured in a similar way.
After having added all the classifiers you need, it is time to create the session groups. Those are named filters that group incoming requests, typically video playback sessions in a video streaming CDN, and are defined with the help of the classifiers. For example, a session group “off-net mobile devices” could be composed of the classifiers “off-net traffic” and “mobile devices”.
Open the Session Groups view from the menu and hit the plus sign to add a new session group.


Define the new sessions groups by combining the previously created classifiers. It is often convenient to define an “All” session group that matches any incoming request.
Next go the “CDN Offload” view:

Here you define conditions for CDN offload. Each row defines a rule for offloading a specified session group. The rule makes use of the Selection Input API. This is an integration API that provides a way to supply additional data for use in the routing decision. Common examples are current bitrates or availability status. The selection input variables to use must be defined in the “Selection Input Types” view in the “Administration” section of the menu:
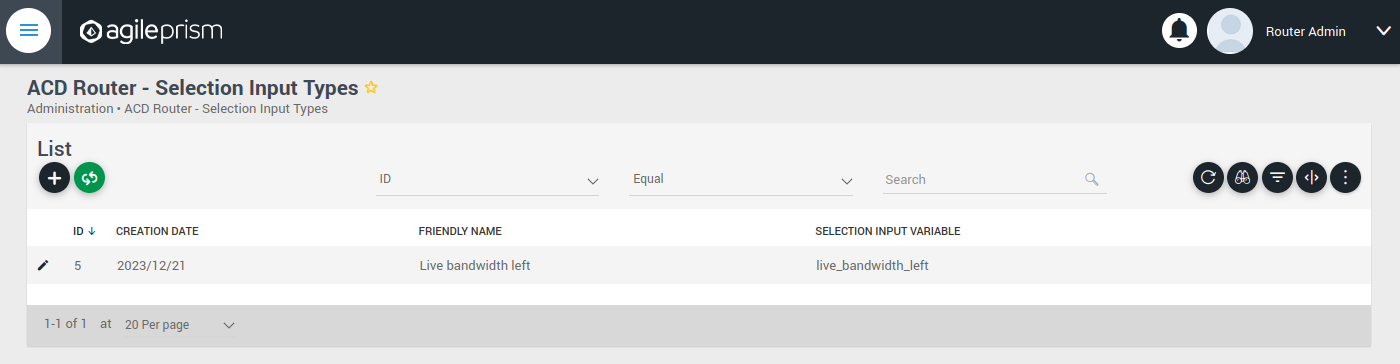
Reach out to the solution engineers from AgileTV in order to perform this integration in the best way. If no external data is required, such that the offload rule can be based solely based on session groups, this is not necessary and the condition field can be set to “Always” or “Disabled”.
When clicking the plus sign to add a new CDN Offload rule, the following view is presented:
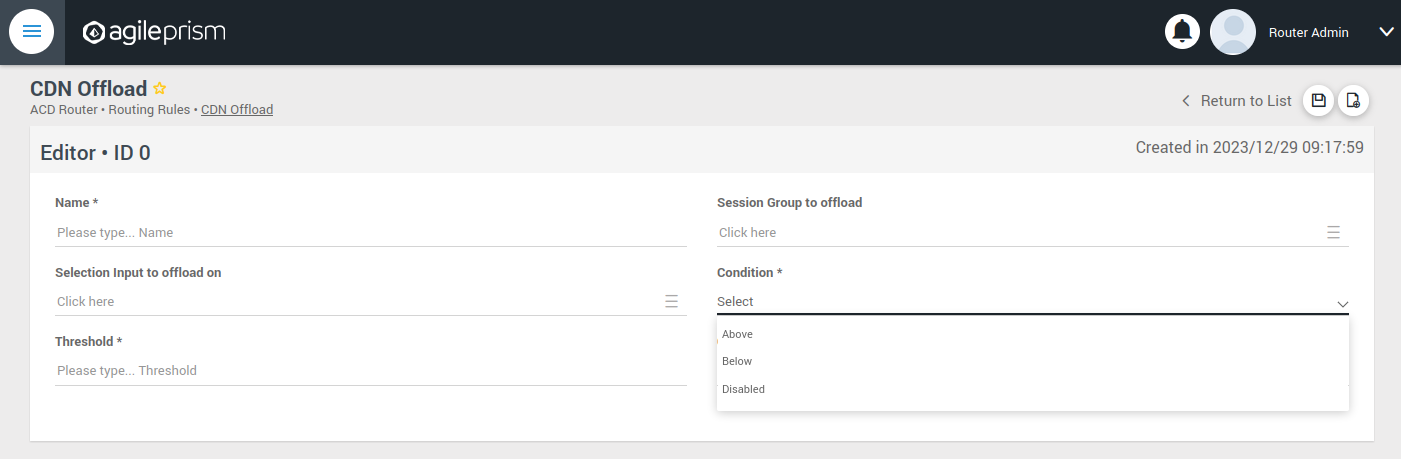
The selection input rule is phrased in terms of a variable being above or below a threshold, but also a state such as “available” taking values 0 or 1 can be supported by for instance checking if “available” is below 1.
Moving on, if an incoming request is not offloaded, it will be handled by the Primary CDN section of the routing configuration.

Add all hosts in your primary CDN, together with a weight. A row in this table will be selected by random weighted load balancing. If each weight is the same, each row will be selected with the same probability. Another example would be three rows with weights 100, 100 and 200 which would randomly balance 50% of the load on the last row and the remaining load on the first two rows, i.e. 25% on each of the first and second row. If a Primary CDN host is unavailable, that host will not take part in the random selection.
If all hosts are unavailable, as a final resort the routing evaluation will go to the final Backup CDN step:

Here you can define what to do when all else fail. If not all requests are covered, for example with an “All” session group, then the request will fail with 403 Forbidden.
Now you have defined the basic elements and it is time to define the routing workflow. Select “Routing Workflow” from the menu, as pictured below. Here you can combine the elements previously created to achieve the desired routing behavior.

When everything seems correct, open the “Publish Routing” view from the menu:

Hit “Publish All Changes” and verify that you get a successful result.
4.7.3 - Confd and Confcli
confcli to set up routing rulesConfiguration of a complex routing tree can be difficult. The command line
interface tool called confcli has been developed to make it simpler. It
combines building blocks, representing simple routing decisions, into complex
routing trees capable of satisfying almost any routing requirements.
These blocks are translated into an ESB3024 Router configuration which is automatically sent to the router, overwriting existing routing rules, CDN list and host list.
Installation and Usage
The confcli tools are installed alongside ESB3024 Router, on the same host,
and the confcli command line tool itself is made available on the host machine.
Simply type confcli in a shell on the host to see the current routing
configuration:
$ confcli
{
"services": {
"routing": {
"settings": {
"trustedProxies": [],
"contentPopularity": {
"algorithm": "score_based",
"sessionGroupNames": []
},
"extendedContentIdentifier": {
"enabled": false,
"includedQueryParams": []
},
"instream": {
"dashManifestRewrite": {
"enabled": false,
"sessionGroupNames": []
},
"hlsManifestRewrite": {
"enabled": false,
"sessionGroupNames": []
},
"reversedFilenameComparison": false
},
"usageLog": {
"enabled": false,
"logInterval": 3600000
}
},
"tuning": {
"content": {
"cacheSizeFullManifests": 1000,
"cacheSizeLightManifests": 10000,
"lightCacheTimeMilliseconds": 86400000,
"liveCacheTimeMilliseconds": 100,
"vodCacheTimeMilliseconds": 10000
},
"general": {
"accessLog": false,
"coutFlushRateMilliseconds": 1000,
"cpuLoadWindowSize": 10,
"eagerCdnSwitching": false,
"httpPipeliningEnable": false,
"logLevel": 3,
"maxConnectionsPerHost": 5,
"overloadThreshold": 32,
"readyThreshold": 8,
"redirectingCdnManifestDownloadRetries": 2,
"repeatedSessionStartThresholdSeconds": 30,
"selectionInputMetricsTimeoutSeconds": 30
},
"session": {
"idleDeactivateTimeoutMilliseconds": 20000,
"idleDeleteTimeoutMilliseconds": 1800000
},
"target": {
"responseTimeoutSeconds": 5,
"retryConnectTimeoutSeconds": 2,
"retryResponseTimeoutSeconds": 2,
"connectTimeoutSeconds": 5,
"maxIdleTimeSeconds": 30,
"requestAttempts": 3
}
},
"sessionGroups": [],
"classifiers": [],
"hostGroups": [],
"rules": [],
"entrypoint": "",
"applyConfig": true
}
}
}
The CLI tool can be used to modify, add and delete values by providing it with
the “path” to the object to change. The path is constructed by joining the field
names leading up to the value with a period between each name, e.g. the path to
the entrypoint is services.routing.entrypoint since entrypoint is nested
under the routing object, which in turn is under the services root object.
Lists use an index number in place of a field name, where 0 indicates the very
first element in the list, 1 the second element and so on.
If the list contains objects which have a field with the name name, the
index number can be replaced by the unique name of the object of interest.
Tab completion is supported by confcli. Pressing tab once will complete as far as possible, and pressing tab twice will list all available alternatives at the path constructed so far.
Display the values at a specific path:
$ confcli services.routing.hostGroups
{
"hostGroups": [
{
"name": "internal",
"type": "redirecting",
"httpPort": 80,
"httpsPort": 443,
"hosts": [
{
"name": "rr1",
"hostname": "rr1.example.com",
"ipv6_address": ""
}
]
},
{
"name": "external",
"type": "host",
"httpPort": 80,
"httpsPort": 443,
"hosts": [
{
"name": "offload-streamer1",
"hostname": "streamer1.example.com",
"ipv6_address": ""
},
{
"name": "offload-streamer2",
"hostname": "streamer2.example.com",
"ipv6_address": ""
}
]
}
]
}
Display the values in a specific list index:
$ confcli services.routing.hostGroups.1
{
"1": {
"name": "external",
"type": "host",
"httpPort": 80,
"httpsPort": 443,
"hosts": [
{
"name": "offload-streamer1",
"hostname": "streamer1.example.com",
"ipv6_address": ""
},
{
"name": "offload-streamer2",
"hostname": "streamer2.example.com",
"ipv6_address": ""
}
]
}
}
Display the values in a specific list index using the object’s name:
$ confcli services.routing.hostGroups.1.hosts.offload-streamer2
{
"offload-streamer2": {
"name": "offload-streamer2",
"hostname": "streamer2.example.com",
"ipv6_address": ""
}
}
Modify a single value:
confcli services.routing.hostGroups.1.hosts.offload-streamer2.hostname new-streamer.example.com
services.routing.hostGroups.1.hosts.offload-streamer2.hostname = 'new-streamer.example.com'
Delete an entry:
$ confcli services.routing.sessionGroups.Apple.classifiers.
{
"classifiers": [
"Apple",
""
]
}
$ confcli services.routing.sessionGroups.Apple.classifiers.1 -d
http://localhost:5000/config/__active/services/routing/sessionGroups/Apple/classifiers/1 reset to default/deleted
$ confcli services.routing.sessionGroups.Apple.classifiers.
{
"classifiers": [
"Apple"
]
}
Adding new values in objects and lists is done using a wizard by invoking
confcli with a path and the -w argument. This will be shown extensively in
the examples further down in this document rather than here.
If you have a JSON file with a previously generated confcli configuration
output it can be applied to a system by typing confcli -i <file path>.
CDNs and Hosts
Configuration using confcli has no real concept of CDNs, instead it has groups of hosts that share some common settings such as HTTP(S) port and whether they return a redirection URL, serve content directly or perform a DNS lookup. Of these three variants, the two former share the same parameters, while the DNS variant is slightly different.
Note that by default, the Director expects redirecting CDNs to redirect with
response code 302. If the CDN returns a redirection URL with another HTTP
response code, the field allowAnyRedirectType must be set to true in the
hostGroup configuration. Then any 3xx response code will result in a 302
response code being sent to the client.
If any of the request headers need to be forwarded to the CDN, they can be
listed in the headersToForward field. This is useful if the CDN needs to
know about the original Host header or any custom headers added by the
client or an upstream proxy.
Each host belongs to a host group and may itself be an entire CDN using a single public hostname or a single streamer server, all depending on the needs of the user.
Host Health
When creating a host in the confd configuration, you have the option to define a list of health check functions. Each health check function must return true for a host to be selected. This means that the host will only be considered available if all the defined health check functions evaluate to true. If any of the health check functions return false, the host will be considered unavailable and will not be selected for routing. All health check functions are detailed in the section Built-in Lua functions.
$ confcli services.routing.hostGroups -w
Running wizard for resource 'hostGroups'
Hint: Hitting return will set a value to its default.
Enter '?' to receive the help string
hostGroups : [
hostGroup can be one of
1: dns
2: host
3: redirecting
Choose element index or name: redirecting
Adding a 'redirecting' element
hostGroup : {
name (default: ): edgeware
type (default: redirecting): ⏎
httpPort (default: 80): ⏎
httpsPort (default: 443): ⏎
headersToForward <A list of HTTP headers to forward to the CDN. (default: [])>: [
headersToForward (default: ): ⏎
Add another 'headersToForward' element to array 'headersToForward'? [y/N]: ⏎
]
allowAnyRedirectType (default: False): ⏎
hosts : [
host : {
name (default: ): rr1
hostname (default: ): convoy-rr1.example.com
ipv6_address (default: ): ⏎
healthChecks : [
healthCheck (default: always()): health_check()
Add another 'healthCheck' element to array 'healthChecks'? [y/N]: n
]
}
Add another 'host' element to array 'hosts'? [y/N]: y
host : {
name (default: ): rr2
hostname (default: ): convoy-rr2.example.com
ipv6_address (default: ): ⏎
healthChecks : [
healthCheck (default: always()): ⏎
Add another 'healthCheck' element to array 'healthChecks'? [y/N]: n
]
}
Add another 'host' element to array 'hosts'? [y/N]: ⏎
]
}
Add another 'hostGroup' element to array 'hostGroups'? [y/N]: ⏎
]
Generated config:
{
"hostGroups": [
{
"name": "edgeware",
"type": "redirecting",
"httpPort": 80,
"httpsPort": 443,
"headersToForward": [],
"allowAnyRedirectType": false,
"hosts": [
{
"name": "rr1",
"hostname": "convoy-rr1.example.com",
"ipv6_address": "",
"healthChecks": [
"health_check()"
]
},
{
"name": "rr2",
"hostname": "convoy-rr2.example.com",
"ipv6_address": "",
"healthChecks": [
"always()"
]
}
]
}
]
}
Merge and apply the config? [y/n]: y
$ confcli services.routing.hostGroups -w
Running wizard for resource 'hostGroups'
Hint: Hitting return will set a value to its default.
Enter '?' to receive the help string
hostGroups : [
hostGroup can be one of
1: dns
2: host
3: redirecting
Choose element index or name: dns
Adding a 'dns' element
hostGroup : {
name (default: ): external-dns
type (default: dns): ⏎
hosts : [
host : {
name (default: ): dns-host
hostname (default: ): dns.example.com
ipv6_address (default: ): ⏎
healthChecks : [
healthCheck (default: always()): ⏎
Add another 'healthCheck' element to array 'healthChecks'? [y/N]: n
]
}
Add another 'host' element to array 'hosts'? [y/N]: ⏎
]
}
Add another 'hostGroup' element to array 'hostGroups'? [y/N]: ⏎
]
Generated config:
{
"hostGroups": [
{
"name": "external-dns",
"type": "dns",
"hosts": [
{
"name": "dns-host",
"hostname": "dns.example.com",
"ipv6_address": "",
"healthChecks": [
"always()"
]
}
]
}
]
}
Merge and apply the config? [y/n]: y
Rule Blocks
The routing configuration using confcli is done using a combination of logical
building blocks, or rules. Each block evaluates the incoming request in some way
and sends it on to one or more sub-blocks. If the block is of the host type
described above, the client is sent to that host and the evaluation is done.
Existing Blocks
Currently supported blocks are:
allow: Incoming requests, for which a given rule function matches, are immediately sent to the providedonMatchtarget.consistentHashing: Splits incoming requests randomly between preferred hosts, determined by the proprietary consistent hashing algorithm. The amount of hosts to split between is controlled by thespreadFactor.contentPopularity: Splits incoming requests into two sub-blocks depending on how popular the requested content is.deny: Incoming requests, for which a given rule function matches, are immediately denied, and all non-matching requests are sent to theonMisstarget.firstMatch: Incoming requests are matched by an ordered series of rules, where the request will be handled by the first rule for which the condition evaluates to true.random: Splits incoming requests randomly and equally between a list of target sub-blocks. Useful for simple load balancing.split: Splits incoming requests between two sub-blocks depending on how the request is evaluated by a provided function. Can be used for sending clients to different hosts depending on e.g. geographical location or client hardware type.weighted: Randomly splits incoming requests between a list of target sub-blocks, weighted according to each target’s associated weight rule. A higher weight means a higher portion of requests will be routed to a sub-block. Rules can be used to decide whether or not to pick a target.rawGroup: Contains a raw ESB3024 Router configuration routing tree node, to be inserted as is in the generated configuration. This is only meant to be used in the rare cases when it’s impossible to construct the required routing behavior in any other way.rawHost: A host reference for use as endpoints in rawGroup trees.
$ confcli services.routing.rules -w
Running wizard for resource 'rules'
Hint: Hitting return will set a value to its default.
Enter '?' to receive the help string
rules : [
rule can be one of
1: allow
2: consistentHashing
3: contentPopularity
4: deny
5: firstMatch
6: random
7: rawGroup
8: rawHost
9: split
10: weighted
Choose element index or name: allow
Adding a 'allow' element
rule : {
name (default: ): allow
type (default: allow): ⏎
condition (default: ): customFunction()
onMatch (default: ): rr1
}
Add another 'rule' element to array 'rules'? [y/N]: ⏎
]
Generated config:
{
"rules": [
{
"name": "content",
"type": "contentPopularity",
"condition": "customFunction()",
"onMatch": "rr1"
}
]
}
Merge and apply the config? [y/n]: y
$ confcli services.routing.rules -w
Running wizard for resource 'rules'
Hint: Hitting return will set a value to its default.
Enter '?' to receive the help string
rules : [
rule can be one of
1: allow
2: consistentHashing
3: contentPopularity
4: deny
5: firstMatch
6: random
7: rawGroup
8: rawHost
9: split
10: weighted
Choose element index or name: consistentHashing
Adding a 'consistentHashing' element
rule : {
name (default: ): consistentHashingRule
type (default: consistentHashing):
spreadFactor (default: 1): 2
hashAlgorithm (default: MD5):
targets : [
target : {
target (default: ): rr1
enabled (default: True):
}
Add another 'target' element to array 'targets'? [y/N]: y
target : {
target (default: ): rr2
enabled (default: True):
}
Add another 'target' element to array 'targets'? [y/N]: y
target : {
target (default: ): rr3
enabled (default: True):
}
Add another 'target' element to array 'targets'? [y/N]: n
]
}
Add another 'rule' element to array 'rules'? [y/N]: n
]
Generated config:
{
"rules": [
{
"name": "consistentHashingRule",
"type": "consistentHashing",
"spreadFactor": 2,
"hashAlgorithm": "MD5",
"targets": [
{
"target": "rr1",
"enabled": true
},
{
"target": "rr2",
"enabled": true
},
{
"target": "rr3",
"enabled": true
}
]
}
]
}
Merge and apply the config? [y/n]: y
$ confcli services.routing.rules -w
Running wizard for resource 'rules'
Hint: Hitting return will set a value to its default.
Enter '?' to receive the help string
rules : [
rule can be one of
1: allow
2: consistentHashing
3: contentPopularity
4: deny
5: firstMatch
6: random
7: rawGroup
8: rawHost
9: split
10: weighted
Choose element index or name: contentPopularity
Adding a 'contentPopularity' element
rule : {
name (default: ): content
type (default: contentPopularity): ⏎
contentPopularityCutoff (default: 10): 20
onPopular (default: ): rr1
onUnpopular (default: ): rr2
}
Add another 'rule' element to array 'rules'? [y/N]: ⏎
]
Generated config:
{
"rules": [
{
"name": "content",
"type": "contentPopularity",
"contentPopularityCutoff": 20.0,
"onPopular": "rr1",
"onUnpopular": "rr2"
}
]
}
Merge and apply the config? [y/n]: y
$ confcli services.routing.rules -w
Running wizard for resource 'rules'
Hint: Hitting return will set a value to its default.
Enter '?' to receive the help string
rules : [
rule can be one of
1: allow
2: consistentHashing
3: contentPopularity
4: deny
5: firstMatch
6: random
7: rawGroup
8: rawHost
9: split
10: weighted
Choose element index or name: deny
Adding a 'deny' element
rule : {
name (default: ): deny
type (default: deny): ⏎
condition (default: ): customFunction()
onMiss (default: ): rr1
}
Add another 'rule' element to array 'rules'? [y/N]: ⏎
]
Generated config:
{
"rules": [
{
"name": "content",
"type": "contentPopularity",
"condition": "customFunction()",
"onMiss": "rr1"
}
]
}
Merge and apply the config? [y/n]: y
$ confcli services.routing.rules -w
Running wizard for resource 'rules'
Hint: Hitting return will set a value to its default.
Enter '?' to receive the help string
rules : [
rule can be one of
1: allow
2: consistentHashing
3: contentPopularity
4: deny
5: firstMatch
6: random
7: rawGroup
8: rawHost
9: split
10: weighted
Choose element index or name: firstMatch
Adding a 'firstMatch' element
rule : {
name (default: ): firstMatch
type (default: firstMatch): ⏎
targets : [
target : {
onMatch (default: ): rr1
rule (default: ): customFunction()
}
Add another 'target' element to array 'targets'? [y/N]: y
target : {
onMatch (default: ): rr2
rule (default: ): otherCustomFunction()
}
Add another 'target' element to array 'targets'? [y/N]: n
]
}
Add another 'rule' element to array 'rules'? [y/N]: n
]
Generated config:
{
"rules": [
{
"name": "firstMatch",
"type": "firstMatch",
"targets": [
{
"onMatch": "rr1",
"condition": "customFunction()"
},
{
"onMatch": "rr2",
"condition": "otherCustomFunction()"
}
]
}
]
}
Merge and apply the config? [y/n]: y
$ confcli services.routing.rules -w
Running wizard for resource 'rules'
Hint: Hitting return will set a value to its default.
Enter '?' to receive the help string
rules : [
rule can be one of
1: allow
2: consistentHashing
3: contentPopularity
4: deny
5: firstMatch
6: random
7: rawGroup
8: rawHost
9: split
10: weighted
Choose element index or name: random
Adding a 'random' element
rule : {
name (default: ): random
type (default: random): ⏎
targets : [
target (default: ): rr1
Add another 'target' element to array 'targets'? [y/N]: y
target (default: ): rr2
Add another 'target' element to array 'targets'? [y/N]: ⏎
]
}
Add another 'rule' element to array 'rules'? [y/N]: ⏎
]
Generated config:
{
"rules": [
{
"name": "random",
"type": "random",
"targets": [
"rr1",
"rr2"
]
}
]
}
Merge and apply the config? [y/n]: y
$ confcli services.routing.rules -w
Running wizard for resource 'rules'
Hint: Hitting return will set a value to its default.
Enter '?' to receive the help string
rules : [
rule can be one of
1: allow
2: consistentHashing
3: contentPopularity
4: deny
5: firstMatch
6: random
7: rawGroup
8: rawHost
9: split
10: weighted
Choose element index or name: split
Adding a 'split' element
rule : {
name (default: ): split
type (default: split): ⏎
condition (default: ): custom_function()
onMatch (default: ): rr2
onMiss (default: ): rr1
}
Add another 'rule' element to array 'rules'? [y/N]: ⏎
]
Generated config:
{
"rules": [
{
"name": "split",
"type": "split",
"condition": "custom_function()",
"onMatch": "rr2",
"onMiss": "rr1"
}
]
}
Merge and apply the config? [y/n]: y
$ confcli services.routing.rules. -w
Running wizard for resource 'rules'
Hint: Hitting return will set a value to its default.
Enter '?' to receive the help string
rules : [
rule can be one of
1: allow
2: consistentHashing
3: contentPopularity
4: deny
5: firstMatch
6: random
7: rawGroup
8: rawHost
9: split
10: weighted
Choose element index or name: weighted
Adding a 'weighted' element
rule : {
name (default: ): weight
type (default: weighted): ⏎
targets : [
target : {
target (default: ): rr1
weight (default: 100): ⏎
condition (default: always()): always()
}
Add another 'target' element to array 'targets'? [y/N]: y
target : {
target (default: ): rr2
weight (default: 100): si('rr2-input-weight')
condition (default: always()): gt('rr2-bandwidth', 1000000)
}
Add another 'target' element to array 'targets'? [y/N]: y
target : {
target (default: ): rr2
weight (default: 100): custom_func()
condition (default: always()): always()
}
Add another 'target' element to array 'targets'? [y/N]: ⏎
]
}
Add another 'rule' element to array 'rules'? [y/N]: ⏎
]
Generated config:
{
"rules": [
{
"name": "weight",
"type": "weighted",
"targets": [
{
"target": "rr1",
"weight": "100",
"condition": "always()"
},
{
"target": "rr2",
"weight": "si('rr2-input-weight')",
"condition": "gt('rr2-bandwith', 1000000)"
},
{
"target": "rr2",
"weight": "custom_func()",
"condition": "always()"
}
]
}
]
}
Merge and apply the config? [y/n]: y
>> First add a raw host block that refers to a regular host
$ confcli services.routing.rules. -w
Running wizard for resource 'rules'
Hint: Hitting return will set a value to its default.
Enter '?' to receive the help string
rules : [
rule can be one of
1: allow
2: consistentHashing
3: contentPopularity
4: deny
5: firstMatch
6: random
7: rawGroup
8: rawHost
9: split
10: weighted
Choose element index or name: rawHost
Adding a 'rawHost' element
rule : {
name (default: ): raw-host
type (default: rawHost): ⏎
hostId (default: ): rr1
}
Add another 'rule' element to array 'rules'? [y/N]: ⏎
]
Generated config:
{
"rules": [
{
"name": "raw-host",
"type": "rawHost",
"hostId": "rr1"
}
]
}
Merge and apply the config? [y/n]: y
>> And then add a rule using the host node
$ confcli services.routing.rules. -w
Running wizard for resource 'rules'
Hint: Hitting return will set a value to its default.
Enter '?' to receive the help string
rules : [
rule can be one of
1: allow
2: consistentHashing
3: contentPopularity
4: deny
5: firstMatch
6: random
7: rawGroup
8: rawHost
9: split
10: weighted
Choose element index or name: rawGroup
Adding a 'rawGroup' element
rule : {
name (default: ): raw-node
type (default: rawGroup): ⏎
memberOrder (default: sequential): ⏎
members : [
member : {
target (default: ): raw-host
weightFunction (default: ): return 1
}
Add another 'member' element to array 'members'? [y/N]: ⏎
]
}
Add another 'rule' element to array 'rules'? [y/N]: ⏎
]
Generated config:
{
"rules": [
{
"name": "raw-node",
"type": "rawGroup",
"memberOrder": "sequential",
"members": [
{
"target": "raw-host",
"weightFunction": "return 1"
}
]
}
]
}
Merge and apply the config? [y/n]: y
Rule Language
Some blocks, such as the split and firstMatch types, have a rule field that
contains a small function in a very simple programming language. This field is
used to filter any incoming client requests in order to determine how to rule
block should react.
In the case of a split block, the rule is evaluated and if it is true the
client is sent to the onMatch part of the block, otherwise it is sent to the
onMiss part for further evaluation.
In the case of a firstMatch block, the rule for each target will be evaluated
top to bottom in order until either a rule evaluates to true or the list is
exhausted. If a rule evaluates to true, the client will be sent to the onMatch
part of the block, otherwise the next target in the list will be tried. If all
targets have been exhausted, then the entire rule evaluation will fail, and the
routing tree will be restarted with the firstMatch block effectively removed.
Example of Boolean Functions
Let’s say we have an ESB3024 Router set up with a session group that matches Apple
devices (named “Apple”). To route all Apple devices to a specific streamer one
would simply create a split block with the following rule:
in_session_group('Apple')
In order to make more complex rules it’s possible to combine several checks like
this in the same rule. Let’s extend the hypothetical ESB3024 Router above with a
configured subnet with all IP addresses in Europe (named “Europe”). To make a
rule that accepts any clients using an Apple device and living outside of
Europe, but only as long as the reported load on the streamer (as indicated by
the selection input variable
“europe_load_mbps”) is less than 1000 megabits per second one could make an
offload block with the following rule (without linebreaks):
in_session_group('Apple')
and not in_subnet('Europe')
and lt('europe_load_mbps', 1000)
In this example in_session_group('Apple') will be true if the client belongs
to the session group named ‘Apple’. The function call in_subnet('Europe') is
true if the client’s IP belongs to the subnet named ‘Europe’, but the word not
in front of it reverses the value so the entire section ends up being false if
the client is in Europe. Finally lt('europe_load_mbps', 1000) is true if
there is a selection input variable named “europe_load_mbps” and its value is
less than 1000.
Since the three parts are conjoined with the and keyword they must all
be true for the entire rule to match. If the keyword or had been used
instead it would have been enough for any of the parts to be true for the
rule to match.
Example of Numeric Functions
A hypothetical CDN has two streamers with different capacity; Host_1 has
roughly twice the capacity of Host_2. A simple random load balancing would put
undue stress on the second host since it will receive as much traffic as the
more capable Host_1.
This can be solved by using a weighted random distribution rule block with
suitable rules for the two hosts:
{
"targets": [
{
"target": "Host_1",
"condition": "always()",
"weight": "100"
}
{
"target": "Host_2",
"condition": "always()",
"weight": "50"
},
]
}
resulting in Host_1 receiving twice as many requests as Host_2 as its
weight function is double that of Host_2.
If the CDN is capable of reporting the free capacity of the hosts, for example by writing to a selection input variable for each host, it’s easy to write a more intelligent load balancing rule by making the weights correspond to the amount of capacity left on each host:
{
"targets": [
{
"target": "Host_1",
"condition": "always()",
"weight": "si('free_capacity_host_1')"
}
{
"target": "Host_2",
"condition": "always()",
"weight": "si('free_capacity_host_2')"
},
]
}
It is also possible to write custom Lua functions that return suitable weights, perhaps taking the host as an argument:
{
"targets": [
{
"target": "Host_1",
"condition": "always()",
"weight": "intelligent_weight_function('Host_1')"
}
{
"target": "Host_2",
"condition": "always()",
"weight": "intelligent_weight_function('Host_1')"
},
]
}
These different weight rules can of course be combined in the same rule block, with one target having a hard coded number, another using a dynamically updated selection input variable and yet another having a custom-built function.
Due to limitations in the random number generator used to distribute requests, it’s better to use somewhat large values, around 100–1000 or so, than to use small values near 0.
Built-In Functions
The following built-in functions are available when writing rules:
in_session_group(str name): True if session belongs to session group<name>in_all_session_groups(str sg_name, ...): True if session belongs to all specified session groupsin_any_session_group(str sg_name, ...): True if session belongs to any specified session groupin_subnet(str subnet_name): True if client IP belongs to the named subnetgt(str si_var, number value): True if selection_inputs[si_var] > valuegt(str si_var1, str si_var2): True if selection_inputs[si_var1] > selection_inputs[si_var2]ge(str si_var, number value): True if selection_inputs[si_var] >= valuege(str si_var1, str si_var2): True if selection_inputs[si_var1] >= selection_inputs[si_var2]lt(str si_var, number value): True if selection_inputs[si_var] < valuelt(str si_var1, str si_var2): True if selection_inputs[si_var1] < selection_inputs[si_var2]le(str si_var, number value): True if selection_inputs[si_var] <= valuele(str si_var1, str si_var2): True if selection_inputs[si_var1] <= selection_inputs[si_var2]eq(str si_var, number value): True if selection_inputs[si_var] == valueeq(str si_var1, str si_var2): True if selection_inputs[si_var1] == selection_inputs[si_var2]neq(str si_var, number value): True if selection_inputs[si_var] != valueneq(str si_var1, str si_var2): True if selection_inputs[si_var1] != selection_inputs[si_var2]si(str si_var): Returns the value of selection_inputs[si_var] if it is defined and non-negative, otherwise it returns 0.always(): Returns true, useful when creating weighted rule blocks.never(): Returns false, opposite ofalways().
These functions, as well as custom functions written in Lua and uploaded to the ESB3024 Router, can be combined to make suitably precise rules.
Combining Multiple Boolean Functions
In order to make the rule language easy to work with, it is fairly restricted
and simple. One restriction is that it’s only possible to chain multiple
function results together using either and or or, but not a
combination of both conjunctions.
Statements joined with and or or keywords are evaluated one by one,
starting with the left-most statement and moving right. As soon as the end
result of the entire expression is certain, the evaluation ends. This means that
evaluation ends with the first false statement for and expressions since a
single false component means the entire expression must also be false. It
also means that evaluation ends with the first true statement for or
expressions since only one component must be true for the entire statement to
be true as well. This is known as short-circuit or lazy evaluation.
Custom Functions
It is possible to write extremely complex Lua functions that take many parameters or calculations into consideration when evaluating an incoming client request. By writing such functions and making sure that they return only non-negative integer values and uploading them to the router they can be used from the rule language. Simply call them like any of the built-in functions listed above, using strings and numbers as arguments if necessary, and their result will be used to determine the routing path to use.
Formal Syntax
The full syntax of the language can be described in just a few lines of BNF grammar:
<rule> := <weight_rule> | <match_rule> | <value_rule>
<weight_rule> := "if" <compound_predicate> "then" <weight> "else" <weight>
<match_rule> := <compound_predicate>
<value_rule> := <weight>
<compound_predicate> := <logical_predicate> |
<logical_predicate> ["and" <logical_predicate> ...] |
<logical_predicate> ["or" <logical_predicate> ...] |
<logical_predicate> := ["not"] <predicate>
<predicate> := <function_name> "(" ")" |
<function_name> "(" <argument> ["," <argument> ...] ")"
<function_name> := <letter> [<function_name_tail> ...]
<function_name_tail> := empty | <letter> | <digit> | "_"
<argument> := <string> | <number>
<weight> := integer | <predicate>
<number> := float | integer
<string> := "'" [<letter> | <digit> | <symbol> ...] "'"
Building a Routing Configuration
This example sets up an entire routing configuration for a system with a ESB3008 Request Router, two streamers and the Apple devices outside of Europe example used earlier in this document. Any clients not matching the criteria will be sent to an offload CDN with two streamers in a simple uniformly randomized load balancing setup.
Set up Session Group
First make a classifier and a session group that uses it:
$ confcli services.routing.classifiers -w
Running wizard for resource 'classifiers'
Hint: Hitting return will set a value to its default.
Enter '?' to receive the help string
classifiers : [
classifier can be one of
1: anonymousIp
2: asnIds
3: contentUrlPath
4: contentUrlQueryParameters
5: geoip
6: hostName
7: ipranges
8: random
9: regexMatcher
10: requestHeader
11: stringMatcher
12: subnet
13: userAgent
Choose element index or name: userAgent
Adding a 'userAgent' element
classifier : {
name (default: ): Apple
type (default: userAgent): ⏎
inverted (default: False): ⏎
patternType (default: stringMatch): ⏎
pattern (default: ): *apple*
}
Add another 'classifier' element to array 'classifiers'? [y/N]: ⏎
]
Generated config:
{
"classifiers": [
{
"name": "Apple",
"type": "userAgent",
"inverted": false,
"patternType": "stringMatch",
"pattern": "*apple*"
}
]
}
Merge and apply the config? [y/n]: y
$ confcli services.routing.sessionGroups -w
Running wizard for resource 'sessionGroups'
Hint: Hitting return will set a value to its default.
Enter '?' to receive the help string
sessionGroups : [
sessionGroup : {
name (default: ): Apple
classifiers : [
classifier (default: ): Apple
Add another 'classifier' element to array 'classifiers'? [y/N]: ⏎
]
}
Add another 'sessionGroup' element to array 'sessionGroups'? [y/N]: ⏎
]
Generated config:
{
"sessionGroups": [
{
"name": "Apple",
"classifiers": [
"Apple"
]
}
]
}
Merge and apply the config? [y/n]: y
Set up Hosts
Create two host groups and add a Request Router to the first and two streamers to the second, which will be used for offload:
$ confcli services.routing.hostGroups -w
Running wizard for resource 'hostGroups'
Hint: Hitting return will set a value to its default.
Enter '?' to receive the help string
hostGroups : [
hostGroup can be one of
1: dns
2: host
3: redirecting
Choose element index or name: redirecting
Adding a 'redirecting' element
hostGroup : {
name (default: ): internal
type (default: redirecting): ⏎
httpPort (default: 80): ⏎
httpsPort (default: 443): ⏎
headersToForward <A list of HTTP headers to forward to the CDN. (default: [])>: [
headersToForward (default: ): ⏎
Add another 'headersToForward' element to array 'headersToForward'? [y/N]: ⏎
]
allowAnyRedirectType (default: False): ⏎
hosts : [
host : {
name (default: ): rr1
hostname (default: ): rr1.example.com
ipv6_address (default: ): ⏎
}
Add another 'host' element to array 'hosts'? [y/N]: ⏎
]
}
Add another 'hostGroup' element to array 'hostGroups'? [y/N]: y
hostGroup can be one of
1: dns
2: host
3: redirecting
Choose element index or name: host
Adding a 'host' element
hostGroup : {
name (default: ): external
type (default: host): ⏎
httpPort (default: 80): ⏎
httpsPort (default: 443): ⏎
hosts : [
host : {
name (default: ): offload-streamer1
hostname (default: ): streamer1.example.com
ipv6_address (default: ): ⏎
}
Add another 'host' element to array 'hosts'? [y/N]: y
host : {
name (default: ): offload-streamer2
hostname (default: ): streamer2.example.com
ipv6_address (default: ): ⏎
}
Add another 'host' element to array 'hosts'? [y/N]: ⏎
]
}
Add another 'hostGroup' element to array 'hostGroups'? [y/N]: ⏎
]
Generated config:
{
"hostGroups": [
{
"name": "internal",
"type": "redirecting",
"httpPort": 80,
"httpsPort": 443,
"headersToForward": [],
"allowAnyRedirectType": false,
"hosts": [
{
"name": "rr1",
"hostname": "rr1.example.com",
"ipv6_address": ""
}
]
},
{
"name": "external",
"type": "host",
"httpPort": 80,
"httpsPort": 443,
"hosts": [
{
"name": "offload-streamer1",
"hostname": "streamer1.example.com",
"ipv6_address": ""
},
{
"name": "offload-streamer2",
"hostname": "streamer2.example.com",
"ipv6_address": ""
}
]
}
]
}
Merge and apply the config? [y/n]: y
Create Load Balancing and Offload Block
Add both offload streamers as targets in a randomgroup block:
$ confcli services.routing.rules -w
Running wizard for resource 'rules'
Hint: Hitting return will set a value to its default.
Enter '?' to receive the help string
rules : [
rule can be one of
1: allow
2: consistentHashing
3: contentPopularity
4: deny
5: firstMatch
6: random
7: rawGroup
8: rawHost
9: split
10: weighted
Choose element index or name: random
Adding a 'random' element
rule : {
name (default: ): balancer
type (default: random): ⏎
targets : [
target (default: ): offload-streamer1
Add another 'target' element to array 'targets'? [y/N]: y
target (default: ): offload-streamer2
Add another 'target' element to array 'targets'? [y/N]: ⏎
]
}
Add another 'rule' element to array 'rules'? [y/N]: ⏎
]
Generated config:
{
"rules": [
{
"name": "balancer",
"type": "random",
"targets": [
"offload-streamer1",
"offload-streamer2"
]
}
]
}
Merge and apply the config? [y/n]: y
Then create a split block with the request router and the load balanced CDN as targets:
$ confcli services.routing.rules -w
Running wizard for resource 'rules'
Hint: Hitting return will set a value to its default.
Enter '?' to receive the help string
rules : [
rule can be one of
1: allow
2: consistentHashing
3: contentPopularity
4: deny
5: firstMatch
6: random
7: rawGroup
8: rawHost
9: split
10: weighted
Choose element index or name: split
Adding a 'split' element
rule : {
name (default: ): offload
type (default: split): ⏎
rule (default: ): in_session_group('Apple') and not in_subnet('Europe') and lt('europe_load_mbps', 1000)
onMatch (default: ): rr1
onMiss (default: ): balancer
}
Add another 'rule' element to array 'rules'? [y/N]: ⏎
]
Generated config:
{
"rules": [
{
"name": "offload",
"type": "split",
"condition": "in_session_group('Apple') and not in_subnet('Europe') and lt('europe_load_mbps', 1000)",
"onMatch": "rr1",
"onMiss": "balancer"
}
]
}
Merge and apply the config? [y/n]: y
The last step required is to set the entrypoint of the routing tree so the router knows where to start evaluating:
$ confcli services.routing.entrypoint offload
services.routing.entrypoint = 'offload'
Evaluate
Now that all the rules have been set up properly and the router has been reconfigured. The translated configuration can be read from the router’s configuration API:
$ curl -k https://router-host:5001/v2/configuration 2> /dev/null | jq .routing
{
"id": "offload",
"member_order": "sequential",
"members": [
{
"host_id": "rr1",
"id": "offload.rr1",
"weight_function": "return ((in_session_group('Apple') ~= 0) and
(in_subnet('Europe') == 0) and
(lt('europe_load_mbps', 1000) ~= 0) and 1) or 0 "
},
{
"id": "offload.balancer",
"member_order": "weighted",
"members": [
{
"host_id": "offload-streamer1",
"id": "offload.balancer.offload-streamer1",
"weight_function": "return 100"
},
{
"host_id": "offload-streamer2",
"id": "offload.balancer.offload-streamer2",
"weight_function": "return 100"
}
],
"weight_function": "return 1"
}
],
"weight_function": "return 100"
}
Note that the configuration language code has been translated into its Lua equivalent.
4.7.4 - Session Groups and Classification
ESB3024 Router provides a flexible classification engine, allowing the assignment of clients into session groups that can then be used to base routing decisions on.
Session Classification
In order to perform routing it is necessary to classify incoming sessions according to the relevant parameters. This is done through session groups and their associated classifiers.
There are different ways of classifying a request:
Anonymous IP: Classifies clients using an anonymous IP database. See Geographic Databases for information about the database.ASN IDs: Checks to see if a client’s IP belongs to any of the specified ASN IDs. See Geographic Databases for information about the ASN database.Content URL path: Matches the given pattern against the path part of the URL requested by the client. The match can be either a case-insensitive wildcard match or a regular expression match.Content URL query parameters: Matches the given pattern against the query parameters of the URL requested by the client. The query parameters are passed as a single string. The match can be either a case-insensitive wildcard match or a regular expression match.GeoIP: Based on the geographic location of the client, supporting wildcard matching. See Route on GeoIP/ASN for more details. The possible values to match with are any combinations of:- Continent
- Country
- Region
- Cities
- ASN
Host name: Matches the given pattern against the name of the host that the request was sent to. The match can be either a case-insensitive wildcard match or a regular expression match.IP ranges: Classifies a client based on whether its IP address belongs to any of the listed IP ranges or not.Random: Randomly classifies clients according to a given probability. The classifier is deterministic, meaning that a session will always get the same classification, even if evaluated multiple times.Regular expression matcher: Matches the given pattern against a configurable source. The match is case-insensitive and supports regular expressions. The following sources are available:content_url_path: The path part of the URL requested by the client.content_url_query_params: The query parameters of the URL requested by the client. The query parameters are passed as a single string.hostname: The name of the host that the request was sent to.user_agent: The user agent string in the HTTP request from the client.
Request Header: Classifies clients based on the value of a specified HTTP header in the request from the client.String matcher: Matches the given pattern against a configurable source. The match is case-insensitive and supports wildcards (’*’). The following sources are available:content_url_path: The path part of the URL requested by the client.content_url_query_params: The query parameters of the URL requested by the client. The query parameters are passed as a single string.hostname: The name of the host that the request was sent to.user_agent: The user agent string in the HTTP request from the client.
Subnet: Tests if a client’s IP belongs to a named subnet, see Subnets for more details.User agent: Matches the given pattern against the user agent string in the HTTP request from the client. The match can be either a case-insensitive wildcard match or a regular expression match.
A session group may have more than one classifier. If it does, all the classifiers must match the incoming client request for it to belong to the session group. It is also possible for a request to belong to multiple session groups, or to none.
To send certain clients to a specific host you first need to create a suitable
classifier using confcli in wizard mode. The wizard will guide you through the
process of creating a new entry, asking you what value to input for each field
and helping you by telling you what inputs are allowed for restricted fields
such as the string comparison source mentioned above:
$ confcli services.routing.classifiers -w
Running wizard for resource 'classifiers'
Hint: Hitting return will set a value to its default.
Enter '?' to receive the help string
classifiers : [
classifier can be one of
1: anonymousIp
2: asnIds
3: contentUrlPath
4: contentUrlQueryParameters
5: geoip
6: hostName
7: ipranges
8: random
9: regexMatcher
10: requestHeader
11: stringMatcher
12: subnet
13: userAgent
Choose element index or name: anonymousIp
Adding a 'anonymousIp' element
classifier : {
name (default: ): anon_ip_matcher
type (default: anonymousIp):
inverted (default: False):
}
Add another 'classifier' element to array 'classifiers'? [y/N]: n
]
Generated config:
{
"classifiers": [
{
"name": "anon_ip_matcher",
"type": "anonymousIp",
"inverted": false
}
]
}
Merge and apply the config? [y/n]: y
$ confcli services.routing.classifiers -w
Running wizard for resource 'classifiers'
Hint: Hitting return will set a value to its default.
Enter '?' to receive the help string
classifiers : [
classifier can be one of
1: anonymousIp
2: asnIds
3: contentUrlPath
4: contentUrlQueryParameters
5: geoip
6: hostName
7: ipranges
8: random
9: regexMatcher
10: requestHeader
11: stringMatcher
12: subnet
13: userAgent
Choose element index or name: asnIds
Adding a 'asnIds' element
classifier : {
name (default: ): asn_matcher
type (default: asnIds): ⏎
inverted (default: False): ⏎
asnIds <The list of ASN IDs to accept. (default: [])>: [
asnId: 1
Add another 'asnId' element to array 'asnIds'? [y/N]: y
asnId: 2
Add another 'asnId' element to array 'asnIds'? [y/N]: y
asnId: 3
Add another 'asnId' element to array 'asnIds'? [y/N]: ⏎
]
}
Add another 'classifier' element to array 'classifiers'? [y/N]: ⏎
]
Generated config:
{
"classifiers": [
{
"name": "asn_matcher",
"type": "asnIds",
"inverted": false,
"asnIds": [
1,
2,
3
]
}
]
}
Merge and apply the config? [y/n]: y
$ confcli services.routing.classifiers -w
Running wizard for resource 'classifiers'
Hint: Hitting return will set a value to its default.
Enter '?' to receive the help string
classifiers : [
classifier can be one of
1: anonymousIp
2: asnIds
3: contentUrlPath
4: contentUrlQueryParameters
5: geoip
6: hostName
7: ipranges
8: random
9: regexMatcher
10: requestHeader
11: stringMatcher
12: subnet
13: userAgent
Choose element index or name: contentUrlPath
Adding a 'contentUrlPath' element
classifier : {
name (default: ): vod_matcher
type (default: contentUrlPath): ⏎
inverted (default: False): ⏎
patternType (default: stringMatch): ⏎
pattern (default: ): *vod*
}
Add another 'classifier' element to array 'classifiers'? [y/N]: n
]
Generated config:
{
"classifiers": [
{
"name": "vod_matcher",
"type": "contentUrlPath",
"inverted": false,
"patternType": "stringMatch",
"pattern": "*vod*"
}
]
}
Merge and apply the config? [y/n]: y
$ confcli services.routing.classifiers -w
Running wizard for resource 'classifiers'
Hint: Hitting return will set a value to its default.
Enter '?' to receive the help string
classifiers : [
classifier can be one of
1: anonymousIp
2: asnIds
3: contentUrlPath
4: contentUrlQueryParameters
5: geoip
6: hostName
7: ipranges
8: random
9: regexMatcher
10: requestHeader
11: stringMatcher
12: subnet
13: userAgent
Choose element index or name: contentUrlQueryParameters
Adding a 'contentUrlQueryParameters' element
classifier : {
name (default: ): bitrate_matcher
type (default: contentUrlQueryParameters): ⏎
inverted (default: False): ⏎
patternType (default: stringMatch): regex
pattern (default: ): .*bitrate=100000.*
}
Add another 'classifier' element to array 'classifiers'? [y/N]: n
]
Generated config:
{
"classifiers": [
{
"name": "bitrate_matcher",
"type": "contentUrlQueryParameters",
"inverted": false,
"patternType": "regex",
"pattern": ".*bitrate=100000.*"
}
]
}
Merge and apply the config? [y/n]: y
$ confcli services.routing.classifiers -w
Running wizard for resource 'classifiers'
Hint: Hitting return will set a value to its default.
Enter '?' to receive the help string
classifiers : [
classifier can be one of
1: anonymousIp
2: asnIds
3: contentUrlPath
4: contentUrlQueryParameters
5: geoip
6: hostName
7: ipranges
8: random
9: regexMatcher
10: requestHeader
11: stringMatcher
12: subnet
13: userAgent
Choose element index or name: geoip
Adding a 'geoip' element
classifier : {
name (default: ): sweden_matcher
type (default: geoip): ⏎
inverted (default: False): ⏎
continent (default: ): ⏎
country (default: ): sweden
cities : [
city (default: ): ⏎
Add another 'city' element to array 'cities'? [y/N]: ⏎
]
asn (default: ): ⏎
}
Add another 'classifier' element to array 'classifiers'? [y/N]: ⏎
]
Generated config:
{
"classifiers": [
{
"name": "sweden_matcher",
"type": "geoip",
"inverted": false,
"continent": "",
"country": "sweden",
"cities": [
""
],
"asn": ""
}
]
}
Merge and apply the config? [y/n]: y
$ confcli services.routing.classifiers -w
Running wizard for resource 'classifiers'
Hint: Hitting return will set a value to its default.
Enter '?' to receive the help string
classifiers : [
classifier can be one of
1: anonymousIp
2: asnIds
3: contentUrlPath
4: contentUrlQueryParameters
5: geoip
6: hostName
7: ipranges
8: random
9: regexMatcher
10: requestHeader
11: stringMatcher
12: subnet
13: userAgent
Choose element index or name: hostName
Adding a 'hostName' element
classifier : {
name (default: ): host_name_classifier
type (default: hostName): ⏎
inverted (default: False): ⏎
patternType (default: stringMatch): ⏎
pattern (default: ): *live.example*
}
Add another 'classifier' element to array 'classifiers'? [y/N]: n
]
Generated config:
{
"classifiers": [
{
"name": "host_name_classifier",
"type": "hostName",
"inverted": false,
"patternType": "stringMatch",
"pattern": "*live.example*"
}
]
}
Merge and apply the config? [y/n]: y
$ confcli services.routing.classifiers -w
Running wizard for resource 'classifiers'
Hint: Hitting return will set a value to its default.
Enter '?' to receive the help string
classifiers : [
classifier can be one of
1: anonymousIp
2: asnIds
3: contentUrlPath
4: contentUrlQueryParameters
5: geoip
6: hostName
7: ipranges
8: random
9: regexMatcher
10: requestHeader
11: stringMatcher
12: subnet
13: userAgent
Choose element index or name: ipranges
Adding a 'ipranges' element
classifier : {
name (default: ): company_matcher
type (default: ipranges): ⏎
inverted (default: False): ⏎
ipranges : [
iprange (default: ): 90.128.0.0/12
Add another 'iprange' element to array 'ipranges'? [y/N]: ⏎
]
}
Add another 'classifier' element to array 'classifiers'? [y/N]: ⏎
]
Generated config:
{
"classifiers": [
{
"name": "company_matcher",
"type": "ipranges",
"inverted": false,
"ipranges": [
"90.128.0.0/12"
]
}
]
}
Merge and apply the config? [y/n]: y
$ confcli services.routing.classifiers -w
Running wizard for resource 'classifiers'
Hint: Hitting return will set a value to its default.
Enter '?' to receive the help string
classifiers : [
classifier can be one of
1: anonymousIp
2: asnIds
3: contentUrlPath
4: contentUrlQueryParameters
5: geoip
6: hostName
7: ipranges
8: random
9: regexMatcher
10: requestHeader
11: stringMatcher
12: subnet
13: userAgent
Choose element index or name: random
Adding a 'random' element
classifier <A classifier randomly applying to clients based on the provided probability. (default: OrderedDict())>: {
name (default: ): random_matcher
type (default: random):
probability (default: 0.5): 0.7
}
Add another 'classifier' element to array 'classifiers'? [y/N]: n
]
Generated config:
{
"classifiers": [
{
"name": "random_matcher",
"type": "random",
"probability": 0.7
}
]
}
Merge and apply the config? [y/n]: y
$ confcli services.routing.classifiers -w
Running wizard for resource 'classifiers'
Hint: Hitting return will set a value to its default.
Enter '?' to receive the help string
classifiers : [
classifier can be one of
1: anonymousIp
2: asnIds
3: contentUrlPath
4: contentUrlQueryParameters
5: geoip
6: hostName
7: ipranges
8: random
9: regexMatcher
10: requestHeader
11: stringMatcher
12: subnet
13: userAgent
Choose element index or name: regexMatcher
Adding a 'regexMatcher' element
classifier : {
name (default: ): content_matcher
type (default: regexMatcher): ⏎
inverted (default: False): ⏎
source (default: content_url_path): ⏎
pattern (default: ): .*/(live|news_channel)/.*m3u8
}
Add another 'classifier' element to array 'classifiers'? [y/N]: ⏎
]
Generated config:
{
"classifiers": [
{
"name": "content_matcher",
"type": "regexMatcher",
"inverted": false,
"source": "content_url_path",
"pattern": ".*/(live|news_channel)/.*m3u8"
}
]
}
Merge and apply the config? [y/n]: y
$ confcli services.routing.classifiers -w
Running wizard for resource 'classifiers'
Hint: Hitting return will set a value to its default.
Enter '?' to receive the help string
classifiers : [
classifier can be one of
1: anonymousIp
2: asnIds
3: contentUrlPath
4: contentUrlQueryParameters
5: geoip
6: hostName
7: ipranges
8: random
9: regexMatcher
10: requestHeader
11: stringMatcher
12: subnet
13: userAgent
Choose element index or name: requestHeader
Adding a 'requestHeader' element
classifier <A classifier that matches on headers in the HTTP request. (default: OrderedDict())>: {
name (default: ): curl
type (default: requestHeader): ⏎
inverted (default: False): ⏎
header (default: ): User-Agent
patternType (default: stringMatch): ⏎
patternSource (default: inline): ⏎
pattern (default: ): curl*
}
Add another 'classifier' element to array 'classifiers'? [y/N]: n
]
Generated config:
{
"classifiers": [
{
"name": "curl",
"type": "requestHeader",
"inverted": false,
"header": "User-Agent",
"patternType": "stringMatch",
"patternSource": "inline",
"pattern": "curl*"
}
]
}
Merge and apply the config? [y/n]: y
$ confcli services.routing.classifiers -w
Running wizard for resource 'classifiers'
Hint: Hitting return will set a value to its default.
Enter '?' to receive the help string
classifiers : [
classifier can be one of
1: anonymousIp
2: asnIds
3: contentUrlPath
4: contentUrlQueryParameters
5: geoip
6: hostName
7: ipranges
8: random
9: regexMatcher
10: requestHeader
11: stringMatcher
12: subnet
13: userAgent
Choose element index or name: stringMatcher
Adding a 'stringMatcher' element
classifier : {
name (default: ): apple_matcher
type (default: stringMatcher): ⏎
inverted (default: False): ⏎
source (default: content_url_path): user_agent
pattern (default: ): *apple*
}
Add another 'classifier' element to array 'classifiers'? [y/N]: ⏎
]
Generated config:
{
"classifiers": [
{
"name": "apple_matcher",
"type": "stringMatcher",
"inverted": false,
"source": "user_agent",
"pattern": "*apple*"
}
]
}
Merge and apply the config? [y/n]: y
$ confcli services.routing.classifiers -w
Running wizard for resource 'classifiers'
Hint: Hitting return will set a value to its default.
Enter '?' to receive the help string
classifiers : [
classifier can be one of
1: anonymousIp
2: asnIds
3: contentUrlPath
4: contentUrlQueryParameters
5: geoip
6: hostName
7: ipranges
8: random
9: regexMatcher
10: requestHeader
11: stringMatcher
12: subnet
13: userAgent
Choose element index or name: subnet
Adding a 'subnet' element
classifier : {
name (default: ): company_matcher
type (default: subnet): ⏎
inverted (default: False): ⏎
patternSource (default: inline): ⏎
pattern (default: ): company
}
Add another 'classifier' element to array 'classifiers'? [y/N]: ⏎
]
Generated config:
{
"classifiers": [
{
"name": "company_matcher",
"type": "subnet",
"inverted": false,
"patternSource": "inline",
"pattern": "company"
}
]
}
Merge and apply the config? [y/n]: y
$ confcli services.routing.classifiers -w
Running wizard for resource 'classifiers'
Hint: Hitting return will set a value to its default.
Enter '?' to receive the help string
classifiers : [
classifier can be one of
1: anonymousIp
2: asnIds
3: contentUrlPath
4: contentUrlQueryParameters
5: geoip
6: hostName
7: ipranges
8: random
9: regexMatcher
10: requestHeader
11: stringMatcher
12: subnet
13: userAgent
Choose element index or name: userAgent
Adding a 'userAgent' element
classifier : {
name (default: ): iphone_matcher
type (default: userAgent): ⏎
inverted (default: False): ⏎
patternType (default: stringMatch): regex
pattern (default: ): i(P|p)hone
}
Add another 'classifier' element to array 'classifiers'? [y/N]: n
]
Generated config:
{
"classifiers": [
{
"name": "iphone_matcher",
"type": "userAgent",
"inverted": false,
"patternType": "regex",
"pattern": "i(P|p)hone"
}
]
}
Merge and apply the config? [y/n]: y
These classifiers can now be used to construct session groups and properly classify clients. Using the examples above, let’s create a session group classifying clients from Sweden using an Apple device:
$ confcli services.routing.sessionGroups -w
Running wizard for resource 'sessionGroups'
Hint: Hitting return will set a value to its default.
Enter '?' to receive the help string
sessionGroups : [
sessionGroup : {
name (default: ): inSwedenUsingAppleDevice
classifiers : [
classifier (default: ): sweden_matcher
Add another 'classifier' element to array 'classifiers'? [y/N]: y
classifier (default: ): apple_matcher
Add another 'classifier' element to array 'classifiers'? [y/N]: ⏎
]
}
Add another 'sessionGroup' element to array 'sessionGroups'? [y/N]: ⏎
]
Generated config:
{
"sessionGroups": [
{
"name": "inSwedenUsingAppleDevice",
"classifiers": [
"sweden_matcher",
"apple_matcher"
]
}
]
}
Merge and apply the config? [y/n]: y
Clients classified by the sweden_matcher and apple_matcher classifiers
will now be put in the session group inSwedenUsingAppleDevice. Using session
groups in routing will be demonstrated later in this document.
Pattern Source
The requestHeader and subnet classifiers have a patternSource field,
which can be either inline or selectionInput. When set to inline, the
pattern is taken directly from the pattern field.
If it is selectionInput, the pattern field is used as a path in the
selection input that points
to the pattern to use for classification. The selection input path may contain
a wildcard ("*"), which matches all elements inside an object or array.
For example, if patternSource contains /blocked_user_agents/*/agent, the
classifier will take its pattern from all agent fields in objects inside
/blocked_user_agents.
If the selection input contains the following data:
{
"blocked_user_agents": {
{ "agent1": { "agent": "Firefox" }},
{ "agent2": { "agent": "Chrome" }}
}
}
then the classifier will match either Firefox or Chrome.
Advanced Classification
The above example will simply apply all classifiers in the list, and as long as they all evaluate to true for a session, that session will be tagged with the session group. For situations where this isn’t enough, classifiers can instead be combined using simple logic statements to form complex rules.
A first simple example can be a session group that accepts any viewers in either
ASN 1, 2 or 3 (corresponding to the classifier asn_matcher or living in Sweden.
This can be done by creating a session group, and adding the following logic
statement:
'sweden_matcher' OR 'asn_matcher'
A slightly more advanced case is where a session group should only contain sessions neither in any of the three ASNs nor in Sweden. This is done by negating the previous example:
NOT ('sweden_matcher' OR 'asn_matcher')
A single classifier can also be negated, rather than the whole statement, for example to accept any Swedish viewers except those in the three ASNs:
'sweden_matcher' AND NOT 'asn_matcher'
Arbitrarily complex statements can be created using classifier names, parentheses,
and the keywords AND, OR and NOT.
For example a session group accepting any Swedish viewers except those in the Stockholm region unless they are also Apple users:
'sweden_matcher' AND (NOT 'stockholm_matcher' OR 'apple_matcher')
Note that the classifier names must be enclosed in single quotes when using this syntax.
Applying this kind of complex classifier using confcli is no more difficult than adding a single classifier at a time:
$ confcli services.routing.sessionGroups. -w
Running wizard for resource 'sessionGroups'
Hint: Hitting return will set a value to its default.
Enter '?' to receive the help string
sessionGroups : [
sessionGroup : {
name (default: ): complex_group
classifiers : [
classifier (default: ): 'sweden_matcher' AND (NOT 'stockholm_matcher' OR 'apple_matcher')
Add another 'classifier' element to array 'classifiers'? [y/N]: ⏎
]
}
Add another 'sessionGroup' element to array 'sessionGroups'? [y/N]: ⏎
]
Generated config:
{
"sessionGroups": [
{
"name": "complex_group",
"classifiers": [
"'sweden_matcher' AND (NOT 'stockholm_matcher' OR 'apple_matcher')"
]
}
]
}
Merge and apply the config? [y/n]: y
4.7.5 - Accounts
If accounts are configured, the router will tag sessions as belonging to an
account. Note that if accounts are not configured or a session does not belong to
an account, a session will be tagged with the default account.
Metrics will be tracked separately for each account when applicable.
Configuration
Accounts are configured using session groups, see Classification
for more information. Using confcli, an account is configured by defining an
account name and a list of session groups for which a session must be classified
into to belong to the account. An account called account_1 can be configured by
running the command
confcli services.routing.accounts -w
Running wizard for resource 'accounts'
Hint: Hitting return will set a value to its default.
Enter '?' to receive the help string
accounts : [
account : {
name (default: ): account_1
sessionGroups <A session will be tagged as belonging to this account if it's classified into all of the listed session groups. (default: [])>: [
sessionGroup (default: ): session_group_1
Add another 'sessionGroup' element to array 'sessionGroups'? [y/N]: y
sessionGroup (default: ): session_group_2
Add another 'sessionGroup' element to array 'sessionGroups'? [y/N]: n
]
}
Add another 'account' element to array 'accounts'? [y/N]: n
]
Generated config:
{
"accounts": [
{
"name": "account_1",
"sessionGroups": [
"session_group_1",
"session_group_2"
]
}
]
}
Merge and apply the config? [y/n]: y
A session will belong to the account account_1 if it has been classified into
the two session groups session_group_1 and session_group_2.
Metrics
If using the configuration above, the metrics will be separated per account:
# TYPE num_requests counter
num_requests{account="account_1",selector="initial"} 3
# TYPE num_requests counter
num_requests{account="default",selector="initial"} 3
4.7.6 - Data streams
Data streams can be used to produce and consume data to and from external data sources. This is useful for integrating with other systems, such as Kafka, to allow data synchronization between different instances of the Director or to read external selection input data.
Configuration
Currently, only Kafka data streams are supported. The addresses of the Kafka
brokers to connect to are configured in integration.kafka.bootstrapServers:
confcli integration.kafka.bootstrapServers
{
"bootstrapServers": [
"kafka-broker-host:9096"
]
}
These Kafka brokers can then be interacted with by configuring data streams in
the services.routing.dataStreams section of the configuration:
confcli services.routing.dataStreams
{
"dataStreams": {
"incoming": [],
"outgoing": []
}
}
Incoming data streams
incoming is a list of data streams that the Director will consume data from.
An incoming data stream defines the following properties:
name: The name of the data stream. This is used to identify the data stream in the configuration and in the logs.source: The source of the data stream. Currently, the only supported source iskafka, which means that the data will be consumed from the Kafka broker configured inintegration.kafka.bootstrapServers.target: The target of the data consumed from the stream. Currently, the only supported target isselectionInput, which means that the consumed data will be stored as selection input data.kafkaTopics: A list of Kafka topics to consume data from.
The following configuration will make the Director consume data from the Kafka
topic selection_input from the Kafka broker configured in
integration.kafka.bootstrapServers and store it as selection input data.
confcli services.routing.dataStreams.incoming
{
"incoming": [
{
"name": "incomingDataStream",
"source": "kafka",
"kafkaTopics": [
"selection_input"
],
"target": "selectionInput"
}
]
}
Outgoing data streams
outgoing is a list of data streams that the Director will produce data to.
An outgoing data stream defines the following properties:
name: The name of the data stream. This is used to identify the data stream in the configuration, in a Lua context and in the logs.type: The type of the data stream. Currently, the only supported type iskafka, which means that the data will be produced to the Kafka broker configured inintegration.kafka.bootstrapServers.kafkaTopic: The Kafka topic to produce data to.
Example of an outgoing data stream that produces to the Kafka topic selection_input:
confcli services.routing.dataStreams.outgoing
{
"outgoing": [
{
"name": "outgoingDataStream",
"type": "kafka",
"kafkaTopic": "selection_input"
}
]
}
Data can be sent to outgoing data streams from a Lua function, see Data stream related functions for more information.
4.7.7 - Advanced features
4.7.7.1 - Content popularity
ESB3024 Router can make routing decisions based on content popularity. All incoming content requests are tracked to continuously update a content popularity ranking list. The popularity ranking algorithm is designed to let popular content quickly rise to the top while unpopular content decays and sinks towards the bottom.
Routing
A content popularity based routing rule can be created by running
$ confcli services.routing.rules -w
Running wizard for resource 'rules'
Hint: Hitting return will set a value to its default.
Enter '?' to receive the help string
rules : [
rule can be one of
1: allow
2: consistentHashing
3: contentPopularity
4: deny
5: firstMatch
6: random
7: rawGroup
8: rawHost
9: split
10: weighted
Choose element index or name: contentPopularity
Adding a 'contentPopularity' element
rule : {
name (default: ): content_popularity_rule
type (default: contentPopularity):
contentPopularityCutoff (default: 10): 5
onPopular (default: ): edge-streamer
onUnpopular (default: ): offload
}
Add another 'rule' element to array 'rules'? [y/N]: n
]
Generated config:
{
"rules": [
{
"name": "content_popularity_rule",
"type": "contentPopularity",
"contentPopularityCutoff": 5.0,
"onPopular": "edge-streamer",
"onUnpopular": "offload"
}
]
}
Merge and apply the config? [y/n]: y
This rule will route requests for the top 5 most popular content items to
edge-streamer and all other requests to offload.
Some configuration settings attributed to content popularity are available:
$ confcli services.routing.settings.contentPopularity
{
"contentPopularity": {
"enabled": true,
"algorithm": "score_based",
"sessionGroupNames": [],
"popularityListMaxSize": 100000,
"scoreBased": {
"popularityDecayFraction": 0.2,
"popularityPredictionFactor": 2.5,
"requestsBetweenPopularityDecay": 1000
},
"timeBased": {
"intervalsPerHour": 10
}
}
}
enabled: Whether or not to track content popularity. Whenenabledis set tofalse, content popularity will not be tracked. Note that routing on content popularity is possible even ifenabledisfalseand content popularity has been tracked previously.algorithm: Choice of content popularity tracking algorithm. There are two possible choices:score_basedortime_based(detailed below).sessionGroupNames: Names of the session groups for which content popularity should be tracked. If left empty, content popularity will be tracked for all sessions. The content popularity is tracked globally, not per session group, but the popularity metrics is only updated for sessions belonging to these groups.popularityListMaxSize: The maximum amount of unique content items to track for popularity.scoreBased: Configuration parameters unique to the score based algorithm.timeBased: Configuration parameters unique to the time based algorithm.
Size of Popularity List
The size of the popularity list is limited to prevent it growing forever. A single entry in the popularity ranking list will at most consume 180 bytes of memory. E.g. setting the maximum size to 1000 would consume at most 180⋅1,000 = 180,000 B = 0.18 MB. If the content popularity list is full, a request to a new item will replace the least popular item.
Setting a very high maximum size will not impact performance, it will only consume more memory.
Score-Based Algorithm
The requestsBetweenPopularityDecay parameter defines the number of requests
between each popularity decay update, an integral component of this feature.
The popularityPredictionFactor and popularityDecayFraction settings tune
the behaviour of the content popularity ranking algorithm, explained further
below.
Decay Update
To allow for popular content to quickly rise in popularity and unpopular content to sink, a dynamic popularity ranking algorithm is used. The goal of the algorithm is to track content popularity in real time, allowing routing decisions based on the requested content’s popularity. The algorithm is applied every decay update.
The algorithm uses current trending content to predict content popularity. The
popularityPredictionFactor setting regulates how much the algorithm should rely
on predicted popularity. A high prediction factor allows rising content to quickly
rise to high popularity but can also cause unpopular content with a sudden burst
of requests to wrongfully rise to the top. A low prediction factor can cause
stagnation in the popularity ranking, not allowing new popular content to rise
to the top.
Unpopular content decays in popularity, the magnitude of which is regulated by
popularityDecayFraction. A high value will aggressively decay content
popularity on every decay update while a low value will bloat the ranking,
causing stagnation. Once content decays to a trivially low popularity score, it
is pruned from the content popularity list.
When configuring these tuning parameters, the most crucial data to consider is
the size of your asset catalog, i.e. the number of unique contents you offer.
The recommended values, obtained through testing, are presented in the table below.
Note that the popularityPredictionFactor setting is the principal factor in
controlling the algorithm’s behaviour.
| Catalog size n | Popularity prediction factor | Popularity decay fraction |
|---|---|---|
| n < 1000 | 2.2 | 0.2 |
| 1000 < n < 5000 | 2.3 | 0.2 |
| 5000 < n < 10000 | 2.5 | 0.2 |
| n > 10000 | 2.6 | 0.2 |
Time-Based Algorithm
The time based algorithm only requires the configuration parameter
intervalsPerHour. As an example, setting intervalsPerHour to 10
would give 10 six minute intervals per hour. During each interval,
all unique content requests has an associated counter, increasing
by one for each incoming request. After an hour, all intervals have
been cycled through. The counters in the first interval will be reset
and all incoming content requests will increase the counters in the
first interval again. This cycle continues forever.
When determining a single content’s popularity, the sum of each content’s counter in all intervals is used to determine a popularity ranking.
4.7.7.2 - Consistent Hashing
Consistent hashing based routing is a feature that can be used to distribute requests to a set of hosts in a cache friendly manner. By using AgileTV’s consistent distributed hash algorithm, the amount of cache redistribution is minimized within a set of hosts. Requests for a content will always be routed to the same set of hosts, the amount of which is configured by the spread factor, allowing high cache usage. When adding or removing hosts, the algorithm minimizes cache redistribution.
Say you have the host group [s1, s2, s3, s4, s5] and have
configured spreadFactor = 3. A request for a content asset1 would then be
routed to the same three hosts with one of them being selected randomly for each
request. Requests for a different content asset2 would also be routed to one
of three different hosts, most likely a different combination of hosts than
requests for content asset1.
Example routing results with spreadFactor = 3:
- Request for
asset1→ route to one of[s1, s3, s4]. - Request for
asset2→ route to one of[s2, s4, s5]. - Request for
asset3→ route to one of[s1, s2, s5].
Since consistent hashing based routing ensures that requests for a specific content always get routed to the same set of hosts, the risk of cache misses are lowered on the hosts since they will be served the same content requests over and over again.
Note that the maximum value of
spreadFactoris 64. Consequently, the highest amount of hosts you can use in aconsistentHashingrule block is 64.
Three different hashing algorithms are available: MD5, SDBM and Murmur.
The algorithm is chosen during configuration.
Configuration
Configuring consistent hashing based routing is easily done using confcli. Let’s configure the example described above:
confcli services.routing.rules -w
Running wizard for resource 'rules'
Hint: Hitting return will set a value to its default.
Enter '?' to receive the help string
rules : [
rule can be one of
1: allow
2: consistentHashing
3: contentPopularity
4: deny
5: firstMatch
6: random
7: rawGroup
8: rawHost
9: split
10: weighted
Choose element index or name: consistentHashing
Adding a 'consistentHashing' element
rule : {
name (default: ): consistentHashingRule
type (default: consistentHashing):
spreadFactor (default: 1): 3
hashAlgorithm (default: MD5):
targets : [
target : {
target (default: ): s1
enabled (default: True):
}
Add another 'target' element to array 'targets'? [y/N]: y
target : {
target (default: ): s2
enabled (default: True):
}
Add another 'target' element to array 'targets'? [y/N]: y
target : {
target (default: ): s3
enabled (default: True):
}
Add another 'target' element to array 'targets'? [y/N]: y
target : {
target (default: ): s4
enabled (default: True):
}
Add another 'target' element to array 'targets'? [y/N]: y
target : {
target (default: ): s5
enabled (default: True):
}
Add another 'target' element to array 'targets'? [y/N]: n
]
}
Add another 'rule' element to array 'rules'? [y/N]: n
]
Generated config:
{
"rules": [
{
"name": "consistentHashingRule",
"type": "consistentHashing",
"spreadFactor": 3,
"hashAlgorithm": "MD5",
"targets": [
{
"target": "s1",
"enabled": true
},
{
"target": "s2",
"enabled": true
},
{
"target": "s3",
"enabled": true
},
{
"target": "s4",
"enabled": true
},
{
"target": "s5",
"enabled": true
}
]
}
]
}
Adding Hosts
Adding a host to the list will give an additional target for the consistent hashing algorithm to route requests to. This will shift content distribution onto the new host.
confcli services.routing.rules.consistentHashingRule.targets -w
Running wizard for resource 'targets'
Hint: Hitting return will set a value to its default.
Enter '?' to receive the help string
targets : [
target : {
target (default: ): s6
enabled (default: True):
}
Add another 'target' element to array 'targets'? [y/N]: n
]
Generated config:
{
"targets": [
{
"target": "s6",
"enabled": true
}
]
}
Merge and apply the config? [y/n]: y
Removing Hosts
There is one very important caveat of using a consistent hashing rule block. As long as you don’t modify the list of hosts, the consistent hashing algorithm will keep routing requests to the same hosts. However, if you remove a host from the block in any position except the last, the consistent hashing algorithm’s behaviour will change and the algorithm cannot maintain a minimum amount of cache redistribution.
If you’re in a situation where you have to remove a host from the routing
targets but want to keep the same consistent hashing behaviour, e.g. during
very high load, you’ll have to toggle that target’s enabled field to false.
E.g., disabling requests to s2 can be accomplished by:
$ confcli services.routing.rules.consistentHashingRule.targets.1.enabled false
services.routing.rules.consistentHashingRule.targets.1.enabled = False
$ confcli services.routing.rules.consistentHashingRule.targets.1
{
"1": {
"target": "s2",
"enabled": false
}
}
If you modify the list order or remove hosts, it is highly recommended to do so during moments where a higher rate of cache misses are acceptable.
4.7.7.3 - Security token verification
The security token verification feature allows for ESB3024 Router to only process requests that contain a correct security token. The token is generated by the client, for example in the portal, using an algorithm that it shares with the router. The router verifies the token and rejects the request if the token is incorrect.
It is beyond the scope of this document to describe how the token is generated, that is described in the Security Tokens application note that is installed with the ESB3024 Router’s extra documentation.
Setting up a Routing Rule
The token verification is performed by calling the verify_security_token()
function from a routing rule. The function returns 1 if the token is
correct, otherwise it returns 0. It should typically be called from the
first routing rule, to make requests with bad tokens fail as early as possible.
The confcli example assumes that the router already has rules configured, with
an entry point named select_cdn. Token verification is enabled by inserting an
“allow” rule first in the rule list.
confcli services.routing.rules -w
Running wizard for resource 'rules'
Hint: Hitting return will set a value to its default.
Enter '?' to receive the help string
rules : [
rule can be one of
1: allow
2: consistentHashing
3: contentPopularity
4: deny
5: firstMatch
6: random
7: rawGroup
8: rawHost
9: split
10: weighted
Choose element index or name: allow
Adding a 'allow' element
rule : {
name (default: ): token_verification
type (default: allow):
condition (default: always()): verify_security_token()
onMatch (default: ): select_cdn
}
Add another 'rule' element to array 'rules'? [y/N]: n
]
Generated config:
{
"rules": [
{
"name": "token_verification",
"type": "allow",
"condition": "verify_security_token()",
"onMatch": "select_cdn"
}
]
}
Merge and apply the config? [y/n]: y
$ confcli services.routing.entrypoint token_verification
services.routing.entrypoint = 'token_verification'
"routing": {
"id": "token_verification",
"member_order": "sequential",
"members": [
{
"id": "token_verification.0.select_cdn",
"member_order": "weighted",
"members": [
...
],
"weight_function": "return verify_security_token() ~= 0"
},
{
"id": "token_verification.1.rejected",
"member_order": "sequential",
"members": [],
"weight_function": "return 1"
}
],
"weight_function": "return 100"
},Configuring Security Token Options
The secret parameter is not part of the router request, but needs to be
configured separately in the router. That can be done with the host-config
tool that is installed with the router.
Besides configuring the secret, host-config can also configure floating
sessions and a URL prefix. Floating sessions are sessions that are not tied to a
specific IP address. When that is enabled, the token verification will not take
the IP address into account when verifying the token.
The security token verification is configured per host, where a host is the name
of the host that the request was sent to. This makes it possible for a router to
support multiple customer accounts, each with their own secret. If no
configuration is found for a host, a configuration with the name default is
used.
host-config supports three commands: print, set and delete.
The print command prints the current configuration for a host. The following
parameters are supported:
host-config print [-n <host-name>]
By default it prints the configuration for all hosts, but if the optional -n
flag is given it will print the configuration for a single host.
Set
The set command sets the configuration for a host. The configuration is given
as command line parameters. The following parameters are supported:
host-config set
-n <host-name>
[-f floating]
[-p url-prefix]
[-r <secret-to-remove>]
[-s <secret-to-add>]
-n <host-name>- The name of the host to configure.-f floating- A boolean option that specifies if floating sessions are accepted. The parameter accepts the valuestrueandfalse.-p url-prefix- A URL prefix that is used for identifying requests that come from a certain account. This is not used when verifying tokens.-r <secret-to-remove>- A secret that should be removed from the list of secrets.-s <secret-to-add>- A secret that should be added to the list of secrets.
For example, to set the secret “secret-1” and enable floating sessions for the default host, the following command can be used:
host-config set -n default -s secret-1 -f true
The set command only touches the configuration options that are mentioned on
the command line, so the following command line will add a second secret to the
default host without changing the floating session setting:
host-config set -n default -s secret-2
It is possible to set multiple secrets per host. This is useful when updating a secret, then both the old and the new secret can be valid during the transition period. After the transition period the old secret can be removed by typing:
host-config set -n default -r secret-1
Delete
The delete command deletes the configuration for a host. It supports the
following parameters:
host-config delete -n <host-name>
For example, to delete the configuration for example.com, the following
command can be used:
host-config delete -n example.com
Global Options
host-config also has a few global options. They are:
-k <security-key>- The security key that is used when communicating with the router. This is normally retrieved automatically.-h- Print a help message and exit.-r <router>- The router to connect to. This default tolocalhost, but can be changed to connect to a remote router.-v- Verbose output, can be given multiple times.
Debugging Security Token Verification
The security token verification only logs messages when the log level is set to
4 or higher. Then it will only log some errors. It is possible to enable more
verbose logging using the security-token-config that is installed together
with the router.
When verbose logging is enabled, the router will log information about the token verification, including the configured token secrets, so it needs to be used with care.
The logged lines are prefixed with verify_security_token.
The security-token-config tool supports the commands print and set.
The print command prints the current configuration. If nothing is configured
it will not print anything.
Set
The set command sets the configuration. The following parameters are
supported:
security-token-config set
[-d <enabled>]
-d <enabled>- A boolean option that specifies if debug logging should be enabled or not. The parameter accepts the valuestrueandfalse.
4.7.7.4 - Subnets API
ESB3024 Router provides utilities to quickly match clients into subnets. Any combination of IPv4 and IPv6 addresses can be used. To begin, a JSON file is needed, defining all subnets, e.g:
{
"255.255.255.255/24": "area1",
"255.255.255.255/16": "area2",
"255.255.255.255/8": "area3",
"90.90.1.3/16": "area4",
"5.5.0.4/8": "area5",
"2a02:2e02:9bc0::/48": "area6",
"2a02:2e02:9bc0::/32": "area7",
"2a02:2e02:9bc0::/16": "area8",
"2a02:2e02:9de0::/44": "combined_area",
"2a02:2e02:ada0::/44": "combined_area"
}
and PUT it to the endpoint :5001/v1/subnets or :5001/v2/subnets, the
API version doesn’t matter for subnets:
curl -k -T subnets.json -H "Content-Type: application/json" https://router-host:5001/v1/subnets
Note that it is possible for several subnet CIDR strings to share the same label, effectively grouping them together.
The router provides the built-in function in_subnet(subnet_name) that
can to make routing decisions based on a client’s subnet. For more details, see
Built-in Lua functions.
To configure a rule that only allows clients in the area1 subnet, run the
command
$ confcli services.routing.rules -w
Running wizard for resource 'rules'
Hint: Hitting return will set a value to its default.
Enter '?' to receive the help string
rules : [
rule can be one of
1: allow
2: consistentHashing
3: contentPopularity
4: deny
5: firstMatch
6: random
7: rawGroup
8: rawHost
9: split
10: weighted
Choose element index or name: allow
Adding a 'allow' element
rule : {
name (default: ): only_allow_area1
type (default: allow):
condition (default: always()): in_subnet('area1')
onMatch (default: ): example-host
}
Add another 'rule' element to array 'rules'? [y/N]: n
]
Generated config:
{
"rules": [
{
"name": "only_allow_area1",
"type": "allow",
"condition": "in_subnet('area1')",
"onMatch": "example-host"
}
]
}
Merge and apply the config? [y/n]: y
Invalid IP-addresses will be omitted during subnet list construction accompanied by a message in the log displaying the invalid IP address.
4.7.7.5 - Lua Features
4.7.7.5.1 - Built-in Lua Functions
This section details all built-in Lua functions provided by the router.
Logging Functions
The router provides Lua logging functionality that is convenient when creating custom Lua functions. A prefix can be added to the log message which is useful to differentiate log messages from different lua files. At the top of the Lua source file, add the line
local log = log.add_prefix("my_lua_file")
to prepend all log messages with "my_lua_file".
The logging functions support formatting and common log levels:
log.critical('A log message with number %d', 1.5)
log.error('A log message with string %s', 'a string')
log.warning('A log message with integer %i', 1)
log.info('A log message with a local number variable %d', some_local_number)
log.debug('A log message with a local string variable %s', some_local_string)
log.trace('A log message with a local integer variable %i', some_local_integer)
log.message('A log message')
Many of the router’s built-in Lua functions use the logging functions.
Predictive Load-Balancing Functions
Predictive load balancing is a tool that can be used to avoid overloading hosts with traffic. Consider the case where a popular event starts at a certain time, let’s say 12 PM. A spike in traffic will be routed to the hosts that are streaming the content at 12 PM, most of them starting at low bitrates. A host might have sufficient bandwidth left to take on more clients but when the recently connected clients start ramping up in video quality and increase their bitrate, the host can quickly become overloaded, possibly dropping incoming requests or going offline. Predictive load balancing solves this issue by considering how many times a host recently been redirected to.
Four functions for predictive load balancing are provided by the router
that can be used when constructing conditions/weight functions: host_bitrate()
, host_bitrate_custom(), host_has_bw() and host_has_bw_custom().
All require data to be supplied to the selection input API and apply
only to leaf nodes in the routing tree. In order for predictive load balancing
to work properly the data must be updated at regular intervals. The data needs
to be supplied by the target system.
These functions are suitable to used as host health checks. To configure host health checks, see configuring CDNs and hosts.
Note that host_bitrate() and host_has_bw() rely on data supplied by metrics
agents, detailed in Cache hardware metrics: monitoring and routing.
host_bitrate_custom() and host_has_bw_custom() rely on
manually supplied selection input data, detailed in selection input API. The
bitrate unit depends on the data submitted to the selection input API.
Example Metrics
The data supplied to the selection input API by the metrics agents uses the following structure:
{
"streamer-1": {
"hardware_metrics": {
"/": {
"free": 1741596278784,
"total": 1758357934080,
"used": 16761655296,
"used_percent": 0.9532561585516977
},
"cpu_load1": 0.02,
"cpu_load15": 0.12,
"cpu_load5": 0.02,
"mem_available": 4895789056,
"mem_available_percent": 59.551760354263074,
"mem_total": 8221065216,
"mem_used": 2474393600,
"n_cpus": 4
},
"per_interface_metrics": {
"eths1": {
"link": 1,
"interface_up": true,
"megabits_sent": 22322295739.378456,
"megabits_sent_rate": 8085.2523952,
"speed": 100000
}
}
}
}
Note that all built-in functions interacting with selection input values support indexing into nested selection input data. Consider the selection input data in above. The nested values can be accessed by using dots between the keys:
si('streamer-1.per_interface_metrics.eths1.megabits_sent_rate')
Note that the whole selection input variable name must be within single quotes.
The function si() is documented under
general purpose functions.
host_bitrate({})
host_bitrate() returns the predicted bitrate (in megabits per second) of
the host after the recently connected clients start ramping up in streaming
quality. The function accepts an argument table with the following keys:
interface: The name of the interface to use for bitrate prediction.- Optional
avg_bitrate: the average bitrate per client, defaults to 6 megabits per second. - Optional
num_routers: the number of routers that can route to this host, defaults to 1. This is important to accurately predict the incoming load if multiple routers are used. - Optional
host: The name of the host to use for bitrate prediction. Defaults to the current host if not provided.
Required Selection Input Data
This function relies on the field megabits_sent_rate, supplied by the Telegraf
metrics agent, as seen in example metrics. If these fields
are missing from your selection input data, this function will not work.
Examples of usage:
host_bitrate({interface='eths0'})
host_bitrate({avg_bitrate=1, interface='eths0'})
host_bitrate({num_routers=2, interface='eths0'})
host_bitrate({avg_bitrate=1, num_routers=4, interface='eths0'})
host_bitrate({avg_bitrate=1, num_routers=4, host='custom_host', interface='eths0'})
host_bitrate({}) calculates the predicted bitrate as:
predicted_host_bitrate = current_host_bitrate + (recent_connections * avg_bitrate * num_routers)
host_bitrate_custom({})
Same functionality as host_bitrate() but uses a custom selection input
variable as bitrate input instead of accessing hardware metrics. The function
accepts an argument table with the following keys:
custom_bitrate_var: The name of the selection input variable to be used for accessing current host bitrate.- Optional
avg_bitrate: seehost_bitrate()documentation above. - Optional
num_routers: seehost_bitrate()documentation above.
host_bitrate_custom({custom_bitrate_var='host1_current_bitrate'})
host_bitrate_custom({avg_bitrate=1, custom_bitrate_var='host1_current_bitrate'})
host_bitrate_custom({num_routers=4, custom_bitrate_var='host1_current_bitrate'})
host_has_bw({})
Instead of accessing the predicted bitrate of a host through host_bitrate(),
host_has_bw() returns 1 if the host is predicted to have enough
bandwidth left to take on more clients after recent connections ramp up in
bitrate, otherwise it returns 0. The function accepts an argument table with the
following keys:
interface: seehost_bitrate()documentation above.- Optional
avg_bitrate: seehost_bitrate()documentation above. - Optional
num_routers: seehost_bitrate()documentation above. - Optional
host: seehost_bitrate()documentation above. - Optional
margin: the bitrate (megabits per second) headroom that should be taken into account during calculation, defaults to 0.
host_has_bw({}) returns whether or not the following statement is true:
predicted_host_bitrate + margin < host_bitrate_capacity
Required Selection Input Data
host_has_bw({}) relies on the fields megabits_sent_rate and speed,
supplied by the Telegraf metrics agent, as seen in
example metrics. If these fields are missing from your
selection input data, this function will not work.
Examples of usage:
host_has_bw({interface='eths0'})
host_has_bw({margin=10, interface='eth0'})
host_has_bw({avg_bitrate=1, interface='eth0'})
host_has_bw({num_routers=4, interface='eth0'})
host_has_bw({host='custom_host', interface='eth0'})
host_has_bw_custom({})
Same functionality as host_has_bw() but uses a custom selection input
variable as bitrate. It also uses a number or a custom selection input
variable for the capacity. The function accepts an argument table
with the following keys:
custom_capacity_var: a number representing the capacity of the network interface OR the name of the selection input variable to be used for accessing host capacity.custom_bitrate_var: seehost_bitrate_custom()documentation- Optional
margin: seehost_has_bw()documentation above. above. - Optional
avg_bitrate: seehost_bitrate()documentation above. - Optional
num_routers: seehost_bitrate()documentation above.
Examples of usage:
host_has_bw_custom({custom_capacity_var=10000, custom_bitrate_var='streamer-1.per_interface_metrics.eths1.megabits_sent_rate'})
host_has_bw_custom({custom_capacity_var='host1_capacity', custom_bitrate_var='streamer-1.per_interface_metrics.eths1.megabits_sent_rate'})
host_has_bw_custom({margin=10, custom_capacity_var=10000, custom_bitrate_var='streamer-1.per_interface_metrics.eths1.megabits_sent_rate'})
host_has_bw_custom({avg_bitrate=1, custom_capacity_var=10000, custom_bitrate_var='streamer-1.per_interface_metrics.eths1.megabits_sent_rate'})
host_has_bw_custom({num_routers=4, custom_capacity_var=10000, custom_bitrate_var='streamer-1.per_interface_metrics.eths1.megabits_sent_rate'})
Health Check Functions
This section details built-in Lua functions that are meant to be used for host health checks. Note that these functions rely on data supplied by metric agents detailed in Cache hardware metrics: monitoring and routing. Make sure cache hardware metrics are supplied to the router before using any of these functions.
cpu_load_ok({})
The function accepts an optional argument table with the following keys:
- Optional
host: The name of the host. Defaults to the name of the selected host if not provided. - Optional
cpu_load5_limit: The acceptable limit for the 5-minute CPU load. Defaults to 0.9 if not provided.
The function returns 1 if the five minute CPU load average is below their respective limits, and 0 otherwise.
Examples of usage:
cpu_load_ok()
cpu_load_ok({host = 'custom_host'})
cpu_load_ok({cpu_load5_limit = 0.8})
cpu_load_ok({host = 'custom_host', cpu_load5_limit = 0.8})
memory_usage_ok({})
The function accepts an optional argument table with the following keys:
- Optional
host: The name of the host. Defaults to the host of the selected host if not provided. - Optional
memory_usage_limit: The acceptable limit for the memory usage. Defaults to 0.9 if not provided.
The function returns 1 if the memory usage is below the limit, and 0 otherwise.
Examples of usage:
memory_usage_ok()
memory_usage_ok({host = 'custom_host'})
memory_usage_ok({memory_usage_limit = 0.7})
memory_usage_ok({host = 'custom_host', memory_usage_limit = 0.7})
interfaces_online({})
The function accepts an argument table with the following keys:
- Required
interfaces: A string or a table of strings representing the network interfaces to check. - Optional
host: The name of the host. Defaults to the host of the selected host if not provided.
The function returns 1 if all the specified interfaces are online, and 0 otherwise.
Required Selection Input Data
This function relies on the fields link and interface_up, supplied by
the Telegraf metrics agent, as seen in example metrics. If
these fields are missing from your selection input data, this function will not
work.
Examples of usage:
interfaces_online({interfaces = 'eth0'})
interfaces_online({interfaces = {'eth0', 'eth1'}})
interfaces_online({host = 'custom_host', interfaces = 'eth0'})
interfaces_online({host = 'custom_host', interfaces = {'eth0', 'eth1'}})
health_check({})
The function accepts an optional argument table with the following keys:
- Required
interfaces: A string or a table of strings representing the network interfaces to check. - Optional
host: The name of the host. Defaults to the host of the selected host if not provided. - Optional
cpu_load5_limit: The acceptable limit for the 5-minute CPU load. Defaults to 0.9 if not provided. - Optional
memory_usage_limit: The acceptable limit for the memory usage. Defaults to 0.9 if not provided.
The function calls the health check functions cpu_load_ok({}),
memory_usage_ok({}) and interfaces_online({}). The functions returns 1 if
all these functions returned 1, otherwise it returns 0.
Examples of usage:
health_check({interfaces = 'eths0'})
health_check({host = 'custom_host', interfaces = 'eths0'})
health_check({cpu_load5_limit = 0.7, memory_usage_limit = 0.8, interfaces = 'eth0'})
health_check({host = 'custom_host', cpu_load5_limit = 0.7, memory_usage_limit = 0.8, interfaces = {'eth0', 'eth1'}})
General Purpose Functions
The router supplies a number of general purpose Lua functions.
always()
Always returns 1.
never()
Always returns 0. Useful for temporarily disabling caches by using it as a health check.
Examples of usage:
always()
never()
si(si_name)
The function reads the value of the selection input variable si_name and
returns it if it exists, otherwise it returns 0. The function accepts a string
argument for the selection input variable name.
Examples of usage:
si('some_selection_input_variable_name')
si('streamer-1.per_interface_metrics.eths1.megabits_sent_rate')
Comparison functions
All comparison functions use the form function(si_name, value) and compares
the selection input value with the name si_name with value.
ge(si_name, value) - greater than or equal
gt(si_name, value) - greater than
le(si_name, value) - less than or equal
lt(si_name, value) - less than
eq(si_name, value) - equal to
neq(si_name, value) - not equal to
Examples of usage:
ge('streamer-1.hardware_metrics.mem_available_percent', 30)
gt('streamer-1.hardware_metrics./.free', 1000000000)
le('streamer-1.hardware_metrics.cpu_load5', 0.8)
lt('streamer-1.per_interface_metrics.eths1.megabits_sent_rate', 9000)
eq('streamer-1.per_interface_metrics.eths1.link.', 1)
neq('streamer-1.hardware_metrics.n_cpus', 4)
Session Checking Functions
in_subnet(subnet)
Returns 1 if the current session belongs to subnet, otherwise it returns 0.
See Subnets API for more details on how to use
subnets in routing. The function accepts a string argument for the subnet name.
Examples of usage:
in_subnet('stockholm')
in_subnet('unserviced_region')
in_subnet('some_other_subnet')
These functions checks the current session’s session groups.
in_session_group(session_group)
Returns 1 if the current session has been classified into session_group,
otherwise it returns 0. The function accepts a string argument for the session
group name.
in_any_session_group({})
Returns 1 if the current session has been classified into any of
session_groups, otherwise it returns 0. The function accepts a table array of
strings as argument for the session group names.
in_all_session_groups({})
Returns 1 if the current session has been classified into all of
session_groups, otherwise it returns 0. The function accepts a table array of
strings as argument for the session group names.
Examples of usage:
in_session_group('safari_browser')
in_any_session_group({ 'in_europe', 'in_asia'})
in_all_session_group({ 'vod_content', 'in_america'})
Other built-in functions
base64_encode(data)
base64_encode(data) returns the base64 encoded string of data.
Arguments:
data: The data to encode.
Example:
print(base64_encode('Hello world!'))
SGVsbG8gd29ybGQh
base64_decode(data)
base64_decode(data) returns the decoded data of the base64 encoded string, as
a raw binary string.
Arguments:
data: The data to decode.
Example:
print(base64_decode('SGVsbG8gd29ybGQh'))
Hello world!
base64_url_encode(data)
base64_url_encode(data) returns the base64 URL encoded string of data.
Arguments:
data: The data to encode.
Example:
print(base64_url_encode('ab~~'))
YWJ-fg
base64_url_decode(data)
base64_url_decode(data) returns the decoded data of the base64 URL encoded
string, as a raw binary string.
Arguments:
data: The data to decode.
Example:
print(base64_url_decode('YWJ-fg'))
ab~~
to_hex_string(data)
to_hex_string(data) returns a string containing the hexadecimal
representation of the string data.
Arguments:
data: The data to convert.
Example:
print(to_hex_string('Hello world!\n'))
48656c6c6f20776f726c64210a
from_hex_string(data)
from_hex_string(data) returns a string containing the byte representation of
the hexadecimal string data.
Arguments:
data: The data to convert.
Example:
print(from_hex_string('48656c6c6f20776f726c6421'))
Hello world!
empty(table)
empty(table) returns true if table is empty, otherwise it returns false.
Arguments:
table: The table to check.
Examples:
print(tostring(empty({})))
true
print(tostring(empty({1, 2, 3})))
false
md5(data)
md5(data) returns the MD5 hash of data, as a hexstring.
Arguments:
data: The data to hash.
Example:
print(md5('Hello world!'))
86fb269d190d2c85f6e0468ceca42a20
sha256(date)
sha256(data) returns the SHA-256 hash of data, as a hexstring.
Arguments:
data: The data to hash.
Example:
print(sha256('Hello world!'))
c0535e4be2b79ffd93291305436bf889314e4a3faec05ecffcbb7df31ad9e51a
hmac_sha256(key, data)
hmac_sha256(key, data) returns the HMAC-SHA-256 hash of data using key,
as a string containing raw binary data.
Arguments:
key: The key to use.data: The data to hash.
Example:
print(to_hex_string(hmac_sha256('secret', 'Hello world!')))
a65f4cfcf5f421ff2be052e0642bccbcfeb126ee73ebc4fe3b381964302eb632
hmac_sha384(key, data)
hmac_sha384(key, data) returns the HMAC-SHA-384 hash of data using key,
as a string containing raw binary data.
Arguments:
key: The key to use.data: The data to hash.
Example:
print(to_hex_string(hmac_sha384('secret', 'Hello world!')))
917516d93d3509a371a129ca50933195dd659712652f07ba5792cbd5cade5e6285a841808842cfa0c3c69c8fb234468a
hmac_sha512(key, data)
hmac_sha512(key, data) returns the HMAC-SHA-512 hash of data using key,
as a string containing raw binary data.
Arguments:
key: The key to use.data: The data to hash.
Example:
print(to_hex_string(hmac_sha512('secret', 'Hello world!')))
dff6c00943387f9039566bfee0994de698aa2005eecdbf12d109e17aff5bbb1b022347fbf4bd94ede7c7d51571022525556b64f9d5e4386de99d0025886eaaff
hmac_md5(key, data)
hmac_md5(key, data) returns the HMAC-MD5 hash of data using key,
as a string containing raw binary data.
Arguments:
key: The key to use.data: The data to hash.
Example:
print(to_hex_string(hmac_md5('secret', 'Hello world!')))
444fad0d374d14369d6b595062da5d91
regex_replace
regex_replace(data, pattern, replacement) returns the string data with all
occurrences of the regular expression pattern replaced with replacement.
Arguments:
data: The data to replace.pattern: The regular expression pattern to match.replacement: The replacement string.
Examples:
print(regex_replace('Hello world!', 'world', 'Lua'))
Hello Lua!
print(regex_replace('Hello world!', 'l+', 'lua'))
Heluao worluad!
If the regular expression pattern is invalid, regex_replace() returns an
error message.
Examples:
print(regex_replace('Hello world!', '*', 'lua'))
regex_error caught: regex_error
unixtime()
unixtime() returns the current Unix timestamp, as seconds since midnight,
Janury 1 1970 UTC, as an integer.
Arguments:
- None
Example:
print(unixtime())
1733517373
now()
now() returns the current Unix timestamp, the number of seconds since
midnight, Janury 1 1970 UTC, as an number with decimals.
Arguments:
- None
Example:
print(now())
1733517373.5007
time_to_epoch(time, fmt)
time_to_epoch(time, fmt) returns the Unix timestamp, the number of seconds
since midnight, Janury 1 1970 UTC, of the time string time, which is
formatted according to the format string fmt.
Arguments:
time: The time string to convert.fmt(Optional): The format string of the time string, as specified by the POSIX function strptime(). If not specified, it defaults to “%Y-%m-%dT%TZ”.
Examples:
print(time_to_epoch('1972-04-17T06:10:20Z'))
72339020
print(time_to_epoch('17/04-72 06:20:30', '%d/%m-%y %H:%M:%S'))
72339630
epoch_to_time(time, format)
epoch_to_time(time, format) returns the time string of the Unix timestamp
time, formatted according to format.
Arguments:
time: The Unix timestamp to convert, as a number.format(Optional): The format string of the time string, as specified by the POSIX function strftime(). If not specified, it defaults to “%Y-%m-%dT%TZ”.
Examples:
print(epoch_to_time(123456789))
1973-11-29T21:33:09Z
print(epoch_to_time(1234567890, '%d/%m-%y %H:%M:%S'))
13/02-09 23:31:30
get_consistent_hashing_weight(contentName, nodeIdsString, spreadFactor, hashAlgoritm, nodeId)
get_consistent_hashing_weight(contentName, nodeIdsString, spreadFactor, hashAlgoritm, nodeId)
returns the priority that node nodeId has in the list of preferred nodes,
determined using consistent hashing. The first spreadfactor:th nodes should
have equal weights to randomize requests between them. Remaining nodes should
have decrementally decreasing weights to honor node priority during failover.
Arguments:
contentName: The name of the content to hash.nodeIdsString: A string containing the node IDs to hash, on the format ‘0,1,2,3’.spreadFactor: The number of nodes to spread the requests between.hashAlgorithm: Which hash algorithm to use. Supported algorithms are “MD5”, “SDBM” and “Murmur”. Default is “MD5”.nodeId: The ID of the node to calculate the weight for.
Examples:
print(get_consistent_hashing_weight('/vod/film1', '0,1,2,3,4,5', 3, 'MD5', 3))
6
print(get_consistent_hashing_weight('/vod/film2', '0,1,2,3,4,5', 3, 'MD5', 3))
4
print(get_consistent_hashing_weight('/vod/film2', '0,1,2', 2, 'Murmur', 1))
2
See Consistent Hashing for more information about consistent hashing.
expand_ipv6_address(address)
expand_ipv6_address(address) returns the fully expanded form of the IPv6
address address.
Arguments:
address: The IPv6 address to expand. If the address is not a valid IPv6 address, the function returns the contents ofaddressunmodified. This allows for the function to pass through IPv4 addresses.
Examples:
print(expand_ipv6_address('2001:db8::1'))
2001:0db8:0000:0000:0000:0000:0000:0001
print(expand_ipv6_address('198.51.100.5'))
198.51.100.5
Data stream related functions
The router provides a number of functions that are useful when working with
data streams. These functions are used to write data to the data stream
configured in the services.routing.dataStreams.outgoing section of the
configuration. See data streams for more information.
send_to_data_stream
send_to_data_stream(data_stream, message) sends the string message to the
outgoing data stream data_stream. Note that message is sent verbatim,
without any formatting.
Arguments:
data_stream: The name of the data stream to send to.message: The message to send.
Example:
-- Sends the message "Hello world!" to the data stream 'token_stream'
send_to_data_stream('token_stream', 'Hello world!')
data_streams.post_selection_key_value
data_streams.post_selection_key_value(data_stream, path, key, value, ttl_s)
posts the key-value pair key=value on the path path to the data stream
data_stream. The key-value is formatted as a selection input value
{key: value}, will be stored in path and will persist for ttl_s seconds.
This is the same format that is expected when parsing data from incoming data
streams of the type "selectionInput" to read selection input data from
external data streams. This means that this function can be used to post
selection input data to an external data stream, which can then be read by
other Director instances.
Arguments:
data_stream: The name of the data stream to post to.path: The path to post the key-value pair to. Note that the path is automatically prefixed with"/v2/selection_input".key: The key to post.value: The value to post.- Optional
ttl_s: The time to live of the key-value pair, in seconds. If not specified, it will persist forever.
Example:
-- Posts the selection input value {"si_var": 1337} on the path "/v2/selection_input/path"
-- to the data stream 'outgoingDataStream' with a TTL of 60 seconds
data_streams.post_selection_key_value('outgoingDataStream', '/path', 'si_var', 1337, 60)
Token blocking functions
The router provides a number of functions that are useful when working with token blocking to control CDN access.
blocked_tokens.augment_token(token, customer_id)
Returns an augmented token string formatted like <customer_id>__<token>. This
function is useful when additional information is needed for token blocking,
such as customer ID.
Arguments:
token: The token to augment.customer_id: The customer ID to augment the token with.
Example:
-- Augments the token eyJhbG213 with the customer ID 12345
local augmented_token = blocked_tokens.augment_token('eyJhbG213', '12345')
print(augmented_token)
12345__eyJhbG213
blocked_tokens.add(stream_name, token, ttl_s)
blocked_tokens.add() is a specialized version of
data_streams.post_selection_key_value() that is commonly used to synchronize
blocked tokens between multiple Directors to deny unpermitted access into a CDN.
It posts selection input data to the data stream stream_name which is consumed
into selection input by all connected Director instances so that the blocked
token can easily be checked during routing by calling blocked_tokens.is_blocked(token).
Arguments:
stream_name: The name of the data stream to post to.token: The token to post.- Optional
ttl_s: The time to live of the token, in seconds. Defaults to 3 hours (10800 seconds) if not specified.
Example:
-- Posts the token eyJhbG213 with a TTL of 3 hours
blocked_tokens.add('token_stream', 'eyJhbG213')
-- Posts the token R5cCI6Ik with a TTL of 60 seconds
blocked_tokens.add('token_stream', 'R5cCI6Ik', 60)
blocked_tokens.is_blocked(token)
blocked_tokens.is_blocked(token) checks if the token token has been blocked
by checking if it is stored in selection input. It returns true if the token is
blocked, otherwise it returns false.
Arguments:
token: The token to check.
Example:
-- Checks if the token eyJhbG213 is blocked
blocked_tokens.is_blocked('eyJhbG213')
-- Checks if the augmented token 12345__eyJhbG213 is blocked
blocked_tokens.is_blocked(blocked_tokens.augment_token('eyJhbG213', '12345'))
blocked_tokens.is_blocked('12345__eyJhbG213')
Custom Lua Metrics functions
The router provides functions for managing custom metrics counters that will be available in the OpenMetrics format on the router’s metrics API.
increase_metrics_counter(counter_name, label_table, amount)
increase_metrics_counter(counter_name, label_table, amount) increases the
custom metrics counter counter_name by amount. The counter is identified by
the label_table which is a table of key-value pairs.
Arguments:
counter_name: The name of the counter to increase.label_table: A table of key-value pairs to identify the counter.- Optional
amount: The amount to increase the counter by. Defaults to 1 if not defined.
Example:
-- Increases the counter 'my_counter' by 1
increase_metrics_counter('my_counter', {label='foo'})
-- Increases the counter 'another_counter' by 5
increase_metrics_counter('another_counter', {label1='value1', label2='value2'}, 5)
These examples will create the following metrics:
# TYPE my_counter counter
my_counter{label="foo"} 1
# TYPE another_counter counter
another_counter{label1="value1", label2="value2"} 5
reset_metrics_counter(counter_name, label_table)
reset_metrics_counter(counter_name, label_table) removes the custom metrics
counter counter_name with the labels defined in label_table.
Arguments:
counter_name: The name of the counter to remove.label_table: A table of key-value pairs to identify the counter.
Example:
-- Removes the counter 'my_counter'
reset_metrics_counter('my_counter', {label='foo'})
-- Removes the counter 'another_counter'
reset_metrics_counter('another_counter', {label1='value1', label2='value2'})
Configuration examples
Many of the functions documented are suitable to use in host health checks. To configure host health checks, see configuring CDNs and hosts. Here are some configuration examples of using the built-in Lua functions, utilizing the example metrics:
"healthChecks": [
"gt('streamer-1.hardware_metrics.mem_available_percent', 20)", // More than 20% memory is left
"lt('streamer-1.per_interface_metrics.eths1.megabits_sent_rate', 9000)" // Current bitrate is lower than 9000 Mbps
"host_has_bw({host='streamer-1', interface='eths1', margin=1000})", // host_has_bw() uses 'streamer-1.per_interface_metrics.eths1.speed' to determine if there is enough bandwidth left with a 1000 Mbps margin
"interfaces_online({host='streamer-1', interfaces='eths1'})",
"memory_usage_ok({host='streamer-1'})",
"cpu_load_ok({host='streamer-1'})",
"health_check({host='streamer-1', interfaces='eths1'})" // Combines interfaces_online(), memory_usage_ok(), cpu_load_ok()
]
4.7.7.5.2 - Global Lua Tables
There are multiple global tables containing important data available while writing Lua code for the router.
selection_input
Contains arbitrary, custom fields fed into the router by clients, see API overview for details on how to inject data into this table.
Note that the selection_input table is iterable.
Usage examples:
print(selection_input['some_value'])
-- Iterate over table
if selection_input then
for k, v in pairs(selection_input) do
print('here is '..'selection_input!')
print(k..'='..v)
end
else
print('selection_input is nil')
end
session_groups
Defines a mapping from session group name to boolean, indicating whether
the session belongs to the session group or not.
Usage examples:
if session_groups.vod then print('vod') else print('not vod') end
if session_groups['vod'] then print('vod') else print('not vod') end
session_count
Provides counters of number of session types per session group. The table
uses the structure qoe_score.<session_type>.<session_group>.
Usage examples:
print(session_count.instream.vod)
print(session_count.initial.vod)
qoe_score
Provides the quality of experience score per host per session group. The table
uses the structure qoe_score.<host>.<session_group>.
Usage examples:
print(qoe_score.host1.vod)
print(qoe_score.host1.live)
request
Contains data related to the HTTP request between the client and the router.
request.method- Description: HTTP request method.
- Type:
string - Example:
'GET','POST'
request.body- Description: HTTP request body string.
- Type:
stringornil - Example:
'{"foo": "bar"}'
request.major_version- Description: Major HTTP version such as
xinHTTP/x.1. - Type:
integer - Example:
1
- Description: Major HTTP version such as
request.minor_version- Description: Minor HTTP version such as
xinHTTP/1.x. - Type:
integer - Example:
1
- Description: Minor HTTP version such as
request.protocol- Description: Transfer protocol variant.
- Type:
string - Example:
'HTTP','HTTPS'
request.client_ip- Description: IP address of the client issuing the request.
- Type:
string - Example:
'172.16.238.128'
request.path_with_query_params- Description: Full request path including query parameters.
- Type:
string - Example:
'/mycontent/superman.m3u8?b=y&c=z&a=x'
request.path- Description: Request path without query parameters.
- Type:
string - Example:
'/mycontent/superman.m3u8'
request.query_params- Description: The query parameter string.
- Type:
string - Example:
'b=y&c=z&a=x'
request.filename- Description: The part of the path following the final slash, if any.
- Type:
string - Example:
'superman.m3u8'
request.subnet- Description: Subnet of
client_ip. - Type:
stringornil - Example:
'all'
- Description: Subnet of
session
Contains data related to the current session.
session.client_ip- Description: Alias for
request.client_ip. See documentation for table request above.
- Description: Alias for
session.path_with_query_params- Description: Alias for
request.path_with_query_params. See documentation for table request above.
- Description: Alias for
session.path- Description: Alias for
request.path. See documentation for table request above.
- Description: Alias for
session.query_params- Description: Alias for
request.query_params. See documentation for table request above.
- Description: Alias for
session.filename- Description: Alias for
request.filename. See documentation for table request above.
- Description: Alias for
session.subnet- Description: Alias for
request.subnet. See documentation for table request above.
- Description: Alias for
session.host- Description: ID of the currently selected host for the session.
- Type:
stringornil - Example:
'host1'
session.id- Description: ID of the session.
- Type:
string - Example:
'8eb2c1bdc106-17d2ff-00000000'
session.session_type- Description: Type of the session.
- Type:
string - Example:
'initial'or'instream'. Identical to the value of theTypeargument of the session translation function.
session.is_managed- Description: Identifies managed sessions.
- Type:
boolean - Example:
trueifType/session.session_typeis'instream'
request_headers
Contains the headers from the request between the client and the router, keyed by name.
Usage example:
print(request_headers['User-Agent'])
request_query_params
Contains the query parameters from the request between the client and the router, keyed by name.
Usage example:
print(request_query_params.a)
session_query_params
Alias for metatable request_query_params.
response
Contains data related to the outgoing response apart from the headers.
response.body- Description: HTTP response body string.
- Type:
stringornil - Example:
'{"foo": "bar"}'
response.code- Description: HTTP response status code.
- Type:
integer - Example:
200,404
response.text- Description: HTTP response status text.
- Type:
string - Example:
'OK','Not found'
response.major_version- Description: Major HTTP version such as
xinHTTP/x.1. - Type:
integer - Example:
1
- Description: Major HTTP version such as
response.minor_version- Description: Minor HTTP version such as
xinHTTP/1.x. - Type:
integer - Example:
1
- Description: Minor HTTP version such as
response.protocol- Description: Transfer protocol variant.
- Type:
string - Example:
'HTTP','HTTPS'
response_headers
Contains the response headers keyed by name.
Usage example:
print(response_headers['User-Agent'])
4.7.7.5.3 - Request Translation Function
Specifies the body of a Lua function that inspects every incoming HTTP request and overwrites individual fields before further processing by the router.
Returns nil when nothing is to be changed, or HTTPRequest(t) where t
is a table with any of the following optional fields:
Method- Description: Replaces the HTTP request method in the request being processed.
- Type:
string - Example:
'GET','POST'
Path- Description: Replaces the request path in the request being processed.
- Type:
string - Example:
'/mycontent/superman.m3u8'
ClientIp- Description: Replaces client IP address in the request being processed.
- Type:
string - Example:
'172.16.238.128'
Body- Description: Replaces body in the request being processed.
- Type:
stringornil - Example:
'{"foo": "bar"}'
QueryParameters- Description: Adds, removes or replaces individual query parameters in the request being processed.
- Type: nested
table(indexed by number) representing an array of query parameters as{[1]='Name',[2]='Value'}pairs that are added to the request being processed, or overwriting existing query parameters with colliding names. To remove a query parameter from the request, specifynilas value, i.e.QueryParameters={..., {[1]='foo',[2]=nil} ...}. Returning a query parameter with a name but no value, such asain the request'/index.m3u8?a&b=22'is currently not supported.
Headers- Description: Adds, removes or replaces individual headers in the request being processed.
- Type: nested
table(indexed by number) representing an array of request headers as{[1]='Name',[2]='Value'}pairs that are added to the request being processed, or overwriting existing request headers with colliding names. To remove a header from the request, specifynilas value, i.e.Headers={..., {[1]='foo',[2]=nil} ...}. Duplicate names are supported. A multi-value header such asFoo: bar1,bar2is defined by specifyingHeaders={..., {[1]='foo',[2]='bar1'}, {[1]='foo',[2]='bar2'}, ...}.
OutgoingRequest: See Sending HTTP requests from translation functions for more information.
Example of a request_translation_function body that sets the request path
to a hardcoded value and adds the hardcoded query parameter a=b:
-- Statements go here
print('Setting hardcoded Path and QueryParameters')
return HTTPRequest({
Path = '/content.mpd',
QueryParameters = {
{'a','b'}
}
})
Arguments
The following (iterable) arguments will be known by the function:
QueryParameters
Type: nested
table(indexed by number).Description: Array of query parameters as
{[1]='Name',[2]='Value'}pairs that were present in the query string of the request. Format identical to theHTTPRequest.QueryParameters-field specified for the return value above.Example usage:
for _, queryParam in pairs(QueryParameters) do print(queryParam[1]..'='..queryParam[2]) end
Headers
Type: nested
table(indexed by number).Description: Array of request headers as
{[1]='Name',[2]='Value'}pairs that were present in the request. Format identical to theHTTPRequest.Headers-field specified for the return value above. A multi-value header such asFoo: bar1,bar2is seen inrequest_translation_functionasHeaders={..., {[1]='foo',[2]='bar1'}, {[1]='foo',[2]='bar1'}, ...}.Example usage:
for _, header in pairs(Headers) do print(header[1]..'='..header[2]) end
Additional Data
In addition to the arguments above, the following Lua tables, documented in Global Lua Tables, provide additional data that is available when executing the request translation function:
If the request translation function modifies the request, the request,
request_query_params and request_headers tables will be updated with the
modified request and made available to the routing rules.
4.7.7.5.4 - Session Translation Function
Specifies the body of a Lua function that inspects a newly created session and may override its suggested type from “initial” to “instream” or vice versa. A number of helper functions are provided to simplify changing the session type.
Returns nil when the session type is to remain unchanged, or Session(t)
where t is a table with a single field:
Type- Description: New type of the session.
- Type:
string - Example:
'instream','initial'
OutgoingRequest: See Sending HTTP requests from translation functions for more information.
Basic Configuration
It is possible to configure the maximum number of simultaneous managed sessions
on the router. If the maximum number is reached, no more managed sessions can be
created. Using confcli, it can be configured by running
$ confcli services.routing.tuning.general.maxActiveManagedSessions
{
"maxActiveManagedSessions": 1000
}
$ confcli services.routing.tuning.general.maxActiveManagedSessions 900
services.routing.tuning.general.maxActiveManagedSessions = 900
Common Arguments
While executing the session translation function, the following arguments are available:
Type: The current type of the session ('instream'or'initial').
Usage examples:
-- Flip session type
local newType = 'initial'
if Type == 'initial' then
newType = 'instream'
end
print('Changing session type from ' .. Type .. ' to ' .. newType)
return Session({['Type'] = newType})
Session Translation Helper Functions
The standard Lua library prodives four helper functions to simplify the configuration of the session translation function:
set_session_type(session_type)
This function will set the session type to the supplied session_type and
the maximum number of sessions of that type has not been reached.
Parameters
session_type: The type of session to create, possible values are ‘initial’ or ‘instream’.
Usage Examples
return set_session_type('instream')
return set_session_type('initial')
set_session_type_if_in_group(session_type, session_group)
This function will set the session type to the supplied session_type if the
session is part of session_group and the maximum number of sessions of that
type has not been reached.
Parameters
session_type: The type of session to create, possible values are ‘initial’ or ‘instream’.session_group: The name of the session group.
Usage Examples
return set_session_type_if_in_group('instream', 'sg1')
set_session_type_if_in_all_groups(session_type, session_groups)
This function will set the session type to the supplied session_type if the
session is part of all session groups given by session_groups and the maximum
number of sessions of that type has not been reached.
Parameters
session_type: The type of session to create, possible values are ‘initial’ or ‘instream’.session_groups: A list of session group names.
Usage Examples
return set_session_type_if_in_all_groups('instream', {'sg1', 'sg2'})
set_session_type_if_in_any_group(session_type)
This function will set the session type to the supplied session_type if the
session is part of one or more of the session groups given by session_groups
and the maximum number of sessions of that type has not been reached.
Parameters
session_type: The type of session to create, possible values are ‘initial’ or ‘instream’.session_groups: A list of session group names.
Usage Examples
return set_session_type_if_in_any_group('instream', {'sg1', 'sg2'})
Configuration
Using confcli, example of how the functions above can be used in the session
translation function can be configured by running any of
$ confcli services.routing.translationFunctions.session "return set_session_type('instream')"
services.routing.translationFunctions.session = "return set_session_type('instream')"
$ confcli services.routing.translationFunctions.session "return set_session_type_if_in_group('instream', 'sg1')"
services.routing.translationFunctions.session = "return set_session_type_if_in_group('instream', 'sg1')"
$ confcli services.routing.translationFunctions.session "return set_session_type_if_in_all_groups('instream', {'sg1', 'sg2'})"
services.routing.translationFunctions.session = "return set_session_type_if_in_all_groups('instream', {'sg1', 'sg2'})"
$ confcli services.routing.translationFunctions.session "return set_session_type_if_in_any_group('instream', {'sg1', 'sg2'})"
services.routing.translationFunctions.session = "return set_session_type_if_in_any_group('instream', {'sg1', 'sg2'})"
Additional Data
In addition to the arguments above, the following Lua tables, documented in Global Lua Tables, provide additional data that is available when executing the response translation function:
The selection_input table will not change while a routing request is handled.
A request_translation_function and the corresponding
response_translation_function will see the same selection_input table, even
if the selection data is updated while the request is being handled.
4.7.7.5.5 - Host Request Translation Function
The host request translation function defines a Lua function that modifies
HTTP requests sent to a host. These hosts are configured in
services.routing.hostGroups.
Hosts can receive requests for a manifest. A regular host will respond with the manifest itself, while a redirecting host and a DNS host will respond with a redirection to a streamer. This function can modify all these types of requests.
The function returns nil when nothing is to be changed, or HTTPRequest(t)
where t is a table with any of the following optional fields:
Method- Description: Replaces the HTTP request method in the request being processed.
- Type:
string - Example:
'GET','POST'
Path- Description: Replaces the request path in the request being processed.
- Type:
string - Example:
'/mycontent/superman.m3u8'
Body- Description: Replaces body in the request being processed.
- Type:
stringornil - Example:
'{"foo": "bar"}'
QueryParameters- Description: Adds, removes or replaces individual query parameters in the request being processed.
- Type: nested
table(indexed by number) representing an array of query parameters as{[1]='Name',[2]='Value'}pairs that are added to the request being processed, or overwriting existing query parameters with colliding names. To remove a query parameter from the request, specifynilas value, i.e.QueryParameters={..., {[1]='foo',[2]=nil} ...}. Returning a query parameter with a name but no value, such asain the request'/index.m3u8?a&b=22'is currently not supported.
Headers- Description: Adds, removes or replaces individual headers in the request being processed.
- Type: nested
table(indexed by number) representing an array of request headers as{[1]='Name',[2]='Value'}pairs that are added to the request being processed, or overwriting existing request headers with colliding names. To remove a header from the request, specifynilas value, i.e.Headers={..., {[1]='foo',[2]=nil} ...}. Duplicate names are supported. A multi-value header such asFoo: bar1,bar2is defined by specifyingHeaders={..., {[1]='foo',[2]='bar1'}, {[1]='foo',[2]='bar2'}, ...}.
Host- Description: Replaces the host that the request is sent to.
- Type:
string - Example:
'new-host.example.com','192.0.2.7'
Port- Description: Replaces the TCP port that the request is sent to.
- Type:
number - Example:
8081
Protocol- Description: Decides which protocol that will be used for sending the
request. Valid protocols are
'HTTP'and'HTTPS'. - Type:
string - Example:
'HTTP','HTTPS'
- Description: Decides which protocol that will be used for sending the
request. Valid protocols are
OutgoingRequest: See Sending HTTP requests from translation functions for more information.
Example of a host_request_translation_function body that sets the request path
to a hardcoded value and adds the hardcoded query parameter a=b:
-- Statements go here
print('Setting hardcoded Path and QueryParameters')
return HTTPRequest({
Path = '/content.mpd',
QueryParameters = {
{'a','b'}
}
})
Arguments
The following (iterable) arguments will be known by the function:
QueryParameters
Type: nested
table(indexed by number).Description: Array of query parameters as
{[1]='Name',[2]='Value'}pairs that are present in the query string of the request from the client to the router. Format identical to theHTTPRequest.QueryParameters-field specified for the return value above.Example usage:
for _, queryParam in pairs(QueryParameters) do print(queryParam[1]..'='..queryParam[2]) end
Headers
Type: nested
table(indexed by number).Description: Array of request headers as
{[1]='Name',[2]='Value'}pairs that are present in the request from the client to the router. Format identical to theHTTPRequest.Headers-field specified for the return value above. A multi-value header such asFoo: bar1,bar2is seen inhost_request_translation_functionasHeaders={..., {[1]='foo',[2]='bar1'}, {[1]='foo',[2]='bar1'}, ...}.Example usage:
for _, header in pairs(Headers) do print(header[1]..'='..header[2]) end
Global Tables
The following non-iterable global tables are available for use by the
host_request_translation_function.
Table outgoing_request
The outgoing_request table contains the request that is to be sent to the
host.
outgoing_request.method- Description: HTTP request method.
- Type:
string - Example:
'GET','POST'
outgoing_request.body- Description: HTTP request body string.
- Type:
stringornil - Example:
'{"foo": "bar"}'
outgoing_request.major_version- Description: Major HTTP version such as
xinHTTP/x.1. - Type:
integer - Example:
1
- Description: Major HTTP version such as
outgoing_request.minor_version- Description: Minor HTTP version such as
xinHTTP/1.x. - Type:
integer - Example:
1
- Description: Minor HTTP version such as
outgoing_request.protocol- Description: Transfer protocol variant.
- Type:
string - Example:
'HTTP','HTTPS'
Table outgoing_request_headers
Contains the request headers from the request that is to be sent to the host, keyed by name.
Example:
print(outgoing_request_headers['X-Forwarded-For'])
Multiple values are separated with a comma.
Additional Data
In addition to the arguments above, the following Lua tables, documented in Global Lua Tables, provide additional data that is available when executing the request translation function:
4.7.7.5.6 - Response Translation Function
Specifies the body of a Lua function that inspects every outgoing HTTP response and overwrites individual fields before being sent to the client.
Returns nil when nothing is to be changed, or HTTPResponse(t) where t
is a table with any of the following optional fields:
Code- Description: Replaces status code in the response being sent.
- Type:
integer - Example:
200,404
Text- Description: Replaces status text in the response being sent.
- Type:
string - Example:
'OK','Not found'
MajorVersion- Description: Replaces major HTTP version such as
xinHTTP/x.1in the response being sent. - Type:
integer - Example:
1
- Description: Replaces major HTTP version such as
MinorVersion- Description: Replaces minor HTTP version such as
xinHTTP/1.xin the response being sent. - Type:
integer - Example:
1
- Description: Replaces minor HTTP version such as
Protocol- Description: Replaces protocol in the response being sent.
- Type:
string - Example:
'HTTP','HTTPS'
Body- Description: Replaces body in the response being sent.
- Type:
stringornil - Example:
'{"foo": "bar"}'
Headers- Description: Adds, removes or replaces individual headers in the response being sent.
- Type: nested
table(indexed by number) representing an array of response headers as{[1]='Name',[2]='Value'}pairs that are added to the response being sent, or overwriting existing request headers with colliding names. To remove a header from the response, specifynilas value, i.e.Headers={..., {[1]='foo',[2]=nil} ...}. Duplicate names are supported. A multi-value header such asFoo: bar1,bar2is defined by specifyingHeaders={..., {[1]='foo',[2]='bar1'}, {[1]='foo',[2]='bar2'}, ...}.
OutgoingRequest: See Sending HTTP requests from translation functions for more information.
Example of a response_translation_function body that sets the Location
header to a hardcoded value:
-- Statements go here
print('Setting hardcoded Location')
return HTTPResponse({
Headers = {
{'Location', 'cdn1.com/content.mpd?a=b'}
}
})
Arguments
The following (iterable) arguments will be known by the function:
Headers
Type: nested
table(indexed by number).Description: Array of response headers as
{[1]='Name',[2]='Value'}pairs that are present in the response being sent. Format identical to theHTTPResponse.Headers-field specified for the return value above. A multi-value header such asFoo: bar1,bar2is seen inresponse_translation_functionasHeaders={..., {[1]='foo',[2]='bar1'}, {[1]='foo',[2]='bar1'}, ...}.Example usage:
for _, header in pairs(Headers) do print(header[1]..'='..header[2]) end
Additional Data
In addition to the arguments above, the following Lua tables, documented in Global Lua Tables, provide additional data that is available when executing the response translation function:
4.7.7.5.7 - Sending HTTP requests from translation functions
It is possible to configure all translation functions to send HTTP requests. If an outgoing request is sent in a translation function, the Director will delay the response to the incoming request until the outgoing request has been completed. Note that the response to the outgoing request is not handled by the Director, it only waits for the outgoing request to complete.
Requests can be sent from any translation function by defining the table
OutgoingRequest in the translation function return value:
{
OutgoingRequest = {
Method = "HEAD",
Protocol = "HTTP",
Host = "example.com",
Port = 8080,
Path = "/example/path",
EncodeURL = true,
QueryParameters = {{"param1", "value1"}, {"param2", "value2"}},
Headers = {{"x-header", "header-value"}, {"Authorization", "Basic dXNlcjpwYXNz"}}
}
}
The following fields for OutgoingRequest are supported:
Method: The HTTP method to use. Defaults toHEAD.Protocol: The protocol to use. Defaults to the protocol of the incoming request.Host: The host to send the request to.Port: The port to send the request to. Defaults to 80 ifProtocolisHTTPand 443 ifProtocolisHTTPS.Path: The path to send the request to. Defaults to/.EncodeURL: A boolean value that determines if the URL should be percent-encoded. Defaults totrue. WARNING: Not encoding the URL is not HTTP compliant and might cause issues with some servers. Use with caution. See RFC 1738 for more information.QueryParameters: A list of query parameters to include in the request. Note that the query parameters are defined as two-element lists in Lua.Headers: A Lua table of headers to include in the request. Note that if the header name contains a dash-, it must be defined as a two-element list as seen in the example above.Body: A string containing the body of the request. If this field is not defined, no body will be included in the request. If it is defined, theContent-Lengthheader, with the length of the body, will be added to the request.
All fields except Host are optional.
Using the example above, the following response translation function
will make the Director can send a GET request to
http://example.com:8080/example/path?param1=value1¶m2=value2 with the
headers x-header: x-value and Authorization: Basic dXNlcjpwYXNz:
return HTTPResponse({
OutgoingRequest = {
Method = "HEAD",
Protocol = "HTTP",
Host = "example.com",
Port = 8080,
Path = "/example/path",
QueryParameters = {{"param1", "value1"}, {"param2", "value2"}},
Headers = {{"x-header", "x-value"}, {"Authorization", "Basic dXNlcjpwYXNz"}}
}
})
Using log level 4, the outgoing request can be seen in the Director logs:
DEBUG orc-re-work-0 AsyncRequestSender: Sending request: url=http://example.com/example/path?param1=value1¶m2=value2
DEBUG orc-re-work-0 CDNManager: OutboundContentConn: example.com:8080: Connecting to target CDN example.com:8080
DEBUG orc-re-work-0 ClientConn: 192.168.103.16/28:60201/https: Sent a Lua request: outstanding-requests=1
DEBUG orc-re-work-0 CDNManager: OutboundContentConn: example.com:8080: Target CDN connection established.
DEBUG orc-re-work-0 CDNManager: OutboundContentConn: example.com:8080: Sending request to target CDN:
GET /example/path?param1=value1¶m2=value2 HTTP/1.0
Authorization: Basic dXNlcjpwYXNz
Host: example.com:8080
x-header: x-value
4.7.8 - Trusted proxies
When a request with the header X-Forwarded-For is sent to the router, the
router will check if the client is in the list of trusted proxies. If the client
is not a trusted proxy, the router will drop the connection, returning an empty
reply to the client. If the client is a trusted proxy, the IP address defined
in the X-Forwarded-For will be regarded as the client’s IP address.
The list of trusted proxies can be configured by modifying the configuration
field services.routing.settings.trustedProxies with the IP addresses of
trusted proxies:
$ confcli services.routing.settings.trustedProxies -w
Running wizard for resource 'trustedProxies'
<A list of IP addresses from which the proxy IP address of requests with the X-Forwarded-For header defined are checked. If the IP isn't in this list, the connection is dropped. (default: [])>
Hint: Hitting return will set a value to its default.
Enter '?' to receive the help string
trustedProxies <A list of IP addresses from which the proxy IP address of requests with the X-Forwarded-For header defined are checked. If the IP isn't in this list, the connection is dropped. (default: [])>: [
trustedProxy (default: ): 1.2.3.4
Add another 'trustedProxy' element to array 'trustedProxies'? [y/N]: n
]
Generated config:
{
"trustedProxies": [
"1.2.3.4"
]
}
Merge and apply the config? [y/n]: y
Note that by configuring 0.0.0.0/0 as a trusted proxy, all proxied requests
will be trusted.
4.7.9 - Confd Auto Upgrade Tool
The confd-auto-upgrade tool is a simple utility to automatically migrate the confd
configuration schema between different versions of the Director. Starting with version
1.12.0, it is possible to automatically apply the necessary configuration changes in a
controlled and predictable manner. While this tool is intended to help transition the
configuration format between the different versions, it is not a substitute for proper
backups, and while downgrading to an earlier version, it may not be possible to recover
previously modified or deleted configuration values.
When using the tool, both the “from” and “to” versions must be specified. Internally, the tool will calculate a list of migrations which must be applied to transition between the given versions, and apply them, outputting the final configuration to standard output. The current configuration can either be piped in to the tool via standard input, or supplied as a static file. Providing a “from” version which is later than the “to” version will result in the downgrade migrations being applied in reverse order, effectively downgrading the configuration to the lower version.
For convenience, the tool is deployed to the ACD Nodes automatically at install time as a standard Podman container, however since it is not intended to run as a service, only the image will be present, not a running container.
Performing the Upgrade
In the following example scenario, a system with version 1.10.1 has been upgraded
to 1.14.0. Before upgrading a backup of the configuration was taken and saved to
current_config.json.
Using the image and tag as determined in the above section. Issue the following command:
cat current_config.json | \
podman run -i --rm images.edgeware.tv/acd-confd-migration:1.14.0 \
--in - --from 1.10.1 --to 1.14.0 \
| tee upgraded_config.json
In the above example, the updated configuration is saved to upgraded_config.json.
It is recommended to manually verify the generated configuration, and after
which apply the config to confd by using cat upgraded_config.json | confcli -i.
It is also possible to combine the two commands, by piping the output of the auto-upgrade
tool directly to confcli -i. E.g.
cat current_config.json | podman run ... | tee upgraded_config.json | confcli -i
This will save a backup of the upgraded configuration to upgraded_config.json and
at the same time apply the changes to confd immediately.
Downgrading the Configuration
The steps for downgrading the configuration are exactly the same as for upgrade except for the --from
and --to versions should be swapped. E.g. --from 1.14.0 --to 1.10.1. Keep in mind however,
that during an upgrade some configuration properties may have been deleted or modified, and while
downgrading over those steps, some data loss may occur. In those cases, it may be easier and safer
to simply restore from backup. In most cases where configuration properties are removed during upgrade,
the corresponding downgrade will simply restore the default values of those properties.
4.8 - Operations
This guide describes how to perform day-to-day operations of the ACD Router and its associated services, collectively known as the Director.
Component Overview
To effectively operate the Director software, it is important to understand the composition of the various software components and how they are deployed.
Each Director instance functions as an independent system, comprising multiple containerized services. These containers are managed by a standard container runtime and are seamlessly integrated with the host’s operating system to enhance the overall operator experience.
The containers are managed by the Podman container runtime, which operates without additional daemon services running on the host. Unlike Docker, Podman manages each container as a separate process, eliminating the reliance on a shared daemon and mitigating the risk of a single-point-of-failure scenario.
Although several distinct services make up the Director, the primary component is the router. The router is responsible for listening for incoming requests, processing the request, and redirecting the client to the appropriate host, or CDN to deliver the requested content.
Two additional containers are responsible for configuration management. Those are
confd and confd-transformer. The former manages a local database of configuration
metadata and provides a REST API for managing the configuration. The confd-transformer
simply listens for configuration changes from confd and adapts that configuration
to a format suitable for the router to ingest. For additional information about
setting up and using confd see here..
The next two components, the edns-proxy and the convoy-bridge allow the router
to communicate with an EDNS server for EDNS-based routing, and with synchronization
with Convoy respectively. Additional information about the EDNS-Proxy is available
here.. For the Convoy Bridge
service see here..
The remaining containers are useful for metrics, monitoring, and alerting. These
include prometheus and grafana for monitoring and analytics, and alertmanager
for monitoring and alarms.
4.8.1 - Services
Each container shipped with the Director is fully-integrated with the systemd
service on the host, enabling easy management using standard systemd commands.
The logs for each container are also full-integrated with journald to simplify
troubleshooting.
In order to integrate the Podman containers with systemd, a common prefix
of acd- has been applied to each service name. For example the router
container is managed by the service acd-router, and the confd container
is managed by the service acd-confd. These same prefixed names apply while
fetching logs via journald. This common prefix aids in grouping the related
services as well as provides simpler filtering for tab-completion.
Starting / Stopping Services
Standard systemd commands should be used to start and stop the services.
systemctl start acd-router- Starts theroutercontainer.systemctl stop acd-router- Stops theroutercontainer.systemctl status acd-router- Displays the status of theroutercontainer.
Due to the limitation of needing the acd- prefix, it provides the ability to
work with all ACD services in a group. For example:
systemctl status 'acd-*'- Display the status of all installed ACD components.systemctl start 'acd-*'- Start all ACD components.
Logging
Each ACD component corresponds to a journal entry with the same unit name, with
the acd- prefix. Standard journald commands can be used to view and manage the
logging.
journalctl -u acd-router- Display the logs for theroutercontainer
Access Log
Refer to Access Logging.
Troubleshooting
Some additional logging may be available in the filesystem, the paths of which can
be determined by executing the ew-sysinfo command. See
Diagnostics. for additional details.
4.8.2 - Geographic Databases
To do geographic based routing, the Director uses geographic location databases. The databases need to be on the format provided by MaxMind.
When first installed, the Director comes with example databases. These are only suitable for testing and evaluation, if geographic routing is to be used in production, proper databases need to be obtained from MaxMind.
For the Director to find them, each database needs to have a specific filename. Three databases are supported:
| Type | Filename |
|---|---|
| City and Country | /opt/edgeware/acd/geoip2/GeoIP2-City.mmdb |
| ASN | /opt/edgeware/acd/geoip2/GeoLite2-ASN.mmdb |
| Anonymous IP | /opt/edgeware/acd/geoip2/GeoIP2-Anonymous-IP.mmdb |
When updating the database files, the new file is copied over the old file. After that the Director has to be told to reload it. This is done by typing the following:
podman kill --signal HUP router
4.9 - Convoy Bridge
The convoy-bridge is an optional integration service, pre-installed alongside the router which provides two-way communication between the router and a separate Convoy installation.
The convoy-bridge is designed to allow the Convoy account metadata to be available from within the router for such use-cases as inserting the account specific prefixes in the redirect URL and validating per-account internal security tokens. The service works by periodically polling the Convoy server for changes to the configuration, and when detected, the relevant configuration information is pushed to the router.
In addition, the convoy-bridge has the ability to integrate the router with the Convoy analytics service, such that client sessions started by the router are properly collected by Convoy, and are available in the dashboards.
Configuration
The convoy-bridge service is configured using confcli on the router host.
All configuration for the convoy-bridge exists under the path
integration.convoy.bridge.
{
"logLevel": "info",
"accounts": {
"enabled": true,
"dbUrl": "mysql://convoy:eith7jee@convoy:3306",
"dbPollInterval": 60
},
"analytics": {
"enabled": true,
"brokers": ["broker1:9092", "broker2:9092"],
"batchInterval": 10,
"maxBatchSize": 500
},
"otherRouters": [
{
"url": "https://router2:5001",
"apiKey": "key1",
"validateCerts": true
}
]
}
In the above configuration block, there are three main sections. The accounts
section enables fetching account metadata from Convoy towards the router. The
analytics section controls the integration between the router and the Convoy
analytics service. The otherRouters section is used to synchronize additional
router instances. The local router instance will always be implicitly included.
Additional routers listed in this section will be handled by this instance of
the convoy-bridge service.
Logging
The logs are available in the system journal and can be viewed using:
journalctl -u acd-convoy-bridge
4.10 - Monitoring
4.10.1 - Access logging
Access logging is activated by default and can be enabled/disabled by running
$ confcli services.routing.tuning.general.accessLog true
$ confcli services.routing.tuning.general.accessLog false
Requests are logged in the combined log format and can be found at
/var/log/acd-router/access.log. Additionally, the symbolic link
/opt/edgeware/acd/router/log points to /var/log/acd-router, allowing
the access logs to also be found at /opt/edgeware/acd/router/log/access.log.
Example Output
$ cat /var/log/acd-router/access.log
May 29 07:20:00 router[52236]: ::1 - - [29/May/2023:07:20:00 +0000] "GET /vod/batman.m3u8 HTTP/1.1" 302 0 "-" "curl/7.61.1"
Access Log Rotation
Access logs are rotated and compressed once the access log file reaches a size of 100 MB. By default, 10 rotated logs are stored before being rotated out. These rotation parameters can be reconfigured by editing the lines
size 100M
rotate 10
in /etc/logrotate.d/acd-router-access-log. For more log rotation configuration
possibilites, refer to the
Logrotate documentation.
4.10.2 - System troubleshooting
ESB3024 contains the tool ew-sysinfo that gives an overview of how the
system is doing. Simply use the command and the tool will output information
about the system and the installed ESB3024 services.
The output format can be changed using the --format flag, possible values
are human (default) and json, e.g.:
$ ew-sysinfo
system:
os: ['5.4.17-2136.321.4.el8uek.x86_64', 'Oracle Linux Server 8.8']
cpu_cores: 2
cpu_load_average: [0.03, 0.03, 0.0]
memory_usage: 478 MB
memory_load_average: [0.03, 0.03, 0.0]
boot_time: 2023-09-08T08:30:57Z
uptime: 6 days, 3:43:44.640665
processes: 122
open_sockets:
ipv4: 12
ipv6: 18
ip_total: 30
tcp_over_ipv4: 9
tcp_over_ipv6: 16
tcp_total: 25
udp_over_ipv4: 3
udp_over_ipv6: 2
udp_total: 5
total: 145
system_disk (/):
total: 33271 MB
used: 7978 MB (24.00%)
free: 25293 MB
journal_disk (/run/log/journal):
total: 1954 MB
used: 217 MB (11.10%)
free: 1736 MB
vulnerabilities:
meltdown: Mitigation: PTI
spectre_v1: Mitigation: usercopy/swapgs barriers and __user pointer sanitization
spectre_v2: Mitigation: Retpolines, STIBP: disabled, RSB filling, PBRSB-eIBRS: Not affected
processes:
orc-re:
pid: 177199
status: sleeping
cpu_usage_percent: 1.0%
cpu_load_average: 131.11%
memory_usage: 14 MB (0.38%)
num_threads: 10
hints:
get_raw_router_config: cat /opt/edgeware/acd/router/cache/config.json
get_confd_config: cat /opt/edgeware/acd/confd/store/__active
get_router_logs: journalctl -u acd-router
get_edns_proxy_logs: journalctl -u acd-edns-proxy
check_firewall_status: systemctl status firewalld
check_firewall_config: iptables -nvL# For --format=json, it's recommended to pipe the output to a JSON interpreter
# such as jq
$ ew-sysinfo --format=json | jq
{
"system": {
"os": [
"5.4.17-2136.321.4.el8uek.x86_64",
"Oracle Linux Server 8.8"
],
"cpu_cores": 2,
"cpu_load_average": [
0.01,
0.0,
0.0
],
"memory_usage": "479 MB",
"memory_load_average": [
0.01,
0.0,
0.0
],
"boot_time": "2023-09-08 08:30:57",
"uptime": "6 days, 5:12:24.617114",
"processes": 123,
"open_sockets": {
"ipv4": 13,
"ipv6": 18,
"ip_total": 31,
"tcp_over_ipv4": 10,
"tcp_over_ipv6": 16,
"tcp_total": 26,
"udp_over_ipv4": 3,
"udp_over_ipv6": 2,
"udp_total": 5,
"total": 146
}
},
"system_disk (/)": {
"total": "33271 MB",
"used": "7977 MB (24.00%)",
"free": "25293 MB"
},
"journal_disk (/run/log/journal)": {
"total": "1954 MB",
"used": "225 MB (11.50%)",
"free": "1728 MB"
},
"vulnerabilities": {
"meltdown": "Mitigation: PTI",
"spectre_v1": "Mitigation: usercopy/swapgs barriers and __user pointer sanitization",
"spectre_v2": "Mitigation: Retpolines, STIBP: disabled, RSB filling, PBRSB-eIBRS: Not affected"
},
"processes": {
"orc-re": {
"pid": 177199,
"status": "sleeping",
"cpu_usage_percent": "0.0%",
"cpu_load_average": "137.63%",
"memory_usage": "14 MB (0.38%)",
"num_threads": 10
}
}
}Note that your system might have different monitored processes and field names.
The field hints is different from the rest. It lists common commands
that can be used to further monitor system performance, useful for
quickly troubleshooting a faulty system.
4.10.3 - Scraping data with Prometheus
Prometheus is a third-party data scraper which is installed as a containerized service in the default installation of ESB3024 Router. It periodically reads metrics data from different services, such as acd-router, aggregates it and makes it available to other services that visualize the data. Those services include Grafana and Alertmanager.
The Prometheus configuration file can be found on the host at
/opt/edgeware/acd/prometheus/prometheus.yaml.
Accessing Prometheus
Prometheus has a web interface that is listening for HTTP connections on port 9090. There is no authentication, so anyone who has access to the host that is running Prometheus can access the interface.
Starting / Stopping Prometheus
After the service is configured, it can be managed via systemd, under the
service unit acd-prometheus.
systemctl start acd-prometheus
Logging
The container logs are automatically published to the system journal, under
the same unit descriptor, and can be viewed using journalctl
journalctl -u acd-prometheus
4.10.4 - Visualizing data with Grafana
4.10.4.1 - Managing Grafana
Grafana displays graphs based on data from Prometheus. A default deployment of Grafana is running in a container alongside ESB3024 Router.
Grafana’s configuration and runtime files are stored under
/opt/edgeware/acd/grafana. It comes with default dashboards that are
documented at Grafana dashboards.
Accessing Grafana
Grafana’s web interface is listening for HTTP connections on port
3000. It has two default accounts, edgeware and admin.
The edgeware account can only view graphs, while the admin account can also
edit graphs. The accounts with default passwords are shown in the table below.
| Account | Default password |
|---|---|
edgeware | edgeware |
admin | edgeware |
Starting / Stopping Grafana
Grafana can be managed via systemd, under the service unit acd-grafana.
systemctl start acd-grafana
Logging
The container logs are automatically published to the system journal, under
the same unit descriptor, and can be viewed using journalctl
journalctl -u acd-grafana
4.10.4.2 - Grafana Dashboards
Grafana will be populated with pre-configured graphs which present some metrics on a time scale. Below is a comprehensive list of those dashboards, along with short descriptions.
Router Monitoring dashboard
This dashboard is by default set as home directory - it’s what user will see
after logging in.
Number Of Initial Routing Decisions
HTTP Status Codes
Total number of responses sent back to incoming requests, shown by their status codes. Metric: client-response-status
Incoming HTTP and HTTPS Requests
Total number of incoming requests that were deemed valid, divided into SSL
and Unencrypted categories.
Metric: num_valid_http_requests
Debugging Information dashboard
Number of Lua Exceptions
Number of exceptions encountered so far while evaluating Lua rules. Metric: lua_num_errors
Number of Lua Contexts
Number of active Lua interpreters, both running and idle. Metric: lua_num_evaluators
Time Spent In Lua
Number of microseconds the Lua interpreters were running. Metric: lua_time_spent
Router Latencies
Histogram-like graph showing how many responses were sent within the given latency interval. Metric: orc_latency_bucket
Internal debugging
A folder that contains dashboards intended for internal use.
ACD: Incoming Internet Connections dashboard
SSL Warnings
Rate of warnings logged during TLS connections Metric: num_ssl_warnings_total
SSL Errors
Rate of errors logged during TLS connections Metric: num_ssl_errors_total
Valid Internet HTTPS Requests
Rate of incoming requests that were deemed valid, HTTPS only. Metric: num_valid_http_requests
Invalid Internet HTTPS Requests
Rate of incoming requests that were deemed invalid, HTTPS only. Metric: num_invalid_http_requests
Valid Internet HTTP Requests
Rate of incoming requests that were deemed valid, HTTP only. Metric: num_valid_http_requests
Invalid Internet HTTP Requests
Rate of incoming requests that were deemed invalid, HTTP only. Metric: num_invalid_http_requests
Prometheus: ACD dashboard
Logged Warnings
Rate of logged warnings since the router has started, divided into CDN-related and CDN-unrelated. Metric: num_log_warnings_total
Logged Errors
Rate of logged errors since the router has started. Metric: num_log_errors_total
HTTP Requests
Rate of responses sent to incoming connections. Metric: orc_latency_count
Number Of Active Sessions
Number of sessions opened on router that are still active. Metric: num_sessions
Total Number Of Sessions
Total number of sessions opened on router. Metric: num_sessions
Session Type Counts (Non-Stacked)
Number of active sessions divided by type; see metric documentation linked below for up-to-date list of types. Metric: num_sessions
Prometheus/ACD: Subrunners
Client Connections
Number of currently open client connections per subrunner. Metric: subrunner_client_conns
Asynchronous Queues (Current)
Number of queued events per subrunner, roughly corresponding to load. Metric: subrunner_async_queue
Used <Send/receive> Data Blocks
Number of send or receive data blocks currently in use per subrunner, as decided by the “Send/receive” drop down box. Metric: subrunner_used_send_data_blocks and subrunner_used_receive_data_blocks
Asynchronous Queues (Max)
Maximum number of events waiting in queue. Metric: subrunner_max_async_queue
Total <Send/receive> Data Blocks
Number of send or receive data blocks allocated per subrunner, as decided by the “Send/receive” drop down box. Metric: subrunner_total_send_data_blocks and subrunner_total_receive_data_blocks
Low Queue (Current)
Number of low priority events queued per subrunner. Metric: subrunner_low_queue
Medium Queue (Current)
Number of medium priority events queued per subrunner. Metric: subrunner_medium_queue
High Queue (Current)
Number of high priority events queued per subrunner. Metric: subrunner_high_queue
Low Queue (Max)
Maximum number of events waiting in low priority queue. Metric: subrunner_max_low_queue
Medium Queue (Max)
Maximum number of events waiting in medium priority queue. Metric: subrunner_max_medium_queue
High Queue (Max)
Maximum number of events waiting in high priority queue. Metric: subrunner_max_high_queue
Wakeups
The number of times a subrunner has been waken up from sleep. Metric: subrunner_io_wakeups
Overloaded
The number of times the number of queued events for a subrunner exceeded its maximum. Metric: subrunner_times_worker_overloaded
Autopause
Number of sockets that have been automatically paused. This happens when the work manager is under heavy load. Metric: subrunner_io_autopause_sockets
4.10.5 - Alarms and Alerting
Alerts are generated by the third-party service Prometheus, which sends them to the Alertmanager service. A default containerized instance of Alertmanager is deployed alongside ESB3024 Router. Out of the box, Alertmanager ships with only a sample configuration file, and will require manual configuration prior to enabling the alerting functionality. Due to the many different possible configurations for how alerts are both detected and where they are pushed, the official Alertmanager documentation should be followed for how to configure the service.
The router ships with Alertmanager 0.25, the documentation
for which can be found at prometheus.io.
The Alertmanager configuration file can be found on the host at
/opt/edgeware/acd/alertmanager/alertmanager.yml.
Accessing Alertmanager
Alertmanager has a web interface that is listening for HTTP connections on port 9093. There is no authentication, so anyone who has access to the host that is running Alertmanager can access the interface.
Starting / Stopping Alertmanager
After the service is configured, it can be managed via systemd, under the
service unit acd-alertmanager.
systemctl start acd-alertmanager
Logging
The container logs are automatically published to the system journal, under
the same unit descriptor, and can be viewed using journalctl
journalctl -u acd-alertmanager
4.10.6 - Monitoring multiple routers
By default an instance of Prometheus only monitors the ESB3024 Router that is installed on the same host as where Prometheus is installed. It is possible to make it monitor other router instances and visualize all instances on one Grafana instance.
Configuring of Prometheus
This is configured in the scraping configuration of Prometheus, which is found
in the file /opt/edgeware/acd/prometheus/prometheus.yaml, which typically
looks like this:
global:
scrape_interval: 15s
rule_files:
- recording-rules.yaml
# A scrape configuration for router metrics
scrape_configs:
- job_name: 'router-scraper'
scheme: https
tls_config:
insecure_skip_verify: true
static_configs:
- targets:
- acd-router-1:5001
metrics_path: /m1/v1/metrics
honor_timestamps: true
- job_name: 'edns-proxy-scraper'
scheme: http
static_configs:
- targets:
- acd-router-1:8888
metrics_path: /metrics
honor_timestamps: true
More routers can be added to the scrape configuration by simply adding more
routers under targets in the scraper jobs.
For instance, to monitor acd-router-2 and acd-router-3 along acd-router-1,
the configuration file needs to be modified like this:
global:
scrape_interval: 15s
rule_files:
- recording-rules.yaml
# A scrape configuration for router metrics
scrape_configs:
- job_name: 'router-scraper'
scheme: https
tls_config:
insecure_skip_verify: true
static_configs:
- targets:
- acd-router-1:5001
- acd-router-2:5001
- acd-router-3:5001
metrics_path: /m1/v1/metrics
honor_timestamps: true
- job_name: 'edns-proxy-scraper'
scheme: http
static_configs:
- targets:
- acd-router-1:8888
- acd-router-2:8888
- acd-router-3:8888
metrics_path: /metrics
honor_timestamps: true
After the file has been modified, Prometheus needs to be restarted by typing
systemctl restart acd-prometheus
It is possible to use the same configuration on multiple routers, so that all routers in a deployment can monitor each other.
Selecting Router in Grafana
In the top left corner the Grafana dashboards have a drop-down menu labeled “ACD Router”, which allows to choose which router to monitor.
4.10.7 - Routing Rule Evaluation Metrics
ESB3024 Router counts the number of times a node and any of its children is selected in the routing table.
The visit counters can be retrieved with the following end points:
/v1/node_visits
Returns visit counters for each node as a flat list of
host:counterpairs in JSON.Example output:
{ "node1": "1", "node2": "1", "node3": "1", "top": "3" }
/v1/node_visits_graph
Returns a full graph of nodes with their respective visit counters in GraphML.
Example output:
<?xml version="1.0"?> <graphml xmlns="http://graphml.graphdrawing.org/xmlns" xmlns:xsi="http://www.w3.org/2001/XMLSchema-instance" xsi:schemaLocation="http://graphml.graphdrawing.org/xmlns http://graphml.graphdrawing.org/xmlns/1.0/graphml.xsd"> <key id="visits" for="node" attr.name="visits" attr.type="string" /> <graph id="G" edgedefault="directed"> <node id="routing_table"> <data key="visits">5</data> </node> <node id="cdn1"> <data key="visits">1</data> </node> <node id="node1"> <data key="visits">1</data> </node> <node id="cdn2"> <data key="visits">2</data> </node> <node id="node2"> <data key="visits">2</data> </node> <node id="cdn3"> <data key="visits">2</data> </node> <node id="node3"> <data key="visits">2</data> </node> <edge id="e0" source="cdn1" target="node1" /> <edge id="e1" source="routing_table" target="cdn1" /> <edge id="e2" source="cdn2" target="node2" /> <edge id="e3" source="routing_table" target="cdn2" /> <edge id="e4" source="cdn3" target="node3" /> <edge id="e5" source="routing_table" target="cdn3" /> </graph> </graphml>To receive the graph as JSON, specify
Accept:application/jsonin the request headers.Example output:
{ "edges": [ { "source": "cdn1", "target": "node1" }, { "source": "routing_table", "target": "cdn1" }, { "source": "cdn2", "target": "node2" }, { "source": "routing_table", "target": "cdn2" }, { "source": "cdn3", "target": "node3" }, { "source": "routing_table", "target": "cdn3" } ], "nodes": [ { "id": "routing_table", "visits": "5" }, { "id": "cdn1", "visits": "1" }, { "id": "node1", "visits": "1" }, { "id": "cdn2", "visits": "2" }, { "id": "node2", "visits": "2" }, { "id": "cdn3", "visits": "2" }, { "id": "node3", "visits": "2" } ] }
Resetting Visit Counters
A node visit counter with an id not matching any node id of a newly applied
routing table is destroyed.
Reset all counters to zero by momentarily applying a configuration with a
placeholder routing root node, that has unique id and an empty members
list, e.g:
"routing": {
"id": "empty_routing_table",
"members": []
}
… and immediately reapply the desired configuration.
4.10.8 - Metrics
ESB3024 Router collects a large number of metrics that can give insight into
it’s condition at runtime. Those metrics are available in
Prometheus’ text-based exposition format
at endpoint :5001/m1/v1/metrics.
Below is the description of these metrics along with their labels.
client_response_status
Number of responses sent back to incoming requests.
- Type: counter
lua_num_errors
Number of errors encountered when evaluating Lua rules.
- Type:
counter
lua_num_evaluators
Number of Lua rules evaluators (active interpreters).
- Type: gauge
lua_time_spent
Time spent by running Lua evaluators, in microseconds.
- Type:
counter
num_configuration_changes
Number of times configuration has been changed since the router has started.
- Type:
counter
num_endpoint_requests
Number of requests redirected per CDN endpoint.
- Type:
counter - Labels:
endpoint- CDN endpoint address.selector- whether the request was counted duringinitialorinstreamselection.
num_invalid_http_requests
Number of client requests that either use wrong method or wrong URL path. Also number of all requests that cannot be parsed as HTTP.
- Type:
counter - Labels:
source- name of internal filter function that classified request as invalid. Probably not of much use outside debugging.type- whether the request was HTTP (Unencrypted) or HTTPS (SSL).
num_log_errors_total
Number of logged errors since the router has started.
- Type:
counter
num_log_warnings_total
Number of logged warnings since the router has started.
- Type:
counter
num_managed_redirects
Number of redirects to the router itself, which allows session management.
- Type:
counter
num_manifests
Number of cached manifests.
- Type:
gauge - Labels:
count- state of manifest in cache, can be eitherlru,evictedortotal.
num_qoe_losses
Number of “lost” QoE decisions per CDN.
- Type:
counter - Labels:
cdn_id- ID of CDN that loose QoE battle.cdn_name- name of CDN that loose QoE battle.selector- whether the decision was taken duringinitialorinstreamselection.
num_qoe_wins
Number of “won” QoE decisions per CDN.
- Type:
counter - Labels:
cdn_id- ID of CDN that won QoE battle.cdn_name- name of CDN that won QoE battle.selector- whether the decision was taken duringinitialorinstreamselection.
num_rejected_requests
Deprecated, should always be at 0.
- Type:
counter - Labels:
selector- whether the request was counted duringinitialorinstreamselection.
num_requests
Total number of requests received by the router.
- Type:
counter - Labels:
selector- whether the request was counted duringinitialorinstreamselection.
num_sessions
Number of sessions opened on router.
- Type:
gauge - Labels:
state- eitheractiveorinactive.type- one of:initial,instream,qoe_on,qoe_off,qoe_agentorsp_agent.
num_ssl_errors_total
Number of all errors logged during TLS connections, both incoming and outgoing.
- Type:
counter
num_ssl_warnings_total
Number of all warnings logged during TLS connections, both incoming and outgoing.
- Type:
counter - Labels:
category- which kind of TLS connection triggered the warning. Can be one of:cdn,content,generic,repeated_sessionor empty.
num_unhandled_requests
Number of requests for which no CDN could be found.
- Type:
counter - Labels:
selector- whether the request was counted duringinitialorinstreamselection.
num_unmanaged_redirects
Number of redirects to “outside” the router - usually to CDN.
- Type:
counter - Labels:
cdn_id- ID of CDN picked for redirection.cdn_name- name of CDN picked for redirection.selector- whether the redirect was result ofinitialorinstreamselection.
num_valid_http_requests
Number of received requests that were not deemed invalid, see
num_invalid_http_requests.
- Type:
counter - Labels:
source- name of internal filter function that classified request as invalid. Probably not of much use outside debugging.type- whether the request was HTTP (Unencrypted) or HTTPS (SSL).
orc_latency_bucket
Total number of responses sorted into “latency buckets” - labels denoting latency interval.
- Type:
counter - Labels:
le- latency bucket that given response falls into.orc_status_code- HTTP status code of given response.
orc_latency_count
Total number of responses.
- Type:
counter - Labels:
tls- whether the response was sent via SSL/TLS connection or not.orc_status_code- HTTP status code of given response.
ssl_certificate_days_remaining
Number of days until a SSL certificate expires.
- Type:
gauge - Labels:
domain- the common name of the domain that the certificate authenticates.not_valid_after- the expiry time of the certificate.not_valid_before- when the certificate starts being valid.usable- if the certificate is usable to the router, see the ssl_certificate_usable_count metric for an explanation.
ssl_certificate_usable_count
Number of usable SSL certificates. A certificate is usable if it is valid and authenticates a domain name that points to the router.
- Type:
gauge
4.10.8.1 - Internal Metrics
A subrunner is an internal module of ESB3024 Router which handles routing requests. The subrunner metrics are technical and mainly of interest for AgileTV. These metrics will be briefly described here.
subrunner_async_queue
Number of queued events per subrunner, roughly corresponding to load.
- Type:
gauge - Labels:
subrunner_id- ID of given subrunner.
subrunner_client_conns
Number of currently open client connections per subrunner.
- Type:
gauge - Labels:
subrunner_id- ID of given subrunner.
subrunner_high_queue
Number of high priority events queued per subrunner.
- Type:
gauge - Labels:
subrunner_id- ID of given subrunner.
subrunner_io_autopause_sockets
Number of sockets that have been automatically paused. This happens when the work manager is under heavy load.
- Type:
counter - Labels:
subrunner_id- ID of given subrunner.
subrunner_io_send_data_fast_attempts
A fast data path was added that in many cases increases the performance of the router. This metric was added to verify that the fast data path is taken.
- Type:
counter - Labels:
subrunner_id- ID of given subrunner.
subrunner_io_wakeups
The number of times a subrunner has been waken up from sleep.
- Type:
counter - Labels:
subrunner_id- ID of given subrunner.
subrunner_low_queue
Number of low priority events queued per subrunner.
- Type:
gauge - Labels:
subrunner_id- ID of given subrunner.
subrunner_max_async_queue
Maximum number of events waiting in queue.
- Type:
gauge - Labels:
subrunner_id- ID of given subrunner.
subrunner_max_high_queue
Maximum number of events waiting in high priority queue.
- Type:
gauge - Labels:
subrunner_id- ID of given subrunner.
subrunner_max_low_queue
Maximum number of events waiting in low priority queue.
- Type:
gauge - Labels:
subrunner_id- ID of given subrunner.
subrunner_max_medium_queue
Maximum number of events waiting in medium priority queue.
- Type:
gauge - Labels:
subrunner_id- ID of given subrunner.
subrunner_medium_queue
Number of medium priority events queued per subrunner.
- Type:
gauge - Labels:
subrunner_id- ID of given subrunner.
subrunner_times_worker_overloaded
Number of times when queued events for given subrunner exceeded
the tuning.overload_threshold value (defaults to 32).
- Type:
counter - Labels:
subrunner_id- ID of given subrunner.
subrunner_total_receive_data_blocks
Number of receive data blocks allocated per subrunner.
- Type:
gauge - Labels:
subrunner_id- ID of given subrunner.
subrunner_total_send_data_blocks
Number of send data blocks allocated per subrunner.
- Type:
gauge - Labels:
subrunner_id- ID of given subrunner.
subrunner_used_receive_data_blocks
Number of receive data blocks currently in use per subrunner. Same as subrunner_total_receive_data_blocks.
- Type:
gauge - Labels:
subrunner_id- ID of given subrunner.
subrunner_used_send_data_blocks
Number of send data blocks currently in use per subrunner. Same as subrunner_total_send_data_blocks.
- Type:
gauge - Labels:
subrunner_id- ID of given subrunner.
4.11 - Glossary
- ACD
- Agile CDN Director. See “Director”.
- Confd
- A backend service that hosts the service configuration. Comes with an API, a CLI and a GUI.
- Classifier
- A filter that associate a request with a tag that can be used to define session groups.
- Director
- The Agile Delivery OTT router and related services.
- ESB
- A software bundle that can be separately installed and upgraded, and is released as one entity with one change log. Each ESB is identified with a number. Over time, features and functions within an ESB can change.
- Lua
- A widely available scripting language that is often used to extend the capabilities of a piece of software.
- Router
- Unless otherwise specified, an HTTP router that manages an OTT session using HTTP redirect. There are also ways to use DNS instead of HTTP.
- Selection Input API
- Data posted to this API can be accessed by the routing rules and hence influence the routing decisions.
- Subnet API
- An API to define mappings between subnets and names (typically regions) for those subnets. Routing rules can then refer to the names rather than the subnets.
- Session Group
- A handle on a group of requests, defined via classifiers.
5 - AgileTV CDN Director (esb3024)
5.1 - Release Notes for esb3024-1.22.1
Build date
2026-02-05
Release status
Type: production
Compatibility
This release has been tested with the following product versions:
- AgileTV CDN Manager, ESB3027-1.4.1
- Orbit, ESB2001-4.2.2 (see Known limitations below)
- SW-Streamer, ESB3004-2.6.2
- Convoy, ESB3006-3.8.0
- Request Router, ESB3008-3.10.1
- GUI 3.2.9
Breaking changes since release esb3024-1.22.0
- If the system has a lot of entries in the selection input,
services.routing.tuning.general.selectionInputItemLimitneeds to be tweaked, otherwise it will not work after upgrading.
Change log
- NEW: Performance optimizations and improvements
- NEW: Show number of selection input entries in Grafana [ESB3024-1582]
- NEW: Monitor Lua memory usage [ESB3024-1591]
- NEW: Monitor memory and CPU usage [ESB3024-1592]
- NEW: Improved expiration handling of messages read from Kafka [ESB3024-1594]
- FIXED: Selection input item limit does not work [ESB3024-1472]
- FIXED: The Director does not reconnect when a Kafka topic is recreated [ESB3024-1491]
- FIXED: Segmentation fault when connection to Kafka is lost [ESB3024-1523]
- FIXED: SELinux being set to enforced without consent [ESB3024-1586]
- FIXED: Migraton script missing for
integration.guiconfig [ESB3024-1621] - FIXED: Installation fails if firewalld is disabled [ESB3024-1623]
Deprecated functionality
Deprecated since ESB3024-1.18.0:
- Lua function
epochToTimehas been deprecated in favor ofepoch_to_time. - Lua function
timeToEpochhas been deprecated in favor oftime_to_epoch. - The session proxy has been deprecated. Its functionality is replaced by the new “Send HTTP requests from Lua code” function.
System requirements
See the current system requirements in Getting Started.
Known limitations
It is recommended to set
services.routing.tuning.general.overloadThresholdto 128. This is particularly important if the Director will receive messages from Kafka.Sometimes the ACD Confd Transformer does not start correctly after the ACD Director has been upgraded. This can be identified by typing
systemctl status acd-confd-transformer.serviceafter the upgrade is complete. If it shows that the service is not running, it needs to be started manually by typingsystemctl start acd-confd-transformer.service. [ESB3024-1675]When configured to use TLS,
acd-telegraf-metrics-databasemight log the following error message:http: TLS handshake error from <client ip>: client sent an HTTP request to an HTTPS serverwhen receiving metrics from caches even though the Telegraf agents are configured to use TLS. The Telegraf logs on the caches do not show any errors related to this. However, the data is still received over TLS and stored correctly byacd-telegraf-metrics-database. The issue seemingly resolved itself during investigation and is not reproducible. Current hypothesis is a logging bug in Telegraf.The Telegraf metrics agent might not be able to read all relevant network interface data on ESB2001 releases older than 3.6.2. The predictive load balancing function
host_has_bw()and the health check functioninterfaces_online()might therefore not work as expected.- The recommended workaround for
host_has_bw()is to usehost_has_bw_custom(), documented in Built-in Lua functions.host_has_bw_custom()accepts a numeric argument for the host’s network interface capacity which can be used if the data supplied by the Telegraf metrics agents do not contain this information. - It is not recommended to use
interfaces_online()for ESB2001 instances until they are updated to 3.6.2 or later.
- The recommended workaround for
5.2 - Getting Started
The Director serves as a versatile network service designed to redirect incoming HTTP(s) requests to the optimal host or Content Delivery Network (CDN) by evaluating various request properties through a set of rules. Although requests can be generic, the primary focus centers around audio-video content delivery. The rule engine allows users to construct routing configurations using predefined blocks, providing for the creation of intricate routing logic. This modular approach allows the users to tailor and streamline the content delivery process to meet their specific needs. The Director’s flexible rule engine takes into account factors such as geographical location, server load, content type, and other metadata from external sources to intelligently route incoming requests. It supports dynamic adjustments to seamlessly adapt to changing network conditions, ensuring efficient and reliable content delivery. The Director improves the overall user experience by delivering content from the most suitable and responsive sources, thereby reducing latency and enhancing performance.
Requirements
Hardware
The Director is designed to be installed and operated on commodity hardware, ensuring accessibility for a broad range of users. The minimum hardware specifications are as follows:
- CPU: x86-64 AMD or Intel with at least 2 cores.
- Memory: At least 2 GB free at runtime.
Operating System Compatibility
The Director is officially supported on Red Hat Enterprise Linux 8 or 9 or any
compatible operating system. In order to run the service, a minimum CPU
architecture of x86-64-v2 is required. This can be determined by running the
following command. If supported, it will be listed as “(supported)” in the
output.
/usr/lib64/ld-linux-x86-64.so.2 --help | grep x86-64-v2
External Internet access is necessary during the installation process for the installer to download and install additional dependencies. This ensures a seamless setup and optimal functionality of the Director on Red Hat Enterprise Linux 8 or 9. It’s worth noting that, due to the unique workings of the DNF package manager in Red Hat Enterprise Linux with rolling package streams, an air-gapped installation process is not available.
Firewall Recommendations
See Firewall.
Installation
See Installation.
Operations
See Operations.
Configuration Process
Once the router is operational, it requires a valid configuration before it can route incoming requests.
There are currently three methods available for configuring the router, each catering to different levels of complexity. The first is a Web UI, suitable for the most common use-cases, providing an intuitive interface for configuration. The second involves utilizing a confd REST service, complemented by an optional command line tool, confcli, suitable for all but the most advanced scenarios. The third method involves leveraging an internal REST API, ideal for the most intricate cases where using confd proves to be less flexible. It’s essential to note that as the configuration method advances through these levels, both flexibility and complexity increase, providing users with tailored options based on their specific needs and expertise.
API Key Management
Regardless of the method used to configure the system, a unique API key is
crucial for safeguarding the router’s configuration and preventing unauthorized
access to the API. This key must be supplied when interacting with the API.
During the router software installation, an automatically generated API key is
created and can be located on the installed system at
/opt/edgeware/acd/router/cache/rest-api-key.json. The structure of this file
is as follows:
{"api_key": "abc123"}
When accessing the internal configuration API, the key must be included in the
X-API-key header of the request, as shown below:
curl -v -k -H "X-API-Key: abc123" https://<router-host.example>:5001/v2/configuration
Modification to the authentication key and behavior can be done through the
/v2/rest_api_key endpoint. To change the key, a PUT request with a JSON body
of the same structure can be sent to the endpoint:
curl -v -k -X PUT -T new-key.json -H "X-API-Key: abc123" \
-H "Content-Type: application/json" https://<router-host.example>:5001/v2/rest_api_key
Additionally, key authentication can be disabled completely by sending a DELETE
request to the endpoint:
curl -v -k -X DELETE -H "X-API-Key: abc123" \
https://<router-host.example>:5001/v2/rest_api_key
In the event of a lost or forgotten authentication key, it can always be
retrieved at /opt/edgeware/acd/router/cache/rest-api-key.json on the
machine running the router. It is critical to emphasize that the API key should
remain private to prevent unauthorized access to the internal API, as it grants
full access to the router’s configuration.
Configuration Basics
Upon completing the installation process and configuring the API keys, the subsequent section will provide guidance on configuring the router to route all incoming requests to a single host. For straightforward CDN Offload use cases, there is a web based user interface described here.
For further details on configuring the router using confd and confcli, please consult the Confd documentation.
The initial step involves defining the target host group. In this illustration,
a singular group named all will be established, comprising two hosts.
$ confcli services.routing.hostGroups -w
Running wizard for resource 'hostGroups'
Hint: Hitting return will set a value to its default.
Enter '?' to receive the help string
hostGroups : [
hostGroup can be one of
1: dns
2: host
3: redirecting
Choose element index or name: host
Adding a 'host' element
hostGroup : {
name (default: ): all
type (default: host):
httpPort (default: 80):
httpsPort (default: 443):
hosts : [
host : {
name (default: ): host1.example.com
hostname (default: ): host1.example.com
ipv6_address (default: ):
}
Add another 'host' element to array 'hosts'? [y/N]: y
host : {
name (default: ): host2.example.com
hostname (default: ): host2.example.com
ipv6_address (default: ):
}
Add another 'host' element to array 'hosts'? [y/N]: n
]
}
Add another 'hostGroup' element to array 'hostGroups'? [y/N]: n
]
Generated config:
{
"hostGroups": [
{
"name": "all",
"type": "host",
"httpPort": 80,
"httpsPort": 443,
"hosts": [
{
"name": "host1.example.com",
"hostname": "host1.example.com",
"ipv6_address": ""
},
{
"name": "host2.example.com",
"hostname": "host2.example.com",
"ipv6_address": ""
}
]
}
]
}
Merge and apply the config? [y/n]:
After defining the host group, the next step is to establish a rule that directs
incoming requests to the designated host. In this example, a sole rule named
random will be generated, ensuring that all incoming requests are consistently
routed to the previously defined host.
$ confcli services.routing.rules -w
Running wizard for resource 'rules'
Hint: Hitting return will set a value to its default.
Enter '?' to receive the help string
rules : [
rule can be one of
1: allow
2: consistentHashing
3: contentPopularity
4: deny
5: firstMatch
6: random
7: rawGroup
8: rawHost
9: split
10: weighted
Choose element index or name: random
Adding a 'random' element
rule : {
name (default: ): random
type (default: random):
targets : [
target (default: ): host1.example.com
Add another 'target' element to array 'targets'? [y/N]: y
target (default: ): host2.example.com
Add another 'target' element to array 'targets'? [y/N]: n
]
}
Add another 'rule' element to array 'rules'? [y/N]: n
]
Generated config:
{
"rules": [
{
"name": "random",
"type": "random",
"targets": [
"host1.example.com",
"host2.example.com"
]
}
]
}
Merge and apply the config? [y/n]:
The last essential step involves instructing the router on which rule should
serve as the entry point into the routing tree. In this example, we designate
the rule random as the entrypoint for the routing process.
$ confcli services.routing.entrypoint random
services.routing.entrypoint = 'random'
Once this configuration is defined, all incoming requests will initiate their
traversal through the routing rules, starting with the rule named random. This
rule is designed to consistently match for every incoming request, effectively load
balancing evenly between host1.example.com and host2.example.com on port 80
or 443, depending on whether the initial request was made using HTTP or HTTPS.
Integration with Convoy
The router is equipped with the capability to synchronize specific configuration metadata with a separate Convoy installation through the integrated convoy-bridge service. However, this service necessitates additional setup and configuration, and you can find comprehensive details on the process here..
Additional Resources
Additional documentation resources are included with the Director and can be
accessed at the following directory: /opt/edgeware/acd/documentation/. This
directory contains supplementary materials to provide users with comprehensive
information and guidance for optimizing their experience with the Director.
Ready for Production
Once the Director software is completely installed and configured, there are a few additional considerations before moving to a full production environment. See the section Ready for Production for additional information.
5.3 - Installing a 1.22 release
To install ESB3024 Router, you first need to copy the installation ISO image to
the target node where the router will be run. Due to the way the installer
operates, it is necessary that the host is reachable by ssh from itself for
the user account that will perform the installation, and that this user has
sudo access.
Prerequisites:
Ensure that the current user has
sudoaccess.sudo -lIf the above command fails, you may need to add the user to the
/etc/sudoersfile.Ensure that the installer has ssh access to
localhost.If using the
rootuser, thePermitRootLoginproperty of the/etc/ssh/sshd_configfile must be set to ‘yes’.Ensure that
sshpassis installed.If the installer is run by the root user, this step is not necessary.
sshpassis installed by typing this:sudo dnf install -y sshpass
Assuming the installation ISO image is in the current working directory,
the following steps need to be executed either by root user or with sudo.
Mount the installation ISO image under
/mnt/acd.Note: The mount-point may be any accessible path, but
/mnt/acdwill be used throughout this document.mkdir -p /mnt/acd mount esb3024-acd-router-1.22.1.iso /mnt/acdRun the installer script.
/mnt/acd/installerIf it is not running as root, the installer will ask both for the “SSH password” and the “BECOME password”. The “SSH password” is the password that the user running the installer uses to log in to the local machine, and the “BECOME password” is the password for the user to gain
sudoaccess. They are usually the same.
Upgrading From an Earlier ESB3024 Router Release
The following steps can be taken to upgrade the router from a 1.10 or later release to 1.22.1. If upgrading from an earlier release it is recommended to first upgrade to 1.10.1 and then to upgrade to 1.22.1.
The upgrade procedure for the router is performed by taking a backup of the configuration, installing the new release of the router, and applying the saved configuration.
With the router running, save a backup of the configuration.
The exact procedure to accomplish this depends on the current method of configuration, e.g. if
confdis used, then the configuration should be extracted fromconfd, but if the REST API is used directly, then the configuration must be saved by fetching the current configuration snapshot using the REST API.Extracting the configuration using
confdis the recommend approach where available.confcli | tee config_backup.jsonTo extract the configuration from the REST API, the following may be used instead. Depending on the version of the router used, an API-Key may be required to fetch from the REST API.
curl --insecure https://localhost:5001/v2/configuration \ | tee config_backup.jsonIf the API Key is required, it can be found in the file
/opt/edgeware/acd/router/cache/rest-api-key.jsonand can be passed to the API by setting the value of theX-API-Keyheader.curl --insecure -H "X-API-Key: 1234abcd" \ https://localhost:5001/v2/configuration \ | tee config_backup.jsonMount the new installation ISO under
/mnt/acd.Note: The mount-point may be any accessible path, but
/mnt/acdwill be used throughout this document.mkdir -p /mnt/acd mount esb3024-acd-router-1.22.1.iso /mnt/acdStop the router and all associated services.
Before upgrading the router it needs to be stopped, which can be done by typing this:
systemctl stop 'acd-*'Run the installer script.
/mnt/acd/installerPlease note that the installer will install new container images, but it will not remove the old ones. The old images can be removed manually after the upgrade is complete.
Migrate the configuration.
Note that this step only applies if the router is configured using
confd. If it is configured using the REST API, this step is not necessary.The confd configuration used in the previous versions is not directly compatible with 1.22, and may need to be converted. If this is not done, the configuration will not be valid and it will not be possible to make configuration changes.
The
acd-confd-migrationtool will automatically apply any necessary schema migrations. Further details about this tool can be found at Confd Auto Upgrade Tool.The tool takes as input the old configuration file, either by reading the file directly, or by reading from standard input, applies any necessary migrations between the two specified versions, and outputs a new configuration to standard output which is suitable for being applied to the upgraded system. While the tool has the ability to migrate between multiple versions at a time, the earliest supported version is 1.10.1.
The example below shows how to upgrade from 1.20.1. If upgrading from 1.18.0,
--from 1.20.1should be replaced with--from 1.18.0.The command line required to run the tool is different depending on which esb3024 release it is run on. On 1.22.1 it is run like this:
cat config_backup.json | \ podman run -i --rm \ images.edgeware.tv/acd-confd-migration:1.22.1 \ --in - --from 1.20.1 --to 1.22.1 \ | tee config_upgraded.jsonAfter running the above command, apply the new configuration to
confdby runningcat config_upgraded.json | confcli -i.
Troubleshooting
If there is a problem running the installer, additional debug information can
be output by adding -v or -vv or -vvv to the installer command, the
more “v” characters, the more detailed output.
5.3.1 - Configuration changes between 1.20 and 1.22
Confd configuration changes
Below are the changes to the confd configuration between versions 1.20 and 1.22 listed.
Removed services.routing.settings.usageLog.enabled
The services.routing.settings.usageLog.enabled setting has been removed. The
usage log is always enabled and this setting is no longer necessary.
Replaced forwardHostHeader with headersToForward
The services.routing.hostGroups.<name>.forwardHostHeader setting has been
replaced with services.routing.hostGroups.<name>.headersToForward, which is a
list of headers to forward to the origin server.
See CDNs and Hosts for more information.
Added selectionInputFetchBase
The integration.manager.selectionInputFetchBase setting has been added. It is
used to configure the base URL for fetching initial selection input from the
manager. See Selection Input Configurations for more information.
Added the requestHeader classifier
A new classifier, requestHeader, has been added. See Session
Classification for more
information.
Added patternSource to the subnet classifier
The subnet classifier has been extended with a new setting, patternSource.
See Session Classification for more
information.
5.4 - Firewall
For security reasons, the ESB3024 Installer does not automatically configure the local firewall to allow incoming traffic. It is the responsibility of the operations person to ensure that the system is protected from external access by placing it behind a suitable firewall solution. The following table describes the set of ports required for operation of the router.
| Application | Port | Protocol | Direction | Source | Description |
|---|---|---|---|---|---|
| Prometheus Alert Manager | 9093 | TCP | IN | internal | Monitoring Services |
| Confd | 5000 | TCP | IN | internal | Configuration Services |
| Router | 80 | TCP | IN | public | Incoming HTTP Requests |
| Router | 443 | TCP | IN | public | Incoming HTTPS Requests |
| Router | 5001 | TCP | IN | localhost | Access to router’s REST API |
| Router | 8000 | TCP | IN | localhost | Internal monitoring port |
| EDNS-Proxy | 8888 | TCP | IN | localhost | Proxy EDNS Requests |
| Grafana | 3000 | TCP | IN | internal | Monitoring Services |
| Grafana-Loki | 3100 | TCP | IN | internal | Log monitoring daemon |
| Prometheus | 9090 | TCP | IN | internal | Monitoring Service |
The “Direction” column represents the direction in which the connection is established.
IN- The connection is originated from an outside serverOUT- The connection is established from the host to an external server.
Once a connection is established through the firewall, bidirectional traffic must be allowed using the established connection.
For the “Source” column, the following terms are used.
internal- Any host or network which is allowed to monitor or operate the system.public- Any host or subnet that can access the router. This includes any customer network that will be making routing requests.localhost- Access can be limited to local connections only.any- All traffic from any source or to any destination.
Additional Ports
Convoy Bridge Integration
The optional convoy-bridge service needs the ability to access the Convoy MariaDB service, which by default runs on port 3306 on all of the Convoy Management servers. To allow this integration to run, port 3306/tcp must be allowed from the router to the configured Convoy Management node.
5.5 - API Overview
ESB3024 Router provides two different types of API:s:
- A content request API that is used by video clients to ask for content, normally using port 80 for HTTP and port 443 for HTTPS.
- A few REST API:s used by administrators to configure and monitor the router installation, using port 5001 over HTTPS by default.
The content API won’t be described further in this document, since it’s a simple HTTP interface serving content as regular files or redirect responses.
Raw configuration – /v2/configuration
Used to check and update the raw configuration of ESB3024 Router. Note that this API is considered an implementation detail and is not documented further.
| REQUEST Method | Content-Type | RESPONSE Result | Status Code | Content-Type |
|---|---|---|---|---|
GET | <N/A> | Success | 200 OK | application/json |
PUT | application/json | Success | 204 No Content | <N/A> |
PUT | application/json | Failure | 400 Bad Request | application/json1 |
Validate Configuration – /v2/validate_configuration
Used to determine if a JSON payload is correctly formatted without actually applying its configuration. A successful return status does not guarantee that the applied configuration will work, it only validates the JSON structure.
| REQUEST Method | Content-Type | RESPONSE Result | Status Code | Content-Type |
|---|---|---|---|---|
PUT | application/json | Success | 204 No Content | <N/A> |
PUT | application/json | Failure | 400 Bad Request | application/json1 |
Example request
When an expected field is missing from the payload, the validation will show which one and return an appropriate error message in its payload:
$ curl -i -X PUT \
-d '{"routing": {"log_level": 3}}' \
-H "Content-Type: application/json" \
https://router.example:5001/v2/validate_configuration
HTTP/1.1 400 Bad Request
Access-Control-Allow-Origin: *
Content-Length: 132
Content-Type: application/json
X-Service-Identity: router.example-5fc78d
"Configuration validation: Configuration parsing failed. \
Exception: [json.exception.out_of_range.403] (/routing) key 'id' not found"
Selection Input
The selection input API is used to inject user-defined data into the routing engine, making the data available for making routing decisions. Any JSON structures can be stored in the selection input.
One use case for selection input is to provide data on cache availability. For
example, if {"edge-streamer-2-online": true} is sent to the selection
input API, the routing condition eq('edge-streamer-2-online', true) can
be used to ensure that no traffic gets routed to the streamer if it’s offline.
/v3/selection_input
The /v3/selection_input API supports the GET, POST, PUT, and DELETE
methods.
PUTreplaces the data at the specified path with the provided data. If the path does not exist, it will be created.POSTis only used for appending data to arrays. The last element in the path must be an array. If the path does not exist, it will be created, with the last segment as an array.GETrequests fetch the current selection input data at the given path.DELETErequests remove the data at the given path.
Example PUT request
$ curl -i -X PUT \
-d '{"bitrate": 13000, "capacity": 50000}' \
-H "Content-Type: application/json" \
https://router.example.com:5001/v3/selection_input/hosts/host1
HTTP/1.1 201 Created
Access-Control-Allow-Headers: Content-Type, Authorization
Access-Control-Allow-Methods: GET, POST, PUT, DELETE, OPTIONS
Access-Control-Allow-Origin: *
Content-Length: 0
X-Service-Identity: router.example.com-5fc78d
Example POST request
$ curl -i -X POST \
-d '"server1"' \
-H "Content-Type: application/json" \
https://router.example.com:5001/v3/selection_input/modules/allowed_servers
HTTP/1.1 201 Created
Access-Control-Allow-Headers: Content-Type, Authorization
Access-Control-Allow-Methods: GET, POST, PUT, DELETE, OPTIONS
Access-Control-Allow-Origin: *
Content-Length: 0
X-Service-Identity: router.example.com-5fc78d
Example GET request
$ curl -i https://router.example.com:5001/v3/selection_input
HTTP/1.1 200 OK
Access-Control-Allow-Headers: Content-Type, Authorization
Access-Control-Allow-Methods: GET, POST, PUT, DELETE, OPTIONS
Access-Control-Allow-Origin: *
Content-Length: 156
Content-Type: application/json
X-Service-Identity: router.example.com-5fc78d
{
"hosts": {
"host1": {
"bitrate": 13000,
"capacity": 50000
}
},
"modules": {
"allowed_servers": [
"server1"
]
}
}
Example DELETE request
$ curl -i -X DELETE \
https://router.example.com:5001/v3/selection_input/modules/allowed_servers
HTTP/1.1 204 No Content
Access-Control-Allow-Headers: Content-Type, Authorization
Access-Control-Allow-Methods: GET, POST, PUT, DELETE, OPTIONS
Access-Control-Allow-Origin: *
Content-Length: 0
X-Service-Identity: router.example.com-5fc78d
/v1/selection_input
The /v1/selection_input API is retained only for backward compatibility with
legacy integrations.
When performing GET or DELETE requests, specific selection input values can
be accessed or deleted by including a path to the request. Note that not
specifying a path will select all selection input values. PUT requests do not
support supplying paths, the path to the element to be modified is deduced by
the keys in the provided JSON object.
| REQUEST Method | Content-Type | RESPONSE Result | Status Code | Content-Type |
|---|---|---|---|---|
PUT | application/json | Success | 204 No Content | <N/A> |
PUT | application/json | Failure | 400 Bad Request | application/json |
GET | <N/A> | Success | 200 OK | application/json |
DELETE | <N/A> | Success | 204 No Content | <N/A> |
DELETE | <N/A> | Failure | 404 Not Found | <N/A> |
Example successful request (PUT)
$ curl -i -X PUT \
-d '{"host1_bitrate": 13000, "host1_capacity": 50000}' \
-H "Content-Type: application/json" \
https://router.example.com:5001/v1/selection_input
HTTP/1.1 204 No Content
Access-Control-Allow-Origin: *
Content-Length: 0
X-Service-Identity: router.example.com-5fc78d
Example unsuccessful request (PUT)
$ curl -i -X PUT \
-d '{"cdn-status": {"session-count": 12345, "load-percent" 98}}' \
-H "Content-Type: application/json" \
https://router.example.com:5001/v1/selection_input
HTTP/1.1 400 Bad Request
Access-Control-Allow-Origin: *
Content-Length: 169
Content-Type: application/json
X-Service-Identity: router.example.com-5fc78d
{
"error": "[json.exception.parse_error.101] parse error at line 1, column 57: \
syntax error while parsing object separator - \
unexpected number literal; expected ':'"
}
Example successful request (GET)
curl -i https://router.example.com:5001/v1/selection_input
HTTP/1.1 200 OK
Access-Control-Allow-Origin: *
Content-Length: 129
Content-Type: application/json
X-Service-Identity: router.example.com-5fc78d
{
"host1_bitrate": 13000,
"host1_capacity": 50000
}
Example successful specific value request (GET)
curl -i https://router.example.com:5001/v1/selection_input/path/to/value
HTTP/1.1 200 OK
Access-Control-Allow-Origin: *
Content-Length: 129
Content-Type: application/json
X-Service-Identity: router.example.com-5fc78d
1
Example successful request (DELETE)
curl -i -X DELETE https://router.example.com:5001/v1/selection_input
HTTP/1.1 204 OK
Access-Control-Allow-Origin: *
Content-Length: 129
X-Service-Identity: router.example.com-5fc78d
Example successful specific value request (DELETE)
curl -i -X DELETE https://router.example.com:5001/v1/selection_input/value/to/delete
HTTP/1.1 204 OK
Access-Control-Allow-Origin: *
Content-Length: 129
X-Service-Identity: router.example.com-5fc78d
Example unsuccessful request (DELETE)
curl -i -X DELETE https://router.example.com:5001/v1/selection_input/non/existent/value
HTTP/1.1 404 Not Found
Access-Control-Allow-Origin: *
Content-Length: 129
X-Service-Identity: router.example.com-5fc78d
Subnets – /v1/subnets
An API for managing named subnets that can be used for routing and block lists. See Subnets for more details.
PUT requests inject key value pairs with the form {<subnet>: <value>}, where
<subnet> is a valid CIDR string, into ACD, e.g.:
$ curl -i -X PUT \
-d '{"255.255.255.255/24": "area1", "1.2.3.4/24": "area2"}' \
-H "Content-Type: application/json" \
https://router.example:5001/v1/subnets
HTTP/1.1 204 No Content
Access-Control-Allow-Origin: *
Content-Length: 0
X-Service-Identity: router.example-5fc78d
GET requests are used to fetch injected subnets, e.g.:
# Fetch all injected subnets
$ curl -i https://router.example:5001/v1/subnets
HTTP/1.1 200 OK
Access-Control-Allow-Origin: *
Content-Length: 411
Content-Type: application/json
X-Service-Identity: router.example-5fc78d
{
"1.2.3.4/16": "area2",
"1.2.3.4/24": "area1",
"1.2.3.4/8": "area3",
"255.255.255.255/16": "area2",
"255.255.255.255/24": "area1",
"255.255.255.255/8": "area3",
"2a02:2e02:9bc0::/16": "area8",
"2a02:2e02:9bc0::/32": "area7",
"2a02:2e02:9bc0::/48": "area6",
"2a02:2e02:9de0::/44": "combined_area",
"2a02:2e02:ada0::/44": "combined_area",
"5.5.0.4/8": "area5",
"90.90.1.3/16": "area4"
}
DELETE requests are used to delete injected subnets, e.g.:
# Delete all injected subnets
$ curl -i https://router.example:5001/v1/subnets -X DELETE
HTTP/1.1 204 No Content
Access-Control-Allow-Origin: *
Content-Length: 0
X-Service-Identity: router.example-5fc78d
Both GET and DELETE requests can be specified with the paths /byKey/ and
/byValue/ to filter which subnets to GET or DELETE.
# Fetch subnet with the CIDR string 1.2.3.4/8 if it exists
$ curl -i https://router.example:5001/v1/subnets/byKey/1.2.3.4/8
HTTP/1.1 200 OK
Access-Control-Allow-Origin: *
Content-Length: 26
Content-Type: application/json
X-Service-Identity: router.example-5fc78d
{
"1.2.3.4/8": "area3"
}
# Fetch all subnets whose CIDR string begins with the IP 1.2.3.4
$ curl -i https://router.example:5001/v1/subnets/byKey/1.2.3.4
HTTP/1.1 200 OK
Access-Control-Allow-Origin: *
Content-Length: 76
Content-Type: application/json
X-Service-Identity: router.example-5fc78d
{
"1.2.3.4/16": "area2",
"1.2.3.4/24": "area1",
"1.2.3.4/8": "area3"
}
# Fetch all subnets whose value equals 'area1'
$ curl -i https://router.example:5001/v1/subnets/byValue/area1
HTTP/1.1 200 OK
Access-Control-Allow-Origin: *
Content-Length: 60
Content-Type: application/json
X-Service-Identity: router.example-5fc78d
{
"1.2.3.4/24": "area1",
"255.255.255.255/24": "area1"
}
# Delete subnet with the CIDR string 1.2.3.4/8 if it exists
$ curl -i https://router.example:5001/v1/subnets/byKey/1.2.3.4/8
HTTP/1.1 204 No Content
Access-Control-Allow-Origin: *
Content-Length: 0
X-Service-Identity: router.example-5fc78d
# Delete all subnets whose CIDR string begins with the IP 1.2.3.4
$ curl -i https://router.example:5001/v1/subnets/byKey/1.2.3.4
HTTP/1.1 204 No Content
Access-Control-Allow-Origin: *
Content-Length: 0
X-Service-Identity: router.example-5fc78d
# Delete all subnets whose value equals 'area1'
$ curl -i https://router.example:5001/v1/subnets/byValue/area1
HTTP/1.1 204 No Content
Access-Control-Allow-Origin: *
Content-Length: 0
X-Service-Identity: router.example-5fc78d
| REQUEST Method | Content-Type | RESPONSE Result | Status Code | Content-Type |
|---|---|---|---|---|
PUT | application/json | Success | 204 No Content | <N/A> |
PUT | application/json | Failure | 400 Bad Request | application/json |
GET | <N/A> | Success | 200 OK | application/json |
GET | <N/A> | Failure | 400 Bad Request | application/json |
DELETE | <N/A> | Success | 204 No Content | application/json |
DELETE | <N/A> | Failure | 400 Bad Request | application/json |
Subrunner Resource Usage – /v1/usage
Used to monitor the load on subrunners, the processes performing those tasks that are possible to run in parallel.
| REQUEST Method | Content-Type | RESPONSE Result | Status Code | Content-Type |
|---|---|---|---|---|
GET | <N/A> | Success | 200 OK | application/json |
Example request
$ curl -i https://router.example:5001/v1/usage
HTTP/1.1 200 OK
Access-Control-Allow-Origin: *
Content-Length: 1234
Content-Type: application/json
X-Service-Identity: router.example-5fc78d
{
"total_usage": {
"content": {
"lru": 0,
"newest": "-",
"oldest": "-",
"total": 0
},
"sessions": 0,
"subrunner_usage": {
[...]
}
},
"usage_per_subrunner": [
{
"subrunner_usage": {
[...]
}
},
[...]
]
}
Metrics – /m1/v1/metrics
An interface intended to be scraped by Prometheus. It is possible to scrape it manually to see current values, but doing so will reset some counters and cause actual Prometheus data to become faulty.
| REQUEST Method | Content-Type | RESPONSE Result | Status Code | Content-Type |
|---|---|---|---|---|
GET | <N/A> | Success | 200 OK | text/plain |
Example request
$ curl -i https://router.example:5001/m1/v1/metrics
HTTP/1.1 200 OK
Access-Control-Allow-Origin: *
Content-Length: 1234
Content-Type: text/plain
X-Service-Identity: router.example-5fc78d
# TYPE num_configuration_changes counter
num_configuration_changes 12
# TYPE num_log_errors_total counter
num_log_errors_total 0
# TYPE num_log_warnings_total counter
num_log_warnings_total{category=""} 123
# TYPE num_log_warnings_total counter
num_log_warnings_total{category="cdn"} 0
# TYPE num_log_warnings_total counter
num_log_warnings_total{category="content"} 0
# TYPE num_log_warnings_total counter
num_log_warnings_total{category="generic"} 10
# TYPE num_log_warnings_total counter
num_log_warnings_total{category="repeated_session"} 0
# TYPE num_ssl_errors_total counter
[...]
Node Visit Counters – /v1/node_visits
Used to gather statistics about the number of visits to each node in the routing tree. The returned value is a JSON object containing node ID names and their corresponding counter values.
| REQUEST Method | Content-Type | RESPONSE Result | Status Code | Content-Type |
|---|---|---|---|---|
GET | <N/A> | Success | 200 OK | application/json |
See Routing Rule Evaluation Metrics for more details.
Example request
$ curl -i https://router.example:5001/v1/node_visits
HTTP/1.1 200 OK
Access-Control-Allow-Origin: *
Content-Length: 73
Content-Type: application/json
X-Service-Identity: router.example-5fc78d
{
"cache1.tv": "99900",
"offload": "100"
"routingtable": "100000"
}
Node Visit Graph – /v1/node_visits_graph
Creates a GraphML representation of the node visitation data that can be rendered into an image to make it easier to understand the data.
| REQUEST Method | Content-Type | RESPONSE Result | Status Code | Content-Type |
|---|---|---|---|---|
GET | <N/A> | Success | 200 OK | application/xml |
See Routing Rule Evaluation Metrics for more details.
Example request
> curl -i -k https://router.example:5001/v1/node_visits_graph
HTTP/1.1 200 OK
Access-Control-Allow-Origin: *
Content-Length: 731
Content-Type: application/xml
X-Service-Identity: router.example-5fc78d
<?xml version="1.0"?>
<graphml xmlns="http://graphml.graphdrawing.org/xmlns"
xmlns:xsi="http://www.w3.org/2001/XMLSchema-instance"
xsi:schemaLocation="http://graphml.graphdrawing.org/xmlns http://graphml.graphdrawing.org/xmlns/1.0/graphml.xsd">
<key id="visits" for="node" attr.name="visits" attr.type="string" />
<graph id="G" edgedefault="directed">
<node id="routingtable">
<data key="visits">100000</data>
</node>
<node id="cache1.tv">
<data key="visits">99900</data>
</node>
<node id="offload">
<data key="visits">100</data>
</node>
<edge id="e0" source="routingtable" target="cache1.tv" />
<edge id="e1" source="routingtable" target="offload" />
</graph>
</graphml>
Session list - /v1/sessions
Used to monitor the load on subrunners, the processes performing those tasks that are possible to run in parallel.
| REQUEST Method | Content-Type | RESPONSE Result | Status Code | Content-Type |
|---|---|---|---|---|
GET | <N/A> | Success | 200 OK | application/json |
Example request
$ curl -k -i https://router.example:5001/v1/sessions
HTTP/1.1 200 OK
Access-Control-Allow-Origin: *
Content-Length: 12345
Content-Type: application/json
X-Service-Identity: router.example-5fc78d
{
"sessions": [
{
"age_seconds": 103,
"cdn": "edgeware",
"cdn_is_redirecting": false,
"client_ip": "1.2.3.4",
"host": "cdn.example:80",
"id": "router.example-5fc78d-00000001",
"idle_seconds": 103,
"last_request_time": "2022-12-02T14:05:05Z",
"latest_request_path": "/__cl/s:storage1/__c/v/f/0/5/v_sintel3v_f05a05f07d352e891d79863131ef4df7/__op/hls-default/__f/index.m3u8",
"no_of_requests": 1,
"requested_bytes": 0,
"requests_redirected": 0,
"requests_served": 0,
"session_groups": [
"all"
],
"session_groups_generation": 2,
"session_path": "/__cl/s:storage1/__c/v/f/0/5/v_sintel3v_f05a05f07d352e891d79863131ef4df7/__op/hls-default/__f/index.m3u8",
"start_time": "2022-12-02T14:05:05Z",
"type": "instream",
"user_agent": "libmpv"
},
[...]
]
}
Session details - /v1/sessions/<id: str>
Used to get details about a specific session from the above session list. The
id part of the URL corresponds to the id field in one of the
returned session entries in the above response.
| REQUEST Method | Content-Type | RESPONSE Result | Status Code | Content-Type |
|---|---|---|---|---|
GET | <N/A> | Success | 200 OK | application/json |
GET | <N/A> | Failure | 404 Not Found | application/json |
Example request
$ curl -k -i https://router.example:5001/v1/sessions/router.example-5fc78d-00000001
HTTP/1.1 200 OK
Access-Control-Allow-Origin: *
Content-Length: 763
Content-Type: application/json
X-Service-Identity: router.example-5fc78d
{
"age_seconds": 183,
"cdn": "edgeware",
"cdn_is_redirecting": false,
"client_ip": "1.2.3.4",
"host": "cdn.example:80",
"id": "router.example-5fc78d-00000001",
"idle_seconds": 183,
"last_request_time": "2022-12-02T14:05:05Z",
"latest_request_path": "/__cl/s:storage1/__c/v/f/0/5/v_sintel3v_f05a05f07d352e891d79863131ef4df7/__op/hls-default/__f/index.m3u8",
"no_of_requests": 1,
"requested_bytes": 0,
"requests_redirected": 0,
"requests_served": 0,
"session_groups": [
"all"
],
"session_groups_generation": 2,
"session_path": "/__cl/s:storage1/__c/v/f/0/5/v_sintel3v_f05a05f07d352e891d79863131ef4df7/__op/hls-default/__f/index.m3u8",
"start_time": "2022-12-02T14:05:05Z",
"type": "instream",
"user_agent": "libmpv"
}
Content List - /v1/content
| REQUEST Method | Content-Type | RESPONSE Result | Status Code | Content-Type |
|---|---|---|---|---|
GET | <N/A> | Success | 200 OK | application/json |
Example request
$ curl -k -i https://router.example:5001/v1/content
HTTP/1.1 200 OK
Access-Control-Allow-Origin: *
Content-Length: 572
Content-Type: application/json
X-Service-Identity: router.example-5fc78d
{
"content": [
[
"/__cl/s:storage1/__c/v/f/0/5/v_sintel3v_f05a05f07d352e891d79863131ef4df7/__op/hls-default/__f/index.m3u8",
{
"cached_count": 0,
"content_requested": false,
"content_set": false,
"expiration_time": "2022-12-02T14:05:05Z",
"key": "/__cl/s:storage1/__c/v/f/0/5/v_sintel3v_f05a05f07d352e891d79863131ef4df7/__op/hls-default/__f/index.m3u8",
"listeners": 0,
"manifest": "",
"request_count": 4,
"state": "HLS:MANIFEST-PENDING",
"wait_count": 0
}
]
]
}
Lua scripts – /v1/lua/<path str>.lua
Used to upload, retrieve and delete custom named Lua scripts on the router.
Global functions in uploaded scripts automatically become available to Lua code
in the configuration (which effectively may be viewed as hooks). Upload a
script by PUTing a application/x-lua to the endpoint, and retrieve it by
GETing the endpoint without payload.
| REQUEST Method | Content-Type | RESPONSE Result | Status Code | Content-Type |
|---|---|---|---|---|
PUT | application/x-lua | Success | 204 No Content | <N/A> |
PUT | application/x-lua | Failure | 400 Bad Request | application/json |
GET | <N/A> | Success | 200 OK | application/x-lua |
GET | <N/A> | Failure | 404 Not Found | application/json |
DELETE | <N/A> | Success | 204 No Content | <N/A> |
DELETE | <N/A> | Failure | 400 Bad Request | application/json |
DELETE | <N/A> | Failure | 404 Not Found | application/json |
Example request (PUT)
Save a Lua script under the name advanced_functions/f1.lua:
$ curl -i -X PUT \
-d 'function fun1() return 1 end' \
-H "Content-Type: application/x-lua" \
https://router.example:5001/v1/lua/advanced_functions/f1.lua
HTTP/1.1 204 Successfully saved Lua file
Access-Control-Allow-Origin: *
Content-Length: 0
X-Service-Identity: router.example-5fc78d
Example request (PUT, from file)
Upload an entire Lua file under the name advanced_functions/f1.lua:
First put your code in a file.
$ cat f1.lua
function fun1()
return 1
end
Then upload it using the --data-binary flag to preserve newlines
$ curl -i -X PUT \
--data-binary @f1.lua \
-H "Content-Type: application/x-lua" \
https://router.example:5001/v1/lua/advanced_functions/f1.lua
HTTP/1.1 204 Successfully saved Lua file
Access-Control-Allow-Origin: *
Content-Length: 0
X-Service-Identity: router.example-5fc78d
Example request (GET)
Request the Lua script named advanced_functions/f1.lua using a GET request:
$ curl -i https://router.example:5001/v1/lua/advanced_functions/f1.lua
HTTP/1.1 200 OK
Access-Control-Allow-Origin: *
Content-Length: 28
Content-Type: application/x-lua
X-Service-Identity: router.example-5fc78d
function fun1() return 1 end
Example request (DELETE)
Delete the Lua script named advanced_functions/f1.lua using a DELETE request:
$ curl -i -X DELETE \
https://router.example:5001/v1/lua/advanced_functions/f1.lua
HTTP/1.1 204 Successfully removed Lua file
Access-Control-Allow-Origin: *
Content-Length: 0
X-Service-Identity: router.example-5fc78d
List Lua scripts – /v1/lua
Used to list previously uploaded custom Lua scripts on the router, retrieving their respective paths and file checksums.
| REQUEST Method | Content-Type | RESPONSE Result | Status Code | Content-Type |
|---|---|---|---|---|
GET | <N/A> | Success | 200 OK | application/json |
Example request
$ curl -k -i https://router.example:5001/v1/lua
HTTP/1.1 200 OK
Access-Control-Allow-Origin: *
Content-Length: 108
Content-Type: application/json
X-Service-Identity: router.example-5fc78d
[
{
"file_checksum": "d41d8cd98f00b204e9800998ecf8427e",
"path": "advanced_functions/f1.lua"
}
]
Debug a Lua expression – /v1/lua/debug
Used to debug an arbitrary Lua expression on the router in a “sandbox” (with no visible side effects to the state of the router), and inspect the result.
The Lua expression in the body is evaluated inside an isolated copy of the
internal Lua environment including selection input. The stdout field of the
resulting JSON body is populated with a concatenation of every string provided
as argument to the Lua print() function during the course of evaluation.
Upon a successful evaluation, as indicated by the success flag,
return.value and return.lua_type_name capture the resulting Lua value.
Otherwise, if valuation was aborted (e.g. due to a Lua exception), error_msg
reflects any error description arising from the Lua environment.
| REQUEST Method | Content-Type | RESPONSE Result | Status Code | Content-Type |
|---|---|---|---|---|
POST | application/x-lua | Success | 200 OK | application/json |
Example successful request
$ curl -i -X POST \
-d 'fun1()' \
-H "Content-Type: application/x-lua" \
https://router.example:5001/v1/lua/debug
HTTP/1.1 200 OK
Access-Control-Allow-Origin: *
Content-Length: 123
Content-Type: application/json
X-Service-Identity: router.example-5fc78d
{
"error_msg": "",
"return": {
"lua_type_name": "number",
"value": 1.0
},
"stdout": "",
"success": true
}
Example unsuccessful request
(attempt to invoke unknown function)
$ curl -i -X POST \
-d 'fun5()' \
-H "Content-Type: application/x-lua" \
https://router.example:5001/v1/lua/debug
HTTP/1.1 200 OK
Access-Control-Allow-Origin: *
Content-Length: 123
Content-Type: application/json
X-Service-Identity: router.example-5fc78d
{
"error_msg": "[string \"function f0() ...\"]:2: attempt to call global 'fun5' (a nil value)",
"return": {
"lua_type_name": "",
"value": null
},
"stdout": "",
"success": false
}
Footnotes
5.6 - Configuration
5.6.1 - WebUI Configuration
The web-based user interface can be used to configure many common use cases for the CDN Director.
Normally the GUI is accessible from the CDN Manager at an address like
https://cdn-manager/gui/. After navigating to the UI, a login screen will be
presented:

Enter your credentials and log in.
Once logged in, the middle of the screen will present a few sections. Depending on your user’s permissions and licensed features, different options will be made available.
In the general case, two options will be presented:
- CDN Director
- Configuration Panel
At the top right corner is a user menu with an option to log out.
The left-hand side of the page shows a collapsible menu with a few icons:
 filters the menu options
 used to return to the landing page
 link to the
Director Routing rule configuration view
link to the
Director Routing rule configuration view link
to the Director configuration panel view
link
to the Director configuration panel view
CDN Director Routing
This view provides a graphical tree-based model for configuring how the Director should classify and route incoming content requests.
Menu Options
After navigating to the CDN Director Routing page, the left side will show a list of routing rule block types and host group variants. The user can drag and drop items from this list onto the main canvas in order to design a routing solution.

The Search component input field at the top can be used to search and filter
among the available components. Clicking the question mark next to a component
shows a description popup.

Title Bar
Above the main canvas is the title bar. On the left side is the name of the currently selected routing configuration and its creation date:

To the right are a series of buttons, from left to right:

Creates a grouping rectangle on the canvas. Any routing rules placed on this rectangle can be moved around together, making it easier to construct logical units. This is only a visual and practical effect, it doesn’t in any way change the generated configuration.

Opens a popup menu on the right-hand side of the canvas where various configuration options can be changed. A list of CDN Director instances to apply the configuration to can be found and modified here, as well as the general look and feel of the GUI.

Opens a display of the configuration JSON generated from the graphical representation and allows for editing the text directly. Any changes made will automatically be loaded into the graphical representation.

Automatically arranges all the blocks in the canvas, hopefully making it less messy. Routing decision flow begins from the top left and moves rightwards.

Pushes the currently active configuration onto all the configured CDN Director instances. Changes take effect immediately assuming they do not contain any errors and the GUI will display a dialog with the update results.

Saves the configuration to the listed CDN Director targets, with a name provided by the user. Previously saved configurations can be accessed by clicking the house icon next to the configuration title at the middle top of the canvas.
Note that merely saving a configuration does not make it take effect, it is just for making backups or alternative configurations.
To make a configuration take effect, you have to
Publishit.
Saved Configurations
Clicking the  icon in the title bar
navigates to the saved configurations section.
icon in the title bar
navigates to the saved configurations section.
The upper part of this section is a template list allowing the user to either start a new configuration from scratch by selecting “New configuration” or start from a skeleton configuration by selecting one of the available template tiles.

The lower part contains all stored configurations. First in the list is always the currently published configuration, followed by any user-created configurations that have been saved.
Each entry in the list contain information about its name, who created it and when it was last saved. Next to each saved configuration is a trash can button used to delete it.
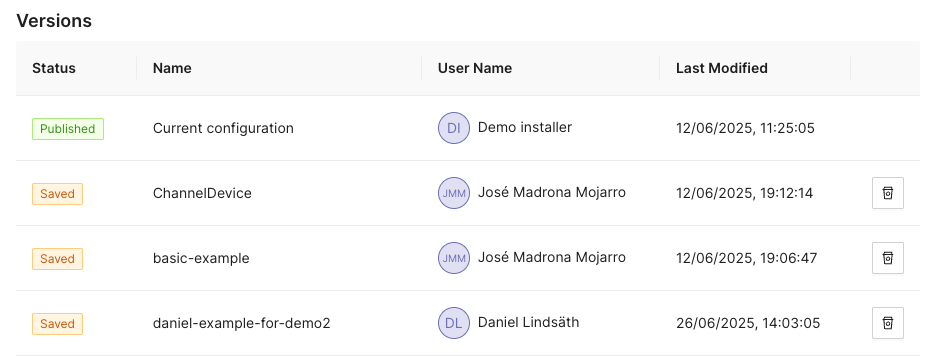
Configuration Options
Clicking the icon opens a
panel with configuration options and settings on the right-hand side of the
screen. This panel has the two tabs Configurations and Style.
Configuration
The configuration tab allows the user to manage the CDN Director instances that are to be configured by the GUI.
Whenever a user pushes either Publish or Save version, the configuration
will be sent to routers configured in this list.

Each entry has a name, an address and a radio button to disable publication to specific instances that are e.g. taken out for maintenance. Turning a Director off won’t affect the current running status of that instance, it will only disable pushing any new configuration to it.
As seen above, the address can be either a full URL with scheme, hostname, port
and path such as http://router1.example.com:5000/config or a relative path
used e.g. to push configurations through an CDN Manager node:
/confd/router1/config.
Style Options
This pane contains various settings for the look and feel of the routing configuration view. The user can change line width and stroke type as well as colors associated with different node types.

Arrange Button
This button will automatically arrange the routing nodes in the canvas, trying to make the connections easier to follow.
Imagine a user has designed the routing flow organically, placing components anywhere on the screen as their need arose. This can make it difficult to get an overview.

Clicking the Arrange button makes the GUI suggest a more structured
arrangement:

Save Version Button
Sometimes it can be useful to save a copy of a configuration, either because you need to try an entirely different design, or because you want to store a working setup before tweaking it to make sure you can revert to a working state in case anything goes wrong.
Clicking the Save version button opens a dialog box allowing you to pick a
name and save the currently displayed configuration to all the linked CDN
Director instances without activating it.

Going back to the saved configurations list, the new entry has appeared:

Publish Button
Clicking the Publish button sends the currently displayed configuration to be
sent to all enabled CDN Director instances. If it contains a complete and valid
configuration the Directors will then apply any changes.
A dialog box will display the publish status for each configured Director:

Configuration Panel
The configuration panel view allows for configuring routing-adjacent features, such as blocked/allowed referral addresses, blocked/allowed user agent strings or CDN host capacity values.

At the moment there are two supported configurations: Blocked tokens and blocked referrers.
Tokens
Selecting Tokens allows the user to observe and edit a list of currently
blocked tokens:
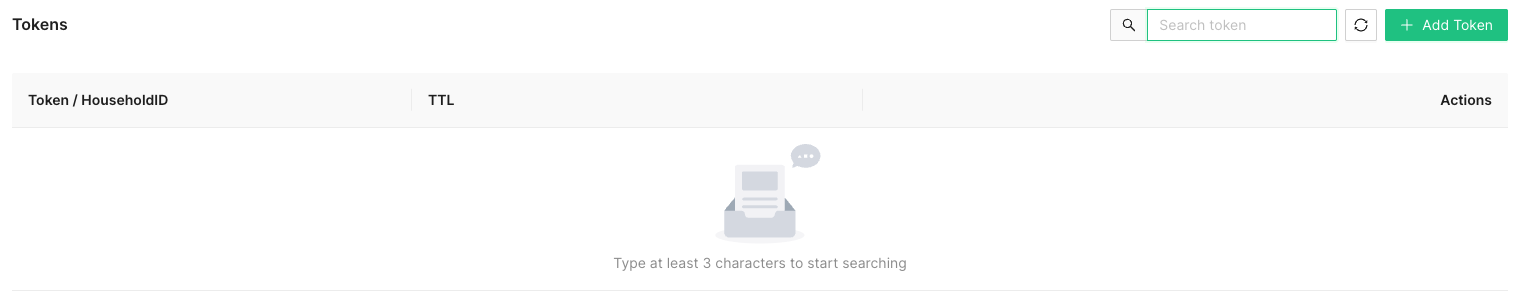
Several actions are available at this point:

Add a new token string to be blocked, along with a corresponding time-to-live (TTL) value in seconds.
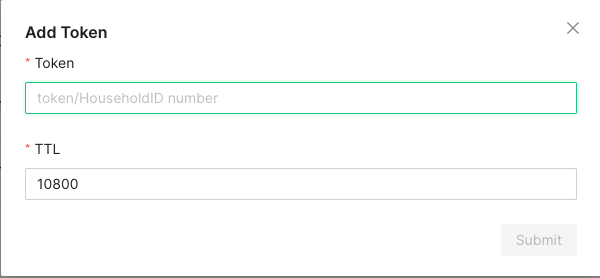
A newly added token will automatically be removed after TTL seconds, to avoid filling up the database with outdated or stale values.

In order to avoid performance hits when there are many tokens, nothing is shown in this list until a search string is entered manually by the operator. This is because a token is added to the list every time a valid token request is made and the database can grow to millions of entries.
At least three characters must be entered for searching to begin. A maximum of 100 results are shown. Write more specific search strings to filter out irrelevant token entries.
Note that token-reuse blocking depends on there being a Routing node, e.g. a
Denyblock, with a suitable condition function that performs the token extraction and blocking.
Referrers
This section allows for blocking specific referrer addresses. Unlike the token list, this table will display entries immediately since it is not anticipated to contain nearly as many entries.
Like with the token list, at most 100 entries are shown at a time. Use the search box to find the relevant referrers if the list is full.

Clicking the button will open a window to add a new referrer string to the block list. Clicking the ‘X’ closes the window without adding a new entry.

The search box filters which already-added referrer strings are displayed in the list. At least three characters must be written for filtering to begin, and regardless of how many matching results there are, only 100 will be displayed in the list so it is recommended to be as specific as necessary when searching.

Clicking the trash can next to a referrer removes it from the list of blocked referrers.
Example Routing Configuration
The following text will describe how to set up a simple routing system that has an internal CDN with two streaming servers and one external CDN.
The internal CDN is meant for serving live TV with low latency as well as VOD traffic provided there is enough capacity left without overloading the servers and affect live traffic latency.
In order to demonstrate the Director’s traffic filtering capability the setup will also send any mobile traffic from outside of Stockholm, Sweden to the external CDN.
Finally, a load balancing node is added to split the remaining incoming requests equally between the two internal hosts.
In summary, the configuration will:
- Route off-net traffic from mobile phones to the external CDN.
- Route Live traffic to the external CDN if the internal CDN is overloaded.
- Route any remaining traffic to the internal CDN.
Step-by-Step Walkthrough
When creating a new configuration the only thing that exists is an Entrypoint
node. This node is used to indicate where the routing engine should begin
traversing the routing tree for a new incoming request.

Begin by dragging a Split node onto the canvas and connect it to the
Entrypoint.
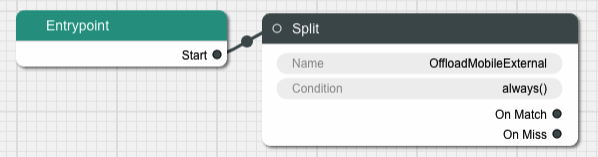
A Split node splits the incoming traffic into two separate streams based on
a condition. The default condition is a function called always() that
evaulates as true for any request. This is not very useful for this example,
replace it by clicking on the Condition input field in the node.
This brings us to a dialog box where we can simply replace the condition with
another string or go to a graphical representation of the condition to help
guide us through the steps to getting the Split node to do what we need.

Graphical Condition Builder
Clicking the Graphical View button opens up the graphical representation which
currently shows two condition nodes connected together, one representing the
default condition always() previously mentioned, and one called Condition Output which is a target placeholder for the end result of the entire graph.
Output from one condition node is connected to the input of another node until
the entire chain ends up with the Condition Output node.


On the left-hand side is a menu with the items Session Groups, Conditions
and Classifiers. The Conditions section contains different condition
components whose outputs can be connected to either other condition nodes or
the Condition Output.

Delete the Always node and replace it with one from the Conditions menu,
specifically In Session Group, and connect its output to Condition Output.
The new condition node takes a Session Group as its input. Drag one of those
from the menu onto the canvas and connect its output to the input labeled
“Session Group”. Give the Session Group node the name “mobile-off-net” since
it is going to contain requests from mobile units outside of the main network.
The Session Group takes a number of classifiers as inputs. Open the
Classifiers section of the menu and drag a Geo IP and a User Agent node
onto the canvas and connect their outputs to the Session Group. Note that
when one classifier is connected, the connection label is updated with its name
and a new empty connection slot is added.

Fill in the two classifier nodes with appropriate values:
Give the Geo IP node the name “off-net”, set Continent to “Europe”,
Country to “Sweden” and City to “Stockholm”. Finally, change the Inverted
toggle to true since we want this condition to match any traffic that comes
from anywhere but Stockholm.
The User Agent node is meant to match mobile devices, but for simplicity’s
sake this classifier is limited to Apple devices for this example. Set the name
to “mobile”, make sure Pattern Type is “stringMatch” and set the pattern to
“apple”. The asterisks will match against any strings at the beginning and end
of the user agent string, and “apple” is case insensitive.
The resulting graph should look like this:

Click Save to return to the routing tree configuration view. Note that
"always()" has been replaced with "in_session_group('mobile-off-net')".

It is time to add a node for the external CDN. Open up the Hosts section in
the left-hand side menu if it is closed. Then drag a Host node onto the
canvas and name it “OffloadCDN”.
This creates a host group which contains hosts which belong together and share common settings such as ports.
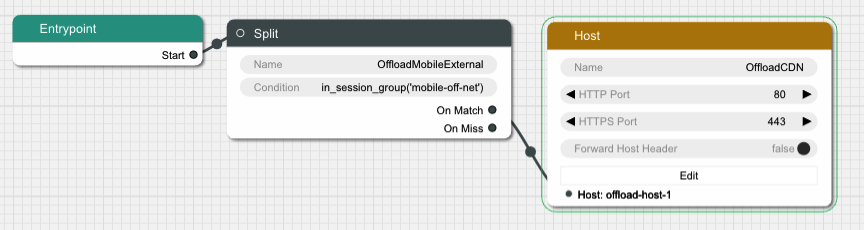
Click the Edit button to open a dialog where the actual hosts can be added to
the host group by clicking the icon with a new document on it. Add a host with
the name “offload-host-1” and address “offload-1.example.com”. The IPv6 address field can be left empty.
Click Save to return to the canvas view and connect the Split node’s
onMatch slot to the newly created host. Now any request that matches the
condition we added to the Split node will be sent to the external host.

The next step is to add an offload in case the internal CDN is overloaded. Add
another Split node, call it “LiveOffload” and connect it to the previous
Split node’s onMiss slot. We will use a Selection Input
value named "live_bandwidth_left" to determine whether or not the internal CDN
is overloaded.
Click the Condition field and bring up the graphical view. Remove the
default Always node and replace it with a Less Than node. Set its Selection Input string to “live_bandwidth_left” and the Value to 100 in order to send
traffic to the offload CDN whenever the internal CDN reports less than 100
capacity left.
Save the condition and connect the Split node’s onMatch output to the
“offload-host-1” Host.

In order to balance the incoming Live traffic between the two internal CDN nodes
we create a Random node, which simply splits the traffic equally among its
targets.

Finally we create another Host node and give it two hosts called
“private-host-1” and “private-host-2”. Connect the Random node to the two
hosts and the routing configuration is finished.
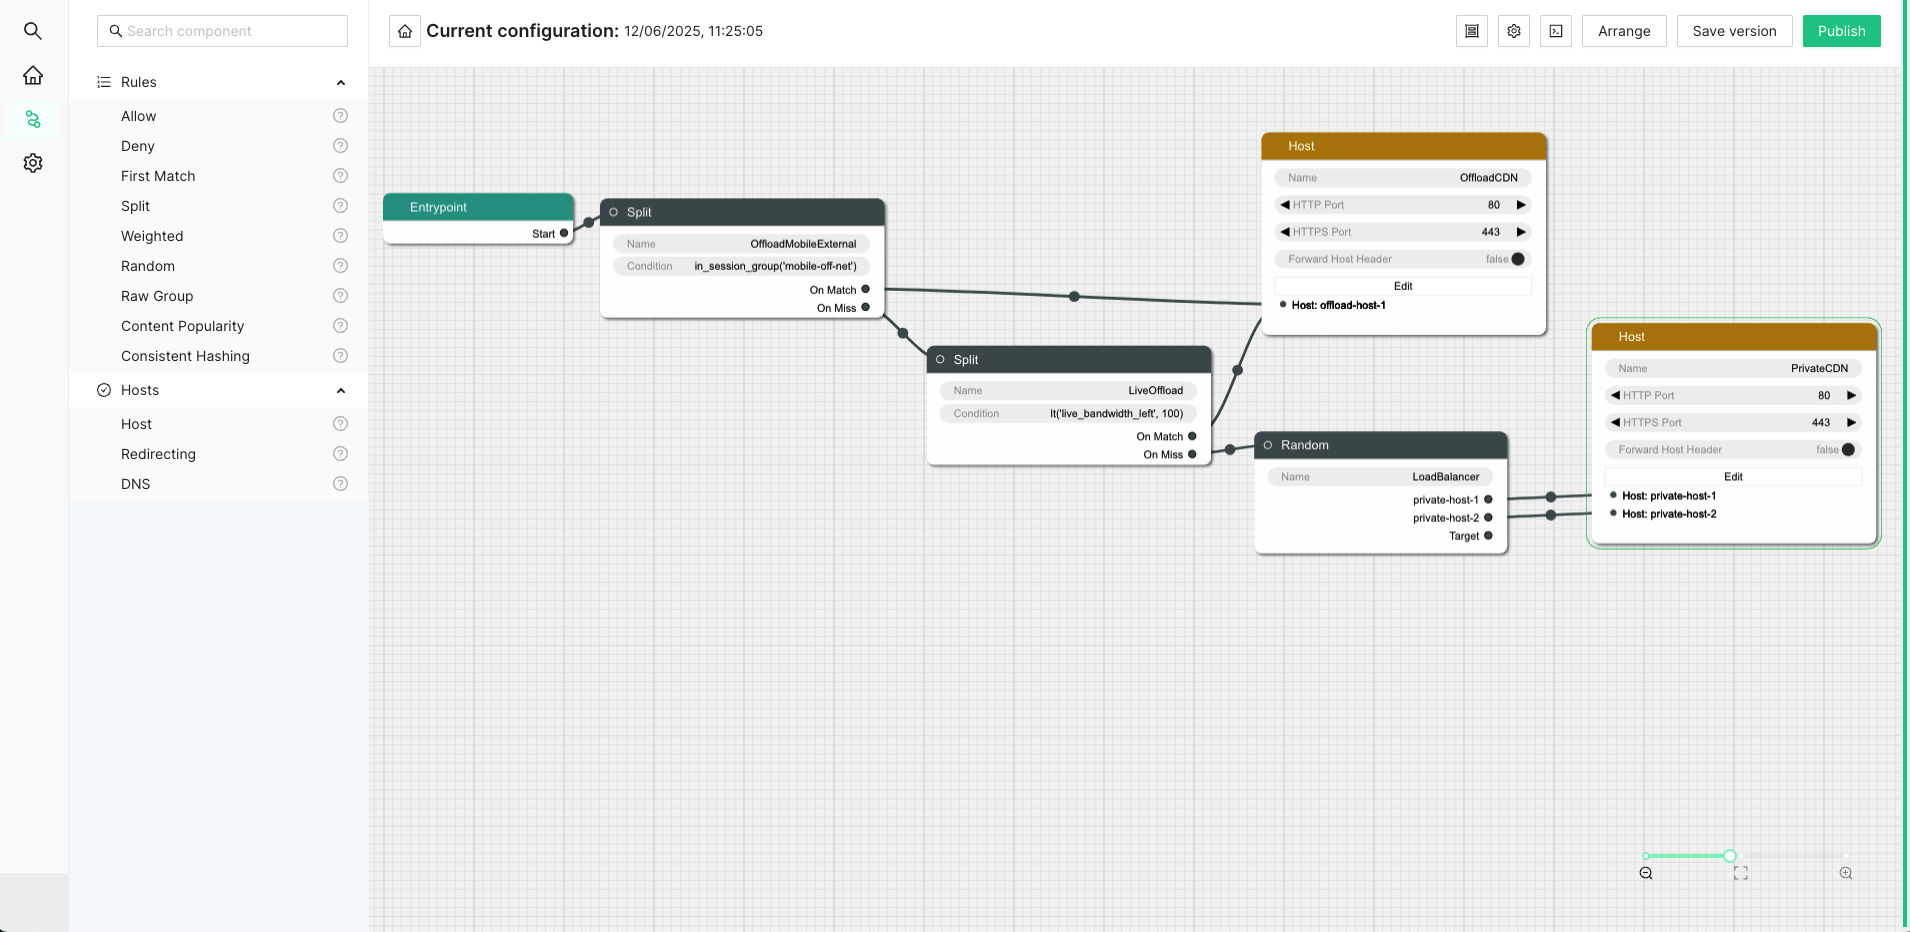
5.6.2 - OLD WebUI Configuration
The web based user interface is installed as a separate component and can be used to configure many common use cases. After navigating to the UI, a login screen will be presented.

Enter your credentials and log in. In the top left corner is a menu to select what section of the configuration to change. The configuration that will be active on the router is added in the Routing Workflow view. However, basic elements such as classification rules and routing targets, etc must be added first. Hence the following main steps are required to produce a proper configuration:
- Create classifiers serving as basic elements to create session groups.
- Create session groups which, using the classifiers, tag requests/clients for later use in the routing logic. of the incoming traffic.
- Define offload rules.
- Define rules to control behavior of internal traffic.
- Define backup rules to be used if the routing targets in the above step are unavailable.
- Finally, create the desired routing workflow using the elements defined in the previous steps.
A simplified concrete example of the above steps could be:
- Create two classifiers “smartphone” and “off-net”.
- Create a session group “mobile off-net”.
- Offload off-net traffic from mobile phones to a public CDN.
- Route other traffic to a private CDN.
- If the private CDN has an outage, use the public CDN for all traffic.
Hence, to start with, define the classifiers you will need. Those are based on information in the incoming request, optionally in combination with GeoIP databases or subnet information configured via the Subnet API. Here we show how to set up a GeoIP classifier. Note that the Director ships with a compatible snapshot of the GeoIP database, but for a production system a licensed and updated database is required.

Click the plus sign indicated in the picture above to create a new GeoIP classifier. You will be presented with the following view:
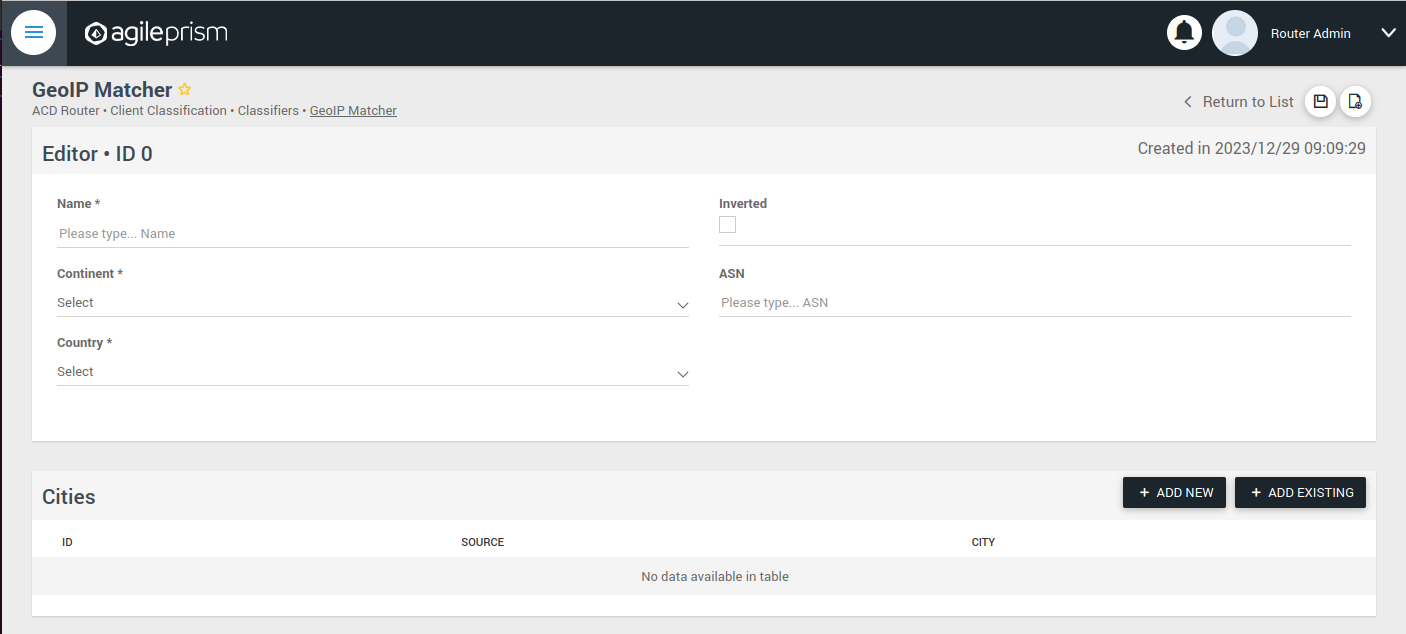
Here you can enter the geographical data on which to match, or check the “Inverted” check box to match anything except the entered geographical data.
The other kinds of classifiers are configured in a similar way.
After having added all the classifiers you need, it is time to create the session groups. Those are named filters that group incoming requests, typically video playback sessions in a video streaming CDN, and are defined with the help of the classifiers. For example, a session group “off-net mobile devices” could be composed of the classifiers “off-net traffic” and “mobile devices”.
Open the Session Groups view from the menu and hit the plus sign to add a new session group.


Define the new sessions groups by combining the previously created classifiers. It is often convenient to define an “All” session group that matches any incoming request.
Next go the “CDN Offload” view:

Here you define conditions for CDN offload. Each row defines a rule for offloading a specified session group. The rule makes use of the Selection Input API. This is an integration API that provides a way to supply additional data for use in the routing decision. Common examples are current bitrates or availability status. The selection input variables to use must be defined in the “Selection Input Types” view in the “Administration” section of the menu:

Reach out to the solution engineers from AgileTV in order to perform this integration in the best way. If no external data is required, such that the offload rule can be based solely based on session groups, this is not necessary and the condition field can be set to “Always” or “Disabled”.
When clicking the plus sign to add a new CDN Offload rule, the following view is presented:

The selection input rule is phrased in terms of a variable being above or below a threshold, but also a state such as “available” taking values 0 or 1 can be supported by for instance checking if “available” is below 1.
Moving on, if an incoming request is not offloaded, it will be handled by the Primary CDN section of the routing configuration.

Add all hosts in your primary CDN, together with a weight. A row in this table will be selected by random weighted load balancing. If each weight is the same, each row will be selected with the same probability. Another example would be three rows with weights 100, 100 and 200 which would randomly balance 50% of the load on the last row and the remaining load on the first two rows, i.e. 25% on each of the first and second row. If a Primary CDN host is unavailable, that host will not take part in the random selection.
If all hosts are unavailable, as a final resort the routing evaluation will go to the final Backup CDN step:

Here you can define what to do when all else fail. If not all requests are covered, for example with an “All” session group, then the request will fail with 403 Forbidden.
Now you have defined the basic elements and it is time to define the routing workflow. Select “Routing Workflow” from the menu, as pictured below. Here you can combine the elements previously created to achieve the desired routing behavior.

When everything seems correct, open the “Publish Routing” view from the menu:
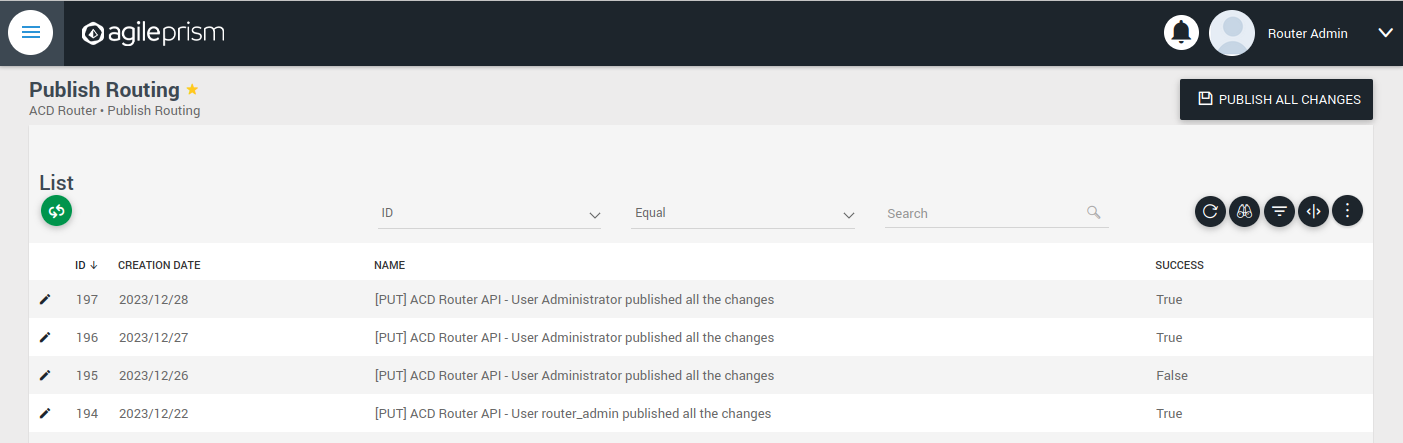
Hit “Publish All Changes” and verify that you get a successful result.
5.6.3 - Confd and Confcli
confcli to set up routing rulesConfiguration of a complex routing tree can be difficult. The command line
interface tool called confcli has been developed to make it simpler. It
combines building blocks, representing simple routing decisions, into complex
routing trees capable of satisfying almost any routing requirements.
These blocks are translated into an ESB3024 Router configuration which is automatically sent to the router, overwriting existing routing rules, CDN list and host list.
Installation and Usage
The confcli tools are installed alongside ESB3024 Router, on the same host,
and the confcli command line tool itself is made available on the host machine.
Simply type confcli in a shell on the host to see the current routing
configuration:
$ confcli
{
"services": {
"routing": {
"settings": {
"trustedProxies": [],
"contentPopularity": {
"algorithm": "score_based",
"sessionGroupNames": []
},
"extendedContentIdentifier": {
"enabled": false,
"includedQueryParams": []
},
"instream": {
"dashManifestRewrite": {
"enabled": false,
"sessionGroupNames": []
},
"hlsManifestRewrite": {
"enabled": false,
"sessionGroupNames": []
},
"reversedFilenameComparison": false
},
"usageLog": {
"enabled": false,
"logInterval": 3600000
}
},
"tuning": {
"content": {
"cacheSizeFullManifests": 1000,
"cacheSizeLightManifests": 10000,
"lightCacheTimeMilliseconds": 86400000,
"liveCacheTimeMilliseconds": 100,
"vodCacheTimeMilliseconds": 10000
},
"general": {
"accessLog": false,
"coutFlushRateMilliseconds": 1000,
"cpuLoadWindowSize": 10,
"eagerCdnSwitching": false,
"httpPipeliningEnable": false,
"logLevel": 3,
"maxConnectionsPerHost": 5,
"overloadThreshold": 32,
"readyThreshold": 8,
"redirectingCdnManifestDownloadRetries": 2,
"repeatedSessionStartThresholdSeconds": 30,
"selectionInputMetricsTimeoutSeconds": 30
},
"session": {
"idleDeactivateTimeoutMilliseconds": 20000,
"idleDeleteTimeoutMilliseconds": 1800000
},
"target": {
"responseTimeoutSeconds": 5,
"retryConnectTimeoutSeconds": 2,
"retryResponseTimeoutSeconds": 2,
"connectTimeoutSeconds": 5,
"maxIdleTimeSeconds": 30,
"requestAttempts": 3
}
},
"sessionGroups": [],
"classifiers": [],
"hostGroups": [],
"rules": [],
"entrypoint": "",
"applyConfig": true
}
}
}
The CLI tool can be used to modify, add and delete values by providing it with
the “path” to the object to change. The path is constructed by joining the field
names leading up to the value with a period between each name, e.g. the path to
the entrypoint is services.routing.entrypoint since entrypoint is nested
under the routing object, which in turn is under the services root object.
Lists use an index number in place of a field name, where 0 indicates the very
first element in the list, 1 the second element and so on.
If the list contains objects which have a field with the name name, the
index number can be replaced by the unique name of the object of interest.
Tab completion is supported by confcli. Pressing tab once will complete as far as possible, and pressing tab twice will list all available alternatives at the path constructed so far.
Display the values at a specific path:
$ confcli services.routing.hostGroups
{
"hostGroups": [
{
"name": "internal",
"type": "redirecting",
"httpPort": 80,
"httpsPort": 443,
"hosts": [
{
"name": "rr1",
"hostname": "rr1.example.com",
"ipv6_address": ""
}
]
},
{
"name": "external",
"type": "host",
"httpPort": 80,
"httpsPort": 443,
"hosts": [
{
"name": "offload-streamer1",
"hostname": "streamer1.example.com",
"ipv6_address": ""
},
{
"name": "offload-streamer2",
"hostname": "streamer2.example.com",
"ipv6_address": ""
}
]
}
]
}
Display the values in a specific list index:
$ confcli services.routing.hostGroups.1
{
"1": {
"name": "external",
"type": "host",
"httpPort": 80,
"httpsPort": 443,
"hosts": [
{
"name": "offload-streamer1",
"hostname": "streamer1.example.com",
"ipv6_address": ""
},
{
"name": "offload-streamer2",
"hostname": "streamer2.example.com",
"ipv6_address": ""
}
]
}
}
Display the values in a specific list index using the object’s name:
$ confcli services.routing.hostGroups.1.hosts.offload-streamer2
{
"offload-streamer2": {
"name": "offload-streamer2",
"hostname": "streamer2.example.com",
"ipv6_address": ""
}
}
Modify a single value:
confcli services.routing.hostGroups.1.hosts.offload-streamer2.hostname new-streamer.example.com
services.routing.hostGroups.1.hosts.offload-streamer2.hostname = 'new-streamer.example.com'
Delete an entry:
$ confcli services.routing.sessionGroups.Apple.classifiers.
{
"classifiers": [
"Apple",
""
]
}
$ confcli services.routing.sessionGroups.Apple.classifiers.1 -d
http://localhost:5000/config/__active/services/routing/sessionGroups/Apple/classifiers/1 reset to default/deleted
$ confcli services.routing.sessionGroups.Apple.classifiers.
{
"classifiers": [
"Apple"
]
}
Adding new values in objects and lists is done using a wizard by invoking
confcli with a path and the -w argument. This will be shown extensively in
the examples further down in this document rather than here.
If you have a JSON file with a previously generated confcli configuration
output it can be applied to a system by typing confcli -i <file path>.
CDNs and Hosts
Configuration using confcli has no real concept of CDNs, instead it has groups of hosts that share some common settings such as HTTP(S) port and whether they return a redirection URL, serve content directly or perform a DNS lookup. Of these three variants, the two former share the same parameters, while the DNS variant is slightly different.
Note that by default, the Director expects redirecting CDNs to redirect with
response code 302. If the CDN returns a redirection URL with another HTTP
response code, the field allowAnyRedirectType must be set to true in the
hostGroup configuration. Then any 3xx response code will result in a 302
response code being sent to the client.
If any of the request headers need to be forwarded to the CDN, they can be
listed in the headersToForward field. This is useful if the CDN needs to
know about the original Host header or any custom headers added by the
client or an upstream proxy.
Each host belongs to a host group and may itself be an entire CDN using a single public hostname or a single streamer server, all depending on the needs of the user.
Host Health
When creating a host in the confd configuration, you have the option to define a list of health check functions. Each health check function must return true for a host to be selected. This means that the host will only be considered available if all the defined health check functions evaluate to true. If any of the health check functions return false, the host will be considered unavailable and will not be selected for routing. All health check functions are detailed in the section Built-in Lua functions.
$ confcli services.routing.hostGroups -w
Running wizard for resource 'hostGroups'
Hint: Hitting return will set a value to its default.
Enter '?' to receive the help string
hostGroups : [
hostGroup can be one of
1: dns
2: host
3: redirecting
Choose element index or name: redirecting
Adding a 'redirecting' element
hostGroup : {
name (default: ): edgeware
type (default: redirecting): ⏎
httpPort (default: 80): ⏎
httpsPort (default: 443): ⏎
headersToForward <A list of HTTP headers to forward to the CDN. (default: [])>: [
headersToForward (default: ): ⏎
Add another 'headersToForward' element to array 'headersToForward'? [y/N]: ⏎
]
allowAnyRedirectType (default: False): ⏎
hosts : [
host : {
name (default: ): rr1
hostname (default: ): convoy-rr1.example.com
ipv6_address (default: ): ⏎
healthChecks : [
healthCheck (default: always()): health_check()
Add another 'healthCheck' element to array 'healthChecks'? [y/N]: n
]
}
Add another 'host' element to array 'hosts'? [y/N]: y
host : {
name (default: ): rr2
hostname (default: ): convoy-rr2.example.com
ipv6_address (default: ): ⏎
healthChecks : [
healthCheck (default: always()): ⏎
Add another 'healthCheck' element to array 'healthChecks'? [y/N]: n
]
}
Add another 'host' element to array 'hosts'? [y/N]: ⏎
]
}
Add another 'hostGroup' element to array 'hostGroups'? [y/N]: ⏎
]
Generated config:
{
"hostGroups": [
{
"name": "edgeware",
"type": "redirecting",
"httpPort": 80,
"httpsPort": 443,
"headersToForward": [],
"allowAnyRedirectType": false,
"hosts": [
{
"name": "rr1",
"hostname": "convoy-rr1.example.com",
"ipv6_address": "",
"healthChecks": [
"health_check()"
]
},
{
"name": "rr2",
"hostname": "convoy-rr2.example.com",
"ipv6_address": "",
"healthChecks": [
"always()"
]
}
]
}
]
}
Merge and apply the config? [y/n]: y
$ confcli services.routing.hostGroups -w
Running wizard for resource 'hostGroups'
Hint: Hitting return will set a value to its default.
Enter '?' to receive the help string
hostGroups : [
hostGroup can be one of
1: dns
2: host
3: redirecting
Choose element index or name: dns
Adding a 'dns' element
hostGroup : {
name (default: ): external-dns
type (default: dns): ⏎
hosts : [
host : {
name (default: ): dns-host
hostname (default: ): dns.example.com
ipv6_address (default: ): ⏎
healthChecks : [
healthCheck (default: always()): ⏎
Add another 'healthCheck' element to array 'healthChecks'? [y/N]: n
]
}
Add another 'host' element to array 'hosts'? [y/N]: ⏎
]
}
Add another 'hostGroup' element to array 'hostGroups'? [y/N]: ⏎
]
Generated config:
{
"hostGroups": [
{
"name": "external-dns",
"type": "dns",
"hosts": [
{
"name": "dns-host",
"hostname": "dns.example.com",
"ipv6_address": "",
"healthChecks": [
"always()"
]
}
]
}
]
}
Merge and apply the config? [y/n]: y
Rule Blocks
The routing configuration using confcli is done using a combination of logical
building blocks, or rules. Each block evaluates the incoming request in some way
and sends it on to one or more sub-blocks. If the block is of the host type
described above, the client is sent to that host and the evaluation is done.
Existing Blocks
Currently supported blocks are:
allow: Incoming requests, for which a given rule function matches, are immediately sent to the providedonMatchtarget.consistentHashing: Splits incoming requests randomly between preferred hosts, determined by the proprietary consistent hashing algorithm. The amount of hosts to split between is controlled by thespreadFactor.contentPopularity: Splits incoming requests into two sub-blocks depending on how popular the requested content is.deny: Incoming requests, for which a given rule function matches, are immediately denied, and all non-matching requests are sent to theonMisstarget.firstMatch: Incoming requests are matched by an ordered series of rules, where the request will be handled by the first rule for which the condition evaluates to true.random: Splits incoming requests randomly and equally between a list of target sub-blocks. Useful for simple load balancing.split: Splits incoming requests between two sub-blocks depending on how the request is evaluated by a provided function. Can be used for sending clients to different hosts depending on e.g. geographical location or client hardware type.weighted: Randomly splits incoming requests between a list of target sub-blocks, weighted according to each target’s associated weight rule. A higher weight means a higher portion of requests will be routed to a sub-block. Rules can be used to decide whether or not to pick a target.rawGroup: Contains a raw ESB3024 Router configuration routing tree node, to be inserted as is in the generated configuration. This is only meant to be used in the rare cases when it’s impossible to construct the required routing behavior in any other way.rawHost: A host reference for use as endpoints in rawGroup trees.
$ confcli services.routing.rules -w
Running wizard for resource 'rules'
Hint: Hitting return will set a value to its default.
Enter '?' to receive the help string
rules : [
rule can be one of
1: allow
2: consistentHashing
3: contentPopularity
4: deny
5: firstMatch
6: random
7: rawGroup
8: rawHost
9: split
10: weighted
Choose element index or name: allow
Adding a 'allow' element
rule : {
name (default: ): allow
type (default: allow): ⏎
condition (default: ): customFunction()
onMatch (default: ): rr1
}
Add another 'rule' element to array 'rules'? [y/N]: ⏎
]
Generated config:
{
"rules": [
{
"name": "content",
"type": "contentPopularity",
"condition": "customFunction()",
"onMatch": "rr1"
}
]
}
Merge and apply the config? [y/n]: y
$ confcli services.routing.rules -w
Running wizard for resource 'rules'
Hint: Hitting return will set a value to its default.
Enter '?' to receive the help string
rules : [
rule can be one of
1: allow
2: consistentHashing
3: contentPopularity
4: deny
5: firstMatch
6: random
7: rawGroup
8: rawHost
9: split
10: weighted
Choose element index or name: consistentHashing
Adding a 'consistentHashing' element
rule : {
name (default: ): consistentHashingRule
type (default: consistentHashing):
spreadFactor (default: 1): 2
hashAlgorithm (default: MD5):
targets : [
target : {
target (default: ): rr1
enabled (default: True):
}
Add another 'target' element to array 'targets'? [y/N]: y
target : {
target (default: ): rr2
enabled (default: True):
}
Add another 'target' element to array 'targets'? [y/N]: y
target : {
target (default: ): rr3
enabled (default: True):
}
Add another 'target' element to array 'targets'? [y/N]: n
]
}
Add another 'rule' element to array 'rules'? [y/N]: n
]
Generated config:
{
"rules": [
{
"name": "consistentHashingRule",
"type": "consistentHashing",
"spreadFactor": 2,
"hashAlgorithm": "MD5",
"targets": [
{
"target": "rr1",
"enabled": true
},
{
"target": "rr2",
"enabled": true
},
{
"target": "rr3",
"enabled": true
}
]
}
]
}
Merge and apply the config? [y/n]: y
$ confcli services.routing.rules -w
Running wizard for resource 'rules'
Hint: Hitting return will set a value to its default.
Enter '?' to receive the help string
rules : [
rule can be one of
1: allow
2: consistentHashing
3: contentPopularity
4: deny
5: firstMatch
6: random
7: rawGroup
8: rawHost
9: split
10: weighted
Choose element index or name: contentPopularity
Adding a 'contentPopularity' element
rule : {
name (default: ): content
type (default: contentPopularity): ⏎
contentPopularityCutoff (default: 10): 20
onPopular (default: ): rr1
onUnpopular (default: ): rr2
}
Add another 'rule' element to array 'rules'? [y/N]: ⏎
]
Generated config:
{
"rules": [
{
"name": "content",
"type": "contentPopularity",
"contentPopularityCutoff": 20.0,
"onPopular": "rr1",
"onUnpopular": "rr2"
}
]
}
Merge and apply the config? [y/n]: y
$ confcli services.routing.rules -w
Running wizard for resource 'rules'
Hint: Hitting return will set a value to its default.
Enter '?' to receive the help string
rules : [
rule can be one of
1: allow
2: consistentHashing
3: contentPopularity
4: deny
5: firstMatch
6: random
7: rawGroup
8: rawHost
9: split
10: weighted
Choose element index or name: deny
Adding a 'deny' element
rule : {
name (default: ): deny
type (default: deny): ⏎
condition (default: ): customFunction()
onMiss (default: ): rr1
}
Add another 'rule' element to array 'rules'? [y/N]: ⏎
]
Generated config:
{
"rules": [
{
"name": "content",
"type": "contentPopularity",
"condition": "customFunction()",
"onMiss": "rr1"
}
]
}
Merge and apply the config? [y/n]: y
$ confcli services.routing.rules -w
Running wizard for resource 'rules'
Hint: Hitting return will set a value to its default.
Enter '?' to receive the help string
rules : [
rule can be one of
1: allow
2: consistentHashing
3: contentPopularity
4: deny
5: firstMatch
6: random
7: rawGroup
8: rawHost
9: split
10: weighted
Choose element index or name: firstMatch
Adding a 'firstMatch' element
rule : {
name (default: ): firstMatch
type (default: firstMatch): ⏎
targets : [
target : {
onMatch (default: ): rr1
rule (default: ): customFunction()
}
Add another 'target' element to array 'targets'? [y/N]: y
target : {
onMatch (default: ): rr2
rule (default: ): otherCustomFunction()
}
Add another 'target' element to array 'targets'? [y/N]: n
]
}
Add another 'rule' element to array 'rules'? [y/N]: n
]
Generated config:
{
"rules": [
{
"name": "firstMatch",
"type": "firstMatch",
"targets": [
{
"onMatch": "rr1",
"condition": "customFunction()"
},
{
"onMatch": "rr2",
"condition": "otherCustomFunction()"
}
]
}
]
}
Merge and apply the config? [y/n]: y
$ confcli services.routing.rules -w
Running wizard for resource 'rules'
Hint: Hitting return will set a value to its default.
Enter '?' to receive the help string
rules : [
rule can be one of
1: allow
2: consistentHashing
3: contentPopularity
4: deny
5: firstMatch
6: random
7: rawGroup
8: rawHost
9: split
10: weighted
Choose element index or name: random
Adding a 'random' element
rule : {
name (default: ): random
type (default: random): ⏎
targets : [
target (default: ): rr1
Add another 'target' element to array 'targets'? [y/N]: y
target (default: ): rr2
Add another 'target' element to array 'targets'? [y/N]: ⏎
]
}
Add another 'rule' element to array 'rules'? [y/N]: ⏎
]
Generated config:
{
"rules": [
{
"name": "random",
"type": "random",
"targets": [
"rr1",
"rr2"
]
}
]
}
Merge and apply the config? [y/n]: y
$ confcli services.routing.rules -w
Running wizard for resource 'rules'
Hint: Hitting return will set a value to its default.
Enter '?' to receive the help string
rules : [
rule can be one of
1: allow
2: consistentHashing
3: contentPopularity
4: deny
5: firstMatch
6: random
7: rawGroup
8: rawHost
9: split
10: weighted
Choose element index or name: split
Adding a 'split' element
rule : {
name (default: ): split
type (default: split): ⏎
condition (default: ): custom_function()
onMatch (default: ): rr2
onMiss (default: ): rr1
}
Add another 'rule' element to array 'rules'? [y/N]: ⏎
]
Generated config:
{
"rules": [
{
"name": "split",
"type": "split",
"condition": "custom_function()",
"onMatch": "rr2",
"onMiss": "rr1"
}
]
}
Merge and apply the config? [y/n]: y
$ confcli services.routing.rules. -w
Running wizard for resource 'rules'
Hint: Hitting return will set a value to its default.
Enter '?' to receive the help string
rules : [
rule can be one of
1: allow
2: consistentHashing
3: contentPopularity
4: deny
5: firstMatch
6: random
7: rawGroup
8: rawHost
9: split
10: weighted
Choose element index or name: weighted
Adding a 'weighted' element
rule : {
name (default: ): weight
type (default: weighted): ⏎
targets : [
target : {
target (default: ): rr1
weight (default: 100): ⏎
condition (default: always()): always()
}
Add another 'target' element to array 'targets'? [y/N]: y
target : {
target (default: ): rr2
weight (default: 100): si('rr2-input-weight')
condition (default: always()): gt('rr2-bandwidth', 1000000)
}
Add another 'target' element to array 'targets'? [y/N]: y
target : {
target (default: ): rr2
weight (default: 100): custom_func()
condition (default: always()): always()
}
Add another 'target' element to array 'targets'? [y/N]: ⏎
]
}
Add another 'rule' element to array 'rules'? [y/N]: ⏎
]
Generated config:
{
"rules": [
{
"name": "weight",
"type": "weighted",
"targets": [
{
"target": "rr1",
"weight": "100",
"condition": "always()"
},
{
"target": "rr2",
"weight": "si('rr2-input-weight')",
"condition": "gt('rr2-bandwith', 1000000)"
},
{
"target": "rr2",
"weight": "custom_func()",
"condition": "always()"
}
]
}
]
}
Merge and apply the config? [y/n]: y
>> First add a raw host block that refers to a regular host
$ confcli services.routing.rules. -w
Running wizard for resource 'rules'
Hint: Hitting return will set a value to its default.
Enter '?' to receive the help string
rules : [
rule can be one of
1: allow
2: consistentHashing
3: contentPopularity
4: deny
5: firstMatch
6: random
7: rawGroup
8: rawHost
9: split
10: weighted
Choose element index or name: rawHost
Adding a 'rawHost' element
rule : {
name (default: ): raw-host
type (default: rawHost): ⏎
hostId (default: ): rr1
}
Add another 'rule' element to array 'rules'? [y/N]: ⏎
]
Generated config:
{
"rules": [
{
"name": "raw-host",
"type": "rawHost",
"hostId": "rr1"
}
]
}
Merge and apply the config? [y/n]: y
>> And then add a rule using the host node
$ confcli services.routing.rules. -w
Running wizard for resource 'rules'
Hint: Hitting return will set a value to its default.
Enter '?' to receive the help string
rules : [
rule can be one of
1: allow
2: consistentHashing
3: contentPopularity
4: deny
5: firstMatch
6: random
7: rawGroup
8: rawHost
9: split
10: weighted
Choose element index or name: rawGroup
Adding a 'rawGroup' element
rule : {
name (default: ): raw-node
type (default: rawGroup): ⏎
memberOrder (default: sequential): ⏎
members : [
member : {
target (default: ): raw-host
weightFunction (default: ): return 1
}
Add another 'member' element to array 'members'? [y/N]: ⏎
]
}
Add another 'rule' element to array 'rules'? [y/N]: ⏎
]
Generated config:
{
"rules": [
{
"name": "raw-node",
"type": "rawGroup",
"memberOrder": "sequential",
"members": [
{
"target": "raw-host",
"weightFunction": "return 1"
}
]
}
]
}
Merge and apply the config? [y/n]: y
Rule Language
Some blocks, such as the split and firstMatch types, have a rule field that
contains a small function in a very simple programming language. This field is
used to filter any incoming client requests in order to determine how to rule
block should react.
In the case of a split block, the rule is evaluated and if it is true the
client is sent to the onMatch part of the block, otherwise it is sent to the
onMiss part for further evaluation.
In the case of a firstMatch block, the rule for each target will be evaluated
top to bottom in order until either a rule evaluates to true or the list is
exhausted. If a rule evaluates to true, the client will be sent to the onMatch
part of the block, otherwise the next target in the list will be tried. If all
targets have been exhausted, then the entire rule evaluation will fail, and the
routing tree will be restarted with the firstMatch block effectively removed.
Example of Boolean Functions
Let’s say we have an ESB3024 Router set up with a session group that matches Apple
devices (named “Apple”). To route all Apple devices to a specific streamer one
would simply create a split block with the following rule:
in_session_group('Apple')
In order to make more complex rules it’s possible to combine several checks like
this in the same rule. Let’s extend the hypothetical ESB3024 Router above with a
configured subnet with all IP addresses in Europe (named “Europe”). To make a
rule that accepts any clients using an Apple device and living outside of
Europe, but only as long as the reported load on the streamer (as indicated by
the selection input variable
“europe_load_mbps”) is less than 1000 megabits per second one could make an
offload block with the following rule (without linebreaks):
in_session_group('Apple')
and not in_subnet('Europe')
and lt('europe_load_mbps', 1000)
In this example in_session_group('Apple') will be true if the client belongs
to the session group named ‘Apple’. The function call in_subnet('Europe') is
true if the client’s IP belongs to the subnet named ‘Europe’, but the word not
in front of it reverses the value so the entire section ends up being false if
the client is in Europe. Finally lt('europe_load_mbps', 1000) is true if
there is a selection input variable named “europe_load_mbps” and its value is
less than 1000.
Since the three parts are conjoined with the and keyword they must all
be true for the entire rule to match. If the keyword or had been used
instead it would have been enough for any of the parts to be true for the
rule to match.
Example of Numeric Functions
A hypothetical CDN has two streamers with different capacity; Host_1 has
roughly twice the capacity of Host_2. A simple random load balancing would put
undue stress on the second host since it will receive as much traffic as the
more capable Host_1.
This can be solved by using a weighted random distribution rule block with
suitable rules for the two hosts:
{
"targets": [
{
"target": "Host_1",
"condition": "always()",
"weight": "100"
}
{
"target": "Host_2",
"condition": "always()",
"weight": "50"
},
]
}
resulting in Host_1 receiving twice as many requests as Host_2 as its
weight function is double that of Host_2.
If the CDN is capable of reporting the free capacity of the hosts, for example by writing to a selection input variable for each host, it’s easy to write a more intelligent load balancing rule by making the weights correspond to the amount of capacity left on each host:
{
"targets": [
{
"target": "Host_1",
"condition": "always()",
"weight": "si('free_capacity_host_1')"
}
{
"target": "Host_2",
"condition": "always()",
"weight": "si('free_capacity_host_2')"
},
]
}
It is also possible to write custom Lua functions that return suitable weights, perhaps taking the host as an argument:
{
"targets": [
{
"target": "Host_1",
"condition": "always()",
"weight": "intelligent_weight_function('Host_1')"
}
{
"target": "Host_2",
"condition": "always()",
"weight": "intelligent_weight_function('Host_1')"
},
]
}
These different weight rules can of course be combined in the same rule block, with one target having a hard coded number, another using a dynamically updated selection input variable and yet another having a custom-built function.
Due to limitations in the random number generator used to distribute requests, it’s better to use somewhat large values, around 100–1000 or so, than to use small values near 0.
Built-In Functions
The following built-in functions are available when writing rules:
in_session_group(str name): True if session belongs to session group<name>in_all_session_groups(str sg_name, ...): True if session belongs to all specified session groupsin_any_session_group(str sg_name, ...): True if session belongs to any specified session groupin_subnet(str subnet_name): True if client IP belongs to the named subnetgt(str si_var, number value): True if selection_inputs[si_var] > valuegt(str si_var1, str si_var2): True if selection_inputs[si_var1] > selection_inputs[si_var2]ge(str si_var, number value): True if selection_inputs[si_var] >= valuege(str si_var1, str si_var2): True if selection_inputs[si_var1] >= selection_inputs[si_var2]lt(str si_var, number value): True if selection_inputs[si_var] < valuelt(str si_var1, str si_var2): True if selection_inputs[si_var1] < selection_inputs[si_var2]le(str si_var, number value): True if selection_inputs[si_var] <= valuele(str si_var1, str si_var2): True if selection_inputs[si_var1] <= selection_inputs[si_var2]eq(str si_var, number value): True if selection_inputs[si_var] == valueeq(str si_var1, str si_var2): True if selection_inputs[si_var1] == selection_inputs[si_var2]neq(str si_var, number value): True if selection_inputs[si_var] != valueneq(str si_var1, str si_var2): True if selection_inputs[si_var1] != selection_inputs[si_var2]si(str si_var): Returns the value of selection_inputs[si_var] if it is defined and non-negative, otherwise it returns 0.always(): Returns true, useful when creating weighted rule blocks.never(): Returns false, opposite ofalways().
These functions, as well as custom functions written in Lua and uploaded to the ESB3024 Router, can be combined to make suitably precise rules.
Combining Multiple Boolean Functions
In order to make the rule language easy to work with, it is fairly restricted
and simple. One restriction is that it’s only possible to chain multiple
function results together using either and or or, but not a
combination of both conjunctions.
Statements joined with and or or keywords are evaluated one by one,
starting with the left-most statement and moving right. As soon as the end
result of the entire expression is certain, the evaluation ends. This means that
evaluation ends with the first false statement for and expressions since a
single false component means the entire expression must also be false. It
also means that evaluation ends with the first true statement for or
expressions since only one component must be true for the entire statement to
be true as well. This is known as short-circuit or lazy evaluation.
Custom Functions
It is possible to write extremely complex Lua functions that take many parameters or calculations into consideration when evaluating an incoming client request. By writing such functions and making sure that they return only non-negative integer values and uploading them to the router they can be used from the rule language. Simply call them like any of the built-in functions listed above, using strings and numbers as arguments if necessary, and their result will be used to determine the routing path to use.
Formal Syntax
The full syntax of the language can be described in just a few lines of BNF grammar:
<rule> := <weight_rule> | <match_rule> | <value_rule>
<weight_rule> := "if" <compound_predicate> "then" <weight> "else" <weight>
<match_rule> := <compound_predicate>
<value_rule> := <weight>
<compound_predicate> := <logical_predicate> |
<logical_predicate> ["and" <logical_predicate> ...] |
<logical_predicate> ["or" <logical_predicate> ...] |
<logical_predicate> := ["not"] <predicate>
<predicate> := <function_name> "(" ")" |
<function_name> "(" <argument> ["," <argument> ...] ")"
<function_name> := <letter> [<function_name_tail> ...]
<function_name_tail> := empty | <letter> | <digit> | "_"
<argument> := <string> | <number>
<weight> := integer | <predicate>
<number> := float | integer
<string> := "'" [<letter> | <digit> | <symbol> ...] "'"
Building a Routing Configuration
This example sets up an entire routing configuration for a system with a ESB3008 Request Router, two streamers and the Apple devices outside of Europe example used earlier in this document. Any clients not matching the criteria will be sent to an offload CDN with two streamers in a simple uniformly randomized load balancing setup.
Set up Session Group
First make a classifier and a session group that uses it:
$ confcli services.routing.classifiers -w
Running wizard for resource 'classifiers'
Hint: Hitting return will set a value to its default.
Enter '?' to receive the help string
classifiers : [
classifier can be one of
1: anonymousIp
2: asnIds
3: contentUrlPath
4: contentUrlQueryParameters
5: geoip
6: hostName
7: ipranges
8: random
9: regexMatcher
10: requestHeader
11: stringMatcher
12: subnet
13: userAgent
Choose element index or name: userAgent
Adding a 'userAgent' element
classifier : {
name (default: ): Apple
type (default: userAgent): ⏎
inverted (default: False): ⏎
patternType (default: stringMatch): ⏎
pattern (default: ): *apple*
}
Add another 'classifier' element to array 'classifiers'? [y/N]: ⏎
]
Generated config:
{
"classifiers": [
{
"name": "Apple",
"type": "userAgent",
"inverted": false,
"patternType": "stringMatch",
"pattern": "*apple*"
}
]
}
Merge and apply the config? [y/n]: y
$ confcli services.routing.sessionGroups -w
Running wizard for resource 'sessionGroups'
Hint: Hitting return will set a value to its default.
Enter '?' to receive the help string
sessionGroups : [
sessionGroup : {
name (default: ): Apple
classifiers : [
classifier (default: ): Apple
Add another 'classifier' element to array 'classifiers'? [y/N]: ⏎
]
}
Add another 'sessionGroup' element to array 'sessionGroups'? [y/N]: ⏎
]
Generated config:
{
"sessionGroups": [
{
"name": "Apple",
"classifiers": [
"Apple"
]
}
]
}
Merge and apply the config? [y/n]: y
Set up Hosts
Create two host groups and add a Request Router to the first and two streamers to the second, which will be used for offload:
$ confcli services.routing.hostGroups -w
Running wizard for resource 'hostGroups'
Hint: Hitting return will set a value to its default.
Enter '?' to receive the help string
hostGroups : [
hostGroup can be one of
1: dns
2: host
3: redirecting
Choose element index or name: redirecting
Adding a 'redirecting' element
hostGroup : {
name (default: ): internal
type (default: redirecting): ⏎
httpPort (default: 80): ⏎
httpsPort (default: 443): ⏎
headersToForward <A list of HTTP headers to forward to the CDN. (default: [])>: [
headersToForward (default: ): ⏎
Add another 'headersToForward' element to array 'headersToForward'? [y/N]: ⏎
]
allowAnyRedirectType (default: False): ⏎
hosts : [
host : {
name (default: ): rr1
hostname (default: ): rr1.example.com
ipv6_address (default: ): ⏎
}
Add another 'host' element to array 'hosts'? [y/N]: ⏎
]
}
Add another 'hostGroup' element to array 'hostGroups'? [y/N]: y
hostGroup can be one of
1: dns
2: host
3: redirecting
Choose element index or name: host
Adding a 'host' element
hostGroup : {
name (default: ): external
type (default: host): ⏎
httpPort (default: 80): ⏎
httpsPort (default: 443): ⏎
hosts : [
host : {
name (default: ): offload-streamer1
hostname (default: ): streamer1.example.com
ipv6_address (default: ): ⏎
}
Add another 'host' element to array 'hosts'? [y/N]: y
host : {
name (default: ): offload-streamer2
hostname (default: ): streamer2.example.com
ipv6_address (default: ): ⏎
}
Add another 'host' element to array 'hosts'? [y/N]: ⏎
]
}
Add another 'hostGroup' element to array 'hostGroups'? [y/N]: ⏎
]
Generated config:
{
"hostGroups": [
{
"name": "internal",
"type": "redirecting",
"httpPort": 80,
"httpsPort": 443,
"headersToForward": [],
"allowAnyRedirectType": false,
"hosts": [
{
"name": "rr1",
"hostname": "rr1.example.com",
"ipv6_address": ""
}
]
},
{
"name": "external",
"type": "host",
"httpPort": 80,
"httpsPort": 443,
"hosts": [
{
"name": "offload-streamer1",
"hostname": "streamer1.example.com",
"ipv6_address": ""
},
{
"name": "offload-streamer2",
"hostname": "streamer2.example.com",
"ipv6_address": ""
}
]
}
]
}
Merge and apply the config? [y/n]: y
Create Load Balancing and Offload Block
Add both offload streamers as targets in a randomgroup block:
$ confcli services.routing.rules -w
Running wizard for resource 'rules'
Hint: Hitting return will set a value to its default.
Enter '?' to receive the help string
rules : [
rule can be one of
1: allow
2: consistentHashing
3: contentPopularity
4: deny
5: firstMatch
6: random
7: rawGroup
8: rawHost
9: split
10: weighted
Choose element index or name: random
Adding a 'random' element
rule : {
name (default: ): balancer
type (default: random): ⏎
targets : [
target (default: ): offload-streamer1
Add another 'target' element to array 'targets'? [y/N]: y
target (default: ): offload-streamer2
Add another 'target' element to array 'targets'? [y/N]: ⏎
]
}
Add another 'rule' element to array 'rules'? [y/N]: ⏎
]
Generated config:
{
"rules": [
{
"name": "balancer",
"type": "random",
"targets": [
"offload-streamer1",
"offload-streamer2"
]
}
]
}
Merge and apply the config? [y/n]: y
Then create a split block with the request router and the load balanced CDN as targets:
$ confcli services.routing.rules -w
Running wizard for resource 'rules'
Hint: Hitting return will set a value to its default.
Enter '?' to receive the help string
rules : [
rule can be one of
1: allow
2: consistentHashing
3: contentPopularity
4: deny
5: firstMatch
6: random
7: rawGroup
8: rawHost
9: split
10: weighted
Choose element index or name: split
Adding a 'split' element
rule : {
name (default: ): offload
type (default: split): ⏎
rule (default: ): in_session_group('Apple') and not in_subnet('Europe') and lt('europe_load_mbps', 1000)
onMatch (default: ): rr1
onMiss (default: ): balancer
}
Add another 'rule' element to array 'rules'? [y/N]: ⏎
]
Generated config:
{
"rules": [
{
"name": "offload",
"type": "split",
"condition": "in_session_group('Apple') and not in_subnet('Europe') and lt('europe_load_mbps', 1000)",
"onMatch": "rr1",
"onMiss": "balancer"
}
]
}
Merge and apply the config? [y/n]: y
The last step required is to set the entrypoint of the routing tree so the router knows where to start evaluating:
$ confcli services.routing.entrypoint offload
services.routing.entrypoint = 'offload'
Evaluate
Now that all the rules have been set up properly and the router has been reconfigured. The translated configuration can be read from the router’s configuration API:
$ curl -k https://router-host:5001/v2/configuration 2> /dev/null | jq .routing
{
"id": "offload",
"member_order": "sequential",
"members": [
{
"host_id": "rr1",
"id": "offload.rr1",
"weight_function": "return ((in_session_group('Apple') ~= 0) and
(in_subnet('Europe') == 0) and
(lt('europe_load_mbps', 1000) ~= 0) and 1) or 0 "
},
{
"id": "offload.balancer",
"member_order": "weighted",
"members": [
{
"host_id": "offload-streamer1",
"id": "offload.balancer.offload-streamer1",
"weight_function": "return 100"
},
{
"host_id": "offload-streamer2",
"id": "offload.balancer.offload-streamer2",
"weight_function": "return 100"
}
],
"weight_function": "return 1"
}
],
"weight_function": "return 100"
}
Note that the configuration language code has been translated into its Lua equivalent.
5.6.4 - Session Groups and Classification
ESB3024 Router provides a flexible classification engine, allowing the assignment of clients into session groups that can then be used to base routing decisions on.
Session Classification
In order to perform routing it is necessary to classify incoming sessions according to the relevant parameters. This is done through session groups and their associated classifiers.
There are different ways of classifying a request:
Anonymous IP: Classifies clients using an anonymous IP database. See Geographic Databases for information about the database.ASN IDs: Checks to see if a client’s IP belongs to any of the specified ASN IDs. See Geographic Databases for information about the ASN database.Content URL path: Matches the given pattern against the path part of the URL requested by the client. The match can be either a case-insensitive wildcard match or a regular expression match.Content URL query parameters: Matches the given pattern against the query parameters of the URL requested by the client. The query parameters are passed as a single string. The match can be either a case-insensitive wildcard match or a regular expression match.GeoIP: Based on the geographic location of the client, supporting wildcard matching. See Route on GeoIP/ASN for more details. The possible values to match with are any combinations of:- Continent
- Country
- Region
- Cities
- ASN
Host name: Matches the given pattern against the name of the host that the request was sent to. The match can be either a case-insensitive wildcard match or a regular expression match.IP ranges: Classifies a client based on whether its IP address belongs to any of the listed IP ranges or not.Random: Randomly classifies clients according to a given probability. The classifier is deterministic, meaning that a session will always get the same classification, even if evaluated multiple times.Regular expression matcher: Matches the given pattern against a configurable source. The match is case-insensitive and supports regular expressions. The following sources are available:content_url_path: The path part of the URL requested by the client.content_url_query_params: The query parameters of the URL requested by the client. The query parameters are passed as a single string.hostname: The name of the host that the request was sent to.user_agent: The user agent string in the HTTP request from the client.
Request Header: Classifies clients based on the value of a specified HTTP header in the request from the client.String matcher: Matches the given pattern against a configurable source. The match is case-insensitive and supports wildcards (’*’). The following sources are available:content_url_path: The path part of the URL requested by the client.content_url_query_params: The query parameters of the URL requested by the client. The query parameters are passed as a single string.hostname: The name of the host that the request was sent to.user_agent: The user agent string in the HTTP request from the client.
Subnet: Tests if a client’s IP belongs to a named subnet, see Subnets for more details.User agent: Matches the given pattern against the user agent string in the HTTP request from the client. The match can be either a case-insensitive wildcard match or a regular expression match.
A session group may have more than one classifier. If it does, all the classifiers must match the incoming client request for it to belong to the session group. It is also possible for a request to belong to multiple session groups, or to none.
To send certain clients to a specific host you first need to create a suitable
classifier using confcli in wizard mode. The wizard will guide you through the
process of creating a new entry, asking you what value to input for each field
and helping you by telling you what inputs are allowed for restricted fields
such as the string comparison source mentioned above:
$ confcli services.routing.classifiers -w
Running wizard for resource 'classifiers'
Hint: Hitting return will set a value to its default.
Enter '?' to receive the help string
classifiers : [
classifier can be one of
1: anonymousIp
2: asnIds
3: contentUrlPath
4: contentUrlQueryParameters
5: geoip
6: hostName
7: ipranges
8: random
9: regexMatcher
10: requestHeader
11: stringMatcher
12: subnet
13: userAgent
Choose element index or name: anonymousIp
Adding a 'anonymousIp' element
classifier : {
name (default: ): anon_ip_matcher
type (default: anonymousIp):
inverted (default: False):
}
Add another 'classifier' element to array 'classifiers'? [y/N]: n
]
Generated config:
{
"classifiers": [
{
"name": "anon_ip_matcher",
"type": "anonymousIp",
"inverted": false
}
]
}
Merge and apply the config? [y/n]: y
$ confcli services.routing.classifiers -w
Running wizard for resource 'classifiers'
Hint: Hitting return will set a value to its default.
Enter '?' to receive the help string
classifiers : [
classifier can be one of
1: anonymousIp
2: asnIds
3: contentUrlPath
4: contentUrlQueryParameters
5: geoip
6: hostName
7: ipranges
8: random
9: regexMatcher
10: requestHeader
11: stringMatcher
12: subnet
13: userAgent
Choose element index or name: asnIds
Adding a 'asnIds' element
classifier : {
name (default: ): asn_matcher
type (default: asnIds): ⏎
inverted (default: False): ⏎
asnIds <The list of ASN IDs to accept. (default: [])>: [
asnId: 1
Add another 'asnId' element to array 'asnIds'? [y/N]: y
asnId: 2
Add another 'asnId' element to array 'asnIds'? [y/N]: y
asnId: 3
Add another 'asnId' element to array 'asnIds'? [y/N]: ⏎
]
}
Add another 'classifier' element to array 'classifiers'? [y/N]: ⏎
]
Generated config:
{
"classifiers": [
{
"name": "asn_matcher",
"type": "asnIds",
"inverted": false,
"asnIds": [
1,
2,
3
]
}
]
}
Merge and apply the config? [y/n]: y
$ confcli services.routing.classifiers -w
Running wizard for resource 'classifiers'
Hint: Hitting return will set a value to its default.
Enter '?' to receive the help string
classifiers : [
classifier can be one of
1: anonymousIp
2: asnIds
3: contentUrlPath
4: contentUrlQueryParameters
5: geoip
6: hostName
7: ipranges
8: random
9: regexMatcher
10: requestHeader
11: stringMatcher
12: subnet
13: userAgent
Choose element index or name: contentUrlPath
Adding a 'contentUrlPath' element
classifier : {
name (default: ): vod_matcher
type (default: contentUrlPath): ⏎
inverted (default: False): ⏎
patternType (default: stringMatch): ⏎
pattern (default: ): *vod*
}
Add another 'classifier' element to array 'classifiers'? [y/N]: n
]
Generated config:
{
"classifiers": [
{
"name": "vod_matcher",
"type": "contentUrlPath",
"inverted": false,
"patternType": "stringMatch",
"pattern": "*vod*"
}
]
}
Merge and apply the config? [y/n]: y
$ confcli services.routing.classifiers -w
Running wizard for resource 'classifiers'
Hint: Hitting return will set a value to its default.
Enter '?' to receive the help string
classifiers : [
classifier can be one of
1: anonymousIp
2: asnIds
3: contentUrlPath
4: contentUrlQueryParameters
5: geoip
6: hostName
7: ipranges
8: random
9: regexMatcher
10: requestHeader
11: stringMatcher
12: subnet
13: userAgent
Choose element index or name: contentUrlQueryParameters
Adding a 'contentUrlQueryParameters' element
classifier : {
name (default: ): bitrate_matcher
type (default: contentUrlQueryParameters): ⏎
inverted (default: False): ⏎
patternType (default: stringMatch): regex
pattern (default: ): .*bitrate=100000.*
}
Add another 'classifier' element to array 'classifiers'? [y/N]: n
]
Generated config:
{
"classifiers": [
{
"name": "bitrate_matcher",
"type": "contentUrlQueryParameters",
"inverted": false,
"patternType": "regex",
"pattern": ".*bitrate=100000.*"
}
]
}
Merge and apply the config? [y/n]: y
$ confcli services.routing.classifiers -w
Running wizard for resource 'classifiers'
Hint: Hitting return will set a value to its default.
Enter '?' to receive the help string
classifiers : [
classifier can be one of
1: anonymousIp
2: asnIds
3: contentUrlPath
4: contentUrlQueryParameters
5: geoip
6: hostName
7: ipranges
8: random
9: regexMatcher
10: requestHeader
11: stringMatcher
12: subnet
13: userAgent
Choose element index or name: geoip
Adding a 'geoip' element
classifier : {
name (default: ): sweden_matcher
type (default: geoip): ⏎
inverted (default: False): ⏎
continent (default: ): ⏎
country (default: ): sweden
cities : [
city (default: ): ⏎
Add another 'city' element to array 'cities'? [y/N]: ⏎
]
asn (default: ): ⏎
}
Add another 'classifier' element to array 'classifiers'? [y/N]: ⏎
]
Generated config:
{
"classifiers": [
{
"name": "sweden_matcher",
"type": "geoip",
"inverted": false,
"continent": "",
"country": "sweden",
"cities": [
""
],
"asn": ""
}
]
}
Merge and apply the config? [y/n]: y
$ confcli services.routing.classifiers -w
Running wizard for resource 'classifiers'
Hint: Hitting return will set a value to its default.
Enter '?' to receive the help string
classifiers : [
classifier can be one of
1: anonymousIp
2: asnIds
3: contentUrlPath
4: contentUrlQueryParameters
5: geoip
6: hostName
7: ipranges
8: random
9: regexMatcher
10: requestHeader
11: stringMatcher
12: subnet
13: userAgent
Choose element index or name: hostName
Adding a 'hostName' element
classifier : {
name (default: ): host_name_classifier
type (default: hostName): ⏎
inverted (default: False): ⏎
patternType (default: stringMatch): ⏎
pattern (default: ): *live.example*
}
Add another 'classifier' element to array 'classifiers'? [y/N]: n
]
Generated config:
{
"classifiers": [
{
"name": "host_name_classifier",
"type": "hostName",
"inverted": false,
"patternType": "stringMatch",
"pattern": "*live.example*"
}
]
}
Merge and apply the config? [y/n]: y
$ confcli services.routing.classifiers -w
Running wizard for resource 'classifiers'
Hint: Hitting return will set a value to its default.
Enter '?' to receive the help string
classifiers : [
classifier can be one of
1: anonymousIp
2: asnIds
3: contentUrlPath
4: contentUrlQueryParameters
5: geoip
6: hostName
7: ipranges
8: random
9: regexMatcher
10: requestHeader
11: stringMatcher
12: subnet
13: userAgent
Choose element index or name: ipranges
Adding a 'ipranges' element
classifier : {
name (default: ): company_matcher
type (default: ipranges): ⏎
inverted (default: False): ⏎
ipranges : [
iprange (default: ): 90.128.0.0/12
Add another 'iprange' element to array 'ipranges'? [y/N]: ⏎
]
}
Add another 'classifier' element to array 'classifiers'? [y/N]: ⏎
]
Generated config:
{
"classifiers": [
{
"name": "company_matcher",
"type": "ipranges",
"inverted": false,
"ipranges": [
"90.128.0.0/12"
]
}
]
}
Merge and apply the config? [y/n]: y
$ confcli services.routing.classifiers -w
Running wizard for resource 'classifiers'
Hint: Hitting return will set a value to its default.
Enter '?' to receive the help string
classifiers : [
classifier can be one of
1: anonymousIp
2: asnIds
3: contentUrlPath
4: contentUrlQueryParameters
5: geoip
6: hostName
7: ipranges
8: random
9: regexMatcher
10: requestHeader
11: stringMatcher
12: subnet
13: userAgent
Choose element index or name: random
Adding a 'random' element
classifier <A classifier randomly applying to clients based on the provided probability. (default: OrderedDict())>: {
name (default: ): random_matcher
type (default: random):
probability (default: 0.5): 0.7
}
Add another 'classifier' element to array 'classifiers'? [y/N]: n
]
Generated config:
{
"classifiers": [
{
"name": "random_matcher",
"type": "random",
"probability": 0.7
}
]
}
Merge and apply the config? [y/n]: y
$ confcli services.routing.classifiers -w
Running wizard for resource 'classifiers'
Hint: Hitting return will set a value to its default.
Enter '?' to receive the help string
classifiers : [
classifier can be one of
1: anonymousIp
2: asnIds
3: contentUrlPath
4: contentUrlQueryParameters
5: geoip
6: hostName
7: ipranges
8: random
9: regexMatcher
10: requestHeader
11: stringMatcher
12: subnet
13: userAgent
Choose element index or name: regexMatcher
Adding a 'regexMatcher' element
classifier : {
name (default: ): content_matcher
type (default: regexMatcher): ⏎
inverted (default: False): ⏎
source (default: content_url_path): ⏎
pattern (default: ): .*/(live|news_channel)/.*m3u8
}
Add another 'classifier' element to array 'classifiers'? [y/N]: ⏎
]
Generated config:
{
"classifiers": [
{
"name": "content_matcher",
"type": "regexMatcher",
"inverted": false,
"source": "content_url_path",
"pattern": ".*/(live|news_channel)/.*m3u8"
}
]
}
Merge and apply the config? [y/n]: y
$ confcli services.routing.classifiers -w
Running wizard for resource 'classifiers'
Hint: Hitting return will set a value to its default.
Enter '?' to receive the help string
classifiers : [
classifier can be one of
1: anonymousIp
2: asnIds
3: contentUrlPath
4: contentUrlQueryParameters
5: geoip
6: hostName
7: ipranges
8: random
9: regexMatcher
10: requestHeader
11: stringMatcher
12: subnet
13: userAgent
Choose element index or name: requestHeader
Adding a 'requestHeader' element
classifier <A classifier that matches on headers in the HTTP request. (default: OrderedDict())>: {
name (default: ): curl
type (default: requestHeader): ⏎
inverted (default: False): ⏎
header (default: ): User-Agent
patternType (default: stringMatch): ⏎
patternSource (default: inline): ⏎
pattern (default: ): curl*
}
Add another 'classifier' element to array 'classifiers'? [y/N]: n
]
Generated config:
{
"classifiers": [
{
"name": "curl",
"type": "requestHeader",
"inverted": false,
"header": "User-Agent",
"patternType": "stringMatch",
"patternSource": "inline",
"pattern": "curl*"
}
]
}
Merge and apply the config? [y/n]: y
$ confcli services.routing.classifiers -w
Running wizard for resource 'classifiers'
Hint: Hitting return will set a value to its default.
Enter '?' to receive the help string
classifiers : [
classifier can be one of
1: anonymousIp
2: asnIds
3: contentUrlPath
4: contentUrlQueryParameters
5: geoip
6: hostName
7: ipranges
8: random
9: regexMatcher
10: requestHeader
11: stringMatcher
12: subnet
13: userAgent
Choose element index or name: stringMatcher
Adding a 'stringMatcher' element
classifier : {
name (default: ): apple_matcher
type (default: stringMatcher): ⏎
inverted (default: False): ⏎
source (default: content_url_path): user_agent
pattern (default: ): *apple*
}
Add another 'classifier' element to array 'classifiers'? [y/N]: ⏎
]
Generated config:
{
"classifiers": [
{
"name": "apple_matcher",
"type": "stringMatcher",
"inverted": false,
"source": "user_agent",
"pattern": "*apple*"
}
]
}
Merge and apply the config? [y/n]: y
$ confcli services.routing.classifiers -w
Running wizard for resource 'classifiers'
Hint: Hitting return will set a value to its default.
Enter '?' to receive the help string
classifiers : [
classifier can be one of
1: anonymousIp
2: asnIds
3: contentUrlPath
4: contentUrlQueryParameters
5: geoip
6: hostName
7: ipranges
8: random
9: regexMatcher
10: requestHeader
11: stringMatcher
12: subnet
13: userAgent
Choose element index or name: subnet
Adding a 'subnet' element
classifier : {
name (default: ): company_matcher
type (default: subnet): ⏎
inverted (default: False): ⏎
patternSource (default: inline): ⏎
pattern (default: ): company
}
Add another 'classifier' element to array 'classifiers'? [y/N]: ⏎
]
Generated config:
{
"classifiers": [
{
"name": "company_matcher",
"type": "subnet",
"inverted": false,
"patternSource": "inline",
"pattern": "company"
}
]
}
Merge and apply the config? [y/n]: y
$ confcli services.routing.classifiers -w
Running wizard for resource 'classifiers'
Hint: Hitting return will set a value to its default.
Enter '?' to receive the help string
classifiers : [
classifier can be one of
1: anonymousIp
2: asnIds
3: contentUrlPath
4: contentUrlQueryParameters
5: geoip
6: hostName
7: ipranges
8: random
9: regexMatcher
10: requestHeader
11: stringMatcher
12: subnet
13: userAgent
Choose element index or name: userAgent
Adding a 'userAgent' element
classifier : {
name (default: ): iphone_matcher
type (default: userAgent): ⏎
inverted (default: False): ⏎
patternType (default: stringMatch): regex
pattern (default: ): i(P|p)hone
}
Add another 'classifier' element to array 'classifiers'? [y/N]: n
]
Generated config:
{
"classifiers": [
{
"name": "iphone_matcher",
"type": "userAgent",
"inverted": false,
"patternType": "regex",
"pattern": "i(P|p)hone"
}
]
}
Merge and apply the config? [y/n]: y
These classifiers can now be used to construct session groups and properly classify clients. Using the examples above, let’s create a session group classifying clients from Sweden using an Apple device:
$ confcli services.routing.sessionGroups -w
Running wizard for resource 'sessionGroups'
Hint: Hitting return will set a value to its default.
Enter '?' to receive the help string
sessionGroups : [
sessionGroup : {
name (default: ): inSwedenUsingAppleDevice
classifiers : [
classifier (default: ): sweden_matcher
Add another 'classifier' element to array 'classifiers'? [y/N]: y
classifier (default: ): apple_matcher
Add another 'classifier' element to array 'classifiers'? [y/N]: ⏎
]
}
Add another 'sessionGroup' element to array 'sessionGroups'? [y/N]: ⏎
]
Generated config:
{
"sessionGroups": [
{
"name": "inSwedenUsingAppleDevice",
"classifiers": [
"sweden_matcher",
"apple_matcher"
]
}
]
}
Merge and apply the config? [y/n]: y
Clients classified by the sweden_matcher and apple_matcher classifiers
will now be put in the session group inSwedenUsingAppleDevice. Using session
groups in routing will be demonstrated later in this document.
Pattern Source
The requestHeader and subnet classifiers have a patternSource field,
which can be either inline or selectionInput. When set to inline, the
pattern is taken directly from the pattern field.
If it is selectionInput, the pattern field is used as a path in the
selection input that points
to the pattern to use for classification. The selection input path may contain
a wildcard ("*"), which matches all elements inside an object or array.
For example, if patternSource contains /blocked_user_agents/*/agent, the
classifier will take its pattern from all agent fields in objects inside
/blocked_user_agents.
If the selection input contains the following data:
{
"blocked_user_agents": {
{ "agent1": { "agent": "Firefox" }},
{ "agent2": { "agent": "Chrome" }}
}
}
then the classifier will match either Firefox or Chrome.
Advanced Classification
The above example will simply apply all classifiers in the list, and as long as they all evaluate to true for a session, that session will be tagged with the session group. For situations where this isn’t enough, classifiers can instead be combined using simple logic statements to form complex rules.
A first simple example can be a session group that accepts any viewers in either
ASN 1, 2 or 3 (corresponding to the classifier asn_matcher or living in Sweden.
This can be done by creating a session group, and adding the following logic
statement:
'sweden_matcher' OR 'asn_matcher'
A slightly more advanced case is where a session group should only contain sessions neither in any of the three ASNs nor in Sweden. This is done by negating the previous example:
NOT ('sweden_matcher' OR 'asn_matcher')
A single classifier can also be negated, rather than the whole statement, for example to accept any Swedish viewers except those in the three ASNs:
'sweden_matcher' AND NOT 'asn_matcher'
Arbitrarily complex statements can be created using classifier names, parentheses,
and the keywords AND, OR and NOT.
For example a session group accepting any Swedish viewers except those in the Stockholm region unless they are also Apple users:
'sweden_matcher' AND (NOT 'stockholm_matcher' OR 'apple_matcher')
Note that the classifier names must be enclosed in single quotes when using this syntax.
Applying this kind of complex classifier using confcli is no more difficult than adding a single classifier at a time:
$ confcli services.routing.sessionGroups. -w
Running wizard for resource 'sessionGroups'
Hint: Hitting return will set a value to its default.
Enter '?' to receive the help string
sessionGroups : [
sessionGroup : {
name (default: ): complex_group
classifiers : [
classifier (default: ): 'sweden_matcher' AND (NOT 'stockholm_matcher' OR 'apple_matcher')
Add another 'classifier' element to array 'classifiers'? [y/N]: ⏎
]
}
Add another 'sessionGroup' element to array 'sessionGroups'? [y/N]: ⏎
]
Generated config:
{
"sessionGroups": [
{
"name": "complex_group",
"classifiers": [
"'sweden_matcher' AND (NOT 'stockholm_matcher' OR 'apple_matcher')"
]
}
]
}
Merge and apply the config? [y/n]: y
5.6.5 - Accounts
If accounts are configured, the router will tag sessions as belonging to an
account. Note that if accounts are not configured or a session does not belong to
an account, a session will be tagged with the default account.
Metrics will be tracked separately for each account when applicable.
Configuration
Accounts are configured using session groups, see Classification
for more information. Using confcli, an account is configured by defining an
account name and a list of session groups for which a session must be classified
into to belong to the account. An account called account_1 can be configured by
running the command
confcli services.routing.accounts -w
Running wizard for resource 'accounts'
Hint: Hitting return will set a value to its default.
Enter '?' to receive the help string
accounts : [
account : {
name (default: ): account_1
sessionGroups <A session will be tagged as belonging to this account if it's classified into all of the listed session groups. (default: [])>: [
sessionGroup (default: ): session_group_1
Add another 'sessionGroup' element to array 'sessionGroups'? [y/N]: y
sessionGroup (default: ): session_group_2
Add another 'sessionGroup' element to array 'sessionGroups'? [y/N]: n
]
}
Add another 'account' element to array 'accounts'? [y/N]: n
]
Generated config:
{
"accounts": [
{
"name": "account_1",
"sessionGroups": [
"session_group_1",
"session_group_2"
]
}
]
}
Merge and apply the config? [y/n]: y
A session will belong to the account account_1 if it has been classified into
the two session groups session_group_1 and session_group_2.
Metrics
If using the configuration above, the metrics will be separated per account:
# TYPE num_requests counter
num_requests{account="account_1",selector="initial"} 3
# TYPE num_requests counter
num_requests{account="default",selector="initial"} 3
5.6.6 - Data streams
Data streams can be used to produce and consume data to and from external data sources. This is useful for integrating with other systems, such as Kafka, to allow data synchronization between different instances of the Director or to read external selection input data.
Configuration
Currently, only Kafka data streams are supported. The addresses of the Kafka
brokers to connect to are configured in integration.kafka.bootstrapServers:
confcli integration.kafka.bootstrapServers
{
"bootstrapServers": [
"kafka-broker-host:9095"
]
}
These Kafka brokers can then be interacted with by configuring data streams in
the services.routing.dataStreams section of the configuration:
confcli services.routing.dataStreams
{
"dataStreams": {
"incoming": [],
"outgoing": []
}
}
Incoming data streams
incoming is a list of data streams that the Director will consume data from.
An incoming data stream defines the following properties:
name: The name of the data stream. This is used to identify the data stream in the configuration and in the logs.source: The source of the data stream. Currently, the only supported source iskafka, which means that the data will be consumed from the Kafka broker configured inintegration.kafka.bootstrapServers.target: The target of the data consumed from the stream. Currently, the only supported target isselectionInput, which means that the consumed data will be stored as selection input data.kafkaTopics: A list of Kafka topics to consume data from.
The following configuration will make the Director consume data from the Kafka
topic selection_input from the Kafka broker configured in
integration.kafka.bootstrapServers and store it as selection input data.
confcli services.routing.dataStreams.incoming
{
"incoming": [
{
"name": "incomingDataStream",
"source": "kafka",
"kafkaTopics": [
"selection_input"
],
"target": "selectionInput"
}
]
}
Outgoing data streams
outgoing is a list of data streams that the Director will produce data to.
An outgoing data stream defines the following properties:
name: The name of the data stream. This is used to identify the data stream in the configuration, in a Lua context and in the logs.type: The type of the data stream. Currently, the only supported type iskafka, which means that the data will be produced to the Kafka broker configured inintegration.kafka.bootstrapServers.kafkaTopic: The Kafka topic to produce data to.
Example of an outgoing data stream that produces to the Kafka topic selection_input:
confcli services.routing.dataStreams.outgoing
{
"outgoing": [
{
"name": "outgoingDataStream",
"type": "kafka",
"kafkaTopic": "selection_input"
}
]
}
Data can be sent to outgoing data streams from a Lua function, see Data stream related functions for more information.
5.6.7 - Selection Input Configurations
Selection Input Limits
The number of stored selection input leaf items can be limited with the
selectionInputItemLimit tuning parameter.
$ confcli services.routing.tuning.general.selectionInputItemLimit
{
"selectionInputItemLimit": 10000
}
Selection Input Persistence
Selection input data used by classifiers can be stored in the AgileTV CDN
Manager. This makes the data persistent and allows it to be shared between
Director instances. Each Director fetches the data on startup from the Manager
when selectionInputFetchBase is configured:
$ confcli integration.manager.selectionInputFetchBase
{
"selectionInputFetchBase": "https://acd-manager.example.com/api/selection-input/"
}
5.6.8 - Advanced features
5.6.8.1 - Content popularity
ESB3024 Router can make routing decisions based on content popularity. All incoming content requests are tracked to continuously update a content popularity ranking list. The popularity ranking algorithm is designed to let popular content quickly rise to the top while unpopular content decays and sinks towards the bottom.
Routing
A content popularity based routing rule can be created by running
$ confcli services.routing.rules -w
Running wizard for resource 'rules'
Hint: Hitting return will set a value to its default.
Enter '?' to receive the help string
rules : [
rule can be one of
1: allow
2: consistentHashing
3: contentPopularity
4: deny
5: firstMatch
6: random
7: rawGroup
8: rawHost
9: split
10: weighted
Choose element index or name: contentPopularity
Adding a 'contentPopularity' element
rule : {
name (default: ): content_popularity_rule
type (default: contentPopularity):
contentPopularityCutoff (default: 10): 5
onPopular (default: ): edge-streamer
onUnpopular (default: ): offload
}
Add another 'rule' element to array 'rules'? [y/N]: n
]
Generated config:
{
"rules": [
{
"name": "content_popularity_rule",
"type": "contentPopularity",
"contentPopularityCutoff": 5.0,
"onPopular": "edge-streamer",
"onUnpopular": "offload"
}
]
}
Merge and apply the config? [y/n]: y
This rule will route requests for the top 5 most popular content items to
edge-streamer and all other requests to offload.
Some configuration settings attributed to content popularity are available:
$ confcli services.routing.settings.contentPopularity
{
"contentPopularity": {
"enabled": true,
"algorithm": "score_based",
"sessionGroupNames": [],
"popularityListMaxSize": 100000,
"scoreBased": {
"popularityDecayFraction": 0.2,
"popularityPredictionFactor": 2.5,
"requestsBetweenPopularityDecay": 1000
},
"timeBased": {
"intervalsPerHour": 10
}
}
}
enabled: Whether or not to track content popularity. Whenenabledis set tofalse, content popularity will not be tracked. Note that routing on content popularity is possible even ifenabledisfalseand content popularity has been tracked previously.algorithm: Choice of content popularity tracking algorithm. There are two possible choices:score_basedortime_based(detailed below).sessionGroupNames: Names of the session groups for which content popularity should be tracked. If left empty, content popularity will be tracked for all sessions. The content popularity is tracked globally, not per session group, but the popularity metrics is only updated for sessions belonging to these groups.popularityListMaxSize: The maximum amount of unique content items to track for popularity.scoreBased: Configuration parameters unique to the score based algorithm.timeBased: Configuration parameters unique to the time based algorithm.
Size of Popularity List
The size of the popularity list is limited to prevent it growing forever. A single entry in the popularity ranking list will at most consume 180 bytes of memory. E.g. setting the maximum size to 1000 would consume at most 180⋅1,000 = 180,000 B = 0.18 MB. If the content popularity list is full, a request to a new item will replace the least popular item.
Setting a very high maximum size will not impact performance, it will only consume more memory.
Score-Based Algorithm
The requestsBetweenPopularityDecay parameter defines the number of requests
between each popularity decay update, an integral component of this feature.
The popularityPredictionFactor and popularityDecayFraction settings tune
the behaviour of the content popularity ranking algorithm, explained further
below.
Decay Update
To allow for popular content to quickly rise in popularity and unpopular content to sink, a dynamic popularity ranking algorithm is used. The goal of the algorithm is to track content popularity in real time, allowing routing decisions based on the requested content’s popularity. The algorithm is applied every decay update.
The algorithm uses current trending content to predict content popularity. The
popularityPredictionFactor setting regulates how much the algorithm should rely
on predicted popularity. A high prediction factor allows rising content to quickly
rise to high popularity but can also cause unpopular content with a sudden burst
of requests to wrongfully rise to the top. A low prediction factor can cause
stagnation in the popularity ranking, not allowing new popular content to rise
to the top.
Unpopular content decays in popularity, the magnitude of which is regulated by
popularityDecayFraction. A high value will aggressively decay content
popularity on every decay update while a low value will bloat the ranking,
causing stagnation. Once content decays to a trivially low popularity score, it
is pruned from the content popularity list.
When configuring these tuning parameters, the most crucial data to consider is
the size of your asset catalog, i.e. the number of unique contents you offer.
The recommended values, obtained through testing, are presented in the table below.
Note that the popularityPredictionFactor setting is the principal factor in
controlling the algorithm’s behaviour.
| Catalog size n | Popularity prediction factor | Popularity decay fraction |
|---|---|---|
| n < 1000 | 2.2 | 0.2 |
| 1000 < n < 5000 | 2.3 | 0.2 |
| 5000 < n < 10000 | 2.5 | 0.2 |
| n > 10000 | 2.6 | 0.2 |
Time-Based Algorithm
The time based algorithm only requires the configuration parameter
intervalsPerHour. As an example, setting intervalsPerHour to 10
would give 10 six minute intervals per hour. During each interval,
all unique content requests has an associated counter, increasing
by one for each incoming request. After an hour, all intervals have
been cycled through. The counters in the first interval will be reset
and all incoming content requests will increase the counters in the
first interval again. This cycle continues forever.
When determining a single content’s popularity, the sum of each content’s counter in all intervals is used to determine a popularity ranking.
5.6.8.2 - Consistent Hashing
Consistent hashing based routing is a feature that can be used to distribute requests to a set of hosts in a cache friendly manner. By using AgileTV’s consistent distributed hash algorithm, the amount of cache redistribution is minimized within a set of hosts. Requests for a content will always be routed to the same set of hosts, the amount of which is configured by the spread factor, allowing high cache usage. When adding or removing hosts, the algorithm minimizes cache redistribution.
Say you have the host group [s1, s2, s3, s4, s5] and have
configured spreadFactor = 3. A request for a content asset1 would then be
routed to the same three hosts with one of them being selected randomly for each
request. Requests for a different content asset2 would also be routed to one
of three different hosts, most likely a different combination of hosts than
requests for content asset1.
Example routing results with spreadFactor = 3:
- Request for
asset1→ route to one of[s1, s3, s4]. - Request for
asset2→ route to one of[s2, s4, s5]. - Request for
asset3→ route to one of[s1, s2, s5].
Since consistent hashing based routing ensures that requests for a specific content always get routed to the same set of hosts, the risk of cache misses are lowered on the hosts since they will be served the same content requests over and over again.
Note that the maximum value of
spreadFactoris 64. Consequently, the highest amount of hosts you can use in aconsistentHashingrule block is 64.
Three different hashing algorithms are available: MD5, SDBM and Murmur.
The algorithm is chosen during configuration.
Configuration
Configuring consistent hashing based routing is easily done using confcli. Let’s configure the example described above:
confcli services.routing.rules -w
Running wizard for resource 'rules'
Hint: Hitting return will set a value to its default.
Enter '?' to receive the help string
rules : [
rule can be one of
1: allow
2: consistentHashing
3: contentPopularity
4: deny
5: firstMatch
6: random
7: rawGroup
8: rawHost
9: split
10: weighted
Choose element index or name: consistentHashing
Adding a 'consistentHashing' element
rule : {
name (default: ): consistentHashingRule
type (default: consistentHashing):
spreadFactor (default: 1): 3
hashAlgorithm (default: MD5):
targets : [
target : {
target (default: ): s1
enabled (default: True):
}
Add another 'target' element to array 'targets'? [y/N]: y
target : {
target (default: ): s2
enabled (default: True):
}
Add another 'target' element to array 'targets'? [y/N]: y
target : {
target (default: ): s3
enabled (default: True):
}
Add another 'target' element to array 'targets'? [y/N]: y
target : {
target (default: ): s4
enabled (default: True):
}
Add another 'target' element to array 'targets'? [y/N]: y
target : {
target (default: ): s5
enabled (default: True):
}
Add another 'target' element to array 'targets'? [y/N]: n
]
}
Add another 'rule' element to array 'rules'? [y/N]: n
]
Generated config:
{
"rules": [
{
"name": "consistentHashingRule",
"type": "consistentHashing",
"spreadFactor": 3,
"hashAlgorithm": "MD5",
"targets": [
{
"target": "s1",
"enabled": true
},
{
"target": "s2",
"enabled": true
},
{
"target": "s3",
"enabled": true
},
{
"target": "s4",
"enabled": true
},
{
"target": "s5",
"enabled": true
}
]
}
]
}
Adding Hosts
Adding a host to the list will give an additional target for the consistent hashing algorithm to route requests to. This will shift content distribution onto the new host.
confcli services.routing.rules.consistentHashingRule.targets -w
Running wizard for resource 'targets'
Hint: Hitting return will set a value to its default.
Enter '?' to receive the help string
targets : [
target : {
target (default: ): s6
enabled (default: True):
}
Add another 'target' element to array 'targets'? [y/N]: n
]
Generated config:
{
"targets": [
{
"target": "s6",
"enabled": true
}
]
}
Merge and apply the config? [y/n]: y
Removing Hosts
There is one very important caveat of using a consistent hashing rule block. As long as you don’t modify the list of hosts, the consistent hashing algorithm will keep routing requests to the same hosts. However, if you remove a host from the block in any position except the last, the consistent hashing algorithm’s behaviour will change and the algorithm cannot maintain a minimum amount of cache redistribution.
If you’re in a situation where you have to remove a host from the routing
targets but want to keep the same consistent hashing behaviour, e.g. during
very high load, you’ll have to toggle that target’s enabled field to false.
E.g., disabling requests to s2 can be accomplished by:
$ confcli services.routing.rules.consistentHashingRule.targets.1.enabled false
services.routing.rules.consistentHashingRule.targets.1.enabled = False
$ confcli services.routing.rules.consistentHashingRule.targets.1
{
"1": {
"target": "s2",
"enabled": false
}
}
If you modify the list order or remove hosts, it is highly recommended to do so during moments where a higher rate of cache misses are acceptable.
5.6.8.3 - Security token verification
The security token verification feature allows for ESB3024 Router to only process requests that contain a correct security token. The token is generated by the client, for example in the portal, using an algorithm that it shares with the router. The router verifies the token and rejects the request if the token is incorrect.
It is beyond the scope of this document to describe how the token is generated, that is described in the Security Tokens application note that is installed with the ESB3024 Router’s extra documentation.
Setting up a Routing Rule
The token verification is performed by calling the verify_security_token()
function from a routing rule. The function returns 1 if the token is
correct, otherwise it returns 0. It should typically be called from the
first routing rule, to make requests with bad tokens fail as early as possible.
The confcli example assumes that the router already has rules configured, with
an entry point named select_cdn. Token verification is enabled by inserting an
“allow” rule first in the rule list.
confcli services.routing.rules -w
Running wizard for resource 'rules'
Hint: Hitting return will set a value to its default.
Enter '?' to receive the help string
rules : [
rule can be one of
1: allow
2: consistentHashing
3: contentPopularity
4: deny
5: firstMatch
6: random
7: rawGroup
8: rawHost
9: split
10: weighted
Choose element index or name: allow
Adding a 'allow' element
rule : {
name (default: ): token_verification
type (default: allow):
condition (default: always()): verify_security_token()
onMatch (default: ): select_cdn
}
Add another 'rule' element to array 'rules'? [y/N]: n
]
Generated config:
{
"rules": [
{
"name": "token_verification",
"type": "allow",
"condition": "verify_security_token()",
"onMatch": "select_cdn"
}
]
}
Merge and apply the config? [y/n]: y
$ confcli services.routing.entrypoint token_verification
services.routing.entrypoint = 'token_verification'
"routing": {
"id": "token_verification",
"member_order": "sequential",
"members": [
{
"id": "token_verification.0.select_cdn",
"member_order": "weighted",
"members": [
...
],
"weight_function": "return verify_security_token() ~= 0"
},
{
"id": "token_verification.1.rejected",
"member_order": "sequential",
"members": [],
"weight_function": "return 1"
}
],
"weight_function": "return 100"
},Configuring Security Token Options
The secret parameter is not part of the router request, but needs to be
configured separately in the router. That can be done with the host-config
tool that is installed with the router.
Besides configuring the secret, host-config can also configure floating
sessions and a URL prefix. Floating sessions are sessions that are not tied to a
specific IP address. When that is enabled, the token verification will not take
the IP address into account when verifying the token.
The security token verification is configured per host, where a host is the name
of the host that the request was sent to. This makes it possible for a router to
support multiple customer accounts, each with their own secret. If no
configuration is found for a host, a configuration with the name default is
used.
host-config supports three commands: print, set and delete.
The print command prints the current configuration for a host. The following
parameters are supported:
host-config print [-n <host-name>]
By default it prints the configuration for all hosts, but if the optional -n
flag is given it will print the configuration for a single host.
Set
The set command sets the configuration for a host. The configuration is given
as command line parameters. The following parameters are supported:
host-config set
-n <host-name>
[-f floating]
[-p url-prefix]
[-r <secret-to-remove>]
[-s <secret-to-add>]
-n <host-name>- The name of the host to configure.-f floating- A boolean option that specifies if floating sessions are accepted. The parameter accepts the valuestrueandfalse.-p url-prefix- A URL prefix that is used for identifying requests that come from a certain account. This is not used when verifying tokens.-r <secret-to-remove>- A secret that should be removed from the list of secrets.-s <secret-to-add>- A secret that should be added to the list of secrets.
For example, to set the secret “secret-1” and enable floating sessions for the default host, the following command can be used:
host-config set -n default -s secret-1 -f true
The set command only touches the configuration options that are mentioned on
the command line, so the following command line will add a second secret to the
default host without changing the floating session setting:
host-config set -n default -s secret-2
It is possible to set multiple secrets per host. This is useful when updating a secret, then both the old and the new secret can be valid during the transition period. After the transition period the old secret can be removed by typing:
host-config set -n default -r secret-1
Delete
The delete command deletes the configuration for a host. It supports the
following parameters:
host-config delete -n <host-name>
For example, to delete the configuration for example.com, the following
command can be used:
host-config delete -n example.com
Global Options
host-config also has a few global options. They are:
-k <security-key>- The security key that is used when communicating with the router. This is normally retrieved automatically.-h- Print a help message and exit.-r <router>- The router to connect to. This default tolocalhost, but can be changed to connect to a remote router.-v- Verbose output, can be given multiple times.
Debugging Security Token Verification
The security token verification only logs messages when the log level is set to
4 or higher. Then it will only log some errors. It is possible to enable more
verbose logging using the security-token-config that is installed together
with the router.
When verbose logging is enabled, the router will log information about the token verification, including the configured token secrets, so it needs to be used with care.
The logged lines are prefixed with verify_security_token.
The security-token-config tool supports the commands print and set.
The print command prints the current configuration. If nothing is configured
it will not print anything.
Set
The set command sets the configuration. The following parameters are
supported:
security-token-config set
[-d <enabled>]
-d <enabled>- A boolean option that specifies if debug logging should be enabled or not. The parameter accepts the valuestrueandfalse.
5.6.8.4 - Subnets API
ESB3024 Router provides utilities to quickly match clients into subnets. Any combination of IPv4 and IPv6 addresses can be used. To begin, a JSON file is needed, defining all subnets, e.g:
{
"255.255.255.255/24": "area1",
"255.255.255.255/16": "area2",
"255.255.255.255/8": "area3",
"90.90.1.3/16": "area4",
"5.5.0.4/8": "area5",
"2a02:2e02:9bc0::/48": "area6",
"2a02:2e02:9bc0::/32": "area7",
"2a02:2e02:9bc0::/16": "area8",
"2a02:2e02:9de0::/44": "combined_area",
"2a02:2e02:ada0::/44": "combined_area"
}
and PUT it to the endpoint :5001/v1/subnets or :5001/v2/subnets, the
API version doesn’t matter for subnets:
curl -k -T subnets.json -H "Content-Type: application/json" https://router-host:5001/v1/subnets
Note that it is possible for several subnet CIDR strings to share the same label, effectively grouping them together.
The router provides the built-in function in_subnet(subnet_name) that
can to make routing decisions based on a client’s subnet. For more details, see
Built-in Lua functions.
To configure a rule that only allows clients in the area1 subnet, run the
command
$ confcli services.routing.rules -w
Running wizard for resource 'rules'
Hint: Hitting return will set a value to its default.
Enter '?' to receive the help string
rules : [
rule can be one of
1: allow
2: consistentHashing
3: contentPopularity
4: deny
5: firstMatch
6: random
7: rawGroup
8: rawHost
9: split
10: weighted
Choose element index or name: allow
Adding a 'allow' element
rule : {
name (default: ): only_allow_area1
type (default: allow):
condition (default: always()): in_subnet('area1')
onMatch (default: ): example-host
}
Add another 'rule' element to array 'rules'? [y/N]: n
]
Generated config:
{
"rules": [
{
"name": "only_allow_area1",
"type": "allow",
"condition": "in_subnet('area1')",
"onMatch": "example-host"
}
]
}
Merge and apply the config? [y/n]: y
Invalid IP-addresses will be omitted during subnet list construction accompanied by a message in the log displaying the invalid IP address.
5.6.8.5 - Lua Features
5.6.8.5.1 - Built-in Lua Functions
This section details all built-in Lua functions provided by the router.
Logging Functions
The router provides Lua logging functionality that is convenient when creating custom Lua functions. A prefix can be added to the log message which is useful to differentiate log messages from different lua files. At the top of the Lua source file, add the line
local log = log.add_prefix("my_lua_file")
to prepend all log messages with "my_lua_file".
The logging functions support formatting and common log levels:
log.critical('A log message with number %d', 1.5)
log.error('A log message with string %s', 'a string')
log.warning('A log message with integer %i', 1)
log.info('A log message with a local number variable %d', some_local_number)
log.debug('A log message with a local string variable %s', some_local_string)
log.trace('A log message with a local integer variable %i', some_local_integer)
log.message('A log message')
Many of the router’s built-in Lua functions use the logging functions.
Predictive Load-Balancing Functions
Predictive load balancing is a tool that can be used to avoid overloading hosts with traffic. Consider the case where a popular event starts at a certain time, let’s say 12 PM. A spike in traffic will be routed to the hosts that are streaming the content at 12 PM, most of them starting at low bitrates. A host might have sufficient bandwidth left to take on more clients but when the recently connected clients start ramping up in video quality and increase their bitrate, the host can quickly become overloaded, possibly dropping incoming requests or going offline. Predictive load balancing solves this issue by considering how many times a host recently been redirected to.
Four functions for predictive load balancing are provided by the router
that can be used when constructing conditions/weight functions: host_bitrate()
, host_bitrate_custom(), host_has_bw() and host_has_bw_custom().
All require data to be supplied to the selection input API and apply
only to leaf nodes in the routing tree. In order for predictive load balancing
to work properly the data must be updated at regular intervals. The data needs
to be supplied by the target system.
These functions are suitable to used as host health checks. To configure host health checks, see configuring CDNs and hosts.
Note that host_bitrate() and host_has_bw() rely on data supplied by metrics
agents, detailed in Cache hardware metrics: monitoring and routing.
host_bitrate_custom() and host_has_bw_custom() rely on
manually supplied selection input data, detailed in selection input API. The
bitrate unit depends on the data submitted to the selection input API.
Example Metrics
The data supplied to the selection input API by the metrics agents uses the following structure:
{
"streamer-1": {
"hardware_metrics": {
"/": {
"free": 1741596278784,
"total": 1758357934080,
"used": 16761655296,
"used_percent": 0.9532561585516977
},
"cpu_load1": 0.02,
"cpu_load15": 0.12,
"cpu_load5": 0.02,
"mem_available": 4895789056,
"mem_available_percent": 59.551760354263074,
"mem_total": 8221065216,
"mem_used": 2474393600,
"n_cpus": 4
},
"per_interface_metrics": {
"eths1": {
"link": 1,
"interface_up": true,
"megabits_sent": 22322295739.378456,
"megabits_sent_rate": 8085.2523952,
"speed": 100000
}
}
}
}
Note that all built-in functions interacting with selection input values support indexing into nested selection input data. Consider the selection input data in above. The nested values can be accessed by using dots between the keys:
si('streamer-1.per_interface_metrics.eths1.megabits_sent_rate')
Note that the whole selection input variable name must be within single quotes.
The function si() is documented under
general purpose functions.
host_bitrate({})
host_bitrate() returns the predicted bitrate (in megabits per second) of
the host after the recently connected clients start ramping up in streaming
quality. The function accepts an argument table with the following keys:
interface: The name of the interface to use for bitrate prediction.- Optional
avg_bitrate: the average bitrate per client, defaults to 6 megabits per second. - Optional
num_routers: the number of routers that can route to this host, defaults to 1. This is important to accurately predict the incoming load if multiple routers are used. - Optional
host: The name of the host to use for bitrate prediction. Defaults to the current host if not provided.
Required Selection Input Data
This function relies on the field megabits_sent_rate, supplied by the Telegraf
metrics agent, as seen in example metrics. If these fields
are missing from your selection input data, this function will not work.
Examples of usage:
host_bitrate({interface='eths0'})
host_bitrate({avg_bitrate=1, interface='eths0'})
host_bitrate({num_routers=2, interface='eths0'})
host_bitrate({avg_bitrate=1, num_routers=4, interface='eths0'})
host_bitrate({avg_bitrate=1, num_routers=4, host='custom_host', interface='eths0'})
host_bitrate({}) calculates the predicted bitrate as:
predicted_host_bitrate = current_host_bitrate + (recent_connections * avg_bitrate * num_routers)
host_bitrate_custom({})
Same functionality as host_bitrate() but uses a custom selection input
variable as bitrate input instead of accessing hardware metrics. The function
accepts an argument table with the following keys:
custom_bitrate_var: The name of the selection input variable to be used for accessing current host bitrate.- Optional
avg_bitrate: seehost_bitrate()documentation above. - Optional
num_routers: seehost_bitrate()documentation above.
host_bitrate_custom({custom_bitrate_var='host1_current_bitrate'})
host_bitrate_custom({avg_bitrate=1, custom_bitrate_var='host1_current_bitrate'})
host_bitrate_custom({num_routers=4, custom_bitrate_var='host1_current_bitrate'})
host_has_bw({})
Instead of accessing the predicted bitrate of a host through host_bitrate(),
host_has_bw() returns 1 if the host is predicted to have enough
bandwidth left to take on more clients after recent connections ramp up in
bitrate, otherwise it returns 0. The function accepts an argument table with the
following keys:
interface: seehost_bitrate()documentation above.- Optional
avg_bitrate: seehost_bitrate()documentation above. - Optional
num_routers: seehost_bitrate()documentation above. - Optional
host: seehost_bitrate()documentation above. - Optional
margin: the bitrate (megabits per second) headroom that should be taken into account during calculation, defaults to 0.
host_has_bw({}) returns whether or not the following statement is true:
predicted_host_bitrate + margin < host_bitrate_capacity
Required Selection Input Data
host_has_bw({}) relies on the fields megabits_sent_rate and speed,
supplied by the Telegraf metrics agent, as seen in
example metrics. If these fields are missing from your
selection input data, this function will not work.
Examples of usage:
host_has_bw({interface='eths0'})
host_has_bw({margin=10, interface='eth0'})
host_has_bw({avg_bitrate=1, interface='eth0'})
host_has_bw({num_routers=4, interface='eth0'})
host_has_bw({host='custom_host', interface='eth0'})
host_has_bw_custom({})
Same functionality as host_has_bw() but uses a custom selection input
variable as bitrate. It also uses a number or a custom selection input
variable for the capacity. The function accepts an argument table
with the following keys:
custom_capacity_var: a number representing the capacity of the network interface OR the name of the selection input variable to be used for accessing host capacity.custom_bitrate_var: seehost_bitrate_custom()documentation- Optional
margin: seehost_has_bw()documentation above. above. - Optional
avg_bitrate: seehost_bitrate()documentation above. - Optional
num_routers: seehost_bitrate()documentation above.
Examples of usage:
host_has_bw_custom({custom_capacity_var=10000, custom_bitrate_var='streamer-1.per_interface_metrics.eths1.megabits_sent_rate'})
host_has_bw_custom({custom_capacity_var='host1_capacity', custom_bitrate_var='streamer-1.per_interface_metrics.eths1.megabits_sent_rate'})
host_has_bw_custom({margin=10, custom_capacity_var=10000, custom_bitrate_var='streamer-1.per_interface_metrics.eths1.megabits_sent_rate'})
host_has_bw_custom({avg_bitrate=1, custom_capacity_var=10000, custom_bitrate_var='streamer-1.per_interface_metrics.eths1.megabits_sent_rate'})
host_has_bw_custom({num_routers=4, custom_capacity_var=10000, custom_bitrate_var='streamer-1.per_interface_metrics.eths1.megabits_sent_rate'})
Health Check Functions
This section details built-in Lua functions that are meant to be used for host health checks. Note that these functions rely on data supplied by metric agents detailed in Cache hardware metrics: monitoring and routing. Make sure cache hardware metrics are supplied to the router before using any of these functions.
cpu_load_ok({})
The function accepts an optional argument table with the following keys:
- Optional
host: The name of the host. Defaults to the name of the selected host if not provided. - Optional
cpu_load5_limit: The acceptable limit for the 5-minute CPU load. Defaults to 0.9 if not provided.
The function returns 1 if the five minute CPU load average is below their respective limits, and 0 otherwise.
Examples of usage:
cpu_load_ok()
cpu_load_ok({host = 'custom_host'})
cpu_load_ok({cpu_load5_limit = 0.8})
cpu_load_ok({host = 'custom_host', cpu_load5_limit = 0.8})
memory_usage_ok({})
The function accepts an optional argument table with the following keys:
- Optional
host: The name of the host. Defaults to the host of the selected host if not provided. - Optional
memory_usage_limit: The acceptable limit for the memory usage. Defaults to 0.9 if not provided.
The function returns 1 if the memory usage is below the limit, and 0 otherwise.
Examples of usage:
memory_usage_ok()
memory_usage_ok({host = 'custom_host'})
memory_usage_ok({memory_usage_limit = 0.7})
memory_usage_ok({host = 'custom_host', memory_usage_limit = 0.7})
interfaces_online({})
The function accepts an argument table with the following keys:
- Required
interfaces: A string or a table of strings representing the network interfaces to check. - Optional
host: The name of the host. Defaults to the host of the selected host if not provided.
The function returns 1 if all the specified interfaces are online, and 0 otherwise.
Required Selection Input Data
This function relies on the fields link and interface_up, supplied by
the Telegraf metrics agent, as seen in example metrics. If
these fields are missing from your selection input data, this function will not
work.
Examples of usage:
interfaces_online({interfaces = 'eth0'})
interfaces_online({interfaces = {'eth0', 'eth1'}})
interfaces_online({host = 'custom_host', interfaces = 'eth0'})
interfaces_online({host = 'custom_host', interfaces = {'eth0', 'eth1'}})
health_check({})
The function accepts an optional argument table with the following keys:
- Required
interfaces: A string or a table of strings representing the network interfaces to check. - Optional
host: The name of the host. Defaults to the host of the selected host if not provided. - Optional
cpu_load5_limit: The acceptable limit for the 5-minute CPU load. Defaults to 0.9 if not provided. - Optional
memory_usage_limit: The acceptable limit for the memory usage. Defaults to 0.9 if not provided.
The function calls the health check functions cpu_load_ok({}),
memory_usage_ok({}) and interfaces_online({}). The functions returns 1 if
all these functions returned 1, otherwise it returns 0.
Examples of usage:
health_check({interfaces = 'eths0'})
health_check({host = 'custom_host', interfaces = 'eths0'})
health_check({cpu_load5_limit = 0.7, memory_usage_limit = 0.8, interfaces = 'eth0'})
health_check({host = 'custom_host', cpu_load5_limit = 0.7, memory_usage_limit = 0.8, interfaces = {'eth0', 'eth1'}})
General Purpose Functions
The router supplies a number of general purpose Lua functions.
always()
Always returns 1.
never()
Always returns 0. Useful for temporarily disabling caches by using it as a health check.
Examples of usage:
always()
never()
si(si_name)
The function reads the value of the selection input variable si_name and
returns it if it exists, otherwise it returns 0. The function accepts a string
argument for the selection input variable name.
Examples of usage:
si('some_selection_input_variable_name')
si('streamer-1.per_interface_metrics.eths1.megabits_sent_rate')
Comparison functions
All comparison functions use the form function(si_name, value) and compares
the selection input value with the name si_name with value.
ge(si_name, value) - greater than or equal
gt(si_name, value) - greater than
le(si_name, value) - less than or equal
lt(si_name, value) - less than
eq(si_name, value) - equal to
neq(si_name, value) - not equal to
Examples of usage:
ge('streamer-1.hardware_metrics.mem_available_percent', 30)
gt('streamer-1.hardware_metrics./.free', 1000000000)
le('streamer-1.hardware_metrics.cpu_load5', 0.8)
lt('streamer-1.per_interface_metrics.eths1.megabits_sent_rate', 9000)
eq('streamer-1.per_interface_metrics.eths1.link.', 1)
neq('streamer-1.hardware_metrics.n_cpus', 4)
Session Checking Functions
in_subnet(subnet)
Returns 1 if the current session belongs to subnet, otherwise it returns 0.
See Subnets API for more details on how to use
subnets in routing. The function accepts a string argument for the subnet name.
Examples of usage:
in_subnet('stockholm')
in_subnet('unserviced_region')
in_subnet('some_other_subnet')
These functions checks the current session’s session groups.
in_session_group(session_group)
Returns 1 if the current session has been classified into session_group,
otherwise it returns 0. The function accepts a string argument for the session
group name.
in_any_session_group({})
Returns 1 if the current session has been classified into any of
session_groups, otherwise it returns 0. The function accepts a table array of
strings as argument for the session group names.
in_all_session_groups({})
Returns 1 if the current session has been classified into all of
session_groups, otherwise it returns 0. The function accepts a table array of
strings as argument for the session group names.
Examples of usage:
in_session_group('safari_browser')
in_any_session_group({ 'in_europe', 'in_asia'})
in_all_session_group({ 'vod_content', 'in_america'})
Other built-in functions
base64_encode(data)
base64_encode(data) returns the base64 encoded string of data.
Arguments:
data: The data to encode.
Example:
print(base64_encode('Hello world!'))
SGVsbG8gd29ybGQh
base64_decode(data)
base64_decode(data) returns the decoded data of the base64 encoded string, as
a raw binary string.
Arguments:
data: The data to decode.
Example:
print(base64_decode('SGVsbG8gd29ybGQh'))
Hello world!
base64_url_encode(data)
base64_url_encode(data) returns the base64 URL encoded string of data.
Arguments:
data: The data to encode.
Example:
print(base64_url_encode('ab~~'))
YWJ-fg
base64_url_decode(data)
base64_url_decode(data) returns the decoded data of the base64 URL encoded
string, as a raw binary string.
Arguments:
data: The data to decode.
Example:
print(base64_url_decode('YWJ-fg'))
ab~~
to_hex_string(data)
to_hex_string(data) returns a string containing the hexadecimal
representation of the string data.
Arguments:
data: The data to convert.
Example:
print(to_hex_string('Hello world!\n'))
48656c6c6f20776f726c64210a
from_hex_string(data)
from_hex_string(data) returns a string containing the byte representation of
the hexadecimal string data.
Arguments:
data: The data to convert.
Example:
print(from_hex_string('48656c6c6f20776f726c6421'))
Hello world!
empty(table)
empty(table) returns true if table is empty, otherwise it returns false.
Arguments:
table: The table to check.
Examples:
print(tostring(empty({})))
true
print(tostring(empty({1, 2, 3})))
false
md5(data)
md5(data) returns the MD5 hash of data, as a hexstring.
Arguments:
data: The data to hash.
Example:
print(md5('Hello world!'))
86fb269d190d2c85f6e0468ceca42a20
sha256(date)
sha256(data) returns the SHA-256 hash of data, as a hexstring.
Arguments:
data: The data to hash.
Example:
print(sha256('Hello world!'))
c0535e4be2b79ffd93291305436bf889314e4a3faec05ecffcbb7df31ad9e51a
hmac_sha256(key, data)
hmac_sha256(key, data) returns the HMAC-SHA-256 hash of data using key,
as a string containing raw binary data.
Arguments:
key: The key to use.data: The data to hash.
Example:
print(to_hex_string(hmac_sha256('secret', 'Hello world!')))
a65f4cfcf5f421ff2be052e0642bccbcfeb126ee73ebc4fe3b381964302eb632
hmac_sha384(key, data)
hmac_sha384(key, data) returns the HMAC-SHA-384 hash of data using key,
as a string containing raw binary data.
Arguments:
key: The key to use.data: The data to hash.
Example:
print(to_hex_string(hmac_sha384('secret', 'Hello world!')))
917516d93d3509a371a129ca50933195dd659712652f07ba5792cbd5cade5e6285a841808842cfa0c3c69c8fb234468a
hmac_sha512(key, data)
hmac_sha512(key, data) returns the HMAC-SHA-512 hash of data using key,
as a string containing raw binary data.
Arguments:
key: The key to use.data: The data to hash.
Example:
print(to_hex_string(hmac_sha512('secret', 'Hello world!')))
dff6c00943387f9039566bfee0994de698aa2005eecdbf12d109e17aff5bbb1b022347fbf4bd94ede7c7d51571022525556b64f9d5e4386de99d0025886eaaff
hmac_md5(key, data)
hmac_md5(key, data) returns the HMAC-MD5 hash of data using key,
as a string containing raw binary data.
Arguments:
key: The key to use.data: The data to hash.
Example:
print(to_hex_string(hmac_md5('secret', 'Hello world!')))
444fad0d374d14369d6b595062da5d91
regex_replace
regex_replace(data, pattern, replacement) returns the string data with all
occurrences of the regular expression pattern replaced with replacement.
Arguments:
data: The data to replace.pattern: The regular expression pattern to match.replacement: The replacement string.
Examples:
print(regex_replace('Hello world!', 'world', 'Lua'))
Hello Lua!
print(regex_replace('Hello world!', 'l+', 'lua'))
Heluao worluad!
If the regular expression pattern is invalid, regex_replace() returns an
error message.
Examples:
print(regex_replace('Hello world!', '*', 'lua'))
regex_error caught: regex_error
unixtime()
unixtime() returns the current Unix timestamp, as seconds since midnight,
Janury 1 1970 UTC, as an integer.
Arguments:
- None
Example:
print(unixtime())
1733517373
now()
now() returns the current Unix timestamp, the number of seconds since
midnight, Janury 1 1970 UTC, as an number with decimals.
Arguments:
- None
Example:
print(now())
1733517373.5007
time_to_epoch(time, fmt)
time_to_epoch(time, fmt) returns the Unix timestamp, the number of seconds
since midnight, Janury 1 1970 UTC, of the time string time, which is
formatted according to the format string fmt.
Arguments:
time: The time string to convert.fmt(Optional): The format string of the time string, as specified by the POSIX function strptime(). If not specified, it defaults to “%Y-%m-%dT%TZ”.
Examples:
print(time_to_epoch('1972-04-17T06:10:20Z'))
72339020
print(time_to_epoch('17/04-72 06:20:30', '%d/%m-%y %H:%M:%S'))
72339630
epoch_to_time(time, format)
epoch_to_time(time, format) returns the time string of the Unix timestamp
time, formatted according to format.
Arguments:
time: The Unix timestamp to convert, as a number.format(Optional): The format string of the time string, as specified by the POSIX function strftime(). If not specified, it defaults to “%Y-%m-%dT%TZ”.
Examples:
print(epoch_to_time(123456789))
1973-11-29T21:33:09Z
print(epoch_to_time(1234567890, '%d/%m-%y %H:%M:%S'))
13/02-09 23:31:30
get_consistent_hashing_weight(contentName, nodeIdsString, spreadFactor, hashAlgoritm, nodeId)
get_consistent_hashing_weight(contentName, nodeIdsString, spreadFactor, hashAlgoritm, nodeId)
returns the priority that node nodeId has in the list of preferred nodes,
determined using consistent hashing. The first spreadfactor:th nodes should
have equal weights to randomize requests between them. Remaining nodes should
have decrementally decreasing weights to honor node priority during failover.
Arguments:
contentName: The name of the content to hash.nodeIdsString: A string containing the node IDs to hash, on the format ‘0,1,2,3’.spreadFactor: The number of nodes to spread the requests between.hashAlgorithm: Which hash algorithm to use. Supported algorithms are “MD5”, “SDBM” and “Murmur”. Default is “MD5”.nodeId: The ID of the node to calculate the weight for.
Examples:
print(get_consistent_hashing_weight('/vod/film1', '0,1,2,3,4,5', 3, 'MD5', 3))
6
print(get_consistent_hashing_weight('/vod/film2', '0,1,2,3,4,5', 3, 'MD5', 3))
4
print(get_consistent_hashing_weight('/vod/film2', '0,1,2', 2, 'Murmur', 1))
2
See Consistent Hashing for more information about consistent hashing.
expand_ipv6_address(address)
expand_ipv6_address(address) returns the fully expanded form of the IPv6
address address.
Arguments:
address: The IPv6 address to expand. If the address is not a valid IPv6 address, the function returns the contents ofaddressunmodified. This allows for the function to pass through IPv4 addresses.
Examples:
print(expand_ipv6_address('2001:db8::1'))
2001:0db8:0000:0000:0000:0000:0000:0001
print(expand_ipv6_address('198.51.100.5'))
198.51.100.5
Data stream related functions
The router provides a number of functions that are useful when working with
data streams. These functions are used to write data to the data stream
configured in the services.routing.dataStreams.outgoing section of the
configuration. See data streams for more information.
send_to_data_stream
send_to_data_stream(data_stream, message) sends the string message to the
outgoing data stream data_stream. Note that message is sent verbatim,
without any formatting.
Arguments:
data_stream: The name of the data stream to send to.message: The message to send.
Example:
-- Sends the message "Hello world!" to the data stream 'token_stream'
send_to_data_stream('token_stream', 'Hello world!')
data_streams.post_selection_key_value
data_streams.post_selection_key_value(data_stream, path, key, value, ttl_s)
posts the key-value pair key=value on the path path to the data stream
data_stream. The key-value is formatted as a selection input value
{key: value}, will be stored in path and will persist for ttl_s seconds.
This is the same format that is expected when parsing data from incoming data
streams of the type "selectionInput" to read selection input data from
external data streams. This means that this function can be used to post
selection input data to an external data stream, which can then be read by
other Director instances.
Arguments:
data_stream: The name of the data stream to post to.path: The path to post the key-value pair to. Note that the path is automatically prefixed with"/v2/selection_input".key: The key to post.value: The value to post.- Optional
ttl_s: The time to live of the key-value pair, in seconds. If not specified, it will persist forever.
Example:
-- Posts the selection input value {"si_var": 1337} on the path "/v2/selection_input/path"
-- to the data stream 'outgoingDataStream' with a TTL of 60 seconds
data_streams.post_selection_key_value('outgoingDataStream', '/path', 'si_var', 1337, 60)
Token blocking functions
The router provides a number of functions that are useful when working with token blocking to control CDN access.
blocked_tokens.augment_token(token, customer_id)
Returns an augmented token string formatted like <customer_id>__<token>. This
function is useful when additional information is needed for token blocking,
such as customer ID.
Arguments:
token: The token to augment.customer_id: The customer ID to augment the token with.
Example:
-- Augments the token eyJhbG213 with the customer ID 12345
local augmented_token = blocked_tokens.augment_token('eyJhbG213', '12345')
print(augmented_token)
12345__eyJhbG213
blocked_tokens.add(stream_name, token, ttl_s)
blocked_tokens.add() is a specialized version of
data_streams.post_selection_key_value() that is commonly used to synchronize
blocked tokens between multiple Directors to deny unpermitted access into a CDN.
It posts selection input data to the data stream stream_name which is consumed
into selection input by all connected Director instances so that the blocked
token can easily be checked during routing by calling blocked_tokens.is_blocked(token).
Arguments:
stream_name: The name of the data stream to post to.token: The token to post.- Optional
ttl_s: The time to live of the token, in seconds. Defaults to 3 hours (10800 seconds) if not specified.
Example:
-- Posts the token eyJhbG213 with a TTL of 3 hours
blocked_tokens.add('token_stream', 'eyJhbG213')
-- Posts the token R5cCI6Ik with a TTL of 60 seconds
blocked_tokens.add('token_stream', 'R5cCI6Ik', 60)
blocked_tokens.is_blocked(token)
blocked_tokens.is_blocked(token) checks if the token token has been blocked
by checking if it is stored in selection input. It returns true if the token is
blocked, otherwise it returns false.
Arguments:
token: The token to check.
Example:
-- Checks if the token eyJhbG213 is blocked
blocked_tokens.is_blocked('eyJhbG213')
-- Checks if the augmented token 12345__eyJhbG213 is blocked
blocked_tokens.is_blocked(blocked_tokens.augment_token('eyJhbG213', '12345'))
blocked_tokens.is_blocked('12345__eyJhbG213')
Custom Lua Metrics functions
The router provides functions for managing custom metrics counters that will be available in the OpenMetrics format on the router’s metrics API.
increase_metrics_counter(counter_name, label_table, amount)
increase_metrics_counter(counter_name, label_table, amount) increases the
custom metrics counter counter_name by amount. The counter is identified by
the label_table which is a table of key-value pairs.
Arguments:
counter_name: The name of the counter to increase.label_table: A table of key-value pairs to identify the counter.- Optional
amount: The amount to increase the counter by. Defaults to 1 if not defined.
Example:
-- Increases the counter 'my_counter' by 1
increase_metrics_counter('my_counter', {label='foo'})
-- Increases the counter 'another_counter' by 5
increase_metrics_counter('another_counter', {label1='value1', label2='value2'}, 5)
These examples will create the following metrics:
# TYPE my_counter counter
my_counter{label="foo"} 1
# TYPE another_counter counter
another_counter{label1="value1", label2="value2"} 5
reset_metrics_counter(counter_name, label_table)
reset_metrics_counter(counter_name, label_table) removes the custom metrics
counter counter_name with the labels defined in label_table.
Arguments:
counter_name: The name of the counter to remove.label_table: A table of key-value pairs to identify the counter.
Example:
-- Removes the counter 'my_counter'
reset_metrics_counter('my_counter', {label='foo'})
-- Removes the counter 'another_counter'
reset_metrics_counter('another_counter', {label1='value1', label2='value2'})
Configuration examples
Many of the functions documented are suitable to use in host health checks. To configure host health checks, see configuring CDNs and hosts. Here are some configuration examples of using the built-in Lua functions, utilizing the example metrics:
"healthChecks": [
"gt('streamer-1.hardware_metrics.mem_available_percent', 20)", // More than 20% memory is left
"lt('streamer-1.per_interface_metrics.eths1.megabits_sent_rate', 9000)" // Current bitrate is lower than 9000 Mbps
"host_has_bw({host='streamer-1', interface='eths1', margin=1000})", // host_has_bw() uses 'streamer-1.per_interface_metrics.eths1.speed' to determine if there is enough bandwidth left with a 1000 Mbps margin
"interfaces_online({host='streamer-1', interfaces='eths1'})",
"memory_usage_ok({host='streamer-1'})",
"cpu_load_ok({host='streamer-1'})",
"health_check({host='streamer-1', interfaces='eths1'})" // Combines interfaces_online(), memory_usage_ok(), cpu_load_ok()
]
5.6.8.5.2 - Global Lua Tables
There are multiple global tables containing important data available while writing Lua code for the router.
selection_input
Contains arbitrary, custom fields fed into the router by clients, see API overview for details on how to inject data into this table.
Note that the selection_input table is iterable.
Usage examples:
print(selection_input['some_value'])
-- Iterate over table
if selection_input then
for k, v in pairs(selection_input) do
print('here is '..'selection_input!')
print(k..'='..v)
end
else
print('selection_input is nil')
end
session_groups
Defines a mapping from session group name to boolean, indicating whether
the session belongs to the session group or not.
Usage examples:
if session_groups.vod then print('vod') else print('not vod') end
if session_groups['vod'] then print('vod') else print('not vod') end
session_count
Provides counters of number of session types per session group. The table
uses the structure qoe_score.<session_type>.<session_group>.
Usage examples:
print(session_count.instream.vod)
print(session_count.initial.vod)
qoe_score
Provides the quality of experience score per host per session group. The table
uses the structure qoe_score.<host>.<session_group>.
Usage examples:
print(qoe_score.host1.vod)
print(qoe_score.host1.live)
request
Contains data related to the HTTP request between the client and the router.
request.method- Description: HTTP request method.
- Type:
string - Example:
'GET','POST'
request.body- Description: HTTP request body string.
- Type:
stringornil - Example:
'{"foo": "bar"}'
request.major_version- Description: Major HTTP version such as
xinHTTP/x.1. - Type:
integer - Example:
1
- Description: Major HTTP version such as
request.minor_version- Description: Minor HTTP version such as
xinHTTP/1.x. - Type:
integer - Example:
1
- Description: Minor HTTP version such as
request.protocol- Description: Transfer protocol variant.
- Type:
string - Example:
'HTTP','HTTPS'
request.client_ip- Description: IP address of the client issuing the request.
- Type:
string - Example:
'172.16.238.128'
request.path_with_query_params- Description: Full request path including query parameters.
- Type:
string - Example:
'/mycontent/superman.m3u8?b=y&c=z&a=x'
request.path- Description: Request path without query parameters.
- Type:
string - Example:
'/mycontent/superman.m3u8'
request.query_params- Description: The query parameter string.
- Type:
string - Example:
'b=y&c=z&a=x'
request.filename- Description: The part of the path following the final slash, if any.
- Type:
string - Example:
'superman.m3u8'
request.subnet- Description: Subnet of
client_ip. - Type:
stringornil - Example:
'all'
- Description: Subnet of
session
Contains data related to the current session.
session.client_ip- Description: Alias for
request.client_ip. See documentation for table request above.
- Description: Alias for
session.path_with_query_params- Description: Alias for
request.path_with_query_params. See documentation for table request above.
- Description: Alias for
session.path- Description: Alias for
request.path. See documentation for table request above.
- Description: Alias for
session.query_params- Description: Alias for
request.query_params. See documentation for table request above.
- Description: Alias for
session.filename- Description: Alias for
request.filename. See documentation for table request above.
- Description: Alias for
session.subnet- Description: Alias for
request.subnet. See documentation for table request above.
- Description: Alias for
session.host- Description: ID of the currently selected host for the session.
- Type:
stringornil - Example:
'host1'
session.id- Description: ID of the session.
- Type:
string - Example:
'8eb2c1bdc106-17d2ff-00000000'
session.session_type- Description: Type of the session.
- Type:
string - Example:
'initial'or'instream'. Identical to the value of theTypeargument of the session translation function.
session.is_managed- Description: Identifies managed sessions.
- Type:
boolean - Example:
trueifType/session.session_typeis'instream'
request_headers
Contains the headers from the request between the client and the router, keyed by name.
Usage example:
print(request_headers['User-Agent'])
request_query_params
Contains the query parameters from the request between the client and the router, keyed by name.
Usage example:
print(request_query_params.a)
session_query_params
Alias for metatable request_query_params.
response
Contains data related to the outgoing response apart from the headers.
response.body- Description: HTTP response body string.
- Type:
stringornil - Example:
'{"foo": "bar"}'
response.code- Description: HTTP response status code.
- Type:
integer - Example:
200,404
response.text- Description: HTTP response status text.
- Type:
string - Example:
'OK','Not found'
response.major_version- Description: Major HTTP version such as
xinHTTP/x.1. - Type:
integer - Example:
1
- Description: Major HTTP version such as
response.minor_version- Description: Minor HTTP version such as
xinHTTP/1.x. - Type:
integer - Example:
1
- Description: Minor HTTP version such as
response.protocol- Description: Transfer protocol variant.
- Type:
string - Example:
'HTTP','HTTPS'
response_headers
Contains the response headers keyed by name.
Usage example:
print(response_headers['User-Agent'])
5.6.8.5.3 - Request Translation Function
Specifies the body of a Lua function that inspects every incoming HTTP request and overwrites individual fields before further processing by the router.
Returns nil when nothing is to be changed, or HTTPRequest(t) where t
is a table with any of the following optional fields:
Method- Description: Replaces the HTTP request method in the request being processed.
- Type:
string - Example:
'GET','POST'
Path- Description: Replaces the request path in the request being processed.
- Type:
string - Example:
'/mycontent/superman.m3u8'
ClientIp- Description: Replaces client IP address in the request being processed.
- Type:
string - Example:
'172.16.238.128'
Body- Description: Replaces body in the request being processed.
- Type:
stringornil - Example:
'{"foo": "bar"}'
QueryParameters- Description: Adds, removes or replaces individual query parameters in the request being processed.
- Type: nested
table(indexed by number) representing an array of query parameters as{[1]='Name',[2]='Value'}pairs that are added to the request being processed, or overwriting existing query parameters with colliding names. To remove a query parameter from the request, specifynilas value, i.e.QueryParameters={..., {[1]='foo',[2]=nil} ...}. Returning a query parameter with a name but no value, such asain the request'/index.m3u8?a&b=22'is currently not supported.
Headers- Description: Adds, removes or replaces individual headers in the request being processed.
- Type: nested
table(indexed by number) representing an array of request headers as{[1]='Name',[2]='Value'}pairs that are added to the request being processed, or overwriting existing request headers with colliding names. To remove a header from the request, specifynilas value, i.e.Headers={..., {[1]='foo',[2]=nil} ...}. Duplicate names are supported. A multi-value header such asFoo: bar1,bar2is defined by specifyingHeaders={..., {[1]='foo',[2]='bar1'}, {[1]='foo',[2]='bar2'}, ...}.
OutgoingRequest: See Sending HTTP requests from translation functions for more information.
Example of a request_translation_function body that sets the request path
to a hardcoded value and adds the hardcoded query parameter a=b:
-- Statements go here
print('Setting hardcoded Path and QueryParameters')
return HTTPRequest({
Path = '/content.mpd',
QueryParameters = {
{'a','b'}
}
})
Arguments
The following (iterable) arguments will be known by the function:
QueryParameters
Type: nested
table(indexed by number).Description: Array of query parameters as
{[1]='Name',[2]='Value'}pairs that were present in the query string of the request. Format identical to theHTTPRequest.QueryParameters-field specified for the return value above.Example usage:
for _, queryParam in pairs(QueryParameters) do print(queryParam[1]..'='..queryParam[2]) end
Headers
Type: nested
table(indexed by number).Description: Array of request headers as
{[1]='Name',[2]='Value'}pairs that were present in the request. Format identical to theHTTPRequest.Headers-field specified for the return value above. A multi-value header such asFoo: bar1,bar2is seen inrequest_translation_functionasHeaders={..., {[1]='foo',[2]='bar1'}, {[1]='foo',[2]='bar1'}, ...}.Example usage:
for _, header in pairs(Headers) do print(header[1]..'='..header[2]) end
Additional Data
In addition to the arguments above, the following Lua tables, documented in Global Lua Tables, provide additional data that is available when executing the request translation function:
If the request translation function modifies the request, the request,
request_query_params and request_headers tables will be updated with the
modified request and made available to the routing rules.
5.6.8.5.4 - Session Translation Function
Specifies the body of a Lua function that inspects a newly created session and may override its suggested type from “initial” to “instream” or vice versa. A number of helper functions are provided to simplify changing the session type.
Returns nil when the session type is to remain unchanged, or Session(t)
where t is a table with a single field:
Type- Description: New type of the session.
- Type:
string - Example:
'instream','initial'
OutgoingRequest: See Sending HTTP requests from translation functions for more information.
Basic Configuration
It is possible to configure the maximum number of simultaneous managed sessions
on the router. If the maximum number is reached, no more managed sessions can be
created. Using confcli, it can be configured by running
$ confcli services.routing.tuning.general.maxActiveManagedSessions
{
"maxActiveManagedSessions": 1000
}
$ confcli services.routing.tuning.general.maxActiveManagedSessions 900
services.routing.tuning.general.maxActiveManagedSessions = 900
Common Arguments
While executing the session translation function, the following arguments are available:
Type: The current type of the session ('instream'or'initial').
Usage examples:
-- Flip session type
local newType = 'initial'
if Type == 'initial' then
newType = 'instream'
end
print('Changing session type from ' .. Type .. ' to ' .. newType)
return Session({['Type'] = newType})
Session Translation Helper Functions
The standard Lua library prodives four helper functions to simplify the configuration of the session translation function:
set_session_type(session_type)
This function will set the session type to the supplied session_type and
the maximum number of sessions of that type has not been reached.
Parameters
session_type: The type of session to create, possible values are ‘initial’ or ‘instream’.
Usage Examples
return set_session_type('instream')
return set_session_type('initial')
set_session_type_if_in_group(session_type, session_group)
This function will set the session type to the supplied session_type if the
session is part of session_group and the maximum number of sessions of that
type has not been reached.
Parameters
session_type: The type of session to create, possible values are ‘initial’ or ‘instream’.session_group: The name of the session group.
Usage Examples
return set_session_type_if_in_group('instream', 'sg1')
set_session_type_if_in_all_groups(session_type, session_groups)
This function will set the session type to the supplied session_type if the
session is part of all session groups given by session_groups and the maximum
number of sessions of that type has not been reached.
Parameters
session_type: The type of session to create, possible values are ‘initial’ or ‘instream’.session_groups: A list of session group names.
Usage Examples
return set_session_type_if_in_all_groups('instream', {'sg1', 'sg2'})
set_session_type_if_in_any_group(session_type)
This function will set the session type to the supplied session_type if the
session is part of one or more of the session groups given by session_groups
and the maximum number of sessions of that type has not been reached.
Parameters
session_type: The type of session to create, possible values are ‘initial’ or ‘instream’.session_groups: A list of session group names.
Usage Examples
return set_session_type_if_in_any_group('instream', {'sg1', 'sg2'})
Configuration
Using confcli, example of how the functions above can be used in the session
translation function can be configured by running any of
$ confcli services.routing.translationFunctions.session "return set_session_type('instream')"
services.routing.translationFunctions.session = "return set_session_type('instream')"
$ confcli services.routing.translationFunctions.session "return set_session_type_if_in_group('instream', 'sg1')"
services.routing.translationFunctions.session = "return set_session_type_if_in_group('instream', 'sg1')"
$ confcli services.routing.translationFunctions.session "return set_session_type_if_in_all_groups('instream', {'sg1', 'sg2'})"
services.routing.translationFunctions.session = "return set_session_type_if_in_all_groups('instream', {'sg1', 'sg2'})"
$ confcli services.routing.translationFunctions.session "return set_session_type_if_in_any_group('instream', {'sg1', 'sg2'})"
services.routing.translationFunctions.session = "return set_session_type_if_in_any_group('instream', {'sg1', 'sg2'})"
Additional Data
In addition to the arguments above, the following Lua tables, documented in Global Lua Tables, provide additional data that is available when executing the response translation function:
The selection_input table will not change while a routing request is handled.
A request_translation_function and the corresponding
response_translation_function will see the same selection_input table, even
if the selection data is updated while the request is being handled.
5.6.8.5.5 - Host Request Translation Function
The host request translation function defines a Lua function that modifies
HTTP requests sent to a host. These hosts are configured in
services.routing.hostGroups.
Hosts can receive requests for a manifest. A regular host will respond with the manifest itself, while a redirecting host and a DNS host will respond with a redirection to a streamer. This function can modify all these types of requests.
The function returns nil when nothing is to be changed, or HTTPRequest(t)
where t is a table with any of the following optional fields:
Method- Description: Replaces the HTTP request method in the request being processed.
- Type:
string - Example:
'GET','POST'
Path- Description: Replaces the request path in the request being processed.
- Type:
string - Example:
'/mycontent/superman.m3u8'
Body- Description: Replaces body in the request being processed.
- Type:
stringornil - Example:
'{"foo": "bar"}'
QueryParameters- Description: Adds, removes or replaces individual query parameters in the request being processed.
- Type: nested
table(indexed by number) representing an array of query parameters as{[1]='Name',[2]='Value'}pairs that are added to the request being processed, or overwriting existing query parameters with colliding names. To remove a query parameter from the request, specifynilas value, i.e.QueryParameters={..., {[1]='foo',[2]=nil} ...}. Returning a query parameter with a name but no value, such asain the request'/index.m3u8?a&b=22'is currently not supported.
Headers- Description: Adds, removes or replaces individual headers in the request being processed.
- Type: nested
table(indexed by number) representing an array of request headers as{[1]='Name',[2]='Value'}pairs that are added to the request being processed, or overwriting existing request headers with colliding names. To remove a header from the request, specifynilas value, i.e.Headers={..., {[1]='foo',[2]=nil} ...}. Duplicate names are supported. A multi-value header such asFoo: bar1,bar2is defined by specifyingHeaders={..., {[1]='foo',[2]='bar1'}, {[1]='foo',[2]='bar2'}, ...}.
Host- Description: Replaces the host that the request is sent to.
- Type:
string - Example:
'new-host.example.com','192.0.2.7'
Port- Description: Replaces the TCP port that the request is sent to.
- Type:
number - Example:
8081
Protocol- Description: Decides which protocol that will be used for sending the
request. Valid protocols are
'HTTP'and'HTTPS'. - Type:
string - Example:
'HTTP','HTTPS'
- Description: Decides which protocol that will be used for sending the
request. Valid protocols are
OutgoingRequest: See Sending HTTP requests from translation functions for more information.
Example of a host_request_translation_function body that sets the request path
to a hardcoded value and adds the hardcoded query parameter a=b:
-- Statements go here
print('Setting hardcoded Path and QueryParameters')
return HTTPRequest({
Path = '/content.mpd',
QueryParameters = {
{'a','b'}
}
})
Arguments
The following (iterable) arguments will be known by the function:
QueryParameters
Type: nested
table(indexed by number).Description: Array of query parameters as
{[1]='Name',[2]='Value'}pairs that are present in the query string of the request from the client to the router. Format identical to theHTTPRequest.QueryParameters-field specified for the return value above.Example usage:
for _, queryParam in pairs(QueryParameters) do print(queryParam[1]..'='..queryParam[2]) end
Headers
Type: nested
table(indexed by number).Description: Array of request headers as
{[1]='Name',[2]='Value'}pairs that are present in the request from the client to the router. Format identical to theHTTPRequest.Headers-field specified for the return value above. A multi-value header such asFoo: bar1,bar2is seen inhost_request_translation_functionasHeaders={..., {[1]='foo',[2]='bar1'}, {[1]='foo',[2]='bar1'}, ...}.Example usage:
for _, header in pairs(Headers) do print(header[1]..'='..header[2]) end
Global Tables
The following non-iterable global tables are available for use by the
host_request_translation_function.
Table outgoing_request
The outgoing_request table contains the request that is to be sent to the
host.
outgoing_request.method- Description: HTTP request method.
- Type:
string - Example:
'GET','POST'
outgoing_request.body- Description: HTTP request body string.
- Type:
stringornil - Example:
'{"foo": "bar"}'
outgoing_request.major_version- Description: Major HTTP version such as
xinHTTP/x.1. - Type:
integer - Example:
1
- Description: Major HTTP version such as
outgoing_request.minor_version- Description: Minor HTTP version such as
xinHTTP/1.x. - Type:
integer - Example:
1
- Description: Minor HTTP version such as
outgoing_request.protocol- Description: Transfer protocol variant.
- Type:
string - Example:
'HTTP','HTTPS'
Table outgoing_request_headers
Contains the request headers from the request that is to be sent to the host, keyed by name.
Example:
print(outgoing_request_headers['X-Forwarded-For'])
Multiple values are separated with a comma.
Additional Data
In addition to the arguments above, the following Lua tables, documented in Global Lua Tables, provide additional data that is available when executing the request translation function:
5.6.8.5.6 - Response Translation Function
Specifies the body of a Lua function that inspects every outgoing HTTP response and overwrites individual fields before being sent to the client.
Returns nil when nothing is to be changed, or HTTPResponse(t) where t
is a table with any of the following optional fields:
Code- Description: Replaces status code in the response being sent.
- Type:
integer - Example:
200,404
Text- Description: Replaces status text in the response being sent.
- Type:
string - Example:
'OK','Not found'
MajorVersion- Description: Replaces major HTTP version such as
xinHTTP/x.1in the response being sent. - Type:
integer - Example:
1
- Description: Replaces major HTTP version such as
MinorVersion- Description: Replaces minor HTTP version such as
xinHTTP/1.xin the response being sent. - Type:
integer - Example:
1
- Description: Replaces minor HTTP version such as
Protocol- Description: Replaces protocol in the response being sent.
- Type:
string - Example:
'HTTP','HTTPS'
Body- Description: Replaces body in the response being sent.
- Type:
stringornil - Example:
'{"foo": "bar"}'
Headers- Description: Adds, removes or replaces individual headers in the response being sent.
- Type: nested
table(indexed by number) representing an array of response headers as{[1]='Name',[2]='Value'}pairs that are added to the response being sent, or overwriting existing request headers with colliding names. To remove a header from the response, specifynilas value, i.e.Headers={..., {[1]='foo',[2]=nil} ...}. Duplicate names are supported. A multi-value header such asFoo: bar1,bar2is defined by specifyingHeaders={..., {[1]='foo',[2]='bar1'}, {[1]='foo',[2]='bar2'}, ...}.
OutgoingRequest: See Sending HTTP requests from translation functions for more information.
Example of a response_translation_function body that sets the Location
header to a hardcoded value:
-- Statements go here
print('Setting hardcoded Location')
return HTTPResponse({
Headers = {
{'Location', 'cdn1.com/content.mpd?a=b'}
}
})
Arguments
The following (iterable) arguments will be known by the function:
Headers
Type: nested
table(indexed by number).Description: Array of response headers as
{[1]='Name',[2]='Value'}pairs that are present in the response being sent. Format identical to theHTTPResponse.Headers-field specified for the return value above. A multi-value header such asFoo: bar1,bar2is seen inresponse_translation_functionasHeaders={..., {[1]='foo',[2]='bar1'}, {[1]='foo',[2]='bar1'}, ...}.Example usage:
for _, header in pairs(Headers) do print(header[1]..'='..header[2]) end
Additional Data
In addition to the arguments above, the following Lua tables, documented in Global Lua Tables, provide additional data that is available when executing the response translation function:
5.6.8.5.7 - Sending HTTP requests from translation functions
It is possible to configure all translation functions to send HTTP requests. If an outgoing request is sent in a translation function, the Director will delay the response to the incoming request until the outgoing request has been completed. Note that the response to the outgoing request is not handled by the Director, it only waits for the outgoing request to complete.
Requests can be sent from any translation function by defining the table
OutgoingRequest in the translation function return value:
{
OutgoingRequest = {
Method = "HEAD",
Protocol = "HTTP",
Host = "example.com",
Port = 8080,
Path = "/example/path",
EncodeURL = true,
QueryParameters = {{"param1", "value1"}, {"param2", "value2"}},
Headers = {{"x-header", "header-value"}, {"Authorization", "Basic dXNlcjpwYXNz"}}
}
}
The following fields for OutgoingRequest are supported:
Method: The HTTP method to use. Defaults toHEAD.Protocol: The protocol to use. Defaults to the protocol of the incoming request.Host: The host to send the request to.Port: The port to send the request to. Defaults to 80 ifProtocolisHTTPand 443 ifProtocolisHTTPS.Path: The path to send the request to. Defaults to/.EncodeURL: A boolean value that determines if the URL should be percent-encoded. Defaults totrue. WARNING: Not encoding the URL is not HTTP compliant and might cause issues with some servers. Use with caution. See RFC 1738 for more information.QueryParameters: A list of query parameters to include in the request. Note that the query parameters are defined as two-element lists in Lua.Headers: A Lua table of headers to include in the request. Note that if the header name contains a dash-, it must be defined as a two-element list as seen in the example above.Body: A string containing the body of the request. If this field is not defined, no body will be included in the request. If it is defined, theContent-Lengthheader, with the length of the body, will be added to the request.
All fields except Host are optional.
Using the example above, the following response translation function
will make the Director can send a GET request to
http://example.com:8080/example/path?param1=value1¶m2=value2 with the
headers x-header: x-value and Authorization: Basic dXNlcjpwYXNz:
return HTTPResponse({
OutgoingRequest = {
Method = "HEAD",
Protocol = "HTTP",
Host = "example.com",
Port = 8080,
Path = "/example/path",
QueryParameters = {{"param1", "value1"}, {"param2", "value2"}},
Headers = {{"x-header", "x-value"}, {"Authorization", "Basic dXNlcjpwYXNz"}}
}
})
Using log level 4, the outgoing request can be seen in the Director logs:
DEBUG orc-re-work-0 AsyncRequestSender: Sending request: url=http://example.com/example/path?param1=value1¶m2=value2
DEBUG orc-re-work-0 CDNManager: OutboundContentConn: example.com:8080: Connecting to target CDN example.com:8080
DEBUG orc-re-work-0 ClientConn: 192.168.103.16/28:60201/https: Sent a Lua request: outstanding-requests=1
DEBUG orc-re-work-0 CDNManager: OutboundContentConn: example.com:8080: Target CDN connection established.
DEBUG orc-re-work-0 CDNManager: OutboundContentConn: example.com:8080: Sending request to target CDN:
GET /example/path?param1=value1¶m2=value2 HTTP/1.0
Authorization: Basic dXNlcjpwYXNz
Host: example.com:8080
x-header: x-value
5.6.9 - Trusted proxies
When a request with the header X-Forwarded-For is sent to the router, the
router will check if the client is in the list of trusted proxies. If the client
is not a trusted proxy, the router will drop the connection, returning an empty
reply to the client. If the client is a trusted proxy, the IP address defined
in the X-Forwarded-For will be regarded as the client’s IP address.
The list of trusted proxies can be configured by modifying the configuration
field services.routing.settings.trustedProxies with the IP addresses of
trusted proxies:
$ confcli services.routing.settings.trustedProxies -w
Running wizard for resource 'trustedProxies'
<A list of IP addresses from which the proxy IP address of requests with the X-Forwarded-For header defined are checked. If the IP isn't in this list, the connection is dropped. (default: [])>
Hint: Hitting return will set a value to its default.
Enter '?' to receive the help string
trustedProxies <A list of IP addresses from which the proxy IP address of requests with the X-Forwarded-For header defined are checked. If the IP isn't in this list, the connection is dropped. (default: [])>: [
trustedProxy (default: ): 1.2.3.4
Add another 'trustedProxy' element to array 'trustedProxies'? [y/N]: n
]
Generated config:
{
"trustedProxies": [
"1.2.3.4"
]
}
Merge and apply the config? [y/n]: y
Note that by configuring 0.0.0.0/0 as a trusted proxy, all proxied requests
will be trusted.
5.6.10 - Confd Auto Upgrade Tool
The confd-auto-upgrade tool is a simple utility to automatically migrate the confd
configuration schema between different versions of the Director. Starting with version
1.12.0, it is possible to automatically apply the necessary configuration changes in a
controlled and predictable manner. While this tool is intended to help transition the
configuration format between the different versions, it is not a substitute for proper
backups, and while downgrading to an earlier version, it may not be possible to recover
previously modified or deleted configuration values.
When using the tool, both the “from” and “to” versions must be specified. Internally, the tool will calculate a list of migrations which must be applied to transition between the given versions, and apply them, outputting the final configuration to standard output. The current configuration can either be piped in to the tool via standard input, or supplied as a static file. Providing a “from” version which is later than the “to” version will result in the downgrade migrations being applied in reverse order, effectively downgrading the configuration to the lower version.
For convenience, the tool is deployed to the ACD Nodes automatically at install time as a standard Podman container, however since it is not intended to run as a service, only the image will be present, not a running container.
Performing the Upgrade
In the following example scenario, a system with version 1.10.1 has been upgraded
to 1.14.0. Before upgrading a backup of the configuration was taken and saved to
current_config.json.
Using the image and tag as determined in the above section. Issue the following command:
cat current_config.json | \
podman run -i --rm images.edgeware.tv/acd-confd-migration:1.14.0 \
--in - --from 1.10.1 --to 1.14.0 \
| tee upgraded_config.json
In the above example, the updated configuration is saved to upgraded_config.json.
It is recommended to manually verify the generated configuration, and after
which apply the config to confd by using cat upgraded_config.json | confcli -i.
It is also possible to combine the two commands, by piping the output of the auto-upgrade
tool directly to confcli -i. E.g.
cat current_config.json | podman run ... | tee upgraded_config.json | confcli -i
This will save a backup of the upgraded configuration to upgraded_config.json and
at the same time apply the changes to confd immediately.
Downgrading the Configuration
The steps for downgrading the configuration are exactly the same as for upgrade except for the --from
and --to versions should be swapped. E.g. --from 1.14.0 --to 1.10.1. Keep in mind however,
that during an upgrade some configuration properties may have been deleted or modified, and while
downgrading over those steps, some data loss may occur. In those cases, it may be easier and safer
to simply restore from backup. In most cases where configuration properties are removed during upgrade,
the corresponding downgrade will simply restore the default values of those properties.
5.7 - Operations
This guide describes how to perform day-to-day operations of the ACD Router and its associated services, collectively known as the Director.
Component Overview
To effectively operate the Director software, it is important to understand the composition of the various software components and how they are deployed.
Each Director instance functions as an independent system, comprising multiple containerized services. These containers are managed by a standard container runtime and are seamlessly integrated with the host’s operating system to enhance the overall operator experience.
The containers are managed by the Podman container runtime, which operates without additional daemon services running on the host. Unlike Docker, Podman manages each container as a separate process, eliminating the reliance on a shared daemon and mitigating the risk of a single-point-of-failure scenario.
Although several distinct services make up the Director, the primary component is the router. The router is responsible for listening for incoming requests, processing the request, and redirecting the client to the appropriate host, or CDN to deliver the requested content.
Two additional containers are responsible for configuration management. Those are
confd and confd-transformer. The former manages a local database of configuration
metadata and provides a REST API for managing the configuration. The confd-transformer
simply listens for configuration changes from confd and adapts that configuration
to a format suitable for the router to ingest. For additional information about
setting up and using confd see here..
The next two components, the edns-proxy and the convoy-bridge allow the router
to communicate with an EDNS server for EDNS-based routing, and with synchronization
with Convoy respectively. Additional information about the EDNS-Proxy is available
here.. For the Convoy Bridge
service see here..
The remaining containers are useful for metrics, monitoring, and alerting. These
include prometheus and grafana for monitoring and analytics, and alertmanager
for monitoring and alarms.
5.7.1 - Services
Each container shipped with the Director is fully-integrated with the systemd
service on the host, enabling easy management using standard systemd commands.
The logs for each container are also full-integrated with journald to simplify
troubleshooting.
In order to integrate the Podman containers with systemd, a common prefix
of acd- has been applied to each service name. For example the router
container is managed by the service acd-router, and the confd container
is managed by the service acd-confd. These same prefixed names apply while
fetching logs via journald. This common prefix aids in grouping the related
services as well as provides simpler filtering for tab-completion.
Starting / Stopping Services
Standard systemd commands should be used to start and stop the services.
systemctl start acd-router- Starts theroutercontainer.systemctl stop acd-router- Stops theroutercontainer.systemctl status acd-router- Displays the status of theroutercontainer.
Due to the limitation of needing the acd- prefix, it provides the ability to
work with all ACD services in a group. For example:
systemctl status 'acd-*'- Display the status of all installed ACD components.systemctl start 'acd-*'- Start all ACD components.
Logging
Each ACD component corresponds to a journal entry with the same unit name, with
the acd- prefix. Standard journald commands can be used to view and manage the
logging.
journalctl -u acd-router- Display the logs for theroutercontainer
Access Log
Refer to Access Logging.
Troubleshooting
Some additional logging may be available in the filesystem, the paths of which can
be determined by executing the ew-sysinfo command. See
Diagnostics. for additional details.
5.7.2 - Geographic Databases
To do geographic based routing, the Director uses geographic location databases. The databases need to be on the format provided by MaxMind.
When first installed, the Director comes with example databases. These are only suitable for testing and evaluation, if geographic routing is to be used in production, proper databases need to be obtained from MaxMind.
For the Director to find them, each database needs to have a specific filename. Three databases are supported:
| Type | Filename |
|---|---|
| City and Country | /opt/edgeware/acd/geoip2/GeoIP2-City.mmdb |
| ASN | /opt/edgeware/acd/geoip2/GeoLite2-ASN.mmdb |
| Anonymous IP | /opt/edgeware/acd/geoip2/GeoIP2-Anonymous-IP.mmdb |
When updating the database files, the new file is copied over the old file. After that the Director has to be told to reload it. This is done by typing the following:
podman kill --signal HUP router
5.8 - Convoy Bridge
The convoy-bridge is an optional integration service, pre-installed alongside the router which provides two-way communication between the router and a separate Convoy installation.
The convoy-bridge is designed to allow the Convoy account metadata to be available from within the router for such use-cases as inserting the account specific prefixes in the redirect URL and validating per-account internal security tokens. The service works by periodically polling the Convoy server for changes to the configuration, and when detected, the relevant configuration information is pushed to the router.
In addition, the convoy-bridge has the ability to integrate the router with the Convoy analytics service, such that client sessions started by the router are properly collected by Convoy, and are available in the dashboards.
Configuration
The convoy-bridge service is configured using confcli on the router host.
All configuration for the convoy-bridge exists under the path
integration.convoy.bridge.
{
"logLevel": "info",
"accounts": {
"enabled": true,
"dbUrl": "mysql://convoy:eith7jee@convoy:3306",
"dbPollInterval": 60
},
"analytics": {
"enabled": true,
"brokers": ["broker1:9092", "broker2:9092"],
"batchInterval": 10,
"maxBatchSize": 500
},
"otherRouters": [
{
"url": "https://router2:5001",
"apiKey": "key1",
"validateCerts": true
}
]
}
In the above configuration block, there are three main sections. The accounts
section enables fetching account metadata from Convoy towards the router. The
analytics section controls the integration between the router and the Convoy
analytics service. The otherRouters section is used to synchronize additional
router instances. The local router instance will always be implicitly included.
Additional routers listed in this section will be handled by this instance of
the convoy-bridge service.
Logging
The logs are available in the system journal and can be viewed using:
journalctl -u acd-convoy-bridge
5.9 - Monitoring
5.9.1 - Access logging
Access logging is activated by default and can be enabled/disabled by running
$ confcli services.routing.tuning.general.accessLog true
$ confcli services.routing.tuning.general.accessLog false
Requests are logged in the combined log format and can be found at
/var/log/acd-router/access.log. Additionally, the symbolic link
/opt/edgeware/acd/router/log points to /var/log/acd-router, allowing
the access logs to also be found at /opt/edgeware/acd/router/log/access.log.
Example Output
$ cat /var/log/acd-router/access.log
May 29 07:20:00 router[52236]: ::1 - - [29/May/2023:07:20:00 +0000] "GET /vod/batman.m3u8 HTTP/1.1" 302 0 "-" "curl/7.61.1"
Access Log Rotation
Access logs are rotated and compressed once the access log file reaches a size of 100 MB. By default, 10 rotated logs are stored before being rotated out. These rotation parameters can be reconfigured by editing the lines
size 100M
rotate 10
in /etc/logrotate.d/acd-router-access-log. For more log rotation configuration
possibilites, refer to the
Logrotate documentation.
5.9.2 - System troubleshooting
ESB3024 contains the tool ew-sysinfo that gives an overview of how the
system is doing. Simply use the command and the tool will output information
about the system and the installed ESB3024 services.
The output format can be changed using the --format flag, possible values
are human (default) and json, e.g.:
$ ew-sysinfo
system:
os: ['5.4.17-2136.321.4.el8uek.x86_64', 'Oracle Linux Server 8.8']
cpu_cores: 2
cpu_load_average: [0.03, 0.03, 0.0]
memory_usage: 478 MB
memory_load_average: [0.03, 0.03, 0.0]
boot_time: 2023-09-08T08:30:57Z
uptime: 6 days, 3:43:44.640665
processes: 122
open_sockets:
ipv4: 12
ipv6: 18
ip_total: 30
tcp_over_ipv4: 9
tcp_over_ipv6: 16
tcp_total: 25
udp_over_ipv4: 3
udp_over_ipv6: 2
udp_total: 5
total: 145
system_disk (/):
total: 33271 MB
used: 7978 MB (24.00%)
free: 25293 MB
journal_disk (/run/log/journal):
total: 1954 MB
used: 217 MB (11.10%)
free: 1736 MB
vulnerabilities:
meltdown: Mitigation: PTI
spectre_v1: Mitigation: usercopy/swapgs barriers and __user pointer sanitization
spectre_v2: Mitigation: Retpolines, STIBP: disabled, RSB filling, PBRSB-eIBRS: Not affected
processes:
orc-re:
pid: 177199
status: sleeping
cpu_usage_percent: 1.0%
cpu_load_average: 131.11%
memory_usage: 14 MB (0.38%)
num_threads: 10
hints:
get_raw_router_config: cat /opt/edgeware/acd/router/cache/config.json
get_confd_config: cat /opt/edgeware/acd/confd/store/__active
get_router_logs: journalctl -u acd-router
get_edns_proxy_logs: journalctl -u acd-edns-proxy
check_firewall_status: systemctl status firewalld
check_firewall_config: iptables -nvL# For --format=json, it's recommended to pipe the output to a JSON interpreter
# such as jq
$ ew-sysinfo --format=json | jq
{
"system": {
"os": [
"5.4.17-2136.321.4.el8uek.x86_64",
"Oracle Linux Server 8.8"
],
"cpu_cores": 2,
"cpu_load_average": [
0.01,
0.0,
0.0
],
"memory_usage": "479 MB",
"memory_load_average": [
0.01,
0.0,
0.0
],
"boot_time": "2023-09-08 08:30:57",
"uptime": "6 days, 5:12:24.617114",
"processes": 123,
"open_sockets": {
"ipv4": 13,
"ipv6": 18,
"ip_total": 31,
"tcp_over_ipv4": 10,
"tcp_over_ipv6": 16,
"tcp_total": 26,
"udp_over_ipv4": 3,
"udp_over_ipv6": 2,
"udp_total": 5,
"total": 146
}
},
"system_disk (/)": {
"total": "33271 MB",
"used": "7977 MB (24.00%)",
"free": "25293 MB"
},
"journal_disk (/run/log/journal)": {
"total": "1954 MB",
"used": "225 MB (11.50%)",
"free": "1728 MB"
},
"vulnerabilities": {
"meltdown": "Mitigation: PTI",
"spectre_v1": "Mitigation: usercopy/swapgs barriers and __user pointer sanitization",
"spectre_v2": "Mitigation: Retpolines, STIBP: disabled, RSB filling, PBRSB-eIBRS: Not affected"
},
"processes": {
"orc-re": {
"pid": 177199,
"status": "sleeping",
"cpu_usage_percent": "0.0%",
"cpu_load_average": "137.63%",
"memory_usage": "14 MB (0.38%)",
"num_threads": 10
}
}
}Note that your system might have different monitored processes and field names.
The field hints is different from the rest. It lists common commands
that can be used to further monitor system performance, useful for
quickly troubleshooting a faulty system.
5.9.3 - Scraping data with Prometheus
Prometheus is a third-party data scraper which is installed as a containerized service in the default installation of ESB3024 Router. It periodically reads metrics data from different services, such as acd-router, aggregates it and makes it available to other services that visualize the data. Those services include Grafana and Alertmanager.
The Prometheus configuration file can be found on the host at
/opt/edgeware/acd/prometheus/prometheus.yaml.
Accessing Prometheus
Prometheus has a web interface that is listening for HTTP connections on port 9090. There is no authentication, so anyone who has access to the host that is running Prometheus can access the interface.
Starting / Stopping Prometheus
After the service is configured, it can be managed via systemd, under the
service unit acd-prometheus.
systemctl start acd-prometheus
Logging
The container logs are automatically published to the system journal, under
the same unit descriptor, and can be viewed using journalctl
journalctl -u acd-prometheus
5.9.4 - Visualizing data with Grafana
5.9.4.1 - Managing Grafana
Grafana displays graphs based on data from Prometheus. A default deployment of Grafana is running in a container alongside ESB3024 Router.
Grafana’s configuration and runtime files are stored under
/opt/edgeware/acd/grafana. It comes with default dashboards that are
documented at Grafana dashboards.
Accessing Grafana
Grafana’s web interface is listening for HTTP connections on port
3000. It has two default accounts, edgeware and admin.
The edgeware account can only view graphs, while the admin account can also
edit graphs. The accounts with default passwords are shown in the table below.
| Account | Default password |
|---|---|
edgeware | edgeware |
admin | edgeware |
Starting / Stopping Grafana
Grafana can be managed via systemd, under the service unit acd-grafana.
systemctl start acd-grafana
Logging
The container logs are automatically published to the system journal, under
the same unit descriptor, and can be viewed using journalctl
journalctl -u acd-grafana
5.9.4.2 - Grafana Dashboards
Grafana will be populated with pre-configured graphs which present some metrics on a time scale. Below is a comprehensive list of those dashboards, along with short descriptions.
Router Monitoring dashboard
This dashboard is by default set as home directory - it’s what user will see
after logging in.
Number Of Initial Routing Decisions
HTTP Status Codes
Total number of responses sent back to incoming requests, shown by their status codes. Metric: client-response-status
Incoming HTTP and HTTPS Requests
Total number of incoming requests that were deemed valid, divided into SSL
and Unencrypted categories.
Metric: num_valid_http_requests
Debugging Information dashboard
Number of Lua Exceptions
Number of exceptions encountered so far while evaluating Lua rules. Metric: lua_num_errors
Number of Lua Contexts
Number of active Lua interpreters, both running and idle. Metric: lua_num_evaluators
Time Spent In Lua
Number of microseconds the Lua interpreters were running. Metric: lua_time_spent
Router Latencies
Histogram-like graph showing how many responses were sent within the given latency interval. Metric: orc_latency_bucket
Internal debugging
A folder that contains dashboards intended for internal use.
ACD: Incoming Internet Connections dashboard
SSL Warnings
Rate of warnings logged during TLS connections Metric: num_ssl_warnings_total
SSL Errors
Rate of errors logged during TLS connections Metric: num_ssl_errors_total
Valid Internet HTTPS Requests
Rate of incoming requests that were deemed valid, HTTPS only. Metric: num_valid_http_requests
Invalid Internet HTTPS Requests
Rate of incoming requests that were deemed invalid, HTTPS only. Metric: num_invalid_http_requests
Valid Internet HTTP Requests
Rate of incoming requests that were deemed valid, HTTP only. Metric: num_valid_http_requests
Invalid Internet HTTP Requests
Rate of incoming requests that were deemed invalid, HTTP only. Metric: num_invalid_http_requests
Prometheus: ACD dashboard
Logged Warnings
Rate of logged warnings since the router has started, divided into CDN-related and CDN-unrelated. Metric: num_log_warnings_total
Logged Errors
Rate of logged errors since the router has started. Metric: num_log_errors_total
HTTP Requests
Rate of responses sent to incoming connections. Metric: orc_latency_count
Number Of Active Sessions
Number of sessions opened on router that are still active. Metric: num_sessions
Total Number Of Sessions
Total number of sessions opened on router. Metric: num_sessions
Session Type Counts (Non-Stacked)
Number of active sessions divided by type; see metric documentation linked below for up-to-date list of types. Metric: num_sessions
Prometheus/ACD: Subrunners
Client Connections
Number of currently open client connections per subrunner. Metric: subrunner_client_conns
Asynchronous Queues (Current)
Number of queued events per subrunner, roughly corresponding to load. Metric: subrunner_async_queue
Used <Send/receive> Data Blocks
Number of send or receive data blocks currently in use per subrunner, as decided by the “Send/receive” drop down box. Metric: subrunner_used_send_data_blocks and subrunner_used_receive_data_blocks
Asynchronous Queues (Max)
Maximum number of events waiting in queue. Metric: subrunner_max_async_queue
Total <Send/receive> Data Blocks
Number of send or receive data blocks allocated per subrunner, as decided by the “Send/receive” drop down box. Metric: subrunner_total_send_data_blocks and subrunner_total_receive_data_blocks
Low Queue (Current)
Number of low priority events queued per subrunner. Metric: subrunner_low_queue
Medium Queue (Current)
Number of medium priority events queued per subrunner. Metric: subrunner_medium_queue
High Queue (Current)
Number of high priority events queued per subrunner. Metric: subrunner_high_queue
Low Queue (Max)
Maximum number of events waiting in low priority queue. Metric: subrunner_max_low_queue
Medium Queue (Max)
Maximum number of events waiting in medium priority queue. Metric: subrunner_max_medium_queue
High Queue (Max)
Maximum number of events waiting in high priority queue. Metric: subrunner_max_high_queue
Wakeups
The number of times a subrunner has been waken up from sleep. Metric: subrunner_io_wakeups
Overloaded
The number of times the number of queued events for a subrunner exceeded its maximum. Metric: subrunner_times_worker_overloaded
Autopause
Number of sockets that have been automatically paused. This happens when the work manager is under heavy load. Metric: subrunner_io_autopause_sockets
5.9.5 - Alarms and Alerting
Alerts are generated by the third-party service Prometheus, which sends them to the Alertmanager service. A default containerized instance of Alertmanager is deployed alongside ESB3024 Router. Out of the box, Alertmanager ships with only a sample configuration file, and will require manual configuration prior to enabling the alerting functionality. Due to the many different possible configurations for how alerts are both detected and where they are pushed, the official Alertmanager documentation should be followed for how to configure the service.
The router ships with Alertmanager 0.25, the documentation
for which can be found at prometheus.io.
The Alertmanager configuration file can be found on the host at
/opt/edgeware/acd/alertmanager/alertmanager.yml.
Accessing Alertmanager
Alertmanager has a web interface that is listening for HTTP connections on port 9093. There is no authentication, so anyone who has access to the host that is running Alertmanager can access the interface.
Starting / Stopping Alertmanager
After the service is configured, it can be managed via systemd, under the
service unit acd-alertmanager.
systemctl start acd-alertmanager
Logging
The container logs are automatically published to the system journal, under
the same unit descriptor, and can be viewed using journalctl
journalctl -u acd-alertmanager
5.9.6 - Monitoring multiple routers
By default an instance of Prometheus only monitors the ESB3024 Router that is installed on the same host as where Prometheus is installed. It is possible to make it monitor other router instances and visualize all instances on one Grafana instance.
Configuring of Prometheus
This is configured in the scraping configuration of Prometheus, which is found
in the file /opt/edgeware/acd/prometheus/prometheus.yaml, which typically
looks like this:
global:
scrape_interval: 15s
rule_files:
- recording-rules.yaml
# A scrape configuration for router metrics
scrape_configs:
- job_name: 'router-scraper'
scheme: https
tls_config:
insecure_skip_verify: true
static_configs:
- targets:
- acd-router-1:5001
metrics_path: /m1/v1/metrics
honor_timestamps: true
- job_name: 'edns-proxy-scraper'
scheme: http
static_configs:
- targets:
- acd-router-1:8888
metrics_path: /metrics
honor_timestamps: true
More routers can be added to the scrape configuration by simply adding more
routers under targets in the scraper jobs.
For instance, to monitor acd-router-2 and acd-router-3 along acd-router-1,
the configuration file needs to be modified like this:
global:
scrape_interval: 15s
rule_files:
- recording-rules.yaml
# A scrape configuration for router metrics
scrape_configs:
- job_name: 'router-scraper'
scheme: https
tls_config:
insecure_skip_verify: true
static_configs:
- targets:
- acd-router-1:5001
- acd-router-2:5001
- acd-router-3:5001
metrics_path: /m1/v1/metrics
honor_timestamps: true
- job_name: 'edns-proxy-scraper'
scheme: http
static_configs:
- targets:
- acd-router-1:8888
- acd-router-2:8888
- acd-router-3:8888
metrics_path: /metrics
honor_timestamps: true
After the file has been modified, Prometheus needs to be restarted by typing
systemctl restart acd-prometheus
It is possible to use the same configuration on multiple routers, so that all routers in a deployment can monitor each other.
Selecting Router in Grafana
In the top left corner the Grafana dashboards have a drop-down menu labeled “ACD Router”, which allows to choose which router to monitor.
5.9.7 - Routing Rule Evaluation Metrics
ESB3024 Router counts the number of times a node and any of its children is selected in the routing table.
The visit counters can be retrieved with the following end points:
/v1/node_visits
Returns visit counters for each node as a flat list of
host:counterpairs in JSON.Example output:
{ "node1": "1", "node2": "1", "node3": "1", "top": "3" }
/v1/node_visits_graph
Returns a full graph of nodes with their respective visit counters in GraphML.
Example output:
<?xml version="1.0"?> <graphml xmlns="http://graphml.graphdrawing.org/xmlns" xmlns:xsi="http://www.w3.org/2001/XMLSchema-instance" xsi:schemaLocation="http://graphml.graphdrawing.org/xmlns http://graphml.graphdrawing.org/xmlns/1.0/graphml.xsd"> <key id="visits" for="node" attr.name="visits" attr.type="string" /> <graph id="G" edgedefault="directed"> <node id="routing_table"> <data key="visits">5</data> </node> <node id="cdn1"> <data key="visits">1</data> </node> <node id="node1"> <data key="visits">1</data> </node> <node id="cdn2"> <data key="visits">2</data> </node> <node id="node2"> <data key="visits">2</data> </node> <node id="cdn3"> <data key="visits">2</data> </node> <node id="node3"> <data key="visits">2</data> </node> <edge id="e0" source="cdn1" target="node1" /> <edge id="e1" source="routing_table" target="cdn1" /> <edge id="e2" source="cdn2" target="node2" /> <edge id="e3" source="routing_table" target="cdn2" /> <edge id="e4" source="cdn3" target="node3" /> <edge id="e5" source="routing_table" target="cdn3" /> </graph> </graphml>To receive the graph as JSON, specify
Accept:application/jsonin the request headers.Example output:
{ "edges": [ { "source": "cdn1", "target": "node1" }, { "source": "routing_table", "target": "cdn1" }, { "source": "cdn2", "target": "node2" }, { "source": "routing_table", "target": "cdn2" }, { "source": "cdn3", "target": "node3" }, { "source": "routing_table", "target": "cdn3" } ], "nodes": [ { "id": "routing_table", "visits": "5" }, { "id": "cdn1", "visits": "1" }, { "id": "node1", "visits": "1" }, { "id": "cdn2", "visits": "2" }, { "id": "node2", "visits": "2" }, { "id": "cdn3", "visits": "2" }, { "id": "node3", "visits": "2" } ] }
Resetting Visit Counters
A node visit counter with an id not matching any node id of a newly applied
routing table is destroyed.
Reset all counters to zero by momentarily applying a configuration with a
placeholder routing root node, that has unique id and an empty members
list, e.g:
"routing": {
"id": "empty_routing_table",
"members": []
}
… and immediately reapply the desired configuration.
5.9.8 - Metrics
ESB3024 Router collects a large number of metrics that can give insight into
it’s condition at runtime. Those metrics are available in
Prometheus’ text-based exposition format
at endpoint :5001/m1/v1/metrics.
Below is the description of these metrics along with their labels.
client_response_status
Number of responses sent back to incoming requests.
- Type: counter
lua_num_errors
Number of errors encountered when evaluating Lua rules.
- Type:
counter
lua_num_evaluators
Number of Lua rules evaluators (active interpreters).
- Type: gauge
lua_time_spent
Time spent by running Lua evaluators, in microseconds.
- Type:
counter
num_configuration_changes
Number of times configuration has been changed since the router has started.
- Type:
counter
num_endpoint_requests
Number of requests redirected per CDN endpoint.
- Type:
counter - Labels:
endpoint- CDN endpoint address.selector- whether the request was counted duringinitialorinstreamselection.
num_invalid_http_requests
Number of client requests that either use wrong method or wrong URL path. Also number of all requests that cannot be parsed as HTTP.
- Type:
counter - Labels:
source- name of internal filter function that classified request as invalid. Probably not of much use outside debugging.type- whether the request was HTTP (Unencrypted) or HTTPS (SSL).
num_log_errors_total
Number of logged errors since the router has started.
- Type:
counter
num_log_warnings_total
Number of logged warnings since the router has started.
- Type:
counter
num_managed_redirects
Number of redirects to the router itself, which allows session management.
- Type:
counter
num_manifests
Number of cached manifests.
- Type:
gauge - Labels:
count- state of manifest in cache, can be eitherlru,evictedortotal.
num_qoe_losses
Number of “lost” QoE decisions per CDN.
- Type:
counter - Labels:
cdn_id- ID of CDN that loose QoE battle.cdn_name- name of CDN that loose QoE battle.selector- whether the decision was taken duringinitialorinstreamselection.
num_qoe_wins
Number of “won” QoE decisions per CDN.
- Type:
counter - Labels:
cdn_id- ID of CDN that won QoE battle.cdn_name- name of CDN that won QoE battle.selector- whether the decision was taken duringinitialorinstreamselection.
num_rejected_requests
Deprecated, should always be at 0.
- Type:
counter - Labels:
selector- whether the request was counted duringinitialorinstreamselection.
num_requests
Total number of requests received by the router.
- Type:
counter - Labels:
selector- whether the request was counted duringinitialorinstreamselection.
num_sessions
Number of sessions opened on router.
- Type:
gauge - Labels:
state- eitheractiveorinactive.type- one of:initial,instream,qoe_on,qoe_off,qoe_agentorsp_agent.
num_ssl_errors_total
Number of all errors logged during TLS connections, both incoming and outgoing.
- Type:
counter
num_ssl_warnings_total
Number of all warnings logged during TLS connections, both incoming and outgoing.
- Type:
counter - Labels:
category- which kind of TLS connection triggered the warning. Can be one of:cdn,content,generic,repeated_sessionor empty.
num_unhandled_requests
Number of requests for which no CDN could be found.
- Type:
counter - Labels:
selector- whether the request was counted duringinitialorinstreamselection.
num_unmanaged_redirects
Number of redirects to “outside” the router - usually to CDN.
- Type:
counter - Labels:
cdn_id- ID of CDN picked for redirection.cdn_name- name of CDN picked for redirection.selector- whether the redirect was result ofinitialorinstreamselection.
num_valid_http_requests
Number of received requests that were not deemed invalid, see
num_invalid_http_requests.
- Type:
counter - Labels:
source- name of internal filter function that classified request as invalid. Probably not of much use outside debugging.type- whether the request was HTTP (Unencrypted) or HTTPS (SSL).
orc_latency_bucket
Total number of responses sorted into “latency buckets” - labels denoting latency interval.
- Type:
counter - Labels:
le- latency bucket that given response falls into.orc_status_code- HTTP status code of given response.
orc_latency_count
Total number of responses.
- Type:
counter - Labels:
tls- whether the response was sent via SSL/TLS connection or not.orc_status_code- HTTP status code of given response.
ssl_certificate_days_remaining
Number of days until a SSL certificate expires.
- Type:
gauge - Labels:
domain- the common name of the domain that the certificate authenticates.not_valid_after- the expiry time of the certificate.not_valid_before- when the certificate starts being valid.usable- if the certificate is usable to the router, see the ssl_certificate_usable_count metric for an explanation.
ssl_certificate_usable_count
Number of usable SSL certificates. A certificate is usable if it is valid and authenticates a domain name that points to the router.
- Type:
gauge
5.9.8.1 - Internal Metrics
A subrunner is an internal module of ESB3024 Router which handles routing requests. The subrunner metrics are technical and mainly of interest for AgileTV. These metrics will be briefly described here.
subrunner_async_queue
Number of queued events per subrunner, roughly corresponding to load.
- Type:
gauge - Labels:
subrunner_id- ID of given subrunner.
subrunner_client_conns
Number of currently open client connections per subrunner.
- Type:
gauge - Labels:
subrunner_id- ID of given subrunner.
subrunner_high_queue
Number of high priority events queued per subrunner.
- Type:
gauge - Labels:
subrunner_id- ID of given subrunner.
subrunner_io_autopause_sockets
Number of sockets that have been automatically paused. This happens when the work manager is under heavy load.
- Type:
counter - Labels:
subrunner_id- ID of given subrunner.
subrunner_io_send_data_fast_attempts
A fast data path was added that in many cases increases the performance of the router. This metric was added to verify that the fast data path is taken.
- Type:
counter - Labels:
subrunner_id- ID of given subrunner.
subrunner_io_wakeups
The number of times a subrunner has been waken up from sleep.
- Type:
counter - Labels:
subrunner_id- ID of given subrunner.
subrunner_low_queue
Number of low priority events queued per subrunner.
- Type:
gauge - Labels:
subrunner_id- ID of given subrunner.
subrunner_max_async_queue
Maximum number of events waiting in queue.
- Type:
gauge - Labels:
subrunner_id- ID of given subrunner.
subrunner_max_high_queue
Maximum number of events waiting in high priority queue.
- Type:
gauge - Labels:
subrunner_id- ID of given subrunner.
subrunner_max_low_queue
Maximum number of events waiting in low priority queue.
- Type:
gauge - Labels:
subrunner_id- ID of given subrunner.
subrunner_max_medium_queue
Maximum number of events waiting in medium priority queue.
- Type:
gauge - Labels:
subrunner_id- ID of given subrunner.
subrunner_medium_queue
Number of medium priority events queued per subrunner.
- Type:
gauge - Labels:
subrunner_id- ID of given subrunner.
subrunner_times_worker_overloaded
Number of times when queued events for given subrunner exceeded
the tuning.overload_threshold value (defaults to 32).
- Type:
counter - Labels:
subrunner_id- ID of given subrunner.
subrunner_total_receive_data_blocks
Number of receive data blocks allocated per subrunner.
- Type:
gauge - Labels:
subrunner_id- ID of given subrunner.
subrunner_total_send_data_blocks
Number of send data blocks allocated per subrunner.
- Type:
gauge - Labels:
subrunner_id- ID of given subrunner.
subrunner_used_receive_data_blocks
Number of receive data blocks currently in use per subrunner. Same as subrunner_total_receive_data_blocks.
- Type:
gauge - Labels:
subrunner_id- ID of given subrunner.
subrunner_used_send_data_blocks
Number of send data blocks currently in use per subrunner. Same as subrunner_total_send_data_blocks.
- Type:
gauge - Labels:
subrunner_id- ID of given subrunner.
5.10 - Glossary
- ACD
- Agile CDN Director. See “Director”.
- Confd
- A backend service that hosts the service configuration. Comes with an API, a CLI and a GUI.
- Classifier
- A filter that associate a request with a tag that can be used to define session groups.
- Director
- The Agile Delivery OTT router and related services.
- ESB
- A software bundle that can be separately installed and upgraded, and is released as one entity with one change log. Each ESB is identified with a number. Over time, features and functions within an ESB can change.
- Lua
- A widely available scripting language that is often used to extend the capabilities of a piece of software.
- Router
- Unless otherwise specified, an HTTP router that manages an OTT session using HTTP redirect. There are also ways to use DNS instead of HTTP.
- Selection Input API
- Data posted to this API can be accessed by the routing rules and hence influence the routing decisions.
- Subnet API
- An API to define mappings between subnets and names (typically regions) for those subnets. Routing rules can then refer to the names rather than the subnets.
- Session Group
- A handle on a group of requests, defined via classifiers.
6 - AgileTV CDN Director (esb3024)
6.1 - Release Notes for esb3024-1.24.0
Build date
2026-04-23
Release status
Type: production
Compatibility
This release has been tested with the following product versions:
- AgileTV CDN Manager, ESB3027-1.6.0
- Orbit, ESB2001-4.2.2 (see Known limitations below)
- SW-Streamer, ESB3004-2.6.2
- Convoy, ESB3006-3.8.0
- Request Router, ESB3008-3.10.1
- GUI 4.0.3
Breaking changes since release esb3024-1.22.1
- None
Change log
- NEW: Add configuration feedback [ESB3024-122]
- NEW: Add module based logging [ESB3024-505]
- NEW: Support for QoE based routing [ESB3024-641]
- NEW: Add nested expressions to condition language [ESB3024-1099]
- NEW: Logging performance improvements [ESB3024-1163]
- NEW: Forward the last error code from CDN to client [ESB3024-1625]
- NEW: Log name of loaded GeoIP database [ESB3024-1646]
- NEW: Restructure logging configuration [ESB3024-1654]
- NEW: Improved logs when connection is closed prematurely [ESB3024-1769]
- FIXED: Dash variants not detected for QoE Streams [ESB3024-390]
- FIXED: Quotation marks not supported in classifier patterns [ESB3024-695]
- FIXED: Restart loop when directory Lua directory is manually created by user root [ESB3024-705]
- FIXED: Invalid JSON makes confd-transformer crash [ESB3024-1041]
- FIXED: Internal Server Error on requests from unknown instream sessions [ESB3024-1376]
- FIXED: Response translate function not invoked when no route found [ESB3024-1377]
- FIXED: Lua response body not set for instream sessions [ESB3024-1378]
- FIXED: Confd schema accepts config without mandatory properties [ESB3024-1583]
- FIXED: Connection header is not respected [ESB3024-1655]
Deprecated functionality
Deprecated since ESB3024-1.18.0:
- Lua function
epochToTimehas been deprecated in favor ofepoch_to_time. - Lua function
timeToEpochhas been deprecated in favor oftime_to_epoch. - The session proxy has been deprecated. Its functionality is replaced by the new “Send HTTP requests from Lua code” function.
System requirements
See the current system requirements in Getting Started.
Known limitations
Downgrading to a version prior to 1.22.1 will fail if the configuration is missing an
integration.routingsection. When this happens, theacd-confd-migrationtool will print an error message and exit. The workaround is to add an emptyintegration.routingsection to the configuration before downgrading.This is the error message that is printed:
Migration failed at migrations.v1_22_1.00_add_missing_gui_integration: 'routing'It is recommended to set
services.routing.tuning.general.overloadThresholdto 128. This is particularly important if the Director will receive messages from Kafka.Sometimes the ACD Confd Transformer does not start correctly after the ACD Director has been upgraded. This can be identified by typing
systemctl status acd-confd-transformer.serviceafter the upgrade is complete. If it shows that the service is not running, it needs to be started manually by typingsystemctl start acd-confd-transformer.service. [ESB3024-1675]When configured to use TLS,
acd-telegraf-metrics-databasemight log the following error message:http: TLS handshake error from <client ip>: client sent an HTTP request to an HTTPS serverwhen receiving metrics from caches even though the Telegraf agents are configured to use TLS. The Telegraf logs on the caches do not show any errors related to this. However, the data is still received over TLS and stored correctly byacd-telegraf-metrics-database. The issue seemingly resolved itself during investigation and is not reproducible. Current hypothesis is a logging bug in Telegraf.The Telegraf metrics agent might not be able to read all relevant network interface data on ESB2001 releases older than 3.6.2. The predictive load balancing function
host_has_bw()and the health check functioninterfaces_online()might therefore not work as expected.- The recommended workaround for
host_has_bw()is to usehost_has_bw_custom(), documented in Built-in Lua functions.host_has_bw_custom()accepts a numeric argument for the host’s network interface capacity which can be used if the data supplied by the Telegraf metrics agents do not contain this information. - It is not recommended to use
interfaces_online()for ESB2001 instances until they are updated to 3.6.2 or later.
- The recommended workaround for
6.2 - Getting Started
The Director serves as a versatile network service designed to redirect incoming HTTP(s) requests to the optimal host or Content Delivery Network (CDN) by evaluating various request properties through a set of rules. Although requests can be generic, the primary focus centers around audio-video content delivery. The rule engine allows users to construct routing configurations using predefined blocks, providing for the creation of intricate routing logic. This modular approach allows the users to tailor and streamline the content delivery process to meet their specific needs. The Director’s flexible rule engine takes into account factors such as geographical location, server load, content type, and other metadata from external sources to intelligently route incoming requests. It supports dynamic adjustments to seamlessly adapt to changing network conditions, ensuring efficient and reliable content delivery. The Director improves the overall user experience by delivering content from the most suitable and responsive sources, thereby reducing latency and enhancing performance.
Requirements
Hardware
The Director is designed to be installed and operated on commodity hardware, ensuring accessibility for a broad range of users. The minimum hardware specifications are as follows:
- CPU: x86-64 AMD or Intel with at least 2 cores.
- Memory: At least 2 GB free at runtime.
Operating System Compatibility
The Director is officially supported on Red Hat Enterprise Linux 8 or 9 or any
compatible operating system. In order to run the service, a minimum CPU
architecture of x86-64-v2 is required. This can be determined by running the
following command. If supported, it will be listed as “(supported)” in the
output.
/usr/lib64/ld-linux-x86-64.so.2 --help | grep x86-64-v2
External Internet access is necessary during the installation process for the installer to download and install additional dependencies. This ensures a seamless setup and optimal functionality of the Director on Red Hat Enterprise Linux 8 or 9. It’s worth noting that, due to the unique workings of the DNF package manager in Red Hat Enterprise Linux with rolling package streams, an air-gapped installation process is not available.
Firewall Recommendations
See Firewall.
Installation
See Installation.
Operations
See Operations.
Configuration Process
Once the router is operational, it requires a valid configuration before it can route incoming requests.
There are currently three methods available for configuring the router, each catering to different levels of complexity. The first is a Web UI, suitable for the most common use-cases, providing an intuitive interface for configuration. The second involves utilizing a confd REST service, complemented by an optional command line tool, confcli, suitable for all but the most advanced scenarios. The third method involves leveraging an internal REST API, ideal for the most intricate cases where using confd proves to be less flexible. It’s essential to note that as the configuration method advances through these levels, both flexibility and complexity increase, providing users with tailored options based on their specific needs and expertise.
API Key Management
Regardless of the method used to configure the system, a unique API key is
crucial for safeguarding the router’s configuration and preventing unauthorized
access to the API. This key must be supplied when interacting with the API.
During the router software installation, an automatically generated API key is
created and can be located on the installed system at
/opt/edgeware/acd/router/cache/rest-api-key.json. The structure of this file
is as follows:
{"api_key": "abc123"}
When accessing the internal configuration API, the key must be included in the
X-API-key header of the request, as shown below:
curl -v -k -H "X-API-Key: abc123" https://<router-host.example>:5001/v2/configuration
Modification to the authentication key and behavior can be done through the
/v2/rest_api_key endpoint. To change the key, a PUT request with a JSON body
of the same structure can be sent to the endpoint:
curl -v -k -X PUT -T new-key.json -H "X-API-Key: abc123" \
-H "Content-Type: application/json" https://<router-host.example>:5001/v2/rest_api_key
Additionally, key authentication can be disabled completely by sending a DELETE
request to the endpoint:
curl -v -k -X DELETE -H "X-API-Key: abc123" \
https://<router-host.example>:5001/v2/rest_api_key
In the event of a lost or forgotten authentication key, it can always be
retrieved at /opt/edgeware/acd/router/cache/rest-api-key.json on the
machine running the router. It is critical to emphasize that the API key should
remain private to prevent unauthorized access to the internal API, as it grants
full access to the router’s configuration.
Configuration Basics
Upon completing the installation process and configuring the API keys, the subsequent section will provide guidance on configuring the router to route all incoming requests to a single host. For straightforward CDN Offload use cases, there is a web based user interface described here.
For further details on configuring the router using confd and confcli, please consult the Confd documentation.
The initial step involves defining the target host group. In this illustration,
a singular group named all will be established, comprising two hosts.
$ confcli services.routing.hostGroups -w
Running wizard for resource 'hostGroups'
Hint: Hitting return will set a value to its default.
Enter '?' to receive the help string
hostGroups : [
hostGroup can be one of
1: dns
2: host
3: redirecting
Choose element index or name: host
Adding a 'host' element
hostGroup : {
name (default: ): all
type (default: host):
httpPort (default: 80):
httpsPort (default: 443):
hosts : [
host : {
name (default: ): host1.example.com
hostname (default: ): host1.example.com
ipv6_address (default: ):
}
Add another 'host' element to array 'hosts'? [y/N]: y
host : {
name (default: ): host2.example.com
hostname (default: ): host2.example.com
ipv6_address (default: ):
}
Add another 'host' element to array 'hosts'? [y/N]: n
]
}
Add another 'hostGroup' element to array 'hostGroups'? [y/N]: n
]
Generated config:
{
"hostGroups": [
{
"name": "all",
"type": "host",
"httpPort": 80,
"httpsPort": 443,
"hosts": [
{
"name": "host1.example.com",
"hostname": "host1.example.com",
"ipv6_address": ""
},
{
"name": "host2.example.com",
"hostname": "host2.example.com",
"ipv6_address": ""
}
]
}
]
}
Merge and apply the config? [y/n]:
After defining the host group, the next step is to establish a rule that directs
incoming requests to the designated host. In this example, a sole rule named
random will be generated, ensuring that all incoming requests are consistently
routed to the previously defined host.
$ confcli services.routing.rules -w
Running wizard for resource 'rules'
Hint: Hitting return will set a value to its default.
Enter '?' to receive the help string
rules : [
rule can be one of
1: allow
2: consistentHashing
3: contentPopularity
4: deny
5: firstMatch
6: random
7: rawGroup
8: rawHost
9: split
10: weighted
Choose element index or name: random
Adding a 'random' element
rule : {
name (default: ): random
type (default: random):
targets : [
target (default: ): host1.example.com
Add another 'target' element to array 'targets'? [y/N]: y
target (default: ): host2.example.com
Add another 'target' element to array 'targets'? [y/N]: n
]
}
Add another 'rule' element to array 'rules'? [y/N]: n
]
Generated config:
{
"rules": [
{
"name": "random",
"type": "random",
"targets": [
"host1.example.com",
"host2.example.com"
]
}
]
}
Merge and apply the config? [y/n]:
The last essential step involves instructing the router on which rule should
serve as the entry point into the routing tree. In this example, we designate
the rule random as the entrypoint for the routing process.
$ confcli services.routing.entrypoint random
services.routing.entrypoint = 'random'
Once this configuration is defined, all incoming requests will initiate their
traversal through the routing rules, starting with the rule named random. This
rule is designed to consistently match for every incoming request, effectively load
balancing evenly between host1.example.com and host2.example.com on port 80
or 443, depending on whether the initial request was made using HTTP or HTTPS.
Integration with Convoy
The router is equipped with the capability to synchronize specific configuration metadata with a separate Convoy installation through the integrated convoy-bridge service. However, this service necessitates additional setup and configuration, and you can find comprehensive details on the process here..
Additional Resources
Additional documentation resources are included with the Director and can be
accessed at the following directory: /opt/edgeware/acd/documentation/. This
directory contains supplementary materials to provide users with comprehensive
information and guidance for optimizing their experience with the Director.
Ready for Production
Once the Director software is completely installed and configured, there are a few additional considerations before moving to a full production environment. See the section Ready for Production for additional information.
6.3 - Installing ESB3024 Router release 1.24.0
To install ESB3024 Router, you first need to copy the installation ISO image to
the target node where the router will be run. Due to the way the installer
operates, it is necessary that the host is reachable by ssh from itself for
the user account that will perform the installation, and that this user has
sudo access.
Prerequisites:
Ensure that the current user has
sudoaccess.sudo -lIf the above command fails, you may need to add the user to the
/etc/sudoersfile.Ensure that the installer has ssh access to
localhost.If using the
rootuser, thePermitRootLoginproperty of the/etc/ssh/sshd_configfile must be set to ‘yes’.Ensure that
sshpassis installed.If the installer is run by the root user, this step is not necessary.
sshpassis installed by typing this:sudo dnf install -y sshpass
Assuming the installation ISO image is in the current working directory,
the following steps need to be executed either by root user or with sudo.
Mount the installation ISO image under
/mnt/acd.Note: The mount-point may be any accessible path, but
/mnt/acdwill be used throughout this document.mkdir -p /mnt/acd mount esb3024-acd-router-1.24.0.iso /mnt/acdRun the installer script.
/mnt/acd/installerIf it is not running as root, the installer will ask both for the “SSH password” and the “BECOME password”. The “SSH password” is the password that the user running the installer uses to log in to the local machine, and the “BECOME password” is the password for the user to gain
sudoaccess. They are usually the same.
Upgrading From an Earlier ESB3024 Router Release
The following steps can be taken to upgrade the router from a 1.10 or later release to 1.24.0. If upgrading from an earlier release it is recommended to first upgrade to 1.10.1 and then to upgrade to 1.24.0.
The upgrade procedure for the router is performed by taking a backup of the configuration, installing the new release of the router, and applying the saved configuration.
With the router running, save a backup of the configuration.
The exact procedure to accomplish this depends on the current method of configuration, e.g. if
confdis used, then the configuration should be extracted fromconfd, but if the REST API is used directly, then the configuration must be saved by fetching the current configuration snapshot using the REST API.Extracting the configuration using
confdis the recommend approach where available.confcli | tee config_backup.jsonTo extract the configuration from the REST API, the following may be used instead. Depending on the version of the router used, an API-Key may be required to fetch from the REST API.
curl --insecure https://localhost:5001/v2/configuration \ | tee config_backup.jsonIf the API Key is required, it can be found in the file
/opt/edgeware/acd/router/cache/rest-api-key.jsonand can be passed to the API by setting the value of theX-API-Keyheader.curl --insecure -H "X-API-Key: 1234abcd" \ https://localhost:5001/v2/configuration \ | tee config_backup.jsonMount the new installation ISO under
/mnt/acd.Note: The mount-point may be any accessible path, but
/mnt/acdwill be used throughout this document.mkdir -p /mnt/acd mount esb3024-acd-router-1.24.0.iso /mnt/acdStop the router and all associated services.
Before upgrading the router it needs to be stopped, which can be done by typing this:
systemctl stop 'acd-*'Run the installer script.
/mnt/acd/installerPlease note that the installer will install new container images, but it will not remove the old ones. The old images can be removed manually after the upgrade is complete.
Migrate the configuration.
Note that this step only applies if the router is configured using
confd. If it is configured using the REST API, this step is not necessary.The confd configuration used in the previous versions is not directly compatible with 1.24, and may need to be converted. If this is not done, the configuration will not be valid and it will not be possible to make configuration changes.
The
acd-confd-migrationtool will automatically apply any necessary schema migrations. Further details about this tool can be found at Confd Auto Upgrade Tool.The tool takes as input the old configuration file, either by reading the file directly, or by reading from standard input, applies any necessary migrations between the two specified versions, and outputs a new configuration to standard output which is suitable for being applied to the upgraded system. While the tool has the ability to migrate between multiple versions at a time, the earliest supported version is 1.10.1.
The example below shows how to upgrade from 1.22.1. If upgrading from 1.20.1,
--from 1.22.1should be replaced with--from 1.20.1.The command line required to run the tool is different depending on which esb3024 release it is run on. On 1.24.0 it is run like this:
cat config_backup.json | \ podman run -i --rm \ images.edgeware.tv/acd-confd-migration:1.24.0 \ --in - --from 1.22.1 --to 1.24.0 \ | tee config_upgraded.jsonAfter running the above command, apply the new configuration to
confdby runningcat config_upgraded.json | confcli -i.
Troubleshooting
If there is a problem running the installer, additional debug information can
be output by adding -v or -vv or -vvv to the installer command, the
more “v” characters, the more detailed output.
6.3.1 - Configuration changes between 1.22 and 1.24
Confd configuration changes
Below are the changes to the confd configuration between versions 1.22 and 1.24 listed.
Added services.routing.settings.qoeTracking.requestsIgnoredAfterHostChange
The services.routing.settings.qoeTracking.requestsIgnoredAfterHostChange
setting configures the number of requests to ignore for QoE tracking after a
host change.
Removed unused tuning items
The following tuning items were not used and have been removed:
services.routing.tuning.general.cpuLoadWindowSizeservices.routing.tuning.general.repeatedSessionStartThresholdSecondsservices.routing.tuning.general.selectionInputMetricsTimeoutSeconds
Made items in services.routing required
The items under services.routing were previously marked as optional, but are
now required. A configuration that missed some of these items would previously
have been valid, but starting with 1.24 it will be invalid.
The items that are now required are:
services.routing.accountsservices.routing.applyConfigservices.routing.classifiersservices.routing.dataStreamsservices.routing.entrypointservices.routing.hostGroupsservices.routing.rulesservices.routing.sessionGroupsservices.routing.settingsservices.routing.translationFunctionsservices.routing.tuning
Added services.routing.tuning.general.responseCodeTracking
The services.routing.tuning.general.responseCodeTracking setting enables
tracking of the last response code received from each CDN host. If all CDNs
return errors, the Director will respond with the last received error code
instead of a generic 403.
Moved all logging configuration to services.routing.settings.logging
All logging configuration has been moved to
services.routing.settings.logging. The section contains log level, access log
and usage log configuration.
The following items have been added to the logging configuration:
accessErrorLogandaccessErrorLogDepth- see Access Error Log.moduleLogLevels- enables fine-grained log levels per module.
6.4 - Firewall
For security reasons, the ESB3024 Installer does not automatically configure the local firewall to allow incoming traffic. It is the responsibility of the operations person to ensure that the system is protected from external access by placing it behind a suitable firewall solution. The following table describes the set of ports required for operation of the router.
| Application | Port | Protocol | Direction | Source | Description |
|---|---|---|---|---|---|
| Prometheus Alert Manager | 9093 | TCP | IN | internal | Monitoring Services |
| Confd | 5000 | TCP | IN | internal | Configuration Services |
| Router | 80 | TCP | IN | public | Incoming HTTP Requests |
| Router | 443 | TCP | IN | public | Incoming HTTPS Requests |
| Router | 5001 | TCP | IN | localhost | Access to router’s REST API |
| Router | 8000 | TCP | IN | localhost | Internal monitoring port |
| EDNS-Proxy | 8888 | TCP | IN | localhost | Proxy EDNS Requests |
| Grafana | 3000 | TCP | IN | internal | Monitoring Services |
| Grafana-Loki | 3100 | TCP | IN | internal | Log monitoring daemon |
| Prometheus | 9090 | TCP | IN | internal | Monitoring Service |
The “Direction” column represents the direction in which the connection is established.
IN- The connection is originated from an outside serverOUT- The connection is established from the host to an external server.
Once a connection is established through the firewall, bidirectional traffic must be allowed using the established connection.
For the “Source” column, the following terms are used.
internal- Any host or network which is allowed to monitor or operate the system.public- Any host or subnet that can access the router. This includes any customer network that will be making routing requests.localhost- Access can be limited to local connections only.any- All traffic from any source or to any destination.
Additional Ports
Convoy Bridge Integration
The optional convoy-bridge service needs the ability to access the Convoy MariaDB service, which by default runs on port 3306 on all of the Convoy Management servers. To allow this integration to run, port 3306/tcp must be allowed from the router to the configured Convoy Management node.
6.5 - API Overview
ESB3024 Router provides two different types of API:s:
- A content request API that is used by video clients to ask for content, normally using port 80 for HTTP and port 443 for HTTPS.
- A few REST API:s used by administrators to configure and monitor the router installation, using port 5001 over HTTPS by default.
The content API won’t be described further in this document, since it’s a simple HTTP interface serving content as regular files or redirect responses.
Raw configuration – /v2/configuration
Used to check and update the raw configuration of ESB3024 Router. Note that this API is considered an implementation detail and is not documented further.
| REQUEST Method | Content-Type | RESPONSE Result | Status Code | Content-Type |
|---|---|---|---|---|
GET | <N/A> | Success | 200 OK | application/json |
PUT | application/json | Success | 204 No Content | <N/A> |
PUT | application/json | Failure | 400 Bad Request | application/json1 |
Validate Configuration – /v2/validate_configuration
Used to determine if a JSON payload is correctly formatted without actually applying its configuration. A successful return status does not guarantee that the applied configuration will work, it only validates the JSON structure.
| REQUEST Method | Content-Type | RESPONSE Result | Status Code | Content-Type |
|---|---|---|---|---|
PUT | application/json | Success | 204 No Content | <N/A> |
PUT | application/json | Failure | 400 Bad Request | application/json1 |
Example request
When an expected field is missing from the payload, the validation will show which one and return an appropriate error message in its payload:
$ curl -i -X PUT \
-d '{"routing": {"log_level": 3}}' \
-H "Content-Type: application/json" \
https://router.example:5001/v2/validate_configuration
HTTP/1.1 400 Bad Request
Access-Control-Allow-Origin: *
Content-Length: 132
Content-Type: application/json
X-Service-Identity: router.example-5fc78d
"Configuration validation: Configuration parsing failed. \
Exception: [json.exception.out_of_range.403] (/routing) key 'id' not found"
Selection Input
The selection input API is used to inject user-defined data into the routing engine, making the data available for making routing decisions. Any JSON structures can be stored in the selection input.
One use case for selection input is to provide data on cache availability. For
example, if {"edge-streamer-2-online": true} is sent to the selection
input API, the routing condition eq('edge-streamer-2-online', true) can
be used to ensure that no traffic gets routed to the streamer if it’s offline.
/v3/selection_input
The /v3/selection_input API supports the GET, POST, PUT, and DELETE
methods.
PUTreplaces the data at the specified path with the provided data. If the path does not exist, it will be created.POSTis only used for appending data to arrays. The last element in the path must be an array. If the path does not exist, it will be created, with the last segment as an array.GETrequests fetch the current selection input data at the given path.DELETErequests remove the data at the given path.
Example PUT request
$ curl -i -X PUT \
-d '{"bitrate": 13000, "capacity": 50000}' \
-H "Content-Type: application/json" \
https://router.example.com:5001/v3/selection_input/hosts/host1
HTTP/1.1 201 Created
Access-Control-Allow-Headers: Content-Type, Authorization
Access-Control-Allow-Methods: GET, POST, PUT, DELETE, OPTIONS
Access-Control-Allow-Origin: *
Content-Length: 0
X-Service-Identity: router.example.com-5fc78d
Example POST request
$ curl -i -X POST \
-d '"server1"' \
-H "Content-Type: application/json" \
https://router.example.com:5001/v3/selection_input/modules/allowed_servers
HTTP/1.1 201 Created
Access-Control-Allow-Headers: Content-Type, Authorization
Access-Control-Allow-Methods: GET, POST, PUT, DELETE, OPTIONS
Access-Control-Allow-Origin: *
Content-Length: 0
X-Service-Identity: router.example.com-5fc78d
Example GET request
$ curl -i https://router.example.com:5001/v3/selection_input
HTTP/1.1 200 OK
Access-Control-Allow-Headers: Content-Type, Authorization
Access-Control-Allow-Methods: GET, POST, PUT, DELETE, OPTIONS
Access-Control-Allow-Origin: *
Content-Length: 156
Content-Type: application/json
X-Service-Identity: router.example.com-5fc78d
{
"hosts": {
"host1": {
"bitrate": 13000,
"capacity": 50000
}
},
"modules": {
"allowed_servers": [
"server1"
]
}
}
Example DELETE request
$ curl -i -X DELETE \
https://router.example.com:5001/v3/selection_input/modules/allowed_servers
HTTP/1.1 204 No Content
Access-Control-Allow-Headers: Content-Type, Authorization
Access-Control-Allow-Methods: GET, POST, PUT, DELETE, OPTIONS
Access-Control-Allow-Origin: *
Content-Length: 0
X-Service-Identity: router.example.com-5fc78d
/v1/selection_input
The /v1/selection_input API is retained only for backward compatibility with
legacy integrations.
When performing GET or DELETE requests, specific selection input values can
be accessed or deleted by including a path to the request. Note that not
specifying a path will select all selection input values. PUT requests do not
support supplying paths, the path to the element to be modified is deduced by
the keys in the provided JSON object.
| REQUEST Method | Content-Type | RESPONSE Result | Status Code | Content-Type |
|---|---|---|---|---|
PUT | application/json | Success | 204 No Content | <N/A> |
PUT | application/json | Failure | 400 Bad Request | application/json |
GET | <N/A> | Success | 200 OK | application/json |
DELETE | <N/A> | Success | 204 No Content | <N/A> |
DELETE | <N/A> | Failure | 404 Not Found | <N/A> |
Example successful request (PUT)
$ curl -i -X PUT \
-d '{"host1_bitrate": 13000, "host1_capacity": 50000}' \
-H "Content-Type: application/json" \
https://router.example.com:5001/v1/selection_input
HTTP/1.1 204 No Content
Access-Control-Allow-Origin: *
Content-Length: 0
X-Service-Identity: router.example.com-5fc78d
Example unsuccessful request (PUT)
$ curl -i -X PUT \
-d '{"cdn-status": {"session-count": 12345, "load-percent" 98}}' \
-H "Content-Type: application/json" \
https://router.example.com:5001/v1/selection_input
HTTP/1.1 400 Bad Request
Access-Control-Allow-Origin: *
Content-Length: 169
Content-Type: application/json
X-Service-Identity: router.example.com-5fc78d
{
"error": "[json.exception.parse_error.101] parse error at line 1, column 57: \
syntax error while parsing object separator - \
unexpected number literal; expected ':'"
}
Example successful request (GET)
curl -i https://router.example.com:5001/v1/selection_input
HTTP/1.1 200 OK
Access-Control-Allow-Origin: *
Content-Length: 129
Content-Type: application/json
X-Service-Identity: router.example.com-5fc78d
{
"host1_bitrate": 13000,
"host1_capacity": 50000
}
Example successful specific value request (GET)
curl -i https://router.example.com:5001/v1/selection_input/path/to/value
HTTP/1.1 200 OK
Access-Control-Allow-Origin: *
Content-Length: 129
Content-Type: application/json
X-Service-Identity: router.example.com-5fc78d
1
Example successful request (DELETE)
curl -i -X DELETE https://router.example.com:5001/v1/selection_input
HTTP/1.1 204 OK
Access-Control-Allow-Origin: *
Content-Length: 129
X-Service-Identity: router.example.com-5fc78d
Example successful specific value request (DELETE)
curl -i -X DELETE https://router.example.com:5001/v1/selection_input/value/to/delete
HTTP/1.1 204 OK
Access-Control-Allow-Origin: *
Content-Length: 129
X-Service-Identity: router.example.com-5fc78d
Example unsuccessful request (DELETE)
curl -i -X DELETE https://router.example.com:5001/v1/selection_input/non/existent/value
HTTP/1.1 404 Not Found
Access-Control-Allow-Origin: *
Content-Length: 129
X-Service-Identity: router.example.com-5fc78d
Subnets – /v1/subnets
An API for managing named subnets that can be used for routing and block lists. See Subnets for more details.
PUT requests inject key value pairs with the form {<subnet>: <value>}, where
<subnet> is a valid CIDR string, into ACD, e.g.:
$ curl -i -X PUT \
-d '{"255.255.255.255/24": "area1", "1.2.3.4/24": "area2"}' \
-H "Content-Type: application/json" \
https://router.example:5001/v1/subnets
HTTP/1.1 204 No Content
Access-Control-Allow-Origin: *
Content-Length: 0
X-Service-Identity: router.example-5fc78d
GET requests are used to fetch injected subnets, e.g.:
# Fetch all injected subnets
$ curl -i https://router.example:5001/v1/subnets
HTTP/1.1 200 OK
Access-Control-Allow-Origin: *
Content-Length: 411
Content-Type: application/json
X-Service-Identity: router.example-5fc78d
{
"1.2.3.4/16": "area2",
"1.2.3.4/24": "area1",
"1.2.3.4/8": "area3",
"255.255.255.255/16": "area2",
"255.255.255.255/24": "area1",
"255.255.255.255/8": "area3",
"2a02:2e02:9bc0::/16": "area8",
"2a02:2e02:9bc0::/32": "area7",
"2a02:2e02:9bc0::/48": "area6",
"2a02:2e02:9de0::/44": "combined_area",
"2a02:2e02:ada0::/44": "combined_area",
"5.5.0.4/8": "area5",
"90.90.1.3/16": "area4"
}
DELETE requests are used to delete injected subnets, e.g.:
# Delete all injected subnets
$ curl -i https://router.example:5001/v1/subnets -X DELETE
HTTP/1.1 204 No Content
Access-Control-Allow-Origin: *
Content-Length: 0
X-Service-Identity: router.example-5fc78d
Both GET and DELETE requests can be specified with the paths /byKey/ and
/byValue/ to filter which subnets to GET or DELETE.
# Fetch subnet with the CIDR string 1.2.3.4/8 if it exists
$ curl -i https://router.example:5001/v1/subnets/byKey/1.2.3.4/8
HTTP/1.1 200 OK
Access-Control-Allow-Origin: *
Content-Length: 26
Content-Type: application/json
X-Service-Identity: router.example-5fc78d
{
"1.2.3.4/8": "area3"
}
# Fetch all subnets whose CIDR string begins with the IP 1.2.3.4
$ curl -i https://router.example:5001/v1/subnets/byKey/1.2.3.4
HTTP/1.1 200 OK
Access-Control-Allow-Origin: *
Content-Length: 76
Content-Type: application/json
X-Service-Identity: router.example-5fc78d
{
"1.2.3.4/16": "area2",
"1.2.3.4/24": "area1",
"1.2.3.4/8": "area3"
}
# Fetch all subnets whose value equals 'area1'
$ curl -i https://router.example:5001/v1/subnets/byValue/area1
HTTP/1.1 200 OK
Access-Control-Allow-Origin: *
Content-Length: 60
Content-Type: application/json
X-Service-Identity: router.example-5fc78d
{
"1.2.3.4/24": "area1",
"255.255.255.255/24": "area1"
}
# Delete subnet with the CIDR string 1.2.3.4/8 if it exists
$ curl -i https://router.example:5001/v1/subnets/byKey/1.2.3.4/8
HTTP/1.1 204 No Content
Access-Control-Allow-Origin: *
Content-Length: 0
X-Service-Identity: router.example-5fc78d
# Delete all subnets whose CIDR string begins with the IP 1.2.3.4
$ curl -i https://router.example:5001/v1/subnets/byKey/1.2.3.4
HTTP/1.1 204 No Content
Access-Control-Allow-Origin: *
Content-Length: 0
X-Service-Identity: router.example-5fc78d
# Delete all subnets whose value equals 'area1'
$ curl -i https://router.example:5001/v1/subnets/byValue/area1
HTTP/1.1 204 No Content
Access-Control-Allow-Origin: *
Content-Length: 0
X-Service-Identity: router.example-5fc78d
| REQUEST Method | Content-Type | RESPONSE Result | Status Code | Content-Type |
|---|---|---|---|---|
PUT | application/json | Success | 204 No Content | <N/A> |
PUT | application/json | Failure | 400 Bad Request | application/json |
GET | <N/A> | Success | 200 OK | application/json |
GET | <N/A> | Failure | 400 Bad Request | application/json |
DELETE | <N/A> | Success | 204 No Content | application/json |
DELETE | <N/A> | Failure | 400 Bad Request | application/json |
Subrunner Resource Usage – /v1/usage
Used to monitor the load on subrunners, the processes performing those tasks that are possible to run in parallel.
| REQUEST Method | Content-Type | RESPONSE Result | Status Code | Content-Type |
|---|---|---|---|---|
GET | <N/A> | Success | 200 OK | application/json |
Example request
$ curl -i https://router.example:5001/v1/usage
HTTP/1.1 200 OK
Access-Control-Allow-Origin: *
Content-Length: 1234
Content-Type: application/json
X-Service-Identity: router.example-5fc78d
{
"total_usage": {
"content": {
"lru": 0,
"newest": "-",
"oldest": "-",
"total": 0
},
"sessions": 0,
"subrunner_usage": {
[...]
}
},
"usage_per_subrunner": [
{
"subrunner_usage": {
[...]
}
},
[...]
]
}
Metrics – /m1/v1/metrics
An interface intended to be scraped by Prometheus. It is possible to scrape it manually to see current values, but doing so will reset some counters and cause actual Prometheus data to become faulty.
| REQUEST Method | Content-Type | RESPONSE Result | Status Code | Content-Type |
|---|---|---|---|---|
GET | <N/A> | Success | 200 OK | text/plain |
Example request
$ curl -i https://router.example:5001/m1/v1/metrics
HTTP/1.1 200 OK
Access-Control-Allow-Origin: *
Content-Length: 1234
Content-Type: text/plain
X-Service-Identity: router.example-5fc78d
# TYPE num_configuration_changes counter
num_configuration_changes 12
# TYPE num_log_errors_total counter
num_log_errors_total 0
# TYPE num_log_warnings_total counter
num_log_warnings_total{category=""} 123
# TYPE num_log_warnings_total counter
num_log_warnings_total{category="cdn"} 0
# TYPE num_log_warnings_total counter
num_log_warnings_total{category="content"} 0
# TYPE num_log_warnings_total counter
num_log_warnings_total{category="generic"} 10
# TYPE num_log_warnings_total counter
num_log_warnings_total{category="repeated_session"} 0
# TYPE num_ssl_errors_total counter
[...]
Node Visit Counters – /v1/node_visits
Used to gather statistics about the number of visits to each node in the routing tree. The returned value is a JSON object containing node ID names and their corresponding counter values.
| REQUEST Method | Content-Type | RESPONSE Result | Status Code | Content-Type |
|---|---|---|---|---|
GET | <N/A> | Success | 200 OK | application/json |
See Routing Rule Evaluation Metrics for more details.
Example request
$ curl -i https://router.example:5001/v1/node_visits
HTTP/1.1 200 OK
Access-Control-Allow-Origin: *
Content-Length: 73
Content-Type: application/json
X-Service-Identity: router.example-5fc78d
{
"cache1.tv": "99900",
"offload": "100"
"routingtable": "100000"
}
Node Visit Graph – /v1/node_visits_graph
Creates a GraphML representation of the node visitation data that can be rendered into an image to make it easier to understand the data.
| REQUEST Method | Content-Type | RESPONSE Result | Status Code | Content-Type |
|---|---|---|---|---|
GET | <N/A> | Success | 200 OK | application/xml |
See Routing Rule Evaluation Metrics for more details.
Example request
> curl -i -k https://router.example:5001/v1/node_visits_graph
HTTP/1.1 200 OK
Access-Control-Allow-Origin: *
Content-Length: 731
Content-Type: application/xml
X-Service-Identity: router.example-5fc78d
<?xml version="1.0"?>
<graphml xmlns="http://graphml.graphdrawing.org/xmlns"
xmlns:xsi="http://www.w3.org/2001/XMLSchema-instance"
xsi:schemaLocation="http://graphml.graphdrawing.org/xmlns http://graphml.graphdrawing.org/xmlns/1.0/graphml.xsd">
<key id="visits" for="node" attr.name="visits" attr.type="string" />
<graph id="G" edgedefault="directed">
<node id="routingtable">
<data key="visits">100000</data>
</node>
<node id="cache1.tv">
<data key="visits">99900</data>
</node>
<node id="offload">
<data key="visits">100</data>
</node>
<edge id="e0" source="routingtable" target="cache1.tv" />
<edge id="e1" source="routingtable" target="offload" />
</graph>
</graphml>
Session list - /v1/sessions
Used to monitor the load on subrunners, the processes performing those tasks that are possible to run in parallel.
| REQUEST Method | Content-Type | RESPONSE Result | Status Code | Content-Type |
|---|---|---|---|---|
GET | <N/A> | Success | 200 OK | application/json |
Example request
$ curl -k -i https://router.example:5001/v1/sessions
HTTP/1.1 200 OK
Access-Control-Allow-Origin: *
Content-Length: 12345
Content-Type: application/json
X-Service-Identity: router.example-5fc78d
{
"sessions": [
{
"age_seconds": 103,
"cdn": "edgeware",
"cdn_is_redirecting": false,
"client_ip": "1.2.3.4",
"host": "cdn.example:80",
"id": "router.example-5fc78d-00000001",
"idle_seconds": 103,
"last_request_time": "2022-12-02T14:05:05Z",
"latest_request_path": "/__cl/s:storage1/__c/v/f/0/5/v_sintel3v_f05a05f07d352e891d79863131ef4df7/__op/hls-default/__f/index.m3u8",
"no_of_requests": 1,
"requested_bytes": 0,
"requests_redirected": 0,
"requests_served": 0,
"session_groups": [
"all"
],
"session_groups_generation": 2,
"session_path": "/__cl/s:storage1/__c/v/f/0/5/v_sintel3v_f05a05f07d352e891d79863131ef4df7/__op/hls-default/__f/index.m3u8",
"start_time": "2022-12-02T14:05:05Z",
"type": "instream",
"user_agent": "libmpv"
},
[...]
]
}
Session details - /v1/sessions/<id: str>
Used to get details about a specific session from the above session list. The
id part of the URL corresponds to the id field in one of the
returned session entries in the above response.
| REQUEST Method | Content-Type | RESPONSE Result | Status Code | Content-Type |
|---|---|---|---|---|
GET | <N/A> | Success | 200 OK | application/json |
GET | <N/A> | Failure | 404 Not Found | application/json |
Example request
$ curl -k -i https://router.example:5001/v1/sessions/router.example-5fc78d-00000001
HTTP/1.1 200 OK
Access-Control-Allow-Origin: *
Content-Length: 763
Content-Type: application/json
X-Service-Identity: router.example-5fc78d
{
"age_seconds": 183,
"cdn": "edgeware",
"cdn_is_redirecting": false,
"client_ip": "1.2.3.4",
"host": "cdn.example:80",
"id": "router.example-5fc78d-00000001",
"idle_seconds": 183,
"last_request_time": "2022-12-02T14:05:05Z",
"latest_request_path": "/__cl/s:storage1/__c/v/f/0/5/v_sintel3v_f05a05f07d352e891d79863131ef4df7/__op/hls-default/__f/index.m3u8",
"no_of_requests": 1,
"requested_bytes": 0,
"requests_redirected": 0,
"requests_served": 0,
"session_groups": [
"all"
],
"session_groups_generation": 2,
"session_path": "/__cl/s:storage1/__c/v/f/0/5/v_sintel3v_f05a05f07d352e891d79863131ef4df7/__op/hls-default/__f/index.m3u8",
"start_time": "2022-12-02T14:05:05Z",
"type": "instream",
"user_agent": "libmpv"
}
Content List - /v1/content
| REQUEST Method | Content-Type | RESPONSE Result | Status Code | Content-Type |
|---|---|---|---|---|
GET | <N/A> | Success | 200 OK | application/json |
Example request
$ curl -k -i https://router.example:5001/v1/content
HTTP/1.1 200 OK
Access-Control-Allow-Origin: *
Content-Length: 572
Content-Type: application/json
X-Service-Identity: router.example-5fc78d
{
"content": [
[
"/__cl/s:storage1/__c/v/f/0/5/v_sintel3v_f05a05f07d352e891d79863131ef4df7/__op/hls-default/__f/index.m3u8",
{
"cached_count": 0,
"content_requested": false,
"content_set": false,
"expiration_time": "2022-12-02T14:05:05Z",
"key": "/__cl/s:storage1/__c/v/f/0/5/v_sintel3v_f05a05f07d352e891d79863131ef4df7/__op/hls-default/__f/index.m3u8",
"listeners": 0,
"manifest": "",
"request_count": 4,
"state": "HLS:MANIFEST-PENDING",
"wait_count": 0
}
]
]
}
Lua scripts – /v1/lua/<path str>.lua
Used to upload, retrieve and delete custom named Lua scripts on the router.
Global functions in uploaded scripts automatically become available to Lua code
in the configuration (which effectively may be viewed as hooks). Upload a
script by PUTing a application/x-lua to the endpoint, and retrieve it by
GETing the endpoint without payload.
| REQUEST Method | Content-Type | RESPONSE Result | Status Code | Content-Type |
|---|---|---|---|---|
PUT | application/x-lua | Success | 204 No Content | <N/A> |
PUT | application/x-lua | Failure | 400 Bad Request | application/json |
GET | <N/A> | Success | 200 OK | application/x-lua |
GET | <N/A> | Failure | 404 Not Found | application/json |
DELETE | <N/A> | Success | 204 No Content | <N/A> |
DELETE | <N/A> | Failure | 400 Bad Request | application/json |
DELETE | <N/A> | Failure | 404 Not Found | application/json |
Example request (PUT)
Save a Lua script under the name advanced_functions/f1.lua:
$ curl -i -X PUT \
-d 'function fun1() return 1 end' \
-H "Content-Type: application/x-lua" \
https://router.example:5001/v1/lua/advanced_functions/f1.lua
HTTP/1.1 204 Successfully saved Lua file
Access-Control-Allow-Origin: *
Content-Length: 0
X-Service-Identity: router.example-5fc78d
Example request (PUT, from file)
Upload an entire Lua file under the name advanced_functions/f1.lua:
First put your code in a file.
$ cat f1.lua
function fun1()
return 1
end
Then upload it using the --data-binary flag to preserve newlines
$ curl -i -X PUT \
--data-binary @f1.lua \
-H "Content-Type: application/x-lua" \
https://router.example:5001/v1/lua/advanced_functions/f1.lua
HTTP/1.1 204 Successfully saved Lua file
Access-Control-Allow-Origin: *
Content-Length: 0
X-Service-Identity: router.example-5fc78d
Example request (GET)
Request the Lua script named advanced_functions/f1.lua using a GET request:
$ curl -i https://router.example:5001/v1/lua/advanced_functions/f1.lua
HTTP/1.1 200 OK
Access-Control-Allow-Origin: *
Content-Length: 28
Content-Type: application/x-lua
X-Service-Identity: router.example-5fc78d
function fun1() return 1 end
Example request (DELETE)
Delete the Lua script named advanced_functions/f1.lua using a DELETE request:
$ curl -i -X DELETE \
https://router.example:5001/v1/lua/advanced_functions/f1.lua
HTTP/1.1 204 Successfully removed Lua file
Access-Control-Allow-Origin: *
Content-Length: 0
X-Service-Identity: router.example-5fc78d
List Lua scripts – /v1/lua
Used to list previously uploaded custom Lua scripts on the router, retrieving their respective paths and file checksums.
| REQUEST Method | Content-Type | RESPONSE Result | Status Code | Content-Type |
|---|---|---|---|---|
GET | <N/A> | Success | 200 OK | application/json |
Example request
$ curl -k -i https://router.example:5001/v1/lua
HTTP/1.1 200 OK
Access-Control-Allow-Origin: *
Content-Length: 108
Content-Type: application/json
X-Service-Identity: router.example-5fc78d
[
{
"file_checksum": "d41d8cd98f00b204e9800998ecf8427e",
"path": "advanced_functions/f1.lua"
}
]
Debug a Lua expression – /v1/lua/debug
Used to debug an arbitrary Lua expression on the router in a “sandbox” (with no visible side effects to the state of the router), and inspect the result.
The Lua expression in the body is evaluated inside an isolated copy of the
internal Lua environment including selection input. The stdout field of the
resulting JSON body is populated with a concatenation of every string provided
as argument to the Lua print() function during the course of evaluation.
Upon a successful evaluation, as indicated by the success flag,
return.value and return.lua_type_name capture the resulting Lua value.
Otherwise, if evaluation was aborted (e.g. due to a Lua exception), error_msg
reflects any error description arising from the Lua environment.
| REQUEST Method | Content-Type | RESPONSE Result | Status Code | Content-Type |
|---|---|---|---|---|
POST | application/x-lua | Success | 200 OK | application/json |
Example successful request
$ curl -i -X POST \
-d 'fun1()' \
-H "Content-Type: application/x-lua" \
https://router.example:5001/v1/lua/debug
HTTP/1.1 200 OK
Access-Control-Allow-Origin: *
Content-Length: 123
Content-Type: application/json
X-Service-Identity: router.example-5fc78d
{
"error_msg": "",
"return": {
"lua_type_name": "number",
"value": 1.0
},
"stdout": "",
"success": true
}
Example unsuccessful request
(attempt to invoke unknown function)
$ curl -i -X POST \
-d 'fun5()' \
-H "Content-Type: application/x-lua" \
https://router.example:5001/v1/lua/debug
HTTP/1.1 200 OK
Access-Control-Allow-Origin: *
Content-Length: 123
Content-Type: application/json
X-Service-Identity: router.example-5fc78d
{
"error_msg": "[string \"function f0() ...\"]:2: attempt to call global 'fun5' (a nil value)",
"return": {
"lua_type_name": "",
"value": null
},
"stdout": "",
"success": false
}
Footnotes
6.6 - Configuration
6.6.1 - WebUI Configuration
The web-based user interface can be used to configure many common use cases for the CDN Director.
Normally the GUI is accessible from the CDN Manager at an address like
https://cdn-manager/gui/. After navigating to the UI, a login screen will be
presented:

Enter your credentials and log in.
Once logged in, the middle of the screen will present a few sections. Depending on your user’s permissions and licensed features, different options will be made available.
In the general case, two options will be presented:
- CDN Director
- Configuration Panel
At the top right corner is a user menu with an option to log out.
The left-hand side of the page shows a collapsible menu with a few icons:
 filters the menu options
 used to return to the landing page
 link to the
Director Routing rule configuration view
link to the
Director Routing rule configuration view link
to the Director configuration panel view
link
to the Director configuration panel view
CDN Director Routing
This view provides a graphical tree-based model for configuring how the Director should classify and route incoming content requests.
Menu Options
After navigating to the CDN Director Routing page, the left side will show a list of routing rule block types and host group variants. The user can drag and drop items from this list onto the main canvas in order to design a routing solution.

The Search component input field at the top can be used to search and filter
among the available components. Clicking the question mark next to a component
shows a description popup.

Title Bar
Above the main canvas is the title bar. On the left side is the name of the currently selected routing configuration and its creation date:

To the right are a series of buttons, from left to right:

Creates a grouping rectangle on the canvas. Any routing rules placed on this rectangle can be moved around together, making it easier to construct logical units. This is only a visual and practical effect, it doesn’t in any way change the generated configuration.

Opens a popup menu on the right-hand side of the canvas where various configuration options can be changed. A list of CDN Director instances to apply the configuration to can be found and modified here, as well as the general look and feel of the GUI.

Opens a display of the configuration JSON generated from the graphical representation and allows for editing the text directly. Any changes made will automatically be loaded into the graphical representation.

Automatically arranges all the blocks in the canvas, hopefully making it less messy. Routing decision flow begins from the top left and moves rightwards.

Pushes the currently active configuration onto all the configured CDN Director instances. Changes take effect immediately assuming they do not contain any errors and the GUI will display a dialog with the update results.

Saves the configuration to the listed CDN Director targets, with a name provided by the user. Previously saved configurations can be accessed by clicking the house icon next to the configuration title at the middle top of the canvas.
Note that merely saving a configuration does not make it take effect, it is just for making backups or alternative configurations.
To make a configuration take effect, you have to
Publishit.
Saved Configurations
Clicking the  icon in the title bar
navigates to the saved configurations section.
icon in the title bar
navigates to the saved configurations section.
The upper part of this section is a template list allowing the user to either start a new configuration from scratch by selecting “New configuration” or start from a skeleton configuration by selecting one of the available template tiles.

The lower part contains all stored configurations. First in the list is always the currently published configuration, followed by any user-created configurations that have been saved.
Each entry in the list contain information about its name, who created it and when it was last saved. Next to each saved configuration is a trash can button used to delete it.

Configuration Options
Clicking the icon opens a
panel with configuration options and settings on the right-hand side of the
screen. This panel has the two tabs Configurations and Style.
Configuration
The configuration tab allows the user to manage the CDN Director instances that are to be configured by the GUI.
Whenever a user pushes either Publish or Save version, the configuration
will be sent to routers configured in this list.
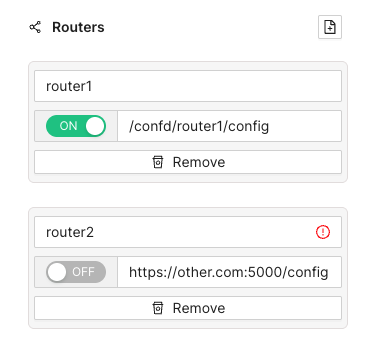
Each entry has a name, an address and a radio button to disable publication to specific instances that are e.g. taken out for maintenance. Turning a Director off won’t affect the current running status of that instance, it will only disable pushing any new configuration to it.
As seen above, the address can be either a full URL with scheme, hostname, port
and path such as http://router1.example.com:5000/config or a relative path
used e.g. to push configurations through an CDN Manager node:
/confd/router1/config.
Style Options
This pane contains various settings for the look and feel of the routing configuration view. The user can change line width and stroke type as well as colors associated with different node types.

Arrange Button
This button will automatically arrange the routing nodes in the canvas, trying to make the connections easier to follow.
Imagine a user has designed the routing flow organically, placing components anywhere on the screen as their need arose. This can make it difficult to get an overview.
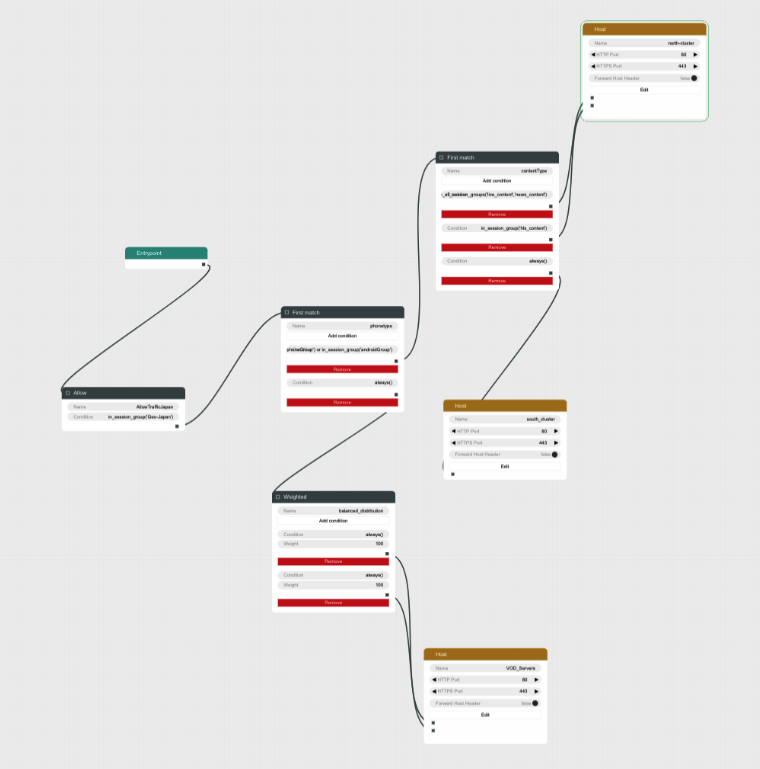
Clicking the Arrange button makes the GUI suggest a more structured
arrangement:

Save Version Button
Sometimes it can be useful to save a copy of a configuration, either because you need to try an entirely different design, or because you want to store a working setup before tweaking it to make sure you can revert to a working state in case anything goes wrong.
Clicking the Save version button opens a dialog box allowing you to pick a
name and save the currently displayed configuration to all the linked CDN
Director instances without activating it.


Going back to the saved configurations list, the new entry has appeared:

Publish Button
Clicking the Publish button sends the currently displayed configuration to be
sent to all enabled CDN Director instances. If it contains a complete and valid
configuration the Directors will then apply any changes.
A dialog box will display the publish status for each configured Director:

Configuration Panel
The configuration panel view allows for configuring routing-adjacent features, such as blocked/allowed referral addresses, blocked/allowed user agent strings or CDN host capacity values.
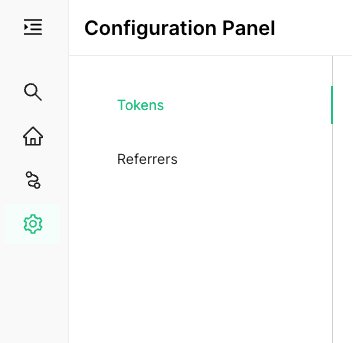
At the moment there are two supported configurations: Blocked tokens and blocked referrers.
Tokens
Selecting Tokens allows the user to observe and edit a list of currently
blocked tokens:

Several actions are available at this point:

Add a new token string to be blocked, along with a corresponding time-to-live (TTL) value in seconds.

A newly added token will automatically be removed after TTL seconds, to avoid filling up the database with outdated or stale values.

In order to avoid performance hits when there are many tokens, nothing is shown in this list until a search string is entered manually by the operator. This is because a token is added to the list every time a valid token request is made and the database can grow to millions of entries.
At least three characters must be entered for searching to begin. A maximum of 100 results are shown. Write more specific search strings to filter out irrelevant token entries.
Note that token-reuse blocking depends on there being a Routing node, e.g. a
Denyblock, with a suitable condition function that performs the token extraction and blocking.
Referrers
This section allows for blocking specific referrer addresses. Unlike the token list, this table will display entries immediately since it is not anticipated to contain nearly as many entries.
Like with the token list, at most 100 entries are shown at a time. Use the search box to find the relevant referrers if the list is full.

Clicking the button will open a window to add a new referrer string to the block list. Clicking the ‘X’ closes the window without adding a new entry.

The search box filters which already-added referrer strings are displayed in the list. At least three characters must be written for filtering to begin, and regardless of how many matching results there are, only 100 will be displayed in the list so it is recommended to be as specific as necessary when searching.

Clicking the trash can next to a referrer removes it from the list of blocked referrers.
Example Routing Configuration
The following text will describe how to set up a simple routing system that has an internal CDN with two streaming servers and one external CDN.
The internal CDN is meant for serving live TV with low latency as well as VOD traffic provided there is enough capacity left without overloading the servers and affect live traffic latency.
In order to demonstrate the Director’s traffic filtering capability the setup will also send any mobile traffic from outside of Stockholm, Sweden to the external CDN.
Finally, a load balancing node is added to split the remaining incoming requests equally between the two internal hosts.
In summary, the configuration will:
- Route off-net traffic from mobile phones to the external CDN.
- Route Live traffic to the external CDN if the internal CDN is overloaded.
- Route any remaining traffic to the internal CDN.
Step-by-Step Walkthrough
When creating a new configuration the only thing that exists is an Entrypoint
node. This node is used to indicate where the routing engine should begin
traversing the routing tree for a new incoming request.

Begin by dragging a Split node onto the canvas and connect it to the
Entrypoint.

A Split node splits the incoming traffic into two separate streams based on
a condition. The default condition is a function called always() that
evaulates as true for any request. This is not very useful for this example,
replace it by clicking on the Condition input field in the node.
This brings us to a dialog box where we can simply replace the condition with
another string or go to a graphical representation of the condition to help
guide us through the steps to getting the Split node to do what we need.
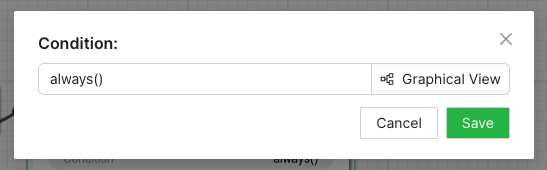
Graphical Condition Builder
Clicking the Graphical View button opens up the graphical representation which
currently shows two condition nodes connected together, one representing the
default condition always() previously mentioned, and one called Condition Output which is a target placeholder for the end result of the entire graph.
Output from one condition node is connected to the input of another node until
the entire chain ends up with the Condition Output node.


On the left-hand side is a menu with the items Session Groups, Conditions
and Classifiers. The Conditions section contains different condition
components whose outputs can be connected to either other condition nodes or
the Condition Output.
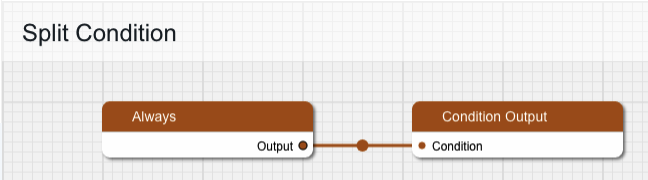
Delete the Always node and replace it with one from the Conditions menu,
specifically In Session Group, and connect its output to Condition Output.
The new condition node takes a Session Group as its input. Drag one of those
from the menu onto the canvas and connect its output to the input labeled
“Session Group”. Give the Session Group node the name “mobile-off-net” since
it is going to contain requests from mobile units outside of the main network.
The Session Group takes a number of classifiers as inputs. Open the
Classifiers section of the menu and drag a Geo IP and a User Agent node
onto the canvas and connect their outputs to the Session Group. Note that
when one classifier is connected, the connection label is updated with its name
and a new empty connection slot is added.

Fill in the two classifier nodes with appropriate values:
Give the Geo IP node the name “off-net”, set Continent to “Europe”,
Country to “Sweden” and City to “Stockholm”. Finally, change the Inverted
toggle to true since we want this condition to match any traffic that comes
from anywhere but Stockholm.
The User Agent node is meant to match mobile devices, but for simplicity’s
sake this classifier is limited to Apple devices for this example. Set the name
to “mobile”, make sure Pattern Type is “stringMatch” and set the pattern to
“apple”. The asterisks will match against any strings at the beginning and end
of the user agent string, and “apple” is case insensitive.
The resulting graph should look like this:

Click Save to return to the routing tree configuration view. Note that
"always()" has been replaced with "in_session_group('mobile-off-net')".

It is time to add a node for the external CDN. Open up the Hosts section in
the left-hand side menu if it is closed. Then drag a Host node onto the
canvas and name it “OffloadCDN”.
This creates a host group which contains hosts which belong together and share common settings such as ports.

Click the Edit button to open a dialog where the actual hosts can be added to
the host group by clicking the icon with a new document on it. Add a host with
the name “offload-host-1” and address “offload-1.example.com”. The IPv6 address field can be left empty.
Click Save to return to the canvas view and connect the Split node’s
onMatch slot to the newly created host. Now any request that matches the
condition we added to the Split node will be sent to the external host.
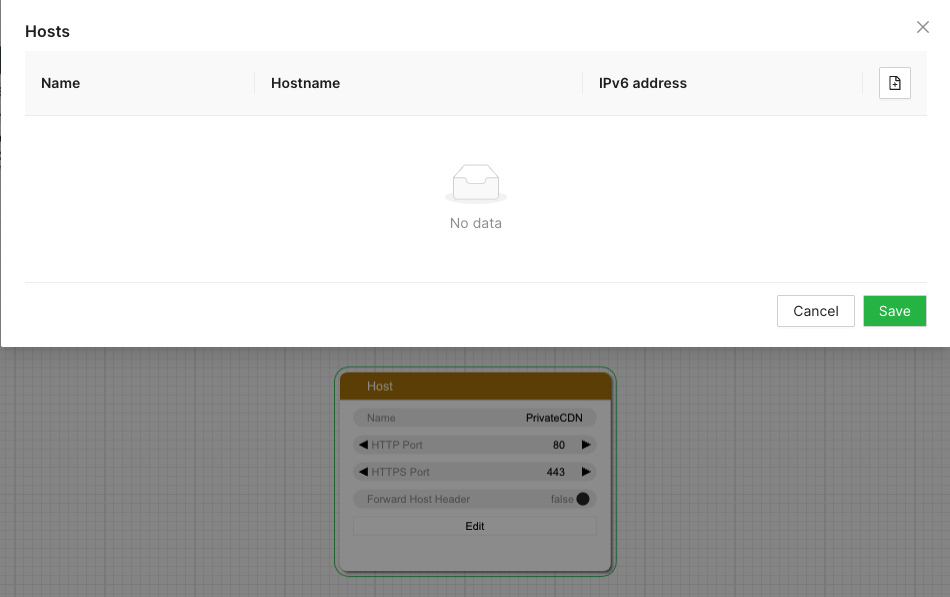
The next step is to add an offload in case the internal CDN is overloaded. Add
another Split node, call it “LiveOffload” and connect it to the previous
Split node’s onMiss slot. We will use a Selection Input
value named "live_bandwidth_left" to determine whether or not the internal CDN
is overloaded.
Click the Condition field and bring up the graphical view. Remove the
default Always node and replace it with a Less Than node. Set its Selection Input string to “live_bandwidth_left” and the Value to 100 in order to send
traffic to the offload CDN whenever the internal CDN reports less than 100
capacity left.
Save the condition and connect the Split node’s onMatch output to the
“offload-host-1” Host.
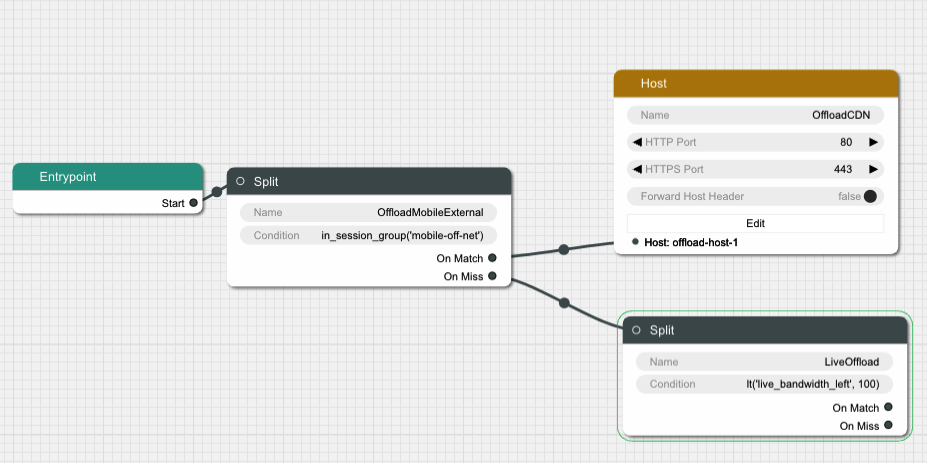
In order to balance the incoming Live traffic between the two internal CDN nodes
we create a Random node, which simply splits the traffic equally among its
targets.

Finally we create another Host node and give it two hosts called
“private-host-1” and “private-host-2”. Connect the Random node to the two
hosts and the routing configuration is finished.

6.6.2 - OLD WebUI Configuration
The web based user interface is installed as a separate component and can be used to configure many common use cases. After navigating to the UI, a login screen will be presented.

Enter your credentials and log in. In the top left corner is a menu to select what section of the configuration to change. The configuration that will be active on the router is added in the Routing Workflow view. However, basic elements such as classification rules and routing targets, etc must be added first. Hence the following main steps are required to produce a proper configuration:
- Create classifiers serving as basic elements to create session groups.
- Create session groups which, using the classifiers, tag requests/clients for later use in the routing logic. of the incoming traffic.
- Define offload rules.
- Define rules to control behavior of internal traffic.
- Define backup rules to be used if the routing targets in the above step are unavailable.
- Finally, create the desired routing workflow using the elements defined in the previous steps.
A simplified concrete example of the above steps could be:
- Create two classifiers “smartphone” and “off-net”.
- Create a session group “mobile off-net”.
- Offload off-net traffic from mobile phones to a public CDN.
- Route other traffic to a private CDN.
- If the private CDN has an outage, use the public CDN for all traffic.
Hence, to start with, define the classifiers you will need. Those are based on information in the incoming request, optionally in combination with GeoIP databases or subnet information configured via the Subnet API. Here we show how to set up a GeoIP classifier. Note that the Director ships with a compatible snapshot of the GeoIP database, but for a production system a licensed and updated database is required.
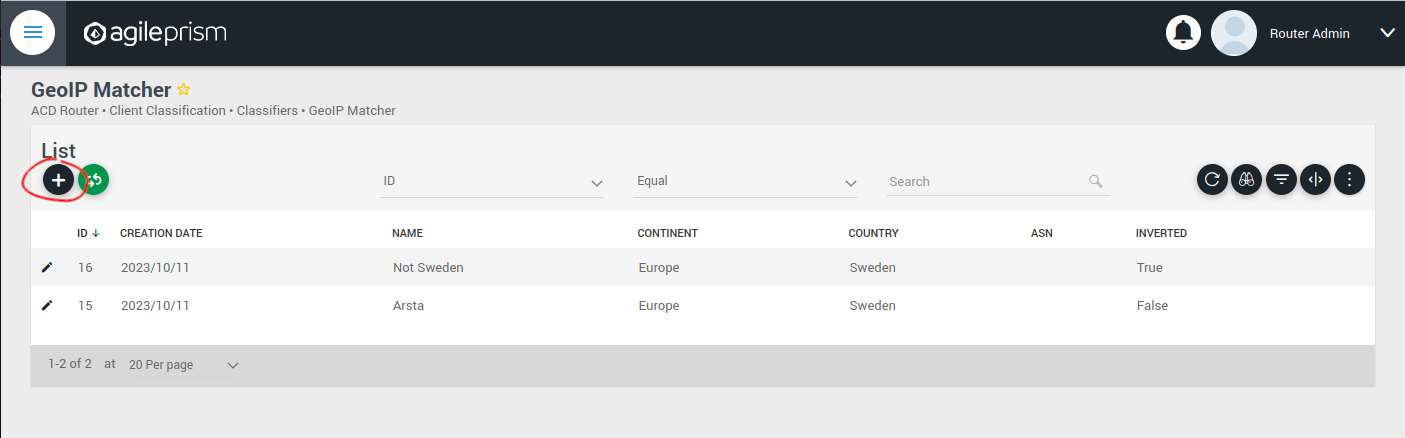
Click the plus sign indicated in the picture above to create a new GeoIP classifier. You will be presented with the following view:

Here you can enter the geographical data on which to match, or check the “Inverted” check box to match anything except the entered geographical data.
The other kinds of classifiers are configured in a similar way.
After having added all the classifiers you need, it is time to create the session groups. Those are named filters that group incoming requests, typically video playback sessions in a video streaming CDN, and are defined with the help of the classifiers. For example, a session group “off-net mobile devices” could be composed of the classifiers “off-net traffic” and “mobile devices”.
Open the Session Groups view from the menu and hit the plus sign to add a new session group.


Define the new sessions groups by combining the previously created classifiers. It is often convenient to define an “All” session group that matches any incoming request.
Next go the “CDN Offload” view:

Here you define conditions for CDN offload. Each row defines a rule for offloading a specified session group. The rule makes use of the Selection Input API. This is an integration API that provides a way to supply additional data for use in the routing decision. Common examples are current bitrates or availability status. The selection input variables to use must be defined in the “Selection Input Types” view in the “Administration” section of the menu:

Reach out to the solution engineers from AgileTV in order to perform this integration in the best way. If no external data is required, such that the offload rule can be based solely based on session groups, this is not necessary and the condition field can be set to “Always” or “Disabled”.
When clicking the plus sign to add a new CDN Offload rule, the following view is presented:

The selection input rule is phrased in terms of a variable being above or below a threshold, but also a state such as “available” taking values 0 or 1 can be supported by for instance checking if “available” is below 1.
Moving on, if an incoming request is not offloaded, it will be handled by the Primary CDN section of the routing configuration.

Add all hosts in your primary CDN, together with a weight. A row in this table will be selected by random weighted load balancing. If each weight is the same, each row will be selected with the same probability. Another example would be three rows with weights 100, 100 and 200 which would randomly balance 50% of the load on the last row and the remaining load on the first two rows, i.e. 25% on each of the first and second row. If a Primary CDN host is unavailable, that host will not take part in the random selection.
If all hosts are unavailable, as a final resort the routing evaluation will go to the final Backup CDN step:

Here you can define what to do when all else fail. If not all requests are covered, for example with an “All” session group, then the request will fail with 403 Forbidden.
Now you have defined the basic elements and it is time to define the routing workflow. Select “Routing Workflow” from the menu, as pictured below. Here you can combine the elements previously created to achieve the desired routing behavior.

When everything seems correct, open the “Publish Routing” view from the menu:

Hit “Publish All Changes” and verify that you get a successful result.
6.6.3 - Confd and Confcli
confcli to set up routing rulesConfiguration of a complex routing tree can be difficult. The command line
interface tool called confcli has been developed to make it simpler. It
combines building blocks, representing simple routing decisions, into complex
routing trees capable of satisfying almost any routing requirements.
These blocks are translated into an ESB3024 Router configuration which is automatically sent to the router, overwriting existing routing rules, CDN list and host list.
Installation and Usage
The confcli tools are installed alongside ESB3024 Router, on the same host,
and the confcli command line tool itself is made available on the host machine.
Simply type confcli in a shell on the host to see the current routing
configuration:
$ confcli
{
"services": {
"routing": {
"settings": {
"trustedProxies": [],
"contentPopularity": {
"algorithm": "score_based",
"sessionGroupNames": []
},
"extendedContentIdentifier": {
"enabled": false,
"includedQueryParams": []
},
"instream": {
"dashManifestRewrite": {
"enabled": false,
"sessionGroupNames": []
},
"hlsManifestRewrite": {
"enabled": false,
"sessionGroupNames": []
},
"reversedFilenameComparison": false
},
"usageLog": {
"enabled": false,
"logInterval": 3600000
}
},
"tuning": {
"content": {
"cacheSizeFullManifests": 1000,
"cacheSizeLightManifests": 10000,
"lightCacheTimeMilliseconds": 86400000,
"liveCacheTimeMilliseconds": 100,
"vodCacheTimeMilliseconds": 10000
},
"general": {
"accessLog": false,
"coutFlushRateMilliseconds": 1000,
"cpuLoadWindowSize": 10,
"eagerCdnSwitching": false,
"httpPipeliningEnable": false,
"logLevel": 3,
"maxConnectionsPerHost": 5,
"overloadThreshold": 32,
"readyThreshold": 8,
"redirectingCdnManifestDownloadRetries": 2,
"repeatedSessionStartThresholdSeconds": 30,
"selectionInputMetricsTimeoutSeconds": 30
},
"session": {
"idleDeactivateTimeoutMilliseconds": 20000,
"idleDeleteTimeoutMilliseconds": 1800000
},
"target": {
"responseTimeoutSeconds": 5,
"retryConnectTimeoutSeconds": 2,
"retryResponseTimeoutSeconds": 2,
"connectTimeoutSeconds": 5,
"maxIdleTimeSeconds": 30,
"requestAttempts": 3
}
},
"sessionGroups": [],
"classifiers": [],
"hostGroups": [],
"rules": [],
"entrypoint": "",
"applyConfig": true
}
}
}
The CLI tool can be used to modify, add and delete values by providing it with
the “path” to the object to change. The path is constructed by joining the field
names leading up to the value with a period between each name, e.g. the path to
the entrypoint is services.routing.entrypoint since entrypoint is nested
under the routing object, which in turn is under the services root object.
Lists use an index number in place of a field name, where 0 indicates the very
first element in the list, 1 the second element and so on.
If the list contains objects which have a field with the name name, the
index number can be replaced by the unique name of the object of interest.
Tab completion is supported by confcli. Pressing tab once will complete as far as possible, and pressing tab twice will list all available alternatives at the path constructed so far.
Display the values at a specific path:
$ confcli services.routing.hostGroups
{
"hostGroups": [
{
"name": "internal",
"type": "redirecting",
"httpPort": 80,
"httpsPort": 443,
"hosts": [
{
"name": "rr1",
"hostname": "rr1.example.com",
"ipv6_address": ""
}
]
},
{
"name": "external",
"type": "host",
"httpPort": 80,
"httpsPort": 443,
"hosts": [
{
"name": "offload-streamer1",
"hostname": "streamer1.example.com",
"ipv6_address": ""
},
{
"name": "offload-streamer2",
"hostname": "streamer2.example.com",
"ipv6_address": ""
}
]
}
]
}
Display the values in a specific list index:
$ confcli services.routing.hostGroups.1
{
"1": {
"name": "external",
"type": "host",
"httpPort": 80,
"httpsPort": 443,
"hosts": [
{
"name": "offload-streamer1",
"hostname": "streamer1.example.com",
"ipv6_address": ""
},
{
"name": "offload-streamer2",
"hostname": "streamer2.example.com",
"ipv6_address": ""
}
]
}
}
Display the values in a specific list index using the object’s name:
$ confcli services.routing.hostGroups.1.hosts.offload-streamer2
{
"offload-streamer2": {
"name": "offload-streamer2",
"hostname": "streamer2.example.com",
"ipv6_address": ""
}
}
Modify a single value:
confcli services.routing.hostGroups.1.hosts.offload-streamer2.hostname new-streamer.example.com
services.routing.hostGroups.1.hosts.offload-streamer2.hostname = 'new-streamer.example.com'
Delete an entry:
$ confcli services.routing.sessionGroups.Apple.classifiers.
{
"classifiers": [
"Apple",
""
]
}
$ confcli services.routing.sessionGroups.Apple.classifiers.1 -d
http://localhost:5000/config/__active/services/routing/sessionGroups/Apple/classifiers/1 reset to default/deleted
$ confcli services.routing.sessionGroups.Apple.classifiers.
{
"classifiers": [
"Apple"
]
}
Adding new values in objects and lists is done using a wizard by invoking
confcli with a path and the -w argument. This will be shown extensively in
the examples further down in this document rather than here.
If you have a JSON file with a previously generated confcli configuration
output it can be applied to a system by typing confcli -i <file path>.
CDNs and Hosts
Configuration using confcli has no real concept of CDNs, instead it has groups of hosts that share some common settings such as HTTP(S) port and whether they return a redirection URL, serve content directly or perform a DNS lookup. Of these three variants, the two former share the same parameters, while the DNS variant is slightly different.
Note that by default, the Director expects redirecting CDNs to redirect with
response code 302. If the CDN returns a redirection URL with another HTTP
response code, the field allowAnyRedirectType must be set to true in the
hostGroup configuration. Then any 3xx response code will result in a 302
response code being sent to the client.
If any of the request headers need to be forwarded to the CDN, they can be
listed in the headersToForward field. This is useful if the CDN needs to
know about the original Host header or any custom headers added by the
client or an upstream proxy.
Each host belongs to a host group and may itself be an entire CDN using a single public hostname or a single streamer server, all depending on the needs of the user.
Host Health
When creating a host in the confd configuration, you have the option to define a list of health check functions. Each health check function must return true for a host to be selected. This means that the host will only be considered available if all the defined health check functions evaluate to true. If any of the health check functions return false, the host will be considered unavailable and will not be selected for routing. All health check functions are detailed in the section Built-in Lua functions.
$ confcli services.routing.hostGroups -w
Running wizard for resource 'hostGroups'
Hint: Hitting return will set a value to its default.
Enter '?' to receive the help string
hostGroups : [
hostGroup can be one of
1: dns
2: host
3: redirecting
Choose element index or name: redirecting
Adding a 'redirecting' element
hostGroup : {
name (default: ): edgeware
type (default: redirecting): ⏎
httpPort (default: 80): ⏎
httpsPort (default: 443): ⏎
headersToForward <A list of HTTP headers to forward to the CDN. (default: [])>: [
headersToForward (default: ): ⏎
Add another 'headersToForward' element to array 'headersToForward'? [y/N]: ⏎
]
allowAnyRedirectType (default: False): ⏎
hosts : [
host : {
name (default: ): rr1
hostname (default: ): convoy-rr1.example.com
ipv6_address (default: ): ⏎
healthChecks : [
healthCheck (default: always()): health_check()
Add another 'healthCheck' element to array 'healthChecks'? [y/N]: n
]
}
Add another 'host' element to array 'hosts'? [y/N]: y
host : {
name (default: ): rr2
hostname (default: ): convoy-rr2.example.com
ipv6_address (default: ): ⏎
healthChecks : [
healthCheck (default: always()): ⏎
Add another 'healthCheck' element to array 'healthChecks'? [y/N]: n
]
}
Add another 'host' element to array 'hosts'? [y/N]: ⏎
]
}
Add another 'hostGroup' element to array 'hostGroups'? [y/N]: ⏎
]
Generated config:
{
"hostGroups": [
{
"name": "edgeware",
"type": "redirecting",
"httpPort": 80,
"httpsPort": 443,
"headersToForward": [],
"allowAnyRedirectType": false,
"hosts": [
{
"name": "rr1",
"hostname": "convoy-rr1.example.com",
"ipv6_address": "",
"healthChecks": [
"health_check()"
]
},
{
"name": "rr2",
"hostname": "convoy-rr2.example.com",
"ipv6_address": "",
"healthChecks": [
"always()"
]
}
]
}
]
}
Merge and apply the config? [y/n]: y
$ confcli services.routing.hostGroups -w
Running wizard for resource 'hostGroups'
Hint: Hitting return will set a value to its default.
Enter '?' to receive the help string
hostGroups : [
hostGroup can be one of
1: dns
2: host
3: redirecting
Choose element index or name: dns
Adding a 'dns' element
hostGroup : {
name (default: ): external-dns
type (default: dns): ⏎
hosts : [
host : {
name (default: ): dns-host
hostname (default: ): dns.example.com
ipv6_address (default: ): ⏎
healthChecks : [
healthCheck (default: always()): ⏎
Add another 'healthCheck' element to array 'healthChecks'? [y/N]: n
]
}
Add another 'host' element to array 'hosts'? [y/N]: ⏎
]
}
Add another 'hostGroup' element to array 'hostGroups'? [y/N]: ⏎
]
Generated config:
{
"hostGroups": [
{
"name": "external-dns",
"type": "dns",
"hosts": [
{
"name": "dns-host",
"hostname": "dns.example.com",
"ipv6_address": "",
"healthChecks": [
"always()"
]
}
]
}
]
}
Merge and apply the config? [y/n]: y
Rule Blocks
The routing configuration using confcli is done using a combination of logical
building blocks, or rules. Each block evaluates the incoming request in some way
and sends it on to one or more sub-blocks. If the block is of the host type
described above, the client is sent to that host and the evaluation is done.
Existing Blocks
Currently supported blocks are:
allow: Incoming requests, for which a given rule function matches, are immediately sent to the providedonMatchtarget.consistentHashing: Splits incoming requests randomly between preferred hosts, determined by the proprietary consistent hashing algorithm. The amount of hosts to split between is controlled by thespreadFactor.contentPopularity: Splits incoming requests into two sub-blocks depending on how popular the requested content is.deny: Incoming requests, for which a given rule function matches, are immediately denied, and all non-matching requests are sent to theonMisstarget.firstMatch: Incoming requests are matched by an ordered series of rules, where the request will be handled by the first rule for which the condition evaluates to true.random: Splits incoming requests randomly and equally between a list of target sub-blocks. Useful for simple load balancing.split: Splits incoming requests between two sub-blocks depending on how the request is evaluated by a provided function. Can be used for sending clients to different hosts depending on e.g. geographical location or client hardware type.weighted: Randomly splits incoming requests between a list of target sub-blocks, weighted according to each target’s associated weight rule. A higher weight means a higher portion of requests will be routed to a sub-block. Rules can be used to decide whether or not to pick a target.rawGroup: Contains a raw ESB3024 Router configuration routing tree node, to be inserted as is in the generated configuration. This is only meant to be used in the rare cases when it’s impossible to construct the required routing behavior in any other way.rawHost: A host reference for use as endpoints in rawGroup trees.
$ confcli services.routing.rules -w
Running wizard for resource 'rules'
Hint: Hitting return will set a value to its default.
Enter '?' to receive the help string
rules : [
rule can be one of
1: allow
2: consistentHashing
3: contentPopularity
4: deny
5: firstMatch
6: random
7: rawGroup
8: rawHost
9: split
10: weighted
Choose element index or name: allow
Adding a 'allow' element
rule : {
name (default: ): allow
type (default: allow): ⏎
condition (default: ): customFunction()
onMatch (default: ): rr1
}
Add another 'rule' element to array 'rules'? [y/N]: ⏎
]
Generated config:
{
"rules": [
{
"name": "content",
"type": "contentPopularity",
"condition": "customFunction()",
"onMatch": "rr1"
}
]
}
Merge and apply the config? [y/n]: y
$ confcli services.routing.rules -w
Running wizard for resource 'rules'
Hint: Hitting return will set a value to its default.
Enter '?' to receive the help string
rules : [
rule can be one of
1: allow
2: consistentHashing
3: contentPopularity
4: deny
5: firstMatch
6: random
7: rawGroup
8: rawHost
9: split
10: weighted
Choose element index or name: consistentHashing
Adding a 'consistentHashing' element
rule : {
name (default: ): consistentHashingRule
type (default: consistentHashing):
spreadFactor (default: 1): 2
hashAlgorithm (default: MD5):
targets : [
target : {
target (default: ): rr1
enabled (default: True):
}
Add another 'target' element to array 'targets'? [y/N]: y
target : {
target (default: ): rr2
enabled (default: True):
}
Add another 'target' element to array 'targets'? [y/N]: y
target : {
target (default: ): rr3
enabled (default: True):
}
Add another 'target' element to array 'targets'? [y/N]: n
]
}
Add another 'rule' element to array 'rules'? [y/N]: n
]
Generated config:
{
"rules": [
{
"name": "consistentHashingRule",
"type": "consistentHashing",
"spreadFactor": 2,
"hashAlgorithm": "MD5",
"targets": [
{
"target": "rr1",
"enabled": true
},
{
"target": "rr2",
"enabled": true
},
{
"target": "rr3",
"enabled": true
}
]
}
]
}
Merge and apply the config? [y/n]: y
$ confcli services.routing.rules -w
Running wizard for resource 'rules'
Hint: Hitting return will set a value to its default.
Enter '?' to receive the help string
rules : [
rule can be one of
1: allow
2: consistentHashing
3: contentPopularity
4: deny
5: firstMatch
6: random
7: rawGroup
8: rawHost
9: split
10: weighted
Choose element index or name: contentPopularity
Adding a 'contentPopularity' element
rule : {
name (default: ): content
type (default: contentPopularity): ⏎
contentPopularityCutoff (default: 10): 20
onPopular (default: ): rr1
onUnpopular (default: ): rr2
}
Add another 'rule' element to array 'rules'? [y/N]: ⏎
]
Generated config:
{
"rules": [
{
"name": "content",
"type": "contentPopularity",
"contentPopularityCutoff": 20.0,
"onPopular": "rr1",
"onUnpopular": "rr2"
}
]
}
Merge and apply the config? [y/n]: y
$ confcli services.routing.rules -w
Running wizard for resource 'rules'
Hint: Hitting return will set a value to its default.
Enter '?' to receive the help string
rules : [
rule can be one of
1: allow
2: consistentHashing
3: contentPopularity
4: deny
5: firstMatch
6: random
7: rawGroup
8: rawHost
9: split
10: weighted
Choose element index or name: deny
Adding a 'deny' element
rule : {
name (default: ): deny
type (default: deny): ⏎
condition (default: ): customFunction()
onMiss (default: ): rr1
}
Add another 'rule' element to array 'rules'? [y/N]: ⏎
]
Generated config:
{
"rules": [
{
"name": "content",
"type": "contentPopularity",
"condition": "customFunction()",
"onMiss": "rr1"
}
]
}
Merge and apply the config? [y/n]: y
$ confcli services.routing.rules -w
Running wizard for resource 'rules'
Hint: Hitting return will set a value to its default.
Enter '?' to receive the help string
rules : [
rule can be one of
1: allow
2: consistentHashing
3: contentPopularity
4: deny
5: firstMatch
6: random
7: rawGroup
8: rawHost
9: split
10: weighted
Choose element index or name: firstMatch
Adding a 'firstMatch' element
rule : {
name (default: ): firstMatch
type (default: firstMatch): ⏎
targets : [
target : {
onMatch (default: ): rr1
rule (default: ): customFunction()
}
Add another 'target' element to array 'targets'? [y/N]: y
target : {
onMatch (default: ): rr2
rule (default: ): otherCustomFunction()
}
Add another 'target' element to array 'targets'? [y/N]: n
]
}
Add another 'rule' element to array 'rules'? [y/N]: n
]
Generated config:
{
"rules": [
{
"name": "firstMatch",
"type": "firstMatch",
"targets": [
{
"onMatch": "rr1",
"condition": "customFunction()"
},
{
"onMatch": "rr2",
"condition": "otherCustomFunction()"
}
]
}
]
}
Merge and apply the config? [y/n]: y
$ confcli services.routing.rules -w
Running wizard for resource 'rules'
Hint: Hitting return will set a value to its default.
Enter '?' to receive the help string
rules : [
rule can be one of
1: allow
2: consistentHashing
3: contentPopularity
4: deny
5: firstMatch
6: random
7: rawGroup
8: rawHost
9: split
10: weighted
Choose element index or name: random
Adding a 'random' element
rule : {
name (default: ): random
type (default: random): ⏎
targets : [
target (default: ): rr1
Add another 'target' element to array 'targets'? [y/N]: y
target (default: ): rr2
Add another 'target' element to array 'targets'? [y/N]: ⏎
]
}
Add another 'rule' element to array 'rules'? [y/N]: ⏎
]
Generated config:
{
"rules": [
{
"name": "random",
"type": "random",
"targets": [
"rr1",
"rr2"
]
}
]
}
Merge and apply the config? [y/n]: y
$ confcli services.routing.rules -w
Running wizard for resource 'rules'
Hint: Hitting return will set a value to its default.
Enter '?' to receive the help string
rules : [
rule can be one of
1: allow
2: consistentHashing
3: contentPopularity
4: deny
5: firstMatch
6: random
7: rawGroup
8: rawHost
9: split
10: weighted
Choose element index or name: split
Adding a 'split' element
rule : {
name (default: ): split
type (default: split): ⏎
condition (default: ): custom_function()
onMatch (default: ): rr2
onMiss (default: ): rr1
}
Add another 'rule' element to array 'rules'? [y/N]: ⏎
]
Generated config:
{
"rules": [
{
"name": "split",
"type": "split",
"condition": "custom_function()",
"onMatch": "rr2",
"onMiss": "rr1"
}
]
}
Merge and apply the config? [y/n]: y
$ confcli services.routing.rules. -w
Running wizard for resource 'rules'
Hint: Hitting return will set a value to its default.
Enter '?' to receive the help string
rules : [
rule can be one of
1: allow
2: consistentHashing
3: contentPopularity
4: deny
5: firstMatch
6: random
7: rawGroup
8: rawHost
9: split
10: weighted
Choose element index or name: weighted
Adding a 'weighted' element
rule : {
name (default: ): weight
type (default: weighted): ⏎
targets : [
target : {
target (default: ): rr1
weight (default: 100): ⏎
condition (default: always()): always()
}
Add another 'target' element to array 'targets'? [y/N]: y
target : {
target (default: ): rr2
weight (default: 100): si('rr2-input-weight')
condition (default: always()): gt('rr2-bandwidth', 1000000)
}
Add another 'target' element to array 'targets'? [y/N]: y
target : {
target (default: ): rr2
weight (default: 100): custom_func()
condition (default: always()): always()
}
Add another 'target' element to array 'targets'? [y/N]: ⏎
]
}
Add another 'rule' element to array 'rules'? [y/N]: ⏎
]
Generated config:
{
"rules": [
{
"name": "weight",
"type": "weighted",
"targets": [
{
"target": "rr1",
"weight": "100",
"condition": "always()"
},
{
"target": "rr2",
"weight": "si('rr2-input-weight')",
"condition": "gt('rr2-bandwith', 1000000)"
},
{
"target": "rr2",
"weight": "custom_func()",
"condition": "always()"
}
]
}
]
}
Merge and apply the config? [y/n]: y
>> First add a raw host block that refers to a regular host
$ confcli services.routing.rules. -w
Running wizard for resource 'rules'
Hint: Hitting return will set a value to its default.
Enter '?' to receive the help string
rules : [
rule can be one of
1: allow
2: consistentHashing
3: contentPopularity
4: deny
5: firstMatch
6: random
7: rawGroup
8: rawHost
9: split
10: weighted
Choose element index or name: rawHost
Adding a 'rawHost' element
rule : {
name (default: ): raw-host
type (default: rawHost): ⏎
hostId (default: ): rr1
}
Add another 'rule' element to array 'rules'? [y/N]: ⏎
]
Generated config:
{
"rules": [
{
"name": "raw-host",
"type": "rawHost",
"hostId": "rr1"
}
]
}
Merge and apply the config? [y/n]: y
>> And then add a rule using the host node
$ confcli services.routing.rules. -w
Running wizard for resource 'rules'
Hint: Hitting return will set a value to its default.
Enter '?' to receive the help string
rules : [
rule can be one of
1: allow
2: consistentHashing
3: contentPopularity
4: deny
5: firstMatch
6: random
7: rawGroup
8: rawHost
9: split
10: weighted
Choose element index or name: rawGroup
Adding a 'rawGroup' element
rule : {
name (default: ): raw-node
type (default: rawGroup): ⏎
memberOrder (default: sequential): ⏎
members : [
member : {
target (default: ): raw-host
weightFunction (default: ): return 1
}
Add another 'member' element to array 'members'? [y/N]: ⏎
]
}
Add another 'rule' element to array 'rules'? [y/N]: ⏎
]
Generated config:
{
"rules": [
{
"name": "raw-node",
"type": "rawGroup",
"memberOrder": "sequential",
"members": [
{
"target": "raw-host",
"weightFunction": "return 1"
}
]
}
]
}
Merge and apply the config? [y/n]: y
Rule Language
Some blocks, such as the split and firstMatch types, have a rule field that
contains a small function in a very simple, custom-made programming language, that
is a limited subset of Lua. This field is used to filter any incoming client
requests in order to determine how to rule block should react.
In the case of a split block, the rule is evaluated and if it is true the
client is sent to the onMatch part of the block, otherwise it is sent to the
onMiss part for further evaluation.
In the case of a firstMatch block, the rule for each target will be evaluated
top to bottom in order until either a rule evaluates to true or the list is
exhausted. If a rule evaluates to true, the client will be sent to the onMatch
part of the block, otherwise the next target in the list will be tried. If all
targets have been exhausted, then the entire rule evaluation will fail, and the
routing tree will be restarted with the firstMatch block effectively removed.
Example of Boolean Functions
Let’s say we have an ESB3024 Router set up with a session group that matches Apple
devices (named “Apple”). To route all Apple devices to a specific streamer one
would simply create a split block with the following rule:
in_session_group('Apple')
In order to make more complex rules it’s possible to combine several checks like
this in the same rule. Let’s extend the hypothetical ESB3024 Router above with a
configured subnet with all IP addresses in Europe (named “Europe”). To make a
rule that accepts any clients using an Apple device and living outside of
Europe, but only as long as the reported load on the streamer (as indicated by
the selection input variable
“europe_load_mbps”) is less than 1000 megabits per second one could make an
offload block with the following rule (without linebreaks):
in_session_group('Apple')
and not in_subnet('Europe')
and lt('europe_load_mbps', 1000)
In this example in_session_group('Apple') will be true if the client belongs
to the session group named ‘Apple’. The function call in_subnet('Europe') is
true if the client’s IP belongs to the subnet named ‘Europe’, but the word not
in front of it reverses the value so the entire section ends up being false if
the client is in Europe. Finally lt('europe_load_mbps', 1000) is true if
there is a selection input variable named “europe_load_mbps” and its value is
less than 1000.
Since the three parts are conjoined with the and keyword they must all
be true for the entire rule to match. If the keyword or had been used
instead it would have been enough for any of the parts to be true for the
rule to match.
Example of Numeric Functions
A hypothetical CDN has two streamers with different capacity; Host_1 has
roughly twice the capacity of Host_2. A simple random load balancing would put
undue stress on the second host since it will receive as much traffic as the
more capable Host_1.
This can be solved by using a weighted random distribution rule block with
suitable rules for the two hosts:
{
"targets": [
{
"target": "Host_1",
"condition": "always()",
"weight": "100"
}
{
"target": "Host_2",
"condition": "always()",
"weight": "50"
},
]
}
resulting in Host_1 receiving twice as many requests as Host_2 as its
weight function is double that of Host_2.
If the CDN is capable of reporting the free capacity of the hosts, for example by writing to a selection input variable for each host, it’s easy to write a more intelligent load balancing rule by making the weights correspond to the amount of capacity left on each host:
{
"targets": [
{
"target": "Host_1",
"condition": "always()",
"weight": "si('free_capacity_host_1')"
}
{
"target": "Host_2",
"condition": "always()",
"weight": "si('free_capacity_host_2')"
},
]
}
It is also possible to write custom Lua functions that return suitable weights, perhaps taking the host as an argument:
{
"targets": [
{
"target": "Host_1",
"condition": "always()",
"weight": "intelligent_weight_function('Host_1')"
}
{
"target": "Host_2",
"condition": "always()",
"weight": "intelligent_weight_function('Host_1')"
},
]
}
These different weight rules can of course be combined in the same rule block, with one target having a hard coded number, another using a dynamically updated selection input variable and yet another having a custom-built function.
Due to limitations in the random number generator used to distribute requests, it’s better to use somewhat large values, around 100–1000 or so, than to use small values near 0.
Built-In Functions
The following built-in functions are available when writing rules:
in_session_group(str name): True if session belongs to session group<name>in_all_session_groups(str sg_name, ...): True if session belongs to all specified session groupsin_any_session_group(str sg_name, ...): True if session belongs to any specified session groupin_subnet(str subnet_name): True if client IP belongs to the named subnetgt(str si_var, number value): True if selection_inputs[si_var] > valuegt(str si_var1, str si_var2): True if selection_inputs[si_var1] > selection_inputs[si_var2]ge(str si_var, number value): True if selection_inputs[si_var] >= valuege(str si_var1, str si_var2): True if selection_inputs[si_var1] >= selection_inputs[si_var2]lt(str si_var, number value): True if selection_inputs[si_var] < valuelt(str si_var1, str si_var2): True if selection_inputs[si_var1] < selection_inputs[si_var2]le(str si_var, number value): True if selection_inputs[si_var] <= valuele(str si_var1, str si_var2): True if selection_inputs[si_var1] <= selection_inputs[si_var2]eq(str si_var, number value): True if selection_inputs[si_var] == valueeq(str si_var1, str si_var2): True if selection_inputs[si_var1] == selection_inputs[si_var2]neq(str si_var, number value): True if selection_inputs[si_var] != valueneq(str si_var1, str si_var2): True if selection_inputs[si_var1] != selection_inputs[si_var2]si(str si_var): Returns the value of selection_inputs[si_var] if it is defined and non-negative, otherwise it returns 0.always(): Returns true, useful when creating weighted rule blocks.never(): Returns false, opposite ofalways().
These functions, as well as custom functions written in Lua and uploaded to the ESB3024 Router, can be combined to make suitably precise rules.
Combining Multiple Boolean Functions
The rule language supports flexible boolean logic with and, or, and not
operators. Complex expressions can be built using parentheses for explicit
precedence control.
Operator Precedence:
- Parentheses have highest precedence and force explicit grouping
notbinds tightly to the predicate immediately following itandhas higher precedence thanor- Operators at the same level are left-associative
Examples:
// Simple conjunction
in_session_group('mobile') and in_subnet('asia')
// Simple disjunction
in_session_group('premium') or in_session_group('trial')
// Mixed operators (and binds tighter than or)
in_subnet('internal') or in_session_group('staff') and gt('clearance', 5)
// Equivalent to:
// in_subnet('internal') or (in_session_group('staff') and gt('clearance', 5))
// Explicit grouping with parentheses
(in_session_group('mobile') or in_session_group('tablet')) and not in_subnet('blocked')
// Negation with grouping
not (in_session_group('free') and gt('requests_today', 100))
Short-circuit Evaluation:
Expressions use short-circuit (lazy) evaluation, evaluating left-to-right and stopping as soon as the result is certain:
- For and: stops at the first false (since the entire expression must be false)
- For or: stops at the first true (since only one true makes the entire expression true)
This means expensive predicates should be placed after cheaper ones when possible to minimize unnecessary evaluation.
Custom Functions
It is possible to write extremely complex Lua functions that take many parameters or calculations into consideration when evaluating an incoming client request. By writing such functions and making sure that they return only non-negative integer values and uploading them to the router they can be used from the rule language. Simply call them like any of the built-in functions listed above, using strings and numbers as arguments if necessary, and their result will be used to determine the routing path to use.
Formal Syntax
The full syntax of the language can be described in just a few lines of BNF grammar:
<rule> := <weight_rule> | <match_rule> | <value_rule>
<weight_rule> := "if" <compound_predicate> "then" <weight> "else" <weight>
<value_rule> := <weight>
<match_rule> := <compound_predicate>
<compound-predicate> := <or-predicate>
<or-predicate> := <and-predicate> ["or" <and-predicate> ...]
<and-predicate> := <term-predicate> ["and" <term-predicate> ...]
<term-predicate> := "(" <compound-predicate> ")" |
"not" "(" <compound-predicate> ")" |
<logical-predicate>
<logical-predicate> := ["not"] <predicate>
<predicate> := <function-name> "(" ")" |
<function-name> "(" <argument> ["," <argument> ...] ")"
<function-name> := <letter> [<function-name-tail> ...]
<function-name-tail> := empty | <letter> | <digit> | "_"
<argument> := <string> | <number>
<weight> := integer | <predicate>
<number> := float | integer
<string> := "'" [<letter> | <digit> | <symbol> ...] "'"
<letter> := "a" | "b" | ... | "z" | "A" | "B" | ... | "Z"
<digit> := "0" | "1" | ... | "9"
<symbol> := any printable character except "'" unless escaped by a backslash
Building a Routing Configuration
This example sets up an entire routing configuration for a system with a ESB3008 Request Router, two streamers and the Apple devices outside of Europe example used earlier in this document. Any clients not matching the criteria will be sent to an offload CDN with two streamers in a simple uniformly randomized load balancing setup.
Set up Session Group
First make a classifier and a session group that uses it:
$ confcli services.routing.classifiers -w
Running wizard for resource 'classifiers'
Hint: Hitting return will set a value to its default.
Enter '?' to receive the help string
classifiers : [
classifier can be one of
1: anonymousIp
2: asnIds
3: contentUrlPath
4: contentUrlQueryParameters
5: geoip
6: hostName
7: ipranges
8: random
9: regexMatcher
10: requestHeader
11: stringMatcher
12: subnet
13: userAgent
Choose element index or name: userAgent
Adding a 'userAgent' element
classifier : {
name (default: ): Apple
type (default: userAgent): ⏎
inverted (default: False): ⏎
patternType (default: stringMatch): ⏎
pattern (default: ): *apple*
}
Add another 'classifier' element to array 'classifiers'? [y/N]: ⏎
]
Generated config:
{
"classifiers": [
{
"name": "Apple",
"type": "userAgent",
"inverted": false,
"patternType": "stringMatch",
"pattern": "*apple*"
}
]
}
Merge and apply the config? [y/n]: y
$ confcli services.routing.sessionGroups -w
Running wizard for resource 'sessionGroups'
Hint: Hitting return will set a value to its default.
Enter '?' to receive the help string
sessionGroups : [
sessionGroup : {
name (default: ): Apple
classifiers : [
classifier (default: ): Apple
Add another 'classifier' element to array 'classifiers'? [y/N]: ⏎
]
}
Add another 'sessionGroup' element to array 'sessionGroups'? [y/N]: ⏎
]
Generated config:
{
"sessionGroups": [
{
"name": "Apple",
"classifiers": [
"Apple"
]
}
]
}
Merge and apply the config? [y/n]: y
Set up Hosts
Create two host groups and add a Request Router to the first and two streamers to the second, which will be used for offload:
$ confcli services.routing.hostGroups -w
Running wizard for resource 'hostGroups'
Hint: Hitting return will set a value to its default.
Enter '?' to receive the help string
hostGroups : [
hostGroup can be one of
1: dns
2: host
3: redirecting
Choose element index or name: redirecting
Adding a 'redirecting' element
hostGroup : {
name (default: ): internal
type (default: redirecting): ⏎
httpPort (default: 80): ⏎
httpsPort (default: 443): ⏎
headersToForward <A list of HTTP headers to forward to the CDN. (default: [])>: [
headersToForward (default: ): ⏎
Add another 'headersToForward' element to array 'headersToForward'? [y/N]: ⏎
]
allowAnyRedirectType (default: False): ⏎
hosts : [
host : {
name (default: ): rr1
hostname (default: ): rr1.example.com
ipv6_address (default: ): ⏎
}
Add another 'host' element to array 'hosts'? [y/N]: ⏎
]
}
Add another 'hostGroup' element to array 'hostGroups'? [y/N]: y
hostGroup can be one of
1: dns
2: host
3: redirecting
Choose element index or name: host
Adding a 'host' element
hostGroup : {
name (default: ): external
type (default: host): ⏎
httpPort (default: 80): ⏎
httpsPort (default: 443): ⏎
hosts : [
host : {
name (default: ): offload-streamer1
hostname (default: ): streamer1.example.com
ipv6_address (default: ): ⏎
}
Add another 'host' element to array 'hosts'? [y/N]: y
host : {
name (default: ): offload-streamer2
hostname (default: ): streamer2.example.com
ipv6_address (default: ): ⏎
}
Add another 'host' element to array 'hosts'? [y/N]: ⏎
]
}
Add another 'hostGroup' element to array 'hostGroups'? [y/N]: ⏎
]
Generated config:
{
"hostGroups": [
{
"name": "internal",
"type": "redirecting",
"httpPort": 80,
"httpsPort": 443,
"headersToForward": [],
"allowAnyRedirectType": false,
"hosts": [
{
"name": "rr1",
"hostname": "rr1.example.com",
"ipv6_address": ""
}
]
},
{
"name": "external",
"type": "host",
"httpPort": 80,
"httpsPort": 443,
"hosts": [
{
"name": "offload-streamer1",
"hostname": "streamer1.example.com",
"ipv6_address": ""
},
{
"name": "offload-streamer2",
"hostname": "streamer2.example.com",
"ipv6_address": ""
}
]
}
]
}
Merge and apply the config? [y/n]: y
Create Load Balancing and Offload Block
Add both offload streamers as targets in a randomgroup block:
$ confcli services.routing.rules -w
Running wizard for resource 'rules'
Hint: Hitting return will set a value to its default.
Enter '?' to receive the help string
rules : [
rule can be one of
1: allow
2: consistentHashing
3: contentPopularity
4: deny
5: firstMatch
6: random
7: rawGroup
8: rawHost
9: split
10: weighted
Choose element index or name: random
Adding a 'random' element
rule : {
name (default: ): balancer
type (default: random): ⏎
targets : [
target (default: ): offload-streamer1
Add another 'target' element to array 'targets'? [y/N]: y
target (default: ): offload-streamer2
Add another 'target' element to array 'targets'? [y/N]: ⏎
]
}
Add another 'rule' element to array 'rules'? [y/N]: ⏎
]
Generated config:
{
"rules": [
{
"name": "balancer",
"type": "random",
"targets": [
"offload-streamer1",
"offload-streamer2"
]
}
]
}
Merge and apply the config? [y/n]: y
Then create a split block with the request router and the load balanced CDN as targets:
$ confcli services.routing.rules -w
Running wizard for resource 'rules'
Hint: Hitting return will set a value to its default.
Enter '?' to receive the help string
rules : [
rule can be one of
1: allow
2: consistentHashing
3: contentPopularity
4: deny
5: firstMatch
6: random
7: rawGroup
8: rawHost
9: split
10: weighted
Choose element index or name: split
Adding a 'split' element
rule : {
name (default: ): offload
type (default: split): ⏎
rule (default: ): in_session_group('Apple') and not in_subnet('Europe') and lt('europe_load_mbps', 1000)
onMatch (default: ): rr1
onMiss (default: ): balancer
}
Add another 'rule' element to array 'rules'? [y/N]: ⏎
]
Generated config:
{
"rules": [
{
"name": "offload",
"type": "split",
"condition": "in_session_group('Apple') and not in_subnet('Europe') and lt('europe_load_mbps', 1000)",
"onMatch": "rr1",
"onMiss": "balancer"
}
]
}
Merge and apply the config? [y/n]: y
The last step required is to set the entrypoint of the routing tree so the router knows where to start evaluating:
$ confcli services.routing.entrypoint offload
services.routing.entrypoint = 'offload'
Evaluate
Now that all the rules have been set up properly and the router has been reconfigured. The translated configuration can be read from the router’s configuration API:
$ curl -k https://router-host:5001/v2/configuration 2> /dev/null | jq .routing
{
"id": "offload",
"member_order": "sequential",
"members": [
{
"host_id": "rr1",
"id": "offload.rr1",
"weight_function": "return ((in_session_group('Apple') ~= 0) and
(in_subnet('Europe') == 0) and
(lt('europe_load_mbps', 1000) ~= 0) and 1) or 0 "
},
{
"id": "offload.balancer",
"member_order": "weighted",
"members": [
{
"host_id": "offload-streamer1",
"id": "offload.balancer.offload-streamer1",
"weight_function": "return 100"
},
{
"host_id": "offload-streamer2",
"id": "offload.balancer.offload-streamer2",
"weight_function": "return 100"
}
],
"weight_function": "return 1"
}
],
"weight_function": "return 100"
}
Note that the configuration language code has been translated into its Lua equivalent.
6.6.4 - Session Groups and Classification
ESB3024 Router provides a flexible classification engine, allowing the assignment of clients into session groups that can then be used to base routing decisions on.
Session Classification
In order to perform routing it is necessary to classify incoming sessions according to the relevant parameters. This is done through session groups and their associated classifiers.
There are different ways of classifying a request:
Anonymous IP: Classifies clients using an anonymous IP database. See Geographic Databases for information about the database.ASN IDs: Checks to see if a client’s IP belongs to any of the specified ASN IDs. See Geographic Databases for information about the ASN database.Content URL path: Matches the given pattern against the path part of the URL requested by the client. The match can be either a case-insensitive wildcard match or a regular expression match.Content URL query parameters: Matches the given pattern against the query parameters of the URL requested by the client. The query parameters are passed as a single string. The match can be either a case-insensitive wildcard match or a regular expression match.GeoIP: Based on the geographic location of the client, supporting wildcard matching. See Route on GeoIP/ASN for more details. The possible values to match with are any combinations of:- Continent
- Country
- Region
- Cities
- ASN
Host name: Matches the given pattern against the name of the host that the request was sent to. The match can be either a case-insensitive wildcard match or a regular expression match.IP ranges: Classifies a client based on whether its IP address belongs to any of the listed IP ranges or not.Random: Randomly classifies clients according to a given probability. The classifier is deterministic, meaning that a session will always get the same classification, even if evaluated multiple times.Regular expression matcher: Matches the given pattern against a configurable source. The match is case-insensitive and supports regular expressions. The following sources are available:content_url_path: The path part of the URL requested by the client.content_url_query_params: The query parameters of the URL requested by the client. The query parameters are passed as a single string.hostname: The name of the host that the request was sent to.user_agent: The user agent string in the HTTP request from the client.
Request Header: Classifies clients based on the value of a specified HTTP header in the request from the client.String matcher: Matches the given pattern against a configurable source. The match is case-insensitive and supports wildcards (’*’). The following sources are available:content_url_path: The path part of the URL requested by the client.content_url_query_params: The query parameters of the URL requested by the client. The query parameters are passed as a single string.hostname: The name of the host that the request was sent to.user_agent: The user agent string in the HTTP request from the client.
Subnet: Tests if a client’s IP belongs to a named subnet, see Subnets for more details.User agent: Matches the given pattern against the user agent string in the HTTP request from the client. The match can be either a case-insensitive wildcard match or a regular expression match.
A session group may have more than one classifier. If it does, all the classifiers must match the incoming client request for it to belong to the session group. It is also possible for a request to belong to multiple session groups, or to none.
To send certain clients to a specific host you first need to create a suitable
classifier using confcli in wizard mode. The wizard will guide you through the
process of creating a new entry, asking you what value to input for each field
and helping you by telling you what inputs are allowed for restricted fields
such as the string comparison source mentioned above:
$ confcli services.routing.classifiers -w
Running wizard for resource 'classifiers'
Hint: Hitting return will set a value to its default.
Enter '?' to receive the help string
classifiers : [
classifier can be one of
1: anonymousIp
2: asnIds
3: contentUrlPath
4: contentUrlQueryParameters
5: geoip
6: hostName
7: ipranges
8: random
9: regexMatcher
10: requestHeader
11: stringMatcher
12: subnet
13: userAgent
Choose element index or name: anonymousIp
Adding a 'anonymousIp' element
classifier : {
name (default: ): anon_ip_matcher
type (default: anonymousIp):
inverted (default: False):
}
Add another 'classifier' element to array 'classifiers'? [y/N]: n
]
Generated config:
{
"classifiers": [
{
"name": "anon_ip_matcher",
"type": "anonymousIp",
"inverted": false
}
]
}
Merge and apply the config? [y/n]: y
$ confcli services.routing.classifiers -w
Running wizard for resource 'classifiers'
Hint: Hitting return will set a value to its default.
Enter '?' to receive the help string
classifiers : [
classifier can be one of
1: anonymousIp
2: asnIds
3: contentUrlPath
4: contentUrlQueryParameters
5: geoip
6: hostName
7: ipranges
8: random
9: regexMatcher
10: requestHeader
11: stringMatcher
12: subnet
13: userAgent
Choose element index or name: asnIds
Adding a 'asnIds' element
classifier : {
name (default: ): asn_matcher
type (default: asnIds): ⏎
inverted (default: False): ⏎
asnIds <The list of ASN IDs to accept. (default: [])>: [
asnId: 1
Add another 'asnId' element to array 'asnIds'? [y/N]: y
asnId: 2
Add another 'asnId' element to array 'asnIds'? [y/N]: y
asnId: 3
Add another 'asnId' element to array 'asnIds'? [y/N]: ⏎
]
}
Add another 'classifier' element to array 'classifiers'? [y/N]: ⏎
]
Generated config:
{
"classifiers": [
{
"name": "asn_matcher",
"type": "asnIds",
"inverted": false,
"asnIds": [
1,
2,
3
]
}
]
}
Merge and apply the config? [y/n]: y
$ confcli services.routing.classifiers -w
Running wizard for resource 'classifiers'
Hint: Hitting return will set a value to its default.
Enter '?' to receive the help string
classifiers : [
classifier can be one of
1: anonymousIp
2: asnIds
3: contentUrlPath
4: contentUrlQueryParameters
5: geoip
6: hostName
7: ipranges
8: random
9: regexMatcher
10: requestHeader
11: stringMatcher
12: subnet
13: userAgent
Choose element index or name: contentUrlPath
Adding a 'contentUrlPath' element
classifier : {
name (default: ): vod_matcher
type (default: contentUrlPath): ⏎
inverted (default: False): ⏎
patternType (default: stringMatch): ⏎
pattern (default: ): *vod*
}
Add another 'classifier' element to array 'classifiers'? [y/N]: n
]
Generated config:
{
"classifiers": [
{
"name": "vod_matcher",
"type": "contentUrlPath",
"inverted": false,
"patternType": "stringMatch",
"pattern": "*vod*"
}
]
}
Merge and apply the config? [y/n]: y
$ confcli services.routing.classifiers -w
Running wizard for resource 'classifiers'
Hint: Hitting return will set a value to its default.
Enter '?' to receive the help string
classifiers : [
classifier can be one of
1: anonymousIp
2: asnIds
3: contentUrlPath
4: contentUrlQueryParameters
5: geoip
6: hostName
7: ipranges
8: random
9: regexMatcher
10: requestHeader
11: stringMatcher
12: subnet
13: userAgent
Choose element index or name: contentUrlQueryParameters
Adding a 'contentUrlQueryParameters' element
classifier : {
name (default: ): bitrate_matcher
type (default: contentUrlQueryParameters): ⏎
inverted (default: False): ⏎
patternType (default: stringMatch): regex
pattern (default: ): .*bitrate=100000.*
}
Add another 'classifier' element to array 'classifiers'? [y/N]: n
]
Generated config:
{
"classifiers": [
{
"name": "bitrate_matcher",
"type": "contentUrlQueryParameters",
"inverted": false,
"patternType": "regex",
"pattern": ".*bitrate=100000.*"
}
]
}
Merge and apply the config? [y/n]: y
$ confcli services.routing.classifiers -w
Running wizard for resource 'classifiers'
Hint: Hitting return will set a value to its default.
Enter '?' to receive the help string
classifiers : [
classifier can be one of
1: anonymousIp
2: asnIds
3: contentUrlPath
4: contentUrlQueryParameters
5: geoip
6: hostName
7: ipranges
8: random
9: regexMatcher
10: requestHeader
11: stringMatcher
12: subnet
13: userAgent
Choose element index or name: geoip
Adding a 'geoip' element
classifier : {
name (default: ): sweden_matcher
type (default: geoip): ⏎
inverted (default: False): ⏎
continent (default: ): ⏎
country (default: ): sweden
cities : [
city (default: ): ⏎
Add another 'city' element to array 'cities'? [y/N]: ⏎
]
asn (default: ): ⏎
}
Add another 'classifier' element to array 'classifiers'? [y/N]: ⏎
]
Generated config:
{
"classifiers": [
{
"name": "sweden_matcher",
"type": "geoip",
"inverted": false,
"continent": "",
"country": "sweden",
"cities": [
""
],
"asn": ""
}
]
}
Merge and apply the config? [y/n]: y
$ confcli services.routing.classifiers -w
Running wizard for resource 'classifiers'
Hint: Hitting return will set a value to its default.
Enter '?' to receive the help string
classifiers : [
classifier can be one of
1: anonymousIp
2: asnIds
3: contentUrlPath
4: contentUrlQueryParameters
5: geoip
6: hostName
7: ipranges
8: random
9: regexMatcher
10: requestHeader
11: stringMatcher
12: subnet
13: userAgent
Choose element index or name: hostName
Adding a 'hostName' element
classifier : {
name (default: ): host_name_classifier
type (default: hostName): ⏎
inverted (default: False): ⏎
patternType (default: stringMatch): ⏎
pattern (default: ): *live.example*
}
Add another 'classifier' element to array 'classifiers'? [y/N]: n
]
Generated config:
{
"classifiers": [
{
"name": "host_name_classifier",
"type": "hostName",
"inverted": false,
"patternType": "stringMatch",
"pattern": "*live.example*"
}
]
}
Merge and apply the config? [y/n]: y
$ confcli services.routing.classifiers -w
Running wizard for resource 'classifiers'
Hint: Hitting return will set a value to its default.
Enter '?' to receive the help string
classifiers : [
classifier can be one of
1: anonymousIp
2: asnIds
3: contentUrlPath
4: contentUrlQueryParameters
5: geoip
6: hostName
7: ipranges
8: random
9: regexMatcher
10: requestHeader
11: stringMatcher
12: subnet
13: userAgent
Choose element index or name: ipranges
Adding a 'ipranges' element
classifier : {
name (default: ): company_matcher
type (default: ipranges): ⏎
inverted (default: False): ⏎
ipranges : [
iprange (default: ): 90.128.0.0/12
Add another 'iprange' element to array 'ipranges'? [y/N]: ⏎
]
}
Add another 'classifier' element to array 'classifiers'? [y/N]: ⏎
]
Generated config:
{
"classifiers": [
{
"name": "company_matcher",
"type": "ipranges",
"inverted": false,
"ipranges": [
"90.128.0.0/12"
]
}
]
}
Merge and apply the config? [y/n]: y
$ confcli services.routing.classifiers -w
Running wizard for resource 'classifiers'
Hint: Hitting return will set a value to its default.
Enter '?' to receive the help string
classifiers : [
classifier can be one of
1: anonymousIp
2: asnIds
3: contentUrlPath
4: contentUrlQueryParameters
5: geoip
6: hostName
7: ipranges
8: random
9: regexMatcher
10: requestHeader
11: stringMatcher
12: subnet
13: userAgent
Choose element index or name: random
Adding a 'random' element
classifier <A classifier randomly applying to clients based on the provided probability. (default: OrderedDict())>: {
name (default: ): random_matcher
type (default: random):
probability (default: 0.5): 0.7
}
Add another 'classifier' element to array 'classifiers'? [y/N]: n
]
Generated config:
{
"classifiers": [
{
"name": "random_matcher",
"type": "random",
"probability": 0.7
}
]
}
Merge and apply the config? [y/n]: y
$ confcli services.routing.classifiers -w
Running wizard for resource 'classifiers'
Hint: Hitting return will set a value to its default.
Enter '?' to receive the help string
classifiers : [
classifier can be one of
1: anonymousIp
2: asnIds
3: contentUrlPath
4: contentUrlQueryParameters
5: geoip
6: hostName
7: ipranges
8: random
9: regexMatcher
10: requestHeader
11: stringMatcher
12: subnet
13: userAgent
Choose element index or name: regexMatcher
Adding a 'regexMatcher' element
classifier : {
name (default: ): content_matcher
type (default: regexMatcher): ⏎
inverted (default: False): ⏎
source (default: content_url_path): ⏎
pattern (default: ): .*/(live|news_channel)/.*m3u8
}
Add another 'classifier' element to array 'classifiers'? [y/N]: ⏎
]
Generated config:
{
"classifiers": [
{
"name": "content_matcher",
"type": "regexMatcher",
"inverted": false,
"source": "content_url_path",
"pattern": ".*/(live|news_channel)/.*m3u8"
}
]
}
Merge and apply the config? [y/n]: y
$ confcli services.routing.classifiers -w
Running wizard for resource 'classifiers'
Hint: Hitting return will set a value to its default.
Enter '?' to receive the help string
classifiers : [
classifier can be one of
1: anonymousIp
2: asnIds
3: contentUrlPath
4: contentUrlQueryParameters
5: geoip
6: hostName
7: ipranges
8: random
9: regexMatcher
10: requestHeader
11: stringMatcher
12: subnet
13: userAgent
Choose element index or name: requestHeader
Adding a 'requestHeader' element
classifier <A classifier that matches on headers in the HTTP request. (default: OrderedDict())>: {
name (default: ): curl
type (default: requestHeader): ⏎
inverted (default: False): ⏎
header (default: ): User-Agent
patternType (default: stringMatch): ⏎
patternSource (default: inline): ⏎
pattern (default: ): curl*
}
Add another 'classifier' element to array 'classifiers'? [y/N]: n
]
Generated config:
{
"classifiers": [
{
"name": "curl",
"type": "requestHeader",
"inverted": false,
"header": "User-Agent",
"patternType": "stringMatch",
"patternSource": "inline",
"pattern": "curl*"
}
]
}
Merge and apply the config? [y/n]: y
$ confcli services.routing.classifiers -w
Running wizard for resource 'classifiers'
Hint: Hitting return will set a value to its default.
Enter '?' to receive the help string
classifiers : [
classifier can be one of
1: anonymousIp
2: asnIds
3: contentUrlPath
4: contentUrlQueryParameters
5: geoip
6: hostName
7: ipranges
8: random
9: regexMatcher
10: requestHeader
11: stringMatcher
12: subnet
13: userAgent
Choose element index or name: stringMatcher
Adding a 'stringMatcher' element
classifier : {
name (default: ): apple_matcher
type (default: stringMatcher): ⏎
inverted (default: False): ⏎
source (default: content_url_path): user_agent
pattern (default: ): *apple*
}
Add another 'classifier' element to array 'classifiers'? [y/N]: ⏎
]
Generated config:
{
"classifiers": [
{
"name": "apple_matcher",
"type": "stringMatcher",
"inverted": false,
"source": "user_agent",
"pattern": "*apple*"
}
]
}
Merge and apply the config? [y/n]: y
$ confcli services.routing.classifiers -w
Running wizard for resource 'classifiers'
Hint: Hitting return will set a value to its default.
Enter '?' to receive the help string
classifiers : [
classifier can be one of
1: anonymousIp
2: asnIds
3: contentUrlPath
4: contentUrlQueryParameters
5: geoip
6: hostName
7: ipranges
8: random
9: regexMatcher
10: requestHeader
11: stringMatcher
12: subnet
13: userAgent
Choose element index or name: subnet
Adding a 'subnet' element
classifier : {
name (default: ): company_matcher
type (default: subnet): ⏎
inverted (default: False): ⏎
patternSource (default: inline): ⏎
pattern (default: ): company
}
Add another 'classifier' element to array 'classifiers'? [y/N]: ⏎
]
Generated config:
{
"classifiers": [
{
"name": "company_matcher",
"type": "subnet",
"inverted": false,
"patternSource": "inline",
"pattern": "company"
}
]
}
Merge and apply the config? [y/n]: y
$ confcli services.routing.classifiers -w
Running wizard for resource 'classifiers'
Hint: Hitting return will set a value to its default.
Enter '?' to receive the help string
classifiers : [
classifier can be one of
1: anonymousIp
2: asnIds
3: contentUrlPath
4: contentUrlQueryParameters
5: geoip
6: hostName
7: ipranges
8: random
9: regexMatcher
10: requestHeader
11: stringMatcher
12: subnet
13: userAgent
Choose element index or name: userAgent
Adding a 'userAgent' element
classifier : {
name (default: ): iphone_matcher
type (default: userAgent): ⏎
inverted (default: False): ⏎
patternType (default: stringMatch): regex
pattern (default: ): i(P|p)hone
}
Add another 'classifier' element to array 'classifiers'? [y/N]: n
]
Generated config:
{
"classifiers": [
{
"name": "iphone_matcher",
"type": "userAgent",
"inverted": false,
"patternType": "regex",
"pattern": "i(P|p)hone"
}
]
}
Merge and apply the config? [y/n]: y
These classifiers can now be used to construct session groups and properly classify clients. Using the examples above, let’s create a session group classifying clients from Sweden using an Apple device:
$ confcli services.routing.sessionGroups -w
Running wizard for resource 'sessionGroups'
Hint: Hitting return will set a value to its default.
Enter '?' to receive the help string
sessionGroups : [
sessionGroup : {
name (default: ): inSwedenUsingAppleDevice
classifiers : [
classifier (default: ): 'sweden_matcher' and 'apple_matcher'
Add another 'classifier' element to array 'classifiers'? [y/N]: ⏎
]
}
Add another 'sessionGroup' element to array 'sessionGroups'? [y/N]: ⏎
]
Generated config:
{
"sessionGroups": [
{
"name": "inSwedenUsingAppleDevice",
"classifiers": [
"'sweden_matcher' and 'apple_matcher'"
]
}
]
}
Merge and apply the config? [y/n]: y
Clients classified by the sweden_matcher and apple_matcher classifiers
will now be put in the session group inSwedenUsingAppleDevice. Note the
single quotation marks around the classifier names.
Using session groups in routing will be demonstrated later in this document.
Classifier Boolean Logic
Session groups combine classifiers using boolean logic expressions. Each classifier
is referenced by its name enclosed in single quotes (e.g. 'sweden_matcher') and
multiple classifiers can be combined using the keywords and, or and not to
create sophisticated matching rules.
Operator precedence order:
- “Parentheses”
( )group items together; expressions within parentheses are evaluated first. - “not” negates the immediately following classifier or parenthesis expression
- “and” evaluates to true if both expressions surrounding it are true
- “or” evaluates to true if either expression surrounding it is true
Since “and” is higher than “or” the expression 'live' and 'spain' or 'sweden'
is functionally identical to ('live' and 'spain') or 'sweden'. If you want
the session group to accept any live content that is in either Spain or Sweden
you need to write 'live' and ('spain' or 'sweden').
To match against all incoming traffic requesting live content but coming from
outside of either Spain or Sweden, you’d write 'live' and not ('spain' or 'sweden').
It is permitted to nest several levels of parentheses and conjunctions if necessary to achieve the desired match.
Alternative form:
The "classifiers" property on a session group is an array, and each expression
in it must be true for the session group to trigger. This means that
"classifiers": ["('sweden' or 'spain') and 'live'"] is equivalent
to "classifiers": ["'sweden' or 'spain'", "'live'"].
This fact can be used for example if expressions become so long that it is necessary to break them up into smaller parts in order to be able to read them.
Pattern Source
The requestHeader and subnet classifiers have a patternSource field,
which can be either inline or selectionInput. When set to inline, the
pattern is taken directly from the pattern field.
If it is selectionInput, the pattern field is used as a path in the
selection input that points
to the pattern to use for classification. The selection input path may contain
a wildcard ("*"), which matches all elements inside an object or array.
For example, if patternSource contains /blocked_user_agents/*/agent, the
classifier will take its pattern from all agent fields in objects inside
/blocked_user_agents.
If the selection input contains the following data:
{
"blocked_user_agents": {
{ "agent1": { "agent": "Firefox" }},
{ "agent2": { "agent": "Chrome" }}
}
}
then the classifier will match either Firefox or Chrome.
Pattern Type
Several classifiers support pattern matching using either regular expressions or a simpler wildcard string matcher.
stringMatch:
The stringMatch pattern type uses shell-style wildcard matching for simple, readable patterns. Matching is case-insensitive.
Supported Wildcards:
*- Matches any sequence of characters (including none)*vod*matches/vod/,/content/vod/stream.m3u8,/my-vod-content/live/*/manifest.m3u8matches/live/sports/manifest.m3u8,/live/news/manifest.m3u8
?- Matches exactly one character/video?.mp4matches/video1.mp4,/videoA.mp4, but not/video10.mp4/test/?????/filematches any path with exactly 5 characters between/test/and/file
[characters]- Matches any single character from the set[abc]matchesa,b, orc[0-9]matches any single digit/video[12].mp4matches/video1.mp4or/video2.mp4
[!characters]or[^characters]- Matches any single character NOT in the set[!xyz]matches any character exceptx,y, orz[^0-9]matches any non-digit character/file[!0-9].txtmatches/fileA.txtbut not/file3.txt
[[:class:]]- POSIX character classes for matching character types[[:alnum:]]- alphanumeric (letters and digits)[[:alpha:]]- letters only[[:digit:]]- digits only[[:lower:]]- lowercase letters[[:upper:]]- uppercase letters[[:space:]]- whitespace characters- Example:
/user[[:digit:]][[:digit:]]/filematches/user12/file,/user00/file
\(backslash) - Escapes special characters to match them literallyfile\*.txtmatches the literal stringfile*.txt(asterisk is not a wildcard)test\?markmatchestest?mark(question mark is not a wildcard)
regex:
The regex pattern type uses full regular expression matching for complex
patterns. Matching is case-sensitive and follows the ECMAScript regular
expression syntax (the same syntax used by JavaScript).
Common Examples:
.*\.m3u8$- matches paths ending with .m3u8.*/(?:live|vod)/.*- matches paths containing /live/ or /vod/^/api/v[0-9]+/.*- matches paths starting with /api/v1/, /api/v2/, etc..*bitrate=[0-9]{6,}.*- matches query strings with bitrate= followed by 6+ digits
When to use:
Use regex when you need:
- Alternation (
a|b) - Precise quantifiers (
{n,m}) - Anchoring (
^start,$end) - Non-capturing groups (
(?:...)) - Lookaheads or other advanced features
For simple wildcard matching, stringMatch is more readable and performs better.
The complete ECMAScript regular expression syntax is documented at:
6.6.5 - Accounts
If accounts are configured, the router will tag sessions as belonging to an
account. Note that if accounts are not configured or a session does not belong to
an account, a session will be tagged with the default account.
Metrics will be tracked separately for each account when applicable.
Configuration
Accounts are configured using session groups, see Classification
for more information. Using confcli, an account is configured by defining an
account name and a list of session groups for which a session must be classified
into to belong to the account. An account called account_1 can be configured by
running the command
confcli services.routing.accounts -w
Running wizard for resource 'accounts'
Hint: Hitting return will set a value to its default.
Enter '?' to receive the help string
accounts : [
account : {
name (default: ): account_1
sessionGroups <A session will be tagged as belonging to this account if it's classified into all of the listed session groups. (default: [])>: [
sessionGroup (default: ): session_group_1
Add another 'sessionGroup' element to array 'sessionGroups'? [y/N]: y
sessionGroup (default: ): session_group_2
Add another 'sessionGroup' element to array 'sessionGroups'? [y/N]: n
]
}
Add another 'account' element to array 'accounts'? [y/N]: n
]
Generated config:
{
"accounts": [
{
"name": "account_1",
"sessionGroups": [
"session_group_1",
"session_group_2"
]
}
]
}
Merge and apply the config? [y/n]: y
A session will belong to the account account_1 if it has been classified into
the two session groups session_group_1 and session_group_2.
Metrics
If using the configuration above, the metrics will be separated per account:
# TYPE num_requests counter
num_requests{account="account_1",selector="initial"} 3
# TYPE num_requests counter
num_requests{account="default",selector="initial"} 3
6.6.6 - Data streams
Data streams can be used to produce and consume data to and from external data sources. This is useful for integrating with other systems, such as Kafka, to allow data synchronization between different instances of the Director or to read external selection input data.
Configuration
Currently, only Kafka data streams are supported. The addresses of the Kafka
brokers to connect to are configured in integration.kafka.bootstrapServers:
confcli integration.kafka.bootstrapServers
{
"bootstrapServers": [
"kafka-broker-host:9095"
]
}
These Kafka brokers can then be interacted with by configuring data streams in
the services.routing.dataStreams section of the configuration:
confcli services.routing.dataStreams
{
"dataStreams": {
"incoming": [],
"outgoing": []
}
}
Incoming data streams
incoming is a list of data streams that the Director will consume data from.
An incoming data stream defines the following properties:
name: The name of the data stream. This is used to identify the data stream in the configuration and in the logs.source: The source of the data stream. Currently, the only supported source iskafka, which means that the data will be consumed from the Kafka broker configured inintegration.kafka.bootstrapServers.target: The target of the data consumed from the stream. Currently, the only supported target isselectionInput, which means that the consumed data will be stored as selection input data.kafkaTopics: A list of Kafka topics to consume data from.
The following configuration will make the Director consume data from the Kafka
topic selection_input from the Kafka broker configured in
integration.kafka.bootstrapServers and store it as selection input data.
confcli services.routing.dataStreams.incoming
{
"incoming": [
{
"name": "incomingDataStream",
"source": "kafka",
"kafkaTopics": [
"selection_input"
],
"target": "selectionInput"
}
]
}
Outgoing data streams
outgoing is a list of data streams that the Director will produce data to.
An outgoing data stream defines the following properties:
name: The name of the data stream. This is used to identify the data stream in the configuration, in a Lua context and in the logs.type: The type of the data stream. Currently, the only supported type iskafka, which means that the data will be produced to the Kafka broker configured inintegration.kafka.bootstrapServers.kafkaTopic: The Kafka topic to produce data to.
Example of an outgoing data stream that produces to the Kafka topic selection_input:
confcli services.routing.dataStreams.outgoing
{
"outgoing": [
{
"name": "outgoingDataStream",
"type": "kafka",
"kafkaTopic": "selection_input"
}
]
}
Data can be sent to outgoing data streams from a Lua function, see Data stream related functions for more information.
6.6.7 - Selection Input Configurations
Selection Input Limits
The number of stored selection input leaf items can be limited with the
selectionInputItemLimit tuning parameter.
$ confcli services.routing.tuning.general.selectionInputItemLimit
{
"selectionInputItemLimit": 10000
}
Selection Input Persistence
Selection input data used by classifiers can be stored in the AgileTV CDN
Manager. This makes the data persistent and allows it to be shared between
Director instances. Each Director fetches the data on startup from the Manager
when selectionInputFetchBase is configured:
$ confcli integration.manager.selectionInputFetchBase
{
"selectionInputFetchBase": "https://acd-manager.example.com/api/selection-input/"
}
6.6.8 - Advanced features
6.6.8.1 - Content popularity
ESB3024 Router can make routing decisions based on content popularity. All incoming content requests are tracked to continuously update a content popularity ranking list. The popularity ranking algorithm is designed to let popular content quickly rise to the top while unpopular content decays and sinks towards the bottom.
Routing
A content popularity based routing rule can be created by running
$ confcli services.routing.rules -w
Running wizard for resource 'rules'
Hint: Hitting return will set a value to its default.
Enter '?' to receive the help string
rules : [
rule can be one of
1: allow
2: consistentHashing
3: contentPopularity
4: deny
5: firstMatch
6: random
7: rawGroup
8: rawHost
9: split
10: weighted
Choose element index or name: contentPopularity
Adding a 'contentPopularity' element
rule : {
name (default: ): content_popularity_rule
type (default: contentPopularity):
contentPopularityCutoff (default: 10): 5
onPopular (default: ): edge-streamer
onUnpopular (default: ): offload
}
Add another 'rule' element to array 'rules'? [y/N]: n
]
Generated config:
{
"rules": [
{
"name": "content_popularity_rule",
"type": "contentPopularity",
"contentPopularityCutoff": 5.0,
"onPopular": "edge-streamer",
"onUnpopular": "offload"
}
]
}
Merge and apply the config? [y/n]: y
This rule will route requests for the top 5 most popular content items to
edge-streamer and all other requests to offload.
Some configuration settings attributed to content popularity are available:
$ confcli services.routing.settings.contentPopularity
{
"contentPopularity": {
"enabled": true,
"algorithm": "score_based",
"sessionGroupNames": [],
"popularityListMaxSize": 100000,
"scoreBased": {
"popularityDecayFraction": 0.2,
"popularityPredictionFactor": 2.5,
"requestsBetweenPopularityDecay": 1000
},
"timeBased": {
"intervalsPerHour": 10
}
}
}
enabled: Whether or not to track content popularity. Whenenabledis set tofalse, content popularity will not be tracked. Note that routing on content popularity is possible even ifenabledisfalseand content popularity has been tracked previously.algorithm: Choice of content popularity tracking algorithm. There are two possible choices:score_basedortime_based(detailed below).sessionGroupNames: Names of the session groups for which content popularity should be tracked. If left empty, content popularity will be tracked for all sessions. The content popularity is tracked globally, not per session group, but the popularity metrics is only updated for sessions belonging to these groups.popularityListMaxSize: The maximum amount of unique content items to track for popularity.scoreBased: Configuration parameters unique to the score based algorithm.timeBased: Configuration parameters unique to the time based algorithm.
Size of Popularity List
The size of the popularity list is limited to prevent it growing forever. A single entry in the popularity ranking list will at most consume 180 bytes of memory. E.g. setting the maximum size to 1000 would consume at most 180⋅1,000 = 180,000 B = 0.18 MB. If the content popularity list is full, a request to a new item will replace the least popular item.
Setting a very high maximum size will not impact performance, it will only consume more memory.
Score-Based Algorithm
The requestsBetweenPopularityDecay parameter defines the number of requests
between each popularity decay update, an integral component of this feature.
The popularityPredictionFactor and popularityDecayFraction settings tune
the behaviour of the content popularity ranking algorithm, explained further
below.
Decay Update
To allow for popular content to quickly rise in popularity and unpopular content to sink, a dynamic popularity ranking algorithm is used. The goal of the algorithm is to track content popularity in real time, allowing routing decisions based on the requested content’s popularity. The algorithm is applied every decay update.
The algorithm uses current trending content to predict content popularity. The
popularityPredictionFactor setting regulates how much the algorithm should rely
on predicted popularity. A high prediction factor allows rising content to quickly
rise to high popularity but can also cause unpopular content with a sudden burst
of requests to wrongfully rise to the top. A low prediction factor can cause
stagnation in the popularity ranking, not allowing new popular content to rise
to the top.
Unpopular content decays in popularity, the magnitude of which is regulated by
popularityDecayFraction. A high value will aggressively decay content
popularity on every decay update while a low value will bloat the ranking,
causing stagnation. Once content decays to a trivially low popularity score, it
is pruned from the content popularity list.
When configuring these tuning parameters, the most crucial data to consider is
the size of your asset catalog, i.e. the number of unique contents you offer.
The recommended values, obtained through testing, are presented in the table below.
Note that the popularityPredictionFactor setting is the principal factor in
controlling the algorithm’s behaviour.
| Catalog size n | Popularity prediction factor | Popularity decay fraction |
|---|---|---|
| n < 1000 | 2.2 | 0.2 |
| 1000 < n < 5000 | 2.3 | 0.2 |
| 5000 < n < 10000 | 2.5 | 0.2 |
| n > 10000 | 2.6 | 0.2 |
Time-Based Algorithm
The time based algorithm only requires the configuration parameter
intervalsPerHour. As an example, setting intervalsPerHour to 10
would give 10 six minute intervals per hour. During each interval,
all unique content requests has an associated counter, increasing
by one for each incoming request. After an hour, all intervals have
been cycled through. The counters in the first interval will be reset
and all incoming content requests will increase the counters in the
first interval again. This cycle continues forever.
When determining a single content’s popularity, the sum of each content’s counter in all intervals is used to determine a popularity ranking.
6.6.8.2 - Consistent Hashing
Consistent hashing based routing is a feature that can be used to distribute requests to a set of hosts in a cache friendly manner. By using AgileTV’s consistent distributed hash algorithm, the amount of cache redistribution is minimized within a set of hosts. Requests for a content will always be routed to the same set of hosts, the amount of which is configured by the spread factor, allowing high cache usage. When adding or removing hosts, the algorithm minimizes cache redistribution.
Say you have the host group [s1, s2, s3, s4, s5] and have
configured spreadFactor = 3. A request for a content asset1 would then be
routed to the same three hosts with one of them being selected randomly for each
request. Requests for a different content asset2 would also be routed to one
of three different hosts, most likely a different combination of hosts than
requests for content asset1.
Example routing results with spreadFactor = 3:
- Request for
asset1→ route to one of[s1, s3, s4]. - Request for
asset2→ route to one of[s2, s4, s5]. - Request for
asset3→ route to one of[s1, s2, s5].
Since consistent hashing based routing ensures that requests for a specific content always get routed to the same set of hosts, the risk of cache misses are lowered on the hosts since they will be served the same content requests over and over again.
Note that the maximum value of
spreadFactoris 64. Consequently, the highest amount of hosts you can use in aconsistentHashingrule block is 64.
Three different hashing algorithms are available: MD5, SDBM and Murmur.
The algorithm is chosen during configuration.
Configuration
Configuring consistent hashing based routing is easily done using confcli. Let’s configure the example described above:
confcli services.routing.rules -w
Running wizard for resource 'rules'
Hint: Hitting return will set a value to its default.
Enter '?' to receive the help string
rules : [
rule can be one of
1: allow
2: consistentHashing
3: contentPopularity
4: deny
5: firstMatch
6: random
7: rawGroup
8: rawHost
9: split
10: weighted
Choose element index or name: consistentHashing
Adding a 'consistentHashing' element
rule : {
name (default: ): consistentHashingRule
type (default: consistentHashing):
spreadFactor (default: 1): 3
hashAlgorithm (default: MD5):
targets : [
target : {
target (default: ): s1
enabled (default: True):
}
Add another 'target' element to array 'targets'? [y/N]: y
target : {
target (default: ): s2
enabled (default: True):
}
Add another 'target' element to array 'targets'? [y/N]: y
target : {
target (default: ): s3
enabled (default: True):
}
Add another 'target' element to array 'targets'? [y/N]: y
target : {
target (default: ): s4
enabled (default: True):
}
Add another 'target' element to array 'targets'? [y/N]: y
target : {
target (default: ): s5
enabled (default: True):
}
Add another 'target' element to array 'targets'? [y/N]: n
]
}
Add another 'rule' element to array 'rules'? [y/N]: n
]
Generated config:
{
"rules": [
{
"name": "consistentHashingRule",
"type": "consistentHashing",
"spreadFactor": 3,
"hashAlgorithm": "MD5",
"targets": [
{
"target": "s1",
"enabled": true
},
{
"target": "s2",
"enabled": true
},
{
"target": "s3",
"enabled": true
},
{
"target": "s4",
"enabled": true
},
{
"target": "s5",
"enabled": true
}
]
}
]
}
Adding Hosts
Adding a host to the list will give an additional target for the consistent hashing algorithm to route requests to. This will shift content distribution onto the new host.
confcli services.routing.rules.consistentHashingRule.targets -w
Running wizard for resource 'targets'
Hint: Hitting return will set a value to its default.
Enter '?' to receive the help string
targets : [
target : {
target (default: ): s6
enabled (default: True):
}
Add another 'target' element to array 'targets'? [y/N]: n
]
Generated config:
{
"targets": [
{
"target": "s6",
"enabled": true
}
]
}
Merge and apply the config? [y/n]: y
Removing Hosts
There is one very important caveat of using a consistent hashing rule block. As long as you don’t modify the list of hosts, the consistent hashing algorithm will keep routing requests to the same hosts. However, if you remove a host from the block in any position except the last, the consistent hashing algorithm’s behaviour will change and the algorithm cannot maintain a minimum amount of cache redistribution.
If you’re in a situation where you have to remove a host from the routing
targets but want to keep the same consistent hashing behaviour, e.g. during
very high load, you’ll have to toggle that target’s enabled field to false.
E.g., disabling requests to s2 can be accomplished by:
$ confcli services.routing.rules.consistentHashingRule.targets.1.enabled false
services.routing.rules.consistentHashingRule.targets.1.enabled = False
$ confcli services.routing.rules.consistentHashingRule.targets.1
{
"1": {
"target": "s2",
"enabled": false
}
}
If you modify the list order or remove hosts, it is highly recommended to do so during moments where a higher rate of cache misses are acceptable.
6.6.8.3 - Security token verification
The security token verification feature allows for ESB3024 Router to only process requests that contain a correct security token. The token is generated by the client, for example in the portal, using an algorithm that it shares with the router. The router verifies the token and rejects the request if the token is incorrect.
It is beyond the scope of this document to describe how the token is generated, that is described in the Security Tokens application note that is installed with the ESB3024 Router’s extra documentation.
Setting up a Routing Rule
The token verification is performed by calling the verify_security_token()
function from a routing rule. The function returns 1 if the token is
correct, otherwise it returns 0. It should typically be called from the
first routing rule, to make requests with bad tokens fail as early as possible.
The confcli example assumes that the router already has rules configured, with
an entry point named select_cdn. Token verification is enabled by inserting an
“allow” rule first in the rule list.
confcli services.routing.rules -w
Running wizard for resource 'rules'
Hint: Hitting return will set a value to its default.
Enter '?' to receive the help string
rules : [
rule can be one of
1: allow
2: consistentHashing
3: contentPopularity
4: deny
5: firstMatch
6: random
7: rawGroup
8: rawHost
9: split
10: weighted
Choose element index or name: allow
Adding a 'allow' element
rule : {
name (default: ): token_verification
type (default: allow):
condition (default: always()): verify_security_token()
onMatch (default: ): select_cdn
}
Add another 'rule' element to array 'rules'? [y/N]: n
]
Generated config:
{
"rules": [
{
"name": "token_verification",
"type": "allow",
"condition": "verify_security_token()",
"onMatch": "select_cdn"
}
]
}
Merge and apply the config? [y/n]: y
$ confcli services.routing.entrypoint token_verification
services.routing.entrypoint = 'token_verification'
"routing": {
"id": "token_verification",
"member_order": "sequential",
"members": [
{
"id": "token_verification.0.select_cdn",
"member_order": "weighted",
"members": [
...
],
"weight_function": "return verify_security_token() ~= 0"
},
{
"id": "token_verification.1.rejected",
"member_order": "sequential",
"members": [],
"weight_function": "return 1"
}
],
"weight_function": "return 100"
},Configuring Security Token Options
The secret parameter is not part of the router request, but needs to be
configured separately in the router. That can be done with the host-config
tool that is installed with the router.
Besides configuring the secret, host-config can also configure floating
sessions and a URL prefix. Floating sessions are sessions that are not tied to a
specific IP address. When that is enabled, the token verification will not take
the IP address into account when verifying the token.
The security token verification is configured per host, where a host is the name
of the host that the request was sent to. This makes it possible for a router to
support multiple customer accounts, each with their own secret. If no
configuration is found for a host, a configuration with the name default is
used.
host-config supports three commands: print, set and delete.
The print command prints the current configuration for a host. The following
parameters are supported:
host-config print [-n <host-name>]
By default it prints the configuration for all hosts, but if the optional -n
flag is given it will print the configuration for a single host.
Set
The set command sets the configuration for a host. The configuration is given
as command line parameters. The following parameters are supported:
host-config set
-n <host-name>
[-f floating]
[-p url-prefix]
[-r <secret-to-remove>]
[-s <secret-to-add>]
-n <host-name>- The name of the host to configure.-f floating- A boolean option that specifies if floating sessions are accepted. The parameter accepts the valuestrueandfalse.-p url-prefix- A URL prefix that is used for identifying requests that come from a certain account. This is not used when verifying tokens.-r <secret-to-remove>- A secret that should be removed from the list of secrets.-s <secret-to-add>- A secret that should be added to the list of secrets.
For example, to set the secret “secret-1” and enable floating sessions for the default host, the following command can be used:
host-config set -n default -s secret-1 -f true
The set command only touches the configuration options that are mentioned on
the command line, so the following command line will add a second secret to the
default host without changing the floating session setting:
host-config set -n default -s secret-2
It is possible to set multiple secrets per host. This is useful when updating a secret, then both the old and the new secret can be valid during the transition period. After the transition period the old secret can be removed by typing:
host-config set -n default -r secret-1
Delete
The delete command deletes the configuration for a host. It supports the
following parameters:
host-config delete -n <host-name>
For example, to delete the configuration for example.com, the following
command can be used:
host-config delete -n example.com
Global Options
host-config also has a few global options. They are:
-k <security-key>- The security key that is used when communicating with the router. This is normally retrieved automatically.-h- Print a help message and exit.-r <router>- The router to connect to. This default tolocalhost, but can be changed to connect to a remote router.-v- Verbose output, can be given multiple times.
Debugging Security Token Verification
The security token verification only logs messages when the log level is set to
4 or higher. Then it will only log some errors. It is possible to enable more
verbose logging using the security-token-config that is installed together
with the router.
When verbose logging is enabled, the router will log information about the token verification, including the configured token secrets, so it needs to be used with care.
The logged lines are prefixed with verify_security_token.
The security-token-config tool supports the commands print and set.
The print command prints the current configuration. If nothing is configured
it will not print anything.
Set
The set command sets the configuration. The following parameters are
supported:
security-token-config set
[-d <enabled>]
-d <enabled>- A boolean option that specifies if debug logging should be enabled or not. The parameter accepts the valuestrueandfalse.
6.6.8.4 - Subnets API
ESB3024 Router provides utilities to quickly match clients into subnets. Any combination of IPv4 and IPv6 addresses can be used. To begin, a JSON file is needed, defining all subnets, e.g:
{
"255.255.255.255/24": "area1",
"255.255.255.255/16": "area2",
"255.255.255.255/8": "area3",
"90.90.1.3/16": "area4",
"5.5.0.4/8": "area5",
"2a02:2e02:9bc0::/48": "area6",
"2a02:2e02:9bc0::/32": "area7",
"2a02:2e02:9bc0::/16": "area8",
"2a02:2e02:9de0::/44": "combined_area",
"2a02:2e02:ada0::/44": "combined_area"
}
and PUT it to the endpoint :5001/v1/subnets or :5001/v2/subnets, the
API version doesn’t matter for subnets:
curl -k -T subnets.json -H "Content-Type: application/json" https://router-host:5001/v1/subnets
Note that it is possible for several subnet CIDR strings to share the same label, effectively grouping them together.
The router provides the built-in function in_subnet(subnet_name) that
can to make routing decisions based on a client’s subnet. For more details, see
Built-in Lua functions.
To configure a rule that only allows clients in the area1 subnet, run the
command
$ confcli services.routing.rules -w
Running wizard for resource 'rules'
Hint: Hitting return will set a value to its default.
Enter '?' to receive the help string
rules : [
rule can be one of
1: allow
2: consistentHashing
3: contentPopularity
4: deny
5: firstMatch
6: random
7: rawGroup
8: rawHost
9: split
10: weighted
Choose element index or name: allow
Adding a 'allow' element
rule : {
name (default: ): only_allow_area1
type (default: allow):
condition (default: always()): in_subnet('area1')
onMatch (default: ): example-host
}
Add another 'rule' element to array 'rules'? [y/N]: n
]
Generated config:
{
"rules": [
{
"name": "only_allow_area1",
"type": "allow",
"condition": "in_subnet('area1')",
"onMatch": "example-host"
}
]
}
Merge and apply the config? [y/n]: y
Invalid IP-addresses will be omitted during subnet list construction accompanied by a message in the log displaying the invalid IP address.
6.6.8.5 - Lua Features
6.6.8.5.1 - Built-in Lua Functions
This section details all built-in Lua functions provided by the router.
Logging Functions
The router provides Lua logging functionality that is convenient when creating custom Lua functions. A prefix can be added to the log message which is useful to differentiate log messages from different lua files. At the top of the Lua source file, add the line
local log = log.add_prefix("my_lua_file")
to prepend all log messages with "my_lua_file".
The logging functions support formatting and common log levels:
log.critical('A log message with number %d', 1.5)
log.error('A log message with string %s', 'a string')
log.warning('A log message with integer %i', 1)
log.info('A log message with a local number variable %d', some_local_number)
log.debug('A log message with a local string variable %s', some_local_string)
log.trace('A log message with a local integer variable %i', some_local_integer)
log.message('A log message')
Many of the router’s built-in Lua functions use the logging functions.
Predictive Load-Balancing Functions
Predictive load balancing is a tool that can be used to avoid overloading hosts with traffic. Consider the case where a popular event starts at a certain time, let’s say 12 PM. A spike in traffic will be routed to the hosts that are streaming the content at 12 PM, most of them starting at low bitrates. A host might have sufficient bandwidth left to take on more clients but when the recently connected clients start ramping up in video quality and increase their bitrate, the host can quickly become overloaded, possibly dropping incoming requests or going offline. Predictive load balancing solves this issue by considering how many times a host recently been redirected to.
Four functions for predictive load balancing are provided by the router
that can be used when constructing conditions/weight functions: host_bitrate()
, host_bitrate_custom(), host_has_bw() and host_has_bw_custom().
All require data to be supplied to the selection input API and apply
only to leaf nodes in the routing tree. In order for predictive load balancing
to work properly the data must be updated at regular intervals. The data needs
to be supplied by the target system.
These functions are suitable to used as host health checks. To configure host health checks, see configuring CDNs and hosts.
Note that host_bitrate() and host_has_bw() rely on data supplied by metrics
agents, detailed in Cache hardware metrics: monitoring and routing.
host_bitrate_custom() and host_has_bw_custom() rely on
manually supplied selection input data, detailed in selection input API. The
bitrate unit depends on the data submitted to the selection input API.
Example Metrics
The data supplied to the selection input API by the metrics agents uses the following structure:
{
"streamer-1": {
"hardware_metrics": {
"/": {
"free": 1741596278784,
"total": 1758357934080,
"used": 16761655296,
"used_percent": 0.9532561585516977
},
"cpu_load1": 0.02,
"cpu_load15": 0.12,
"cpu_load5": 0.02,
"mem_available": 4895789056,
"mem_available_percent": 59.551760354263074,
"mem_total": 8221065216,
"mem_used": 2474393600,
"n_cpus": 4
},
"per_interface_metrics": {
"eths1": {
"link": 1,
"interface_up": true,
"megabits_sent": 22322295739.378456,
"megabits_sent_rate": 8085.2523952,
"speed": 100000
}
}
}
}
Note that all built-in functions interacting with selection input values support indexing into nested selection input data. Consider the selection input data in above. The nested values can be accessed by using dots between the keys:
si('streamer-1.per_interface_metrics.eths1.megabits_sent_rate')
Note that the whole selection input variable name must be within single quotes.
The function si() is documented under
general purpose functions.
host_bitrate({})
host_bitrate() returns the predicted bitrate (in megabits per second) of
the host after the recently connected clients start ramping up in streaming
quality. The function accepts an argument table with the following keys:
interface: The name of the interface to use for bitrate prediction.- Optional
avg_bitrate: the average bitrate per client, defaults to 6 megabits per second. - Optional
num_routers: the number of routers that can route to this host, defaults to 1. This is important to accurately predict the incoming load if multiple routers are used. - Optional
host: The name of the host to use for bitrate prediction. Defaults to the current host if not provided.
Required Selection Input Data
This function relies on the field megabits_sent_rate, supplied by the Telegraf
metrics agent, as seen in example metrics. If these fields
are missing from your selection input data, this function will not work.
Examples of usage:
host_bitrate({interface='eths0'})
host_bitrate({avg_bitrate=1, interface='eths0'})
host_bitrate({num_routers=2, interface='eths0'})
host_bitrate({avg_bitrate=1, num_routers=4, interface='eths0'})
host_bitrate({avg_bitrate=1, num_routers=4, host='custom_host', interface='eths0'})
host_bitrate({}) calculates the predicted bitrate as:
predicted_host_bitrate = current_host_bitrate + (recent_connections * avg_bitrate * num_routers)
host_bitrate_custom({})
Same functionality as host_bitrate() but uses a custom selection input
variable as bitrate input instead of accessing hardware metrics. The function
accepts an argument table with the following keys:
custom_bitrate_var: The name of the selection input variable to be used for accessing current host bitrate.- Optional
avg_bitrate: seehost_bitrate()documentation above. - Optional
num_routers: seehost_bitrate()documentation above.
host_bitrate_custom({custom_bitrate_var='host1_current_bitrate'})
host_bitrate_custom({avg_bitrate=1, custom_bitrate_var='host1_current_bitrate'})
host_bitrate_custom({num_routers=4, custom_bitrate_var='host1_current_bitrate'})
host_has_bw({})
Instead of accessing the predicted bitrate of a host through host_bitrate(),
host_has_bw() returns 1 if the host is predicted to have enough
bandwidth left to take on more clients after recent connections ramp up in
bitrate, otherwise it returns 0. The function accepts an argument table with the
following keys:
interface: seehost_bitrate()documentation above.- Optional
avg_bitrate: seehost_bitrate()documentation above. - Optional
num_routers: seehost_bitrate()documentation above. - Optional
host: seehost_bitrate()documentation above. - Optional
margin: the bitrate (megabits per second) headroom that should be taken into account during calculation, defaults to 0.
host_has_bw({}) returns whether or not the following statement is true:
predicted_host_bitrate + margin < host_bitrate_capacity
Required Selection Input Data
host_has_bw({}) relies on the fields megabits_sent_rate and speed,
supplied by the Telegraf metrics agent, as seen in
example metrics. If these fields are missing from your
selection input data, this function will not work.
Examples of usage:
host_has_bw({interface='eths0'})
host_has_bw({margin=10, interface='eth0'})
host_has_bw({avg_bitrate=1, interface='eth0'})
host_has_bw({num_routers=4, interface='eth0'})
host_has_bw({host='custom_host', interface='eth0'})
host_has_bw_custom({})
Same functionality as host_has_bw() but uses a custom selection input
variable as bitrate. It also uses a number or a custom selection input
variable for the capacity. The function accepts an argument table
with the following keys:
custom_capacity_var: a number representing the capacity of the network interface OR the name of the selection input variable to be used for accessing host capacity.custom_bitrate_var: seehost_bitrate_custom()documentation- Optional
margin: seehost_has_bw()documentation above. above. - Optional
avg_bitrate: seehost_bitrate()documentation above. - Optional
num_routers: seehost_bitrate()documentation above.
Examples of usage:
host_has_bw_custom({custom_capacity_var=10000, custom_bitrate_var='streamer-1.per_interface_metrics.eths1.megabits_sent_rate'})
host_has_bw_custom({custom_capacity_var='host1_capacity', custom_bitrate_var='streamer-1.per_interface_metrics.eths1.megabits_sent_rate'})
host_has_bw_custom({margin=10, custom_capacity_var=10000, custom_bitrate_var='streamer-1.per_interface_metrics.eths1.megabits_sent_rate'})
host_has_bw_custom({avg_bitrate=1, custom_capacity_var=10000, custom_bitrate_var='streamer-1.per_interface_metrics.eths1.megabits_sent_rate'})
host_has_bw_custom({num_routers=4, custom_capacity_var=10000, custom_bitrate_var='streamer-1.per_interface_metrics.eths1.megabits_sent_rate'})
Health Check Functions
This section details built-in Lua functions that are meant to be used for host health checks. Note that these functions rely on data supplied by metric agents detailed in Cache hardware metrics: monitoring and routing. Make sure cache hardware metrics are supplied to the router before using any of these functions.
cpu_load_ok({})
The function accepts an optional argument table with the following keys:
- Optional
host: The name of the host. Defaults to the name of the selected host if not provided. - Optional
cpu_load5_limit: The acceptable limit for the 5-minute CPU load. Defaults to 0.9 if not provided.
The function returns 1 if the five minute CPU load average is below their respective limits, and 0 otherwise.
Examples of usage:
cpu_load_ok()
cpu_load_ok({host = 'custom_host'})
cpu_load_ok({cpu_load5_limit = 0.8})
cpu_load_ok({host = 'custom_host', cpu_load5_limit = 0.8})
memory_usage_ok({})
The function accepts an optional argument table with the following keys:
- Optional
host: The name of the host. Defaults to the host of the selected host if not provided. - Optional
memory_usage_limit: The acceptable limit for the memory usage. Defaults to 0.9 if not provided.
The function returns 1 if the memory usage is below the limit, and 0 otherwise.
Examples of usage:
memory_usage_ok()
memory_usage_ok({host = 'custom_host'})
memory_usage_ok({memory_usage_limit = 0.7})
memory_usage_ok({host = 'custom_host', memory_usage_limit = 0.7})
interfaces_online({})
The function accepts an argument table with the following keys:
- Required
interfaces: A string or a table of strings representing the network interfaces to check. - Optional
host: The name of the host. Defaults to the host of the selected host if not provided.
The function returns 1 if all the specified interfaces are online, and 0 otherwise.
Required Selection Input Data
This function relies on the fields link and interface_up, supplied by
the Telegraf metrics agent, as seen in example metrics. If
these fields are missing from your selection input data, this function will not
work.
Examples of usage:
interfaces_online({interfaces = 'eth0'})
interfaces_online({interfaces = {'eth0', 'eth1'}})
interfaces_online({host = 'custom_host', interfaces = 'eth0'})
interfaces_online({host = 'custom_host', interfaces = {'eth0', 'eth1'}})
health_check({})
The function accepts an optional argument table with the following keys:
- Required
interfaces: A string or a table of strings representing the network interfaces to check. - Optional
host: The name of the host. Defaults to the host of the selected host if not provided. - Optional
cpu_load5_limit: The acceptable limit for the 5-minute CPU load. Defaults to 0.9 if not provided. - Optional
memory_usage_limit: The acceptable limit for the memory usage. Defaults to 0.9 if not provided.
The function calls the health check functions cpu_load_ok({}),
memory_usage_ok({}) and interfaces_online({}). The functions returns 1 if
all these functions returned 1, otherwise it returns 0.
Examples of usage:
health_check({interfaces = 'eths0'})
health_check({host = 'custom_host', interfaces = 'eths0'})
health_check({cpu_load5_limit = 0.7, memory_usage_limit = 0.8, interfaces = 'eth0'})
health_check({host = 'custom_host', cpu_load5_limit = 0.7, memory_usage_limit = 0.8, interfaces = {'eth0', 'eth1'}})
General Purpose Functions
The router supplies a number of general purpose Lua functions.
always()
Always returns 1.
never()
Always returns 0. Useful for temporarily disabling caches by using it as a health check.
Examples of usage:
always()
never()
si(si_name)
The function reads the value of the selection input variable si_name and
returns it if it exists, otherwise it returns 0. The function accepts a string
argument for the selection input variable name.
Examples of usage:
si('some_selection_input_variable_name')
si('streamer-1.per_interface_metrics.eths1.megabits_sent_rate')
Comparison functions
All comparison functions use the form function(si_name, value) and compares
the selection input value with the name si_name with value.
ge(si_name, value) - greater than or equal
gt(si_name, value) - greater than
le(si_name, value) - less than or equal
lt(si_name, value) - less than
eq(si_name, value) - equal to
neq(si_name, value) - not equal to
Examples of usage:
ge('streamer-1.hardware_metrics.mem_available_percent', 30)
gt('streamer-1.hardware_metrics./.free', 1000000000)
le('streamer-1.hardware_metrics.cpu_load5', 0.8)
lt('streamer-1.per_interface_metrics.eths1.megabits_sent_rate', 9000)
eq('streamer-1.per_interface_metrics.eths1.link.', 1)
neq('streamer-1.hardware_metrics.n_cpus', 4)
Session Checking Functions
in_subnet(subnet)
Returns 1 if the current session belongs to subnet, otherwise it returns 0.
See Subnets API for more details on how to use
subnets in routing. The function accepts a string argument for the subnet name.
Examples of usage:
in_subnet('stockholm')
in_subnet('unserviced_region')
in_subnet('some_other_subnet')
These functions checks the current session’s session groups.
in_session_group(session_group)
Returns 1 if the current session has been classified into session_group,
otherwise it returns 0. The function accepts a string argument for the session
group name.
in_any_session_group({})
Returns 1 if the current session has been classified into any of
session_groups, otherwise it returns 0. The function accepts a table array of
strings as argument for the session group names.
in_all_session_groups({})
Returns 1 if the current session has been classified into all of
session_groups, otherwise it returns 0. The function accepts a table array of
strings as argument for the session group names.
Examples of usage:
in_session_group('safari_browser')
in_any_session_group({ 'in_europe', 'in_asia'})
in_all_session_group({ 'vod_content', 'in_america'})
Other built-in functions
base64_encode(data)
base64_encode(data) returns the base64 encoded string of data.
Arguments:
data: The data to encode.
Example:
print(base64_encode('Hello world!'))
SGVsbG8gd29ybGQh
base64_decode(data)
base64_decode(data) returns the decoded data of the base64 encoded string, as
a raw binary string.
Arguments:
data: The data to decode.
Example:
print(base64_decode('SGVsbG8gd29ybGQh'))
Hello world!
base64_url_encode(data)
base64_url_encode(data) returns the base64 URL encoded string of data.
Arguments:
data: The data to encode.
Example:
print(base64_url_encode('ab~~'))
YWJ-fg
base64_url_decode(data)
base64_url_decode(data) returns the decoded data of the base64 URL encoded
string, as a raw binary string.
Arguments:
data: The data to decode.
Example:
print(base64_url_decode('YWJ-fg'))
ab~~
to_hex_string(data)
to_hex_string(data) returns a string containing the hexadecimal
representation of the string data.
Arguments:
data: The data to convert.
Example:
print(to_hex_string('Hello world!\n'))
48656c6c6f20776f726c64210a
from_hex_string(data)
from_hex_string(data) returns a string containing the byte representation of
the hexadecimal string data.
Arguments:
data: The data to convert.
Example:
print(from_hex_string('48656c6c6f20776f726c6421'))
Hello world!
empty(table)
empty(table) returns true if table is empty, otherwise it returns false.
Arguments:
table: The table to check.
Examples:
print(tostring(empty({})))
true
print(tostring(empty({1, 2, 3})))
false
md5(data)
md5(data) returns the MD5 hash of data, as a hexstring.
Arguments:
data: The data to hash.
Example:
print(md5('Hello world!'))
86fb269d190d2c85f6e0468ceca42a20
sha256(date)
sha256(data) returns the SHA-256 hash of data, as a hexstring.
Arguments:
data: The data to hash.
Example:
print(sha256('Hello world!'))
c0535e4be2b79ffd93291305436bf889314e4a3faec05ecffcbb7df31ad9e51a
hmac_sha256(key, data)
hmac_sha256(key, data) returns the HMAC-SHA-256 hash of data using key,
as a string containing raw binary data.
Arguments:
key: The key to use.data: The data to hash.
Example:
print(to_hex_string(hmac_sha256('secret', 'Hello world!')))
a65f4cfcf5f421ff2be052e0642bccbcfeb126ee73ebc4fe3b381964302eb632
hmac_sha384(key, data)
hmac_sha384(key, data) returns the HMAC-SHA-384 hash of data using key,
as a string containing raw binary data.
Arguments:
key: The key to use.data: The data to hash.
Example:
print(to_hex_string(hmac_sha384('secret', 'Hello world!')))
917516d93d3509a371a129ca50933195dd659712652f07ba5792cbd5cade5e6285a841808842cfa0c3c69c8fb234468a
hmac_sha512(key, data)
hmac_sha512(key, data) returns the HMAC-SHA-512 hash of data using key,
as a string containing raw binary data.
Arguments:
key: The key to use.data: The data to hash.
Example:
print(to_hex_string(hmac_sha512('secret', 'Hello world!')))
dff6c00943387f9039566bfee0994de698aa2005eecdbf12d109e17aff5bbb1b022347fbf4bd94ede7c7d51571022525556b64f9d5e4386de99d0025886eaaff
hmac_md5(key, data)
hmac_md5(key, data) returns the HMAC-MD5 hash of data using key,
as a string containing raw binary data.
Arguments:
key: The key to use.data: The data to hash.
Example:
print(to_hex_string(hmac_md5('secret', 'Hello world!')))
444fad0d374d14369d6b595062da5d91
regex_replace
regex_replace(data, pattern, replacement) returns the string data with all
occurrences of the regular expression pattern replaced with replacement.
Arguments:
data: The data to replace.pattern: The regular expression pattern to match.replacement: The replacement string.
Examples:
print(regex_replace('Hello world!', 'world', 'Lua'))
Hello Lua!
print(regex_replace('Hello world!', 'l+', 'lua'))
Heluao worluad!
If the regular expression pattern is invalid, regex_replace() returns an
error message.
Examples:
print(regex_replace('Hello world!', '*', 'lua'))
regex_error caught: regex_error
unixtime()
unixtime() returns the current Unix timestamp, as seconds since midnight,
Janury 1 1970 UTC, as an integer.
Arguments:
- None
Example:
print(unixtime())
1733517373
now()
now() returns the current Unix timestamp, the number of seconds since
midnight, Janury 1 1970 UTC, as an number with decimals.
Arguments:
- None
Example:
print(now())
1733517373.5007
time_to_epoch(time, fmt)
time_to_epoch(time, fmt) returns the Unix timestamp, the number of seconds
since midnight, Janury 1 1970 UTC, of the time string time, which is
formatted according to the format string fmt.
Arguments:
time: The time string to convert.fmt(Optional): The format string of the time string, as specified by the POSIX function strptime(). If not specified, it defaults to “%Y-%m-%dT%TZ”.
Examples:
print(time_to_epoch('1972-04-17T06:10:20Z'))
72339020
print(time_to_epoch('17/04-72 06:20:30', '%d/%m-%y %H:%M:%S'))
72339630
epoch_to_time(time, format)
epoch_to_time(time, format) returns the time string of the Unix timestamp
time, formatted according to format.
Arguments:
time: The Unix timestamp to convert, as a number.format(Optional): The format string of the time string, as specified by the POSIX function strftime(). If not specified, it defaults to “%Y-%m-%dT%TZ”.
Examples:
print(epoch_to_time(123456789))
1973-11-29T21:33:09Z
print(epoch_to_time(1234567890, '%d/%m-%y %H:%M:%S'))
13/02-09 23:31:30
get_consistent_hashing_weight(contentName, nodeIdsString, spreadFactor, hashAlgoritm, nodeId)
get_consistent_hashing_weight(contentName, nodeIdsString, spreadFactor, hashAlgoritm, nodeId)
returns the priority that node nodeId has in the list of preferred nodes,
determined using consistent hashing. The first spreadfactor:th nodes should
have equal weights to randomize requests between them. Remaining nodes should
have decrementally decreasing weights to honor node priority during failover.
Arguments:
contentName: The name of the content to hash.nodeIdsString: A string containing the node IDs to hash, on the format ‘0,1,2,3’.spreadFactor: The number of nodes to spread the requests between.hashAlgorithm: Which hash algorithm to use. Supported algorithms are “MD5”, “SDBM” and “Murmur”. Default is “MD5”.nodeId: The ID of the node to calculate the weight for.
Examples:
print(get_consistent_hashing_weight('/vod/film1', '0,1,2,3,4,5', 3, 'MD5', 3))
6
print(get_consistent_hashing_weight('/vod/film2', '0,1,2,3,4,5', 3, 'MD5', 3))
4
print(get_consistent_hashing_weight('/vod/film2', '0,1,2', 2, 'Murmur', 1))
2
See Consistent Hashing for more information about consistent hashing.
expand_ipv6_address(address)
expand_ipv6_address(address) returns the fully expanded form of the IPv6
address address.
Arguments:
address: The IPv6 address to expand. If the address is not a valid IPv6 address, the function returns the contents ofaddressunmodified. This allows for the function to pass through IPv4 addresses.
Examples:
print(expand_ipv6_address('2001:db8::1'))
2001:0db8:0000:0000:0000:0000:0000:0001
print(expand_ipv6_address('198.51.100.5'))
198.51.100.5
Data stream related functions
The router provides a number of functions that are useful when working with
data streams. These functions are used to write data to the data stream
configured in the services.routing.dataStreams.outgoing section of the
configuration. See data streams for more information.
send_to_data_stream
send_to_data_stream(data_stream, message) sends the string message to the
outgoing data stream data_stream. Note that message is sent verbatim,
without any formatting.
Arguments:
data_stream: The name of the data stream to send to.message: The message to send.
Example:
-- Sends the message "Hello world!" to the data stream 'token_stream'
send_to_data_stream('token_stream', 'Hello world!')
data_streams.post_selection_key_value
data_streams.post_selection_key_value(data_stream, path, key, value, ttl_s)
posts the key-value pair key=value on the path path to the data stream
data_stream. The key-value is formatted as a selection input value
{key: value}, will be stored in path and will persist for ttl_s seconds.
This is the same format that is expected when parsing data from incoming data
streams of the type "selectionInput" to read selection input data from
external data streams. This means that this function can be used to post
selection input data to an external data stream, which can then be read by
other Director instances.
Arguments:
data_stream: The name of the data stream to post to.path: The path to post the key-value pair to. Note that the path is automatically prefixed with"/v2/selection_input".key: The key to post.value: The value to post.- Optional
ttl_s: The time to live of the key-value pair, in seconds. If not specified, it will persist forever.
Example:
-- Posts the selection input value {"si_var": 1337} on the path "/v2/selection_input/path"
-- to the data stream 'outgoingDataStream' with a TTL of 60 seconds
data_streams.post_selection_key_value('outgoingDataStream', '/path', 'si_var', 1337, 60)
Token blocking functions
The router provides a number of functions that are useful when working with token blocking to control CDN access.
blocked_tokens.augment_token(token, customer_id)
Returns an augmented token string formatted like <customer_id>__<token>. This
function is useful when additional information is needed for token blocking,
such as customer ID.
Arguments:
token: The token to augment.customer_id: The customer ID to augment the token with.
Example:
-- Augments the token eyJhbG213 with the customer ID 12345
local augmented_token = blocked_tokens.augment_token('eyJhbG213', '12345')
print(augmented_token)
12345__eyJhbG213
blocked_tokens.add(stream_name, token, ttl_s)
blocked_tokens.add() is a specialized version of
data_streams.post_selection_key_value() that is commonly used to synchronize
blocked tokens between multiple Directors to deny unpermitted access into a CDN.
It posts selection input data to the data stream stream_name which is consumed
into selection input by all connected Director instances so that the blocked
token can easily be checked during routing by calling blocked_tokens.is_blocked(token).
Arguments:
stream_name: The name of the data stream to post to.token: The token to post.- Optional
ttl_s: The time to live of the token, in seconds. Defaults to 3 hours (10800 seconds) if not specified.
Example:
-- Posts the token eyJhbG213 with a TTL of 3 hours
blocked_tokens.add('token_stream', 'eyJhbG213')
-- Posts the token R5cCI6Ik with a TTL of 60 seconds
blocked_tokens.add('token_stream', 'R5cCI6Ik', 60)
blocked_tokens.is_blocked(token)
blocked_tokens.is_blocked(token) checks if the token token has been blocked
by checking if it is stored in selection input. It returns true if the token is
blocked, otherwise it returns false.
Arguments:
token: The token to check.
Example:
-- Checks if the token eyJhbG213 is blocked
blocked_tokens.is_blocked('eyJhbG213')
-- Checks if the augmented token 12345__eyJhbG213 is blocked
blocked_tokens.is_blocked(blocked_tokens.augment_token('eyJhbG213', '12345'))
blocked_tokens.is_blocked('12345__eyJhbG213')
Custom Lua Metrics functions
The router provides functions for managing custom metrics counters that will be available in the OpenMetrics format on the router’s metrics API.
increase_metrics_counter(counter_name, label_table, amount)
increase_metrics_counter(counter_name, label_table, amount) increases the
custom metrics counter counter_name by amount. The counter is identified by
the label_table which is a table of key-value pairs.
Arguments:
counter_name: The name of the counter to increase.label_table: A table of key-value pairs to identify the counter.- Optional
amount: The amount to increase the counter by. Defaults to 1 if not defined.
Example:
-- Increases the counter 'my_counter' by 1
increase_metrics_counter('my_counter', {label='foo'})
-- Increases the counter 'another_counter' by 5
increase_metrics_counter('another_counter', {label1='value1', label2='value2'}, 5)
These examples will create the following metrics:
# TYPE my_counter counter
my_counter{label="foo"} 1
# TYPE another_counter counter
another_counter{label1="value1", label2="value2"} 5
reset_metrics_counter(counter_name, label_table)
reset_metrics_counter(counter_name, label_table) removes the custom metrics
counter counter_name with the labels defined in label_table.
Arguments:
counter_name: The name of the counter to remove.label_table: A table of key-value pairs to identify the counter.
Example:
-- Removes the counter 'my_counter'
reset_metrics_counter('my_counter', {label='foo'})
-- Removes the counter 'another_counter'
reset_metrics_counter('another_counter', {label1='value1', label2='value2'})
Configuration examples
Many of the functions documented are suitable to use in host health checks. To configure host health checks, see configuring CDNs and hosts. Here are some configuration examples of using the built-in Lua functions, utilizing the example metrics:
"healthChecks": [
"gt('streamer-1.hardware_metrics.mem_available_percent', 20)", // More than 20% memory is left
"lt('streamer-1.per_interface_metrics.eths1.megabits_sent_rate', 9000)" // Current bitrate is lower than 9000 Mbps
"host_has_bw({host='streamer-1', interface='eths1', margin=1000})", // host_has_bw() uses 'streamer-1.per_interface_metrics.eths1.speed' to determine if there is enough bandwidth left with a 1000 Mbps margin
"interfaces_online({host='streamer-1', interfaces='eths1'})",
"memory_usage_ok({host='streamer-1'})",
"cpu_load_ok({host='streamer-1'})",
"health_check({host='streamer-1', interfaces='eths1'})" // Combines interfaces_online(), memory_usage_ok(), cpu_load_ok()
]
6.6.8.5.2 - Global Lua Tables
There are multiple global tables containing important data available while writing Lua code for the router.
selection_input
Contains arbitrary, custom fields fed into the router by clients, see API overview for details on how to inject data into this table.
Note that the selection_input table is iterable.
Usage examples:
print(selection_input['some_value'])
-- Iterate over table
if selection_input then
for k, v in pairs(selection_input) do
print('here is '..'selection_input!')
print(k..'='..v)
end
else
print('selection_input is nil')
end
session_groups
Defines a mapping from session group name to boolean, indicating whether
the session belongs to the session group or not.
Usage examples:
if session_groups.vod then print('vod') else print('not vod') end
if session_groups['vod'] then print('vod') else print('not vod') end
session_count
Provides counters of number of session types per session group. The table
uses the structure qoe_score.<session_type>.<session_group>.
Usage examples:
print(session_count.instream.vod)
print(session_count.initial.vod)
qoe_score
Provides the quality of experience score per host per session group. The table
uses the structure qoe_score.<host>.<session_group>.
Usage examples:
print(qoe_score.host1.vod)
print(qoe_score.host1.live)
request
Contains data related to the HTTP request between the client and the router.
request.method- Description: HTTP request method.
- Type:
string - Example:
'GET','POST'
request.body- Description: HTTP request body string.
- Type:
stringornil - Example:
'{"foo": "bar"}'
request.major_version- Description: Major HTTP version such as
xinHTTP/x.1. - Type:
integer - Example:
1
- Description: Major HTTP version such as
request.minor_version- Description: Minor HTTP version such as
xinHTTP/1.x. - Type:
integer - Example:
1
- Description: Minor HTTP version such as
request.protocol- Description: Transfer protocol variant.
- Type:
string - Example:
'HTTP','HTTPS'
request.client_ip- Description: IP address of the client issuing the request.
- Type:
string - Example:
'172.16.238.128'
request.path_with_query_params- Description: Full request path including query parameters.
- Type:
string - Example:
'/mycontent/superman.m3u8?b=y&c=z&a=x'
request.path- Description: Request path without query parameters.
- Type:
string - Example:
'/mycontent/superman.m3u8'
request.query_params- Description: The query parameter string.
- Type:
string - Example:
'b=y&c=z&a=x'
request.filename- Description: The part of the path following the final slash, if any.
- Type:
string - Example:
'superman.m3u8'
request.subnet- Description: Subnet of
client_ip. - Type:
stringornil - Example:
'all'
- Description: Subnet of
session
Contains data related to the current session.
session.client_ip- Description: Alias for
request.client_ip. See documentation for table request above.
- Description: Alias for
session.path_with_query_params- Description: Alias for
request.path_with_query_params. See documentation for table request above.
- Description: Alias for
session.path- Description: Alias for
request.path. See documentation for table request above.
- Description: Alias for
session.query_params- Description: Alias for
request.query_params. See documentation for table request above.
- Description: Alias for
session.filename- Description: Alias for
request.filename. See documentation for table request above.
- Description: Alias for
session.subnet- Description: Alias for
request.subnet. See documentation for table request above.
- Description: Alias for
session.host- Description: ID of the currently selected host for the session.
- Type:
stringornil - Example:
'host1'
session.id- Description: ID of the session.
- Type:
string - Example:
'8eb2c1bdc106-17d2ff-00000000'
session.session_type- Description: Type of the session.
- Type:
string - Example:
'initial'or'instream'. Identical to the value of theTypeargument of the session translation function.
session.is_managed- Description: Identifies managed sessions.
- Type:
boolean - Example:
trueifType/session.session_typeis'instream'
request_headers
Contains the headers from the request between the client and the router, keyed by name.
Usage example:
print(request_headers['User-Agent'])
request_query_params
Contains the query parameters from the request between the client and the router, keyed by name.
Usage example:
print(request_query_params.a)
session_query_params
Alias for metatable request_query_params.
response
Contains data related to the outgoing response apart from the headers.
response.body- Description: HTTP response body string.
- Type:
stringornil - Example:
'{"foo": "bar"}'
response.code- Description: HTTP response status code.
- Type:
integer - Example:
200,404
response.text- Description: HTTP response status text.
- Type:
string - Example:
'OK','Not found'
response.major_version- Description: Major HTTP version such as
xinHTTP/x.1. - Type:
integer - Example:
1
- Description: Major HTTP version such as
response.minor_version- Description: Minor HTTP version such as
xinHTTP/1.x. - Type:
integer - Example:
1
- Description: Minor HTTP version such as
response.protocol- Description: Transfer protocol variant.
- Type:
string - Example:
'HTTP','HTTPS'
response_headers
Contains the response headers keyed by name.
Usage example:
print(response_headers['User-Agent'])
6.6.8.5.3 - Request Translation Function
Specifies the body of a Lua function that inspects every incoming HTTP request and overwrites individual fields before further processing by the router.
Returns nil when nothing is to be changed, or HTTPRequest(t) where t
is a table with any of the following optional fields:
Method- Description: Replaces the HTTP request method in the request being processed.
- Type:
string - Example:
'GET','POST'
Path- Description: Replaces the request path in the request being processed.
- Type:
string - Example:
'/mycontent/superman.m3u8'
ClientIp- Description: Replaces client IP address in the request being processed.
- Type:
string - Example:
'172.16.238.128'
Body- Description: Replaces body in the request being processed.
- Type:
stringornil - Example:
'{"foo": "bar"}'
QueryParameters- Description: Adds, removes or replaces individual query parameters in the request being processed.
- Type: nested
table(indexed by number) representing an array of query parameters as{[1]='Name',[2]='Value'}pairs that are added to the request being processed, or overwriting existing query parameters with colliding names. To remove a query parameter from the request, specifynilas value, i.e.QueryParameters={..., {[1]='foo',[2]=nil} ...}. Returning a query parameter with a name but no value, such asain the request'/index.m3u8?a&b=22'is currently not supported.
Headers- Description: Adds, removes or replaces individual headers in the request being processed.
- Type: nested
table(indexed by number) representing an array of request headers as{[1]='Name',[2]='Value'}pairs that are added to the request being processed, or overwriting existing request headers with colliding names. To remove a header from the request, specifynilas value, i.e.Headers={..., {[1]='foo',[2]=nil} ...}. Duplicate names are supported. A multi-value header such asFoo: bar1,bar2is defined by specifyingHeaders={..., {[1]='foo',[2]='bar1'}, {[1]='foo',[2]='bar2'}, ...}.
OutgoingRequest: See Sending HTTP requests from translation functions for more information.
Example of a request_translation_function body that sets the request path
to a hardcoded value and adds the hardcoded query parameter a=b:
-- Statements go here
print('Setting hardcoded Path and QueryParameters')
return HTTPRequest({
Path = '/content.mpd',
QueryParameters = {
{'a','b'}
}
})
Arguments
The following (iterable) arguments will be known by the function:
QueryParameters
Type: nested
table(indexed by number).Description: Array of query parameters as
{[1]='Name',[2]='Value'}pairs that were present in the query string of the request. Format identical to theHTTPRequest.QueryParameters-field specified for the return value above.Example usage:
for _, queryParam in pairs(QueryParameters) do print(queryParam[1]..'='..queryParam[2]) end
Headers
Type: nested
table(indexed by number).Description: Array of request headers as
{[1]='Name',[2]='Value'}pairs that were present in the request. Format identical to theHTTPRequest.Headers-field specified for the return value above. A multi-value header such asFoo: bar1,bar2is seen inrequest_translation_functionasHeaders={..., {[1]='foo',[2]='bar1'}, {[1]='foo',[2]='bar1'}, ...}.Example usage:
for _, header in pairs(Headers) do print(header[1]..'='..header[2]) end
Additional Data
In addition to the arguments above, the following Lua tables, documented in Global Lua Tables, provide additional data that is available when executing the request translation function:
If the request translation function modifies the request, the request,
request_query_params and request_headers tables will be updated with the
modified request and made available to the routing rules.
6.6.8.5.4 - Session Translation Function
Specifies the body of a Lua function that inspects a newly created session and may override its suggested type from “initial” to “instream” or vice versa. A number of helper functions are provided to simplify changing the session type.
Returns nil when the session type is to remain unchanged, or Session(t)
where t is a table with a single field:
Type- Description: New type of the session.
- Type:
string - Example:
'instream','initial'
OutgoingRequest: See Sending HTTP requests from translation functions for more information.
Basic Configuration
It is possible to configure the maximum number of simultaneous managed sessions
on the router. If the maximum number is reached, no more managed sessions can be
created. Using confcli, it can be configured by running
$ confcli services.routing.tuning.general.maxActiveManagedSessions
{
"maxActiveManagedSessions": 1000
}
$ confcli services.routing.tuning.general.maxActiveManagedSessions 900
services.routing.tuning.general.maxActiveManagedSessions = 900
Common Arguments
While executing the session translation function, the following arguments are available:
Type: The current type of the session ('instream'or'initial').
Usage examples:
-- Flip session type
local newType = 'initial'
if Type == 'initial' then
newType = 'instream'
end
print('Changing session type from ' .. Type .. ' to ' .. newType)
return Session({['Type'] = newType})
Session Translation Helper Functions
The standard Lua library prodives four helper functions to simplify the configuration of the session translation function:
set_session_type(session_type)
This function will set the session type to the supplied session_type and
the maximum number of sessions of that type has not been reached.
Parameters
session_type: The type of session to create, possible values are ‘initial’ or ‘instream’.
Usage Examples
return set_session_type('instream')
return set_session_type('initial')
set_session_type_if_in_group(session_type, session_group)
This function will set the session type to the supplied session_type if the
session is part of session_group and the maximum number of sessions of that
type has not been reached.
Parameters
session_type: The type of session to create, possible values are ‘initial’ or ‘instream’.session_group: The name of the session group.
Usage Examples
return set_session_type_if_in_group('instream', 'sg1')
set_session_type_if_in_all_groups(session_type, session_groups)
This function will set the session type to the supplied session_type if the
session is part of all session groups given by session_groups and the maximum
number of sessions of that type has not been reached.
Parameters
session_type: The type of session to create, possible values are ‘initial’ or ‘instream’.session_groups: A list of session group names.
Usage Examples
return set_session_type_if_in_all_groups('instream', {'sg1', 'sg2'})
set_session_type_if_in_any_group(session_type)
This function will set the session type to the supplied session_type if the
session is part of one or more of the session groups given by session_groups
and the maximum number of sessions of that type has not been reached.
Parameters
session_type: The type of session to create, possible values are ‘initial’ or ‘instream’.session_groups: A list of session group names.
Usage Examples
return set_session_type_if_in_any_group('instream', {'sg1', 'sg2'})
Configuration
Using confcli, example of how the functions above can be used in the session
translation function can be configured by running any of
$ confcli services.routing.translationFunctions.session "return set_session_type('instream')"
services.routing.translationFunctions.session = "return set_session_type('instream')"
$ confcli services.routing.translationFunctions.session "return set_session_type_if_in_group('instream', 'sg1')"
services.routing.translationFunctions.session = "return set_session_type_if_in_group('instream', 'sg1')"
$ confcli services.routing.translationFunctions.session "return set_session_type_if_in_all_groups('instream', {'sg1', 'sg2'})"
services.routing.translationFunctions.session = "return set_session_type_if_in_all_groups('instream', {'sg1', 'sg2'})"
$ confcli services.routing.translationFunctions.session "return set_session_type_if_in_any_group('instream', {'sg1', 'sg2'})"
services.routing.translationFunctions.session = "return set_session_type_if_in_any_group('instream', {'sg1', 'sg2'})"
Additional Data
In addition to the arguments above, the following Lua tables, documented in Global Lua Tables, provide additional data that is available when executing the response translation function:
The selection_input table will not change while a routing request is handled.
A request_translation_function and the corresponding
response_translation_function will see the same selection_input table, even
if the selection data is updated while the request is being handled.
6.6.8.5.5 - Host Request Translation Function
The host request translation function defines a Lua function that modifies
HTTP requests sent to a host. These hosts are configured in
services.routing.hostGroups.
Hosts can receive requests for a manifest. A regular host will respond with the manifest itself, while a redirecting host and a DNS host will respond with a redirection to a streamer. This function can modify all these types of requests.
The function returns nil when nothing is to be changed, or HTTPRequest(t)
where t is a table with any of the following optional fields:
Method- Description: Replaces the HTTP request method in the request being processed.
- Type:
string - Example:
'GET','POST'
Path- Description: Replaces the request path in the request being processed.
- Type:
string - Example:
'/mycontent/superman.m3u8'
Body- Description: Replaces body in the request being processed.
- Type:
stringornil - Example:
'{"foo": "bar"}'
QueryParameters- Description: Adds, removes or replaces individual query parameters in the request being processed.
- Type: nested
table(indexed by number) representing an array of query parameters as{[1]='Name',[2]='Value'}pairs that are added to the request being processed, or overwriting existing query parameters with colliding names. To remove a query parameter from the request, specifynilas value, i.e.QueryParameters={..., {[1]='foo',[2]=nil} ...}. Returning a query parameter with a name but no value, such asain the request'/index.m3u8?a&b=22'is currently not supported.
Headers- Description: Adds, removes or replaces individual headers in the request being processed.
- Type: nested
table(indexed by number) representing an array of request headers as{[1]='Name',[2]='Value'}pairs that are added to the request being processed, or overwriting existing request headers with colliding names. To remove a header from the request, specifynilas value, i.e.Headers={..., {[1]='foo',[2]=nil} ...}. Duplicate names are supported. A multi-value header such asFoo: bar1,bar2is defined by specifyingHeaders={..., {[1]='foo',[2]='bar1'}, {[1]='foo',[2]='bar2'}, ...}.
Host- Description: Replaces the host that the request is sent to.
- Type:
string - Example:
'new-host.example.com','192.0.2.7'
Port- Description: Replaces the TCP port that the request is sent to.
- Type:
number - Example:
8081
Protocol- Description: Decides which protocol that will be used for sending the
request. Valid protocols are
'HTTP'and'HTTPS'. - Type:
string - Example:
'HTTP','HTTPS'
- Description: Decides which protocol that will be used for sending the
request. Valid protocols are
OutgoingRequest: See Sending HTTP requests from translation functions for more information.
Example of a host_request_translation_function body that sets the request path
to a hardcoded value and adds the hardcoded query parameter a=b:
-- Statements go here
print('Setting hardcoded Path and QueryParameters')
return HTTPRequest({
Path = '/content.mpd',
QueryParameters = {
{'a','b'}
}
})
Arguments
The following (iterable) arguments will be known by the function:
QueryParameters
Type: nested
table(indexed by number).Description: Array of query parameters as
{[1]='Name',[2]='Value'}pairs that are present in the query string of the request from the client to the router. Format identical to theHTTPRequest.QueryParameters-field specified for the return value above.Example usage:
for _, queryParam in pairs(QueryParameters) do print(queryParam[1]..'='..queryParam[2]) end
Headers
Type: nested
table(indexed by number).Description: Array of request headers as
{[1]='Name',[2]='Value'}pairs that are present in the request from the client to the router. Format identical to theHTTPRequest.Headers-field specified for the return value above. A multi-value header such asFoo: bar1,bar2is seen inhost_request_translation_functionasHeaders={..., {[1]='foo',[2]='bar1'}, {[1]='foo',[2]='bar1'}, ...}.Example usage:
for _, header in pairs(Headers) do print(header[1]..'='..header[2]) end
Global Tables
The following non-iterable global tables are available for use by the
host_request_translation_function.
Table outgoing_request
The outgoing_request table contains the request that is to be sent to the
host.
outgoing_request.method- Description: HTTP request method.
- Type:
string - Example:
'GET','POST'
outgoing_request.body- Description: HTTP request body string.
- Type:
stringornil - Example:
'{"foo": "bar"}'
outgoing_request.major_version- Description: Major HTTP version such as
xinHTTP/x.1. - Type:
integer - Example:
1
- Description: Major HTTP version such as
outgoing_request.minor_version- Description: Minor HTTP version such as
xinHTTP/1.x. - Type:
integer - Example:
1
- Description: Minor HTTP version such as
outgoing_request.protocol- Description: Transfer protocol variant.
- Type:
string - Example:
'HTTP','HTTPS'
Table outgoing_request_headers
Contains the request headers from the request that is to be sent to the host, keyed by name.
Example:
print(outgoing_request_headers['X-Forwarded-For'])
Multiple values are separated with a comma.
Additional Data
In addition to the arguments above, the following Lua tables, documented in Global Lua Tables, provide additional data that is available when executing the request translation function:
6.6.8.5.6 - Response Translation Function
Specifies the body of a Lua function that inspects every outgoing HTTP response and overwrites individual fields before being sent to the client.
Returns nil when nothing is to be changed, or HTTPResponse(t) where t
is a table with any of the following optional fields:
Code- Description: Replaces status code in the response being sent.
- Type:
integer - Example:
200,404
Text- Description: Replaces status text in the response being sent.
- Type:
string - Example:
'OK','Not found'
MajorVersion- Description: Replaces major HTTP version such as
xinHTTP/x.1in the response being sent. - Type:
integer - Example:
1
- Description: Replaces major HTTP version such as
MinorVersion- Description: Replaces minor HTTP version such as
xinHTTP/1.xin the response being sent. - Type:
integer - Example:
1
- Description: Replaces minor HTTP version such as
Protocol- Description: Replaces protocol in the response being sent.
- Type:
string - Example:
'HTTP','HTTPS'
Body- Description: Replaces body in the response being sent.
- Type:
stringornil - Example:
'{"foo": "bar"}'
Headers- Description: Adds, removes or replaces individual headers in the response being sent.
- Type: nested
table(indexed by number) representing an array of response headers as{[1]='Name',[2]='Value'}pairs that are added to the response being sent, or overwriting existing request headers with colliding names. To remove a header from the response, specifynilas value, i.e.Headers={..., {[1]='foo',[2]=nil} ...}. Duplicate names are supported. A multi-value header such asFoo: bar1,bar2is defined by specifyingHeaders={..., {[1]='foo',[2]='bar1'}, {[1]='foo',[2]='bar2'}, ...}.
OutgoingRequest: See Sending HTTP requests from translation functions for more information.
Example of a response_translation_function body that sets the Location
header to a hardcoded value:
-- Statements go here
print('Setting hardcoded Location')
return HTTPResponse({
Headers = {
{'Location', 'cdn1.com/content.mpd?a=b'}
}
})
Arguments
The following (iterable) arguments will be known by the function:
Headers
Type: nested
table(indexed by number).Description: Array of response headers as
{[1]='Name',[2]='Value'}pairs that are present in the response being sent. Format identical to theHTTPResponse.Headers-field specified for the return value above. A multi-value header such asFoo: bar1,bar2is seen inresponse_translation_functionasHeaders={..., {[1]='foo',[2]='bar1'}, {[1]='foo',[2]='bar1'}, ...}.Example usage:
for _, header in pairs(Headers) do print(header[1]..'='..header[2]) end
Additional Data
In addition to the arguments above, the following Lua tables, documented in Global Lua Tables, provide additional data that is available when executing the response translation function:
6.6.8.5.7 - Sending HTTP requests from translation functions
It is possible to configure all translation functions to send HTTP requests. If an outgoing request is sent in a translation function, the Director will delay the response to the incoming request until the outgoing request has been completed. Note that the response to the outgoing request is not handled by the Director, it only waits for the outgoing request to complete.
Requests can be sent from any translation function by defining the table
OutgoingRequest in the translation function return value:
{
OutgoingRequest = {
Method = "HEAD",
Protocol = "HTTP",
Host = "example.com",
Port = 8080,
Path = "/example/path",
EncodeURL = true,
QueryParameters = {{"param1", "value1"}, {"param2", "value2"}},
Headers = {{"x-header", "header-value"}, {"Authorization", "Basic dXNlcjpwYXNz"}}
}
}
The following fields for OutgoingRequest are supported:
Method: The HTTP method to use. Defaults toHEAD.Protocol: The protocol to use. Defaults to the protocol of the incoming request.Host: The host to send the request to.Port: The port to send the request to. Defaults to 80 ifProtocolisHTTPand 443 ifProtocolisHTTPS.Path: The path to send the request to. Defaults to/.EncodeURL: A boolean value that determines if the URL should be percent-encoded. Defaults totrue. WARNING: Not encoding the URL is not HTTP compliant and might cause issues with some servers. Use with caution. See RFC 1738 for more information.QueryParameters: A list of query parameters to include in the request. Note that the query parameters are defined as two-element lists in Lua.Headers: A Lua table of headers to include in the request. Note that if the header name contains a dash-, it must be defined as a two-element list as seen in the example above.Body: A string containing the body of the request. If this field is not defined, no body will be included in the request. If it is defined, theContent-Lengthheader, with the length of the body, will be added to the request.
All fields except Host are optional.
Using the example above, the following response translation function
will make the Director can send a GET request to
http://example.com:8080/example/path?param1=value1¶m2=value2 with the
headers x-header: x-value and Authorization: Basic dXNlcjpwYXNz:
return HTTPResponse({
OutgoingRequest = {
Method = "HEAD",
Protocol = "HTTP",
Host = "example.com",
Port = 8080,
Path = "/example/path",
QueryParameters = {{"param1", "value1"}, {"param2", "value2"}},
Headers = {{"x-header", "x-value"}, {"Authorization", "Basic dXNlcjpwYXNz"}}
}
})
Using log level 4, the outgoing request can be seen in the Director logs:
DEBUG orc-re-work-0 AsyncRequestSender: Sending request: url=http://example.com/example/path?param1=value1¶m2=value2
DEBUG orc-re-work-0 CDNManager: OutboundContentConn: example.com:8080: Connecting to target CDN example.com:8080
DEBUG orc-re-work-0 ClientConn: 192.168.103.16/28:60201/https: Sent a Lua request: outstanding-requests=1
DEBUG orc-re-work-0 CDNManager: OutboundContentConn: example.com:8080: Target CDN connection established.
DEBUG orc-re-work-0 CDNManager: OutboundContentConn: example.com:8080: Sending request to target CDN:
GET /example/path?param1=value1¶m2=value2 HTTP/1.0
Authorization: Basic dXNlcjpwYXNz
Host: example.com:8080
x-header: x-value
6.6.9 - Trusted proxies
When a request with the header X-Forwarded-For is sent to the router, the
router will check if the client is in the list of trusted proxies. If the client
is not a trusted proxy, the router will drop the connection, returning an empty
reply to the client. If the client is a trusted proxy, the IP address defined
in the X-Forwarded-For will be regarded as the client’s IP address.
The list of trusted proxies can be configured by modifying the configuration
field services.routing.settings.trustedProxies with the IP addresses of
trusted proxies:
$ confcli services.routing.settings.trustedProxies -w
Running wizard for resource 'trustedProxies'
<A list of IP addresses from which the proxy IP address of requests with the X-Forwarded-For header defined are checked. If the IP isn't in this list, the connection is dropped. (default: [])>
Hint: Hitting return will set a value to its default.
Enter '?' to receive the help string
trustedProxies <A list of IP addresses from which the proxy IP address of requests with the X-Forwarded-For header defined are checked. If the IP isn't in this list, the connection is dropped. (default: [])>: [
trustedProxy (default: ): 1.2.3.4
Add another 'trustedProxy' element to array 'trustedProxies'? [y/N]: n
]
Generated config:
{
"trustedProxies": [
"1.2.3.4"
]
}
Merge and apply the config? [y/n]: y
Note that by configuring 0.0.0.0/0 as a trusted proxy, all proxied requests
will be trusted.
6.6.10 - Confd Auto Upgrade Tool
The confd-auto-upgrade tool is a simple utility to automatically migrate the confd
configuration schema between different versions of the Director. Starting with version
1.12.0, it is possible to automatically apply the necessary configuration changes in a
controlled and predictable manner. While this tool is intended to help transition the
configuration format between the different versions, it is not a substitute for proper
backups, and while downgrading to an earlier version, it may not be possible to recover
previously modified or deleted configuration values.
When using the tool, both the “from” and “to” versions must be specified. Internally, the tool will calculate a list of migrations which must be applied to transition between the given versions, and apply them, outputting the final configuration to standard output. The current configuration can either be piped in to the tool via standard input, or supplied as a static file. Providing a “from” version which is later than the “to” version will result in the downgrade migrations being applied in reverse order, effectively downgrading the configuration to the lower version.
For convenience, the tool is deployed to the ACD Nodes automatically at install time as a standard Podman container, however since it is not intended to run as a service, only the image will be present, not a running container.
Performing the Upgrade
In the following example scenario, a system with version 1.10.1 has been upgraded
to 1.14.0. Before upgrading a backup of the configuration was taken and saved to
current_config.json.
Using the image and tag as determined in the above section. Issue the following command:
cat current_config.json | \
podman run -i --rm images.edgeware.tv/acd-confd-migration:1.14.0 \
--in - --from 1.10.1 --to 1.14.0 \
| tee upgraded_config.json
In the above example, the updated configuration is saved to upgraded_config.json.
It is recommended to manually verify the generated configuration, and after
which apply the config to confd by using cat upgraded_config.json | confcli -i.
It is also possible to combine the two commands, by piping the output of the auto-upgrade
tool directly to confcli -i. E.g.
cat current_config.json | podman run ... | tee upgraded_config.json | confcli -i
This will save a backup of the upgraded configuration to upgraded_config.json and
at the same time apply the changes to confd immediately.
Downgrading the Configuration
The steps for downgrading the configuration are exactly the same as for upgrade except for the --from
and --to versions should be swapped. E.g. --from 1.14.0 --to 1.10.1. Keep in mind however,
that during an upgrade some configuration properties may have been deleted or modified, and while
downgrading over those steps, some data loss may occur. In those cases, it may be easier and safer
to simply restore from backup. In most cases where configuration properties are removed during upgrade,
the corresponding downgrade will simply restore the default values of those properties.
6.7 - Operations
This guide describes how to perform day-to-day operations of the ACD Router and its associated services, collectively known as the Director.
Component Overview
To effectively operate the Director software, it is important to understand the composition of the various software components and how they are deployed.
Each Director instance functions as an independent system, comprising multiple containerized services. These containers are managed by a standard container runtime and are seamlessly integrated with the host’s operating system to enhance the overall operator experience.
The containers are managed by the Podman container runtime, which operates without additional daemon services running on the host. Unlike Docker, Podman manages each container as a separate process, eliminating the reliance on a shared daemon and mitigating the risk of a single-point-of-failure scenario.
Although several distinct services make up the Director, the primary component is the router. The router is responsible for listening for incoming requests, processing the request, and redirecting the client to the appropriate host, or CDN to deliver the requested content.
Two additional containers are responsible for configuration management. Those are
confd and confd-transformer. The former manages a local database of configuration
metadata and provides a REST API for managing the configuration. The confd-transformer
simply listens for configuration changes from confd and adapts that configuration
to a format suitable for the router to ingest. For additional information about
setting up and using confd see here..
The next two components, the edns-proxy and the convoy-bridge allow the router
to communicate with an EDNS server for EDNS-based routing, and with synchronization
with Convoy respectively. Additional information about the EDNS-Proxy is available
here.. For the Convoy Bridge
service see here..
The remaining containers are useful for metrics, monitoring, and alerting. These
include prometheus and grafana for monitoring and analytics, and alertmanager
for monitoring and alarms.
6.7.1 - Services
Each container shipped with the Director is fully-integrated with the systemd
service on the host, enabling easy management using standard systemd commands.
The logs for each container are also full-integrated with journald to simplify
troubleshooting.
In order to integrate the Podman containers with systemd, a common prefix
of acd- has been applied to each service name. For example the router
container is managed by the service acd-router, and the confd container
is managed by the service acd-confd. These same prefixed names apply while
fetching logs via journald. This common prefix aids in grouping the related
services as well as provides simpler filtering for tab-completion.
Starting / Stopping Services
Standard systemd commands should be used to start and stop the services.
systemctl start acd-router- Starts theroutercontainer.systemctl stop acd-router- Stops theroutercontainer.systemctl status acd-router- Displays the status of theroutercontainer.
Due to the limitation of needing the acd- prefix, it provides the ability to
work with all ACD services in a group. For example:
systemctl status 'acd-*'- Display the status of all installed ACD components.systemctl start 'acd-*'- Start all ACD components.
Logging
Each ACD component corresponds to a journal entry with the same unit name, with
the acd- prefix. Standard journald commands can be used to view and manage the
logging.
journalctl -u acd-router- Display the logs for theroutercontainer
Access Log
Refer to Access Logging.
Troubleshooting
Some additional logging may be available in the filesystem, the paths of which can
be determined by executing the ew-sysinfo command. See
Diagnostics. for additional details.
6.7.2 - Geographic Databases
To do geographic based routing, the Director uses geographic location databases. The databases need to be on the format provided by MaxMind.
When first installed, the Director comes with example databases. These are only suitable for testing and evaluation, if geographic routing is to be used in production, proper databases need to be obtained from MaxMind.
For the Director to find them, each database needs to have a specific filename. Three databases are supported:
| Type | Filename |
|---|---|
| City and Country | /opt/edgeware/acd/geoip2/GeoIP2-City.mmdb |
| ASN | /opt/edgeware/acd/geoip2/GeoLite2-ASN.mmdb |
| Anonymous IP | /opt/edgeware/acd/geoip2/GeoIP2-Anonymous-IP.mmdb |
When updating the database files, the new file is copied over the old file. After that the Director has to be told to reload it. This is done by typing the following:
podman kill --signal HUP router
6.8 - Convoy Bridge
The convoy-bridge is an optional integration service, pre-installed alongside the router which provides two-way communication between the router and a separate Convoy installation.
The convoy-bridge is designed to allow the Convoy account metadata to be available from within the router for such use-cases as inserting the account specific prefixes in the redirect URL and validating per-account internal security tokens. The service works by periodically polling the Convoy server for changes to the configuration, and when detected, the relevant configuration information is pushed to the router.
In addition, the convoy-bridge has the ability to integrate the router with the Convoy analytics service, such that client sessions started by the router are properly collected by Convoy, and are available in the dashboards.
Configuration
The convoy-bridge service is configured using confcli on the router host.
All configuration for the convoy-bridge exists under the path
integration.convoy.bridge.
{
"logLevel": "info",
"accounts": {
"enabled": true,
"dbUrl": "mysql://convoy:eith7jee@convoy:3306",
"dbPollInterval": 60
},
"analytics": {
"enabled": true,
"brokers": ["broker1:9092", "broker2:9092"],
"batchInterval": 10,
"maxBatchSize": 500
},
"otherRouters": [
{
"url": "https://router2:5001",
"apiKey": "key1",
"validateCerts": true
}
]
}
In the above configuration block, there are three main sections. The accounts
section enables fetching account metadata from Convoy towards the router. The
analytics section controls the integration between the router and the Convoy
analytics service. The otherRouters section is used to synchronize additional
router instances. The local router instance will always be implicitly included.
Additional routers listed in this section will be handled by this instance of
the convoy-bridge service.
Logging
The logs are available in the system journal and can be viewed using:
journalctl -u acd-convoy-bridge
6.9 - Monitoring
6.9.1 - Access logging
Access Log
Access logging is enabled by default and can be disabled by running:
$ confcli services.routing.settings.logging.accessLog false
Requests are logged in the Combined Log Format at:
/var/log/acd-router/access.log. Additionally, the symbolic link
/opt/edgeware/acd/router/log points to /var/log/acd-router, allowing
the access logs to also be found at /opt/edgeware/acd/router/log/access.log.
Access Error Log
Access errors are logged to a separate file. These logs can be useful for troubleshooting. Requests are logged in the Combined Log Format, with the selected routing rules appended.
The access error log is disabled by default and can be enabled by running:
$ confcli services.routing.settings.logging.accessErrorLog true
The rule tree depth can be changed with:
$ confcli services.routing.settings.logging.accessErrorLogDepth 5
The error log is at:
/var/log/acd-router/access-error.log. Additionally, the symbolic link
/opt/edgeware/acd/router/log points to /var/log/acd-router, allowing
the access logs to also be found at /opt/edgeware/acd/router/log/.
Example Output
$ cat /var/log/acd-router/access.log
May 29 07:20:00 router[52236]: ::1 - - [29/May/2023:07:20:00 +0000] "GET /vod/batman.m3u8 HTTP/1.1" 302 0 "-" "curl/7.61.1"
$ cat /var/log/acd-router/access-error.log
Jul 14 12:42:42 router[61136]: ::1 - - [14/Jul/2023:12:42:42 +0000] "GET /private/batman.m3u8 HTTP/1.1" 403 0 "-" "... Safari/605.1.15" [verify_token.0.randis, verify_token.1.rejected]
Access Log Rotation
The access logs are rotated and compressed once the file reaches a size of 100 MB. By default, 10 rotated logs are stored before being rotated out. These rotation parameters can be reconfigured by editing the lines
size 100M
rotate 10
in /etc/logrotate.d/acd-router-access-log. For more log rotation configuration
possibilites, refer to the
Logrotate documentation.
6.9.2 - System troubleshooting
ESB3024 contains the tool ew-sysinfo that gives an overview of how the
system is doing. Simply use the command and the tool will output information
about the system and the installed ESB3024 services.
The output format can be changed using the --format flag, possible values
are human (default) and json, e.g.:
$ ew-sysinfo
system:
os: ['5.4.17-2136.321.4.el8uek.x86_64', 'Oracle Linux Server 8.8']
cpu_cores: 2
cpu_load_average: [0.03, 0.03, 0.0]
memory_usage: 478 MB
memory_load_average: [0.03, 0.03, 0.0]
boot_time: 2023-09-08T08:30:57Z
uptime: 6 days, 3:43:44.640665
processes: 122
open_sockets:
ipv4: 12
ipv6: 18
ip_total: 30
tcp_over_ipv4: 9
tcp_over_ipv6: 16
tcp_total: 25
udp_over_ipv4: 3
udp_over_ipv6: 2
udp_total: 5
total: 145
system_disk (/):
total: 33271 MB
used: 7978 MB (24.00%)
free: 25293 MB
journal_disk (/run/log/journal):
total: 1954 MB
used: 217 MB (11.10%)
free: 1736 MB
vulnerabilities:
meltdown: Mitigation: PTI
spectre_v1: Mitigation: usercopy/swapgs barriers and __user pointer sanitization
spectre_v2: Mitigation: Retpolines, STIBP: disabled, RSB filling, PBRSB-eIBRS: Not affected
processes:
orc-re:
pid: 177199
status: sleeping
cpu_usage_percent: 1.0%
cpu_load_average: 131.11%
memory_usage: 14 MB (0.38%)
num_threads: 10
hints:
get_raw_router_config: cat /opt/edgeware/acd/router/cache/config.json
get_confd_config: cat /opt/edgeware/acd/confd/store/__active
get_router_logs: journalctl -u acd-router
get_edns_proxy_logs: journalctl -u acd-edns-proxy
check_firewall_status: systemctl status firewalld
check_firewall_config: iptables -nvL# For --format=json, it's recommended to pipe the output to a JSON interpreter
# such as jq
$ ew-sysinfo --format=json | jq
{
"system": {
"os": [
"5.4.17-2136.321.4.el8uek.x86_64",
"Oracle Linux Server 8.8"
],
"cpu_cores": 2,
"cpu_load_average": [
0.01,
0.0,
0.0
],
"memory_usage": "479 MB",
"memory_load_average": [
0.01,
0.0,
0.0
],
"boot_time": "2023-09-08 08:30:57",
"uptime": "6 days, 5:12:24.617114",
"processes": 123,
"open_sockets": {
"ipv4": 13,
"ipv6": 18,
"ip_total": 31,
"tcp_over_ipv4": 10,
"tcp_over_ipv6": 16,
"tcp_total": 26,
"udp_over_ipv4": 3,
"udp_over_ipv6": 2,
"udp_total": 5,
"total": 146
}
},
"system_disk (/)": {
"total": "33271 MB",
"used": "7977 MB (24.00%)",
"free": "25293 MB"
},
"journal_disk (/run/log/journal)": {
"total": "1954 MB",
"used": "225 MB (11.50%)",
"free": "1728 MB"
},
"vulnerabilities": {
"meltdown": "Mitigation: PTI",
"spectre_v1": "Mitigation: usercopy/swapgs barriers and __user pointer sanitization",
"spectre_v2": "Mitigation: Retpolines, STIBP: disabled, RSB filling, PBRSB-eIBRS: Not affected"
},
"processes": {
"orc-re": {
"pid": 177199,
"status": "sleeping",
"cpu_usage_percent": "0.0%",
"cpu_load_average": "137.63%",
"memory_usage": "14 MB (0.38%)",
"num_threads": 10
}
}
}Note that your system might have different monitored processes and field names.
The field hints is different from the rest. It lists common commands
that can be used to further monitor system performance, useful for
quickly troubleshooting a faulty system.
6.9.3 - Scraping data with Prometheus
Prometheus is a third-party data scraper which is installed as a containerized service in the default installation of ESB3024 Router. It periodically reads metrics data from different services, such as acd-router, aggregates it and makes it available to other services that visualize the data. Those services include Grafana and Alertmanager.
The Prometheus configuration file can be found on the host at
/opt/edgeware/acd/prometheus/prometheus.yaml.
Accessing Prometheus
Prometheus has a web interface that is listening for HTTP connections on port 9090. There is no authentication, so anyone who has access to the host that is running Prometheus can access the interface.
Starting / Stopping Prometheus
After the service is configured, it can be managed via systemd, under the
service unit acd-prometheus.
systemctl start acd-prometheus
Logging
The container logs are automatically published to the system journal, under
the same unit descriptor, and can be viewed using journalctl
journalctl -u acd-prometheus
6.9.4 - Visualizing data with Grafana
6.9.4.1 - Managing Grafana
Grafana displays graphs based on data from Prometheus. A default deployment of Grafana is running in a container alongside ESB3024 Router.
Grafana’s configuration and runtime files are stored under
/opt/edgeware/acd/grafana. It comes with default dashboards that are
documented at Grafana dashboards.
Accessing Grafana
Grafana’s web interface is listening for HTTP connections on port
3000. It has two default accounts, edgeware and admin.
The edgeware account can only view graphs, while the admin account can also
edit graphs. The accounts with default passwords are shown in the table below.
| Account | Default password |
|---|---|
edgeware | edgeware |
admin | edgeware |
Starting / Stopping Grafana
Grafana can be managed via systemd, under the service unit acd-grafana.
systemctl start acd-grafana
Logging
The container logs are automatically published to the system journal, under
the same unit descriptor, and can be viewed using journalctl
journalctl -u acd-grafana
6.9.4.2 - Grafana Dashboards
Grafana will be populated with pre-configured graphs which present some metrics on a time scale. Below is a comprehensive list of those dashboards, along with short descriptions.
Router Monitoring dashboard
This dashboard is by default set as home directory - it’s what user will see
after logging in.
Number Of Initial Routing Decisions
HTTP Status Codes
Total number of responses sent back to incoming requests, shown by their status codes. Metric: client-response-status
Incoming HTTP and HTTPS Requests
Total number of incoming requests that were deemed valid, divided into SSL
and Unencrypted categories.
Metric: num_valid_http_requests
Debugging Information dashboard
Number of Lua Exceptions
Number of exceptions encountered so far while evaluating Lua rules. Metric: lua_num_errors
Number of Lua Contexts
Number of active Lua interpreters, both running and idle. Metric: lua_num_evaluators
Time Spent In Lua
Number of microseconds the Lua interpreters were running. Metric: lua_time_spent
Router Latencies
Histogram-like graph showing how many responses were sent within the given latency interval. Metric: orc_latency_bucket
Internal debugging
A folder that contains dashboards intended for internal use.
ACD: Incoming Internet Connections dashboard
SSL Warnings
Rate of warnings logged during TLS connections Metric: num_ssl_warnings_total
SSL Errors
Rate of errors logged during TLS connections Metric: num_ssl_errors_total
Valid Internet HTTPS Requests
Rate of incoming requests that were deemed valid, HTTPS only. Metric: num_valid_http_requests
Invalid Internet HTTPS Requests
Rate of incoming requests that were deemed invalid, HTTPS only. Metric: num_invalid_http_requests
Valid Internet HTTP Requests
Rate of incoming requests that were deemed valid, HTTP only. Metric: num_valid_http_requests
Invalid Internet HTTP Requests
Rate of incoming requests that were deemed invalid, HTTP only. Metric: num_invalid_http_requests
Prometheus: ACD dashboard
Logged Warnings
Rate of logged warnings since the router has started, divided into CDN-related and CDN-unrelated. Metric: num_log_warnings_total
Logged Errors
Rate of logged errors since the router has started. Metric: num_log_errors_total
HTTP Requests
Rate of responses sent to incoming connections. Metric: orc_latency_count
Number Of Active Sessions
Number of sessions opened on router that are still active. Metric: num_sessions
Total Number Of Sessions
Total number of sessions opened on router. Metric: num_sessions
Session Type Counts (Non-Stacked)
Number of active sessions divided by type; see metric documentation linked below for up-to-date list of types. Metric: num_sessions
Prometheus/ACD: Subrunners
Client Connections
Number of currently open client connections per subrunner. Metric: subrunner_client_conns
Asynchronous Queues (Current)
Number of queued events per subrunner, roughly corresponding to load. Metric: subrunner_async_queue
Used <Send/receive> Data Blocks
Number of send or receive data blocks currently in use per subrunner, as decided by the “Send/receive” drop down box. Metric: subrunner_used_send_data_blocks and subrunner_used_receive_data_blocks
Asynchronous Queues (Max)
Maximum number of events waiting in queue. Metric: subrunner_max_async_queue
Total <Send/receive> Data Blocks
Number of send or receive data blocks allocated per subrunner, as decided by the “Send/receive” drop down box. Metric: subrunner_total_send_data_blocks and subrunner_total_receive_data_blocks
Low Queue (Current)
Number of low priority events queued per subrunner. Metric: subrunner_low_queue
Medium Queue (Current)
Number of medium priority events queued per subrunner. Metric: subrunner_medium_queue
High Queue (Current)
Number of high priority events queued per subrunner. Metric: subrunner_high_queue
Low Queue (Max)
Maximum number of events waiting in low priority queue. Metric: subrunner_max_low_queue
Medium Queue (Max)
Maximum number of events waiting in medium priority queue. Metric: subrunner_max_medium_queue
High Queue (Max)
Maximum number of events waiting in high priority queue. Metric: subrunner_max_high_queue
Wakeups
The number of times a subrunner has been waken up from sleep. Metric: subrunner_io_wakeups
Overloaded
The number of times the number of queued events for a subrunner exceeded its maximum. Metric: subrunner_times_worker_overloaded
Autopause
Number of sockets that have been automatically paused. This happens when the work manager is under heavy load. Metric: subrunner_io_autopause_sockets
6.9.5 - Alarms and Alerting
Alerts are generated by the third-party service Prometheus, which sends them to the Alertmanager service. A default containerized instance of Alertmanager is deployed alongside ESB3024 Router. Out of the box, Alertmanager ships with only a sample configuration file, and will require manual configuration prior to enabling the alerting functionality. Due to the many different possible configurations for how alerts are both detected and where they are pushed, the official Alertmanager documentation should be followed for how to configure the service.
The router ships with Alertmanager 0.25, the documentation
for which can be found at prometheus.io.
The Alertmanager configuration file can be found on the host at
/opt/edgeware/acd/alertmanager/alertmanager.yml.
Accessing Alertmanager
Alertmanager has a web interface that is listening for HTTP connections on port 9093. There is no authentication, so anyone who has access to the host that is running Alertmanager can access the interface.
Starting / Stopping Alertmanager
After the service is configured, it can be managed via systemd, under the
service unit acd-alertmanager.
systemctl start acd-alertmanager
Logging
The container logs are automatically published to the system journal, under
the same unit descriptor, and can be viewed using journalctl
journalctl -u acd-alertmanager
6.9.6 - Monitoring multiple routers
By default an instance of Prometheus only monitors the ESB3024 Router that is installed on the same host as where Prometheus is installed. It is possible to make it monitor other router instances and visualize all instances on one Grafana instance.
Configuring of Prometheus
This is configured in the scraping configuration of Prometheus, which is found
in the file /opt/edgeware/acd/prometheus/prometheus.yaml, which typically
looks like this:
global:
scrape_interval: 15s
rule_files:
- recording-rules.yaml
# A scrape configuration for router metrics
scrape_configs:
- job_name: 'router-scraper'
scheme: https
tls_config:
insecure_skip_verify: true
static_configs:
- targets:
- acd-router-1:5001
metrics_path: /m1/v1/metrics
honor_timestamps: true
- job_name: 'edns-proxy-scraper'
scheme: http
static_configs:
- targets:
- acd-router-1:8888
metrics_path: /metrics
honor_timestamps: true
More routers can be added to the scrape configuration by simply adding more
routers under targets in the scraper jobs.
For instance, to monitor acd-router-2 and acd-router-3 along acd-router-1,
the configuration file needs to be modified like this:
global:
scrape_interval: 15s
rule_files:
- recording-rules.yaml
# A scrape configuration for router metrics
scrape_configs:
- job_name: 'router-scraper'
scheme: https
tls_config:
insecure_skip_verify: true
static_configs:
- targets:
- acd-router-1:5001
- acd-router-2:5001
- acd-router-3:5001
metrics_path: /m1/v1/metrics
honor_timestamps: true
- job_name: 'edns-proxy-scraper'
scheme: http
static_configs:
- targets:
- acd-router-1:8888
- acd-router-2:8888
- acd-router-3:8888
metrics_path: /metrics
honor_timestamps: true
After the file has been modified, Prometheus needs to be restarted by typing
systemctl restart acd-prometheus
It is possible to use the same configuration on multiple routers, so that all routers in a deployment can monitor each other.
Selecting Router in Grafana
In the top left corner the Grafana dashboards have a drop-down menu labeled “ACD Router”, which allows to choose which router to monitor.
6.9.7 - Routing Rule Evaluation Metrics
ESB3024 Router counts the number of times a node and any of its children is selected in the routing table.
The visit counters can be retrieved with the following end points:
/v1/node_visits
Returns visit counters for each node as a flat list of
host:counterpairs in JSON.Example output:
{ "node1": "1", "node2": "1", "node3": "1", "top": "3" }
/v1/node_visits_graph
Returns a full graph of nodes with their respective visit counters in GraphML.
Example output:
<?xml version="1.0"?> <graphml xmlns="http://graphml.graphdrawing.org/xmlns" xmlns:xsi="http://www.w3.org/2001/XMLSchema-instance" xsi:schemaLocation="http://graphml.graphdrawing.org/xmlns http://graphml.graphdrawing.org/xmlns/1.0/graphml.xsd"> <key id="visits" for="node" attr.name="visits" attr.type="string" /> <graph id="G" edgedefault="directed"> <node id="routing_table"> <data key="visits">5</data> </node> <node id="cdn1"> <data key="visits">1</data> </node> <node id="node1"> <data key="visits">1</data> </node> <node id="cdn2"> <data key="visits">2</data> </node> <node id="node2"> <data key="visits">2</data> </node> <node id="cdn3"> <data key="visits">2</data> </node> <node id="node3"> <data key="visits">2</data> </node> <edge id="e0" source="cdn1" target="node1" /> <edge id="e1" source="routing_table" target="cdn1" /> <edge id="e2" source="cdn2" target="node2" /> <edge id="e3" source="routing_table" target="cdn2" /> <edge id="e4" source="cdn3" target="node3" /> <edge id="e5" source="routing_table" target="cdn3" /> </graph> </graphml>To receive the graph as JSON, specify
Accept:application/jsonin the request headers.Example output:
{ "edges": [ { "source": "cdn1", "target": "node1" }, { "source": "routing_table", "target": "cdn1" }, { "source": "cdn2", "target": "node2" }, { "source": "routing_table", "target": "cdn2" }, { "source": "cdn3", "target": "node3" }, { "source": "routing_table", "target": "cdn3" } ], "nodes": [ { "id": "routing_table", "visits": "5" }, { "id": "cdn1", "visits": "1" }, { "id": "node1", "visits": "1" }, { "id": "cdn2", "visits": "2" }, { "id": "node2", "visits": "2" }, { "id": "cdn3", "visits": "2" }, { "id": "node3", "visits": "2" } ] }
Resetting Visit Counters
A node visit counter with an id not matching any node id of a newly applied
routing table is destroyed.
Reset all counters to zero by momentarily applying a configuration with a
placeholder routing root node, that has unique id and an empty members
list, e.g:
"routing": {
"id": "empty_routing_table",
"members": []
}
… and immediately reapply the desired configuration.
6.9.8 - Metrics
ESB3024 Router collects a large number of metrics that can give insight into
it’s condition at runtime. Those metrics are available in
Prometheus’ text-based exposition format
at endpoint :5001/m1/v1/metrics.
Below is the description of these metrics along with their labels.
client_response_status
Number of responses sent back to incoming requests.
- Type: counter
lua_num_errors
Number of errors encountered when evaluating Lua rules.
- Type:
counter
lua_num_evaluators
Number of Lua rules evaluators (active interpreters).
- Type: gauge
lua_time_spent
Time spent by running Lua evaluators, in microseconds.
- Type:
counter
num_configuration_changes
Number of times configuration has been changed since the router has started.
- Type:
counter
num_endpoint_requests
Number of requests redirected per CDN endpoint.
- Type:
counter - Labels:
endpoint- CDN endpoint address.selector- whether the request was counted duringinitialorinstreamselection.
num_invalid_http_requests
Number of client requests that either use wrong method or wrong URL path. Also number of all requests that cannot be parsed as HTTP.
- Type:
counter - Labels:
source- name of internal filter function that classified request as invalid. Probably not of much use outside debugging.type- whether the request was HTTP (Unencrypted) or HTTPS (SSL).
num_log_errors_total
Number of logged errors since the router has started.
- Type:
counter
num_log_warnings_total
Number of logged warnings since the router has started.
- Type:
counter
num_managed_redirects
Number of redirects to the router itself, which allows session management.
- Type:
counter
num_manifests
Number of cached manifests.
- Type:
gauge - Labels:
count- state of manifest in cache, can be eitherlru,evictedortotal.
num_qoe_losses
Number of “lost” QoE decisions per CDN.
- Type:
counter - Labels:
cdn_id- ID of CDN that loose QoE battle.cdn_name- name of CDN that loose QoE battle.selector- whether the decision was taken duringinitialorinstreamselection.
num_qoe_wins
Number of “won” QoE decisions per CDN.
- Type:
counter - Labels:
cdn_id- ID of CDN that won QoE battle.cdn_name- name of CDN that won QoE battle.selector- whether the decision was taken duringinitialorinstreamselection.
num_rejected_requests
Deprecated, should always be at 0.
- Type:
counter - Labels:
selector- whether the request was counted duringinitialorinstreamselection.
num_requests
Total number of requests received by the router.
- Type:
counter - Labels:
selector- whether the request was counted duringinitialorinstreamselection.
num_sessions
Number of sessions opened on router.
- Type:
gauge - Labels:
state- eitheractiveorinactive.type- one of:initial,instream,qoe_on,qoe_off,qoe_agentorsp_agent.
num_ssl_errors_total
Number of all errors logged during TLS connections, both incoming and outgoing.
- Type:
counter
num_ssl_warnings_total
Number of all warnings logged during TLS connections, both incoming and outgoing.
- Type:
counter - Labels:
category- which kind of TLS connection triggered the warning. Can be one of:cdn,content,generic,repeated_sessionor empty.
num_unhandled_requests
Number of requests for which no CDN could be found.
- Type:
counter - Labels:
selector- whether the request was counted duringinitialorinstreamselection.
num_unmanaged_redirects
Number of redirects to “outside” the router - usually to CDN.
- Type:
counter - Labels:
cdn_id- ID of CDN picked for redirection.cdn_name- name of CDN picked for redirection.selector- whether the redirect was result ofinitialorinstreamselection.
num_valid_http_requests
Number of received requests that were not deemed invalid, see
num_invalid_http_requests.
- Type:
counter - Labels:
source- name of internal filter function that classified request as invalid. Probably not of much use outside debugging.type- whether the request was HTTP (Unencrypted) or HTTPS (SSL).
orc_latency_bucket
Total number of responses sorted into “latency buckets” - labels denoting latency interval.
- Type:
counter - Labels:
le- latency bucket that given response falls into.orc_status_code- HTTP status code of given response.
orc_latency_count
Total number of responses.
- Type:
counter - Labels:
tls- whether the response was sent via SSL/TLS connection or not.orc_status_code- HTTP status code of given response.
ssl_certificate_days_remaining
Number of days until a SSL certificate expires.
- Type:
gauge - Labels:
domain- the common name of the domain that the certificate authenticates.not_valid_after- the expiry time of the certificate.not_valid_before- when the certificate starts being valid.usable- if the certificate is usable to the router, see the ssl_certificate_usable_count metric for an explanation.
ssl_certificate_usable_count
Number of usable SSL certificates. A certificate is usable if it is valid and authenticates a domain name that points to the router.
- Type:
gauge
6.9.8.1 - Internal Metrics
A subrunner is an internal module of ESB3024 Router which handles routing requests. The subrunner metrics are technical and mainly of interest for AgileTV. These metrics will be briefly described here.
subrunner_async_queue
Number of queued events per subrunner, roughly corresponding to load.
- Type:
gauge - Labels:
subrunner_id- ID of given subrunner.
subrunner_client_conns
Number of currently open client connections per subrunner.
- Type:
gauge - Labels:
subrunner_id- ID of given subrunner.
subrunner_high_queue
Number of high priority events queued per subrunner.
- Type:
gauge - Labels:
subrunner_id- ID of given subrunner.
subrunner_io_autopause_sockets
Number of sockets that have been automatically paused. This happens when the work manager is under heavy load.
- Type:
counter - Labels:
subrunner_id- ID of given subrunner.
subrunner_io_send_data_fast_attempts
A fast data path was added that in many cases increases the performance of the router. This metric was added to verify that the fast data path is taken.
- Type:
counter - Labels:
subrunner_id- ID of given subrunner.
subrunner_io_wakeups
The number of times a subrunner has been waken up from sleep.
- Type:
counter - Labels:
subrunner_id- ID of given subrunner.
subrunner_low_queue
Number of low priority events queued per subrunner.
- Type:
gauge - Labels:
subrunner_id- ID of given subrunner.
subrunner_max_async_queue
Maximum number of events waiting in queue.
- Type:
gauge - Labels:
subrunner_id- ID of given subrunner.
subrunner_max_high_queue
Maximum number of events waiting in high priority queue.
- Type:
gauge - Labels:
subrunner_id- ID of given subrunner.
subrunner_max_low_queue
Maximum number of events waiting in low priority queue.
- Type:
gauge - Labels:
subrunner_id- ID of given subrunner.
subrunner_max_medium_queue
Maximum number of events waiting in medium priority queue.
- Type:
gauge - Labels:
subrunner_id- ID of given subrunner.
subrunner_medium_queue
Number of medium priority events queued per subrunner.
- Type:
gauge - Labels:
subrunner_id- ID of given subrunner.
subrunner_times_worker_overloaded
Number of times when queued events for given subrunner exceeded
the tuning.overload_threshold value (defaults to 32).
- Type:
counter - Labels:
subrunner_id- ID of given subrunner.
subrunner_total_receive_data_blocks
Number of receive data blocks allocated per subrunner.
- Type:
gauge - Labels:
subrunner_id- ID of given subrunner.
subrunner_total_send_data_blocks
Number of send data blocks allocated per subrunner.
- Type:
gauge - Labels:
subrunner_id- ID of given subrunner.
subrunner_used_receive_data_blocks
Number of receive data blocks currently in use per subrunner. Same as subrunner_total_receive_data_blocks.
- Type:
gauge - Labels:
subrunner_id- ID of given subrunner.
subrunner_used_send_data_blocks
Number of send data blocks currently in use per subrunner. Same as subrunner_total_send_data_blocks.
- Type:
gauge - Labels:
subrunner_id- ID of given subrunner.
6.10 - Glossary
- ACD
- Agile CDN Director. See “Director”.
- Confd
- A backend service that hosts the service configuration. Comes with an API, a CLI and a GUI.
- Classifier
- A filter that associate a request with a tag that can be used to define session groups.
- Director
- The Agile Delivery OTT router and related services.
- ESB
- A software bundle that can be separately installed and upgraded, and is released as one entity with one change log. Each ESB is identified with a number. Over time, features and functions within an ESB can change.
- Lua
- A widely available scripting language that is often used to extend the capabilities of a piece of software.
- Router
- Unless otherwise specified, an HTTP router that manages an OTT session using HTTP redirect. There are also ways to use DNS instead of HTTP.
- Selection Input API
- Data posted to this API can be accessed by the routing rules and hence influence the routing decisions.
- Subnet API
- An API to define mappings between subnets and names (typically regions) for those subnets. Routing rules can then refer to the names rather than the subnets.
- Session Group
- A handle on a group of requests, defined via classifiers.
7 - AgileTV CDN Director (esb3024)
7.1 - Release Notes for esb3024-1.24.0
Build date
2026-04-23
Release status
Type: production
Compatibility
This release has been tested with the following product versions:
- AgileTV CDN Manager, ESB3027-1.6.0
- Orbit, ESB2001-4.2.2 (see Known limitations below)
- SW-Streamer, ESB3004-2.6.2
- Convoy, ESB3006-3.8.0
- Request Router, ESB3008-3.10.1
- GUI 4.0.3
Breaking changes since release esb3024-1.22.1
- None
Change log
- NEW: Add configuration feedback [ESB3024-122]
- NEW: Add module based logging [ESB3024-505]
- NEW: Support for QoE based routing [ESB3024-641]
- NEW: Add nested expressions to condition language [ESB3024-1099]
- NEW: Logging performance improvements [ESB3024-1163]
- NEW: Forward the last error code from CDN to client [ESB3024-1625]
- NEW: Log name of loaded GeoIP database [ESB3024-1646]
- NEW: Restructure logging configuration [ESB3024-1654]
- NEW: Improved logs when connection is closed prematurely [ESB3024-1769]
- FIXED: Dash variants not detected for QoE Streams [ESB3024-390]
- FIXED: Quotation marks not supported in classifier patterns [ESB3024-695]
- FIXED: Restart loop when directory Lua directory is manually created by user root [ESB3024-705]
- FIXED: Invalid JSON makes confd-transformer crash [ESB3024-1041]
- FIXED: Internal Server Error on requests from unknown instream sessions [ESB3024-1376]
- FIXED: Response translate function not invoked when no route found [ESB3024-1377]
- FIXED: Lua response body not set for instream sessions [ESB3024-1378]
- FIXED: Confd schema accepts config without mandatory properties [ESB3024-1583]
- FIXED: Connection header is not respected [ESB3024-1655]
Deprecated functionality
Deprecated since ESB3024-1.18.0:
- Lua function
epochToTimehas been deprecated in favor ofepoch_to_time. - Lua function
timeToEpochhas been deprecated in favor oftime_to_epoch. - The session proxy has been deprecated. Its functionality is replaced by the new “Send HTTP requests from Lua code” function.
System requirements
See the current system requirements in Getting Started.
Known limitations
Downgrading to a version prior to 1.22.1 will fail if the configuration is missing an
integration.routingsection. When this happens, theacd-confd-migrationtool will print an error message and exit. The workaround is to add an emptyintegration.routingsection to the configuration before downgrading.This is the error message that is printed:
Migration failed at migrations.v1_22_1.00_add_missing_gui_integration: 'routing'It is recommended to set
services.routing.tuning.general.overloadThresholdto 128. This is particularly important if the Director will receive messages from Kafka.Sometimes the ACD Confd Transformer does not start correctly after the ACD Director has been upgraded. This can be identified by typing
systemctl status acd-confd-transformer.serviceafter the upgrade is complete. If it shows that the service is not running, it needs to be started manually by typingsystemctl start acd-confd-transformer.service. [ESB3024-1675]When configured to use TLS,
acd-telegraf-metrics-databasemight log the following error message:http: TLS handshake error from <client ip>: client sent an HTTP request to an HTTPS serverwhen receiving metrics from caches even though the Telegraf agents are configured to use TLS. The Telegraf logs on the caches do not show any errors related to this. However, the data is still received over TLS and stored correctly byacd-telegraf-metrics-database. The issue seemingly resolved itself during investigation and is not reproducible. Current hypothesis is a logging bug in Telegraf.The Telegraf metrics agent might not be able to read all relevant network interface data on ESB2001 releases older than 3.6.2. The predictive load balancing function
host_has_bw()and the health check functioninterfaces_online()might therefore not work as expected.- The recommended workaround for
host_has_bw()is to usehost_has_bw_custom(), documented in Built-in Lua functions.host_has_bw_custom()accepts a numeric argument for the host’s network interface capacity which can be used if the data supplied by the Telegraf metrics agents do not contain this information. - It is not recommended to use
interfaces_online()for ESB2001 instances until they are updated to 3.6.2 or later.
- The recommended workaround for
7.2 - Getting Started
The Director serves as a versatile network service designed to redirect incoming HTTP(s) requests to the optimal host or Content Delivery Network (CDN) by evaluating various request properties through a set of rules. Although requests can be generic, the primary focus centers around audio-video content delivery. The rule engine allows users to construct routing configurations using predefined blocks, providing for the creation of intricate routing logic. This modular approach allows the users to tailor and streamline the content delivery process to meet their specific needs. The Director’s flexible rule engine takes into account factors such as geographical location, server load, content type, and other metadata from external sources to intelligently route incoming requests. It supports dynamic adjustments to seamlessly adapt to changing network conditions, ensuring efficient and reliable content delivery. The Director improves the overall user experience by delivering content from the most suitable and responsive sources, thereby reducing latency and enhancing performance.
Requirements
Hardware
The Director is designed to be installed and operated on commodity hardware, ensuring accessibility for a broad range of users. The minimum hardware specifications are as follows:
- CPU: x86-64 AMD or Intel with at least 2 cores.
- Memory: At least 2 GB free at runtime.
Operating System Compatibility
The Director is officially supported on Red Hat Enterprise Linux 8 or 9 or any
compatible operating system. In order to run the service, a minimum CPU
architecture of x86-64-v2 is required. This can be determined by running the
following command. If supported, it will be listed as “(supported)” in the
output.
/usr/lib64/ld-linux-x86-64.so.2 --help | grep x86-64-v2
External Internet access is necessary during the installation process for the installer to download and install additional dependencies. This ensures a seamless setup and optimal functionality of the Director on Red Hat Enterprise Linux 8 or 9. It’s worth noting that, due to the unique workings of the DNF package manager in Red Hat Enterprise Linux with rolling package streams, an air-gapped installation process is not available.
Firewall Recommendations
See Firewall.
Installation
See Installation.
Operations
See Operations.
Configuration Process
Once the router is operational, it requires a valid configuration before it can route incoming requests.
There are currently three methods available for configuring the router, each catering to different levels of complexity. The first is a Web UI, suitable for the most common use-cases, providing an intuitive interface for configuration. The second involves utilizing a confd REST service, complemented by an optional command line tool, confcli, suitable for all but the most advanced scenarios. The third method involves leveraging an internal REST API, ideal for the most intricate cases where using confd proves to be less flexible. It’s essential to note that as the configuration method advances through these levels, both flexibility and complexity increase, providing users with tailored options based on their specific needs and expertise.
API Key Management
Regardless of the method used to configure the system, a unique API key is
crucial for safeguarding the router’s configuration and preventing unauthorized
access to the API. This key must be supplied when interacting with the API.
During the router software installation, an automatically generated API key is
created and can be located on the installed system at
/opt/edgeware/acd/router/cache/rest-api-key.json. The structure of this file
is as follows:
{"api_key": "abc123"}
When accessing the internal configuration API, the key must be included in the
X-API-key header of the request, as shown below:
curl -v -k -H "X-API-Key: abc123" https://<router-host.example>:5001/v2/configuration
Modification to the authentication key and behavior can be done through the
/v2/rest_api_key endpoint. To change the key, a PUT request with a JSON body
of the same structure can be sent to the endpoint:
curl -v -k -X PUT -T new-key.json -H "X-API-Key: abc123" \
-H "Content-Type: application/json" https://<router-host.example>:5001/v2/rest_api_key
Additionally, key authentication can be disabled completely by sending a DELETE
request to the endpoint:
curl -v -k -X DELETE -H "X-API-Key: abc123" \
https://<router-host.example>:5001/v2/rest_api_key
In the event of a lost or forgotten authentication key, it can always be
retrieved at /opt/edgeware/acd/router/cache/rest-api-key.json on the
machine running the router. It is critical to emphasize that the API key should
remain private to prevent unauthorized access to the internal API, as it grants
full access to the router’s configuration.
Configuration Basics
Upon completing the installation process and configuring the API keys, the subsequent section will provide guidance on configuring the router to route all incoming requests to a single host. For straightforward CDN Offload use cases, there is a web based user interface described here.
For further details on configuring the router using confd and confcli, please consult the Confd documentation.
The initial step involves defining the target host group. In this illustration,
a singular group named all will be established, comprising two hosts.
$ confcli services.routing.hostGroups -w
Running wizard for resource 'hostGroups'
Hint: Hitting return will set a value to its default.
Enter '?' to receive the help string
hostGroups : [
hostGroup can be one of
1: dns
2: host
3: redirecting
Choose element index or name: host
Adding a 'host' element
hostGroup : {
name (default: ): all
type (default: host): ⏎
httpPort (default: 80): ⏎
httpsPort (default: 443): ⏎
headersToForward <A list of HTTP headers to forward to the CDN. (default: [])>: [
headersToForward (default: ): ⏎
Add another 'headersToForward' element to array 'headersToForward'? [y/N]: n
],
queryPassThrough <Controls which query parameters from the client request are forwarded to the backend and included in the redirection URL. (default: OrderedDict())>: {
policy (default: accept): ⏎
exceptions <Query parameters excluded from the policy. When policy is 'accept', these are blocked. When policy is 'deny', these are forwarded. (default: [])>: [
exceptions (default: ): ⏎
Add another 'exceptions' element to array 'exceptions'? [y/N]: ⏎
]
},
createStreamerSession (default: False): ⏎
addUrlPrefix (default: False): ⏎
hosts : [
host : {
name (default: ): host1.example.com
hostname (default: ): host1.example.com
ipv6_address (default: ): ⏎
healthChecks : [
healthCheck (default: always()): ⏎
Add another 'healthCheck' element to array 'healthChecks'? [y/N]: n
]
}
Add another 'host' element to array 'hosts'? [y/N]: y
host : {
name (default: ): host2.example.com
hostname (default: ): host2.example.com
ipv6_address (default: ): ⏎
healthChecks : [
healthCheck (default: always()): ⏎
Add another 'healthCheck' element to array 'healthChecks'? [y/N]: n
]
}
Add another 'host' element to array 'hosts'? [y/N]: n
]
}
Add another 'hostGroup' element to array 'hostGroups'? [y/N]: n
]
Generated config:
{
"hostGroups": [
{
"name": "all",
"type": "host",
"httpPort": 80,
"httpsPort": 443,
"headersToForward": [
""
],
"queryPassThrough": {
"policy": "accept",
"exceptions": [
""
]
},
"createStreamerSession": false,
"addUrlPrefix": false,
"hosts": [
{
"name": "host1.example.com",
"hostname": "host1.example.com",
"ipv6_address": "",
"healthChecks": [
"always()"
]
},
{
"name": "host2.example.com",
"hostname": "host2.example.com",
"ipv6_address": "",
"healthChecks": [
"always()"
]
}
]
}
]
}
Merge and apply the config? [y/n]:
After defining the host group, the next step is to establish a rule that directs
incoming requests to the designated host. In this example, a sole rule named
random will be generated, ensuring that all incoming requests are consistently
routed to the previously defined host.
$ confcli services.routing.rules -w
Running wizard for resource 'rules'
Hint: Hitting return will set a value to its default.
Enter '?' to receive the help string
rules : [
rule can be one of
1: allow
2: consistentHashing
3: contentPopularity
4: deny
5: firstMatch
6: random
7: rawGroup
8: rawHost
9: split
10: weighted
Choose element index or name: random
Adding a 'random' element
rule : {
name (default: ): random
type (default: random):
targets : [
target (default: ): host1.example.com
Add another 'target' element to array 'targets'? [y/N]: y
target (default: ): host2.example.com
Add another 'target' element to array 'targets'? [y/N]: n
]
}
Add another 'rule' element to array 'rules'? [y/N]: n
]
Generated config:
{
"rules": [
{
"name": "random",
"type": "random",
"targets": [
"host1.example.com",
"host2.example.com"
]
}
]
}
Merge and apply the config? [y/n]:
The last essential step involves instructing the router on which rule should
serve as the entry point into the routing tree. In this example, we designate
the rule random as the entrypoint for the routing process.
$ confcli services.routing.entrypoint random
services.routing.entrypoint = 'random'
Once this configuration is defined, all incoming requests will initiate their
traversal through the routing rules, starting with the rule named random. This
rule is designed to consistently match for every incoming request, effectively load
balancing evenly between host1.example.com and host2.example.com on port 80
or 443, depending on whether the initial request was made using HTTP or HTTPS.
Integration with Convoy
The router is equipped with the capability to synchronize specific configuration metadata with a separate Convoy installation through the integrated convoy-bridge service. However, this service necessitates additional setup and configuration, and you can find comprehensive details on the process here..
Additional Resources
Additional documentation resources are included with the Director and can be
accessed at the following directory: /opt/edgeware/acd/documentation/. This
directory contains supplementary materials to provide users with comprehensive
information and guidance for optimizing their experience with the Director.
Ready for Production
Once the Director software is completely installed and configured, there are a few additional considerations before moving to a full production environment. See the section Ready for Production for additional information.
7.3 - Installing ESB3024 Router release 1.24.0
To install ESB3024 Router, you first need to copy the installation ISO image to
the target node where the router will be run. Due to the way the installer
operates, it is necessary that the host is reachable by ssh from itself for
the user account that will perform the installation, and that this user has
sudo access.
Prerequisites:
Ensure that the current user has
sudoaccess.sudo -lIf the above command fails, you may need to add the user to the
/etc/sudoersfile.Ensure that the installer has ssh access to
localhost.If using the
rootuser, thePermitRootLoginproperty of the/etc/ssh/sshd_configfile must be set to ‘yes’.Ensure that
sshpassis installed.If the installer is run by the root user, this step is not necessary.
sshpassis installed by typing this:sudo dnf install -y sshpass
Assuming the installation ISO image is in the current working directory,
the following steps need to be executed either by root user or with sudo.
Mount the installation ISO image under
/mnt/acd.Note: The mount-point may be any accessible path, but
/mnt/acdwill be used throughout this document.mkdir -p /mnt/acd mount esb3024-acd-router-1.24.0.iso /mnt/acdRun the installer script.
/mnt/acd/installerIf it is not running as root, the installer will ask both for the “SSH password” and the “BECOME password”. The “SSH password” is the password that the user running the installer uses to log in to the local machine, and the “BECOME password” is the password for the user to gain
sudoaccess. They are usually the same.
Upgrading From an Earlier ESB3024 Router Release
The following steps can be taken to upgrade the router from a 1.10 or later release to 1.24.0. If upgrading from an earlier release it is recommended to first upgrade to 1.10.1 and then to upgrade to 1.24.0.
The upgrade procedure for the router is performed by taking a backup of the configuration, installing the new release of the router, and applying the saved configuration.
With the router running, save a backup of the configuration.
The exact procedure to accomplish this depends on the current method of configuration, e.g. if
confdis used, then the configuration should be extracted fromconfd, but if the REST API is used directly, then the configuration must be saved by fetching the current configuration snapshot using the REST API.Extracting the configuration using
confdis the recommend approach where available.confcli | tee config_backup.jsonTo extract the configuration from the REST API, the following may be used instead. Depending on the version of the router used, an API-Key may be required to fetch from the REST API.
curl --insecure https://localhost:5001/v2/configuration \ | tee config_backup.jsonIf the API Key is required, it can be found in the file
/opt/edgeware/acd/router/cache/rest-api-key.jsonand can be passed to the API by setting the value of theX-API-Keyheader.curl --insecure -H "X-API-Key: 1234abcd" \ https://localhost:5001/v2/configuration \ | tee config_backup.jsonMount the new installation ISO under
/mnt/acd.Note: The mount-point may be any accessible path, but
/mnt/acdwill be used throughout this document.mkdir -p /mnt/acd mount esb3024-acd-router-1.24.0.iso /mnt/acdStop the router and all associated services.
Before upgrading the router it needs to be stopped, which can be done by typing this:
systemctl stop 'acd-*'Run the installer script.
/mnt/acd/installerPlease note that the installer will install new container images, but it will not remove the old ones. The old images can be removed manually after the upgrade is complete.
Migrate the configuration.
Note that this step only applies if the router is configured using
confd. If it is configured using the REST API, this step is not necessary.The confd configuration used in the previous versions is not directly compatible with 1.24, and may need to be converted. If this is not done, the configuration will not be valid and it will not be possible to make configuration changes.
The
acd-confd-migrationtool will automatically apply any necessary schema migrations. Further details about this tool can be found at Confd Auto Upgrade Tool.The tool takes as input the old configuration file, either by reading the file directly, or by reading from standard input, applies any necessary migrations between the two specified versions, and outputs a new configuration to standard output which is suitable for being applied to the upgraded system. While the tool has the ability to migrate between multiple versions at a time, the earliest supported version is 1.10.1.
The example below shows how to upgrade from 1.22.1. If upgrading from 1.20.1,
--from 1.22.1should be replaced with--from 1.20.1.The command line required to run the tool is different depending on which esb3024 release it is run on. On 1.24.0 it is run like this:
cat config_backup.json | \ podman run -i --rm \ images.edgeware.tv/acd-confd-migration:1.24.0 \ --in - --from 1.22.1 --to 1.24.0 \ | tee config_upgraded.jsonAfter running the above command, apply the new configuration to
confdby runningcat config_upgraded.json | confcli -i.
Troubleshooting
If there is a problem running the installer, additional debug information can
be output by adding -v or -vv or -vvv to the installer command, the
more “v” characters, the more detailed output.
7.3.1 - Configuration changes between 1.22 and 1.24
Confd configuration changes
Below are the changes to the confd configuration between versions 1.22 and 1.24 listed.
Added services.routing.settings.qoeTracking.requestsIgnoredAfterHostChange
The services.routing.settings.qoeTracking.requestsIgnoredAfterHostChange
setting configures the number of requests to ignore for QoE tracking after a
host change.
Removed unused tuning items
The following tuning items were not used and have been removed:
services.routing.tuning.general.cpuLoadWindowSizeservices.routing.tuning.general.repeatedSessionStartThresholdSecondsservices.routing.tuning.general.selectionInputMetricsTimeoutSeconds
Made items in services.routing required
The items under services.routing were previously marked as optional, but are
now required. A configuration that missed some of these items would previously
have been valid, but starting with 1.24 it will be invalid.
The items that are now required are:
services.routing.accountsservices.routing.applyConfigservices.routing.classifiersservices.routing.dataStreamsservices.routing.entrypointservices.routing.hostGroupsservices.routing.rulesservices.routing.sessionGroupsservices.routing.settingsservices.routing.translationFunctionsservices.routing.tuning
Added services.routing.tuning.general.responseCodeTracking
The services.routing.tuning.general.responseCodeTracking setting enables
tracking of the last response code received from each CDN host. If all CDNs
return errors, the Director will respond with the last received error code
instead of a generic 403.
Moved all logging configuration to services.routing.settings.logging
All logging configuration has been moved to
services.routing.settings.logging. The section contains log level, access log
and usage log configuration.
The following items have been added to the logging configuration:
accessErrorLogandaccessErrorLogDepth- see Access Error Log.moduleLogLevels- enables fine-grained log levels per module.
7.4 - Firewall
For security reasons, the ESB3024 Installer does not automatically configure the local firewall to allow incoming traffic. It is the responsibility of the operations person to ensure that the system is protected from external access by placing it behind a suitable firewall solution. The following table describes the set of ports required for operation of the router.
| Application | Port | Protocol | Direction | Source | Description |
|---|---|---|---|---|---|
| Prometheus Alert Manager | 9093 | TCP | IN | internal | Monitoring Services |
| Confd | 5000 | TCP | IN | internal | Configuration Services |
| Router | 80 | TCP | IN | public | Incoming HTTP Requests |
| Router | 443 | TCP | IN | public | Incoming HTTPS Requests |
| Router | 5001 | TCP | IN | localhost | Access to router’s REST API |
| Router | 8000 | TCP | IN | localhost | Internal monitoring port |
| EDNS-Proxy | 8888 | TCP | IN | localhost | Proxy EDNS Requests |
| Grafana | 3000 | TCP | IN | internal | Monitoring Services |
| Grafana-Loki | 3100 | TCP | IN | internal | Log monitoring daemon |
| Prometheus | 9090 | TCP | IN | internal | Monitoring Service |
The “Direction” column represents the direction in which the connection is established.
IN- The connection is originated from an outside serverOUT- The connection is established from the host to an external server.
Once a connection is established through the firewall, bidirectional traffic must be allowed using the established connection.
For the “Source” column, the following terms are used.
internal- Any host or network which is allowed to monitor or operate the system.public- Any host or subnet that can access the router. This includes any customer network that will be making routing requests.localhost- Access can be limited to local connections only.any- All traffic from any source or to any destination.
Additional Ports
Convoy Bridge Integration
The optional convoy-bridge service needs the ability to access the Convoy MariaDB service, which by default runs on port 3306 on all of the Convoy Management servers. To allow this integration to run, port 3306/tcp must be allowed from the router to the configured Convoy Management node.
7.5 - API Overview
ESB3024 Router provides two different types of API:s:
- A content request API that is used by video clients to ask for content, normally using port 80 for HTTP and port 443 for HTTPS.
- A few REST API:s used by administrators to configure and monitor the router installation, using port 5001 over HTTPS by default.
The content API won’t be described further in this document, since it’s a simple HTTP interface serving content as regular files or redirect responses.
Raw configuration – /v2/configuration
Used to check and update the raw configuration of ESB3024 Router. Note that this API is considered an implementation detail and is not documented further.
| REQUEST Method | Content-Type | RESPONSE Result | Status Code | Content-Type |
|---|---|---|---|---|
GET | <N/A> | Success | 200 OK | application/json |
PUT | application/json | Success | 204 No Content | <N/A> |
PUT | application/json | Failure | 400 Bad Request | application/json1 |
Validate Configuration – /v2/validate_configuration
Used to determine if a JSON payload is correctly formatted without actually applying its configuration. A successful return status does not guarantee that the applied configuration will work, it only validates the JSON structure.
| REQUEST Method | Content-Type | RESPONSE Result | Status Code | Content-Type |
|---|---|---|---|---|
PUT | application/json | Success | 204 No Content | <N/A> |
PUT | application/json | Failure | 400 Bad Request | application/json1 |
Example request
When an expected field is missing from the payload, the validation will show which one and return an appropriate error message in its payload:
$ curl -i -X PUT \
-d '{"routing": {"log_level": 3}}' \
-H "Content-Type: application/json" \
https://router.example:5001/v2/validate_configuration
HTTP/1.1 400 Bad Request
Access-Control-Allow-Origin: *
Content-Length: 132
Content-Type: application/json
X-Service-Identity: router.example-5fc78d
"Configuration validation: Configuration parsing failed. \
Exception: [json.exception.out_of_range.403] (/routing) key 'id' not found"
Selection Input
The selection input API is used to inject user-defined data into the routing engine, making the data available for making routing decisions. Any JSON structures can be stored in the selection input.
One use case for selection input is to provide data on cache availability. For
example, if {"edge-streamer-2-online": true} is sent to the selection
input API, the routing condition eq('edge-streamer-2-online', true) can
be used to ensure that no traffic gets routed to the streamer if it’s offline.
/v3/selection_input
The /v3/selection_input API supports the GET, POST, PUT, and DELETE
methods.
PUTreplaces the data at the specified path with the provided data. If the path does not exist, it will be created.POSTis only used for appending data to arrays. The last element in the path must be an array. If the path does not exist, it will be created, with the last segment as an array.GETrequests fetch the current selection input data at the given path.DELETErequests remove the data at the given path.
Example PUT request
$ curl -i -X PUT \
-d '{"bitrate": 13000, "capacity": 50000}' \
-H "Content-Type: application/json" \
https://router.example.com:5001/v3/selection_input/hosts/host1
HTTP/1.1 201 Created
Access-Control-Allow-Headers: Content-Type, Authorization
Access-Control-Allow-Methods: GET, POST, PUT, DELETE, OPTIONS
Access-Control-Allow-Origin: *
Content-Length: 0
X-Service-Identity: router.example.com-5fc78d
Example POST request
$ curl -i -X POST \
-d '"server1"' \
-H "Content-Type: application/json" \
https://router.example.com:5001/v3/selection_input/modules/allowed_servers
HTTP/1.1 201 Created
Access-Control-Allow-Headers: Content-Type, Authorization
Access-Control-Allow-Methods: GET, POST, PUT, DELETE, OPTIONS
Access-Control-Allow-Origin: *
Content-Length: 0
X-Service-Identity: router.example.com-5fc78d
Example GET request
$ curl -i https://router.example.com:5001/v3/selection_input
HTTP/1.1 200 OK
Access-Control-Allow-Headers: Content-Type, Authorization
Access-Control-Allow-Methods: GET, POST, PUT, DELETE, OPTIONS
Access-Control-Allow-Origin: *
Content-Length: 156
Content-Type: application/json
X-Service-Identity: router.example.com-5fc78d
{
"hosts": {
"host1": {
"bitrate": 13000,
"capacity": 50000
}
},
"modules": {
"allowed_servers": [
"server1"
]
}
}
Example DELETE request
$ curl -i -X DELETE \
https://router.example.com:5001/v3/selection_input/modules/allowed_servers
HTTP/1.1 204 No Content
Access-Control-Allow-Headers: Content-Type, Authorization
Access-Control-Allow-Methods: GET, POST, PUT, DELETE, OPTIONS
Access-Control-Allow-Origin: *
Content-Length: 0
X-Service-Identity: router.example.com-5fc78d
/v1/selection_input
The /v1/selection_input API is retained only for backward compatibility with
legacy integrations.
When performing GET or DELETE requests, specific selection input values can
be accessed or deleted by including a path to the request. Note that not
specifying a path will select all selection input values. PUT requests do not
support supplying paths, the path to the element to be modified is deduced by
the keys in the provided JSON object.
| REQUEST Method | Content-Type | RESPONSE Result | Status Code | Content-Type |
|---|---|---|---|---|
PUT | application/json | Success | 204 No Content | <N/A> |
PUT | application/json | Failure | 400 Bad Request | application/json |
GET | <N/A> | Success | 200 OK | application/json |
DELETE | <N/A> | Success | 204 No Content | <N/A> |
DELETE | <N/A> | Failure | 404 Not Found | <N/A> |
Example successful request (PUT)
$ curl -i -X PUT \
-d '{"host1_bitrate": 13000, "host1_capacity": 50000}' \
-H "Content-Type: application/json" \
https://router.example.com:5001/v1/selection_input
HTTP/1.1 204 No Content
Access-Control-Allow-Origin: *
Content-Length: 0
X-Service-Identity: router.example.com-5fc78d
Example unsuccessful request (PUT)
$ curl -i -X PUT \
-d '{"cdn-status": {"session-count": 12345, "load-percent" 98}}' \
-H "Content-Type: application/json" \
https://router.example.com:5001/v1/selection_input
HTTP/1.1 400 Bad Request
Access-Control-Allow-Origin: *
Content-Length: 169
Content-Type: application/json
X-Service-Identity: router.example.com-5fc78d
{
"error": "[json.exception.parse_error.101] parse error at line 1, column 57: \
syntax error while parsing object separator - \
unexpected number literal; expected ':'"
}
Example successful request (GET)
curl -i https://router.example.com:5001/v1/selection_input
HTTP/1.1 200 OK
Access-Control-Allow-Origin: *
Content-Length: 129
Content-Type: application/json
X-Service-Identity: router.example.com-5fc78d
{
"host1_bitrate": 13000,
"host1_capacity": 50000
}
Example successful specific value request (GET)
curl -i https://router.example.com:5001/v1/selection_input/path/to/value
HTTP/1.1 200 OK
Access-Control-Allow-Origin: *
Content-Length: 129
Content-Type: application/json
X-Service-Identity: router.example.com-5fc78d
1
Example successful request (DELETE)
curl -i -X DELETE https://router.example.com:5001/v1/selection_input
HTTP/1.1 204 OK
Access-Control-Allow-Origin: *
Content-Length: 129
X-Service-Identity: router.example.com-5fc78d
Example successful specific value request (DELETE)
curl -i -X DELETE https://router.example.com:5001/v1/selection_input/value/to/delete
HTTP/1.1 204 OK
Access-Control-Allow-Origin: *
Content-Length: 129
X-Service-Identity: router.example.com-5fc78d
Example unsuccessful request (DELETE)
curl -i -X DELETE https://router.example.com:5001/v1/selection_input/non/existent/value
HTTP/1.1 404 Not Found
Access-Control-Allow-Origin: *
Content-Length: 129
X-Service-Identity: router.example.com-5fc78d
Subnets – /v1/subnets
An API for managing named subnets that can be used for routing and block lists. See Subnets for more details.
PUT requests inject key value pairs with the form {<subnet>: <value>}, where
<subnet> is a valid CIDR string, into ACD, e.g.:
$ curl -i -X PUT \
-d '{"255.255.255.255/24": "area1", "1.2.3.4/24": "area2"}' \
-H "Content-Type: application/json" \
https://router.example:5001/v1/subnets
HTTP/1.1 204 No Content
Access-Control-Allow-Origin: *
Content-Length: 0
X-Service-Identity: router.example-5fc78d
GET requests are used to fetch injected subnets, e.g.:
# Fetch all injected subnets
$ curl -i https://router.example:5001/v1/subnets
HTTP/1.1 200 OK
Access-Control-Allow-Origin: *
Content-Length: 411
Content-Type: application/json
X-Service-Identity: router.example-5fc78d
{
"1.2.3.4/16": "area2",
"1.2.3.4/24": "area1",
"1.2.3.4/8": "area3",
"255.255.255.255/16": "area2",
"255.255.255.255/24": "area1",
"255.255.255.255/8": "area3",
"2a02:2e02:9bc0::/16": "area8",
"2a02:2e02:9bc0::/32": "area7",
"2a02:2e02:9bc0::/48": "area6",
"2a02:2e02:9de0::/44": "combined_area",
"2a02:2e02:ada0::/44": "combined_area",
"5.5.0.4/8": "area5",
"90.90.1.3/16": "area4"
}
DELETE requests are used to delete injected subnets, e.g.:
# Delete all injected subnets
$ curl -i https://router.example:5001/v1/subnets -X DELETE
HTTP/1.1 204 No Content
Access-Control-Allow-Origin: *
Content-Length: 0
X-Service-Identity: router.example-5fc78d
Both GET and DELETE requests can be specified with the paths /byKey/ and
/byValue/ to filter which subnets to GET or DELETE.
# Fetch subnet with the CIDR string 1.2.3.4/8 if it exists
$ curl -i https://router.example:5001/v1/subnets/byKey/1.2.3.4/8
HTTP/1.1 200 OK
Access-Control-Allow-Origin: *
Content-Length: 26
Content-Type: application/json
X-Service-Identity: router.example-5fc78d
{
"1.2.3.4/8": "area3"
}
# Fetch all subnets whose CIDR string begins with the IP 1.2.3.4
$ curl -i https://router.example:5001/v1/subnets/byKey/1.2.3.4
HTTP/1.1 200 OK
Access-Control-Allow-Origin: *
Content-Length: 76
Content-Type: application/json
X-Service-Identity: router.example-5fc78d
{
"1.2.3.4/16": "area2",
"1.2.3.4/24": "area1",
"1.2.3.4/8": "area3"
}
# Fetch all subnets whose value equals 'area1'
$ curl -i https://router.example:5001/v1/subnets/byValue/area1
HTTP/1.1 200 OK
Access-Control-Allow-Origin: *
Content-Length: 60
Content-Type: application/json
X-Service-Identity: router.example-5fc78d
{
"1.2.3.4/24": "area1",
"255.255.255.255/24": "area1"
}
# Delete subnet with the CIDR string 1.2.3.4/8 if it exists
$ curl -i https://router.example:5001/v1/subnets/byKey/1.2.3.4/8
HTTP/1.1 204 No Content
Access-Control-Allow-Origin: *
Content-Length: 0
X-Service-Identity: router.example-5fc78d
# Delete all subnets whose CIDR string begins with the IP 1.2.3.4
$ curl -i https://router.example:5001/v1/subnets/byKey/1.2.3.4
HTTP/1.1 204 No Content
Access-Control-Allow-Origin: *
Content-Length: 0
X-Service-Identity: router.example-5fc78d
# Delete all subnets whose value equals 'area1'
$ curl -i https://router.example:5001/v1/subnets/byValue/area1
HTTP/1.1 204 No Content
Access-Control-Allow-Origin: *
Content-Length: 0
X-Service-Identity: router.example-5fc78d
| REQUEST Method | Content-Type | RESPONSE Result | Status Code | Content-Type |
|---|---|---|---|---|
PUT | application/json | Success | 204 No Content | <N/A> |
PUT | application/json | Failure | 400 Bad Request | application/json |
GET | <N/A> | Success | 200 OK | application/json |
GET | <N/A> | Failure | 400 Bad Request | application/json |
DELETE | <N/A> | Success | 204 No Content | application/json |
DELETE | <N/A> | Failure | 400 Bad Request | application/json |
Subrunner Resource Usage – /v1/usage
Used to monitor the load on subrunners, the processes performing those tasks that are possible to run in parallel.
| REQUEST Method | Content-Type | RESPONSE Result | Status Code | Content-Type |
|---|---|---|---|---|
GET | <N/A> | Success | 200 OK | application/json |
Example request
$ curl -i https://router.example:5001/v1/usage
HTTP/1.1 200 OK
Access-Control-Allow-Origin: *
Content-Length: 1234
Content-Type: application/json
X-Service-Identity: router.example-5fc78d
{
"total_usage": {
"content": {
"lru": 0,
"newest": "-",
"oldest": "-",
"total": 0
},
"sessions": 0,
"subrunner_usage": {
[...]
}
},
"usage_per_subrunner": [
{
"subrunner_usage": {
[...]
}
},
[...]
]
}
Metrics – /m1/v1/metrics
An interface intended to be scraped by Prometheus. It is possible to scrape it manually to see current values, but doing so will reset some counters and cause actual Prometheus data to become faulty.
| REQUEST Method | Content-Type | RESPONSE Result | Status Code | Content-Type |
|---|---|---|---|---|
GET | <N/A> | Success | 200 OK | text/plain |
Example request
$ curl -i https://router.example:5001/m1/v1/metrics
HTTP/1.1 200 OK
Access-Control-Allow-Origin: *
Content-Length: 1234
Content-Type: text/plain
X-Service-Identity: router.example-5fc78d
# TYPE num_configuration_changes counter
num_configuration_changes 12
# TYPE num_log_errors_total counter
num_log_errors_total 0
# TYPE num_log_warnings_total counter
num_log_warnings_total{category=""} 123
# TYPE num_log_warnings_total counter
num_log_warnings_total{category="cdn"} 0
# TYPE num_log_warnings_total counter
num_log_warnings_total{category="content"} 0
# TYPE num_log_warnings_total counter
num_log_warnings_total{category="generic"} 10
# TYPE num_log_warnings_total counter
num_log_warnings_total{category="repeated_session"} 0
# TYPE num_ssl_errors_total counter
[...]
Node Visit Counters – /v1/node_visits
Used to gather statistics about the number of visits to each node in the routing tree. The returned value is a JSON object containing node ID names and their corresponding counter values.
| REQUEST Method | Content-Type | RESPONSE Result | Status Code | Content-Type |
|---|---|---|---|---|
GET | <N/A> | Success | 200 OK | application/json |
See Routing Rule Evaluation Metrics for more details.
Example request
$ curl -i https://router.example:5001/v1/node_visits
HTTP/1.1 200 OK
Access-Control-Allow-Origin: *
Content-Length: 73
Content-Type: application/json
X-Service-Identity: router.example-5fc78d
{
"cache1.tv": "99900",
"offload": "100",
"routingtable": "100000"
}
Node Visit Graph – /v1/node_visits_graph
Creates a GraphML representation of the node visitation data that can be rendered into an image to make it easier to understand the data.
| REQUEST Method | Content-Type | RESPONSE Result | Status Code | Content-Type |
|---|---|---|---|---|
GET | <N/A> | Success | 200 OK | application/xml |
See Routing Rule Evaluation Metrics for more details.
Example request
> curl -i -k https://router.example:5001/v1/node_visits_graph
HTTP/1.1 200 OK
Access-Control-Allow-Origin: *
Content-Length: 731
Content-Type: application/xml
X-Service-Identity: router.example-5fc78d
<?xml version="1.0"?>
<graphml xmlns="http://graphml.graphdrawing.org/xmlns"
xmlns:xsi="http://www.w3.org/2001/XMLSchema-instance"
xsi:schemaLocation="http://graphml.graphdrawing.org/xmlns http://graphml.graphdrawing.org/xmlns/1.0/graphml.xsd">
<key id="visits" for="node" attr.name="visits" attr.type="string" />
<graph id="G" edgedefault="directed">
<node id="routingtable">
<data key="visits">100000</data>
</node>
<node id="cache1.tv">
<data key="visits">99900</data>
</node>
<node id="offload">
<data key="visits">100</data>
</node>
<edge id="e0" source="routingtable" target="cache1.tv" />
<edge id="e1" source="routingtable" target="offload" />
</graph>
</graphml>
Session list - /v1/sessions
Used to monitor the load on subrunners, the processes performing those tasks that are possible to run in parallel.
| REQUEST Method | Content-Type | RESPONSE Result | Status Code | Content-Type |
|---|---|---|---|---|
GET | <N/A> | Success | 200 OK | application/json |
Example request
$ curl -k -i https://router.example:5001/v1/sessions
HTTP/1.1 200 OK
Access-Control-Allow-Origin: *
Content-Length: 12345
Content-Type: application/json
X-Service-Identity: router.example-5fc78d
{
"sessions": [
{
"age_seconds": 103,
"cdn": "edgeware",
"cdn_is_redirecting": false,
"client_ip": "1.2.3.4",
"host": "cdn.example:80",
"id": "router.example-5fc78d-00000001",
"idle_seconds": 103,
"last_request_time": "2022-12-02T14:05:05Z",
"latest_request_path": "/__cl/s:storage1/__c/v/f/0/5/v_sintel3v_f05a05f07d352e891d79863131ef4df7/__op/hls-default/__f/index.m3u8",
"no_of_requests": 1,
"requested_bytes": 0,
"requests_redirected": 0,
"requests_served": 0,
"session_groups": [
"all"
],
"session_groups_generation": 2,
"session_path": "/__cl/s:storage1/__c/v/f/0/5/v_sintel3v_f05a05f07d352e891d79863131ef4df7/__op/hls-default/__f/index.m3u8",
"start_time": "2022-12-02T14:05:05Z",
"type": "instream",
"user_agent": "libmpv"
},
[...]
]
}
Session details - /v1/sessions/<id: str>
Used to get details about a specific session from the above session list. The
id part of the URL corresponds to the id field in one of the
returned session entries in the above response.
| REQUEST Method | Content-Type | RESPONSE Result | Status Code | Content-Type |
|---|---|---|---|---|
GET | <N/A> | Success | 200 OK | application/json |
GET | <N/A> | Failure | 404 Not Found | application/json |
Example request
$ curl -k -i https://router.example:5001/v1/sessions/router.example-5fc78d-00000001
HTTP/1.1 200 OK
Access-Control-Allow-Origin: *
Content-Length: 763
Content-Type: application/json
X-Service-Identity: router.example-5fc78d
{
"age_seconds": 183,
"cdn": "edgeware",
"cdn_is_redirecting": false,
"client_ip": "1.2.3.4",
"host": "cdn.example:80",
"id": "router.example-5fc78d-00000001",
"idle_seconds": 183,
"last_request_time": "2022-12-02T14:05:05Z",
"latest_request_path": "/__cl/s:storage1/__c/v/f/0/5/v_sintel3v_f05a05f07d352e891d79863131ef4df7/__op/hls-default/__f/index.m3u8",
"no_of_requests": 1,
"requested_bytes": 0,
"requests_redirected": 0,
"requests_served": 0,
"session_groups": [
"all"
],
"session_groups_generation": 2,
"session_path": "/__cl/s:storage1/__c/v/f/0/5/v_sintel3v_f05a05f07d352e891d79863131ef4df7/__op/hls-default/__f/index.m3u8",
"start_time": "2022-12-02T14:05:05Z",
"type": "instream",
"user_agent": "libmpv"
}
Content List - /v1/content
| REQUEST Method | Content-Type | RESPONSE Result | Status Code | Content-Type |
|---|---|---|---|---|
GET | <N/A> | Success | 200 OK | application/json |
Example request
$ curl -k -i https://router.example:5001/v1/content
HTTP/1.1 200 OK
Access-Control-Allow-Origin: *
Content-Length: 572
Content-Type: application/json
X-Service-Identity: router.example-5fc78d
{
"content": [
[
"/__cl/s:storage1/__c/v/f/0/5/v_sintel3v_f05a05f07d352e891d79863131ef4df7/__op/hls-default/__f/index.m3u8",
{
"cached_count": 0,
"content_requested": false,
"content_set": false,
"expiration_time": "2022-12-02T14:05:05Z",
"key": "/__cl/s:storage1/__c/v/f/0/5/v_sintel3v_f05a05f07d352e891d79863131ef4df7/__op/hls-default/__f/index.m3u8",
"listeners": 0,
"manifest": "",
"request_count": 4,
"state": "HLS:MANIFEST-PENDING",
"wait_count": 0
}
]
]
}
Lua scripts – /v1/lua/<path str>.lua
Used to upload, retrieve and delete custom named Lua scripts on the router.
Global functions in uploaded scripts automatically become available to Lua code
in the configuration (which effectively may be viewed as hooks). Upload a
script by PUTing a application/x-lua to the endpoint, and retrieve it by
GETing the endpoint without payload.
For individual Lua scripts, GET and HEAD responses include an ETag
header containing the script checksum as a quoted entity-tag.
PUT and DELETE may include an optional Match-If header for optimistic
concurrency control. If provided and the script already exists, it must match
the current checksum or the request fails with 412 Precondition Failed.
If omitted, the operation is unconditional.
| REQUEST Method | Content-Type | RESPONSE Result | Status Code | Content-Type |
|---|---|---|---|---|
PUT | application/x-lua | Success | 204 No Content | <N/A> |
PUT | application/x-lua | Failure | 400 Bad Request | application/json |
PUT | application/x-lua | Failure | 412 Precondition Failed | application/json |
PUT | application/x-lua | Failure | 500 Internal Server Error | application/json |
GET | <N/A> | Success | 200 OK | application/x-lua |
GET | <N/A> | Failure | 404 Not Found | application/json |
GET | <N/A> | Failure | 500 Internal Server Error | application/json |
HEAD | <N/A> | Success | 200 OK | <N/A> |
HEAD | <N/A> | Failure | 404 Not Found | <N/A> |
HEAD | <N/A> | Failure | 500 Internal Server Error | <N/A> |
DELETE | <N/A> | Success | 204 No Content | <N/A> |
DELETE | <N/A> | Failure | 400 Bad Request | application/json |
DELETE | <N/A> | Failure | 412 Precondition Failed | application/json |
DELETE | <N/A> | Failure | 404 Not Found | application/json |
DELETE | <N/A> | Failure | 500 Internal Server Error | application/json |
Example request (PUT)
Save a Lua script under the name advanced_functions/f1.lua:
$ curl -i -X PUT \
-d 'function fun1() return 1 end' \
-H "Content-Type: application/x-lua" \
https://router.example:5001/v1/lua/advanced_functions/f1.lua
HTTP/1.1 204 Successfully saved Lua file
Access-Control-Allow-Origin: *
Content-Length: 0
X-Service-Identity: router.example-5fc78d
Example request (PUT, from file)
Upload an entire Lua file under the name advanced_functions/f1.lua:
First put your code in a file.
$ cat f1.lua
function fun1()
return 1
end
Then upload it using the --data-binary flag to preserve newlines
$ curl -i -X PUT \
--data-binary @f1.lua \
-H "Content-Type: application/x-lua" \
https://router.example:5001/v1/lua/advanced_functions/f1.lua
HTTP/1.1 204 Successfully saved Lua file
Access-Control-Allow-Origin: *
Content-Length: 0
X-Service-Identity: router.example-5fc78d
Example request (GET)
Request the Lua script named advanced_functions/f1.lua using a GET request:
$ curl -i https://router.example:5001/v1/lua/advanced_functions/f1.lua
HTTP/1.1 200 OK
Access-Control-Allow-Origin: *
Content-Length: 28
Content-Type: application/x-lua
ETag: "d41d8cd98f00b204e9800998ecf8427e"
X-Service-Identity: router.example-5fc78d
function fun1() return 1 end
Example request (HEAD)
Request only metadata for advanced_functions/f1.lua:
$ curl -I https://router.example:5001/v1/lua/advanced_functions/f1.lua
HTTP/1.1 200 OK
Access-Control-Allow-Origin: *
Content-Type: application/x-lua
ETag: "d41d8cd98f00b204e9800998ecf8427e"
X-Service-Identity: router.example-5fc78d
Example request (PUT with Match-If)
Conditionally overwrite a Lua script only if its checksum matches:
$ curl -i -X PUT \
--data-binary @f1.lua \
-H "Content-Type: application/x-lua" \
-H "Match-If: d41d8cd98f00b204e9800998ecf8427e" \
https://router.example:5001/v1/lua/advanced_functions/f1.lua
HTTP/1.1 204 Successfully saved Lua file
Access-Control-Allow-Origin: *
Content-Length: 0
X-Service-Identity: router.example-5fc78d
Example unsuccessful request (PUT, checksum mismatch)
$ curl -i -X PUT \
--data-binary @f1.lua \
-H "Content-Type: application/x-lua" \
-H 'Match-If: "wrong_checksum"' \
https://router.example:5001/v1/lua/advanced_functions/f1.lua
HTTP/1.1 412 Precondition Failed
Access-Control-Allow-Origin: *
Content-Type: application/json
X-Service-Identity: router.example-5fc78d
Example request (DELETE)
Delete the Lua script named advanced_functions/f1.lua using a DELETE request:
$ curl -i -X DELETE \
https://router.example:5001/v1/lua/advanced_functions/f1.lua
HTTP/1.1 204 Successfully removed Lua file
Access-Control-Allow-Origin: *
Content-Length: 0
X-Service-Identity: router.example-5fc78d
Example request (DELETE with Match-If)
Conditionally delete a Lua script only if its checksum matches:
$ curl -i -X DELETE \
-H 'Match-If: "d41d8cd98f00b204e9800998ecf8427e"' \
https://router.example:5001/v1/lua/advanced_functions/f1.lua
HTTP/1.1 204 Successfully removed Lua file
Access-Control-Allow-Origin: *
Content-Length: 0
X-Service-Identity: router.example-5fc78d
Example unsuccessful request (DELETE, checksum mismatch)
$ curl -i -X DELETE \
-H 'Match-If: "wrong_checksum"' \
https://router.example:5001/v1/lua/advanced_functions/f1.lua
HTTP/1.1 412 Precondition Failed
Access-Control-Allow-Origin: *
Content-Type: application/json
X-Service-Identity: router.example-5fc78d
List Lua scripts – /v1/lua
Used to list previously uploaded custom Lua scripts on the router, retrieving their respective paths and file checksums.
The file_checksum value is the checksum used for ETag and Match-If
comparisons on individual Lua script endpoints.
| REQUEST Method | Content-Type | RESPONSE Result | Status Code | Content-Type |
|---|---|---|---|---|
GET | <N/A> | Success | 200 OK | application/json |
Example request
$ curl -k -i https://router.example:5001/v1/lua
HTTP/1.1 200 OK
Access-Control-Allow-Origin: *
Content-Length: 108
Content-Type: application/json
X-Service-Identity: router.example-5fc78d
[
{
"file_checksum": "d41d8cd98f00b204e9800998ecf8427e",
"path": "advanced_functions/f1.lua"
}
]
Debug a Lua expression – /v1/lua/debug
Used to debug an arbitrary Lua expression on the router in a “sandbox” (with no visible side effects to the state of the router), and inspect the result.
The Lua expression in the body is evaluated inside an isolated copy of the
internal Lua environment including selection input. The stdout field of the
resulting JSON body is populated with a concatenation of every string provided
as argument to the Lua print() function during the course of evaluation.
Upon a successful evaluation, as indicated by the success flag,
return.value and return.lua_type_name capture the resulting Lua value.
Otherwise, if evaluation was aborted (e.g. due to a Lua exception), error_msg
reflects any error description arising from the Lua environment.
| REQUEST Method | Content-Type | RESPONSE Result | Status Code | Content-Type |
|---|---|---|---|---|
POST | application/x-lua | Success | 200 OK | application/json |
Example successful request
$ curl -i -X POST \
-d 'fun1()' \
-H "Content-Type: application/x-lua" \
https://router.example:5001/v1/lua/debug
HTTP/1.1 200 OK
Access-Control-Allow-Origin: *
Content-Length: 123
Content-Type: application/json
X-Service-Identity: router.example-5fc78d
{
"error_msg": "",
"return": {
"lua_type_name": "number",
"value": 1.0
},
"stdout": "",
"success": true
}
Example unsuccessful request
(attempt to invoke unknown function)
$ curl -i -X POST \
-d 'fun5()' \
-H "Content-Type: application/x-lua" \
https://router.example:5001/v1/lua/debug
HTTP/1.1 200 OK
Access-Control-Allow-Origin: *
Content-Length: 123
Content-Type: application/json
X-Service-Identity: router.example-5fc78d
{
"error_msg": "[string \"function f0() ...\"]:2: attempt to call global 'fun5' (a nil value)",
"return": {
"lua_type_name": "",
"value": null
},
"stdout": "",
"success": false
}
Footnotes
7.6 - Configuration
7.6.1 - Advanced features
7.6.1.1 - Content popularity
ESB3024 Router can make routing decisions based on content popularity. All incoming content requests are tracked to continuously update a content popularity ranking list. The popularity ranking algorithm is designed to let popular content quickly rise to the top while unpopular content decays and sinks towards the bottom.
Routing
A content popularity based routing rule can be created by running
$ confcli services.routing.rules -w
Running wizard for resource 'rules'
Hint: Hitting return will set a value to its default.
Enter '?' to receive the help string
rules : [
rule can be one of
1: allow
2: consistentHashing
3: contentPopularity
4: deny
5: firstMatch
6: random
7: rawGroup
8: rawHost
9: split
10: weighted
Choose element index or name: contentPopularity
Adding a 'contentPopularity' element
rule : {
name (default: ): content_popularity_rule
type (default: contentPopularity):
contentPopularityCutoff (default: 10): 5
onPopular (default: ): edge-streamer
onUnpopular (default: ): offload
}
Add another 'rule' element to array 'rules'? [y/N]: n
]
Generated config:
{
"rules": [
{
"name": "content_popularity_rule",
"type": "contentPopularity",
"contentPopularityCutoff": 5.0,
"onPopular": "edge-streamer",
"onUnpopular": "offload"
}
]
}
Merge and apply the config? [y/n]: y
This rule will route requests for the top 5 most popular content items to
edge-streamer and all other requests to offload.
Some configuration settings attributed to content popularity are available:
$ confcli services.routing.settings.contentPopularity
{
"contentPopularity": {
"enabled": true,
"algorithm": "score_based",
"sessionGroupNames": [],
"popularityListMaxSize": 100000,
"scoreBased": {
"popularityDecayFraction": 0.2,
"popularityPredictionFactor": 2.5,
"requestsBetweenPopularityDecay": 1000
},
"timeBased": {
"intervalsPerHour": 10
}
}
}
enabled: Whether or not to track content popularity. Whenenabledis set tofalse, content popularity will not be tracked. Note that routing on content popularity is possible even ifenabledisfalseand content popularity has been tracked previously.algorithm: Choice of content popularity tracking algorithm. There are two possible choices:score_basedortime_based(detailed below).sessionGroupNames: Names of the session groups for which content popularity should be tracked. If left empty, content popularity will be tracked for all sessions. The content popularity is tracked globally, not per session group, but the popularity metrics is only updated for sessions belonging to these groups.popularityListMaxSize: The maximum amount of unique content items to track for popularity.scoreBased: Configuration parameters unique to the score based algorithm.timeBased: Configuration parameters unique to the time based algorithm.
Size of Popularity List
The size of the popularity list is limited to prevent it growing forever. A single entry in the popularity ranking list will at most consume 180 bytes of memory. E.g. setting the maximum size to 1000 would consume at most 180⋅1,000 = 180,000 B = 0.18 MB. If the content popularity list is full, a request to a new item will replace the least popular item.
Setting a very high maximum size will not impact performance, it will only consume more memory.
Score-Based Algorithm
The requestsBetweenPopularityDecay parameter defines the number of requests
between each popularity decay update, an integral component of this feature.
The popularityPredictionFactor and popularityDecayFraction settings tune
the behaviour of the content popularity ranking algorithm, explained further
below.
Decay Update
To allow for popular content to quickly rise in popularity and unpopular content to sink, a dynamic popularity ranking algorithm is used. The goal of the algorithm is to track content popularity in real time, allowing routing decisions based on the requested content’s popularity. The algorithm is applied every decay update.
The algorithm uses current trending content to predict content popularity. The
popularityPredictionFactor setting regulates how much the algorithm should rely
on predicted popularity. A high prediction factor allows rising content to quickly
rise to high popularity but can also cause unpopular content with a sudden burst
of requests to wrongfully rise to the top. A low prediction factor can cause
stagnation in the popularity ranking, not allowing new popular content to rise
to the top.
Unpopular content decays in popularity, the magnitude of which is regulated by
popularityDecayFraction. A high value will aggressively decay content
popularity on every decay update while a low value will bloat the ranking,
causing stagnation. Once content decays to a trivially low popularity score, it
is pruned from the content popularity list.
When configuring these tuning parameters, the most crucial data to consider is
the size of your asset catalog, i.e. the number of unique contents you offer.
The recommended values, obtained through testing, are presented in the table below.
Note that the popularityPredictionFactor setting is the principal factor in
controlling the algorithm’s behaviour.
| Catalog size n | Popularity prediction factor | Popularity decay fraction |
|---|---|---|
| n < 1000 | 2.2 | 0.2 |
| 1000 < n < 5000 | 2.3 | 0.2 |
| 5000 < n < 10000 | 2.5 | 0.2 |
| n > 10000 | 2.6 | 0.2 |
Time-Based Algorithm
The time based algorithm only requires the configuration parameter
intervalsPerHour. As an example, setting intervalsPerHour to 10
would give 10 six minute intervals per hour. During each interval,
all unique content requests has an associated counter, increasing
by one for each incoming request. After an hour, all intervals have
been cycled through. The counters in the first interval will be reset
and all incoming content requests will increase the counters in the
first interval again. This cycle continues forever.
When determining a single content’s popularity, the sum of each content’s counter in all intervals is used to determine a popularity ranking.
7.6.1.2 - Consistent Hashing
Consistent hashing based routing is a feature that can be used to distribute requests to a set of hosts in a cache friendly manner. By using AgileTV’s consistent distributed hash algorithm, the amount of cache redistribution is minimized within a set of hosts. Requests for a content will always be routed to the same set of hosts, the amount of which is configured by the spread factor, allowing high cache usage. When adding or removing hosts, the algorithm minimizes cache redistribution.
Say you have the host group [s1, s2, s3, s4, s5] and have
configured spreadFactor = 3. A request for a content asset1 would then be
routed to the same three hosts with one of them being selected randomly for each
request. Requests for a different content asset2 would also be routed to one
of three different hosts, most likely a different combination of hosts than
requests for content asset1.
Example routing results with spreadFactor = 3:
- Request for
asset1→ route to one of[s1, s3, s4]. - Request for
asset2→ route to one of[s2, s4, s5]. - Request for
asset3→ route to one of[s1, s2, s5].
Since consistent hashing based routing ensures that requests for a specific content always get routed to the same set of hosts, the risk of cache misses are lowered on the hosts since they will be served the same content requests over and over again.
Note that the maximum value of
spreadFactoris 64. Consequently, the highest amount of hosts you can use in aconsistentHashingrule block is 64.
Three different hashing algorithms are available: MD5, SDBM and Murmur.
The algorithm is chosen during configuration.
Configuration
Configuring consistent hashing based routing is easily done using confcli. Let’s configure the example described above:
confcli services.routing.rules -w
Running wizard for resource 'rules'
Hint: Hitting return will set a value to its default.
Enter '?' to receive the help string
rules : [
rule can be one of
1: allow
2: consistentHashing
3: contentPopularity
4: deny
5: firstMatch
6: random
7: rawGroup
8: rawHost
9: split
10: weighted
Choose element index or name: consistentHashing
Adding a 'consistentHashing' element
rule : {
name (default: ): consistentHashingRule
type (default: consistentHashing):
spreadFactor (default: 1): 3
hashAlgorithm (default: MD5):
targets : [
target : {
target (default: ): s1
enabled (default: True):
}
Add another 'target' element to array 'targets'? [y/N]: y
target : {
target (default: ): s2
enabled (default: True):
}
Add another 'target' element to array 'targets'? [y/N]: y
target : {
target (default: ): s3
enabled (default: True):
}
Add another 'target' element to array 'targets'? [y/N]: y
target : {
target (default: ): s4
enabled (default: True):
}
Add another 'target' element to array 'targets'? [y/N]: y
target : {
target (default: ): s5
enabled (default: True):
}
Add another 'target' element to array 'targets'? [y/N]: n
]
}
Add another 'rule' element to array 'rules'? [y/N]: n
]
Generated config:
{
"rules": [
{
"name": "consistentHashingRule",
"type": "consistentHashing",
"spreadFactor": 3,
"hashAlgorithm": "MD5",
"targets": [
{
"target": "s1",
"enabled": true
},
{
"target": "s2",
"enabled": true
},
{
"target": "s3",
"enabled": true
},
{
"target": "s4",
"enabled": true
},
{
"target": "s5",
"enabled": true
}
]
}
]
}
Adding Hosts
Adding a host to the list will give an additional target for the consistent hashing algorithm to route requests to. This will shift content distribution onto the new host.
confcli services.routing.rules.consistentHashingRule.targets -w
Running wizard for resource 'targets'
Hint: Hitting return will set a value to its default.
Enter '?' to receive the help string
targets : [
target : {
target (default: ): s6
enabled (default: True):
}
Add another 'target' element to array 'targets'? [y/N]: n
]
Generated config:
{
"targets": [
{
"target": "s6",
"enabled": true
}
]
}
Merge and apply the config? [y/n]: y
Removing Hosts
There is one very important caveat of using a consistent hashing rule block. As long as you don’t modify the list of hosts, the consistent hashing algorithm will keep routing requests to the same hosts. However, if you remove a host from the block in any position except the last, the consistent hashing algorithm’s behaviour will change and the algorithm cannot maintain a minimum amount of cache redistribution.
If you’re in a situation where you have to remove a host from the routing
targets but want to keep the same consistent hashing behaviour, e.g. during
very high load, you’ll have to toggle that target’s enabled field to false.
E.g., disabling requests to s2 can be accomplished by:
$ confcli services.routing.rules.consistentHashingRule.targets.1.enabled false
services.routing.rules.consistentHashingRule.targets.1.enabled = False
$ confcli services.routing.rules.consistentHashingRule.targets.1
{
"1": {
"target": "s2",
"enabled": false
}
}
If you modify the list order or remove hosts, it is highly recommended to do so during moments where a higher rate of cache misses are acceptable.
7.6.1.3 - Security token verification
The security token verification feature allows for ESB3024 Router to only process requests that contain a correct security token. The token is generated by the client, for example in the portal, using an algorithm that it shares with the router. The router verifies the token and rejects the request if the token is incorrect.
It is beyond the scope of this document to describe how the token is generated, that is described in the Security Tokens application note that is installed with the ESB3024 Router’s extra documentation.
Note: This Lua-based token verification will be deprecated. Using the built-in security token verification is recommended.
Setting up a Routing Rule
The token verification is performed by calling the verify_security_token()
function from a routing rule. The function returns 1 if the token is
correct, otherwise it returns 0. It should typically be called from the
first routing rule, to make requests with bad tokens fail as early as possible.
The confcli example assumes that the router already has rules configured, with
an entry point named select_cdn. Token verification is enabled by inserting an
“allow” rule first in the rule list.
confcli services.routing.rules -w
Running wizard for resource 'rules'
Hint: Hitting return will set a value to its default.
Enter '?' to receive the help string
rules : [
rule can be one of
1: allow
2: consistentHashing
3: contentPopularity
4: deny
5: firstMatch
6: random
7: rawGroup
8: rawHost
9: split
10: weighted
Choose element index or name: allow
Adding a 'allow' element
rule : {
name (default: ): token_verification
type (default: allow):
condition (default: always()): verify_security_token()
onMatch (default: ): select_cdn
}
Add another 'rule' element to array 'rules'? [y/N]: n
]
Generated config:
{
"rules": [
{
"name": "token_verification",
"type": "allow",
"condition": "verify_security_token()",
"onMatch": "select_cdn"
}
]
}
Merge and apply the config? [y/n]: y
$ confcli services.routing.entrypoint token_verification
services.routing.entrypoint = 'token_verification'
"routing": {
"id": "token_verification",
"member_order": "sequential",
"members": [
{
"id": "token_verification.0.select_cdn",
"member_order": "weighted",
"members": [
...
],
"weight_function": "return verify_security_token() ~= 0"
},
{
"id": "token_verification.1.rejected",
"member_order": "sequential",
"members": [],
"weight_function": "return 1"
}
],
"weight_function": "return 100"
},Configuring Security Token Options
The secret parameter is not part of the router request, but needs to be
configured separately in the router. That can be done with the host-config
tool that is installed with the router.
Besides configuring the secret, host-config can also configure floating
sessions and a URL prefix. Floating sessions are sessions that are not tied to a
specific IP address. When that is enabled, the token verification will not take
the IP address into account when verifying the token.
The security token verification is configured per host, where a host is the name
of the host that the request was sent to. This makes it possible for a router to
support multiple customer accounts, each with their own secret. If no
configuration is found for a host, a configuration with the name default is
used.
host-config supports three commands: print, set and delete.
The print command prints the current configuration for a host. The following
parameters are supported:
host-config print [-n <host-name>]
By default it prints the configuration for all hosts, but if the optional -n
flag is given it will print the configuration for a single host.
Set
The set command sets the configuration for a host. The configuration is given
as command line parameters. The following parameters are supported:
host-config set
-n <host-name>
[-f floating]
[-p url-prefix]
[-r <secret-to-remove>]
[-s <secret-to-add>]
-n <host-name>- The name of the host to configure.-f floating- A boolean option that specifies if floating sessions are accepted. The parameter accepts the valuestrueandfalse.-p url-prefix- A URL prefix that is used for identifying requests that come from a certain account. This is not used when verifying tokens.-r <secret-to-remove>- A secret that should be removed from the list of secrets.-s <secret-to-add>- A secret that should be added to the list of secrets.
For example, to set the secret “secret-1” and enable floating sessions for the default host, the following command can be used:
host-config set -n default -s secret-1 -f true
The set command only touches the configuration options that are mentioned on
the command line, so the following command line will add a second secret to the
default host without changing the floating session setting:
host-config set -n default -s secret-2
It is possible to set multiple secrets per host. This is useful when updating a secret, then both the old and the new secret can be valid during the transition period. After the transition period the old secret can be removed by typing:
host-config set -n default -r secret-1
Delete
The delete command deletes the configuration for a host. It supports the
following parameters:
host-config delete -n <host-name>
For example, to delete the configuration for example.com, the following
command can be used:
host-config delete -n example.com
Global Options
host-config also has a few global options. They are:
-k <security-key>- The security key that is used when communicating with the router. This is normally retrieved automatically.-h- Print a help message and exit.-r <router>- The router to connect to. This default tolocalhost, but can be changed to connect to a remote router.-v- Verbose output, can be given multiple times.
Debugging Security Token Verification
The security token verification only logs messages when the log level is set to
4 or higher. Then it will only log some errors. It is possible to enable more
verbose logging using the security-token-config that is installed together
with the router.
When verbose logging is enabled, the router will log information about the token verification, including the configured token secrets, so it needs to be used with care.
The logged lines are prefixed with verify_security_token.
The security-token-config tool supports the commands print and set.
The print command prints the current configuration. If nothing is configured
it will not print anything.
Set
The set command sets the configuration. The following parameters are
supported:
security-token-config set
[-d <enabled>]
-d <enabled>- A boolean option that specifies if debug logging should be enabled or not. The parameter accepts the valuestrueandfalse.
7.6.1.4 - Subnets API
ESB3024 Router provides utilities to quickly match clients into subnets. Any combination of IPv4 and IPv6 addresses can be used. To begin, a JSON file is needed, defining all subnets, e.g:
{
"255.255.255.255/24": "area1",
"255.255.255.255/16": "area2",
"255.255.255.255/8": "area3",
"90.90.1.3/16": "area4",
"5.5.0.4/8": "area5",
"2a02:2e02:9bc0::/48": "area6",
"2a02:2e02:9bc0::/32": "area7",
"2a02:2e02:9bc0::/16": "area8",
"2a02:2e02:9de0::/44": "combined_area",
"2a02:2e02:ada0::/44": "combined_area"
}
and PUT it to the endpoint :5001/v1/subnets or :5001/v2/subnets, the
API version doesn’t matter for subnets:
curl -k -T subnets.json -H "Content-Type: application/json" https://router-host:5001/v1/subnets
Note that it is possible for several subnet CIDR strings to share the same label, effectively grouping them together.
The router provides the built-in function in_subnet(subnet_name) that
can to make routing decisions based on a client’s subnet. For more details, see
Built-in Lua functions.
To configure a rule that only allows clients in the area1 subnet, run the
command
$ confcli services.routing.rules -w
Running wizard for resource 'rules'
Hint: Hitting return will set a value to its default.
Enter '?' to receive the help string
rules : [
rule can be one of
1: allow
2: consistentHashing
3: contentPopularity
4: deny
5: firstMatch
6: random
7: rawGroup
8: rawHost
9: split
10: weighted
Choose element index or name: allow
Adding a 'allow' element
rule : {
name (default: ): only_allow_area1
type (default: allow):
condition (default: always()): in_subnet('area1')
onMatch (default: ): example-host
}
Add another 'rule' element to array 'rules'? [y/N]: n
]
Generated config:
{
"rules": [
{
"name": "only_allow_area1",
"type": "allow",
"condition": "in_subnet('area1')",
"onMatch": "example-host"
}
]
}
Merge and apply the config? [y/n]: y
Invalid IP-addresses will be omitted during subnet list construction accompanied by a message in the log displaying the invalid IP address.
7.6.1.5 - Lua Features
7.6.1.5.1 - Built-in Lua Functions
This section details all built-in Lua functions provided by the router.
Logging Functions
The router provides Lua logging functionality that is convenient when creating custom Lua functions. A prefix can be added to the log message which is useful to differentiate log messages from different lua files. At the top of the Lua source file, add the line
local log = log.add_prefix("my_lua_file")
to prepend all log messages with "my_lua_file".
The logging functions support formatting and common log levels:
log.critical('A log message with number %d', 1.5)
log.error('A log message with string %s', 'a string')
log.warning('A log message with integer %i', 1)
log.info('A log message with a local number variable %d', some_local_number)
log.debug('A log message with a local string variable %s', some_local_string)
log.trace('A log message with a local integer variable %i', some_local_integer)
log.message('A log message')
Many of the router’s built-in Lua functions use the logging functions.
Predictive Load-Balancing Functions
Predictive load balancing is a tool that can be used to avoid overloading hosts with traffic. Consider the case where a popular event starts at a certain time, let’s say 12 PM. A spike in traffic will be routed to the hosts that are streaming the content at 12 PM, most of them starting at low bitrates. A host might have sufficient bandwidth left to take on more clients but when the recently connected clients start ramping up in video quality and increase their bitrate, the host can quickly become overloaded, possibly dropping incoming requests or going offline. Predictive load balancing solves this issue by considering how many times a host recently been redirected to.
Four functions for predictive load balancing are provided by the router
that can be used when constructing conditions/weight functions: host_bitrate()
, host_bitrate_custom(), host_has_bw() and host_has_bw_custom().
All require data to be supplied to the selection input API and apply
only to leaf nodes in the routing tree. In order for predictive load balancing
to work properly the data must be updated at regular intervals. The data needs
to be supplied by the target system.
These functions are suitable to used as host health checks. To configure host health checks, see configuring CDNs and hosts.
Note that host_bitrate() and host_has_bw() rely on data supplied by metrics
agents, detailed in Cache hardware metrics: monitoring and routing.
host_bitrate_custom() and host_has_bw_custom() rely on
manually supplied selection input data, detailed in selection input API. The
bitrate unit depends on the data submitted to the selection input API.
Example Metrics
The data supplied to the selection input API by the metrics agents uses the following structure:
{
"streamer-1": {
"hardware_metrics": {
"/": {
"free": 1741596278784,
"total": 1758357934080,
"used": 16761655296,
"used_percent": 0.9532561585516977
},
"cpu_load1": 0.02,
"cpu_load15": 0.12,
"cpu_load5": 0.02,
"mem_available": 4895789056,
"mem_available_percent": 59.551760354263074,
"mem_total": 8221065216,
"mem_used": 2474393600,
"n_cpus": 4
},
"per_interface_metrics": {
"eths1": {
"link": 1,
"interface_up": true,
"megabits_sent": 22322295739.378456,
"megabits_sent_rate": 8085.2523952,
"speed": 100000
}
}
}
}
Note that all built-in functions interacting with selection input values support indexing into nested selection input data. Consider the selection input data in above. The nested values can be accessed by using dots between the keys:
si('streamer-1.per_interface_metrics.eths1.megabits_sent_rate')
Note that the whole selection input variable name must be within single quotes.
The function si() is documented under
general purpose functions.
host_bitrate({})
host_bitrate() returns the predicted bitrate (in megabits per second) of
the host after the recently connected clients start ramping up in streaming
quality. The function accepts an argument table with the following keys:
interface: The name of the interface to use for bitrate prediction.- Optional
avg_bitrate: the average bitrate per client, defaults to 6 megabits per second. - Optional
num_routers: the number of routers that can route to this host, defaults to 1. This is important to accurately predict the incoming load if multiple routers are used. - Optional
host: The name of the host to use for bitrate prediction. Defaults to the current host if not provided.
Required Selection Input Data
This function relies on the field megabits_sent_rate, supplied by the Telegraf
metrics agent, as seen in example metrics. If these fields
are missing from your selection input data, this function will not work.
Examples of usage:
host_bitrate({interface='eths0'})
host_bitrate({avg_bitrate=1, interface='eths0'})
host_bitrate({num_routers=2, interface='eths0'})
host_bitrate({avg_bitrate=1, num_routers=4, interface='eths0'})
host_bitrate({avg_bitrate=1, num_routers=4, host='custom_host', interface='eths0'})
host_bitrate({}) calculates the predicted bitrate as:
predicted_host_bitrate = current_host_bitrate + (recent_connections * avg_bitrate * num_routers)
host_bitrate_custom({})
Same functionality as host_bitrate() but uses a custom selection input
variable as bitrate input instead of accessing hardware metrics. The function
accepts an argument table with the following keys:
custom_bitrate_var: The name of the selection input variable to be used for accessing current host bitrate.- Optional
avg_bitrate: seehost_bitrate()documentation above. - Optional
num_routers: seehost_bitrate()documentation above.
host_bitrate_custom({custom_bitrate_var='host1_current_bitrate'})
host_bitrate_custom({avg_bitrate=1, custom_bitrate_var='host1_current_bitrate'})
host_bitrate_custom({num_routers=4, custom_bitrate_var='host1_current_bitrate'})
host_has_bw({})
Instead of accessing the predicted bitrate of a host through host_bitrate(),
host_has_bw() returns 1 if the host is predicted to have enough
bandwidth left to take on more clients after recent connections ramp up in
bitrate, otherwise it returns 0. The function accepts an argument table with the
following keys:
interface: seehost_bitrate()documentation above.- Optional
avg_bitrate: seehost_bitrate()documentation above. - Optional
num_routers: seehost_bitrate()documentation above. - Optional
host: seehost_bitrate()documentation above. - Optional
margin: the bitrate (megabits per second) headroom that should be taken into account during calculation, defaults to 0.
host_has_bw({}) returns whether or not the following statement is true:
predicted_host_bitrate + margin < host_bitrate_capacity
Required Selection Input Data
host_has_bw({}) relies on the fields megabits_sent_rate and speed,
supplied by the Telegraf metrics agent, as seen in
example metrics. If these fields are missing from your
selection input data, this function will not work.
Examples of usage:
host_has_bw({interface='eths0'})
host_has_bw({margin=10, interface='eth0'})
host_has_bw({avg_bitrate=1, interface='eth0'})
host_has_bw({num_routers=4, interface='eth0'})
host_has_bw({host='custom_host', interface='eth0'})
host_has_bw_custom({})
Same functionality as host_has_bw() but uses a custom selection input
variable as bitrate. It also uses a number or a custom selection input
variable for the capacity. The function accepts an argument table
with the following keys:
custom_capacity_var: a number representing the capacity of the network interface OR the name of the selection input variable to be used for accessing host capacity.custom_bitrate_var: seehost_bitrate_custom()documentation- Optional
margin: seehost_has_bw()documentation above. above. - Optional
avg_bitrate: seehost_bitrate()documentation above. - Optional
num_routers: seehost_bitrate()documentation above.
Examples of usage:
host_has_bw_custom({custom_capacity_var=10000, custom_bitrate_var='streamer-1.per_interface_metrics.eths1.megabits_sent_rate'})
host_has_bw_custom({custom_capacity_var='host1_capacity', custom_bitrate_var='streamer-1.per_interface_metrics.eths1.megabits_sent_rate'})
host_has_bw_custom({margin=10, custom_capacity_var=10000, custom_bitrate_var='streamer-1.per_interface_metrics.eths1.megabits_sent_rate'})
host_has_bw_custom({avg_bitrate=1, custom_capacity_var=10000, custom_bitrate_var='streamer-1.per_interface_metrics.eths1.megabits_sent_rate'})
host_has_bw_custom({num_routers=4, custom_capacity_var=10000, custom_bitrate_var='streamer-1.per_interface_metrics.eths1.megabits_sent_rate'})
Health Check Functions
This section details built-in Lua functions that are meant to be used for host health checks. Note that these functions rely on data supplied by metric agents detailed in Cache hardware metrics: monitoring and routing. Make sure cache hardware metrics are supplied to the router before using any of these functions.
cpu_load_ok({})
The function accepts an optional argument table with the following keys:
- Optional
host: The name of the host. Defaults to the name of the selected host if not provided. - Optional
cpu_load5_limit: The acceptable limit for the 5-minute CPU load. Defaults to 0.9 if not provided.
The function returns 1 if the five minute CPU load average is below their respective limits, and 0 otherwise.
Examples of usage:
cpu_load_ok()
cpu_load_ok({host = 'custom_host'})
cpu_load_ok({cpu_load5_limit = 0.8})
cpu_load_ok({host = 'custom_host', cpu_load5_limit = 0.8})
memory_usage_ok({})
The function accepts an optional argument table with the following keys:
- Optional
host: The name of the host. Defaults to the host of the selected host if not provided. - Optional
memory_usage_limit: The acceptable limit for the memory usage. Defaults to 0.9 if not provided.
The function returns 1 if the memory usage is below the limit, and 0 otherwise.
Examples of usage:
memory_usage_ok()
memory_usage_ok({host = 'custom_host'})
memory_usage_ok({memory_usage_limit = 0.7})
memory_usage_ok({host = 'custom_host', memory_usage_limit = 0.7})
interfaces_online({})
The function accepts an argument table with the following keys:
- Required
interfaces: A string or a table of strings representing the network interfaces to check. - Optional
host: The name of the host. Defaults to the host of the selected host if not provided.
The function returns 1 if all the specified interfaces are online, and 0 otherwise.
Required Selection Input Data
This function relies on the fields link and interface_up, supplied by
the Telegraf metrics agent, as seen in example metrics. If
these fields are missing from your selection input data, this function will not
work.
Examples of usage:
interfaces_online({interfaces = 'eth0'})
interfaces_online({interfaces = {'eth0', 'eth1'}})
interfaces_online({host = 'custom_host', interfaces = 'eth0'})
interfaces_online({host = 'custom_host', interfaces = {'eth0', 'eth1'}})
health_check({})
The function accepts an optional argument table with the following keys:
- Required
interfaces: A string or a table of strings representing the network interfaces to check. - Optional
host: The name of the host. Defaults to the host of the selected host if not provided. - Optional
cpu_load5_limit: The acceptable limit for the 5-minute CPU load. Defaults to 0.9 if not provided. - Optional
memory_usage_limit: The acceptable limit for the memory usage. Defaults to 0.9 if not provided.
The function calls the health check functions cpu_load_ok({}),
memory_usage_ok({}) and interfaces_online({}). The functions returns 1 if
all these functions returned 1, otherwise it returns 0.
Examples of usage:
health_check({interfaces = 'eths0'})
health_check({host = 'custom_host', interfaces = 'eths0'})
health_check({cpu_load5_limit = 0.7, memory_usage_limit = 0.8, interfaces = 'eth0'})
health_check({host = 'custom_host', cpu_load5_limit = 0.7, memory_usage_limit = 0.8, interfaces = {'eth0', 'eth1'}})
General Purpose Functions
The router supplies a number of general purpose Lua functions.
always()
Always returns 1.
never()
Always returns 0. Useful for temporarily disabling caches by using it as a health check.
Examples of usage:
always()
never()
si(si_name)
The function reads the value of the selection input variable si_name and
returns it if it exists, otherwise it returns 0. The function accepts a string
argument for the selection input variable name.
Examples of usage:
si('some_selection_input_variable_name')
si('streamer-1.per_interface_metrics.eths1.megabits_sent_rate')
Comparison functions
All comparison functions use the form function(si_name, value) and compares
the selection input value with the name si_name with value.
ge(si_name, value) - greater than or equal
gt(si_name, value) - greater than
le(si_name, value) - less than or equal
lt(si_name, value) - less than
eq(si_name, value) - equal to
neq(si_name, value) - not equal to
Examples of usage:
ge('streamer-1.hardware_metrics.mem_available_percent', 30)
gt('streamer-1.hardware_metrics./.free', 1000000000)
le('streamer-1.hardware_metrics.cpu_load5', 0.8)
lt('streamer-1.per_interface_metrics.eths1.megabits_sent_rate', 9000)
eq('streamer-1.per_interface_metrics.eths1.link', 1)
neq('streamer-1.hardware_metrics.n_cpus', 4)
Session Checking Functions
in_subnet(subnet)
Returns 1 if the current session belongs to subnet, otherwise it returns 0.
See Subnets API for more details on how to use
subnets in routing. The function accepts a string argument for the subnet name.
Examples of usage:
in_subnet('stockholm')
in_subnet('unserviced_region')
in_subnet('some_other_subnet')
These functions checks the current session’s session groups.
in_session_group(session_group)
Returns 1 if the current session has been classified into session_group,
otherwise it returns 0. The function accepts a string argument for the session
group name.
in_any_session_group({})
Returns 1 if the current session has been classified into any of
session_groups, otherwise it returns 0. The function accepts a table array of
strings as argument for the session group names.
in_all_session_groups({})
Returns 1 if the current session has been classified into all of
session_groups, otherwise it returns 0. The function accepts a table array of
strings as argument for the session group names.
Examples of usage:
in_session_group('safari_browser')
in_any_session_group({ 'in_europe', 'in_asia'})
in_all_session_group({ 'vod_content', 'in_america'})
Secrets Handling Functions
secrets.getSecrets(id)
Returns the cached secret string for id, as configured in the
secret store.
Returns nil if the secret is not found, or if secrets are disabled.
Other built-in functions
base64_encode(data)
base64_encode(data) returns the base64 encoded string of data.
Arguments:
data: The data to encode.
Example:
print(base64_encode('Hello world!'))
SGVsbG8gd29ybGQh
base64_decode(data)
base64_decode(data) returns the decoded data of the base64 encoded string, as
a raw binary string.
Arguments:
data: The data to decode.
Example:
print(base64_decode('SGVsbG8gd29ybGQh'))
Hello world!
base64_url_encode(data)
base64_url_encode(data) returns the base64 URL encoded string of data.
Arguments:
data: The data to encode.
Example:
print(base64_url_encode('ab~~'))
YWJ-fg
base64_url_decode(data)
base64_url_decode(data) returns the decoded data of the base64 URL encoded
string, as a raw binary string.
Arguments:
data: The data to decode.
Example:
print(base64_url_decode('YWJ-fg'))
ab~~
to_hex_string(data)
to_hex_string(data) returns a string containing the hexadecimal
representation of the string data.
Arguments:
data: The data to convert.
Example:
print(to_hex_string('Hello world!\n'))
48656c6c6f20776f726c64210a
from_hex_string(data)
from_hex_string(data) returns a string containing the byte representation of
the hexadecimal string data.
Arguments:
data: The data to convert.
Example:
print(from_hex_string('48656c6c6f20776f726c6421'))
Hello world!
empty(table)
empty(table) returns true if table is empty, otherwise it returns false.
Arguments:
table: The table to check.
Examples:
print(tostring(empty({})))
true
print(tostring(empty({1, 2, 3})))
false
md5(data)
md5(data) returns the MD5 hash of data, as a hexstring.
Arguments:
data: The data to hash.
Example:
print(md5('Hello world!'))
86fb269d190d2c85f6e0468ceca42a20
sha256(date)
sha256(data) returns the SHA-256 hash of data, as a hexstring.
Arguments:
data: The data to hash.
Example:
print(sha256('Hello world!'))
c0535e4be2b79ffd93291305436bf889314e4a3faec05ecffcbb7df31ad9e51a
hmac_sha256(key, data)
hmac_sha256(key, data) returns the HMAC-SHA-256 hash of data using key,
as a string containing raw binary data.
Arguments:
key: The key to use.data: The data to hash.
Example:
print(to_hex_string(hmac_sha256('secret', 'Hello world!')))
a65f4cfcf5f421ff2be052e0642bccbcfeb126ee73ebc4fe3b381964302eb632
hmac_sha384(key, data)
hmac_sha384(key, data) returns the HMAC-SHA-384 hash of data using key,
as a string containing raw binary data.
Arguments:
key: The key to use.data: The data to hash.
Example:
print(to_hex_string(hmac_sha384('secret', 'Hello world!')))
917516d93d3509a371a129ca50933195dd659712652f07ba5792cbd5cade5e6285a841808842cfa0c3c69c8fb234468a
hmac_sha512(key, data)
hmac_sha512(key, data) returns the HMAC-SHA-512 hash of data using key,
as a string containing raw binary data.
Arguments:
key: The key to use.data: The data to hash.
Example:
print(to_hex_string(hmac_sha512('secret', 'Hello world!')))
dff6c00943387f9039566bfee0994de698aa2005eecdbf12d109e17aff5bbb1b022347fbf4bd94ede7c7d51571022525556b64f9d5e4386de99d0025886eaaff
hmac_md5(key, data)
hmac_md5(key, data) returns the HMAC-MD5 hash of data using key,
as a string containing raw binary data.
Arguments:
key: The key to use.data: The data to hash.
Example:
print(to_hex_string(hmac_md5('secret', 'Hello world!')))
444fad0d374d14369d6b595062da5d91
regex_replace
regex_replace(data, pattern, replacement) returns the string data with all
occurrences of the regular expression pattern replaced with replacement.
Arguments:
data: The data to replace.pattern: The regular expression pattern to match.replacement: The replacement string.
Examples:
print(regex_replace('Hello world!', 'world', 'Lua'))
Hello Lua!
print(regex_replace('Hello world!', 'l+', 'lua'))
Heluao worluad!
If the regular expression pattern is invalid, regex_replace() returns an
error message.
Examples:
print(regex_replace('Hello world!', '*', 'lua'))
regex_error caught: regex_error
unixtime()
unixtime() returns the current Unix timestamp, as seconds since midnight,
Janury 1 1970 UTC, as an integer.
Arguments:
- None
Example:
print(unixtime())
1733517373
now()
now() returns the current Unix timestamp, the number of seconds since
midnight, Janury 1 1970 UTC, as an number with decimals.
Arguments:
- None
Example:
print(now())
1733517373.5007
time_to_epoch(time, fmt)
time_to_epoch(time, fmt) returns the Unix timestamp, the number of seconds
since midnight, Janury 1 1970 UTC, of the time string time, which is
formatted according to the format string fmt.
Arguments:
time: The time string to convert.fmt(Optional): The format string of the time string, as specified by the POSIX function strptime(). If not specified, it defaults to “%Y-%m-%dT%TZ”.
Examples:
print(time_to_epoch('1972-04-17T06:10:20Z'))
72339020
print(time_to_epoch('17/04-72 06:20:30', '%d/%m-%y %H:%M:%S'))
72339630
epoch_to_time(time, format)
epoch_to_time(time, format) returns the time string of the Unix timestamp
time, formatted according to format.
Arguments:
time: The Unix timestamp to convert, as a number.format(Optional): The format string of the time string, as specified by the POSIX function strftime(). If not specified, it defaults to “%Y-%m-%dT%TZ”.
Examples:
print(epoch_to_time(123456789))
1973-11-29T21:33:09Z
print(epoch_to_time(1234567890, '%d/%m-%y %H:%M:%S'))
13/02-09 23:31:30
get_consistent_hashing_weight(contentName, nodeIdsString, spreadFactor, hashAlgoritm, nodeId)
get_consistent_hashing_weight(contentName, nodeIdsString, spreadFactor, hashAlgoritm, nodeId)
returns the priority that node nodeId has in the list of preferred nodes,
determined using consistent hashing. The first spreadfactor:th nodes should
have equal weights to randomize requests between them. Remaining nodes should
have decrementally decreasing weights to honor node priority during failover.
Arguments:
contentName: The name of the content to hash.nodeIdsString: A string containing the node IDs to hash, on the format ‘0,1,2,3’.spreadFactor: The number of nodes to spread the requests between.hashAlgorithm: Which hash algorithm to use. Supported algorithms are “MD5”, “SDBM” and “Murmur”. Default is “MD5”.nodeId: The ID of the node to calculate the weight for.
Examples:
print(get_consistent_hashing_weight('/vod/film1', '0,1,2,3,4,5', 3, 'MD5', 3))
6
print(get_consistent_hashing_weight('/vod/film2', '0,1,2,3,4,5', 3, 'MD5', 3))
4
print(get_consistent_hashing_weight('/vod/film2', '0,1,2', 2, 'Murmur', 1))
2
See Consistent Hashing for more information about consistent hashing.
expand_ipv6_address(address)
expand_ipv6_address(address) returns the fully expanded form of the IPv6
address address.
Arguments:
address: The IPv6 address to expand. If the address is not a valid IPv6 address, the function returns the contents ofaddressunmodified. This allows for the function to pass through IPv4 addresses.
Examples:
print(expand_ipv6_address('2001:db8::1'))
2001:0db8:0000:0000:0000:0000:0000:0001
print(expand_ipv6_address('198.51.100.5'))
198.51.100.5
Data stream related functions
The router provides a number of functions that are useful when working with
data streams. These functions are used to write data to the data stream
configured in the services.routing.dataStreams.outgoing section of the
configuration. See data streams for more information.
send_to_data_stream
send_to_data_stream(data_stream, message) sends the string message to the
outgoing data stream data_stream. Note that message is sent verbatim,
without any formatting.
Arguments:
data_stream: The name of the data stream to send to.message: The message to send.
Example:
-- Sends the message "Hello world!" to the data stream 'token_stream'
send_to_data_stream('token_stream', 'Hello world!')
data_streams.post_selection_key_value
data_streams.post_selection_key_value(data_stream, path, key, value, ttl_s)
posts the key-value pair key=value on the path path to the data stream
data_stream. The key-value is formatted as a selection input value
{key: value}, will be stored in path and will persist for ttl_s seconds.
This is the same format that is expected when parsing data from incoming data
streams of the type "selectionInput" to read selection input data from
external data streams. This means that this function can be used to post
selection input data to an external data stream, which can then be read by
other Director instances.
Arguments:
data_stream: The name of the data stream to post to.path: The path to post the key-value pair to. Note that the path is automatically prefixed with"/v2/selection_input".key: The key to post.value: The value to post.- Optional
ttl_s: The time to live of the key-value pair, in seconds. If not specified, it will persist forever.
Example:
-- Posts the selection input value {"si_var": 1337} on the path "/v2/selection_input/path"
-- to the data stream 'outgoingDataStream' with a TTL of 60 seconds
data_streams.post_selection_key_value('outgoingDataStream', '/path', 'si_var', 1337, 60)
Token blocking functions
The router provides a number of functions that are useful when working with token blocking to control CDN access.
blocked_tokens.augment_token(token, customer_id)
Returns an augmented token string formatted like <customer_id>__<token>. This
function is useful when additional information is needed for token blocking,
such as customer ID.
Arguments:
token: The token to augment.customer_id: The customer ID to augment the token with.
Example:
-- Augments the token eyJhbG213 with the customer ID 12345
local augmented_token = blocked_tokens.augment_token('eyJhbG213', '12345')
print(augmented_token)
12345__eyJhbG213
blocked_tokens.add(stream_name, token, ttl_s)
blocked_tokens.add() is a specialized version of
data_streams.post_selection_key_value() that is commonly used to synchronize
blocked tokens between multiple Directors to deny unpermitted access into a CDN.
It posts selection input data to the data stream stream_name which is consumed
into selection input by all connected Director instances so that the blocked
token can easily be checked during routing by calling blocked_tokens.is_blocked(token).
Arguments:
stream_name: The name of the data stream to post to.token: The token to post.- Optional
ttl_s: The time to live of the token, in seconds. Defaults to 3 hours (10800 seconds) if not specified.
Example:
-- Posts the token eyJhbG213 with a TTL of 3 hours
blocked_tokens.add('token_stream', 'eyJhbG213')
-- Posts the token R5cCI6Ik with a TTL of 60 seconds
blocked_tokens.add('token_stream', 'R5cCI6Ik', 60)
blocked_tokens.is_blocked(token)
blocked_tokens.is_blocked(token) checks if the token token has been blocked
by checking if it is stored in selection input. It returns true if the token is
blocked, otherwise it returns false.
Arguments:
token: The token to check.
Example:
-- Checks if the token eyJhbG213 is blocked
blocked_tokens.is_blocked('eyJhbG213')
-- Checks if the augmented token 12345__eyJhbG213 is blocked
blocked_tokens.is_blocked(blocked_tokens.augment_token('eyJhbG213', '12345'))
blocked_tokens.is_blocked('12345__eyJhbG213')
Custom Lua Metrics functions
The router provides functions for managing custom metrics counters that will be available in the OpenMetrics format on the router’s metrics API.
increase_metrics_counter(counter_name, label_table, amount)
increase_metrics_counter(counter_name, label_table, amount) increases the
custom metrics counter counter_name by amount. The counter is identified by
the label_table which is a table of key-value pairs.
Arguments:
counter_name: The name of the counter to increase.label_table: A table of key-value pairs to identify the counter.- Optional
amount: The amount to increase the counter by. Defaults to 1 if not defined.
Example:
-- Increases the counter 'my_counter' by 1
increase_metrics_counter('my_counter', {label='foo'})
-- Increases the counter 'another_counter' by 5
increase_metrics_counter('another_counter', {label1='value1', label2='value2'}, 5)
These examples will create the following metrics:
# TYPE my_counter counter
my_counter{label="foo"} 1
# TYPE another_counter counter
another_counter{label1="value1", label2="value2"} 5
reset_metrics_counter(counter_name, label_table)
reset_metrics_counter(counter_name, label_table) removes the custom metrics
counter counter_name with the labels defined in label_table.
Arguments:
counter_name: The name of the counter to remove.label_table: A table of key-value pairs to identify the counter.
Example:
-- Removes the counter 'my_counter'
reset_metrics_counter('my_counter', {label='foo'})
-- Removes the counter 'another_counter'
reset_metrics_counter('another_counter', {label1='value1', label2='value2'})
Configuration examples
Many of the functions documented are suitable to use in host health checks. To configure host health checks, see configuring CDNs and hosts. Here are some configuration examples of using the built-in Lua functions, utilizing the example metrics:
"healthChecks": [
"gt('streamer-1.hardware_metrics.mem_available_percent', 20)", // More than 20% memory is left
"lt('streamer-1.per_interface_metrics.eths1.megabits_sent_rate', 9000)" // Current bitrate is lower than 9000 Mbps
"host_has_bw({host='streamer-1', interface='eths1', margin=1000})", // host_has_bw() uses 'streamer-1.per_interface_metrics.eths1.speed' to determine if there is enough bandwidth left with a 1000 Mbps margin
"interfaces_online({host='streamer-1', interfaces='eths1'})",
"memory_usage_ok({host='streamer-1'})",
"cpu_load_ok({host='streamer-1'})",
"health_check({host='streamer-1', interfaces='eths1'})" // Combines interfaces_online(), memory_usage_ok(), cpu_load_ok()
]
7.6.1.5.2 - Global Lua Tables
There are multiple global tables containing important data available while writing Lua code for the router.
selection_input
Contains arbitrary, custom fields fed into the router by clients, see API overview for details on how to inject data into this table.
Note that the selection_input table is iterable.
Usage examples:
print(selection_input['some_value'])
-- Iterate over table
if selection_input then
for k, v in pairs(selection_input) do
print('here is '..'selection_input!')
print(k..'='..v)
end
else
print('selection_input is nil')
end
session_groups
Defines a mapping from session group name to boolean, indicating whether
the session belongs to the session group or not.
Usage examples:
if session_groups.vod then print('vod') else print('not vod') end
if session_groups['vod'] then print('vod') else print('not vod') end
session_count
Provides counters of number of session types per session group. The table
uses the structure qoe_score.<session_type>.<session_group>.
Usage examples:
print(session_count.instream.vod)
print(session_count.initial.vod)
qoe_score
Provides the quality of experience score per host per session group. The table
uses the structure qoe_score.<host>.<session_group>.
Usage examples:
print(qoe_score.host1.vod)
print(qoe_score.host1.live)
request
Contains data related to the HTTP request between the client and the router.
request.method- Description: HTTP request method.
- Type:
string - Example:
'GET','POST'
request.body- Description: HTTP request body string.
- Type:
stringornil - Example:
'{"foo": "bar"}'
request.major_version- Description: Major HTTP version such as
xinHTTP/x.1. - Type:
integer - Example:
1
- Description: Major HTTP version such as
request.minor_version- Description: Minor HTTP version such as
xinHTTP/1.x. - Type:
integer - Example:
1
- Description: Minor HTTP version such as
request.protocol- Description: Transfer protocol variant.
- Type:
string - Example:
'HTTP','HTTPS'
request.client_ip- Description: IP address of the client issuing the request.
- Type:
string - Example:
'172.16.238.128'
request.path_with_query_params- Description: Full request path including query parameters.
- Type:
string - Example:
'/mycontent/superman.m3u8?b=y&c=z&a=x'
request.path- Description: Request path without query parameters.
- Type:
string - Example:
'/mycontent/superman.m3u8'
request.query_params- Description: The query parameter string.
- Type:
string - Example:
'b=y&c=z&a=x'
request.filename- Description: The part of the path following the final slash, if any.
- Type:
string - Example:
'superman.m3u8'
request.subnet- Description: Subnet of
client_ip. - Type:
stringornil - Example:
'all'
- Description: Subnet of
session
Contains data related to the current session.
session.client_ip- Description: Alias for
request.client_ip. See documentation for table request above.
- Description: Alias for
session.path_with_query_params- Description: Alias for
request.path_with_query_params. See documentation for table request above.
- Description: Alias for
session.path- Description: Alias for
request.path. See documentation for table request above.
- Description: Alias for
session.query_params- Description: Alias for
request.query_params. See documentation for table request above.
- Description: Alias for
session.filename- Description: Alias for
request.filename. See documentation for table request above.
- Description: Alias for
session.subnet- Description: Alias for
request.subnet. See documentation for table request above.
- Description: Alias for
session.host- Description: ID of the currently selected host for the session.
- Type:
stringornil - Example:
'host1'
session.id- Description: ID of the session.
- Type:
string - Example:
'8eb2c1bdc106-17d2ff-00000000'
session.session_type- Description: Type of the session.
- Type:
string - Example:
'initial'or'instream'. Identical to the value of theTypeargument of the session translation function.
session.is_managed- Description: Identifies managed sessions.
- Type:
boolean - Example:
trueifType/session.session_typeis'instream'
request_headers
Contains the headers from the request between the client and the router, keyed by name.
Usage example:
print(request_headers['User-Agent'])
request_query_params
Contains the query parameters from the request between the client and the router, keyed by name.
Usage example:
print(request_query_params.a)
session_query_params
Alias for metatable request_query_params.
response
Contains data related to the outgoing response apart from the headers.
response.body- Description: HTTP response body string.
- Type:
stringornil - Example:
'{"foo": "bar"}'
response.code- Description: HTTP response status code.
- Type:
integer - Example:
200,404
response.text- Description: HTTP response status text.
- Type:
string - Example:
'OK','Not found'
response.major_version- Description: Major HTTP version such as
xinHTTP/x.1. - Type:
integer - Example:
1
- Description: Major HTTP version such as
response.minor_version- Description: Minor HTTP version such as
xinHTTP/1.x. - Type:
integer - Example:
1
- Description: Minor HTTP version such as
response.protocol- Description: Transfer protocol variant.
- Type:
string - Example:
'HTTP','HTTPS'
response_headers
Contains the response headers keyed by name.
Usage example:
print(response_headers['User-Agent'])
7.6.1.5.3 - Request Translation Function
Specifies the body of a Lua function that inspects every incoming HTTP request and overwrites individual fields before further processing by the router.
Returns nil when nothing is to be changed, or HTTPRequest(t) where t
is a table with any of the following optional fields:
Method- Description: Replaces the HTTP request method in the request being processed.
- Type:
string - Example:
'GET','POST'
Path- Description: Replaces the request path in the request being processed.
- Type:
string - Example:
'/mycontent/superman.m3u8'
ClientIp- Description: Replaces client IP address in the request being processed.
- Type:
string - Example:
'172.16.238.128'
Body- Description: Replaces body in the request being processed.
- Type:
stringornil - Example:
'{"foo": "bar"}'
QueryParameters- Description: Adds, removes or replaces individual query parameters in the request being processed.
- Type: nested
table(indexed by number) representing an array of query parameters as{[1]='Name',[2]='Value'}pairs that are added to the request being processed, or overwriting existing query parameters with colliding names. To remove a query parameter from the request, specifynilas value, i.e.QueryParameters={..., {[1]='foo',[2]=nil} ...}. Returning a query parameter with a name but no value, such asain the request'/index.m3u8?a&b=22'is currently not supported.
Headers- Description: Adds, removes or replaces individual headers in the request being processed.
- Type: nested
table(indexed by number) representing an array of request headers as{[1]='Name',[2]='Value'}pairs that are added to the request being processed, or overwriting existing request headers with colliding names. To remove a header from the request, specifynilas value, i.e.Headers={..., {[1]='foo',[2]=nil} ...}. Duplicate names are supported. A multi-value header such asFoo: bar1,bar2is defined by specifyingHeaders={..., {[1]='foo',[2]='bar1'}, {[1]='foo',[2]='bar2'}, ...}.
OutgoingRequest: See Sending HTTP requests from translation functions for more information.
Example of a request_translation_function body that sets the request path
to a hardcoded value and adds the hardcoded query parameter a=b:
-- Statements go here
print('Setting hardcoded Path and QueryParameters')
return HTTPRequest({
Path = '/content.mpd',
QueryParameters = {
{'a','b'}
}
})
Arguments
The following (iterable) arguments will be known by the function:
QueryParameters
Type: nested
table(indexed by number).Description: Array of query parameters as
{[1]='Name',[2]='Value'}pairs that were present in the query string of the request. Format identical to theHTTPRequest.QueryParameters-field specified for the return value above.Example usage:
for _, queryParam in pairs(QueryParameters) do print(queryParam[1]..'='..queryParam[2]) end
Headers
Type: nested
table(indexed by number).Description: Array of request headers as
{[1]='Name',[2]='Value'}pairs that were present in the request. Format similar to theHTTPRequest.Headersfield specified for the return value above. A multi-value header such asFoo: bar1,bar2will not be split up as multiple headers. It will appear inrequest_translation_functionasHeaders={..., {[1]='foo',[2]='bar1,bar2'}, ...}.Example usage:
for _, header in pairs(Headers) do print(header[1]..'='..header[2]) end
Additional Data
In addition to the arguments above, the following Lua tables, documented in Global Lua Tables, provide additional data that is available when executing the request translation function:
If the request translation function modifies the request, the request,
request_query_params and request_headers tables will be updated with the
modified request and made available to the routing rules.
7.6.1.5.4 - Session Translation Function
Specifies the body of a Lua function that inspects a newly created session and may override its suggested type from “initial” to “instream” or vice versa. A number of helper functions are provided to simplify changing the session type.
Returns nil when the session type is to remain unchanged, or Session(t)
where t is a table with a single field:
Type- Description: New type of the session.
- Type:
string - Example:
'instream','initial'
OutgoingRequest: See Sending HTTP requests from translation functions for more information.
Basic Configuration
It is possible to configure the maximum number of simultaneous managed sessions
on the router. If the maximum number is reached, no more managed sessions can be
created. Using confcli, it can be configured by running
$ confcli services.routing.tuning.general.maxActiveManagedSessions
{
"maxActiveManagedSessions": 1000
}
$ confcli services.routing.tuning.general.maxActiveManagedSessions 900
services.routing.tuning.general.maxActiveManagedSessions = 900
Common Arguments
While executing the session translation function, the following arguments are available:
Type: The current type of the session ('instream'or'initial').
Usage examples:
-- Flip session type
local newType = 'initial'
if Type == 'initial' then
newType = 'instream'
end
print('Changing session type from ' .. Type .. ' to ' .. newType)
return Session({['Type'] = newType})
Session Translation Helper Functions
The standard Lua library provides four helper functions to simplify the configuration of the session translation function:
set_session_type(session_type)
This function will set the session type to the supplied session_type and
the maximum number of sessions of that type has not been reached.
Parameters
session_type: The type of session to create, possible values are ‘initial’ or ‘instream’.
Usage Examples
return set_session_type('instream')
return set_session_type('initial')
set_session_type_if_in_group(session_type, session_group)
This function will set the session type to the supplied session_type if the
session is part of session_group and the maximum number of sessions of that
type has not been reached.
Parameters
session_type: The type of session to create, possible values are ‘initial’ or ‘instream’.session_group: The name of the session group.
Usage Examples
return set_session_type_if_in_group('instream', 'sg1')
set_session_type_if_in_all_groups(session_type, session_groups)
This function will set the session type to the supplied session_type if the
session is part of all session groups given by session_groups and the maximum
number of sessions of that type has not been reached.
Parameters
session_type: The type of session to create, possible values are ‘initial’ or ‘instream’.session_groups: A list of session group names.
Usage Examples
return set_session_type_if_in_all_groups('instream', {'sg1', 'sg2'})
set_session_type_if_in_any_group(session_type, session_groups)
This function will set the session type to the supplied session_type if the
session is part of one or more of the session groups given by session_groups
and the maximum number of sessions of that type has not been reached.
Parameters
session_type: The type of session to create, possible values are ‘initial’ or ‘instream’.session_groups: A list of session group names.
Usage Examples
return set_session_type_if_in_any_group('instream', {'sg1', 'sg2'})
Configuration
Using confcli, example of how the functions above can be used in the session
translation function can be configured by running any of
$ confcli services.routing.translationFunctions.session "return set_session_type('instream')"
services.routing.translationFunctions.session = "return set_session_type('instream')"
$ confcli services.routing.translationFunctions.session "return set_session_type_if_in_group('instream', 'sg1')"
services.routing.translationFunctions.session = "return set_session_type_if_in_group('instream', 'sg1')"
$ confcli services.routing.translationFunctions.session "return set_session_type_if_in_all_groups('instream', {'sg1', 'sg2'})"
services.routing.translationFunctions.session = "return set_session_type_if_in_all_groups('instream', {'sg1', 'sg2'})"
$ confcli services.routing.translationFunctions.session "return set_session_type_if_in_any_group('instream', {'sg1', 'sg2'})"
services.routing.translationFunctions.session = "return set_session_type_if_in_any_group('instream', {'sg1', 'sg2'})"
Additional Data
In addition to the arguments above, the following Lua tables, documented in Global Lua Tables, provide additional data that is available when executing the response translation function:
The selection_input table will not change while a routing request is handled.
A request_translation_function and the corresponding
response_translation_function will see the same selection_input table, even
if the selection data is updated while the request is being handled.
7.6.1.5.5 - Host Request Translation Function
The host request translation function defines a Lua function that modifies
HTTP requests sent to a host. These hosts are configured in
services.routing.hostGroups.
Hosts can receive requests for a manifest. A regular host will respond with the manifest itself, while a redirecting host and a DNS host will respond with a redirection to a streamer. This function can modify all these types of requests.
The function returns nil when nothing is to be changed, or HTTPRequest(t)
where t is a table with any of the following optional fields:
Method- Description: Replaces the HTTP request method in the request being processed.
- Type:
string - Example:
'GET','POST'
Path- Description: Replaces the request path in the request being processed.
- Type:
string - Example:
'/mycontent/superman.m3u8'
Body- Description: Replaces body in the request being processed.
- Type:
stringornil - Example:
'{"foo": "bar"}'
QueryParameters- Description: Adds, removes or replaces individual query parameters in the request being processed.
- Type: nested
table(indexed by number) representing an array of query parameters as{[1]='Name',[2]='Value'}pairs that are added to the request being processed, or overwriting existing query parameters with colliding names. To remove a query parameter from the request, specifynilas value, i.e.QueryParameters={..., {[1]='foo',[2]=nil} ...}. Returning a query parameter with a name but no value, such asain the request'/index.m3u8?a&b=22'is currently not supported.
Headers- Description: Adds, removes or replaces individual headers in the request being processed.
- Type: nested
table(indexed by number) representing an array of request headers as{[1]='Name',[2]='Value'}pairs that are added to the request being processed, or overwriting existing request headers with colliding names. To remove a header from the request, specifynilas value, i.e.Headers={..., {[1]='foo',[2]=nil} ...}. Duplicate names are supported. A multi-value header such asFoo: bar1,bar2is defined by specifyingHeaders={..., {[1]='foo',[2]='bar1'}, {[1]='foo',[2]='bar2'}, ...}.
Host- Description: Replaces the host that the request is sent to.
- Type:
string - Example:
'new-host.example.com','192.0.2.7'
Port- Description: Replaces the TCP port that the request is sent to.
- Type:
number - Example:
8081
Protocol- Description: Decides which protocol that will be used for sending the
request. Valid protocols are
'HTTP'and'HTTPS'. - Type:
string - Example:
'HTTP','HTTPS'
- Description: Decides which protocol that will be used for sending the
request. Valid protocols are
OutgoingRequest: See Sending HTTP requests from translation functions for more information.
Example of a host_request_translation_function body that sets the request path
to a hardcoded value and adds the hardcoded query parameter a=b:
-- Statements go here
print('Setting hardcoded Path and QueryParameters')
return HTTPRequest({
Path = '/content.mpd',
QueryParameters = {
{'a','b'}
}
})
Arguments
The following (iterable) arguments will be known by the function:
QueryParameters
Type: nested
table(indexed by number).Description: Array of query parameters as
{[1]='Name',[2]='Value'}pairs that are present in the query string of the request from the client to the router. Format identical to theHTTPRequest.QueryParameters-field specified for the return value above.Example usage:
for _, queryParam in pairs(QueryParameters) do print(queryParam[1]..'='..queryParam[2]) end
Headers
Type: nested
table(indexed by number).Description: Array of request headers as
{[1]='Name',[2]='Value'}pairs that are present in the request from the client to the router. Format similar to theHTTPRequest.Headersfield specified for the return value above. A multi-value header such asFoo: bar1,bar2will not be split up as multiple headers. It will appear inhost_request_translation_functionasHeaders={..., {[1]='foo',[2]='bar1,bar2'}, ...}.Example usage:
for _, header in pairs(Headers) do print(header[1]..'='..header[2]) end
Global Tables
The following non-iterable global tables are available for use by the
host_request_translation_function.
Table outgoing_request
The outgoing_request table contains the request that is to be sent to the
host.
outgoing_request.method- Description: HTTP request method.
- Type:
string - Example:
'GET','POST'
outgoing_request.body- Description: HTTP request body string.
- Type:
stringornil - Example:
'{"foo": "bar"}'
outgoing_request.major_version- Description: Major HTTP version such as
xinHTTP/x.1. - Type:
integer - Example:
1
- Description: Major HTTP version such as
outgoing_request.minor_version- Description: Minor HTTP version such as
xinHTTP/1.x. - Type:
integer - Example:
1
- Description: Minor HTTP version such as
outgoing_request.protocol- Description: Transfer protocol variant.
- Type:
string - Example:
'HTTP','HTTPS'
Table outgoing_request_headers
Contains the request headers from the request that is to be sent to the host, keyed by name.
Example:
print(outgoing_request_headers['X-Forwarded-For'])
Multiple values are separated with a comma.
Additional Data
In addition to the arguments above, the following Lua tables, documented in Global Lua Tables, provide additional data that is available when executing the request translation function:
7.6.1.5.6 - Response Translation Function
Specifies the body of a Lua function that inspects every outgoing HTTP response and overwrites individual fields before being sent to the client.
Returns nil when nothing is to be changed, or HTTPResponse(t) where t
is a table with any of the following optional fields:
Code- Description: Replaces status code in the response being sent.
- Type:
integer - Example:
200,404
Text- Description: Replaces status text in the response being sent.
- Type:
string - Example:
'OK','Not found'
MajorVersion- Description: Replaces major HTTP version such as
xinHTTP/x.1in the response being sent. - Type:
integer - Example:
1
- Description: Replaces major HTTP version such as
MinorVersion- Description: Replaces minor HTTP version such as
xinHTTP/1.xin the response being sent. - Type:
integer - Example:
1
- Description: Replaces minor HTTP version such as
Protocol- Description: Replaces protocol in the response being sent.
- Type:
string - Example:
'HTTP','HTTPS'
Body- Description: Replaces body in the response being sent.
- Type:
stringornil - Example:
'{"foo": "bar"}'
Headers- Description: Adds, removes or replaces individual headers in the response being sent.
- Type: nested
table(indexed by number) representing an array of response headers as{[1]='Name',[2]='Value'}pairs that are added to the response being sent, or overwriting existing response headers with colliding names. To remove a header from the response, specifynilas value, i.e.Headers={..., {[1]='foo',[2]=nil} ...}. Duplicate names are supported. A multi-value header such asFoo: bar1,bar2is defined by specifyingHeaders={..., {[1]='foo',[2]='bar1'}, {[1]='foo',[2]='bar2'}, ...}.
OutgoingRequest: See Sending HTTP requests from translation functions for more information.
Example of a response_translation_function body that sets the Location
header to a hardcoded value:
-- Statements go here
print('Setting hardcoded Location')
return HTTPResponse({
Headers = {
{'Location', 'cdn1.com/content.mpd?a=b'}
}
})
Arguments
The following (iterable) arguments will be known by the function:
Headers
Type: nested
table(indexed by number).Description: Array of response headers as
{[1]='Name',[2]='Value'}pairs that are present in the response being sent. Format similar to theHTTPResponse.Headersfield specified for the return value above. A multi-value header such asFoo: bar1,bar2will not be split up as multiple headers. It will appear inresponse_translation_functionasHeaders={..., {[1]='foo',[2]='bar1,bar2'}, ...}.Example usage:
for _, header in pairs(Headers) do print(header[1]..'='..header[2]) end
Additional Data
In addition to the arguments above, the following Lua tables, documented in Global Lua Tables, provide additional data that is available when executing the response translation function:
7.6.1.5.7 - Sending HTTP requests from translation functions
It is possible to configure all translation functions to send HTTP requests. If an outgoing request is sent in a translation function, the Director will delay the response to the incoming request until the outgoing request has been completed. Note that the response to the outgoing request is not handled by the Director, it only waits for the outgoing request to complete.
Requests can be sent from any translation function by defining the table
OutgoingRequest in the translation function return value:
{
OutgoingRequest = {
Method = "HEAD",
Protocol = "HTTP",
Host = "example.com",
Port = 8080,
Path = "/example/path",
EncodeURL = true,
QueryParameters = {{"param1", "value1"}, {"param2", "value2"}},
Headers = {{"x-header", "header-value"}, {"Authorization", "Basic dXNlcjpwYXNz"}}
}
}
The following fields for OutgoingRequest are supported:
Method: The HTTP method to use. Defaults toHEAD.Protocol: The protocol to use. Defaults to the protocol of the incoming request.Host: The host to send the request to.Port: The port to send the request to. Defaults to 80 ifProtocolisHTTPand 443 ifProtocolisHTTPS.Path: The path to send the request to. Defaults to/.EncodeURL: A boolean value that determines if the URL should be percent-encoded. Defaults totrue. WARNING: Not encoding the URL is not HTTP compliant and might cause issues with some servers. Use with caution. See RFC 1738 for more information.QueryParameters: A list of query parameters to include in the request. Note that the query parameters are defined as two-element lists in Lua.Headers: A Lua table of headers to include in the request. Note that if the header name contains a dash-, it must be defined as a two-element list as seen in the example above.Body: A string containing the body of the request. If this field is not defined, no body will be included in the request. If it is defined, theContent-Lengthheader, with the length of the body, will be added to the request.
All fields except Host are optional.
Using the example above, the following
response translation function
will make the Director send a GET request to
http://example.com:8080/example/path?param1=value1¶m2=value2 with the
headers x-header: x-value and Authorization: Basic dXNlcjpwYXNz:
return HTTPResponse({
OutgoingRequest = {
Method = "GET",
Protocol = "HTTP",
Host = "example.com",
Port = 8080,
Path = "/example/path",
QueryParameters = {{"param1", "value1"}, {"param2", "value2"}},
Headers = {{"x-header", "x-value"}, {"Authorization", "Basic dXNlcjpwYXNz"}}
}
})
Using log level 4, the outgoing request can be seen in the Director logs:
DEBUG orc-re-work-0 AsyncRequestSender: Sending request: url=http://example.com/example/path?param1=value1¶m2=value2
DEBUG orc-re-work-0 CDNManager: OutboundContentConn: example.com:8080: Connecting to target CDN example.com:8080
DEBUG orc-re-work-0 ClientConn: 192.168.103.16/28:60201/https: Sent a Lua request: outstanding-requests=1
DEBUG orc-re-work-0 CDNManager: OutboundContentConn: example.com:8080: Target CDN connection established.
DEBUG orc-re-work-0 CDNManager: OutboundContentConn: example.com:8080: Sending request to target CDN:
GET /example/path?param1=value1¶m2=value2 HTTP/1.0
Authorization: Basic dXNlcjpwYXNz
Host: example.com:8080
x-header: x-value
7.6.2 - WebUI Configuration
The web-based user interface can be used to configure many common use cases for the CDN Director.
Normally the GUI is accessible from the CDN Manager at an address like
https://cdn-manager/gui/. After navigating to the UI, a login screen will be
presented:

Enter your credentials and log in.
Once logged in, the middle of the screen will present a few sections. Depending on your user’s permissions and licensed features, different options will be made available.
In the general case, two options will be presented:
- CDN Director
- Configuration Panel
At the top right corner is a user menu with an option to log out.
The left-hand side of the page shows a collapsible menu with a few icons:
 filters the menu options
 used to return to the landing page
 link to the
Director Routing rule configuration view
link to the
Director Routing rule configuration view link
to the Director configuration panel view
link
to the Director configuration panel view
CDN Director Routing
This view provides a graphical tree-based model for configuring how the Director should classify and route incoming content requests.
Menu Options
After navigating to the CDN Director Routing page, the left side will show a list of routing rule block types and host group variants. The user can drag and drop items from this list onto the main canvas in order to design a routing solution.

The Search component input field at the top can be used to search and filter
among the available components. Clicking the question mark next to a component
shows a description popup.

Title Bar
Above the main canvas is the title bar. On the left side is the name of the currently selected routing configuration and its creation date:

To the right are a series of buttons, from left to right:

Creates a grouping rectangle on the canvas. Any routing rules placed on this rectangle can be moved around together, making it easier to construct logical units. This is only a visual and practical effect, it doesn’t in any way change the generated configuration.

Opens a popup menu on the right-hand side of the canvas where various configuration options can be changed. A list of CDN Director instances to apply the configuration to can be found and modified here, as well as the general look and feel of the GUI.

Opens a display of the configuration JSON generated from the graphical representation and allows for editing the text directly. Any changes made will automatically be loaded into the graphical representation.

Automatically arranges all the blocks in the canvas, hopefully making it less messy. Routing decision flow begins from the top left and moves rightwards.

Pushes the currently active configuration onto all the configured CDN Director instances. Changes take effect immediately assuming they do not contain any errors and the GUI will display a dialog with the update results.

Saves the configuration to the listed CDN Director targets, with a name provided by the user. Previously saved configurations can be accessed by clicking the house icon next to the configuration title at the middle top of the canvas.
Note that merely saving a configuration does not make it take effect, it is just for making backups or alternative configurations.
To make a configuration take effect, you have to
Publishit.
Saved Configurations
Clicking the  icon in the title bar
navigates to the saved configurations section.
icon in the title bar
navigates to the saved configurations section.
The upper part of this section is a template list allowing the user to either start a new configuration from scratch by selecting “New configuration” or start from a skeleton configuration by selecting one of the available template tiles.
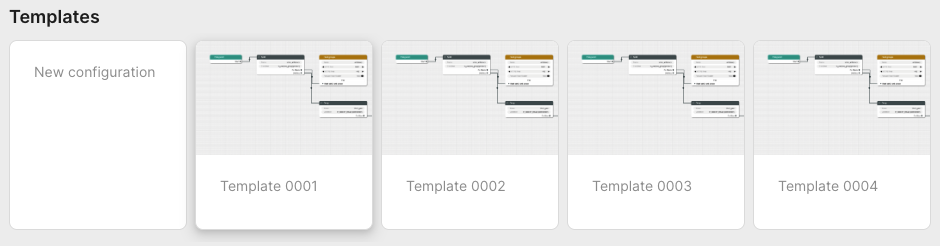
The lower part contains all stored configurations. First in the list is always the currently published configuration, followed by any user-created configurations that have been saved.
Each entry in the list contain information about its name, who created it and when it was last saved. Next to each saved configuration is a trash can button used to delete it.

Configuration Options
Clicking the icon opens a
panel with configuration options and settings on the right-hand side of the
screen. This panel has the two tabs Configurations and Style.
Configuration
The configuration tab allows the user to manage the CDN Director instances that are to be configured by the GUI.
Whenever a user pushes either Publish or Save version, the configuration
will be sent to routers configured in this list.

Each entry has a name, an address and a radio button to disable publication to specific instances that are e.g. taken out for maintenance. Turning a Director off won’t affect the current running status of that instance, it will only disable pushing any new configuration to it.
As seen above, the address can be either a full URL with scheme, hostname, port
and path such as http://router1.example.com:5000/config or a relative path
used e.g. to push configurations through an CDN Manager node:
/confd/router1/config.
Style Options
This pane contains various settings for the look and feel of the routing configuration view. The user can change line width and stroke type as well as colors associated with different node types.
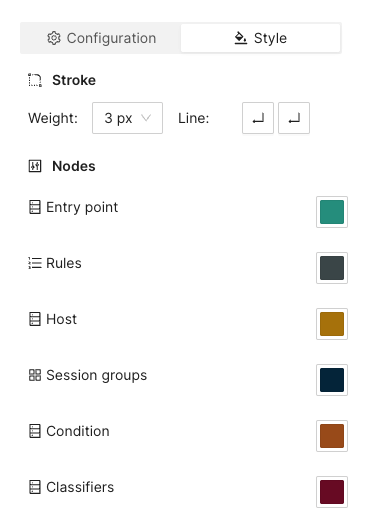
Arrange Button
This button will automatically arrange the routing nodes in the canvas, trying to make the connections easier to follow.
Imagine a user has designed the routing flow organically, placing components anywhere on the screen as their need arose. This can make it difficult to get an overview.

Clicking the Arrange button makes the GUI suggest a more structured
arrangement:

Save Version Button
Sometimes it can be useful to save a copy of a configuration, either because you need to try an entirely different design, or because you want to store a working setup before tweaking it to make sure you can revert to a working state in case anything goes wrong.
Clicking the Save version button opens a dialog box allowing you to pick a
name and save the currently displayed configuration to all the linked CDN
Director instances without activating it.


Going back to the saved configurations list, the new entry has appeared:

Publish Button
Clicking the Publish button sends the currently displayed configuration to be
sent to all enabled CDN Director instances. If it contains a complete and valid
configuration the Directors will then apply any changes.
A dialog box will display the publish status for each configured Director:

Configuration Panel
The configuration panel view allows for configuring routing-adjacent features, such as blocked/allowed referral addresses, blocked/allowed user agent strings or CDN host capacity values.

At the moment there are two supported configurations: Blocked tokens and blocked referrers.
Tokens
Selecting Tokens allows the user to observe and edit a list of currently
blocked tokens:

Several actions are available at this point:

Add a new token string to be blocked, along with a corresponding time-to-live (TTL) value in seconds.

A newly added token will automatically be removed after TTL seconds, to avoid filling up the database with outdated or stale values.

In order to avoid performance hits when there are many tokens, nothing is shown in this list until a search string is entered manually by the operator. This is because a token is added to the list every time a valid token request is made and the database can grow to millions of entries.
At least three characters must be entered for searching to begin. A maximum of 100 results are shown. Write more specific search strings to filter out irrelevant token entries.
Note that token-reuse blocking depends on there being a Routing node, e.g. a
Denyblock, with a suitable condition function that performs the token extraction and blocking.
Referrers
This section allows for blocking specific referrer addresses. Unlike the token list, this table will display entries immediately since it is not anticipated to contain nearly as many entries.
Like with the token list, at most 100 entries are shown at a time. Use the search box to find the relevant referrers if the list is full.

Clicking the button will open a window to add a new referrer string to the block list. Clicking the ‘X’ closes the window without adding a new entry.

The search box filters which already-added referrer strings are displayed in the list. At least three characters must be written for filtering to begin, and regardless of how many matching results there are, only 100 will be displayed in the list so it is recommended to be as specific as necessary when searching.

Clicking the trash can next to a referrer removes it from the list of blocked referrers.
Example Routing Configuration
The following text will describe how to set up a simple routing system that has an internal CDN with two streaming servers and one external CDN.
The internal CDN is meant for serving live TV with low latency as well as VOD traffic provided there is enough capacity left without overloading the servers and affect live traffic latency.
In order to demonstrate the Director’s traffic filtering capability the setup will also send any mobile traffic from outside of Stockholm, Sweden to the external CDN.
Finally, a load balancing node is added to split the remaining incoming requests equally between the two internal hosts.
In summary, the configuration will:
- Route off-net traffic from mobile phones to the external CDN.
- Route Live traffic to the external CDN if the internal CDN is overloaded.
- Route any remaining traffic to the internal CDN.
Step-by-Step Walkthrough
When creating a new configuration the only thing that exists is an Entrypoint
node. This node is used to indicate where the routing engine should begin
traversing the routing tree for a new incoming request.
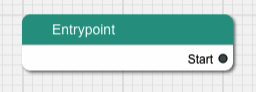
Begin by dragging a Split node onto the canvas and connect it to the
Entrypoint.

A Split node splits the incoming traffic into two separate streams based on
a condition. The default condition is a function called always() that
evaulates as true for any request. This is not very useful for this example,
replace it by clicking on the Condition input field in the node.
This brings us to a dialog box where we can simply replace the condition with
another string or go to a graphical representation of the condition to help
guide us through the steps to getting the Split node to do what we need.

Graphical Condition Builder
Clicking the Graphical View button opens up the graphical representation which
currently shows two condition nodes connected together, one representing the
default condition always() previously mentioned, and one called Condition Output which is a target placeholder for the end result of the entire graph.
Output from one condition node is connected to the input of another node until
the entire chain ends up with the Condition Output node.
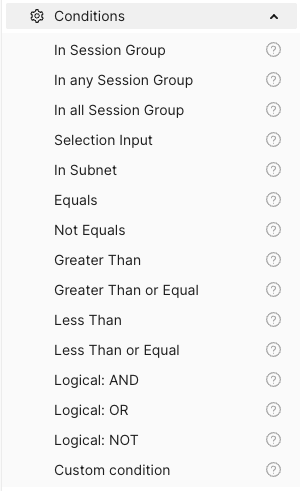


On the left-hand side is a menu with the items Session Groups, Conditions
and Classifiers. The Conditions section contains different condition
components whose outputs can be connected to either other condition nodes or
the Condition Output.

Delete the Always node and replace it with one from the Conditions menu,
specifically In Session Group, and connect its output to Condition Output.
The new condition node takes a Session Group as its input. Drag one of those
from the menu onto the canvas and connect its output to the input labeled
“Session Group”. Give the Session Group node the name “mobile-off-net” since
it is going to contain requests from mobile units outside of the main network.
The Session Group takes a number of classifiers as inputs. Open the
Classifiers section of the menu and drag a Geo IP and a User Agent node
onto the canvas and connect their outputs to the Session Group. Note that
when one classifier is connected, the connection label is updated with its name
and a new empty connection slot is added.

Fill in the two classifier nodes with appropriate values:
Give the Geo IP node the name “off-net”, set Continent to “Europe”,
Country to “Sweden” and City to “Stockholm”. Finally, change the Inverted
toggle to true since we want this condition to match any traffic that comes
from anywhere but Stockholm.
The User Agent node is meant to match mobile devices, but for simplicity’s
sake this classifier is limited to Apple devices for this example. Set the name
to “mobile”, make sure Pattern Type is “stringMatch” and set the pattern to
“apple”. The asterisks will match against any strings at the beginning and end
of the user agent string, and “apple” is case insensitive.
The resulting graph should look like this:
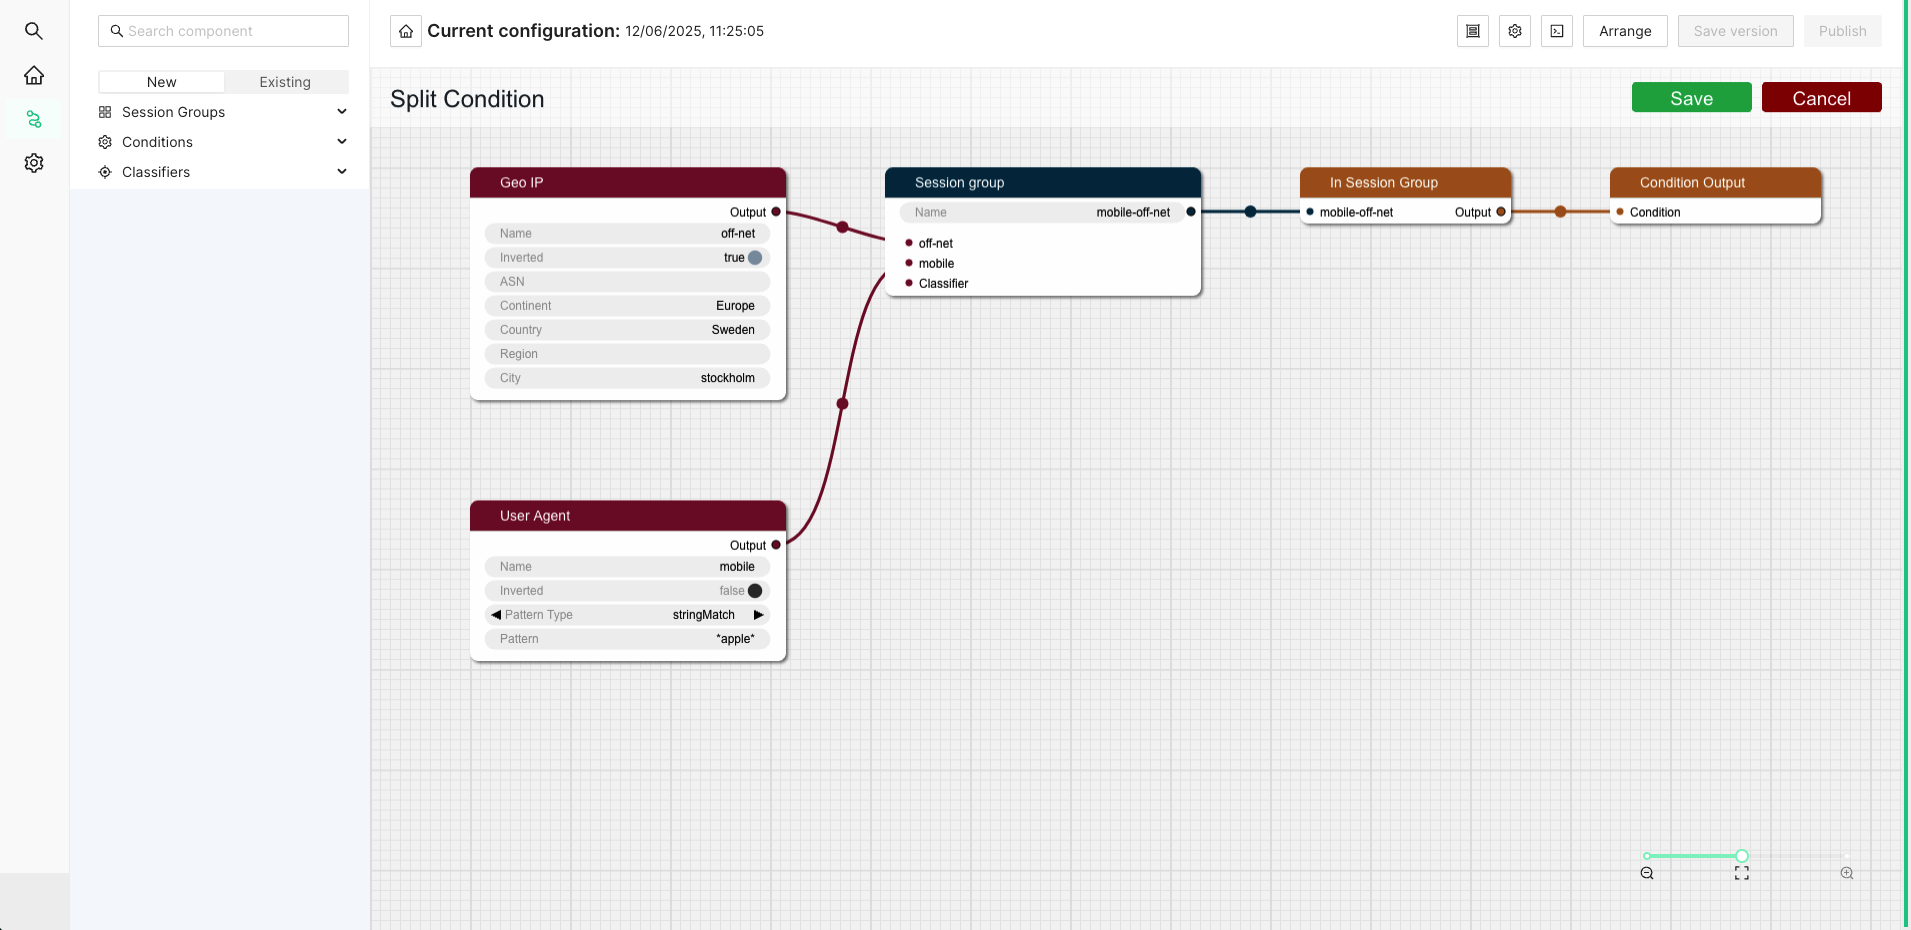
Click Save to return to the routing tree configuration view. Note that
"always()" has been replaced with "in_session_group('mobile-off-net')".
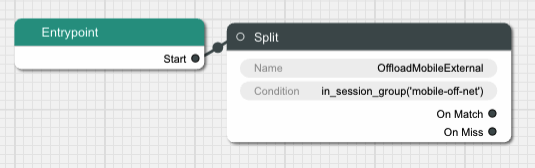
It is time to add a node for the external CDN. Open up the Hosts section in
the left-hand side menu if it is closed. Then drag a Host node onto the
canvas and name it “OffloadCDN”.
This creates a host group which contains hosts which belong together and share common settings such as ports.

Click the Edit button to open a dialog where the actual hosts can be added to
the host group by clicking the icon with a new document on it. Add a host with
the name “offload-host-1” and address “offload-1.example.com”. The IPv6 address field can be left empty.
Click Save to return to the canvas view and connect the Split node’s
onMatch slot to the newly created host. Now any request that matches the
condition we added to the Split node will be sent to the external host.

The next step is to add an offload in case the internal CDN is overloaded. Add
another Split node, call it “LiveOffload” and connect it to the previous
Split node’s onMiss slot. We will use a Selection Input
value named "live_bandwidth_left" to determine whether or not the internal CDN
is overloaded.
Click the Condition field and bring up the graphical view. Remove the
default Always node and replace it with a Less Than node. Set its Selection Input string to “live_bandwidth_left” and the Value to 100 in order to send
traffic to the offload CDN whenever the internal CDN reports less than 100
capacity left.
Save the condition and connect the Split node’s onMatch output to the
“offload-host-1” Host.

In order to balance the incoming Live traffic between the two internal CDN nodes
we create a Random node, which simply splits the traffic equally among its
targets.
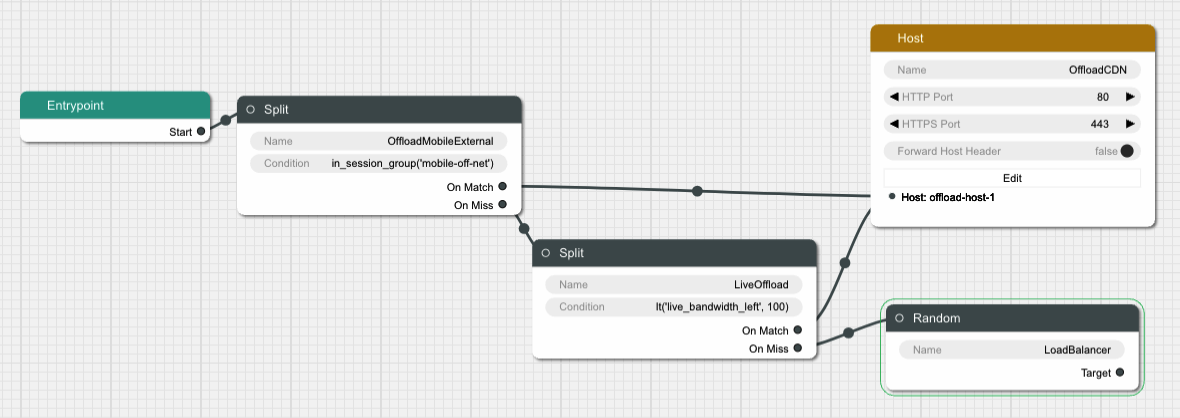
Finally we create another Host node and give it two hosts called
“private-host-1” and “private-host-2”. Connect the Random node to the two
hosts and the routing configuration is finished.

7.6.3 - OLD WebUI Configuration
The web based user interface is installed as a separate component and can be used to configure many common use cases. After navigating to the UI, a login screen will be presented.
Enter your credentials and log in. In the top left corner is a menu to select what section of the configuration to change. The configuration that will be active on the router is added in the Routing Workflow view. However, basic elements such as classification rules and routing targets, etc must be added first. Hence the following main steps are required to produce a proper configuration:
- Create classifiers serving as basic elements to create session groups.
- Create session groups which, using the classifiers, tag requests/clients for later use in the routing logic. of the incoming traffic.
- Define offload rules.
- Define rules to control behavior of internal traffic.
- Define backup rules to be used if the routing targets in the above step are unavailable.
- Finally, create the desired routing workflow using the elements defined in the previous steps.
A simplified concrete example of the above steps could be:
- Create two classifiers “smartphone” and “off-net”.
- Create a session group “mobile off-net”.
- Offload off-net traffic from mobile phones to a public CDN.
- Route other traffic to a private CDN.
- If the private CDN has an outage, use the public CDN for all traffic.
Hence, to start with, define the classifiers you will need. Those are based on information in the incoming request, optionally in combination with GeoIP databases or subnet information configured via the Subnet API. Here we show how to set up a GeoIP classifier. Note that the Director ships with a compatible snapshot of the GeoIP database, but for a production system a licensed and updated database is required.

Click the plus sign indicated in the picture above to create a new GeoIP classifier. You will be presented with the following view:

Here you can enter the geographical data on which to match, or check the “Inverted” check box to match anything except the entered geographical data.
The other kinds of classifiers are configured in a similar way.
After having added all the classifiers you need, it is time to create the session groups. Those are named filters that group incoming requests, typically video playback sessions in a video streaming CDN, and are defined with the help of the classifiers. For example, a session group “off-net mobile devices” could be composed of the classifiers “off-net traffic” and “mobile devices”.
Open the Session Groups view from the menu and hit the plus sign to add a new session group.
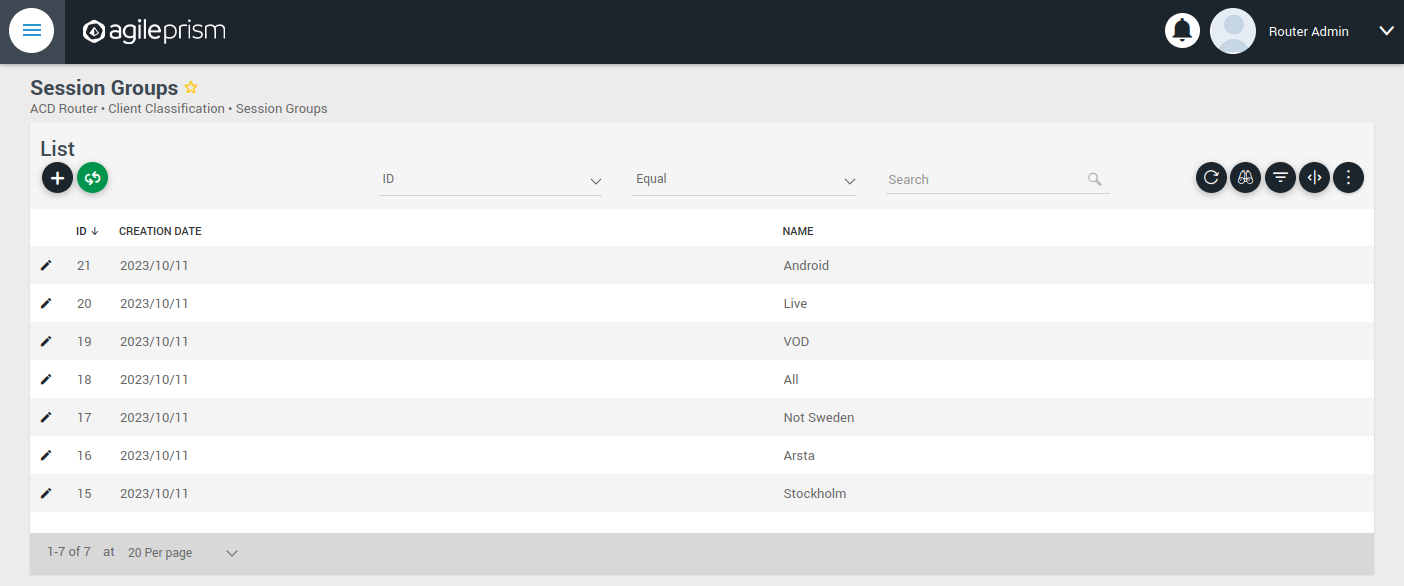

Define the new sessions groups by combining the previously created classifiers. It is often convenient to define an “All” session group that matches any incoming request.
Next go the “CDN Offload” view:

Here you define conditions for CDN offload. Each row defines a rule for offloading a specified session group. The rule makes use of the Selection Input API. This is an integration API that provides a way to supply additional data for use in the routing decision. Common examples are current bitrates or availability status. The selection input variables to use must be defined in the “Selection Input Types” view in the “Administration” section of the menu:

Reach out to the solution engineers from AgileTV in order to perform this integration in the best way. If no external data is required, such that the offload rule can be based solely based on session groups, this is not necessary and the condition field can be set to “Always” or “Disabled”.
When clicking the plus sign to add a new CDN Offload rule, the following view is presented:

The selection input rule is phrased in terms of a variable being above or below a threshold, but also a state such as “available” taking values 0 or 1 can be supported by for instance checking if “available” is below 1.
Moving on, if an incoming request is not offloaded, it will be handled by the Primary CDN section of the routing configuration.
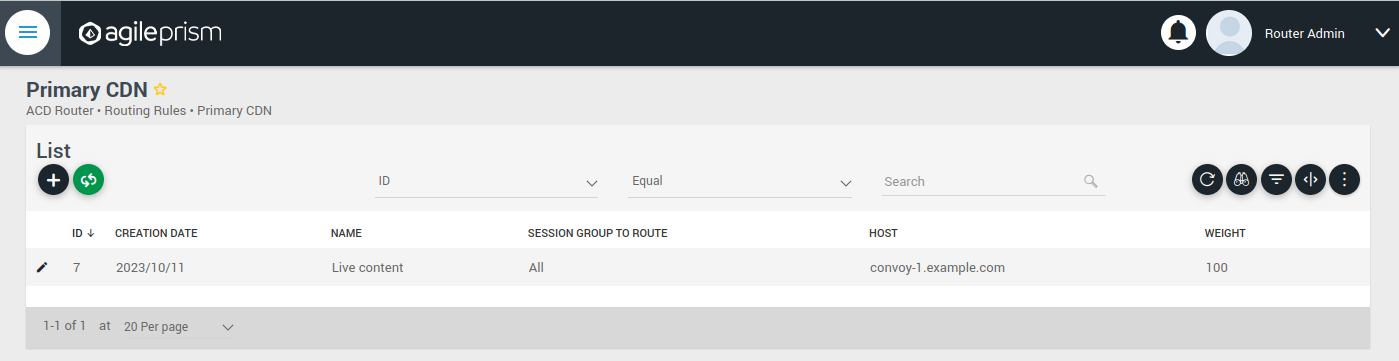
Add all hosts in your primary CDN, together with a weight. A row in this table will be selected by random weighted load balancing. If each weight is the same, each row will be selected with the same probability. Another example would be three rows with weights 100, 100 and 200 which would randomly balance 50% of the load on the last row and the remaining load on the first two rows, i.e. 25% on each of the first and second row. If a Primary CDN host is unavailable, that host will not take part in the random selection.
If all hosts are unavailable, as a final resort the routing evaluation will go to the final Backup CDN step:
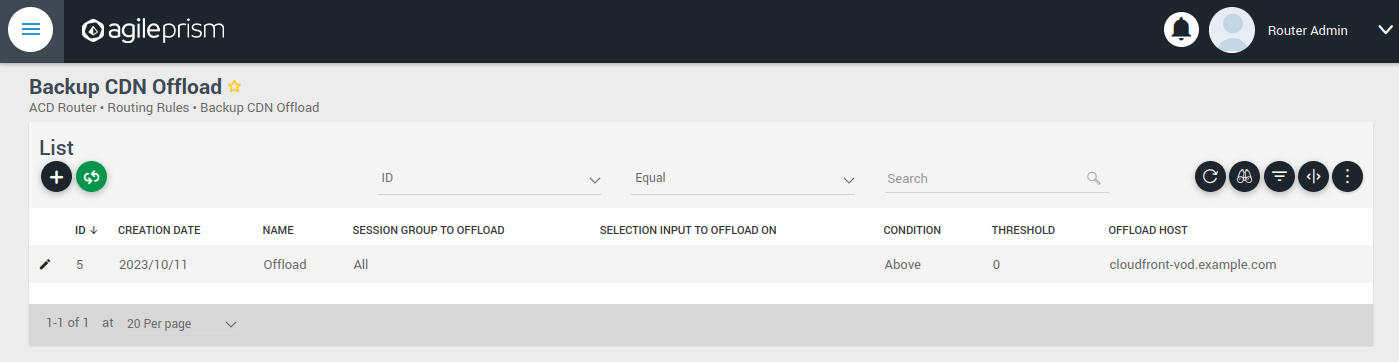
Here you can define what to do when all else fail. If not all requests are covered, for example with an “All” session group, then the request will fail with 403 Forbidden.
Now you have defined the basic elements and it is time to define the routing workflow. Select “Routing Workflow” from the menu, as pictured below. Here you can combine the elements previously created to achieve the desired routing behavior.
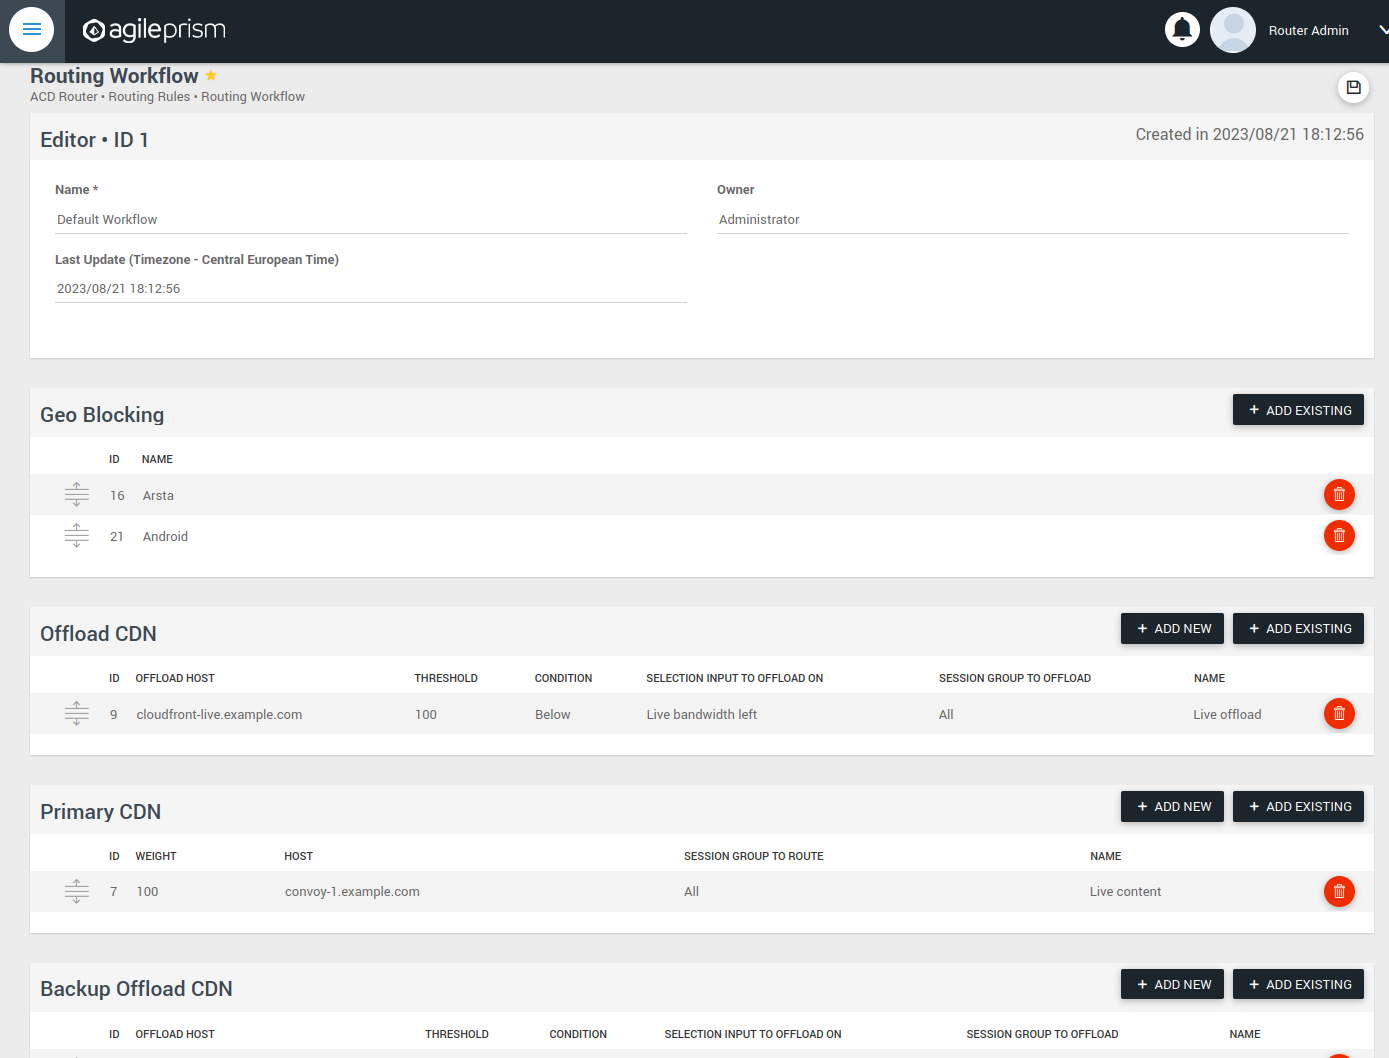
When everything seems correct, open the “Publish Routing” view from the menu:

Hit “Publish All Changes” and verify that you get a successful result.
7.6.4 - Confcli
confcli command line toolConfiguring the CDN Director can be complex. The command-line tool confcli
simplifies this by dividing the configuration into smaller parts that can be
defined incrementally.
Installation and Usage
The confcli tool is installed with the CDN Director. Simply type confcli in
a shell on the host to see the current routing configuration:
$ confcli
{
"services": {
"routing": {
"settings": {
"trustedProxies": [],
"contentPopularity": {
"algorithm": "score_based",
"sessionGroupNames": []
},
"extendedContentIdentifier": {
"enabled": false,
"includedQueryParams": []
},
"instream": {
"dashManifestRewrite": {
"enabled": false,
"sessionGroupNames": []
},
"hlsManifestRewrite": {
"enabled": false,
"sessionGroupNames": []
},
"reversedFilenameComparison": false
},
"usageLog": {
"enabled": false,
"logInterval": 3600000
}
},
"tuning": {
"content": {
"cacheSizeFullManifests": 1000,
"cacheSizeLightManifests": 10000,
"lightCacheTimeMilliseconds": 86400000,
"liveCacheTimeMilliseconds": 100,
"vodCacheTimeMilliseconds": 10000
},
"general": {
"accessLog": false,
"coutFlushRateMilliseconds": 1000,
"cpuLoadWindowSize": 10,
"eagerCdnSwitching": false,
"httpPipeliningEnable": false,
"logLevel": 3,
"maxConnectionsPerHost": 5,
"overloadThreshold": 32,
"readyThreshold": 8,
"redirectingCdnManifestDownloadRetries": 2,
"repeatedSessionStartThresholdSeconds": 30,
"selectionInputMetricsTimeoutSeconds": 30
},
"session": {
"idleDeactivateTimeoutMilliseconds": 20000,
"idleDeleteTimeoutMilliseconds": 1800000
},
"target": {
"responseTimeoutSeconds": 5,
"retryConnectTimeoutSeconds": 2,
"retryResponseTimeoutSeconds": 2,
"connectTimeoutSeconds": 5,
"maxIdleTimeSeconds": 30,
"requestAttempts": 3
}
},
"sessionGroups": [],
"classifiers": [],
"hostGroups": [],
"rules": [],
"entrypoint": "",
"applyConfig": true
}
}
}
The CLI tool can be used to modify, add and delete values by providing it with
the “path” to the object to change. The path is constructed by joining the field
names leading up to the value with a period between each name, e.g. the path to
the entrypoint is services.routing.entrypoint since entrypoint is nested
under the routing object, which in turn is under the services root object.
Lists use an index number in place of a field name, where 0 indicates the very
first element in the list, 1 the second element and so on.
If the list contains objects which have a field with the name name, the
index number can be replaced by the unique name of the object of interest.
Tab completion is supported by confcli. Pressing tab once will complete as far as possible, and pressing tab twice will list all available alternatives at the path constructed so far.
Display the values at a specific path:
$ confcli services.routing.hostGroups
{
"hostGroups": [
{
"name": "internal",
"type": "redirecting",
"httpPort": 80,
"httpsPort": 443,
"headersToForward": [
""
],
"queryPassThrough": {
"policy": "accept",
"exceptions": []
},
"allowAnyRedirectType": false,
"hosts": [
{
"name": "rr1",
"hostname": "rr1.example.com",
"ipv6_address": "",
"healthChecks": [
"always()"
]
}
]
},
{
"name": "external",
"type": "host",
"httpPort": 80,
"httpsPort": 443,
"headersToForward": [
""
],
"queryPassThrough": {
"policy": "accept",
"exceptions": []
},
"createStreamerSession": false,
"addUrlPrefix": false,
"hosts": [
{
"name": "offload-streamer1",
"hostname": "streamer1.example.com",
"ipv6_address": "",
"healthChecks": [
"always()"
]
},
{
"name": "offload-streamer2",
"hostname": "streamer2.example.com",
"ipv6_address": "",
"healthChecks": [
"always()"
]
}
]
}
]
}
Display the values in a specific list index:
$ confcli services.routing.hostGroups.1
{
"1": {
"name": "external",
"type": "host",
"httpPort": 80,
"httpsPort": 443,
"headersToForward": [
""
],
"queryPassThrough": {
"policy": "accept",
"exceptions": []
},
"createStreamerSession": false,
"addUrlPrefix": false,
"hosts": [
{
"name": "offload-streamer1",
"hostname": "streamer1.example.com",
"ipv6_address": "",
"healthChecks": [
"always()"
]
},
{
"name": "offload-streamer2",
"hostname": "streamer2.example.com",
"ipv6_address": "",
"healthChecks": [
"always()"
]
}
]
}
}
Display the values in a specific list index using the object’s name:
$ confcli services.routing.hostGroups.1.hosts.offload-streamer2
{
"offload-streamer2": {
"name": "offload-streamer2",
"hostname": "streamer2.example.com",
"ipv6_address": "",
"healthChecks": [
"always()"
]
}
}
Modify a single value:
confcli services.routing.hostGroups.1.hosts.offload-streamer2.hostname new-streamer.example.com
services.routing.hostGroups.1.hosts.offload-streamer2.hostname = 'new-streamer.example.com'
Delete an entry:
$ confcli services.routing.sessionGroups.Apple.classifiers.
{
"classifiers": [
"Apple",
""
]
}
$ confcli services.routing.sessionGroups.Apple.classifiers.1 -d
http://localhost:5000/config/__active/services/routing/sessionGroups/Apple/classifiers/1 reset to default/deleted
$ confcli services.routing.sessionGroups.Apple.classifiers.
{
"classifiers": [
"Apple"
]
}
Adding new values in objects and lists is done using a wizard by invoking
confcli with a path and the -w argument. This will be shown extensively in
the examples further down in this document rather than here.
If you have a JSON file with a previously generated confcli configuration
output it can be applied to a system by typing confcli -i <file path>.
7.6.5 - CDNs and Hosts
In order to route requests, the ACD Director needs to be configured with hosts
that can serve them. Hosts are grouped in host groups, where each group
contains hosts that share some common settings. There are three types of host
groups: host, redirecting and DNS:
host: Content is served directly. An example of a such a host is the ESB3004 SW Streamer.redirecting: These hosts are themselves CDN selectors. The Director expects a redirecting CDN to respond with a redirection URL which tells where the content can be found. A typical redirecting CDN is the ESB3008 HTTP Request Router.DNS: These hosts are EDNS servers. The ACD Director sends DNS requests to these hosts and expects them to respond with an IP address where the content can be found.
Each host group contains a list of hosts. In addition to that, the host groups have different parameters depending on their type.
Common host group parameters
These parameters are present in all host groups:
name: The name of the host group. This is used to reference the host group from other parts of the configuration.type: The type of the host group as listed above.headersToForward: A list of HTTP headers to forward from the client to the CDN. This is useful if the CDN needs to know about the originalHostheader or any custom headers added by the client or an upstream proxy. If the incoming request contains anX-Forwarded-Forheader, that header will be forwarded to the CDN even if it is not listed.queryPassThrough: Controls which query parameters from the client request are forwarded to the backend and included in the redirection URL. It has two fields:policy:accept(default) ordeny.acceptforwards all query parameters except those listed inexceptions.denyblocks all query parameters except those listed inexceptions.exceptions: A list of query parameter names to exclude from the policy.
hosts: A list of hosts in this host group. The configuration of hosts is detailed in Hosts below.
Parameters shared by host and redirecting host groups
These parameters are only present in host and redirecting host groups:
httpPort: The port to use when sending HTTP requests to the hosts in this group.httpsPort: The port to use when sending HTTPS requests to the hosts in this group.
host group parameters
These parameters are only present in host host groups:
createStreamerSession: AgileTV streamers require a session to be allocated when redirecting to them. Setting this parameter to true tells the Director to create such a session when redirecting to hosts in this group.addUrlPrefix: Enables adding a URL prefix to requests that are redirected to hosts in this group. See URL Prefixes for more information.
redirecting group parameters
These parameters are only present in redirecting host groups:
allowAnyRedirectType: The ACD Director expects redirecting CDNs to redirect with response code 302. Setting this parameter to true allows the Director to accept any 3xx response code as a redirection URL.
Hosts
The hosts parameter is the same in all host groups. It contains a list of
hosts, each with the following parameters:
name: The name of the host. This is used to reference the host from other parts of the configuration.hostname: The hostname of the host. This is where requests are sent. It can be an IPv4 address or a domain name.ipv6_address: The IPv6 address of the host. This is used when the Director needs to send requests to the host over IPv6. If this parameter is not set, the Director will use thehostnameparameter for both IPv4 and IPv6 requests.healthChecks: A list of Lua functions to determine if the host is healthy and can be selected for routing. If any of the health check functions returnsfalse, the host will be considered unhealthy and will not be selected for routing. All health check functions are detailed in the section Built-in Lua functions.
Configuration examples
Below are some examples on how different types of host groups with hosts can be configured.
$ confcli services.routing.hostGroups -w
Running wizard for resource 'hostGroups'
Hint: Hitting return will set a value to its default.
Enter '?' to receive the help string
hostGroups : [
hostGroup can be one of
1: dns
2: host
3: redirecting
Choose element index or name: host
Adding a 'host' element
hostGroup : {
name (default: ): streamers
type (default: host): ⏎
httpPort (default: 80): ⏎
httpsPort (default: 443): ⏎
headersToForward <A list of HTTP headers to forward to the CDN. (default: [])>: [
headersToForward (default: ): ⏎
Add another 'headersToForward' element to array 'headersToForward'? [y/N]: ⏎
]
queryPassThrough <Controls which query parameters from the client request are forwarded to the backend and included in the redirection URL. (default: OrderedDict())>: {
policy (default: accept): ⏎
exceptions <Query parameters excluded from the policy. When policy is 'accept', these are blocked. When policy is 'deny', these are forwarded. (default: [])>: [
exceptions (default: ): ⏎
Add another 'exceptions' element to array 'exceptions'? [y/N]: ⏎
]
}
createStreamerSession (default: False): True
addUrlPrefix (default: False): ⏎
hosts : [
host : {
name (default: ): streamer1
hostname (default: ): streamer1.example.com
ipv6_address (default: ): ⏎
healthChecks : [
healthCheck (default: always()): health_check()
Add another 'healthCheck' element to array 'healthChecks'? [y/N]: n
]
}
Add another 'host' element to array 'hosts'? [y/N]: y
host : {
name (default: ): streamer2
hostname (default: ): streamer2.example.com
ipv6_address (default: ): ⏎
healthChecks : [
healthCheck (default: always()): ⏎
Add another 'healthCheck' element to array 'healthChecks'? [y/N]: n
]
}
Add another 'host' element to array 'hosts'? [y/N]: ⏎
]
}
Add another 'hostGroup' element to array 'hostGroups'? [y/N]: ⏎
]
Generated config:
{
"hostGroups": [
{
"name": "streamers",
"type": "host",
"httpPort": 80,
"httpsPort": 443,
"headersToForward": [
""
],
"queryPassThrough": {
"policy": "accept",
"exceptions": [
""
]
},
"createStreamerSession": true,
"addUrlPrefix": false,
"hosts": [
{
"name": "streamer1",
"hostname": "streamer1.example.com",
"ipv6_address": "",
"healthChecks": [
"health_check()"
]
},
{
"name": "streamer2",
"hostname": "streamer2.example.com",
"ipv6_address": "",
"healthChecks": [
"always()"
]
}
]
}
]
}
Merge and apply the config? [y/n]: y
$ confcli services.routing.hostGroups -w
Running wizard for resource 'hostGroups'
Hint: Hitting return will set a value to its default.
Enter '?' to receive the help string
hostGroups : [
hostGroup can be one of
1: dns
2: host
3: redirecting
Choose element index or name: redirecting
Adding a 'redirecting' element
hostGroup : {
name (default: ): edgeware
type (default: redirecting): ⏎
httpPort (default: 80): ⏎
httpsPort (default: 443): ⏎
headersToForward <A list of HTTP headers to forward to the CDN. (default: [])>: [
headersToForward (default: ): ⏎
Add another 'headersToForward' element to array 'headersToForward'? [y/N]: ⏎
]
queryPassThrough <Controls which query parameters from the client request are forwarded to the backend and included in the redirection URL. (default: OrderedDict())>: {
policy (default: accept): ⏎
exceptions <Query parameters excluded from the policy. When policy is 'accept', these are blocked. When policy is 'deny', these are forwarded. (default: [])>: [
exceptions (default: ): ⏎
Add another 'exceptions' element to array 'exceptions'? [y/N]: ⏎
]
}
allowAnyRedirectType (default: False): ⏎
hosts : [
host : {
name (default: ): rr1
hostname (default: ): convoy-rr1.example.com
ipv6_address (default: ): ⏎
healthChecks : [
healthCheck (default: always()): health_check()
Add another 'healthCheck' element to array 'healthChecks'? [y/N]: n
]
}
Add another 'host' element to array 'hosts'? [y/N]: y
host : {
name (default: ): rr2
hostname (default: ): convoy-rr2.example.com
ipv6_address (default: ): ⏎
healthChecks : [
healthCheck (default: always()): ⏎
Add another 'healthCheck' element to array 'healthChecks'? [y/N]: n
]
}
Add another 'host' element to array 'hosts'? [y/N]: ⏎
]
}
Add another 'hostGroup' element to array 'hostGroups'? [y/N]: ⏎
]
Generated config:
{
"hostGroups": [
{
"name": "edgeware",
"type": "redirecting",
"httpPort": 80,
"httpsPort": 443,
"headersToForward": [
""
],
"queryPassThrough": {
"policy": "accept",
"exceptions": [
""
]
},
"allowAnyRedirectType": false,
"hosts": [
{
"name": "rr1",
"hostname": "convoy-rr1.example.com",
"ipv6_address": "",
"healthChecks": [
"health_check()"
]
},
{
"name": "rr2",
"hostname": "convoy-rr2.example.com",
"ipv6_address": "",
"healthChecks": [
"always()"
]
}
]
}
]
}
Merge and apply the config? [y/n]: y
$ confcli services.routing.hostGroups -w
Running wizard for resource 'hostGroups'
Hint: Hitting return will set a value to its default.
Enter '?' to receive the help string
hostGroups : [
hostGroup can be one of
1: dns
2: host
3: redirecting
Choose element index or name: dns
Adding a 'dns' element
hostGroup : {
name (default: ): external-dns
type (default: dns): ⏎
headersToForward <A list of HTTP headers to forward to the CDN. (default: [])>: [
headersToForward (default: ): ⏎
Add another 'headersToForward' element to array 'headersToForward'? [y/N]: n
]
queryPassThrough <Controls which query parameters from the client request are forwarded to the backend and included in the redirection URL. (default: OrderedDict())>: {
policy (default: accept): ⏎
exceptions <Query parameters excluded from the policy. When policy is 'accept', these are blocked. When policy is 'deny', these are forwarded. (default: [])>: [
exceptions (default: ): ⏎
Add another 'exceptions' element to array 'exceptions'? [y/N]: ⏎
]
}
hosts : [
host : {
name (default: ): dns-host
hostname (default: ): dns.example.com
ipv6_address (default: ): ⏎
healthChecks : [
healthCheck (default: always()): ⏎
Add another 'healthCheck' element to array 'healthChecks'? [y/N]: n
]
}
Add another 'host' element to array 'hosts'? [y/N]: ⏎
]
}
Add another 'hostGroup' element to array 'hostGroups'? [y/N]: ⏎
]
Generated config:
{
"hostGroups": [
{
"name": "external-dns",
"type": "dns",
"headersToForward": [
""
],
"queryPassThrough": {
"policy": "accept",
"exceptions": [
""
]
},
"hosts": [
{
"name": "dns-host",
"hostname": "dns.example.com",
"ipv6_address": "",
"healthChecks": [
"always()"
]
}
]
}
]
}
Merge and apply the config? [y/n]: y
7.6.6 - Routing Rules
The routing configuration using confcli is done using a combination of
logical building blocks, or rules. Each block evaluates the incoming request in
some way and sends it on to one or more sub-blocks. If the block is the name of
a host (see CDNs and hosts), the client is
sent to that host and the evaluation is done.
Existing Blocks
Currently supported blocks are:
allow: Incoming requests, for which a given rule function matches, are immediately sent to the providedonMatchtarget.consistentHashing: Splits incoming requests randomly between preferred hosts, determined by the proprietary consistent hashing algorithm. The amount of hosts to split between is controlled by thespreadFactor.contentPopularity: Splits incoming requests into two sub-blocks depending on how popular the requested content is.deny: Incoming requests, for which a given rule function matches, are immediately denied, and all non-matching requests are sent to theonMisstarget.firstMatch: Incoming requests are matched by an ordered series of rules, where the request will be handled by the first rule for which the condition evaluates to true.random: Splits incoming requests randomly and equally between a list of target sub-blocks. Useful for simple load balancing.split: Splits incoming requests between two sub-blocks depending on how the request is evaluated by a provided function. Can be used for sending clients to different hosts depending on e.g. geographical location or client hardware type.weighted: Randomly splits incoming requests between a list of target sub-blocks, weighted according to each target’s associated weight rule. A higher weight means a higher portion of requests will be routed to a sub-block. Rules can be used to decide whether or not to pick a target.rawGroup: Contains a raw ESB3024 Router configuration routing tree node, to be inserted as is in the generated configuration. This is only meant to be used in the rare cases when it’s impossible to construct the required routing behavior in any other way.rawHost: A host reference for use as endpoints in rawGroup trees.
$ confcli services.routing.rules -w
Running wizard for resource 'rules'
Hint: Hitting return will set a value to its default.
Enter '?' to receive the help string
rules : [
rule can be one of
1: allow
2: consistentHashing
3: contentPopularity
4: deny
5: firstMatch
6: random
7: rawGroup
8: rawHost
9: split
10: weighted
Choose element index or name: allow
Adding a 'allow' element
rule : {
name (default: ): allow
type (default: allow): ⏎
condition (default: ): customFunction()
onMatch (default: ): rr1
}
Add another 'rule' element to array 'rules'? [y/N]: ⏎
]
Generated config:
{
"rules": [
{
"name": "allow",
"type": "allow",
"condition": "customFunction()",
"onMatch": "rr1"
}
]
}
Merge and apply the config? [y/n]: y
$ confcli services.routing.rules -w
Running wizard for resource 'rules'
Hint: Hitting return will set a value to its default.
Enter '?' to receive the help string
rules : [
rule can be one of
1: allow
2: consistentHashing
3: contentPopularity
4: deny
5: firstMatch
6: random
7: rawGroup
8: rawHost
9: split
10: weighted
Choose element index or name: consistentHashing
Adding a 'consistentHashing' element
rule : {
name (default: ): consistentHashingRule
type (default: consistentHashing):
spreadFactor (default: 1): 2
hashAlgorithm (default: MD5):
targets : [
target : {
target (default: ): rr1
enabled (default: True):
}
Add another 'target' element to array 'targets'? [y/N]: y
target : {
target (default: ): rr2
enabled (default: True):
}
Add another 'target' element to array 'targets'? [y/N]: y
target : {
target (default: ): rr3
enabled (default: True):
}
Add another 'target' element to array 'targets'? [y/N]: n
]
}
Add another 'rule' element to array 'rules'? [y/N]: n
]
Generated config:
{
"rules": [
{
"name": "consistentHashingRule",
"type": "consistentHashing",
"spreadFactor": 2,
"hashAlgorithm": "MD5",
"targets": [
{
"target": "rr1",
"enabled": true
},
{
"target": "rr2",
"enabled": true
},
{
"target": "rr3",
"enabled": true
}
]
}
]
}
Merge and apply the config? [y/n]: y
$ confcli services.routing.rules -w
Running wizard for resource 'rules'
Hint: Hitting return will set a value to its default.
Enter '?' to receive the help string
rules : [
rule can be one of
1: allow
2: consistentHashing
3: contentPopularity
4: deny
5: firstMatch
6: random
7: rawGroup
8: rawHost
9: split
10: weighted
Choose element index or name: contentPopularity
Adding a 'contentPopularity' element
rule : {
name (default: ): content
type (default: contentPopularity): ⏎
contentPopularityCutoff (default: 10): 20
onPopular (default: ): rr1
onUnpopular (default: ): rr2
}
Add another 'rule' element to array 'rules'? [y/N]: ⏎
]
Generated config:
{
"rules": [
{
"name": "content",
"type": "contentPopularity",
"contentPopularityCutoff": 20.0,
"onPopular": "rr1",
"onUnpopular": "rr2"
}
]
}
Merge and apply the config? [y/n]: y
$ confcli services.routing.rules -w
Running wizard for resource 'rules'
Hint: Hitting return will set a value to its default.
Enter '?' to receive the help string
rules : [
rule can be one of
1: allow
2: consistentHashing
3: contentPopularity
4: deny
5: firstMatch
6: random
7: rawGroup
8: rawHost
9: split
10: weighted
Choose element index or name: deny
Adding a 'deny' element
rule : {
name (default: ): deny
type (default: deny): ⏎
condition (default: ): customFunction()
onMiss (default: ): rr1
}
Add another 'rule' element to array 'rules'? [y/N]: ⏎
]
Generated config:
{
"rules": [
{
"name": "deny",
"type": "deny",
"condition": "customFunction()",
"onMiss": "rr1"
}
]
}
Merge and apply the config? [y/n]: y
$ confcli services.routing.rules -w
Running wizard for resource 'rules'
Hint: Hitting return will set a value to its default.
Enter '?' to receive the help string
rules : [
rule can be one of
1: allow
2: consistentHashing
3: contentPopularity
4: deny
5: firstMatch
6: random
7: rawGroup
8: rawHost
9: split
10: weighted
Choose element index or name: firstMatch
Adding a 'firstMatch' element
rule : {
name (default: ): firstMatch
type (default: firstMatch): ⏎
targets : [
target : {
onMatch (default: ): rr1
condition (default: ): customFunction()
}
Add another 'target' element to array 'targets'? [y/N]: y
target : {
onMatch (default: ): rr2
condition (default: ): otherCustomFunction()
}
Add another 'target' element to array 'targets'? [y/N]: n
]
}
Add another 'rule' element to array 'rules'? [y/N]: n
]
Generated config:
{
"rules": [
{
"name": "firstMatch",
"type": "firstMatch",
"targets": [
{
"onMatch": "rr1",
"condition": "customFunction()"
},
{
"onMatch": "rr2",
"condition": "otherCustomFunction()"
}
]
}
]
}
Merge and apply the config? [y/n]: y
$ confcli services.routing.rules -w
Running wizard for resource 'rules'
Hint: Hitting return will set a value to its default.
Enter '?' to receive the help string
rules : [
rule can be one of
1: allow
2: consistentHashing
3: contentPopularity
4: deny
5: firstMatch
6: random
7: rawGroup
8: rawHost
9: split
10: weighted
Choose element index or name: random
Adding a 'random' element
rule : {
name (default: ): random
type (default: random): ⏎
targets : [
target (default: ): rr1
Add another 'target' element to array 'targets'? [y/N]: y
target (default: ): rr2
Add another 'target' element to array 'targets'? [y/N]: ⏎
]
}
Add another 'rule' element to array 'rules'? [y/N]: ⏎
]
Generated config:
{
"rules": [
{
"name": "random",
"type": "random",
"targets": [
"rr1",
"rr2"
]
}
]
}
Merge and apply the config? [y/n]: y
$ confcli services.routing.rules -w
Running wizard for resource 'rules'
Hint: Hitting return will set a value to its default.
Enter '?' to receive the help string
rules : [
rule can be one of
1: allow
2: consistentHashing
3: contentPopularity
4: deny
5: firstMatch
6: random
7: rawGroup
8: rawHost
9: split
10: weighted
Choose element index or name: split
Adding a 'split' element
rule : {
name (default: ): split
type (default: split): ⏎
condition (default: ): custom_function()
onMatch (default: ): rr2
onMiss (default: ): rr1
}
Add another 'rule' element to array 'rules'? [y/N]: ⏎
]
Generated config:
{
"rules": [
{
"name": "split",
"type": "split",
"condition": "custom_function()",
"onMatch": "rr2",
"onMiss": "rr1"
}
]
}
Merge and apply the config? [y/n]: y
$ confcli services.routing.rules -w
Running wizard for resource 'rules'
Hint: Hitting return will set a value to its default.
Enter '?' to receive the help string
rules : [
rule can be one of
1: allow
2: consistentHashing
3: contentPopularity
4: deny
5: firstMatch
6: random
7: rawGroup
8: rawHost
9: split
10: weighted
Choose element index or name: weighted
Adding a 'weighted' element
rule : {
name (default: ): weight
type (default: weighted): ⏎
targets : [
target : {
target (default: ): rr1
weight (default: 100): ⏎
condition (default: always()): always()
}
Add another 'target' element to array 'targets'? [y/N]: y
target : {
target (default: ): rr2
weight (default: 100): si('rr2-input-weight')
condition (default: always()): gt('rr2-bandwidth', 1000000)
}
Add another 'target' element to array 'targets'? [y/N]: y
target : {
target (default: ): rr2
weight (default: 100): custom_func()
condition (default: always()): always()
}
Add another 'target' element to array 'targets'? [y/N]: ⏎
]
}
Add another 'rule' element to array 'rules'? [y/N]: ⏎
]
Generated config:
{
"rules": [
{
"name": "weight",
"type": "weighted",
"targets": [
{
"target": "rr1",
"weight": "100",
"condition": "always()"
},
{
"target": "rr2",
"weight": "si('rr2-input-weight')",
"condition": "gt('rr2-bandwidth', 1000000)"
},
{
"target": "rr2",
"weight": "custom_func()",
"condition": "always()"
}
]
}
]
}
Merge and apply the config? [y/n]: y
>> First add a raw host block that refers to a regular host
$ confcli services.routing.rules -w
Running wizard for resource 'rules'
Hint: Hitting return will set a value to its default.
Enter '?' to receive the help string
rules : [
rule can be one of
1: allow
2: consistentHashing
3: contentPopularity
4: deny
5: firstMatch
6: random
7: rawGroup
8: rawHost
9: split
10: weighted
Choose element index or name: rawHost
Adding a 'rawHost' element
rule : {
name (default: ): raw-host
type (default: rawHost): ⏎
hostId (default: ): rr1
}
Add another 'rule' element to array 'rules'? [y/N]: ⏎
]
Generated config:
{
"rules": [
{
"name": "raw-host",
"type": "rawHost",
"hostId": "rr1"
}
]
}
Merge and apply the config? [y/n]: y
>> And then add a rule using the host node
$ confcli services.routing.rules -w
Running wizard for resource 'rules'
Hint: Hitting return will set a value to its default.
Enter '?' to receive the help string
rules : [
rule can be one of
1: allow
2: consistentHashing
3: contentPopularity
4: deny
5: firstMatch
6: random
7: rawGroup
8: rawHost
9: split
10: weighted
Choose element index or name: rawGroup
Adding a 'rawGroup' element
rule : {
name (default: ): raw-node
type (default: rawGroup): ⏎
memberOrder (default: sequential): ⏎
members : [
member : {
target (default: ): raw-host
weightFunction (default: ): return 1
}
Add another 'member' element to array 'members'? [y/N]: ⏎
]
}
Add another 'rule' element to array 'rules'? [y/N]: ⏎
]
Generated config:
{
"rules": [
{
"name": "raw-node",
"type": "rawGroup",
"memberOrder": "sequential",
"members": [
{
"target": "raw-host",
"weightFunction": "return 1"
}
]
}
]
}
Merge and apply the config? [y/n]: y
Rule Language
Some blocks, such as the split and firstMatch types, have a rule field that
contains a small function in a very simple, custom-made programming language, that
is a limited subset of Lua. This field is used to filter any incoming client
requests in order to determine how to rule block should react.
In the case of a split block, the rule is evaluated and if it is true the
client is sent to the onMatch part of the block, otherwise it is sent to the
onMiss part for further evaluation.
In the case of a firstMatch block, the rule for each target will be evaluated
top to bottom in order until either a rule evaluates to true or the list is
exhausted. If a rule evaluates to true, the client will be sent to the onMatch
part of the block, otherwise the next target in the list will be tried. If all
targets have been exhausted, then the entire rule evaluation will fail, and the
routing tree will be restarted with the firstMatch block effectively removed.
Example of Boolean Functions
Let’s say we have an ESB3024 Router set up with a session group that matches Apple
devices (named “Apple”). To route all Apple devices to a specific streamer one
would simply create a split block with the following rule:
in_session_group('Apple')
In order to make more complex rules it’s possible to combine several checks like
this in the same rule. Let’s extend the hypothetical ESB3024 Router above with a
configured subnet with all IP addresses in Europe (named “Europe”). To make a
rule that accepts any clients using an Apple device and living outside of
Europe, but only as long as the reported load on the streamer (as indicated by
the selection input variable
“europe_load_mbps”) is less than 1000 megabits per second one could make an
offload block with the following rule (without linebreaks):
in_session_group('Apple')
and not in_subnet('Europe')
and lt('europe_load_mbps', 1000)
In this example in_session_group('Apple') will be true if the client belongs
to the session group named ‘Apple’. The function call in_subnet('Europe') is
true if the client’s IP belongs to the subnet named ‘Europe’, but the word not
in front of it reverses the value so the entire section ends up being false if
the client is in Europe. Finally lt('europe_load_mbps', 1000) is true if
there is a selection input variable named “europe_load_mbps” and its value is
less than 1000.
Since the three parts are conjoined with the and keyword they must all
be true for the entire rule to match. If the keyword or had been used
instead it would have been enough for any of the parts to be true for the
rule to match.
Example of Numeric Functions
A hypothetical CDN has two streamers with different capacity; Host_1 has
roughly twice the capacity of Host_2. A simple random load balancing would put
undue stress on the second host since it will receive as much traffic as the
more capable Host_1.
This can be solved by using a weighted random distribution rule block with
suitable rules for the two hosts:
{
"targets": [
{
"target": "Host_1",
"condition": "always()",
"weight": "100"
},
{
"target": "Host_2",
"condition": "always()",
"weight": "50"
}
]
}
resulting in Host_1 receiving twice as many requests as Host_2 as its
weight function is double that of Host_2.
If the CDN is capable of reporting the free capacity of the hosts, for example by writing to a selection input variable for each host, it’s easy to write a more intelligent load balancing rule by making the weights correspond to the amount of capacity left on each host:
{
"targets": [
{
"target": "Host_1",
"condition": "always()",
"weight": "si('free_capacity_host_1')"
},
{
"target": "Host_2",
"condition": "always()",
"weight": "si('free_capacity_host_2')"
}
]
}
It is also possible to write custom Lua functions that return suitable weights, perhaps taking the host as an argument:
{
"targets": [
{
"target": "Host_1",
"condition": "always()",
"weight": "intelligent_weight_function('Host_1')"
},
{
"target": "Host_2",
"condition": "always()",
"weight": "intelligent_weight_function('Host_2')"
}
]
}
These different weight rules can of course be combined in the same rule block, with one target having a hard coded number, another using a dynamically updated selection input variable and yet another having a custom-built function.
Due to limitations in the random number generator used to distribute requests, it’s better to use somewhat large values, around 100–1000 or so, than to use small values near 0.
Built-In Functions
The following built-in functions are available when writing rules:
in_session_group(str name): True if session belongs to session group<name>in_all_session_groups(str sg_name, ...): True if session belongs to all specified session groupsin_any_session_group(str sg_name, ...): True if session belongs to any specified session groupin_subnet(str subnet_name): True if client IP belongs to the named subnetgt(str si_var, number value): True if selection_inputs[si_var] > valuegt(str si_var1, str si_var2): True if selection_inputs[si_var1] > selection_inputs[si_var2]ge(str si_var, number value): True if selection_inputs[si_var] >= valuege(str si_var1, str si_var2): True if selection_inputs[si_var1] >= selection_inputs[si_var2]lt(str si_var, number value): True if selection_inputs[si_var] < valuelt(str si_var1, str si_var2): True if selection_inputs[si_var1] < selection_inputs[si_var2]le(str si_var, number value): True if selection_inputs[si_var] <= valuele(str si_var1, str si_var2): True if selection_inputs[si_var1] <= selection_inputs[si_var2]eq(str si_var, number value): True if selection_inputs[si_var] == valueeq(str si_var1, str si_var2): True if selection_inputs[si_var1] == selection_inputs[si_var2]neq(str si_var, number value): True if selection_inputs[si_var] != valueneq(str si_var1, str si_var2): True if selection_inputs[si_var1] != selection_inputs[si_var2]si(str si_var): Returns the value of selection_inputs[si_var] if it is defined and non-negative, otherwise it returns 0.always(): Returns true, useful when creating weighted rule blocks.never(): Returns false, opposite ofalways().
These functions, as well as custom functions written in Lua and uploaded to the ESB3024 Router, can be combined to make suitably precise rules.
Combining Multiple Boolean Functions
The rule language supports flexible boolean logic with and, or and not
operators. Complex expressions can be built using parentheses for explicit
precedence control.
Operator Precedence:
- Parentheses have the highest precedence and force explicit grouping
notbinds tightly to the predicate immediately following itandhas higher precedence thanor- Operators at the same level are left-associative
Examples:
// Simple conjunction
in_session_group('mobile') and in_subnet('asia')
// Simple disjunction
in_session_group('premium') or in_session_group('trial')
// Mixed operators (and binds tighter than or)
in_subnet('internal') or in_session_group('staff') and gt('clearance', 5)
// Equivalent to:
// in_subnet('internal') or (in_session_group('staff') and gt('clearance', 5))
// Explicit grouping with parentheses
(in_session_group('mobile') or in_session_group('tablet')) and not in_subnet('blocked')
// Negation with grouping
not (in_session_group('free') and gt('requests_today', 100))
Short-circuit Evaluation:
Expressions use short-circuit (lazy) evaluation, evaluating left-to-right and stopping as soon as the result is certain:
- For and: stops at the first false (since the entire expression must be false)
- For or: stops at the first true (since only one true makes the entire expression true)
This means expensive predicates should be placed after cheaper ones when possible to minimize unnecessary evaluation.
Custom Functions
It is possible to write extremely complex Lua functions that take many parameters or calculations into consideration when evaluating an incoming client request. By writing such functions and making sure that they return only non-negative integer values and uploading them to the router they can be used from the rule language. Simply call them like any of the built-in functions listed above, using strings and numbers as arguments if necessary, and their result will be used to determine the routing path to use.
Formal Syntax
The full syntax of the language can be described in just a few lines of BNF grammar:
<rule> := <weight_rule> | <match_rule> | <value_rule>
<weight_rule> := "if" <compound_predicate> "then" <weight> "else" <weight>
<value_rule> := <weight>
<match_rule> := <compound_predicate>
<compound-predicate> := <or-predicate>
<or-predicate> := <and-predicate> ["or" <and-predicate> ...]
<and-predicate> := <term-predicate> ["and" <term-predicate> ...]
<term-predicate> := "(" <compound-predicate> ")" |
"not" "(" <compound-predicate> ")" |
<logical-predicate>
<logical-predicate> := ["not"] <predicate>
<predicate> := <function-name> "(" ")" |
<function-name> "(" <argument> ["," <argument> ...] ")"
<function-name> := <letter> [<function-name-tail> ...]
<function-name-tail> := empty | <letter> | <digit> | "_"
<argument> := <string> | <number>
<weight> := integer | <predicate>
<number> := float | integer
<string> := "'" [<letter> | <digit> | <symbol> ...] "'"
<letter> := "a" | "b" | ... | "z" | "A" | "B" | ... | "Z"
<digit> := "0" | "1" | ... | "9"
<symbol> := any printable character except "'" unless escaped by a backslash
Building a Routing Configuration
This example sets up an entire routing configuration for a system with a ESB3008 Request Router, two streamers and the Apple devices outside of Europe example used earlier in this document. Any clients not matching the criteria will be sent to an offload CDN with two streamers in a simple uniformly randomized load balancing setup.
Set up Session Group
First make a classifier and a session group that uses it:
$ confcli services.routing.classifiers -w
Running wizard for resource 'classifiers'
Hint: Hitting return will set a value to its default.
Enter '?' to receive the help string
classifiers : [
classifier can be one of
1: anonymousIp
2: asnIds
3: contentUrlPath
4: contentUrlQueryParameters
5: geoip
6: hostName
7: ipranges
8: random
9: regexMatcher
10: requestHeader
11: stringMatcher
12: subnet
13: userAgent
Choose element index or name: userAgent
Adding a 'userAgent' element
classifier : {
name (default: ): Apple
type (default: userAgent): ⏎
inverted (default: False): ⏎
patternType (default: stringMatch): ⏎
pattern (default: ): *apple*
}
Add another 'classifier' element to array 'classifiers'? [y/N]: ⏎
]
Generated config:
{
"classifiers": [
{
"name": "Apple",
"type": "userAgent",
"inverted": false,
"patternType": "stringMatch",
"pattern": "*apple*"
}
]
}
Merge and apply the config? [y/n]: y
$ confcli services.routing.sessionGroups -w
Running wizard for resource 'sessionGroups'
Hint: Hitting return will set a value to its default.
Enter '?' to receive the help string
sessionGroups : [
sessionGroup : {
name (default: ): Apple
classifiers : [
classifier (default: ): Apple
Add another 'classifier' element to array 'classifiers'? [y/N]: ⏎
]
}
Add another 'sessionGroup' element to array 'sessionGroups'? [y/N]: ⏎
]
Generated config:
{
"sessionGroups": [
{
"name": "Apple",
"classifiers": [
"Apple"
]
}
]
}
Merge and apply the config? [y/n]: y
Set up Hosts
Create two host groups and add a Request Router to the first and two streamers to the second, which will be used for offload:
$ confcli services.routing.hostGroups -w
Running wizard for resource 'hostGroups'
Hint: Hitting return will set a value to its default.
Enter '?' to receive the help string
hostGroups : [
hostGroup can be one of
1: dns
2: host
3: redirecting
Choose element index or name: redirecting
Adding a 'redirecting' element
hostGroup : {
name (default: ): internal
type (default: redirecting): ⏎
httpPort (default: 80): ⏎
httpsPort (default: 443): ⏎
headersToForward <A list of HTTP headers to forward to the CDN. (default: [])>: [
headersToForward (default: ): ⏎
Add another 'headersToForward' element to array 'headersToForward'? [y/N]: ⏎
]
queryPassThrough <Controls which query parameters from the client request are forwarded to the backend and included in the redirection URL. (default: OrderedDict())>: {
policy (default: accept): ⏎
exceptions <Query parameters excluded from the policy. When policy is 'accept', these are blocked. When policy is 'deny', these are forwarded. (default: [])>: [
exceptions (default: ): ⏎
Add another 'exceptions' element to array 'exceptions'? [y/N]: ⏎
]
}
allowAnyRedirectType (default: False): ⏎
hosts : [
host : {
name (default: ): rr1
hostname (default: ): rr1.example.com
ipv6_address (default: ): ⏎
healthChecks : [
healthCheck (default: always()): ⏎
Add another 'healthCheck' element to array 'healthChecks'? [y/N]: n
]
}
Add another 'host' element to array 'hosts'? [y/N]: ⏎
]
}
Add another 'hostGroup' element to array 'hostGroups'? [y/N]: y
hostGroup can be one of
1: dns
2: host
3: redirecting
Choose element index or name: host
Adding a 'host' element
hostGroup : {
name (default: ): external
type (default: host): ⏎
httpPort (default: 80): ⏎
httpsPort (default: 443): ⏎
headersToForward <A list of HTTP headers to forward to the CDN. (default: [])>: [
headersToForward (default: ): ⏎
Add another 'headersToForward' element to array 'headersToForward'? [y/N]: ⏎
]
queryPassThrough <Controls which query parameters from the client request are forwarded to the backend and included in the redirection URL. (default: OrderedDict())>: {
policy (default: accept): ⏎
exceptions <Query parameters excluded from the policy. When policy is 'accept', these are blocked. When policy is 'deny', these are forwarded. (default: [])>: [
exceptions (default: ): ⏎
Add another 'exceptions' element to array 'exceptions'? [y/N]: ⏎
]
}
createStreamerSession (default: False): ⏎
addUrlPrefix (default: False): ⏎
hosts : [
host : {
name (default: ): offload-streamer1
hostname (default: ): streamer1.example.com
ipv6_address (default: ): ⏎
healthChecks : [
healthCheck (default: always()): ⏎
Add another 'healthCheck' element to array 'healthChecks'? [y/N]: n
]
}
Add another 'host' element to array 'hosts'? [y/N]: y
host : {
name (default: ): offload-streamer2
hostname (default: ): streamer2.example.com
ipv6_address (default: ): ⏎
healthChecks : [
healthCheck (default: always()): ⏎
Add another 'healthCheck' element to array 'healthChecks'? [y/N]: n
]
}
Add another 'host' element to array 'hosts'? [y/N]: ⏎
]
}
Add another 'hostGroup' element to array 'hostGroups'? [y/N]: ⏎
]
Generated config:
{
"hostGroups": [
{
"name": "internal",
"type": "redirecting",
"httpPort": 80,
"httpsPort": 443,
"headersToForward": [
""
],
"queryPassThrough": {
"policy": "accept",
"exceptions": [
""
]
},
"allowAnyRedirectType": false,
"hosts": [
{
"name": "rr1",
"hostname": "rr1.example.com",
"ipv6_address": "",
"healthChecks": [
"always()"
]
}
]
},
{
"name": "external",
"type": "host",
"httpPort": 80,
"httpsPort": 443,
"headersToForward": [
""
],
"queryPassThrough": {
"policy": "accept",
"exceptions": [
""
]
},
"createStreamerSession": false,
"addUrlPrefix": false,
"hosts": [
{
"name": "offload-streamer1",
"hostname": "streamer1.example.com",
"ipv6_address": "",
"healthChecks": [
"always()"
]
},
{
"name": "offload-streamer2",
"hostname": "streamer2.example.com",
"ipv6_address": "",
"healthChecks": [
"always()"
]
}
]
}
]
}
Merge and apply the config? [y/n]: y
Create Load Balancing and Offload Block
Add both offload streamers as targets in a random block:
$ confcli services.routing.rules -w
Running wizard for resource 'rules'
Hint: Hitting return will set a value to its default.
Enter '?' to receive the help string
rules : [
rule can be one of
1: allow
2: consistentHashing
3: contentPopularity
4: deny
5: firstMatch
6: random
7: rawGroup
8: rawHost
9: split
10: weighted
Choose element index or name: random
Adding a 'random' element
rule : {
name (default: ): balancer
type (default: random): ⏎
targets : [
target (default: ): offload-streamer1
Add another 'target' element to array 'targets'? [y/N]: y
target (default: ): offload-streamer2
Add another 'target' element to array 'targets'? [y/N]: ⏎
]
}
Add another 'rule' element to array 'rules'? [y/N]: ⏎
]
Generated config:
{
"rules": [
{
"name": "balancer",
"type": "random",
"targets": [
"offload-streamer1",
"offload-streamer2"
]
}
]
}
Merge and apply the config? [y/n]: y
Then create a split block with the request router and the load balanced CDN as targets:
$ confcli services.routing.rules -w
Running wizard for resource 'rules'
Hint: Hitting return will set a value to its default.
Enter '?' to receive the help string
rules : [
rule can be one of
1: allow
2: consistentHashing
3: contentPopularity
4: deny
5: firstMatch
6: random
7: rawGroup
8: rawHost
9: split
10: weighted
Choose element index or name: split
Adding a 'split' element
rule : {
name (default: ): offload
type (default: split): ⏎
condition (default: ): in_session_group('Apple') and not in_subnet('Europe') and lt('europe_load_mbps', 1000)
onMatch (default: ): rr1
onMiss (default: ): balancer
}
Add another 'rule' element to array 'rules'? [y/N]: ⏎
]
Generated config:
{
"rules": [
{
"name": "offload",
"type": "split",
"condition": "in_session_group('Apple') and not in_subnet('Europe') and lt('europe_load_mbps', 1000)",
"onMatch": "rr1",
"onMiss": "balancer"
}
]
}
Merge and apply the config? [y/n]: y
The last step required is to set the entrypoint of the routing tree so the router knows where to start evaluating:
$ confcli services.routing.entrypoint offload
services.routing.entrypoint = 'offload'
Evaluate
Now that all the rules have been set up properly and the router has been reconfigured. The translated configuration can be read from the router’s configuration API:
$ curl -k https://router-host:5001/v2/configuration 2> /dev/null | jq .routing
{
"id": "offload",
"member_order": "sequential",
"members": [
{
"host_id": "rr1",
"id": "offload.rr1",
"weight_function": "return ((in_session_group('Apple') ~= 0) and
(in_subnet('Europe') == 0) and
(lt('europe_load_mbps', 1000) ~= 0) and 1) or 0 "
},
{
"id": "offload.balancer",
"member_order": "weighted",
"members": [
{
"host_id": "offload-streamer1",
"id": "offload.balancer.offload-streamer1",
"weight_function": "return 100"
},
{
"host_id": "offload-streamer2",
"id": "offload.balancer.offload-streamer2",
"weight_function": "return 100"
}
],
"weight_function": "return 1"
}
],
"weight_function": "return 100"
}
Note that the configuration language code has been translated into its Lua equivalent.
7.6.7 - Session Groups and Classification
ESB3024 Router provides a flexible classification engine, allowing the assignment of clients into session groups that can then be used to base routing decisions on.
Session Classification
In order to perform routing it is necessary to classify incoming sessions according to the relevant parameters. This is done through session groups and their associated classifiers.
There are different ways of classifying a request:
Anonymous IP: Classifies clients using an anonymous IP database. See Geographic Databases for information about the database.ASN IDs: Checks to see if a client’s IP belongs to any of the specified ASN IDs. See Geographic Databases for information about the ASN database.Content URL path: Matches the given pattern against the path part of the URL requested by the client. The match can be either a case-insensitive wildcard match or a regular expression match.Content URL query parameters: Matches the given pattern against the query parameters of the URL requested by the client. The query parameters are passed as a single string. The match can be either a case-insensitive wildcard match or a regular expression match.GeoIP: Based on the geographic location of the client, supporting wildcard matching. See Route on GeoIP/ASN for more details. The possible values to match with are any combinations of:- Continent
- Country
- Region
- Cities
- ASN
Host name: Matches the given pattern against the name of the host that the request was sent to. The match can be either a case-insensitive wildcard match or a regular expression match.IP ranges: Classifies a client based on whether its IP address belongs to any of the listed IP ranges or not.Random: Randomly classifies clients according to a given probability. The classifier is deterministic, meaning that a session will always get the same classification, even if evaluated multiple times.Regular expression matcher: Matches the given pattern against a configurable source. The match is case-insensitive and supports regular expressions. The following sources are available:content_url_path: The path part of the URL requested by the client.content_url_query_params: The query parameters of the URL requested by the client. The query parameters are passed as a single string.hostname: The name of the host that the request was sent to.user_agent: The user agent string in the HTTP request from the client.
Request Header: Classifies clients based on the value of a specified HTTP header in the request from the client.String matcher: Matches the given pattern against a configurable source. The match is case-insensitive and supports wildcards (’*’). The following sources are available:content_url_path: The path part of the URL requested by the client.content_url_query_params: The query parameters of the URL requested by the client. The query parameters are passed as a single string.hostname: The name of the host that the request was sent to.user_agent: The user agent string in the HTTP request from the client.
Subnet: Tests if a client’s IP belongs to a named subnet, see Subnets for more details.User agent: Matches the given pattern against the user agent string in the HTTP request from the client. The match can be either a case-insensitive wildcard match or a regular expression match.
A session group may have more than one classifier. If it does, all the classifiers must match the incoming client request for it to belong to the session group. It is also possible for a request to belong to multiple session groups, or to none.
To send certain clients to a specific host you first need to create a suitable
classifier using confcli in wizard mode. The wizard will guide you through the
process of creating a new entry, asking you what value to input for each field
and helping you by telling you what inputs are allowed for restricted fields
such as the string comparison source mentioned above:
$ confcli services.routing.classifiers -w
Running wizard for resource 'classifiers'
Hint: Hitting return will set a value to its default.
Enter '?' to receive the help string
classifiers : [
classifier can be one of
1: anonymousIp
2: asnIds
3: contentUrlPath
4: contentUrlQueryParameters
5: geoip
6: hostName
7: ipranges
8: random
9: regexMatcher
10: requestHeader
11: stringMatcher
12: subnet
13: userAgent
Choose element index or name: anonymousIp
Adding a 'anonymousIp' element
classifier : {
name (default: ): anon_ip_matcher
type (default: anonymousIp):
inverted (default: False):
}
Add another 'classifier' element to array 'classifiers'? [y/N]: n
]
Generated config:
{
"classifiers": [
{
"name": "anon_ip_matcher",
"type": "anonymousIp",
"inverted": false
}
]
}
Merge and apply the config? [y/n]: y
$ confcli services.routing.classifiers -w
Running wizard for resource 'classifiers'
Hint: Hitting return will set a value to its default.
Enter '?' to receive the help string
classifiers : [
classifier can be one of
1: anonymousIp
2: asnIds
3: contentUrlPath
4: contentUrlQueryParameters
5: geoip
6: hostName
7: ipranges
8: random
9: regexMatcher
10: requestHeader
11: stringMatcher
12: subnet
13: userAgent
Choose element index or name: asnIds
Adding a 'asnIds' element
classifier : {
name (default: ): asn_matcher
type (default: asnIds): ⏎
inverted (default: False): ⏎
asnIds <The list of ASN IDs to accept. (default: [])>: [
asnId: 1
Add another 'asnId' element to array 'asnIds'? [y/N]: y
asnId: 2
Add another 'asnId' element to array 'asnIds'? [y/N]: y
asnId: 3
Add another 'asnId' element to array 'asnIds'? [y/N]: ⏎
]
}
Add another 'classifier' element to array 'classifiers'? [y/N]: ⏎
]
Generated config:
{
"classifiers": [
{
"name": "asn_matcher",
"type": "asnIds",
"inverted": false,
"asnIds": [
1,
2,
3
]
}
]
}
Merge and apply the config? [y/n]: y
$ confcli services.routing.classifiers -w
Running wizard for resource 'classifiers'
Hint: Hitting return will set a value to its default.
Enter '?' to receive the help string
classifiers : [
classifier can be one of
1: anonymousIp
2: asnIds
3: contentUrlPath
4: contentUrlQueryParameters
5: geoip
6: hostName
7: ipranges
8: random
9: regexMatcher
10: requestHeader
11: stringMatcher
12: subnet
13: userAgent
Choose element index or name: contentUrlPath
Adding a 'contentUrlPath' element
classifier : {
name (default: ): vod_matcher
type (default: contentUrlPath): ⏎
inverted (default: False): ⏎
patternType (default: stringMatch): ⏎
pattern (default: ): *vod*
}
Add another 'classifier' element to array 'classifiers'? [y/N]: n
]
Generated config:
{
"classifiers": [
{
"name": "vod_matcher",
"type": "contentUrlPath",
"inverted": false,
"patternType": "stringMatch",
"pattern": "*vod*"
}
]
}
Merge and apply the config? [y/n]: y
$ confcli services.routing.classifiers -w
Running wizard for resource 'classifiers'
Hint: Hitting return will set a value to its default.
Enter '?' to receive the help string
classifiers : [
classifier can be one of
1: anonymousIp
2: asnIds
3: contentUrlPath
4: contentUrlQueryParameters
5: geoip
6: hostName
7: ipranges
8: random
9: regexMatcher
10: requestHeader
11: stringMatcher
12: subnet
13: userAgent
Choose element index or name: contentUrlQueryParameters
Adding a 'contentUrlQueryParameters' element
classifier : {
name (default: ): bitrate_matcher
type (default: contentUrlQueryParameters): ⏎
inverted (default: False): ⏎
patternType (default: stringMatch): regex
pattern (default: ): .*bitrate=100000.*
}
Add another 'classifier' element to array 'classifiers'? [y/N]: n
]
Generated config:
{
"classifiers": [
{
"name": "bitrate_matcher",
"type": "contentUrlQueryParameters",
"inverted": false,
"patternType": "regex",
"pattern": ".*bitrate=100000.*"
}
]
}
Merge and apply the config? [y/n]: y
$ confcli services.routing.classifiers -w
Running wizard for resource 'classifiers'
Hint: Hitting return will set a value to its default.
Enter '?' to receive the help string
classifiers : [
classifier can be one of
1: anonymousIp
2: asnIds
3: contentUrlPath
4: contentUrlQueryParameters
5: geoip
6: hostName
7: ipranges
8: random
9: regexMatcher
10: requestHeader
11: stringMatcher
12: subnet
13: userAgent
Choose element index or name: geoip
Adding a 'geoip' element
classifier : {
name (default: ): sweden_matcher
type (default: geoip): ⏎
inverted (default: False): ⏎
continent (default: ): ⏎
country (default: ): sweden
cities : [
city (default: ): ⏎
Add another 'city' element to array 'cities'? [y/N]: ⏎
]
asn (default: ): ⏎
}
Add another 'classifier' element to array 'classifiers'? [y/N]: ⏎
]
Generated config:
{
"classifiers": [
{
"name": "sweden_matcher",
"type": "geoip",
"inverted": false,
"continent": "",
"country": "sweden",
"cities": [
""
],
"asn": ""
}
]
}
Merge and apply the config? [y/n]: y
$ confcli services.routing.classifiers -w
Running wizard for resource 'classifiers'
Hint: Hitting return will set a value to its default.
Enter '?' to receive the help string
classifiers : [
classifier can be one of
1: anonymousIp
2: asnIds
3: contentUrlPath
4: contentUrlQueryParameters
5: geoip
6: hostName
7: ipranges
8: random
9: regexMatcher
10: requestHeader
11: stringMatcher
12: subnet
13: userAgent
Choose element index or name: hostName
Adding a 'hostName' element
classifier : {
name (default: ): host_name_classifier
type (default: hostName): ⏎
inverted (default: False): ⏎
patternType (default: stringMatch): ⏎
pattern (default: ): *live.example*
}
Add another 'classifier' element to array 'classifiers'? [y/N]: n
]
Generated config:
{
"classifiers": [
{
"name": "host_name_classifier",
"type": "hostName",
"inverted": false,
"patternType": "stringMatch",
"pattern": "*live.example*"
}
]
}
Merge and apply the config? [y/n]: y
$ confcli services.routing.classifiers -w
Running wizard for resource 'classifiers'
Hint: Hitting return will set a value to its default.
Enter '?' to receive the help string
classifiers : [
classifier can be one of
1: anonymousIp
2: asnIds
3: contentUrlPath
4: contentUrlQueryParameters
5: geoip
6: hostName
7: ipranges
8: random
9: regexMatcher
10: requestHeader
11: stringMatcher
12: subnet
13: userAgent
Choose element index or name: ipranges
Adding a 'ipranges' element
classifier : {
name (default: ): company_matcher
type (default: ipranges): ⏎
inverted (default: False): ⏎
ipranges : [
iprange (default: ): 90.128.0.0/12
Add another 'iprange' element to array 'ipranges'? [y/N]: ⏎
]
}
Add another 'classifier' element to array 'classifiers'? [y/N]: ⏎
]
Generated config:
{
"classifiers": [
{
"name": "company_matcher",
"type": "ipranges",
"inverted": false,
"ipranges": [
"90.128.0.0/12"
]
}
]
}
Merge and apply the config? [y/n]: y
$ confcli services.routing.classifiers -w
Running wizard for resource 'classifiers'
Hint: Hitting return will set a value to its default.
Enter '?' to receive the help string
classifiers : [
classifier can be one of
1: anonymousIp
2: asnIds
3: contentUrlPath
4: contentUrlQueryParameters
5: geoip
6: hostName
7: ipranges
8: random
9: regexMatcher
10: requestHeader
11: stringMatcher
12: subnet
13: userAgent
Choose element index or name: random
Adding a 'random' element
classifier <A classifier randomly applying to clients based on the provided probability. (default: OrderedDict())>: {
name (default: ): random_matcher
type (default: random):
probability (default: 0.5): 0.7
}
Add another 'classifier' element to array 'classifiers'? [y/N]: n
]
Generated config:
{
"classifiers": [
{
"name": "random_matcher",
"type": "random",
"probability": 0.7
}
]
}
Merge and apply the config? [y/n]: y
$ confcli services.routing.classifiers -w
Running wizard for resource 'classifiers'
Hint: Hitting return will set a value to its default.
Enter '?' to receive the help string
classifiers : [
classifier can be one of
1: anonymousIp
2: asnIds
3: contentUrlPath
4: contentUrlQueryParameters
5: geoip
6: hostName
7: ipranges
8: random
9: regexMatcher
10: requestHeader
11: stringMatcher
12: subnet
13: userAgent
Choose element index or name: regexMatcher
Adding a 'regexMatcher' element
classifier : {
name (default: ): content_matcher
type (default: regexMatcher): ⏎
inverted (default: False): ⏎
source (default: content_url_path): ⏎
pattern (default: ): .*/(live|news_channel)/.*m3u8
}
Add another 'classifier' element to array 'classifiers'? [y/N]: ⏎
]
Generated config:
{
"classifiers": [
{
"name": "content_matcher",
"type": "regexMatcher",
"inverted": false,
"source": "content_url_path",
"pattern": ".*/(live|news_channel)/.*m3u8"
}
]
}
Merge and apply the config? [y/n]: y
$ confcli services.routing.classifiers -w
Running wizard for resource 'classifiers'
Hint: Hitting return will set a value to its default.
Enter '?' to receive the help string
classifiers : [
classifier can be one of
1: anonymousIp
2: asnIds
3: contentUrlPath
4: contentUrlQueryParameters
5: geoip
6: hostName
7: ipranges
8: random
9: regexMatcher
10: requestHeader
11: stringMatcher
12: subnet
13: userAgent
Choose element index or name: requestHeader
Adding a 'requestHeader' element
classifier <A classifier that matches on headers in the HTTP request. (default: OrderedDict())>: {
name (default: ): curl
type (default: requestHeader): ⏎
inverted (default: False): ⏎
header (default: ): User-Agent
patternType (default: stringMatch): ⏎
patternSource (default: inline): ⏎
pattern (default: ): curl*
}
Add another 'classifier' element to array 'classifiers'? [y/N]: n
]
Generated config:
{
"classifiers": [
{
"name": "curl",
"type": "requestHeader",
"inverted": false,
"header": "User-Agent",
"patternType": "stringMatch",
"patternSource": "inline",
"pattern": "curl*"
}
]
}
Merge and apply the config? [y/n]: y
$ confcli services.routing.classifiers -w
Running wizard for resource 'classifiers'
Hint: Hitting return will set a value to its default.
Enter '?' to receive the help string
classifiers : [
classifier can be one of
1: anonymousIp
2: asnIds
3: contentUrlPath
4: contentUrlQueryParameters
5: geoip
6: hostName
7: ipranges
8: random
9: regexMatcher
10: requestHeader
11: stringMatcher
12: subnet
13: userAgent
Choose element index or name: stringMatcher
Adding a 'stringMatcher' element
classifier : {
name (default: ): apple_matcher
type (default: stringMatcher): ⏎
inverted (default: False): ⏎
source (default: content_url_path): user_agent
pattern (default: ): *apple*
}
Add another 'classifier' element to array 'classifiers'? [y/N]: ⏎
]
Generated config:
{
"classifiers": [
{
"name": "apple_matcher",
"type": "stringMatcher",
"inverted": false,
"source": "user_agent",
"pattern": "*apple*"
}
]
}
Merge and apply the config? [y/n]: y
$ confcli services.routing.classifiers -w
Running wizard for resource 'classifiers'
Hint: Hitting return will set a value to its default.
Enter '?' to receive the help string
classifiers : [
classifier can be one of
1: anonymousIp
2: asnIds
3: contentUrlPath
4: contentUrlQueryParameters
5: geoip
6: hostName
7: ipranges
8: random
9: regexMatcher
10: requestHeader
11: stringMatcher
12: subnet
13: userAgent
Choose element index or name: subnet
Adding a 'subnet' element
classifier : {
name (default: ): company_matcher
type (default: subnet): ⏎
inverted (default: False): ⏎
patternSource (default: inline): ⏎
pattern (default: ): company
}
Add another 'classifier' element to array 'classifiers'? [y/N]: ⏎
]
Generated config:
{
"classifiers": [
{
"name": "company_matcher",
"type": "subnet",
"inverted": false,
"patternSource": "inline",
"pattern": "company"
}
]
}
Merge and apply the config? [y/n]: y
$ confcli services.routing.classifiers -w
Running wizard for resource 'classifiers'
Hint: Hitting return will set a value to its default.
Enter '?' to receive the help string
classifiers : [
classifier can be one of
1: anonymousIp
2: asnIds
3: contentUrlPath
4: contentUrlQueryParameters
5: geoip
6: hostName
7: ipranges
8: random
9: regexMatcher
10: requestHeader
11: stringMatcher
12: subnet
13: userAgent
Choose element index or name: userAgent
Adding a 'userAgent' element
classifier : {
name (default: ): iphone_matcher
type (default: userAgent): ⏎
inverted (default: False): ⏎
patternType (default: stringMatch): regex
pattern (default: ): i(P|p)hone
}
Add another 'classifier' element to array 'classifiers'? [y/N]: n
]
Generated config:
{
"classifiers": [
{
"name": "iphone_matcher",
"type": "userAgent",
"inverted": false,
"patternType": "regex",
"pattern": "i(P|p)hone"
}
]
}
Merge and apply the config? [y/n]: y
These classifiers can now be used to construct session groups and properly classify clients. Using the examples above, let’s create a session group classifying clients from Sweden using an Apple device:
$ confcli services.routing.sessionGroups -w
Running wizard for resource 'sessionGroups'
Hint: Hitting return will set a value to its default.
Enter '?' to receive the help string
sessionGroups : [
sessionGroup : {
name (default: ): inSwedenUsingAppleDevice
classifiers : [
classifier (default: ): 'sweden_matcher' and 'apple_matcher'
Add another 'classifier' element to array 'classifiers'? [y/N]: ⏎
]
}
Add another 'sessionGroup' element to array 'sessionGroups'? [y/N]: ⏎
]
Generated config:
{
"sessionGroups": [
{
"name": "inSwedenUsingAppleDevice",
"classifiers": [
"'sweden_matcher' and 'apple_matcher'"
]
}
]
}
Merge and apply the config? [y/n]: y
Clients classified by the sweden_matcher and apple_matcher classifiers
will now be put in the session group inSwedenUsingAppleDevice. Note the
single quotation marks around the classifier names.
Using session groups in routing will be demonstrated later in this document.
Classifier Boolean Logic
Session groups combine classifiers using boolean logic expressions. Each classifier
is referenced by its name enclosed in single quotes (e.g. 'sweden_matcher') and
multiple classifiers can be combined using the keywords and, or and not to
create sophisticated matching rules.
Operator precedence order:
- “Parentheses”
( )group items together; expressions within parentheses are evaluated first. - “not” negates the immediately following classifier or parenthesis expression
- “and” evaluates to true if both expressions surrounding it are true
- “or” evaluates to true if either expression surrounding it is true
Since “and” is higher than “or” the expression 'live' and 'spain' or 'sweden'
is functionally identical to ('live' and 'spain') or 'sweden'. If you want
the session group to accept any live content that is in either Spain or Sweden
you need to write 'live' and ('spain' or 'sweden').
To match against all incoming traffic requesting live content but coming from
outside of either Spain or Sweden, you’d write 'live' and not ('spain' or 'sweden').
It is permitted to nest several levels of parentheses and conjunctions if necessary to achieve the desired match.
Alternative form:
The "classifiers" property on a session group is an array, and each expression
in it must be true for the session group to trigger. This means that
"classifiers": ["('sweden' or 'spain') and 'live'"] is equivalent
to "classifiers": ["'sweden' or 'spain'", "'live'"].
This fact can be used for example if expressions become so long that it is necessary to break them up into smaller parts in order to be able to read them.
Pattern Source
The requestHeader and subnet classifiers have a patternSource field,
which can be either inline or selectionInput. When set to inline, the
pattern is taken directly from the pattern field.
If it is selectionInput, the pattern field is used as a path in the
selection input that points
to the pattern to use for classification. The selection input path may contain
a wildcard ("*"), which matches all elements inside an object or array.
For example, if patternSource contains /blocked_user_agents/*/agent, the
classifier will take its pattern from all agent fields in objects inside
/blocked_user_agents.
If the selection input contains the following data:
{
"blocked_user_agents": {
{ "agent1": { "agent": "Firefox" }},
{ "agent2": { "agent": "Chrome" }}
}
}
then the classifier will match either Firefox or Chrome.
Pattern Type
Several classifiers support pattern matching using either regular expressions or a simpler wildcard string matcher.
stringMatch:
The stringMatch pattern type uses shell-style wildcard matching for simple, readable patterns. Matching is case-insensitive.
Supported Wildcards:
*- Matches any sequence of characters (including none)*vod*matches/vod/,/content/vod/stream.m3u8,/my-vod-content/live/*/manifest.m3u8matches/live/sports/manifest.m3u8,/live/news/manifest.m3u8
?- Matches exactly one character/video?.mp4matches/video1.mp4,/videoA.mp4, but not/video10.mp4/test/?????/filematches any path with exactly 5 characters between/test/and/file
[characters]- Matches any single character from the set[abc]matchesa,b, orc[0-9]matches any single digit/video[12].mp4matches/video1.mp4or/video2.mp4
[!characters]or[^characters]- Matches any single character NOT in the set[!xyz]matches any character exceptx,y, orz[^0-9]matches any non-digit character/file[!0-9].txtmatches/fileA.txtbut not/file3.txt
[[:class:]]- POSIX character classes for matching character types[[:alnum:]]- alphanumeric (letters and digits)[[:alpha:]]- letters only[[:digit:]]- digits only[[:lower:]]- lowercase letters[[:upper:]]- uppercase letters[[:space:]]- whitespace characters- Example:
/user[[:digit:]][[:digit:]]/filematches/user12/file,/user00/file
\(backslash) - Escapes special characters to match them literallyfile\*.txtmatches the literal stringfile*.txt(asterisk is not a wildcard)test\?markmatchestest?mark(question mark is not a wildcard)
regex:
The regex pattern type uses full regular expression matching for complex
patterns. Matching is case-sensitive and follows the ECMAScript regular
expression syntax (the same syntax used by JavaScript).
Common Examples:
.*\.m3u8$- matches paths ending with .m3u8.*/(?:live|vod)/.*- matches paths containing /live/ or /vod/^/api/v[0-9]+/.*- matches paths starting with /api/v1/, /api/v2/, etc..*bitrate=[0-9]{6,}.*- matches query strings with bitrate= followed by 6+ digits
When to use:
Use regex when you need:
- Alternation (
a|b) - Precise quantifiers (
{n,m}) - Anchoring (
^start,$end) - Non-capturing groups (
(?:...)) - Lookaheads or other advanced features
For simple wildcard matching, stringMatch is more readable and performs better.
The complete ECMAScript regular expression syntax is documented at:
7.6.8 - Accounts
If accounts are configured, the router will tag sessions as belonging to an
account. Note that if accounts are not configured or a session does not belong to
an account, a session will be tagged with the default account.
Metrics will be tracked separately for each account when applicable.
Configuration
Accounts are configured using session groups, see Classification
for more information. Using confcli, an account is configured by defining an
account name and a list of session groups for which a session must be classified
into to belong to the account. An account called account_1 can be configured by
running the command
confcli services.routing.accounts -w
Running wizard for resource 'accounts'
Hint: Hitting return will set a value to its default.
Enter '?' to receive the help string
accounts : [
account : {
name (default: ): account_1
sessionGroups <A session will be tagged as belonging to this account if it is a member of one or more of the listed session groups. (default: [])>: [
sessionGroup (default: ): session_group_1
Add another 'sessionGroup' element to array 'sessionGroups'? [y/N]: y
sessionGroup (default: ): session_group_2
Add another 'sessionGroup' element to array 'sessionGroups'? [y/N]: n
]
}
Add another 'account' element to array 'accounts'? [y/N]: n
]
Generated config:
{
"accounts": [
{
"name": "account_1",
"sessionGroups": [
"session_group_1",
"session_group_2"
]
}
]
}
Merge and apply the config? [y/n]: y
A session will belong to the account account_1 if it has been classified into
any of the two session groups session_group_1 and session_group_2.
Metrics
If using the configuration above, the metrics will be separated per account:
# TYPE num_requests counter
num_requests{account="account_1",selector="initial"} 3
# TYPE num_requests counter
num_requests{account="default",selector="initial"} 3
7.6.9 - The Secret Store
Secrets
A secret is a string that can be used for things such as signing tokens or for authenticating with systems. A secret must be kept secret from all outside parties.
Configuring a Secret
A secret is stored in a secrets file. The entire file content is the secret, i.e: there is one secret per file.
Edit - or just echo - a well kept secret to a file (trailing whitespace is ignored):
$ echo abrakadabra > /opt/edgeware/acd/router/secrets/sec-1.txt
Configure a secret, referring to the same file name:
$ confcli integration.secrets -w
Running wizard for resource 'secrets'
Hint: Hitting return will set a value to its default.
Enter '?' to receive the help string
secrets : {
enabled (default: False): true
refreshIntervalSeconds (default: 60):
secretStore : [
secretStore : {
id (default: ): sec-1
type (default: file):
resourceName (default: ): sec-1.txt
}
Add another 'secretStore' element to array 'secretStore'? [y/N]:
]
}
Generated config:
{
"secrets": {
"enabled": true,
"refreshIntervalSeconds": 60,
"secretStore": [
{
"id": "sec-1",
"type": "file",
"resourceName": "sec-1.txt"
}
]
}
}
Merge and apply the config? [y/n]: y
enabledenables/disables all secrets. Disabling secrets will disable polling of, and access to the resources. It will not disable token verification.refreshIntervalSecondsthe interval with which to update the cache. Secrets are cached in RAM for efficient token verification.idis any name. It is important, as it will be referred from theverification.typethe type of resource holding the secret. Currently the only supported type isfile.resourceNamethe file path under/opt/edgeware/acd/router/secrets; typically in the form ofsecret1.txt. The formaccount1/secret1.txtis also possible. (Absolute paths, with a leading/, are allowed, but risky since paths inside the Podman container can differ from host paths.)
Secret usage in the Director
Secrets are typically used by the built-in token verification and generation. It is also possible to access configured secrets from Lua, in order to implement any other custom verification algorithm.
7.6.10 - Token Verification
The Director can be configured to require that requests from clients contain a
token. The purpose of the token is to ensure that the client has permission
to stream the requested content. The token contains information about what the
client is allowed to request and is signed with a secret. The Director will
verify that the token is valid before replying to the request. Requests that
fail validation will be rejected with HTTP 403 FORBIDDEN by the Director.
Note: The older way of using Lua-verified tokens is still available, but it is highly recommended to use the method described here.
Prerequisites
In order to use token verification there should be:
- A stored and configured
secret. See the Secret Store. - A configured
account. See Accounts. Note that if a request is not classified to any account, it will be classified to the account namedefault, even when no accounts are configured. - A configured token verification.
Configure a Token Verification
Each token verification must be connected to at least one account. After configuring secrets and accounts:
$ confcli services.routing.tokens.verification -w
Running wizard for resource 'verification'
Hint: Hitting return will set a value to its default.
Enter '?' to receive the help string
verification : [
verification : {
name (default: ): verification-1
enabled (default: True):
floatingSessions (default: False):
algorithm (default: externalToken):
tokenQueryParam (default: token):
accounts <List of account names this token verification applies to. (default: [])>: [
account (default: ): account-1
Add another 'account' element to array 'accounts'? [y/N]:
]
excludedSessionGroups <Session groups excluded from token verification. (default: [])>: [
excludedSessionGroup (default: ):
Add another 'excludedSessionGroup' element to array 'excludedSessionGroups'? [y/N]:
]
secretIds <List of secret IDs used for token verification. (default: [])>: [
secretId (default: ): sec-1
Add another 'secretId' element to array 'secretIds'? [y/N]:
]
}
Add another 'verification' element to array 'verification'? [y/N]:
]
Generated config:
{
"verification": [
{
"name": "verification-1",
"enabled": true,
"floatingSessions": false,
"algorithm": "externalToken",
"tokenQueryParam": "token",
"accounts": [
"account-1"
],
"excludedSessionGroups": [
""
],
"secretIds": [
"sec-1"
]
}
]
}
Merge and apply the config? [y/n]: y
nameany nameenabledenables disables individual verifications. Disabling a verification temporarily, could be useful during debugging.floatingSessionsallow floating client IPs. (See below.)algorithmcurrently the only supported algorithm isexternalTokentokenQueryParamconfigures a custom query parameter name (other thantoken) to be used in the request URL.accountsthe accounts protected by this token. If no accounts are configured, then the verification can still be used by specifyingdefaulthere.excludedSessionGroupswithin account certain session groups can be excluded from verificationsecretIdsa list of secrets. Multiple secrets can be useful during transit from one secret to a new one.
Floating Sessions
By default a token is locked to one client IP address. When floating sessions are enabled, the address is not included in the token. This allows sessions to transition between client devices. To allow this, simply configure:
"floatingSessions": true
7.6.11 - Token Generation
When directing a client to a CDN, the CDN Director can optionally include a token in the redirected request. The CDN uses the token to make sure that the client has permissions to stream the requested content. The token contains information about what the client is allowed to request and is signed with a secret.
The tokens are generated using the “internal tokens” algorithm. Each request gets a unique token.
Internal Tokens
The internal token generation is configured under
services.routing.tokens.generation. It has the following options:
name- The name of this token generation configuration.algorithm- Which algorithm to use when generating the tokens. The only supported algorithm isinternalToken.variant- The internal token algorithm has three variants:default,withSessionandcustom. They are described below.customFormat- The format to use when thecustomvariant is selected.tokenQueryParam- The name of the query parameter where the token is stored. Default istoken.secretId- The ID of the secret that is used for protecting the token. See the Secret Store.defaultStartLimitSeconds- The default lifetime of the internal token. If 0, it will be the same as the session lifetime.defaultExpiresSeconds- The default lifetime of the session that will be created by the token.
The lifetimes of the internal token and the generated session are decided by
various factors which are not described here. defaultStartLimitSeconds and
defaultExpiresSeconds only set their defaults.
Token generation needs to be enabled per host group. This is done by putting
the name of the token generation configuration in
services.routing.hostGroups.<group>.tokenName.
Default Variant
The default variant can be used together with AgileTV streamers if they are
configured to require signatures with the default algorithm.
“With session” variant
The withSession variant is similar to the default algorithm but also
includes a session ID that AgileTV streamers recognize.
The withSession algorithm will only work properly if
services.routing.hostGroups.<group>.createStreamerSession is set to true.
See CDNs and Hosts for more information.
Custom variant
The custom variant allows for greater control of which parameters that are
covered by the generated token. It is configured in customFormat, which
contains a list of descriptors that start with a % sign. The following
descriptors are recognized:
| Descriptor | Meaning |
|---|---|
%% | A literal “%” symbol. |
%H | The value of the Host header that the client will add to the request to the streamer. |
%I | The IP Address of the streamer. |
%K | The expire time of the session that will be generated from this token. |
%T | The value of the stopTime query parameter. |
%b | The path to the content that is requested. |
%c | The IP address of the client that made the request. |
%f | The IP address of the client if floating sessions are enabled. This is always 0.0.0.0. |
%i | A session ID with the same conditions as the withSession variant. |
%k | The expire time of the internal token, in seconds since Jan 1 1970, UTC. |
%s | The secret used to protect the token. |
%t | The value of the startTime query parameter. |
%u | The value of the User-Agent header from the client’s request to the Director. |
Any text in customFormat that is not a descriptor is copied literally into
the token.
Example
If the Director has the following configuration:
confcli integration.secrets
{
"secrets": {
"enabled": true,
"refreshIntervalSeconds": 60,
"secretStore": [
{
"id": "test-secret",
"type": "file",
"resourceName": "test-secret.txt"
}
]
}
}
confcli services.routing.tokens.generation
{
"generation": [
{
"name": "test-token",
"algorithm": "internalToken",
"variant": "withSession",
"customFormat": "",
"secretId": "test-secret",
"defaultStartLimitSeconds": 0,
"defaultExpiresSeconds": 86400
}
]
}
confcli services.routing.hostGroups
{
"hostGroups": [
{
"name": "streamer",
"type": "host",
"httpPort": 80,
"httpsPort": 443,
"headersToForward": [],
"queryPassThrough": {
"policy": "accept",
"exceptions": []
},
"createStreamerSession": true,
"addUrlPrefix": false,
"tokenName": "test-token",
"hosts": [
{
"name": "streamer-interface1",
"hostname": "streamer1.example.com",
"ipv6_address": "",
"healthChecks": []
}
]
}
]
}
The request
curl https://director1.example.com/film1/index.m3u8
might cause the client to be redirected to:
https://streamer1.example.com/session/director1-ba185d-22d0f2c14c3149b4$h1.0$default/film1/index.m3u8?token=352662c2684ce0bfe66bfb6e9561f15f_1782491083_1782491083
The token token=352662c2684ce0bfe66bfb6e9561f15f_1782491083_1782491083 has
been appended to the URL.
7.6.12 - URL Prefixes
URL prefixes are short strings that help the streamer select which backend to fetch content from. The prefixes are prepended to the URL path. They are typically used together with the AgileTV streamers.
The URL prefixes are configured at services.routing.settings.urlPrefixes. A
typical configuration looks like this:
confcli services.routing.settings.urlPrefixes
{
"urlPrefixes": [
{
"prefix": "abc123",
"sessionGroups": [
"host1-sessions"
]
}
]
}
The above configuration will prepend the prefix abc123 to sessions in the
host1-sessions session group. Prefixes usually differ per host, so the
session group will typically be of type hostName. See Session Groups and
Classification for more information.
Prefix insertion needs to be enabled per host group. It is only possible to
enable prefix insertion for groups of type host. It is enabled via the
services.routing.hostGroups.<group>.addUrlPrefix configuration:
confcli services.routing.hostGroups.<group>.addUrlPrefix true
services.routing.hostGroups.<group>.addUrlPrefix = True
Prefixes will be inserted in redirect response URLs for initial sessions. They will not be inserted for instream sessions.
For example, after the prefix abc123 is inserted, the URL
https://streamer1.example.com/film1/index.m3u8
will be:
https://streamer1.example.com/abc123/film1/index.m3u8
7.6.13 - Selection Input Configurations
Selection Input Limits
The number of stored selection input leaf items can be limited with the
selectionInputItemLimit tuning parameter.
$ confcli services.routing.tuning.general.selectionInputItemLimit
{
"selectionInputItemLimit": 10000
}
Selection Input Persistence
Selection input data used by classifiers can be stored in the AgileTV CDN
Manager. This makes the data persistent and allows it to be shared between
Director instances. Each Director fetches the data on startup from the Manager
when selectionInputFetchBase is configured:
$ confcli integration.manager.selectionInputFetchBase
{
"selectionInputFetchBase": "https://acd-manager.example.com/api/selection-input/"
}
7.6.14 - Data streams
Data streams can be used to produce and consume data to and from external data sources. This is useful for integrating with other systems, such as Kafka, to allow data synchronization between different instances of the Director or to read external selection input data.
Configuration
Currently, only Kafka data streams are supported. The addresses of the Kafka
brokers to connect to are configured in integration.kafka.bootstrapServers:
confcli integration.kafka.bootstrapServers
{
"bootstrapServers": [
"kafka-broker-host:9095"
]
}
These Kafka brokers can then be interacted with by configuring data streams in
the services.routing.dataStreams section of the configuration:
confcli services.routing.dataStreams
{
"dataStreams": {
"incoming": [],
"outgoing": []
}
}
Incoming data streams
incoming is a list of data streams that the Director will consume data from.
An incoming data stream defines the following properties:
name: The name of the data stream. This is used to identify the data stream in the configuration and in the logs.source: The source of the data stream. Currently, the only supported source iskafka, which means that the data will be consumed from the Kafka broker configured inintegration.kafka.bootstrapServers.target: The target of the data consumed from the stream. Currently, the only supported target isselectionInput, which means that the consumed data will be stored as selection input data.kafkaTopics: A list of Kafka topics to consume data from.
The following configuration will make the Director consume data from the Kafka
topic selection_input from the Kafka broker configured in
integration.kafka.bootstrapServers and store it as selection input data.
confcli services.routing.dataStreams.incoming
{
"incoming": [
{
"name": "incomingDataStream",
"source": "kafka",
"kafkaTopics": [
"selection_input"
],
"target": "selectionInput"
}
]
}
Outgoing data streams
outgoing is a list of data streams that the Director will produce data to.
An outgoing data stream defines the following properties:
name: The name of the data stream. This is used to identify the data stream in the configuration, in a Lua context and in the logs.type: The type of the data stream. Currently, the only supported type iskafka, which means that the data will be produced to the Kafka broker configured inintegration.kafka.bootstrapServers.kafkaTopic: The Kafka topic to produce data to.
Example of an outgoing data stream that produces to the Kafka topic selection_input:
confcli services.routing.dataStreams.outgoing
{
"outgoing": [
{
"name": "outgoingDataStream",
"type": "kafka",
"kafkaTopic": "selection_input"
}
]
}
Data can be sent to outgoing data streams from a Lua function, see Data stream related functions for more information.
7.6.15 - Trusted proxies
When a request with the header X-Forwarded-For is sent to the router, the
router will check if the client is in the list of trusted proxies. If the client
is not a trusted proxy, the router will drop the connection, returning an empty
reply to the client. If the client is a trusted proxy, the IP address defined
in the X-Forwarded-For will be regarded as the client’s IP address.
The list of trusted proxies can be configured by modifying the configuration
field services.routing.settings.trustedProxies with the IP addresses of
trusted proxies:
$ confcli services.routing.settings.trustedProxies -w
Running wizard for resource 'trustedProxies'
<A list of IP addresses from which the proxy IP address of requests with the X-Forwarded-For header defined are checked. If the IP isn't in this list, the connection is dropped. (default: [])>
Hint: Hitting return will set a value to its default.
Enter '?' to receive the help string
trustedProxies <A list of IP addresses from which the proxy IP address of requests with the X-Forwarded-For header defined are checked. If the IP isn't in this list, the connection is dropped. (default: [])>: [
trustedProxy (default: ): 1.2.3.4
Add another 'trustedProxy' element to array 'trustedProxies'? [y/N]: n
]
Generated config:
{
"trustedProxies": [
"1.2.3.4"
]
}
Merge and apply the config? [y/n]: y
Note that by configuring 0.0.0.0/0 as a trusted proxy, all proxied requests
will be trusted.
7.6.16 - Confd Auto Upgrade Tool
The confd-auto-upgrade tool is a simple utility to automatically migrate the confd
configuration schema between different versions of the Director. Starting with version
1.12.0, it is possible to automatically apply the necessary configuration changes in a
controlled and predictable manner. While this tool is intended to help transition the
configuration format between the different versions, it is not a substitute for proper
backups, and while downgrading to an earlier version, it may not be possible to recover
previously modified or deleted configuration values.
When using the tool, both the “from” and “to” versions must be specified. Internally, the tool will calculate a list of migrations which must be applied to transition between the given versions, and apply them, outputting the final configuration to standard output. The current configuration can either be piped in to the tool via standard input, or supplied as a static file. Providing a “from” version which is later than the “to” version will result in the downgrade migrations being applied in reverse order, effectively downgrading the configuration to the lower version.
For convenience, the tool is deployed to the ACD Nodes automatically at install time as a standard Podman container, however since it is not intended to run as a service, only the image will be present, not a running container.
Performing the Upgrade
In the following example scenario, a system with version 1.10.1 has been upgraded
to 1.14.0. Before upgrading a backup of the configuration was taken and saved to
current_config.json.
Using the image and tag as determined in the above section. Issue the following command:
cat current_config.json | \
podman run -i --rm images.edgeware.tv/acd-confd-migration:1.14.0 \
--in - --from 1.10.1 --to 1.14.0 \
| tee upgraded_config.json
In the above example, the updated configuration is saved to upgraded_config.json.
It is recommended to manually verify the generated configuration, and after
which apply the config to confd by using cat upgraded_config.json | confcli -i.
It is also possible to combine the two commands, by piping the output of the auto-upgrade
tool directly to confcli -i. E.g.
cat current_config.json | podman run ... | tee upgraded_config.json | confcli -i
This will save a backup of the upgraded configuration to upgraded_config.json and
at the same time apply the changes to confd immediately.
Downgrading the Configuration
The steps for downgrading the configuration are exactly the same as for upgrade except for the --from
and --to versions should be swapped. E.g. --from 1.14.0 --to 1.10.1. Keep in mind however,
that during an upgrade some configuration properties may have been deleted or modified, and while
downgrading over those steps, some data loss may occur. In those cases, it may be easier and safer
to simply restore from backup. In most cases where configuration properties are removed during upgrade,
the corresponding downgrade will simply restore the default values of those properties.
7.7 - Operations
This guide describes how to perform day-to-day operations of the ACD Router and its associated services, collectively known as the Director.
Component Overview
To effectively operate the Director software, it is important to understand the composition of the various software components and how they are deployed.
Each Director instance functions as an independent system, comprising multiple containerized services. These containers are managed by a standard container runtime and are seamlessly integrated with the host’s operating system to enhance the overall operator experience.
The containers are managed by the Podman container runtime, which operates without additional daemon services running on the host. Unlike Docker, Podman manages each container as a separate process, eliminating the reliance on a shared daemon and mitigating the risk of a single-point-of-failure scenario.
Although several distinct services make up the Director, the primary component is the router. The router is responsible for listening for incoming requests, processing the request, and redirecting the client to the appropriate host, or CDN to deliver the requested content.
Two additional containers are responsible for configuration management. Those are
confd and confd-transformer. The former manages a local database of configuration
metadata and provides a REST API for managing the configuration. The confd-transformer
simply listens for configuration changes from confd and adapts that configuration
to a format suitable for the router to ingest. For additional information about
setting up and using confd see here..
The next two components, the edns-proxy and the convoy-bridge allow the router
to communicate with an EDNS server for EDNS-based routing, and with synchronization
with Convoy respectively. Additional information about the EDNS-Proxy is available
here.. For the Convoy Bridge
service see here..
The remaining containers are useful for metrics, monitoring, and alerting. These
include prometheus and grafana for monitoring and analytics, and alertmanager
for monitoring and alarms.
7.7.1 - Services
Each container shipped with the Director is fully integrated with the systemd
service on the host, enabling easy management using standard systemd commands.
The logs for each container are also fully integrated with journald to simplify
troubleshooting.
In order to integrate the Podman containers with systemd, a common prefix
of acd- has been applied to each service name. For example the router
container is managed by the service acd-router, and the confd container
is managed by the service acd-confd. These same prefixed names apply while
fetching logs via journald. This common prefix aids in grouping the related
services as well as provides simpler filtering for tab-completion.
Starting / Stopping Services
Standard systemd commands should be used to start and stop the services.
systemctl start acd-router- Starts theroutercontainer.systemctl stop acd-router- Stops theroutercontainer.systemctl status acd-router- Displays the status of theroutercontainer.
Due to the limitation of needing the acd- prefix, it provides the ability to
work with all ACD services in a group. For example:
systemctl status 'acd-*'- Display the status of all installed ACD components.systemctl start 'acd-*'- Start all ACD components.
Logging
Each ACD component corresponds to a journal entry with the same unit name, with
the acd- prefix. Standard journald commands can be used to view and manage the
logging.
journalctl -u acd-router- Display the logs for theroutercontainer
Access Log
Refer to Access Logging.
Troubleshooting
Some additional logging may be available in the filesystem, the paths of which can
be determined by executing the ew-sysinfo command. See
Diagnostics. for additional details.
7.7.2 - Geographic Databases
To do geographic based routing, the Director uses geographic location databases. The databases need to be on the format provided by MaxMind.
When first installed, the Director comes with example databases. These are only suitable for testing and evaluation, if geographic routing is to be used in production, proper databases need to be obtained from MaxMind.
For the Director to find them, each database needs to have a specific filename. Three databases are supported:
| Type | Filename |
|---|---|
| City and Country | /opt/edgeware/acd/geoip2/GeoIP2-City.mmdb |
| ASN | /opt/edgeware/acd/geoip2/GeoLite2-ASN.mmdb |
| Anonymous IP | /opt/edgeware/acd/geoip2/GeoIP2-Anonymous-IP.mmdb |
When updating the database files, the new file is copied over the old file. After that the Director has to be told to reload it. This is done by typing the following:
podman kill --signal HUP router
7.8 - Convoy Bridge
The convoy-bridge is an optional integration service, pre-installed alongside the router which provides two-way communication between the router and a separate Convoy installation.
The convoy-bridge is designed to allow the Convoy account metadata to be available from within the router for such use-cases as inserting the account specific prefixes in the redirect URL and validating per-account internal security tokens. The service works by periodically polling the Convoy server for changes to the configuration, and when detected, the relevant configuration information is pushed to the router.
In addition, the convoy-bridge has the ability to integrate the router with the Convoy analytics service, such that client sessions started by the router are properly collected by Convoy, and are available in the dashboards.
Configuration
The convoy-bridge service is configured using confcli on the router host.
All configuration for the convoy-bridge exists under the path
integration.convoy.bridge.
{
"logLevel": "info",
"accounts": {
"enabled": true,
"dbUrl": "mysql://convoy:eith7jee@convoy:3306",
"dbPollInterval": 60
},
"analytics": {
"enabled": true,
"brokers": ["broker1:9092", "broker2:9092"],
"batchInterval": 10,
"maxBatchSize": 500
},
"otherRouters": [
{
"url": "https://router2:5001",
"apiKey": "key1",
"validateCerts": true
}
]
}
In the above configuration block, there are three main sections. The accounts
section enables fetching account metadata from Convoy towards the router. The
analytics section controls the integration between the router and the Convoy
analytics service. The otherRouters section is used to synchronize additional
router instances. The local router instance will always be implicitly included.
Additional routers listed in this section will be handled by this instance of
the convoy-bridge service.
Logging
The logs are available in the system journal and can be viewed using:
journalctl -u acd-convoy-bridge
7.9 - Monitoring
7.9.1 - Access logging
Access Log
Access logging is enabled by default and can be disabled by running:
$ confcli services.routing.settings.logging.accessLog false
Requests are logged in the Combined Log Format at:
/var/log/acd-router/access.log. Additionally, the symbolic link
/opt/edgeware/acd/router/log points to /var/log/acd-router, allowing
the access logs to also be found at /opt/edgeware/acd/router/log/access.log.
Access Error Log
Access errors are logged to a separate file. These logs can be useful for troubleshooting. Requests are logged in the Combined Log Format, with the selected routing rules appended.
The access error log is disabled by default and can be enabled by running:
$ confcli services.routing.settings.logging.accessErrorLog true
The rule tree depth can be changed with:
$ confcli services.routing.settings.logging.accessErrorLogDepth 5
The error log is at:
/var/log/acd-router/access-error.log. Additionally, the symbolic link
/opt/edgeware/acd/router/log points to /var/log/acd-router, allowing
the access logs to also be found at /opt/edgeware/acd/router/log/.
Example Output
$ cat /var/log/acd-router/access.log
May 29 07:20:00 router[52236]: ::1 - - [29/May/2023:07:20:00 +0000] "GET /vod/batman.m3u8 HTTP/1.1" 302 0 "-" "curl/7.61.1"
$ cat /var/log/acd-router/access-error.log
Jul 14 12:42:42 router[61136]: ::1 - - [14/Jul/2023:12:42:42 +0000] "GET /private/batman.m3u8 HTTP/1.1" 403 0 "-" "... Safari/605.1.15" [verify_token.0.randis, verify_token.1.rejected]
Access Log Rotation
The access logs are rotated and compressed once the file reaches a size of 100 MB. By default, 10 rotated logs are stored before being rotated out. These rotation parameters can be reconfigured by editing the lines
size 100M
rotate 10
in /etc/logrotate.d/acd-router-access-log. For more log rotation configuration
possibilities, refer to the
Logrotate documentation.
7.9.2 - System troubleshooting
ESB3024 contains the tool ew-sysinfo that gives an overview of how the
system is doing. Simply use the command and the tool will output information
about the system and the installed ESB3024 services.
The output format can be changed using the --format flag, possible values
are human (default) and json, e.g.:
$ ew-sysinfo
system:
os: ['5.4.17-2136.321.4.el8uek.x86_64', 'Oracle Linux Server 8.8']
cpu_cores: 2
cpu_load_average: [0.03, 0.03, 0.0]
memory_usage: 478 MB
memory_load_average: [0.03, 0.03, 0.0]
boot_time: 2023-09-08T08:30:57Z
uptime: 6 days, 3:43:44.640665
processes: 122
open_sockets:
ipv4: 12
ipv6: 18
ip_total: 30
tcp_over_ipv4: 9
tcp_over_ipv6: 16
tcp_total: 25
udp_over_ipv4: 3
udp_over_ipv6: 2
udp_total: 5
total: 145
system_disk (/):
total: 33271 MB
used: 7978 MB (24.00%)
free: 25293 MB
journal_disk (/run/log/journal):
total: 1954 MB
used: 217 MB (11.10%)
free: 1736 MB
vulnerabilities:
meltdown: Mitigation: PTI
spectre_v1: Mitigation: usercopy/swapgs barriers and __user pointer sanitization
spectre_v2: Mitigation: Retpolines, STIBP: disabled, RSB filling, PBRSB-eIBRS: Not affected
processes:
orc-re:
pid: 177199
status: sleeping
cpu_usage_percent: 1.0%
cpu_load_average: 131.11%
memory_usage: 14 MB (0.38%)
num_threads: 10
hints:
get_raw_router_config: cat /opt/edgeware/acd/router/cache/config.json
get_confd_config: cat /opt/edgeware/acd/confd/store/__active
get_router_logs: journalctl -u acd-router
get_edns_proxy_logs: journalctl -u acd-edns-proxy
check_firewall_status: systemctl status firewalld
check_firewall_config: iptables -nvL# For --format=json, it's recommended to pipe the output to a JSON interpreter
# such as jq
$ ew-sysinfo --format=json | jq
{
"system": {
"os": [
"5.4.17-2136.321.4.el8uek.x86_64",
"Oracle Linux Server 8.8"
],
"cpu_cores": 2,
"cpu_load_average": [
0.01,
0.0,
0.0
],
"memory_usage": "479 MB",
"memory_load_average": [
0.01,
0.0,
0.0
],
"boot_time": "2023-09-08 08:30:57",
"uptime": "6 days, 5:12:24.617114",
"processes": 123,
"open_sockets": {
"ipv4": 13,
"ipv6": 18,
"ip_total": 31,
"tcp_over_ipv4": 10,
"tcp_over_ipv6": 16,
"tcp_total": 26,
"udp_over_ipv4": 3,
"udp_over_ipv6": 2,
"udp_total": 5,
"total": 146
}
},
"system_disk (/)": {
"total": "33271 MB",
"used": "7977 MB (24.00%)",
"free": "25293 MB"
},
"journal_disk (/run/log/journal)": {
"total": "1954 MB",
"used": "225 MB (11.50%)",
"free": "1728 MB"
},
"vulnerabilities": {
"meltdown": "Mitigation: PTI",
"spectre_v1": "Mitigation: usercopy/swapgs barriers and __user pointer sanitization",
"spectre_v2": "Mitigation: Retpolines, STIBP: disabled, RSB filling, PBRSB-eIBRS: Not affected"
},
"processes": {
"orc-re": {
"pid": 177199,
"status": "sleeping",
"cpu_usage_percent": "0.0%",
"cpu_load_average": "137.63%",
"memory_usage": "14 MB (0.38%)",
"num_threads": 10
}
}
}Note that your system might have different monitored processes and field names.
The field hints is different from the rest. It lists common commands
that can be used to further monitor system performance, useful for
quickly troubleshooting a faulty system.
7.9.3 - Scraping data with Prometheus
Prometheus is a third-party data scraper which is installed as a containerized service in the default installation of ESB3024 Router. It periodically reads metrics data from different services, such as acd-router, aggregates it and makes it available to other services that visualize the data. Those services include Grafana and Alertmanager.
The Prometheus configuration file can be found on the host at
/opt/edgeware/acd/prometheus/prometheus.yaml.
Accessing Prometheus
Prometheus has a web interface that is listening for HTTP connections on port 9090. There is no authentication, so anyone who has access to the host that is running Prometheus can access the interface.
Starting / Stopping Prometheus
After the service is configured, it can be managed via systemd, under the
service unit acd-prometheus.
systemctl start acd-prometheus
Logging
The container logs are automatically published to the system journal, under
the same unit descriptor, and can be viewed using journalctl
journalctl -u acd-prometheus
7.9.4 - Visualizing data with Grafana
7.9.4.1 - Managing Grafana
Grafana displays graphs based on data from Prometheus. A default deployment of Grafana is running in a container alongside ESB3024 Router.
Grafana’s configuration and runtime files are stored under
/opt/edgeware/acd/grafana. It comes with default dashboards that are
documented at Grafana dashboards.
Accessing Grafana
Grafana’s web interface is listening for HTTP connections on port
3000. It has two default accounts, edgeware and admin.
The edgeware account can only view graphs, while the admin account can also
edit graphs. The accounts with default passwords are shown in the table below.
| Account | Default password |
|---|---|
edgeware | edgeware |
admin | edgeware |
Starting / Stopping Grafana
Grafana can be managed via systemd, under the service unit acd-grafana.
systemctl start acd-grafana
Logging
The container logs are automatically published to the system journal, under
the same unit descriptor, and can be viewed using journalctl
journalctl -u acd-grafana
7.9.4.2 - Grafana Dashboards
Grafana will be populated with pre-configured graphs which present some metrics on a time scale. Below is a comprehensive list of those dashboards, along with short descriptions.
Router Monitoring dashboard
This dashboard is by default set as home directory - it’s what user will see
after logging in.
Number Of Initial Routing Decisions
HTTP Status Codes
Total number of responses sent back to incoming requests, shown by their status codes. Metric: client-response-status
Incoming HTTP and HTTPS Requests
Total number of incoming requests that were deemed valid, divided into SSL
and Unencrypted categories.
Metric: num_valid_http_requests
Debugging Information dashboard
Number of Lua Exceptions
Number of exceptions encountered so far while evaluating Lua rules. Metric: lua_num_errors
Number of Lua Contexts
Number of active Lua interpreters, both running and idle. Metric: lua_num_evaluators
Time Spent In Lua
Number of microseconds the Lua interpreters were running. Metric: lua_time_spent
Router Latencies
Histogram-like graph showing how many responses were sent within the given latency interval. Metric: orc_latency_bucket
Internal debugging
A folder that contains dashboards intended for internal use.
ACD: Incoming Internet Connections dashboard
SSL Warnings
Rate of warnings logged during TLS connections Metric: num_ssl_warnings_total
SSL Errors
Rate of errors logged during TLS connections Metric: num_ssl_errors_total
Valid Internet HTTPS Requests
Rate of incoming requests that were deemed valid, HTTPS only. Metric: num_valid_http_requests
Invalid Internet HTTPS Requests
Rate of incoming requests that were deemed invalid, HTTPS only. Metric: num_invalid_http_requests
Valid Internet HTTP Requests
Rate of incoming requests that were deemed valid, HTTP only. Metric: num_valid_http_requests
Invalid Internet HTTP Requests
Rate of incoming requests that were deemed invalid, HTTP only. Metric: num_invalid_http_requests
Prometheus: ACD dashboard
Logged Warnings
Rate of logged warnings since the router has started, divided into CDN-related and CDN-unrelated. Metric: num_log_warnings_total
Logged Errors
Rate of logged errors since the router has started. Metric: num_log_errors_total
HTTP Requests
Rate of responses sent to incoming connections. Metric: orc_latency_count
Number Of Active Sessions
Number of sessions opened on router that are still active. Metric: num_sessions
Total Number Of Sessions
Total number of sessions opened on router. Metric: num_sessions
Session Type Counts (Non-Stacked)
Number of active sessions divided by type; see metric documentation linked below for up-to-date list of types. Metric: num_sessions
Prometheus/ACD: Subrunners
Client Connections
Number of currently open client connections per subrunner. Metric: subrunner_client_conns
Asynchronous Queues (Current)
Number of queued events per subrunner, roughly corresponding to load. Metric: subrunner_async_queue
Used <Send/receive> Data Blocks
Number of send or receive data blocks currently in use per subrunner, as decided by the “Send/receive” drop down box. Metric: subrunner_used_send_data_blocks and subrunner_used_receive_data_blocks
Asynchronous Queues (Max)
Maximum number of events waiting in queue. Metric: subrunner_max_async_queue
Total <Send/receive> Data Blocks
Number of send or receive data blocks allocated per subrunner, as decided by the “Send/receive” drop down box. Metric: subrunner_total_send_data_blocks and subrunner_total_receive_data_blocks
Low Queue (Current)
Number of low priority events queued per subrunner. Metric: subrunner_low_queue
Medium Queue (Current)
Number of medium priority events queued per subrunner. Metric: subrunner_medium_queue
High Queue (Current)
Number of high priority events queued per subrunner. Metric: subrunner_high_queue
Low Queue (Max)
Maximum number of events waiting in low priority queue. Metric: subrunner_max_low_queue
Medium Queue (Max)
Maximum number of events waiting in medium priority queue. Metric: subrunner_max_medium_queue
High Queue (Max)
Maximum number of events waiting in high priority queue. Metric: subrunner_max_high_queue
Wakeups
The number of times a subrunner has been waken up from sleep. Metric: subrunner_io_wakeups
Overloaded
The number of times the number of queued events for a subrunner exceeded its maximum. Metric: subrunner_times_worker_overloaded
Autopause
Number of sockets that have been automatically paused. This happens when the work manager is under heavy load. Metric: subrunner_io_autopause_sockets
7.9.5 - Alarms and Alerting
Alerts are generated by the third-party service Prometheus, which sends them to the Alertmanager service. A default containerized instance of Alertmanager is deployed alongside ESB3024 Router. Out of the box, Alertmanager ships with only a sample configuration file, and will require manual configuration prior to enabling the alerting functionality. Due to the many different possible configurations for how alerts are both detected and where they are pushed, the official Alertmanager documentation should be followed for how to configure the service.
The router ships with Alertmanager 0.25, the documentation
for which can be found at prometheus.io.
The Alertmanager configuration file can be found on the host at
/opt/edgeware/acd/alertmanager/alertmanager.yml.
Accessing Alertmanager
Alertmanager has a web interface that is listening for HTTP connections on port 9093. There is no authentication, so anyone who has access to the host that is running Alertmanager can access the interface.
Starting / Stopping Alertmanager
After the service is configured, it can be managed via systemd, under the
service unit acd-alertmanager.
systemctl start acd-alertmanager
Logging
The container logs are automatically published to the system journal, under
the same unit descriptor, and can be viewed using journalctl
journalctl -u acd-alertmanager
7.9.6 - Monitoring multiple routers
By default an instance of Prometheus only monitors the ESB3024 Router that is installed on the same host as where Prometheus is installed. It is possible to make it monitor other router instances and visualize all instances on one Grafana instance.
Configuring of Prometheus
This is configured in the scraping configuration of Prometheus, which is found
in the file /opt/edgeware/acd/prometheus/prometheus.yaml, which typically
looks like this:
global:
scrape_interval: 15s
rule_files:
- recording-rules.yaml
# A scrape configuration for router metrics
scrape_configs:
- job_name: 'router-scraper'
scheme: https
tls_config:
insecure_skip_verify: true
static_configs:
- targets:
- acd-router-1:5001
metrics_path: /m1/v1/metrics
honor_timestamps: true
- job_name: 'edns-proxy-scraper'
scheme: http
static_configs:
- targets:
- acd-router-1:8888
metrics_path: /metrics
honor_timestamps: true
More routers can be added to the scrape configuration by simply adding more
routers under targets in the scraper jobs.
For instance, to monitor acd-router-2 and acd-router-3 along acd-router-1,
the configuration file needs to be modified like this:
global:
scrape_interval: 15s
rule_files:
- recording-rules.yaml
# A scrape configuration for router metrics
scrape_configs:
- job_name: 'router-scraper'
scheme: https
tls_config:
insecure_skip_verify: true
static_configs:
- targets:
- acd-router-1:5001
- acd-router-2:5001
- acd-router-3:5001
metrics_path: /m1/v1/metrics
honor_timestamps: true
- job_name: 'edns-proxy-scraper'
scheme: http
static_configs:
- targets:
- acd-router-1:8888
- acd-router-2:8888
- acd-router-3:8888
metrics_path: /metrics
honor_timestamps: true
After the file has been modified, Prometheus needs to be restarted by typing
systemctl restart acd-prometheus
It is possible to use the same configuration on multiple routers, so that all routers in a deployment can monitor each other.
Selecting Router in Grafana
In the top left corner the Grafana dashboards have a drop-down menu labeled “ACD Router”, which allows to choose which router to monitor.
7.9.7 - Routing Rule Evaluation Metrics
ESB3024 Router counts the number of times a node and any of its children is selected in the routing table.
The visit counters can be retrieved with the following end points:
/v1/node_visits
Returns visit counters for each node as a flat list of
host:counterpairs in JSON.Example output:
{ "node1": "1", "node2": "1", "node3": "1", "top": "3" }
/v1/node_visits_graph
Returns a full graph of nodes with their respective visit counters in GraphML.
Example output:
<?xml version="1.0"?> <graphml xmlns="http://graphml.graphdrawing.org/xmlns" xmlns:xsi="http://www.w3.org/2001/XMLSchema-instance" xsi:schemaLocation="http://graphml.graphdrawing.org/xmlns http://graphml.graphdrawing.org/xmlns/1.0/graphml.xsd"> <key id="visits" for="node" attr.name="visits" attr.type="string" /> <graph id="G" edgedefault="directed"> <node id="routing_table"> <data key="visits">5</data> </node> <node id="cdn1"> <data key="visits">1</data> </node> <node id="node1"> <data key="visits">1</data> </node> <node id="cdn2"> <data key="visits">2</data> </node> <node id="node2"> <data key="visits">2</data> </node> <node id="cdn3"> <data key="visits">2</data> </node> <node id="node3"> <data key="visits">2</data> </node> <edge id="e0" source="cdn1" target="node1" /> <edge id="e1" source="routing_table" target="cdn1" /> <edge id="e2" source="cdn2" target="node2" /> <edge id="e3" source="routing_table" target="cdn2" /> <edge id="e4" source="cdn3" target="node3" /> <edge id="e5" source="routing_table" target="cdn3" /> </graph> </graphml>To receive the graph as JSON, specify
Accept:application/jsonin the request headers.Example output:
{ "edges": [ { "source": "cdn1", "target": "node1" }, { "source": "routing_table", "target": "cdn1" }, { "source": "cdn2", "target": "node2" }, { "source": "routing_table", "target": "cdn2" }, { "source": "cdn3", "target": "node3" }, { "source": "routing_table", "target": "cdn3" } ], "nodes": [ { "id": "routing_table", "visits": "5" }, { "id": "cdn1", "visits": "1" }, { "id": "node1", "visits": "1" }, { "id": "cdn2", "visits": "2" }, { "id": "node2", "visits": "2" }, { "id": "cdn3", "visits": "2" }, { "id": "node3", "visits": "2" } ] }
Resetting Visit Counters
A node visit counter with an id not matching any node id of a newly applied
routing table is destroyed.
Reset all counters to zero by momentarily applying a configuration with a
placeholder routing root node, that has unique id and an empty members
list, e.g:
"routing": {
"id": "empty_routing_table",
"members": []
}
… and immediately reapply the desired configuration.
7.9.8 - Metrics
ESB3024 Router collects a large number of metrics that can give insight into
it’s condition at runtime. Those metrics are available in
Prometheus’ text-based exposition format
at endpoint :5001/m1/v1/metrics.
Below is the description of these metrics along with their labels.
client_response_status
Number of responses sent back to incoming requests.
- Type: counter
lua_num_errors
Number of errors encountered when evaluating Lua rules.
- Type:
counter
lua_num_evaluators
Number of Lua rules evaluators (active interpreters).
- Type: gauge
lua_time_spent
Time spent by running Lua evaluators, in microseconds.
- Type:
counter
num_configuration_changes
Number of times configuration has been changed since the router has started.
- Type:
counter
num_endpoint_requests
Number of requests redirected per CDN endpoint.
- Type:
counter - Labels:
endpoint- CDN endpoint address.selector- whether the request was counted duringinitialorinstreamselection.
num_invalid_http_requests
Number of client requests that either use wrong method or wrong URL path. Also number of all requests that cannot be parsed as HTTP.
- Type:
counter - Labels:
source- name of internal filter function that classified request as invalid. Probably not of much use outside debugging.type- whether the request was HTTP (Unencrypted) or HTTPS (SSL).
num_log_errors_total
Number of logged errors since the router has started.
- Type:
counter
num_log_warnings_total
Number of logged warnings since the router has started.
- Type:
counter
num_managed_redirects
Number of redirects to the router itself, which allows session management.
- Type:
counter
num_manifests
Number of cached manifests.
- Type:
gauge - Labels:
count- state of manifest in cache, can be eitherlru,evictedortotal.
num_qoe_losses
Number of “lost” QoE decisions per CDN.
- Type:
counter - Labels:
cdn_id- ID of CDN that loose QoE battle.cdn_name- name of CDN that loose QoE battle.selector- whether the decision was taken duringinitialorinstreamselection.
num_qoe_wins
Number of “won” QoE decisions per CDN.
- Type:
counter - Labels:
cdn_id- ID of CDN that won QoE battle.cdn_name- name of CDN that won QoE battle.selector- whether the decision was taken duringinitialorinstreamselection.
num_rejected_requests
Deprecated, should always be at 0.
- Type:
counter - Labels:
selector- whether the request was counted duringinitialorinstreamselection.
num_requests
Total number of requests received by the router.
- Type:
counter - Labels:
selector- whether the request was counted duringinitialorinstreamselection.
num_sessions
Number of sessions opened on router.
- Type:
gauge - Labels:
state- eitheractiveorinactive.type- one of:initial,instream,qoe_on,qoe_off,qoe_agentorsp_agent.
num_ssl_errors_total
Number of all errors logged during TLS connections, both incoming and outgoing.
- Type:
counter
num_ssl_warnings_total
Number of all warnings logged during TLS connections, both incoming and outgoing.
- Type:
counter - Labels:
category- which kind of TLS connection triggered the warning. Can be one of:cdn,content,generic,repeated_sessionor empty.
num_unhandled_requests
Number of requests for which no CDN could be found.
- Type:
counter - Labels:
selector- whether the request was counted duringinitialorinstreamselection.
num_unmanaged_redirects
Number of redirects to “outside” the router - usually to CDN.
- Type:
counter - Labels:
cdn_id- ID of CDN picked for redirection.cdn_name- name of CDN picked for redirection.selector- whether the redirect was result ofinitialorinstreamselection.
num_valid_http_requests
Number of received requests that were not deemed invalid, see
num_invalid_http_requests.
- Type:
counter - Labels:
source- name of internal filter function that classified request as invalid. Probably not of much use outside debugging.type- whether the request was HTTP (Unencrypted) or HTTPS (SSL).
orc_latency_bucket
Total number of responses sorted into “latency buckets” - labels denoting latency interval.
- Type:
counter - Labels:
le- latency bucket that given response falls into.orc_status_code- HTTP status code of given response.
orc_latency_count
Total number of responses.
- Type:
counter - Labels:
tls- whether the response was sent via SSL/TLS connection or not.orc_status_code- HTTP status code of given response.
ssl_certificate_days_remaining
Number of days until a SSL certificate expires.
- Type:
gauge - Labels:
domain- the common name of the domain that the certificate authenticates.not_valid_after- the expiry time of the certificate.not_valid_before- when the certificate starts being valid.usable- if the certificate is usable to the router, see the ssl_certificate_usable_count metric for an explanation.
ssl_certificate_usable_count
Number of usable SSL certificates. A certificate is usable if it is valid and authenticates a domain name that points to the router.
- Type:
gauge
7.9.8.1 - Internal Metrics
A subrunner is an internal module of ESB3024 Router which handles routing requests. The subrunner metrics are technical and mainly of interest for AgileTV. These metrics will be briefly described here.
subrunner_async_queue
Number of queued events per subrunner, roughly corresponding to load.
- Type:
gauge - Labels:
subrunner_id- ID of given subrunner.
subrunner_client_conns
Number of currently open client connections per subrunner.
- Type:
gauge - Labels:
subrunner_id- ID of given subrunner.
subrunner_high_queue
Number of high priority events queued per subrunner.
- Type:
gauge - Labels:
subrunner_id- ID of given subrunner.
subrunner_io_autopause_sockets
Number of sockets that have been automatically paused. This happens when the work manager is under heavy load.
- Type:
counter - Labels:
subrunner_id- ID of given subrunner.
subrunner_io_send_data_fast_attempts
A fast data path was added that in many cases increases the performance of the router. This metric was added to verify that the fast data path is taken.
- Type:
counter - Labels:
subrunner_id- ID of given subrunner.
subrunner_io_wakeups
The number of times a subrunner has been waken up from sleep.
- Type:
counter - Labels:
subrunner_id- ID of given subrunner.
subrunner_low_queue
Number of low priority events queued per subrunner.
- Type:
gauge - Labels:
subrunner_id- ID of given subrunner.
subrunner_max_async_queue
Maximum number of events waiting in queue.
- Type:
gauge - Labels:
subrunner_id- ID of given subrunner.
subrunner_max_high_queue
Maximum number of events waiting in high priority queue.
- Type:
gauge - Labels:
subrunner_id- ID of given subrunner.
subrunner_max_low_queue
Maximum number of events waiting in low priority queue.
- Type:
gauge - Labels:
subrunner_id- ID of given subrunner.
subrunner_max_medium_queue
Maximum number of events waiting in medium priority queue.
- Type:
gauge - Labels:
subrunner_id- ID of given subrunner.
subrunner_medium_queue
Number of medium priority events queued per subrunner.
- Type:
gauge - Labels:
subrunner_id- ID of given subrunner.
subrunner_times_worker_overloaded
Number of times when queued events for given subrunner exceeded
the tuning.overload_threshold value (defaults to 32).
- Type:
counter - Labels:
subrunner_id- ID of given subrunner.
subrunner_total_receive_data_blocks
Number of receive data blocks allocated per subrunner.
- Type:
gauge - Labels:
subrunner_id- ID of given subrunner.
subrunner_total_send_data_blocks
Number of send data blocks allocated per subrunner.
- Type:
gauge - Labels:
subrunner_id- ID of given subrunner.
subrunner_used_receive_data_blocks
Number of receive data blocks currently in use per subrunner. Same as subrunner_total_receive_data_blocks.
- Type:
gauge - Labels:
subrunner_id- ID of given subrunner.
subrunner_used_send_data_blocks
Number of send data blocks currently in use per subrunner. Same as subrunner_total_send_data_blocks.
- Type:
gauge - Labels:
subrunner_id- ID of given subrunner.
7.10 - Glossary
- ACD
- Agile CDN Director. See “Director”.
- Confd
- A backend service that hosts the service configuration. Comes with an API, a CLI and a GUI.
- Classifier
- A filter that associate a request with a tag that can be used to define session groups.
- Director
- The Agile Delivery OTT router and related services.
- ESB
- A software bundle that can be separately installed and upgraded, and is released as one entity with one change log. Each ESB is identified with a number. Over time, features and functions within an ESB can change.
- Lua
- A widely available scripting language that is often used to extend the capabilities of a piece of software.
- Router
- Unless otherwise specified, an HTTP router that manages an OTT session using HTTP redirect. There are also ways to use DNS instead of HTTP.
- Selection Input API
- Data posted to this API can be accessed by the routing rules and hence influence the routing decisions.
- Subnet API
- An API to define mappings between subnets and names (typically regions) for those subnets. Routing rules can then refer to the names rather than the subnets.
- Session Group
- A handle on a group of requests, defined via classifiers.
8 - AgileTV Account Aggregator (esb3032)
8.1 - Getting Started
The account aggregator is a service responsible for monitoring various input streams, compiling and aggregating statistics, and selectively reporting to one or more output streams. It acts primarily as a centralized collector of metrics which may have various aggregations applied before being published to one or more endpoints.
Modes of Operation
There are two primary modes of operation, a live-monitoring mode, as well as a reporting mode. The live-monitoring mode measures the account records in real-time, filters, and aggregates the data to the various outputs in real-time. In this mode, only the most recent data will be considered, and any historical context upon startup may be skipped. In the reporting mode, the account record data will be consumed and processed in the order in which they were published to Kafka, and the service will guarantee that all records, still available within the Kafka topic will be processed and reported upon.
Activating the various modes of operation is performed by way of the set of
input and output blocks within the configuration file. The file may
contain one or more input blocks which specify where the data is sourced,
e.g. account records from Kafka, and one or more output blocks which
determine how and where the aggregated statistics are published.
While it is possible to specify multiple input and output blocks within
a single configuration file, it is highly recommended to separate each pairing
of input and output blocks into separate instances running on different
nodes. This will yield the best performance and provide for better load
balancing, since each instance will be responsible for a single mode of
operation.
Real-Time Account Monitoring
In the real-time account monitoring mode, account records, which are sent from each streaming server through the Kafka message broker, are processed by the account aggregator, and current real-time throughput metrics are updated in a Redis database. These metrics, which are constantly being updated, reflect the most current state of the CDN, and can be used by the Convoy Request Router to make real-time routing decisions.
PCX Reporting
In the PCX collector mode, account records are consumed in such a way that past throughput and session statistics can be aggregated to produce billing related reports. These reports are not considered real-time metrics, but represent usage statistics over fixed time intervals. This mode of operation requires a PCX API compatible reporting endpoint. See Appendix B for additional information regarding the PCX reporting format.
Installation
Prerequisites
The account aggregator is shipped as a compressed OCI formatted container image and as such, it requires a supported container runtime such as one of the following:
- Docker
- Podman
- Kubernetes
Any runtime capable of running a Linux container should work the same. For simplicity, the following installation instructions assume that Docker is being used, and that Docker is already configured and running on the target system.
To test that Docker is setup and running, and that the current user has the required privileges to create a container, you may execute the following command.
$ docker run hello-world
Hello from Docker!
This message shows that your installation appears to be working correctly.
To generate this message, Docker took the following steps:
1. The Docker client contacted the Docker daemon.
2. The Docker daemon pulled the "hello-world" image from the Docker Hub.
(amd64)
3. The Docker daemon created a new container from that image which runs the
executable that produces the output you are currently reading.
4. The Docker daemon streamed that output to the Docker client, which sent it
to your terminal.
To try something more ambitious, you can run an Ubuntu container with:
$ docker run -it ubuntu bash
Share images, automate workflows, and more with a free Docker ID:
https://hub.docker.com/
For more examples and ideas, visit:
https://docs.docker.com/get-started/
If you get a permission denied error, ensure that the current user is a member
of the docker group or execute all Docker commands under sudo.
Loading the Container Image
The container image is delivered as a compressed OCI formatted image, which
can be loaded directly via the docker load command. The following assumes
that the image is in /tmp/esb3032-acd-aggregator-0.0.0.gz
docker load --input /tmp/esb3032-acd-aggregator-0.0.0.gz
You will now be able to verify that the image was loaded successfully by executing the following and looking for the image name in the output.
$ docker images | grep acd-aggregator
images.edgeware.tv/esb3032-acd-aggregator latest 4bbe28b444d3 1 day ago 2.08GB
Creating the Configuration File
The configuration file may be located anywhere on the filesystem, however
it is recommended to keep everything under the /opt/edgeware/acd/aggregator
folder to be consistent with other products under the ACD product family.
If that folder doesn’t already exist, you may create the folder with the
following command.
mkdir -p /opt/edgeware/acd/aggregator
If using a different location, you will need to map the folder to the container while creating the Docker container. Additional information describing how to map the volume is available in the section “Creating and starting the container” below.
The configuration file for the account aggregator is divided into several
sections, input, output and tuning. One or more input blocks may
be specified to configure from where the data should be sourced. One or
more output blocks may be configured which determine to where the resulting
aggregated data is published. Finally the tuning block configures various
global settings for how the account aggregator operates, such as the global
log_level.
Configuring the Input Source
As of the current version of the account aggregator, there is only a single
type of input source supported, and that is account_records. This input
source connects to a Kafka message broker, and consumes account records.
Depending on which output types are configured, the Kafka consumer may either
start by processing the oldest or most recent records first.
The following configuration block sample will be used as an example in the description below.
Note that the key input is surrounded by double-square-brackets. This is
a syntax element to indicate that there may be multiple input sections in
the configuration.
[[input]]
type = "account_records"
servers = [
"kafka://192.0.2.1:9092",
"kafka://192.0.2.2:9092",
]
group_name = "acd-aggregator"
kafka_max_poll_interval_ms = 30000
kafka_session_timeout_ms = 3000
log_level = "off"
The type property is used to determine the type of input, and the only
valid value is account_records.
The servers list must contain at least 1 Kafka URL, prefixed with the
URL scheme kafka://. If not specified, the default Kafka port of 9092
will be used. It is recommended but not required to specify all servers
here, as the Kafka client library will obtain the full list of endpoints
from the server on startup, however, the initial connection will be made
to one or more of the provided URLs.
The group_name property identifies to which consumer group the aggregator
should belong. Due to the type of data which account records represent, each
instance of the aggregator connecting to the same Kafka message broker
MUST have a unique group name. If two instances belong to the same group,
the data will be partitioned among both instances, and the resulting
aggregations may not be correct. If only a single instance of the account
aggregator is used, this property is optional and defaults to “acd-aggregator”.
The kafka_* properties, for max_poll_interval and session_timeout are
used to tune the connection parameters for the internal Kafka consumer. More
details for these properties can be found in the documentation for the
rdkafka library. See Kafka documentation
for more details.
The log_level property configures the logging level for the Kafka library
and supports the values “off”, “trace”, “debug”, “info”, “warn”, and “error”.
By default, logging from this library is disabled. This should only be
enabled for troubleshooting purposes, as it is extremely verbose, and any
warnings or error messages will be repeated in the account aggregator’s log.
The logging level for the Kafka library must be higher then the general
logging level for the aggregator, as defined in the “tuning” section or the
lower-level messages from the Kafka library will be skipped.
Configuring Output
The account aggregator currently supports two types of output blocks, depending on the desired mode of operation. For reference purposes, both types will be described within this section, but it is recommended to only use a single type per instance of the account aggregator.
Note that the key output is surrounded by double-square-brackets. This is
a syntax element to indicate that there may be multiple output sections in
the configuration.
[[output]]
type = "account_monitor"
redis_servers = [
"redis://192.0.2.7:6379/0",
"redis://:password@192.0.2.8:6379/1",
]
stale_threshold_s = 12
throughput_correction_mbps = 0
minimum_check_interval_ms = 1000
[[output]]
type = "pcx_collector"
report_url = "https://192.0.2.5:8000/v1/collector"
client_id = "edgeware"
secret = "abc123"
report_timeout_ms = 2000
report_interval_s = 30
report_delay_s = 30
Real-Time Account Monitor Output
The first output block has the type account_monitor and represents the
live account monitoring functionality, which publishes per-account bandwidth
metrics to one or more Redis servers. When this type of output block is
configured, the account records will be consumed starting with the most
recent messages first, and offsets will not be committed. Stopping or
restarting the service may cause account records to be skipped. This type
of output is suitable for making real-time routing decisions, but should
not be relied upon for critical billing or reporting metrics.
The redis_servers list consists of URLs to Redis instances which shall be
updated with the current real-time bandwidth metrics. If the Redis instance
requires authentication, the global instance password can be specified as part
of the URL as in the second entry in the list. Since Redis does not support
usernames, anything before the : in the credentials part of the URL will
be ignored. At least 1 Redis URL must be provided.
The stale_threshold_s property determines the maximum timeout in seconds,
after which, if no account records have been received for a given host,
the host will be considered stale and removed.
The throughput_correction_mbps property can be used to add or subtract a
fixed correction factor to the bandwidth reported in Redis. This is specified
in megabits per second, and this may be either positive or negative. If
the value is negative, and the calculated bandwidth is less than the correction
factor, a minimum bandwidth of 0 will be reported.
The minimum_check_interval_ms property is used to throttle how frequently
the statistics will be processed. By default, the account aggregator will not
recalculate the statistics more than once per second. Setting this value too
low will result in potentially higher CPU usage, while setting it too high may
result in some account records being missed. The default of 1 second should
be adequate for most situations.
PCX Collector Output
The pcx_collector type configures the account aggregator as a reporting
agent for the PCX API. Whenever this configuration is present, the account
record consumer will be configured to always start at the oldest records
retained within the Kafka topic. It then processes the records one at a time,
committing the Kafka offset each time a report is successfully received.
This mode does not make any guarantees as to how recent the data is on which
the reports are made, but does guarantee that every record will be counted
in the aggregated report. Stopping or restarting the service will result in
the account record consumer resuming processing from the last successful
report. This type of reporting is suitable for billing purposes assuming
that there are multiple replicated Kafka nodes, and that the service is not
stopped for longer than the maximum retention period configured within
Kafka. Stopping the service for longer than the retention period will result
in messages being unavailable. Because this type of output requires that
the Kafka consumer is processed in a specific order, and will not proceed
with reading additional messages until all reports have been successfully
received, it is not recommended to have both pcx_collector and the
account_monitor type output blocks configured within the same instance.
The report_url property is a single HTTP endpoint URL where the PCX API
can be reached. This property is required and may be either an HTTP or HTTPS
URL. For HTTPS, the validity of the TLS certificate will be enforced, meaning
that self-signed certificates will not be considered valid.
The client_id and secret fields are used to authenticate the client with
the PCX API via token-based authentication. These fields are both required,
however if not used by the specific PCX API instance, the empty string ""
may be provided.
The report_timeout_ms field is an optional maximum timeout for the HTTP
connection to the PCX API before the connection will fail. Failed reports
will be retried indefinitely.
The report_interval_s property represents the interval bucket size for
reporting metrics. The timing for this type of output is based solely
on the embedded timestamp value of the account records, meaning that this
property is not an absolute period on which the reports will be sent, but
instead represents the duration between the start and ending timestamps of
the report. Especially upon startup, reports may be sent much more frequently
than this interval, but will always cover this duration of time.
The report_delay_s property is an optional offset used to account for both
clock synchronization between servers as well as propagation delay of the
account records through the message broker. The default delay is 30 seconds.
This means that the ending timestamp of a given report will be no more recent
than this many seconds in the past. It is important to include this delay, as
any account records received with a timestamp that would be within period which
has already been reported upon, will be dropped.
Tuning the Account Aggregator
The tuning configuration block represents the global properties for tuning
how the account aggregator functions. Currently only one tuning property
can be configured, and that is the log_level. The default log_level is
“info”, which should be used in normal operation of the account aggregator,
however, other possible values in order of verbosity include “trace”,
“debug”, “info”, “warn”, “error”, and “off”.
Note that the tuning key is surrounded by single square-brackets. This is
TOML syntax meaning that only one instance of tuning is allowed.
[tuning]
log_level = "info"
Example Configurations
This section describes some example configuration files which can be used as a starting template depending on which mode of operation is desired.
Real-Time Account Monitoring Example
This configuration will consume account records from a Kafka server running on 3 hosts, kafka-1, kafka-2, and kafka-3. The account records will be consumed starting with the most recent records. The resulting aggregations will be published to two Redis instances, running on redis-1 and redis-2. The reported bandwidth will have a 2Gb/s correction factor applied.
[[input]]
type = "account_records"
servers = [
"kafka://kafka-1:9092",
"kafka://kafka-2:9092",
"kafka://kafka-3:9092"
]
group_name = "acd-aggregator-live"
# kafka_max_poll_interval_ms = 30000
# kafka_session_timeout_ms = 3000
# log_level = "off"
[[output]]
type = "account_monitor"
redis_servers = [
"redis://redis-1:6379/0",
"redis://redis-2:6379/0",
]
# stale_threshold_s = 12
throughput_correction_mbps = 2000
# minimum_check_interval_ms = 1000
[tuning]
log_level = "info"
The keys prefixed by # are commented out, since the default values will
be used. They are included in the example for completeness.
PCX Collector
This configuration will consume account records starting from the earliest
record, calculate aggregated statistics for every 30 seconds, offset with
a delay of 30 seconds, and publish the results to
https://pcx.example.com/v1/collector.
[[input]]
type = "account_records"
servers = [
"kafka://kafka-1:9092",
"kafka://kafka-2:9092",
"kafka://kafka-3:9092"
]
group_name = "acd-aggregator-pcx"
# kafka_max_poll_interval_ms = 30000
# kafka_session_timeout_ms = 3000
# log_level = "off"
[[output]]
type = "pcx_collector"
report_url = "https://pcx.example.com/v1/collector"
client_id = "edgeware"
secret = "abc123"
# report_timeout_ms = 2000
# report_interval_s = 30
# report_delay_s = 30
[tuning]
log_level = "info"
The keys prefixed by # are commented out, since the default values will
be used. They are included in the example for completeness.
Combined PCX Collector with Real-Time Account Monitoring
While this configuration is possible, it is not recommended, since the
pcx_collector output type will force all records to be consumed starting
at the earliest record. This will cause the live statistics to be delayed
until ALL earlier records have been consumed, and reports have been
successfully accepted by the PCX API. This combined role configuration can be
used to minimize the number of servers or services running if the above
limitations are acceptable.
Note: This is simply the combination of the above two output blocks in the
same configuration file.
[[input]]
type = "account_records"
servers = [
"kafka://kafka-1:9092",
"kafka://kafka-2:9092",
"kafka://kafka-3:9092"
]
group_name = "acd-aggregator-combined"
# kafka_max_poll_interval_ms = 30000
# kafka_session_timeout_ms = 3000
# log_level = "off"
[[output]]
type = "account_monitor"
redis_servers = [
"redis://redis-1:6379/0",
"redis://redis-2:6379/0",
]
# stale_threshold_s = 12
throughput_correction_mbps = 2000
# minimum_check_interval_ms = 1000
[[output]]
type = "pcx_collector"
report_url = "https://pcx.example.com/v1/collector"
client_id = "edgeware"
secret = "abc123"
# report_timeout_ms = 2000
# report_interval_s = 30
# report_delay_s = 30
[tuning]
log_level = "info"
Upgrading
The upgrade procedure for the aggregator consists of simply stopping
the existing container with docker stop acd-aggregator, removing the
existing container with docker rm acd-aggregator, and following the
steps in “Creating and starting the container” below with the upgraded
Docker image.
To roll back to a previous version, simply perform the same steps with the
previous image. It is recommended to keep at least one previous image
around until such time that you are satisfied with the new version. After
which, you may remove the previous image with
docker rmi images.edgeware.tv/esb3032-acd-aggregator:1.2.3 where “1.2.3”
represents the previous version number.
Creating and Starting the Container
Now that the configuration file has been created, and the image has been
loaded, we will need to create and start the container instance. The
following docker run command will create a new container called
“acd-aggregator”, start the process, and automatically resume the container
once the Docker daemon is loaded at startup.
docker run \
--name "acd-aggregator" \
--detach \
--restart=always \
-v <PATH_TO_CONFIG_FOLDER>:/opt/edgeware/acd/aggregator:ro \
<IMAGE NAME>:<VERSION> \
--config /opt/edgeware/acd/aggregator/aggregator.toml
As an example using version 1.4.0:
docker run \
--name "acd-aggregator" \
--detach \
--restart=always \
-v /opt/edgeware/acd/aggregator:/opt/edgeware/acd/aggregator:ro \
images.edgeware.tv/esb3032-acd-aggregator:1.4.0 \
--config /opt/edgeware/acd/aggregator/aggregator.toml
Note: The image tag in the example is “1.4.0”, you will need to replace
that tag with the image tag loaded from the compressed OCI formatted image
file, which can be obtained by running docker images and searching for the
account aggregator image as described in the step “Loading the container image”
above.
If the configuration file saved in the previous step was at a different
location from /opt/edgeware/acd/aggregator/aggregator.toml you will need to
change both the -v option and the --config option in the above
command to represent that location. The -v option mounts the containing
folder from the host system on the left to the corresponding path inside
the container on the right, and the :ro tells Docker that the volume is
mounted read-only. The --config should be the absolute path to the
configuration file from INSIDE the container. For example, if you saved
the configuration file as /host/path/config.toml on the host, and you need
to map that to /container/path/config.toml within the container, the lines
should be -v /host/path:/container/path:ro and
--config /container/path/config.toml respectively.
The --restart=always line tells Docker to automatically restart the
container when the Docker runtime is loaded, and is the equivalent in
systemd to “enabling” the service.
Starting and Stopping the Container
To view the status of the running container, use the docker ps command.
This will give a line of output for the acd-aggregator container if it
is currently running. Appending the -a flag, will list the aggregator
container if is not running as well.
Execute the following:
docker ps -a
You should see a line for the container with the container name “acd-aggregator” along with the current state of the container. If all is OK, you should see the container process running at this point, but it may show as “exited” if there was a problem.
To start and stop the container the docker start acd-aggregator and
docker stop acd-aggregator commands can be used.
Viewing the Logs
By default, Docker will maintain the logs of the individual containers within its own internal logging subsystem, which requires the user to use the command
docker logs
to view them. It is possible however to configure the Docker daemon to send logs to the system journal, however configuring that is beyond the scope of this document. Additional details describing how to do that are described here
[https://docs.docker.com/config/containers/logging/journald/].
To view the complete log for the aggregator the following command can be used.
docker logs acd-aggregator
Supplying the -f flag, can be used to “follow” the log until either the
process terminates or CTRL+C is pressed.
docker logs -f acd-aggregator
Appendix A: Real-time Account Monitoring
Redis Key-Value Pairs
Each account will have a single key-value stored in Redis with the current throughput with any correction factor applied, which will be updated in real-time every time all hosts for the given account have received a new account record. This should be approximately every 10 seconds, but may vary slightly due to processing time.
The keys are structured in the following format:
bandwidth:<account>:value
and the value is reported in bits-per-second.
For example for accounts foo, bar and baz we may see the following:
bandwidth:foo:value = 123456789
bandwidth:bar:value = 234567890
bandwidth:baz:value = 102400
These values represent the most current throughput for each account, and will be updated periodically. A TTL of 48 hours is added to the keys, such that they will be pruned automatically after 48 hours since the last update. This is to prevent stale keys from remaining in Redis indefinitely. This TTL is not configurable by the end user.
Appendix B: PCX Collector Reporting
PCX Reporting Format
The following is an example of the report sent to the PCX HTTP endpoint.
{
timestamp_begin: 1674165540,
timestamp_end: 1674165570,
writer_id: "writer-1",
traffic: [
Traffic {
account_id: "unknown",
num_ongoing_sessions: 0,
bytes_transmitted: 0,
edges: [
Edge {
server: "orbit-1632",
num_ongoing_sessions: 0,
bytes_transmitted: 0,
},
],
},
Traffic {
account_id: "default",
num_ongoing_sessions: 747,
bytes_transmitted: 75326,
edges: [
Edge {
server: "orbit-1632",
num_ongoing_sessions: 747,
bytes_transmitted: 75326,
},
],
},
],
}
The report can be broken down into 3 parts. The outer root section includes
the starting and stopping timestamps, as well as a writer_id field which is
currently unused. For each account a Traffic section contains the
aggregated statistics for that account, as well as a detailed breakdown of
each Edge. An Edge is the portion of traffic for the account streamed
by each server. Within an Edge the num_ongoing_sessions represents the
peak ongoing sessions during the reporting interval, while the
bytes_transmitted represents the total egress bandwidth in bytes over the
entire period. For each outer Traffic section, the num_ongoing_sessions
and bytes_transmitted represent the sum of the corresponding entries in
all Edges.
Data Protection and Consistency
The ACD aggregator works by consuming messages from Kafka. Once a report has successfully been submitted, as determined by a 200 OK HTTP status from the reporting endpoint, the position in the Kafka topic will be committed. This means that if the aggregator process stops and is restarted, reporting will resume from the last successful report, and no data will be lost. There is a limitation to this, however, and that has to do with the data retention time of the messages in Kafka and the TTL value specified in the aggregator configuration. Both default to the same value of 24 hours. This means that if the aggregator process is stopped for more than 24 hours, data loss will result since the source account records will have expired from Kafka before they can be reported on by the aggregator.
Upon startup of the aggregator, all records stored in Kafka will be reported on in the order they are read, starting from either the last successful report or the oldest record currently in Kafka. Reports will be sent each time the timestamp in the current record read from Kafka exceeds the reporting interval meaning a large burst of reports will be sent at startup to cover each interval. Once the aggregator has caught up with the backlog of account records, it will send a single report roughly every 30 seconds (configurable).
It is not recommended to have more than a single account aggregator instance reading from Kafka at a time, as this will result in partial reports being sent to the HTTP endpoint which will require the endpoint to reconstruct the data upon receipt. All redundancy in the account aggregator is handled by the redundancy within Kafka itself. With this in mind, it is important to ensure that there are multiple Kafka instances running and that the aggregator is configured to read from all of them.
8.2 - Releases
8.2.1 - Release esb3032-0.2.0
Build date
2022-12-21
Release status
Type: devdrop
Change log
- NEW: Use config file instead of command line switches
- NEW: Reports are now aligned with wall-clock time
- NEW: Reporting time no longer contains gaps in coverage
- FIX: Per-account number of sessions only shows largest host
8.2.2 - Release esb3032-1.0.0
Build date
2023-02-14
Release status
Type: production
Change log
- NEW: Create user documentation for ACD Aggregator
- NEW: Simplify configuration . Changed from YAML to TOML format.
- NEW: Handle account records arriving late
- FIXED: Aggregator hangs if committing to Kafka delays more than 5 minutes
8.2.3 - Release esb3032-1.2.1
Build date
2023-04-24
Release status
Type: production
Breaking changes
No breaking changes
Change log
- NEW: Port Account Monitor functionality for Convoy Request Router
- NEW: Aggregator Performance Improvements
- FIXED: Reports lost when restarting acd-aggregator
8.2.4 - Release esb3032-1.4.0
Build date
2023-09-28
Release status
Type: production
Breaking changes
None
Change log
- NEW: Extend aggregator with additional metrics. Per streamer bandwidth and total bandwidth are now updated in Redis. [ESB3032-98]
- FIXED: Not all Redis instances are updated after a failure [ESB3032-99]
- FIXED: Kafka consumer restarts on Partition EOF [ESB3032-100]
9 - AgileTV CDN Manager (esb3027)
9.1 - Getting Started
Introduction
The ESB3027 AgileTV CDN Manager is a suite of services responsible for coordinating the Content Delivery Network (CDN) operations. It provides essential APIs and features supporting the ESB3024 AgileTV CDN Director. Key capabilities include:
Centralized user management for authentication and authorization Configuration services, APIs, and user interfaces CDN usage monitoring and metrics reporting License-based tracking, monitoring, and billing Core API services Event coordination and synchronization The software can be deployed as either a self-managed cluster or in a public cloud environment such as AWS. Designed as a cloud-native application following CNCF best practices, its deployment varies slightly depending on the environment:
Self-hosted: A lightweight Kubernetes cluster runs on bare-metal or virtual machines within the customer’s network. The application is deployed within this cluster.
Public cloud: The cloud provider manages the cluster infrastructure, with the application deploying into it. The differences are primarily operational; the software’s functionality remains consistent across environments, with distinctions clearly noted in this guide.
Since deployment relies on Kubernetes, familiarity with key tools is essential:
helm: The package manager for Kubernetes, used for installing, upgrading, rolling back, and removing application charts. Helm charts are collections of templates and default values that generate Kubernetes manifests for deployment.
kubectl: The primary command-line tool for managing Kubernetes resources and applications. In a self-hosted setup, it’s typically used from the control plane nodes; in cloud environments, it may be run locally, often from your laptop or desktop.
Cloud provider tools: In cloud environments, familiarity with CLI tools like awscli and the WebUI is also required for managing infrastructure.
Architectural Overview
See the Architecture Guide.
Installation Overview
The installation process for the manager varies depending on the environment.
Self-hosted: Begin by deploying a lightweight Kubernetes cluster. The installation ISO includes an installer for a simple K3s cluster, a Rancher Labs Kubernetes distribution.
Public cloud: Use your cloud provider’s tooling to deploy the cluster. Specific instructions are beyond this document’s scope, as they vary by provider.
Once the cluster is operational, the remaining steps are the same: deploy the manager software using Helm.
The following sections provide an overview based on your environment. For detailed instructions, refer to the Installation Guide.
Hardware Requirements
In a Kubernetes cluster, each node has a fixed amount of resources—such as CPU, memory, and free disk space. Pods are assigned to nodes based on resource availability. The control plane uses a best-effort approach to schedule pods on nodes with the lowest overall utilization.
Kubernetes manifests for each deployment specify both resource requests and limits for each pod. A node must have at least the requested resources available to schedule a pod there. Since each replica of a deployment requires the same resource requests, the total resource consumption depends on the number of replicas, which is configurable.
Additionally, a Horizontal Pod Autoscaler can automatically adjust the number of replicas based on resource utilization, within defined minimum and maximum bounds.
Because of this, the hardware requirements for deploying the software depend heavily on expected load, configuration, and cluster size. Nonetheless, there are some general recommendations for hardware selection.
See the System Requirements Guide for details about the recommended hardware, supported operating systems, and networking requirements.
Installation Guide
The installation instructions can be found in the Installation Guide.
Configuration Reference
A detailed look at the configuration can be found in the Configuration Reference Guide.
9.2 - System Requirements Guide
Cluster Sizing
The ESB3027 AgileTV CDN Manager requires a minimum of three machines for production deployment. While it’s possible to run the software on a single node in a lab environment, such an setup will not offer optimal performance or high availability.
A typical cluster comprises nodes assigned to either a Server or Agent role. Server nodes are responsible for running the control plane software, which manages the cluster, and they can also host application workloads if configured accordingly. Agent nodes, on the other hand, execute the application containers (workloads) but do not participate in the control plane or quorum. They serve to scale capacity as needed. See the Installation Guide for more information about the role types and responsibilities.
For high availability, it is essential to have an odd number of Server nodes. The minimum recommended is three, which allows the cluster to tolerate the loss of one server node. Increasing the Server nodes to five enhances resilience, enabling the cluster to withstand the loss of two server nodes. The critical factor is that more than half of the Server nodes are available; this quorum ensures the cluster remains operational. The loss of Agent nodes does not impact quorum, though workloads on failed nodes are automatically migrated if there is sufficient capacity.
Hardware Requirements
Single-Node Lab Cluster (Acceptance Testing)
For customer acceptance testing in a single-node lab environment, the following hardware is required. These requirements match the Lab Install Guide and are intended for non-production, single-node clusters only:
| CPU | Memory | Disk | |
|---|---|---|---|
| Minimum | 8 Cores | 16GB | 128GB |
| Recommended | 12 Cores | 24GB | 128GB |
- Disk space should be available in the
/varpartition
Note: These requirements are for lab/acceptance testing only. For production workloads, see below.
Production Cluster (3 or More Nodes)
The following tables outline the minimum and recommended hardware specifications for different node
roles within a production cluster. All disk space values refer to the available space on the
/var/lib/longhorn partition. Additional capacity may be needed in other locations not specified
here; it is advisable to follow the operating system vendor’s recommendations for those areas. For
optimal performance, it is recommended to use SSDs or similar high-speed disks for Longhorn storage.
Both virtual machines and bare-metal hardware are supported; however, hosting multiple nodes under a
single hypervisor can impact performance.
Server Role - Control Plane only
| CPU | Memory | Disk | |
|---|---|---|---|
| Minimum | 4 Cores | 8GB | 64GB |
| Recommended | 8 Cores | 16GB | 128GB |
- Disk space should be available in the
/varpartition
Agent Role
| CPU | Memory | Disk | |
|---|---|---|---|
| Minimum | 8 Cores | 16GB | 128GB |
| Recommended | 16 Cores | 32GB | 256GB |
- Disk space should be available in the
/varpartition
Server Role - Control Plane + Workloads
| CPU | Memory | Disk | |
|---|---|---|---|
| Minimum | 12 Cores | 24GB | 128GB |
| Recommended | 24 Cores | 48GB | 256GB |
- Disk space should be available in the
/varpartition
Operating System Requirements
| Operating System | Supported |
|---|---|
| RedHat 7 | No |
| RedHat 8 | Yes |
| RedHat 9 | Yes |
| RedHat 10 | Untested |
We currently support RedHat Enterprise Linux or any compatible clone such as Oracle Linux, Alma Linux, etc., as long as the major version is listed as supported in the above table.
SELinux support will be installed if SELinux is “Enforcing” when installing the ESB3027 AgileTV CDN Manager cluster.
Networking Requirements
A minimum of 1 Network Interface Card must be present and configured as the default gateway on the node when the cluster is installed. If the node does not have an interface with the default route, a default route must be configured. See the Installation Guide for details.
9.3 - Architecture Guide
Kubernetes Architecture
Kubernetes is an open-source container orchestration platform that simplifies the deployment, management, and scaling of containerized applications. It provides a robust framework to run applications reliably across a cluster of machines by abstracting the complexities of the underlying infrastructure. At its core, Kubernetes manages resources through various objects that define how applications are deployed and maintained.
Nodes are the physical or virtual machines that make up the Kubernetes cluster. Each node runs a container runtime, the kubelet agent, and other necessary components to host and manage containers. The smallest deployable units in Kubernetes are Pods, which typically consist of one or more containers sharing storage, network, and a specified way to run the containers. Containers within Pods are the actual runtime instances of the applications.
To manage the lifecycle of applications, Kubernetes offers different controllers such as Deployments and StatefulSets. Deployments are used for stateless applications, enabling easy rolling updates and scaling. StatefulSets, on the other hand, are designed for stateful applications that require persistent storage and stable network identities, like databases. Kubernetes also uses Services to provide a stable network endpoint that abstracts Pods, facilitating reliable communication within the application or from outside the cluster, often distributing traffic load across multiple Pods.
graph TD
subgraph Cluster
direction TB
Node1["Node"]
Node2["Node"]
end
subgraph "Workloads"
Deployment["Deployment (stateless)"]
StatefulSet["StatefulSet (stateful)"]
Pod1["Pod"]
Pod2["Pod"]
Container1["Container"]
Container2["Container"]
end
subgraph "Networking"
Service["Service"]
end
Node1 -->|Hosts| Pod1
Node2 -->|Hosts| Pod2
Deployment -->|Manages| Pod1
StatefulSet -->|Manages| Pod2
Pod1 -->|Contains| Container1
Pod2 -->|Contains| Container2
Service -->|Provides endpoint to| Pod1
Service -->|Provides endpoint to| Pod2Additional Concepts
Both Deployments and StatefulSets can be scaled by adjusting the number of Pod replicas.
In a Deployment, replicas are considered identical clones of the Pod, and a Service
typically performs load balancing across them. Each replica in a ReplicaSet is assigned
a fixed name, usually following a pattern like <name>-<index>, for example, postgresql-0,
postgresql-1, and so on.
Many applications use a fixed number of replicas set through Helm, which remains constant regardless of system load. Alternatively, for more dynamic scaling, a Horizontal Pod Autoscaler (HPA) can be used to automatically adjust the number of replicas between a defined minimum and maximum based on real-time load metrics. In public cloud environments, a Vertical Pod Autoscaler (VPA) may also be employed to dynamically scale the number of nodes, but since this feature is not supported in self-hosted setups and depends on the specific cloud provider’s implementation, it is less commonly used in on-premises environments.
Architectural Diagram
graph TD
subgraph Cluster
direction TB
PostgreSQL[PostgreSQL Database]
Kafka[kafka-controller Pods]
Redis[Redis Master & Replicas]
VictoriaMetrics[VictoriaMetrics]
Prometheus[Prometheus Server]
Grafana[Grafana Dashboard]
Gateway[Nginx Gateway]
Confd[Confd]
Manager[ACD-Manager]
Frontend[MIB Frontend]
ZITADEL[Zitadel]
Telegraf[Telegraf]
AlertManager[Alertmanager]
end
PostgreSQL -->|Stores data| Manager
Kafka -->|Streams data| Manager
Redis -->|Cache / Message Broker| Manager
VictoriaMetrics -->|Billing data| Grafana
Prometheus -->|Billing data| VictoriaMetrics
Prometheus -->|Monitoring data| Grafana
Manager -->|Metrics & Monitoring| Prometheus
Manager -->|Alerting| AlertManager
Manager -->|User Interface| Frontend
Manager -->|Authentication| ZITADEL
Frontend -->|Authentication| Manager
Confd -->|Config Updates| Manager
Telegraf -->|System Metrics| Prometheus
Gateway -->|Proxies| Director[Director APIs]
style PostgreSQL fill:#f9f,stroke:#333,stroke-width:1px
style Kafka fill:#ccf,stroke:#333,stroke-width:1px
style Redis fill:#cfc,stroke:#333,stroke-width:1px
style VictoriaMetrics fill:#ffc,stroke:#333,stroke-width:1px
style Prometheus fill:#ccf,stroke:#333,stroke-width:1px
style Grafana fill:#f99,stroke:#333,stroke-width:1px
style Gateway fill:#eef,stroke:#333,stroke-width:1px
style Confd fill:#eef,stroke:#333,stroke-width:1px
style Manager fill:#eef,stroke:#333,stroke-width:1px
style Frontend fill:#eef,stroke:#333,stroke-width:1px
style ZITADEL fill:#eef,stroke:#333,stroke-width:1px
style Telegraf fill:#eef,stroke:#333,stroke-width:1px
style AlertManager fill:#eef,stroke:#333,stroke-width:1pxCluster Scaling
Most components, of the cluster can be horizontally scaled, as long as sufficient resources exist in the cluster to support the additional pods. There are a few exceptions however. The Selection Input service, currently does not support scaling as the order in which Kafka records would no longer be maintained among different consumer group members. Services such as PostgreSQL, Prometheus and VictoriaMetrics also do not support scaling at the present time due to the additional configuration requirements. Most if not all of the other services may be scaled, either by explicitly setting the number of replicas in the configuration or in some cases by enabling and configuring the horizontal pod autoscaler.
The Horizontal Pod Autoscaler, monitors the resource utilization of the Pods in a deployment, and based on some configurable metrics, will manage the scaling between a preset minimum and maximum number of replicas. See the Configuration Guide for more information.
Kubernetes automatically selects which node will run the pods based on several factors including, the resource utilization of the nodes, any pod and node affinity rules, selector labels, among other considerations. By default, all nodes with the ability to run workloads of both Server and Agent roles are considered unless specific configuration for node and pod affinity rules have been defined.
Summary
- The
acd-managerinteracts with core components like PostgreSQL, Kafka, and Redis for data storage, messaging, and caching. - It exposes APIs via the API Gateway and integrates with Zitadel for authentication.
- Monitoring and alerting are handled through Prometheus, VictoriaMetrics, Grafana, and Alertmanager.
- Supporting services like Confd facilitate configuration management, while Telegraf collects system metrics.
9.4 - Installation Guide
9.4.1 - Overview
Introduction
Installing the ESB3027 AgileTV CDN Manager for production requires a minimum of three nodes. More details about node roles and sizing can be found in the System Requirements Guide. Before beginning the installation, select one node as the primary “Server” node. This node will serve as the main installation point. Once additional Server nodes join the cluster, all Server nodes are considered equivalent, and cluster operations can be managed from any of them. The typical process involves installing the primary node as a Server, then adding more Server nodes to expand the cluster, followed by joining Agent nodes as needed to increase capacity.
Air-Gapped Environments
In air-gapped environments—those without direct Internet access—additional considerations are
required. First, on each node, the Operating System’s ISO must be mounted so that dnf can be
used to install essential packages included with the OS. Second, the “Extras” ISO from the
ESB3027 AgileTV CDN Manager must be mounted to provide access to container images for
third-party software that would otherwise be downloaded from public repositories. Details on
mounting this ISO and loading the included images are provided below.
Roles
All nodes in the cluster have one of two roles. Server nodes run the control-plane software necessary to manage the cluster and provide redundancy. Agent nodes do not run the control-plane software; instead, they are responsible for running the Pods that make up the applications. Jobs are distributed among agent nodes to enable horizontal scalability of workloads. However, agent nodes do not contribute to the cluster’s high availability. If an agent node fails, the Pods assigned to that node are automatically moved to another node, provided sufficient resources are available.
Control-plane only Server nodes
Both server nodes and agent nodes run workloads within the cluster. However, a special attribute called the “CriticalAddonsOnly” taint can be applied to server nodes. This taint prevents the node from scheduling workloads that are not part of the control plane. If the hardware allows, it is recommended to apply this taint to server nodes to separate their responsibilities. Doing so helps prevent misbehaving applications from negatively impacting the overall health of the cluster.
graph TD
subgraph Cluster
direction TB
ServerNodes[Server Nodes]
AgentNodes[Agent Nodes]
end
ServerNodes -->|Manage cluster and control plane| ControlPlane
ServerNodes -->|Provide redundancy| Redundancy
AgentNodes -->|Run application Pods| Pods
Pods -->|Handle workload distribution| Workloads
AgentNodes -->|Failover: Pods move if node fails| Pods
ServerNodes -->|Can run Pods unless tainted with CriticalAddonsOnly| PodExecution
Taint[CriticalAddonsOnly Taint] -->|Applied to server nodes to restrict workload| ServerNodesFor high availability, at least three nodes running the control plane are required, along with at least three nodes running workloads. These can be a combination of server and agent roles, provided that the control-plane nodes are sufficient. If a server node has the “CriticalAddonsOnly” taint applied, an additional agent node must be deployed to ensure workloads can run. For example, the cluster could consist of three untainted server nodes, or two untainted servers, one tainted server, and one agent, or three tainted servers and three agents—all while maintaining at least three control-plane nodes and three workload nodes.
The “CriticalAddonsOnly” taint can be applied to server nodes at any time after cluster installation. However, it only affects Pods scheduled in the future. Existing Pods that have already been assigned to a server node will remain there until they are recreated or rescheduled due to an external event.
kubectl taint nodes <node-name> CriticalAddonsOnly=true:NoSchedule
Where node-name is the hostname of the node for which to apply the taint. Multiple node names
may be specified in the same command. This command should only be run from one of the server nodes.
Next Steps
Continue reading the Installation Requirements.
9.4.2 - Requirements
SELinux
SELinux is fully supported provided it is enabled and set to “Enforcing” mode at the time of the initial cluster installation on all nodes. This is the default configuration for Red Hat Enterprise Linux and its derivatives, such as Oracle Linux and AlmaLinux. If the mode is set to “Enforcing” prior to install time, the necessary SELinux packages will be installed, and the cluster will be started with support for SELinux. For these reasons, enabling SELinux after the initial cluster installation is not supported.
Firewalld
Please see the Networking Guide for the current firewall recommendations.
Hardware
Refer to the System Requirements Guide for the current hardware, operating system, and network requirements.
Networking
A minimum of one network interface card must be present and configured as the default gateway on the node when the cluster is installed. If the node does not have an interface with the default route, a default route must be configured. Even a black-hole route via a dummy interface will suffice. The K3s software requires a default route in order to auto-detect the node’s primary IP, and for cluster routing to function properly. To add a dummy route do the following:
ip link add dummy0 type dummy
ip link set dummy0 up
ip addr add 203.0.113.254/31 dev dummy0
ip route add default via 203.0.113.255 dev dummy0 metric 1000
Special Considerations when using Multiple Network Interfaces
If there are special network considerations, such as using a non-default interface for
cluster communication, that must be configured using the INSTALL_K3S_EXEC environment
variable as below before installing the cluster or joining nodes.
As an example, consider the case where the node contains two interfaces, bond0 and
bond1, where the default route exists through bond0, but where bond1 should be used
for cluster communication. In that case, ensure that the INSTALL_K3S_EXEC environment
variable is set as follows in the environment prior to installing or joining the cluster.
Assuming that bond1 has the local IP address 10.0.0.10:
export INSTALL_K3S_EXEC="<MODE> --node-ip 10.0.0.10 --flannel-iface=bond1"
Where MODE should be one of server or agent depending on the role of the node. The
initial node used to create the cluster MUST be server, and additional nodes vary
depending on the role.
DNS and Hostname Resolution
Kubernetes clusters use internal DNS to allow services and pods to communicate using predictable hostnames. Each service is assigned a DNS name in the format:
<service>.<namespace>.svc.cluster.local
These names are automatically resolvable from within the cluster using the
coredns service, which is deployed by default with K3s. This means that any
pod or service can refer to another by its internal DNS name without needing to
know its IP address.
For DNS queries outside the cluster.local domain (for example, public
internet hostnames or your organization’s internal DNS), coredns forwards
requests to an upstream nameserver. By default, this is set to Google’s public
DNS servers (8.8.8.8 and 8.8.4.4).
However, if the primary installation node has custom nameservers configured in
/etc/resolv.conf, K3s will automatically configure coredns to use those as
the upstream resolvers instead. This allows the cluster to integrate with your
local or corporate DNS infrastructure if needed.
Note for multi-datacenter deployments: If your cluster spans multiple datacenters and each datacenter uses different DNS servers, the cluster will be configured to forward DNS requests to the servers specified in
/etc/resolv.confon the node where the installation was performed. If nodes in other datacenters cannot reach those DNS servers (for example, if the servers are only routable within one datacenter), you must use thehostAliasesmechanism (as described for air-gapped environments) to ensure proper DNS resolution for required services across all nodes.
Note for air-gapped environments: In air-gapped clusters, or any environment where no upstream DNS servers are available or configurable, external DNS queries will not resolve. In these cases, you can override DNS names for required services directly in the configuration using host overrides. This allows the cluster to function without external DNS resolution.
Example: To override hostnames in an air-gapped environment, add a
hostAliasessection to yourvalues.yamlconfiguration.
manager:
hostAliases:
- ip: "192.0.2.10"
hostnames:
- acd-manager
- acd-manager.example.local
- ip: "192.0.2.11"
hostnames:
- acd-manager-alt
- acd-manager-alt.example.local
Next Steps
Continue reading the Installation Guide.
9.4.3 - Quick Start Guide
Lab Install Guide
This section describes a simplified installation process for customer acceptance testing in a single-node lab environment. Unlike the production Quick Start Guide (which assumes 3 or more nodes), the Lab Install Guide is intended for customers to perform acceptance testing prior to installing a production environment.
System Requirements:
- RHEL 8 or 9 (or equivalent) with at least a minimal installation
- 8-core CPU
- 16 GB RAM
- 128 GB available disk space in the
/varpartition
Step 1: Mount the ISO
mkdir -p /mnt/esb3027
mount -o loop,ro esb3027-acd-manager-X.Y.Z.iso /mnt/esb3027
Step 2: Install the Base Cluster Software
/mnt/esb3027/install
Step 3: (Air-gapped only) Mount the Extras ISO and Load Images
mkdir -p /mnt/esb3027-extras
mount -o loop,ro esb3027-acd-manager-extras-X.Y.Z.iso /mnt/esb3027-extras
/mnt/esb3027-extras/load-images
Step 4: Deploy the Cluster Helm Chart
helm install --wait --timeout 10m acd-cluster /mnt/esb3027/helm/charts/acd-cluster
Step 5: Deploy the Manager Helm Chart
helm install acd-manager /mnt/esb3027/helm/charts/acd-manager --values ~/values.yaml --timeout 10m
Step 6: Next Steps
See the Post Install Guide for post-installation steps and recommendations.
You can now access the manager and begin acceptance testing. For full configuration details, see the full Installation Guide.
Quick Start Guide
This section provides a concise, step-by-step summary for installing the ESB3027 AgileTV CDN Manager cluster in a production environment. The Quick Start Guide is intended for production deployments with three or more nodes, providing high availability and scalability. For full details, see the full Installation Guide.
Step 1: Mount the ISO
mkdir -p /mnt/esb3027
mount -o loop,ro esb3027-acd-manager-X.Y.Z.iso /mnt/esb3027
Step 2: Install the Base Cluster Software
/mnt/esb3027/install
Step 3: (Air-gapped only) Mount the Extras ISO and Load Images
mkdir -p /mnt/esb3027-extras
mount -o loop,ro esb3027-acd-manager-extras-X.Y.Z.iso /mnt/esb3027-extras
/mnt/esb3027-extras/load-images
Step 4: Fetch the Node Token
cat /var/lib/rancher/k3s/server/node-token
Step 5: Join Additional Nodes
On each additional node, repeat Step 1, then run:
/mnt/esb3027/join-server https://<primary-server-ip>:6443 <node-token>
# or for agent nodes:
/mnt/esb3027/join-agent https://<primary-server-ip>:6443 <node-token>
Step 6: Deploy the Cluster Helm Chart
helm install --wait --timeout 10m acd-cluster /mnt/esb3027/helm/charts/acd-cluster
Step 7: Deploy the Manager Helm Chart
helm install acd-manager /mnt/esb3027/helm/charts/acd-manager --values ~/values.yaml --timeout 10m
Step 8: Next Steps
See the Post Install Guide for post-installation steps and recommendations.
For configuration details and troubleshooting, see the full Installation Guide.
9.4.4 - Installation Guide
Installing the Primary Server Node
Mount the ESB3027 ISO
Start by mounting the core ESB3027 ISO on the system. There are no limitations on the exact
mountpoint used, but for this document, we will assume /mnt/esb3027.
mkdir -p /mnt/esb3027
mount -o loop,ro esb3027-acd-manager-X.Y.Z.iso /mnt/esb3027
Run the installer
Run the install command to install the base cluster software.
/mnt/esb3027/install
(Air-gapped only) Mount the “Extras” ISO and Load Container Images
In an air-gapped environment, after running the installer, the “extras” image must be mounted. This image contains publicly available container images that otherwise would be simply downloaded from the source repositories.
mkdir -p /mnt/esb3027-extras
mount -o loop,ro esb3027-acd-manager-extras-X.Y.Z.iso /mnt/esb3027-extras
The public container images for third-party products such as Kafka, Redis, Zitadel, etc., need to be loaded into the container runtime. An embedded registry mirror is used to distribute these images to other nodes within the cluster, so this only needs to be performed on one machine.
/mnt/esb3027-extras/load-images
Fetch the primary node token
In order to join additional nodes into the cluster, a unique node token must be provided. This token is automatically generated on the primary node during the installation process. Retrieve this now, and take note of it for later use.
cat /var/lib/rancher/k3s/server/node-token
Join Additional Server Nodes
From each additional server node, mount the core ISO and join the cluster using the following commands.
mkdir -p /mnt/esb3027
mount esb3027-acd-manager-X.Y.Z.iso /mnt/esb3027
Obtain the node token from the primary server as you will need to include it in the following command. You will also need the URL to the primary server for which to connect.
/mnt/esb3027/join-server https://primary-server-ip:6443 abcdefg0123456...987654321
Where primary-server-ip is replaced with the IP address to which this node should connect to the
primary server, and abcdef...321 is the contents of the node-token retrieved from the primary server.
Repeat the above steps on each additional Server node in the cluster.
Join Agent Nodes
From each additional agent node, mount the core ISO and join the cluster using the following commands.
mkdir -p /mnt/esb3027
mount esb3027-acd-manager-X.Y.Z.iso /mnt/esb3027
Obtain the node token from the primary server as you will need to include it in the following command. You will also need the URL to the primary server for which to connect.
/mnt/esb3027/join-agent https://primary-server-ip:6443 abcdefg0123456...987654321
Where primary-server-ip is replaced with the IP address to which this node should connect to the
primary server, and abcdef...321 is the contents of the node-token retrieved from the primary server.
Repeat the above steps on each additional Agent node in the cluster.
Verify the state of the cluster
At this point, a generic Kubernetes cluster should have multiple nodes connected and be marked Ready. Verify this is the case by running the following from any one of the Server nodes.
kubectl get nodes
Each node in the cluster should be listed in the output with the status “Ready”, and the Server nodes should have “control-plane” in the listed Roles. If this is not the case, see the Troubleshooting Guide to help diagnose the problem.
Deploy the cluster helm chart
The acd-cluster helm chart, which is included on the core ISO, contains the clustering software which
is required for self-hosted clusters, but may be optional in Cloud deployments. Currently this consists
of a PostgreSQL database server, but additional components may be added in later releases.
helm install --wait --timeout 10m acd-cluster /mnt/esb3027/helm/charts/acd-cluster
Deploying the Manager chart
The acd-manager helm chart is used to deploy the acd-manager application as well as any of the
third-party services on which the chart depends. Installing this chart requires at least a minimal
configuration to be applied. To get started, either copy the default values.yaml file from the chart
directory /mnt/esb3027/helm/charts/acd-manager/values.yaml or copy the following minimal template to a
writable location such as the user’s home directory.
global:
hosts:
manager:
- host: manager.local
routers:
- name: director-1
address: 192.0.2.1
- name: director-2
address: 192.0.2.2
zitadel:
zitadel:
configmapConfig:
ExternalDomain: manager.local
Where:
manager.localis either the external IP or resolvable DNS name used to access the manager’s cluster.- All director instances should be listed in the
global.hosts.routerssection. Thenamefield is used in URLs, and must consist of only alpha-numeric characters or ‘.’, ‘-’, or ‘_’.
Further details on the available configuration options in the default values.yaml file can be found in
the Configuration Guide.
You must set at a minimum the following properties:
| Property | Type | Description |
|---|---|---|
| global.hosts.manager | Array | List of external IP addresses or DNS hostnames for each node in the cluster |
| global.hosts.router | Array | List of name and address for each instance of ESB3024 AgileTV CDN Director |
| zitadel.zitadel.configmapConfig.ExternalDomain | String | External DNS domain name or IP address of one manager node. This must match the first entry from global.hosts.manager |
Note! The Zitadel ExternalDomain must match the hostname or IP address given in the first
global.hosts.manager entry, and MUST match the Origin used when accessing Zitadel. This is enforced by
CORS.
Hint: For non-air-gapped environments, where no DNS servers are present, a third-party service
sslip.io may be used to provide a resolvable DNS name which can be used for both the
global.hosts.manager and Zitadel ExternalDomain entries. Any IP address passed as
W.X.Y.Z.sslip.io will resolve to the IP W.X.Y.Z
Only the value used for Zitadel’s ExternalDomain may be used to access Zitadel due to CORS
restrictions. E.g. if that is set to “10.10.10.10.sslip.io”, then Zitadel must be accessed via the URL
https://10.10.10.10.sslip.io/ui/console. This must match the first entry in global.hosts.manager as
that entry will be used by internal services that need to interact with Zitadel, such as the frontend
GUI and the manager API services.
Importing TLS Certificates
By default, the manager will generate a self-signed TLS certificate for use with the cluster ingress.
In production environments, it is recommended to use a valid TLS certificate issued by a trusted Certificate Authority (CA).
To install the TLS certificate pair into the ingress controller, the certificate and key must be saved in a Kubernetes secret. The simplest way of doing this is to let Helm generate the secret by including the PEM formatted certificate and private key directly in the configuration values. Alternatively, the secret can be created manually and simply referenced by the configuration.
Option 1: Let Helm manage the secret
To have Helm automatically manage the secret based on the PEM formatted certificate and key, add a record
to ingress.secrets as described in the following snippet.
ingress:
secrets:
- name: <secret-name>
key: |-
-----BEGIN RSA PRIVATE KEY-----
...
-----END RSA PRIVATE KEY-----
certificate: |-
-----BEGIN CERTIFICATE-----
...
-----END CERTIFICATE-----
Option 2: Manually creating the secret
To manually create the secret in Kubernetes, execute the following command: This will create a secret named “secret-name”.
kubectl create secret tls secret-name --cert=tls.crt --key=tls.key
Configure the Ingress
The ingress controllers must be configured as to the name of the secret holding the certificate and key files. Additionally, the DNS hostname or IP address, covered by the certificate, which Must be used to access the ingress, must be set in the configuration.
ingress:
hostname: <dns-hostname>
tls: true
secretName: <secret-name>
zitadel:
ingress:
tls:
- hosts:
- <dns-hostname>
secretName: <secret-name>
confd:
ingress:
hostname: <dns-hostname>
tls: true
secretName: <secret-name>
mib-frontend:
ingress:
hostname: <dns-hostname>
tls: true
secretName: <secret-name>
dns-hostname- A valid DNS hostname for the cluster which is valid for the certificate. For compatibility with Zitadel and CORS restrictions, this MUST be the same DNS hostname listed as the first entry inglobal.hosts.manager.secret-name- An arbitry name used to identify the Kubernetes secret containing the TLS certificate and key. This has a maximum length limitation of 53 characters.
Loading Maxmind GeoIP databases
The Maxmind GeoIP databases are required if GeoIP lookups are to be performed by the manager. If this functionality is used, then Maxmind formatted GeoIP databases must be configured. The following databases are used by the manager.
GeoIP2-City.mmdb- The City Database.GeoLite2-ASN.mmdb- The ASN Database.GeoIP2-Anonymous-IP.mmdb- The VPN and Anonymous IP database.
A helper utility has been provided on the ISO called generate-maxmind-volume that will prompt the user
for the locations of these 3 database files, and the name of a volume, which will be created in
Kubernetes. After running this command, set the manager.maxmindDbVolume property in the configuration
to the volume name.
To run the utility, use:
/mnt/esb3027/generate-maxmind-volume
Installing the Chart
Install the acd-manager helm chart using the following command: (This assumes the configuration is in
~/values.yaml)
helm install acd-manager /mnt/esb3027/helm/charts/acd-manager --values ~/values.yaml --timeout 10m
By default, there is not expected to be much output from the helm install command itself. If you would
like to see more detailed information in real-time throughout the deployment process, you can add the
--debug flag to the command:
helm install acd-manager /mnt/esb3027/helm/charts/acd-manager --values ~/values.yaml --timeout 10m --debug
Note: The
--timeout 10mflag increases the default Helm timeout from 5 minutes to 10 minutes. This is recommended because the default may not be sufficient on slower hardware or in resource-constrained environments. You may need to adjust the timeout value further depending on your system’s performance or deployment conditions.
Monitor the chart rollout with the following command:
kubectl get pods
The output of which should look similar to the following:
NAME READY STATUS RESTARTS AGE
acd-cluster-postgresql-0 1/1 Running 0 44h
acd-manager-6c85ddd747-5j5gt 1/1 Running 0 43h
acd-manager-confd-558f49ffb5-n8dmr 1/1 Running 0 43h
acd-manager-gateway-7594479477-z4bbr 1/1 Running 0 43h
acd-manager-grafana-78c76d8c5-c2tl6 1/1 Running 0 43h
acd-manager-kafka-controller-0 2/2 Running 0 43h
acd-manager-kafka-controller-1 2/2 Running 0 43h
acd-manager-kafka-controller-2 2/2 Running 0 43h
acd-manager-metrics-aggregator-f6ff99654-tjbfs 1/1 Running 0 43h
acd-manager-mib-frontend-67678c69df-tkklr 1/1 Running 0 43h
acd-manager-prometheus-alertmanager-0 1/1 Running 0 43h
acd-manager-prometheus-server-768f5d5c-q78xb 1/1 Running 0 43h
acd-manager-redis-master-0 2/2 Running 0 43h
acd-manager-redis-replicas-0 2/2 Running 0 43h
acd-manager-selection-input-844599bc4d-x7dct 1/1 Running 0 43h
acd-manager-telegraf-585dfc5ff8-n8m5c 1/1 Running 0 43h
acd-manager-victoria-metrics-single-server-0 1/1 Running 0 43h
acd-manager-zitadel-69b6546f8f-v9lkp 1/1 Running 0 43h
acd-manager-zitadel-69b6546f8f-wwcmx 1/1 Running 0 43h
acd-manager-zitadel-init-hnr5p 0/1 Completed 0 43h
acd-manager-zitadel-setup-kjnwh 0/2 Completed 0 43h
The output contains a “READY” column, which indicates the number of ready pods on the left, and the number of requested pods on the right. Pods with status “Completed” are one time commands that have terminated successfully and can be ignored in this output. For “Running” pods, once all pods have the same number on both sides of the “READY” status the rollout is complete.
If a Pod is marked as “CrashLoopBackoff” or “Error” this means that either one of the containers in the pod has failed to deploy, or that the container has terminated in an Error state. See the Troubleshooting Guide to help diagnose the problem. The Kubernetes cluster will retry failed pod deployments several times, and the number in the “RESTARTS” column will show the number of times that has happened. If a pod restarts during the initial rollout, this may simply be that the state of the cluster was not as expected by the pod at that time, and this can be safely ignored. After the initial rollout has completed, the pods should stabilize, and multiple restarts may be an indication that something is wrong. In that case, refer to the Troubleshooting Guide for more information.
Next Steps
For post-installation steps, see the Post Install Guide.
9.4.5 - Upgrade Guide
Upgrade Compatibility Matrix
The following table lists each release and the minimum previous version that supports a direct upgrade. Unless otherwise noted, production releases (even minor versions: 1.0.x, 1.2.x, 1.4.x, etc.) support direct upgrade from the previous two minor versions.
| Release | Minimum Compatible Version for Upgrade | Notes |
|---|---|---|
| 1.4.1 | 1.4.0 | Direct upgrade from 1.2.1 is not supported. |
| 1.4.0 | — | No direct upgrade from previous versions; requires clean install. |
| 1.2.1 | — | No direct upgrade from previous versions; requires clean install. |
Before You Begin
Backup your configuration and data:
Before starting the upgrade, back up your current values.yaml and any persistent data (such as
database volumes or important configuration files). For instructions on how to set up and take
backups of persistent volume claims (PVCs), see the Storage Guide. This ensures
you can recover if anything unexpected occurs during the upgrade process.
About the install script:
Running the install script from the new ISO is safe for upgrades. It is designed to be idempotent
and will not overwrite your existing configuration.
Downtime and rolling restarts:
During the upgrade, the cluster may experience brief downtime or rolling restarts as pods are updated. Plan accordingly if you have production workloads.
Upgrading the Cluster
Review Configuration Before Upgrading
Before performing the upgrade, carefully review your current configuration values against the
default values.yaml file provided on the ESB3027 ISO. This ensures that any new or changed
configuration options are accounted for, and helps prevent issues caused by outdated or missing
settings. The values.yaml file can be found at:
/mnt/esb3027/helm/charts/acd-manager/values.yaml
Compare your existing configuration (typically in ~/values.yaml or your deployment’s values
file) with the ISO’s values.yaml and update your configuration as needed before running the
upgrade commands below.
Mount the ESB3027 ISO
Start by mounting the core ESB3027 ISO on the system. There are no limitations on the exact
mountpoint used, but for this document, we will assume /mnt/esb3027.
mkdir -p /mnt/esb3027
mount -o loop,ro esb3027-acd-manager-X.Y.Z.iso /mnt/esb3027
Run the installer
Run the install command to install the base cluster software.
/mnt/esb3027/install
(Air-gapped only) Mount the “Extras” ISO and Load Container Images
In an air-gapped environment, after running the installer, the “extras” image must be mounted. This image contains publicly available container images that otherwise would be simply downloaded from the source repositories.
mkdir -p /mnt/esb3027-extras
mount -o loop,ro esb3027-acd-manager-extras-X.Y.Z.iso /mnt/esb3027-extras
The public container images for third-party products such as Kafka, Redis, Zitadel, etc., need to be loaded into the container runtime. This only needs to be performed once per upgrade, on a single node. An embedded registry mirror is used to distribute these images to other nodes within the cluster.
/mnt/esb3027-extras/load-images
Upgrade the cluster helm chart
The acd-cluster helm chart, which is included on the core ISO, contains the clustering software
which is required for self-hosted clusters, but may be optional in Cloud deployments. Currently
this consists of a PostgreSQL database server, but additional components may be added in later
releases.
helm upgrade --wait --timeout 10m acd-cluster /mnt/esb3027/helm/charts/acd-cluster
Upgrade the Manager chart
Upgrade the acd-manager helm chart using the following command: (This assumes the configuration is
in ~/values.yaml)
helm upgrade acd-manager /mnt/esb3027/helm/charts/acd-manager --values ~/values.yaml --timeout 10m
By default, there is not expected to be much output from the helm upgrade command itself. If you
would like to see more detailed information in real-time throughout the deployment process, you
can add the --debug flag to the command:
helm upgrade acd-manager /mnt/esb3027/helm/charts/acd-manager --values ~/values.yaml --timeout 10m --debug
Note: The
--timeout 10mflag increases the default Helm timeout from 5 minutes to 10 minutes. This is recommended because the default may not be sufficient on slower hardware or in resource-constrained environments. You may need to adjust the timeout value further depending on your system’s performance or deployment conditions.
Monitor the chart rollout with the following command:
kubectl get pods
The output of which should look similar to the following:
NAME READY STATUS RESTARTS AGE
acd-cluster-postgresql-0 1/1 Running 0 44h
acd-manager-6c85ddd747-5j5gt 1/1 Running 0 43h
acd-manager-confd-558f49ffb5-n8dmr 1/1 Running 0 43h
acd-manager-gateway-7594479477-z4bbr 1/1 Running 0 43h
acd-manager-grafana-78c76d8c5-c2tl6 1/1 Running 0 43h
acd-manager-kafka-controller-0 2/2 Running 0 43h
acd-manager-kafka-controller-1 2/2 Running 0 43h
acd-manager-kafka-controller-2 2/2 Running 0 43h
acd-manager-metrics-aggregator-f6ff99654-tjbfs 1/1 Running 0 43h
acd-manager-mib-frontend-67678c69df-tkklr 1/1 Running 0 43h
acd-manager-prometheus-alertmanager-0 1/1 Running 0 43h
acd-manager-prometheus-server-768f5d5c-q78xb 1/1 Running 0 43h
acd-manager-redis-master-0 2/2 Running 0 43h
acd-manager-redis-replicas-0 2/2 Running 0 43h
acd-manager-selection-input-844599bc4d-x7dct 1/1 Running 0 43h
acd-manager-telegraf-585dfc5ff8-n8m5c 1/1 Running 0 43h
acd-manager-victoria-metrics-single-server-0 1/1 Running 0 43h
acd-manager-zitadel-69b6546f8f-v9lkp 1/1 Running 0 43h
acd-manager-zitadel-69b6546f8f-wwcmx 1/1 Running 0 43h
acd-manager-zitadel-init-hnr5p 0/1 Completed 0 43h
acd-manager-zitadel-setup-kjnwh 0/2 Completed 0 43h
Rollback Procedure
If you encounter issues after upgrading, you can use Helm’s rollback feature to revert the acd-cluster and acd-manager deployments to their previous working versions.
To see the revision history for a release:
helm history acd-cluster
helm history acd-manager
To rollback to the previous revision (or specify a particular revision number):
helm rollback acd-cluster <REVISION>
helm rollback acd-manager <REVISION>
Replace <REVISION> with the desired revision number, or use 1 for the initial deployment,
2 for the first upgrade, etc. If you want to rollback to the immediately previous version,
you can omit the revision number to rollback to the last one:
helm rollback acd-cluster
helm rollback acd-manager
After performing a rollback, monitor the pods to ensure the cluster returns to a healthy state:
kubectl get pods
Refer to the Troubleshooting Guide if you encounter further issues.
Complete Cluster Replacement (Wipe and Reinstall)
If you need to upgrade between versions that do not support direct upgrade (as indicated in the upgrade compatibility matrix), you can perform a complete cluster replacement. This process will completely remove the existing cluster from all nodes and allow you to install the new version as if starting from scratch.
Warning: This method will permanently delete all cluster data, configuration, and persistent volumes from every node. It is equivalent to reinstalling the operating system. There is no rollback possible. Ensure you have taken full backups of any data you wish to preserve before proceeding.
Step 1: Remove the Existing Cluster
On each node in the cluster, run the built-in k3s kill-all script to remove all cluster components:
sudo /usr/local/bin/k3s-killall.sh
sudo /usr/local/bin/k3s-uninstall.sh
Repeat this process on every node that was part of the cluster.
Step 2: Install the New Version
After all nodes have been wiped, follow the standard installation procedure to deploy the new version of the cluster. See the Installation Guide for detailed steps.
This method allows you to jump between unsupported versions without reinstalling or reconfiguring the operating system, but all cluster data and configuration will be lost.
9.4.6 - Post Installation Guide
After installing the cluster, there are a few steps that should be taken to complete the setup.
Create an Admin User
The ESB3027 AgileTV CDN Manager ships with a default user account, but this account is only intended as a way to log in and create an actual user. Attempting to authenticate other services such as the MIB Frontend Configuration GUI, may not work using this pre-provisioned account.
You will need the IP address or DNS name specified in the configuration as both the first manager host and the Zitadel External Domain.
global:
hosts:
manager:
- host: manager.local
Using a web browser, connect to the following URL, replacing manager.local with the IP or DNS name
from the configuration above:
https://manager.local/ui/console
You must authenticate using the default credentials:
Username: admin@agiletv.dev
Password: Password1!
It will ask you to set up Multi-Factor Authentication, however you MUST skip this step for now, as it is not currently supported everywhere in the manager’s APIs.
On the menu bar at the top of the screen, click “Users” and proceed to create a New User. Enter the required information, and for now, ensure the “Email Verified” and “Set Initial Password” boxes are checked. Zitadel will attempt to send a confirmation EMail if the “Email Verified” box is not checked, however on initial installation, the SMTP server details have not been configured.
You should now be able to authenticate to the MIB Frontend GUI at https://manager.local/gui using
the credentials for the new user.
Configure an SMTP Server
Zitadel requires an SMTP server to be configured in order to send validation emails and support
communication with users for password resets, etc. If you have an SMTP server, you can configure
it by logging back into the Zitadel Web UI at https://manager.local/ui/console, clicking on
“Default Settings” at the top of the page, and configuring the SMTP provider from the menu on the
left. After this has been performed, if a new user account is created, an E-Mail will be sent to
the configured E-Mail address with a verification link, which must be clicked before the account
will be valid.
9.5 - Configuration Guide
Overview
When deploying the acd-manager helm chart, a configuration file containing the chart values must
be supplied to Helm. The default values.yaml file can be found on the ISO in the chart’s directory.
Helm does not require that the complete file be supplied at install time, as any files supplied via the
--values command will be merged with the defaults from the chart. This allows the operator to maintain
a much simpler configuration file containing only the modified values. Additionally, values may be
individually overridden by passing --set key=value to the Helm command. However, this is discouraged for
all but temporary cases, as the same arguments must be specified any time the chart is updated.
The default values.yaml file is located on the ISO under the subpath /helm/charts/acd-manager/values.yaml
Since the ISO is mounted read-only, you must copy this file to a writable location to make changes. Helm
supports multiple --values arguments where all files will be merged left-to-right before being merged
with the chart defaults.
Applying the Configuration
After updating the configuration file, you must perform a helm upgrade for the changes to be propagated
to the cluster. Helm tracks the changes in each revision, and supports rolling back to previous configurations.
During the initial chart installation, the configuration values will be supplied to Helm through the helm install
command, but to update an existing installation, the following command line shall be used instead.
helm upgrade acd-manager /mnt/esb3027/helm/charts/acd-manager --values /path/to/values.yaml
Note: Both the helm install and helm upgrade commands take many of the same arguments, and a shortcut
exists helm upgrade --install which can be used in place of either, to update an existing installation, or
deploy a new installation if one did not previously exist.
If the configuration update was unsuccessful, you can roll back to a previous revision using the following
command. Keep in mind, this will not change the values.yaml file on disk, so you must revert the changes
to that file manually, or restore the file from a backup.
helm rollback acd-manager <revision_number>
You can view the current revision number of all installed charts with helm list --all
If you wish to temporarily change one or more values, for instance to increase the manager log level from “info”
to “debug”, you can do so with the --set command.
helm upgrade acd-manager /mnt/esb3027/helm/charts/acd-manager --values /path/to/values.yaml --set manager.logLevel=debug
It is also possible to split the values.yaml into multiple individual files, for instance to separate manager
and metrics values in two files using the following commands. All files will be merged left to right by Helm.
Take notice however, that doing this will require all values files to be supplied in the same order any time
a helm upgrade is performed in the future.
helm upgrade acd-manager /mnt/esb3027/helm/charts/acd-manager --values /path/to/values1.yaml --values /path/to/values2.yaml
Before applying new configuration, it is recommended to perform a dry-run to ensure that the templates
can be rendered properly. This does not guarantee that the templates will be accepted by Kubernetes, only
that the templates can be properly rendered using the supplied values. The rendered templates will be output
to the console.
helm upgrade ... --dry-run
In the event that the helm upgrade fails to produce the desired results, e.g. if the correct configuration
did not propagate to all required pods, simply performing a helm uninstall acd-manager followed by the original
helm install command will force all pods to be redeployed. This is service affecting however and should only be
performed as a last-resort as all pods will be destroyed and recreated.
Configuration Reference
In this section, we break down the configuration file and look more in-depth into the options available.
Globals
The global section, is a special-case section in Helm, intended for sharing global values between charts.
most of the configuration properties here can be ignored, as they are intended as a means of globally
providing defaults that affect nested subcharts. The only necessary field here is the hosts configuration.
global:
hosts:
manager:
- host: manager.local
routers:
- name: default
address: 127.0.0.1
edns_proxy: []
geoip: []
| key | Type | Description |
|---|---|---|
| global.hosts.manager | Array | List of external IP addresses or DNS hostnames for all nodes in the Manager cluster |
| global.hosts.routers | Array | List of ESB3024 AgileTV CDN Director instances |
| global.hosts.edns_proxy | Array | List of EDNS Proxy addresses |
| global.hosts.geoip | Array | List of GeoIP Proxy addresses |
The global.hosts.manager record contains a list of objects containing a single host field. The first
of which is used by several internal services to contact Zitadel for user authentication and authorization.
Since Zitadel, which provides these services enforces CORS protections, this must match exacly the Origin
used to access Zitadel.
The global.hosts.routers record contains a list of objects each with a name and address field. The
name field is a unique identifier used in URLs to refer to the Director instance, and the address field
is the IP address or DNS name used to communicate with the Director node. Only Director instances run outside
of this cluster need to be specified here, as instances running in Kubernetes can utilize the cluster’s auto-
discovery system.
The global.hosts.edns_proxy record contains a list of objects each with an address and port field. This
list is currently unused.
The global.hosts.geoip record contains a list of objects each with an address and port field. This list
should refer to the GeoIP Proxies used by the Frontend GUI. Currently only one GeoIP proxy is supported.
Common Parameters
This section contains common parameters that are namespaced to the acd-manager chart. These should be left at their default values under most circumstances.
| Key | Type | Description |
|---|---|---|
| kubeVersion | String | Override the Kubernetes version reported by .Capabilities |
| apiVersion | String | Override the Kubernetes API version reported by .Capabilities |
| nameOverride | String | Partially override common.names.name |
| fullnameOverride | String | Fully override common.names.name |
| namespaceOverride | String | Fully override common.names.namespace |
| commonLabels | Object | Labels to add to all deployed objects |
| commonAnnotations | Object | Annotations to add to all deployed objects |
| clusterDomain | String | Kubernetes cluster domain name |
| extraDeploy | Array | List of extra Kubernetes objects to deploy with the release |
| diagnosticMode.enabled | Boolean | Enable Diagnostic mode (All probes will be disabled and the command will be overridden) |
| diagnosticMode.command | Array | Override the command when diagnostic mode is enabled |
| diagnosticMode.args | Array | Override the command line arguments when diagnostic mode is enabled |
Manager
This section represents the configuration options for the ACD Manager’s API server.
| Key | Type | Description |
|---|---|---|
| manager.image.registry | String | The docker registry |
| manager.image.repository | String | The docker repository |
| manager.image.tag | String | Override the image tag |
| manager.image.digest | String | Override a specific image digest |
| manager.image.pullPolicy | String | The image pull policy |
| manager.image.pullSecrets | Array | A list of secret names containing credentials for the configured image registry |
| manager.image.debug | boolean | Enable debug mode for the containers |
| manager.logLevel | String | Set the log level used in the containers |
| manager.replicaCount | Number | Number of manager replicas to deploy. This value is ignored if the Horizontal Pod Autoscaler is enabled |
| manager.containerPorts.http | Number | Port number exposed by the container for HTTP traffic |
| manager.extraContainerPorts | Array | List of additional container ports to expose |
| manager.livenessProbe | Object | Configuration for the liveness probe on the manager container |
| manager.readinessProbe | Object | Configuration for the readiness probe on the manager container |
| manager.startupProbe | Object | Configuration for the startup probe on the manager container |
| manager.customLivenessProbe | Object | Override the default liveness probe |
| manager.customReadinessProbe | Object | Override the default readiness probe |
| manager.customStartupProbe | Object | Override the default startup probe |
| manager.resourcePreset | String | Set the manager resources according to one common preset |
| manager.resources | Object | Set request and limits for different resources like CPU or memory |
| manager.podSecurityContext | Object | Set the security context for the manager pods |
| manager.containerSecurityContext | Object | Set the security context for all containers inside the manager pods |
| manager.maxmindDbVolume | String | Name of a Kubernetes volume containing Maxmind GeoIP, ASN, and Anonymous IP databases |
| manager.existingConfigmap | String | Reserved for future use |
| manager.command | Array | Command executed inside the manager container |
| manager.args | Array | Arguments passed to the command |
| manager.automountServiceAccountToken | Boolean | Mount Service Account token in manager pods |
| manager.hostAliases | Array | Add additional entries to /etc/hosts in the pod |
| manager.deploymentAnnotations | Object | Annotations for the manager deployment |
| manager.podLabels | Object | Extra labels for manager pods |
| manager.podAnnotations | Object | Extra annotations for the manager pods |
| manager.podAffinityPreset | String | Allowed values soft or hard |
| manager.podAntiAffinityPreset | String | Allowed values soft or hard |
| manager.nodeAffinityPreset.type | String | Allowed values soft or `hard |
| manager.nodeAffinityPreset.key | String | Node label key to match |
| manager.nodeAffinityPreset.values | Array | List of node labels to match |
| manager.affinity | Object | Override the affinity for pod assignments |
| manager.nodeSelector | Object | Node labels for manager pod assignments |
| manager.tolerations | Array | Tolerations for manager pod assignment |
| manager.updateStrategy.type | String | Can be set to RollingUpdate or Recreate |
| manager.priorityClassName | String | Manager pods’ priorityClassName |
| manager.topologySpreadConstraints | Array | Topology Spread Constraints for manager pod assignment spread across the cluster among failure-domains |
| manager.schedulerName | String | Name of the Kubernetes scheduler for manager pods |
| manager.terminationGracePeriodSeconds | Number | Seconds manager pods need to terminate gracefully |
| manager.lifecycleHooks | Object | Lifecycle Hooks for manager containers to automate configuration before or after startup |
| manager.extraEnvVars | Array | List of extra environment variables to add to the manager containers |
| manager.extraEnvVarsCM | Array | List of Config Maps containing extra environment variables to pass to the Manager pods |
| manager.extraEnvVarsSecret | Array | List of Secrets containing extra environment variables to pass to the Manager pods |
| manager.extraVolumes | Array | Optionally specify extra list of additional volumes for the manager pods |
| manager.extraVolumeMounts | Array | Optionally specify extra list of additional volume mounts for the manager pods |
| manager.sidecars | Array | Add additional sidecar containers to the manager pods |
| manager.initContainers | Array | Add additional init containers to the manager pods |
| manager.pdb.create | Boolean | Enable / disable a Pod Disruption Budget creation |
| manager.pdb.minAvailable | Number | Minimum number/precentage of pods that should remain scheduled |
| manager.pdb.maxUnavailable | Number | Maximum number/percentage of pods that may be made unavailable |
| manager.autoscaling.vpa | Object | Vertical Pod Autoscaler Configuration. Not used for self-hosted clusters |
| manager.autoscaling.hpa | Object | Horizontal Pod Autoscaler. Automatically scale the number of replicas based on resource utilization |
Gateway
The parameters under the gateway namespace are mostly identical to those of the manager section above, but
which affect the NGinx Proxy Gateway service. The additional properites here are described in the following
table.
| Key | Type | Description |
|---|---|---|
| gateway.service.type | String | Service Type |
| gateway.service.ports.http | Number | The service port |
| gateway.service.nodePorts | Object | Allows configuring the exposed node port if the service.type is “NodePort” |
| gateway.service.clusterIP | String | Override the ClusterIP address if the service.type is “ClusterIP” |
| gateway.service.loadBalancerIP | String | Override the LoadBalancer IP address if the service.type is “LoadBalancer” |
| gateway.service.loadBalancerSourceRanges | Array | Source CIDRs for the LoadBalancer |
| gateway.service.externalTrafficPolicy | String | External Traffic Policy for the service |
| gateway.service.annotations | Object | Additional custom annotations for the manager service |
| gateway.service.extraPorts | Array | Extra ports to expose in the manager service. (Normally used with the sidecar value) |
| gateway.service.sessionAffinity | String | Control where client requests go, to the same pod or round-robin |
| gateway.service.sessionAffinityConfig | Object | Additional settings for the sessionAffinity |
Selection Input
The parameters under the selectionInput namespace are mostly identical to those of the manager section above,
but which affect the selection input consumer service. The additional properties here are described in the
following table.
| Key | Type | Description |
|---|---|---|
| selectionInput.kafkaTopic | String | Name of the selection input kafka topic |
Metrics Aggregator
The parameters under the metricsAggregator namespace are mostly identical to those of the manager section above,
but which affect the metrics aggregator service.
Traffic Exposure
These parameters determine how the various services are exposed over the network.
| Key | Type | Description |
|---|---|---|
| service.type | String | Service Type |
| service.ports.http | Number | The service port |
| service.nodePorts | Object | Allows configuring the exposed node port if the service.type is “NodePort” |
| service.clusterIP | String | Override the ClusterIP address if the service.type is “ClusterIP” |
| service.loadBalancerIP | String | Override the LoadBalancer IP address if the service.type is “LoadBalancer” |
| service.loadBalancerSourceRanges | Array | Source CIDRs for the LoadBalancer |
| service.externalTrafficPolicy | String | External Traffic Policy for the service |
| service.annotations | Object | Additional custom annotations for the manager service |
| service.extraPorts | Array | Extra ports to expose in the manager service. (Normally used with the sidecar value) |
| service.sessionAffinity | String | Control where client requests go, to the same pod or round-robin |
| service.sessionAffinityConfig | Object | Additional settings for the sessionAffinity |
| networkPolicy.enabled | Boolean | Specifies whether a NetworkPolicy should be created |
| networkPolicy.allowExternal | Boolean | Doesn’t require server labels for connections |
| networkPolicy.allowExternalEgress | Boolean | Allow the pod to access any range of port and all destinations |
| networkPolicy.allowExternalClientAccess | Boolean | Allow access from pods with client label set to “true” |
| networkPolicy.extraIngress | Array | Add extra ingress rules to the Network Policy |
| networkPolicy.extraEgress | Array | Add extra egress rules to the Network Policy |
| networkPolicy.ingressPodMatchLabels | Object | Labels to match to allow traffic from other pods. |
| networkPolicy.ingressNSMatchLabels | Object | Labels to match to allow traffic from other namespaces. |
| networkPolicy.ingressNSPodMatchLabels | Object | Pod labels to match to allow traffic from other namespaces. |
| ingress.enabled | Boolean | Enable the ingress record generation for the manager |
| ingress.pathType | String | Ingress Path Type |
| ingress.apiVersion | String | Force Ingress API version |
| ingress.hostname | String | Match HOST header for the ingress record |
| ingress.ingressClassName | String | Ingress Class that will be used to implement the Ingress |
| ingress.path | String | Default path for the Ingress record |
| ingress.annotations | Object | Additional annotations for the Ingress resource. |
| ingress.tls | Boolean | Enable TLS configuration for the host defined at ingress.hostname |
| ingress.selfSigned | Boolean | Create a TLS secret for this ingress record using self-signed certificates generated by Helm |
| ingress.extraHosts | Array | An array with additional hostnames to be covered by the Ingress record. |
| ingress.extraPaths | Array | An array of extra path entries to be covered by the Ingress record. |
| ingress.extraTls | Array | TLS configuration for additional hostnames to be covered with this Ingress record. |
| ingress.secrets | Array | Custom TLS certificates as secrets |
| ingress.extraRules | Array | Additional rules to be covered with this Ingress record. |
Persistence
The following values control how persistent storage is used by the manager. Currently these have no effect as the Manager does not use any persistent volume claims, however they are documented here as the same properties are used in several subcontainers to configure persistence.
| Key | Type | Description |
|---|---|---|
| persistence.enabled | Boolean | Enable persistence using Persistent Volume Claims |
| persistence.mountPath | String | Path where to mount the volume |
| persistence.subPath | String | The subdirectory of the volume to mount |
| persistence.storageClass | String | Storage class of backing Persistent Volume Claim |
| persistence.annotations | Object | Persistent Volume Claim annotations |
| persistence.accessModes | Array | Persistent Volume Access Modes |
| persistence.size | String | Size of the data volume |
| persistence.dataSource | Object | Custom PVC data source |
| persistence.existingClaim | String | The name of an existing PVC to use for persistence |
| persistence.selector | Object | Selector to match existing Persistent Volume for data PVC |
Other Values
The following are additional parameters for the chart.
| Key | Type | Description |
|---|---|---|
| defaultInitContainers | Object | Configuration for default init containers. |
| rbac.create | Boolean | Specifies whether Role-Based Access Control Resources should be created. |
| rbac.rules | Object | Custom RBAC rules to apply |
| serviceAccount.create | Boolean | Specifies whether a ServiceAccount should be created |
| serviceAccount.name | String | Override the ServiceAccount name. If not set, a name will be generated automatically. |
| serviceAccount.annotations | Object | Additional Service Account annotations (evaluated as a template) |
| serviceAccount.automountServiceAccountToken | Boolean | Automount the service account token for the service account. |
| metrics.enabled | Boolean | Enable the export of Prometheus metrics. Not currently implemented |
| metrics.serviceMonitor.enabled | Boolean | If true, creates a Prometheus Operator ServiceMonitor |
| metrics.serviceMonitor.namespace | String | Namespace in which Prometheus is running |
| metrics.serviceMonitor.annotations | Object | Additional custom annotations for the ServiceMonitor |
| metrics.serviceMonitor.labels | Object | Extra labels for the ServiceMonitor |
| metrics.serviceMonitor.jobLabel | String | The name of the label on the target service to use as the job name in Prometheus |
| metrics.serviceMonitor.honorLabels | Boolean | Chooses the metric’s labels on collisions with target labels |
| metrics.serviceMonitor.tlsConfig | Object | TLS configuration used for scrape endpoints used by Prometheus |
| metrics.serviceMonitor.interval | Number | Interval at which metrics should be scraped. |
| metrics.serviceMonitor.scrapeTimeout | Number | Timeout after which the scrape is ended. |
| metrics.serviceMonitor.metricRelabelings | Array | Specify additional relabeling of metrics. |
| metrics.serviceMonitor.relabelings | Array | Specify general relabeling |
| metrics.serviceMonitor.selector | Object | Prometheus instance selector labels |
Sub-components
Confd
| Key | Type | Description |
|---|---|---|
| confd.enabled | Boolean | Enable the embedded Confd instance |
| confd.service.ports.internal. | Number | Port number to use for internal communication with the Confd TCP socket |
MIB Frontend
There are many additional properties that can be configured for the MIB Frontend service which are not
specified in the configuration file. The mib-frontend helm Chart follows the same basic template
as the acd-manager chart so documenting them all here would be unnecessarily repeatative. Virtually every
property in this chart can be configured under the mib-frontend namespace and be valid.
| Key | Type | Description |
|---|---|---|
| mib-frontend.enabled | Boolean | Enable the Configuration GUI |
| mib-frontend.frontend.resourcePreset | String | Use a preset resource configuration. |
| mib-frontend.frontend.resources | Object | Use custom resource configuration. |
| mib-frontend.frontend.autoscaling.hpa | Object | Horizontal Pod Autoscaler configuration for MIB Frontend component |
ACD Metrics
There are many additional properties that can be configured for the ACD metrics service which are not
specified in the configuration file. The acd-metrics helm Chart follows the same basic template
as the acd-manager chart, as do each of its subcharts. Documenting them all here would mostly be
unnecessarily repeatative. Virtually any property in this chart can be configured under the acd-metrics
namespace and be valid. For example, setting the resource preset for grafana can be achieved by setting
acd-metrics.grafana.resourcePreset etc.
| Key | Type | Description |
|---|---|---|
| acd-metrics.enabled | Boolean | Enable the ACD Metrics components |
| acd-metrics.telegraf.enabled | Boolean | Enable the Telegraf Database component |
| acd-metrics.prometheus.enabled | Boolean | Enable the Prometheus Service Instance |
| acd-metrics.grafana.enabled | Boolean | Enable the Grafana Service Instance |
| acd-metrics.victoria-metrics-single.enabled | Boolean | Enable Victoria Metrics Service instance |
Zitadel
Zitadel does not follow the same template as many of the other services. Below is a list of Zitadel specific properties.
| Key | Type | Description |
|---|---|---|
| zitadel.enabled | Boolean | Enable the Zitadel instance |
| zitadel.replicaCount | Number | Number of replicas in the Zitadel deployment |
| zitadel.image.repository | String | The full name of the image registry and repository for the Zitadel container |
| zitadel.setupJob | Object | Configuration for the initial setup job to configure the database |
| zitadel.zitadel.masterkeySecretName | String | The name of an existing Kubernetes secret containing the Zitadel Masterkey |
| zitadel.zitadel.configmapConfig | Object | The Zitadel configuration. See Configuration Options in ZITADEL |
| zitadel.zitadel.configmapConfig.ExternalDomain | String | The external domain name or IP address to which all requests must be made. |
| zitadel.service | Ojbect | Service configuration options for Zitadel |
| zitadel.ingress | Object | Traffic exposure parameters for Zitadel |
The zitadel.zitadel.configmapConfig.ExternalDomain MUST be configured with the same
value used as the first entry in in global.hosts.manager. Cross-Origin Resource Sharing (CORS)
is enforced with Zitadel, and only this origin specified here will be allowed to be used
to access Zitadel. The first entry in the global.hosts.manager Array will be used by
internal services, and if this does not match, authentication requests will not be accepted.
For example, if the global.hosts.manager entries look like this:
global:
hosts:
manager:
- host: foo.example.com
- host: bar.example.com
The Zitadel ExternalDomain must be set to foo.example.com, and all requests to Zitadel
must use foo.example.com. e.g https://foo.example.com/ui/console. Requests made to
bar.example.com will result in HTTP 404 errors.
Redis and Kafka
Both the redis and kafka subcharts follow the same basic structure as the acd-manager
chart, and the configurable values in each are nearly identical. Documenting the configuration
of these charts here would be unnecessarily redundant. However, the operator may wish to
adjust the resource configuration for these charts at the following locations:
| Key | Type | Description |
|---|---|---|
| redis.master.resources | Object | Resource configuration for the Redis master instance |
| redis.replica.resources | Object | Resource configuration for the Redis read-only replica instances |
| redis.replica.replicaCount | Number | Number of Read-only Redis replica instances |
| kafka.controller.resources | Object | Resource configuration for the Kafka controller |
| kafka.controller.replicaCount | Number | Number of Kafka controller replica instances to deploy |
Resource Configuration
All resource configuration blocks follow the same basic schema which is defined here.
| Key | Type | Description |
|---|---|---|
| resources.limits.cpu | String | The maximum CPU which can be consumed before the Pod is terminated. |
| resources.limits.memory | String | The maximum amount of memory the pod may consume before being killed. |
| resources.limits.ephemeral-storage | String | The maximum amount of storage a pod may consume |
| resources.requests.cpu | String | The minimum available CPU cores for each Pod to be assigned to a node. |
| resources.requests.memory | String | The minimum available Free Memory on a node for a pod to be assigned. |
| resources.requests.ephemeral-storage | String | The minimum amount of storage a pod requires to be assigned to a node. |
CPU values are specified in units of 1/1000 of a CPU e.g. “1000m” represents 1 core, “250m” is 1/4 of 1 core. Memory and Storage values are specified with the SI suffix, e.g. “250Mi” is 250MB, “3Gi” is 3GB, etc.
Most services also include a resourcePreset value which is a simple String representing
some common configurations.
The presets are as follows:
| Preset | Request CPU | Request Memory | Request Storage | Limit CPU | Limit Memory | Limit Storage |
|---|---|---|---|---|---|---|
| nano | 100m | 128Mi | 50Mi | 150m | 192Mi | 2Gi |
| micro | 250m | 256Mi | 50Mi | 375m | 384Mi | 2Gi |
| small | 500m | 512Mi | 50Mi | 750m | 768Mi | 2Gi |
| medium | 500m | 1024Mi | 50Mi | 750m | 1536Mi | 2Gi |
| large | 1.0 | 2048Mi | 50Mi | 1.5 | 3072Mi | 2Gi |
| xlarge | 1.0 | 3072Mi | 50Mi | 3.0 | 6144Mi | 2Gi |
| 2xlarge | 1.0 | 3072Mi | 50Mi | 6.0 | 12288Mi | 2Gi |
When considering the resource requests vs. limits, the request values should represent the minimum resource usage necessary to run the service, while the limits represent the maximum resources each pod in the deployment will be allowed to consume. The resource request and limits are per pod, so a service using “large” presets with 3 replicas will need a minimum of 3 full cores, and 6GB of available memory to start and may consume up to a maximum of 4.5 Cores and 9GB of memory across all nodes in the cluster.
Security Contexts
Most charts used in the deployment contain configuration for both Pod and Container security contexts. Below is additional information about the parameters there-in.
| Key | Type | Description |
|---|---|---|
| podSecurityContext.enabled | Boolean | Enable the Pod Security Context |
| podSecurityContext.fsGroupChangePolicy | String | Set filesystem group change policy for the nodes |
| podSecurityContext.sysctls | Array | Set kernel settings using sysctl interface for the pods |
| podSecurityContext.supplementalGroups | Array | Set filesystem extra groups for the pods |
| podSecurityContext.fsGroup | Number | Set Filesystem Group ID for the pods |
| containerSecurityContext.enabled | Boolean | Enable the container security context |
| containerSecurityContext.seLinuxOptions | Object | Set SELinux options for each container in the Pod |
| containerSecurityContext.runAsUser | Number | Set runAsUser in the containers Security Context |
| containerSecurityContext.runAsGroup | Number | Set runAsGroup in the containers Security Context |
| containerSecurityContext.runAsNonRoot | Boolean | Set runAsNonRoot in the containers Security Context |
| containerSecurityContext.readOnlyRootFilesystem | Boolean | Set readOnlyRootFilesystem in the containers Security Context |
| containerSecurityContext.privileged | Boolean | Set privileged in the container Security Context |
| containerSecurityContext.allowPrivilegeEscalation | Boolean | Set allowPrivilegeEscalation in the container’s security context |
| containerSecurityContext.capabilities.drop | Array | List of capabilities to be dropped in the container |
| containerSecurityContext.seccompProfile.type | String | Set seccomp profile in the container |
Probe Configuration
Each Pod uses healthcheck probes to determine the readiness of the pod. Three probe types are defined. startupProbe, readinessProbe, and livenessProbe. They all contain exactly the same configuration options, the only difference between the probe types is when they are executed.
Liveness Probe: Checks if the container is running. If this probe fails, Kubernetes restarts the container, assuming it is stuck or unhealthy.
Readiness Probe: Determines if the container is ready to accept traffic. If it fails, the container is removed from the service load balancer until it becomes ready again.
Startup Probe: Used during container startup to determine if the application has started successfully. It helps to prevent the liveness probe from killing a container that is still starting up.
The following table describes each of these properties:
| Property | Description |
|---|---|
| enabled | Determines whether the probe is active (true) or disabled (false). |
| initialDelaySeconds | Time in seconds to wait after the container starts before performing the first probe. |
| periodSeconds | How often (in seconds) to perform the probe. |
| timeoutSeconds | Number of seconds to wait for a probe response before considering it a failure. |
| failureThreshold | Number of consecutive failed probes before considering the container unhealthy (for liveness) or unavailable (for readiness). |
| successThreshold | Number of consecutive successful probes required to consider the container healthy or ready (usually 1). |
| httpGet | Specifies that the probe performs an HTTP GET request to check container health. |
| httpGet.path | The URL path to request during the HTTP GET probe. |
| httpGet.port | The port number or name where the HTTP GET request is sent. |
| exec | Specifies that the probe runs the specified command inside the container and expects a successful exit code to indicate health. |
| exec.command | An array of strings representing the command to run |
Only one of httpGet or exec may be specified in a single probe. These configurations are mutually exclusive.
9.6 - Networking
Port Usage
The following table describes the minimal firewall setup required between each node in the cluster for the Kubernetes cluster to function properly. Unless otherwise specified, these rules must allow traffic to pass between any nodes in the cluster.
| Protocol | Port | Source | Destination | Description |
|---|---|---|---|---|
| TCP | 2379-2380 | Server | Server | Etcd Service |
| TCP | 6443 | Any | Server | K3s Supervisor and Kubernetes API Server |
| UDP | 8472 | Any | Any | Flannel VXLAN |
| TCP | 10250 | Any | Any | Kubelet Metrics |
| TCP | 5001 | Any | Server | Spegel Registry Mirror |
| TCP | 9500 | Any | Any | Longhorn Management API |
| TCP | 8500 | Any | Any | Longhorn Agent |
| Any | N/A | 10.42.0.0/16 | Any | K3s Pods |
| Any | N/A | 10.43.0.0/16 | Any | K3s Services |
| TCP | 80 | Any | Any | Optional Ingress HTTP traffic |
| TCP | 443 | Any | Any | Ingress HTTPS Traffic |
The following table describes the required ports which must be allowed through any firewalls for the manager application. Access to these ports must be allowed from any client which requires access to these services towards any node in the cluster.
| Protocol | Port | Description |
|---|---|---|
| TCP | 443 | Ingress HTTPS Traffic |
| TCP | 3000 | Grafana |
| TCP | 9095 | Kafka |
| TCP | 9093 | Alertmanager |
| TCP | 9090 | Prometheus |
| TCP | 6379 | Redis |
Note: Port 443 is duplicated in both of the above tables. Port 443 is used by the internal applications running within the cluster to access Zitadel so all nodes in the cluster must have access to that port, and it’s also used to provide ingress services from outside the cluster for multiple applications.
Firewall Rules
What follows is an example script that can be used to open the required ports using
firewalld. Adjust the commands as necessary to fit the environment.
# Allow Kubernetes cluster ports (between nodes)
firewall-cmd --permanent --add-port=2379-2380/tcp
firewall-cmd --permanent --add-port=6443/tcp
firewall-cmd --permanent --add-port=8472/udp
firewall-cmd --permanent --add-port=10250/tcp
firewall-cmd --permanent --add-port=5001/tcp
firewall-cmd --permanent --add-port=9500/tcp
firewall-cmd --permanent --add-port=8500/tcp
# Allow all traffic from specific subnets for K3s pods/services
firewall-cmd --permanent --add-rich-rule='rule family="ipv4" source address="10.42.0.0/16" accept'
firewall-cmd --permanent --add-rich-rule='rule family="ipv4" source address="10.43.0.0/16" accept'
# Allow optional ingress HTTP/HTTPS traffic
firewall-cmd --permanent --add-port=80/tcp
firewall-cmd --permanent --add-port=443/tcp
# Allow ports for the manager application (from anywhere)
firewall-cmd --permanent --add-port=443/tcp
firewall-cmd --permanent --add-port=3000/tcp
firewall-cmd --permanent --add-port=9095/tcp
firewall-cmd --permanent --add-port=9093/tcp
firewall-cmd --permanent --add-port=9090/tcp
firewall-cmd --permanent --add-port=6379/tcp
# Reload firewalld to apply changes
firewall-cmd --reload
IP Routing
Proper IP routing is critical for cluster communication. The network must allow nodes to route traffic to each other’s pod CIDRs (e.g., 10.42.0.0/16, 10.43.0.0/16) and external clients to reach ingress and services. Verify that your network infrastructure permits routing between these subnets; otherwise, nodes may not communicate properly, impacting cluster functionality.
Handling Multiple Zones with Kubernetes Interfaces
Kubernetes creates virtual network interfaces for pods within the node’s network namespace. These interfaces are
typically not associated with any specific firewalld zone by default. Firewalld applies rules to the primary
physical interface (such as eth0), not directly to the pod interfaces.
9.7 - Storage Guide
Overview
Longhorn is an open-source distributed block storage system designed specifically for Kubernetes. It provides persistent storage for stateful applications by creating and managing storage volumes that are replicated across multiple nodes to ensure high availability. Longhorn integrates seamlessly with Kubernetes, allowing users to dynamically provision, attach, and manage persistent disks through standard Kubernetes PersistentVolumeClaims (PVCs).
Longhorn deploys a set of controller and replica engines as containers on each node, forming a distributed storage system. When a volume is created, Longhorn replicates data across multiple nodes, ensuring durability even in the event of node failures. The system also handles snapshots, backups, and restores, offering robust data protection. Kubernetes automatically mounts these volumes into Pods, providing persistent storage for stateful applications to operate reliably.
graph TD
subgraph Cluster Nodes
Node1["Node 1"]
Node2["Node 2"]
Node3["Node 3"]
end
subgraph Longhorn Components
Controller["Longhorn Controller"]
Replica1["Replica (Node 1)"]
Replica2["Replica (Node 2)"]
Replica3["Replica (Node 3)"]
end
subgraph Storage Volume
Volume["Persistent Volume"]
end
Node1 -->|Runs| Replica1
Node2 -->|Runs| Replica2
Node3 -->|Runs| Replica3
Controller -->|Manages| Volume
Replica1 & Replica2 & Replica3 -->|Replicate Data| VolumeAccessing the configuration GUI
Longhorn provides a web-based frontend for managing storage configurations across the Kubernetes cluster. This UI allows users to configure various aspects of the storage engine, such as the number of replicas, backup settings, snapshot management, and more.
Since this frontend does not include any authentication mechanisms and improper use could lead to significant data loss, access is restricted. To securely access the UI, a manual port-forward must be established.
You can set up a temporary connection to the Longhorn frontend using the following
kubectl port-forward command:
kubectl port-forward -n longhorn-system --address 0.0.0.0 svc/longhorn-frontend 8888:80
This command forwards local port 8888 to the Longhorn frontend service in the cluster. You can then access the UI by navigating to:
http://k3s-server:8888
This connection remains active as long as the port-forward command is running. To stop it, simply press
Ctrl+C. Make sure to run this command only when needed, and avoid leaving the UI accessible without
proper authentication.
9.8 - Metrics and Monitoring
The ESB3027 AgileTV CDN Manager includes a built-in metrics and monitoring solution based on Telegraf, Prometheus, and Grafana. A set of default Grafana dashboards provides visibility into CDN performance, displaying host metrics such as CPU, memory, network, and disk utilization—collected from the Director and Cache nodes via Telegraf—as well as streaming metrics from each Director instance. These metrics are stored in a Time-Series Database and visualized through Grafana dashboards. Additionally, the system supports custom dashboards using Prometheus as a data source, offering flexibility for customers to monitor all aspects of the CDN according to their specific needs.
Accessing Grafana
Grafana is accessible through the standard ingress controller at the /grafana base path.
To access Grafana, open a browser and navigate to the following URL, replacing manager.local
with the DNS name or IP address of your cluster ingress:
https://manager.local/grafana
Log in using the default administrator account credentials:
Username: admin
Password: edgeware
Known Limitation: Grafana does not currently support Single-Sign-On (SSO) using Zitadel accounts.
Once logged in, use the left column to click “Dashboards” and select the dashboard you wish to view.
Custom Dashboards
The grafana instance uses persistent storage within the cluster for data storage. Any custom dashboards or modifications to existing dashboards will be saved in the persistent storage volume, and will persist across software upgrades.
Billing and Licensing
A separate VictoriaMetrics Time-Series Database is included within the metrics component of the manager. It periodically scrapes usage data from Prometheus to calculate aggregated statistics and verify license compliance. This data is retained for at least one year. Grafana can also use this database as a source to display long-term usage metrics.
9.9 - Operations Guide
Overview
This guide details some of the common commands that will be necessary to operate the ESB3027 AgileTV CDN Manager software. Before starting, you will need at least a basic understanding of the following command line tooling.
Getting and Describing Kubernetes Resources
The two most common commands in Kubernetes are get and describe for a specific resource
such as a Pod or Service. Using kubectl get typically lists all resources of a particular
type; for example, kubectl get pods will display all pods in the current namespace. To obtain
more detailed information about a specific resource, use kubectl describe <resource>, such as
kubectl describe pod postgresql-0 to view details about that particular pod.
When describing a pod, the output includes a recent Event history at the bottom. This can be extremely helpful for troubleshooting issues, such as why a pod failed to deploy or was restarted. However, keep in mind that this event history only reflects the most recent events from the past few hours, so it may not provide insights into problems that occurred days or weeks ago.
Obtaining Logs
Each Pod maintains its own logs for each container. To fetch the logs of a specific pod, use
kubectl logs <pod_name>. Adding the -f flag will stream the logs in follow mode, allowing
real-time monitoring. If a pod contains multiple containers, by default, only the logs from the
primary container are shown. To view logs from a different container within the same pod, use
the -c <container_name> flag.
Since each pod maintains its own logs, retrieving logs from all replicas of a Deployment or StatefulSet may be necessary to get a complete view. You can use label selectors to collect logs from all pods associated with the same application. For example, to fetch logs from all pods belonging to the “acd-manager” deployment, run:
kubectl logs -l app.kubernetes.io/name=acd-manager
To find the labels associated with a specific Deployment or ReplicaSet, describe the resource and look for the “Labels” field.
The following table describes the common labels currently used by deployments in the cluster.
Component Labels
| Label (key=value) | Description |
|---|---|
| app.kubernetes.io/component=manager | Identifies the ACD Manager service |
| app.kubernetes.io/component=confd | Identifies the confd service |
| app.kubernetes.io/component=frontend | Identifies the GUI (frontend) service |
| app.kubernetes.io/component=gateway | Identifies the API gateway service |
| app.kubernetes.io/component=grafana | Identifies the Grafana monitoring service |
| app.kubernetes.io/component=metrics-aggregator | Identifies the metrics aggregator service |
| app.kubernetes.io/component=mib-frontend | Identifies the MIB frontend service |
| app.kubernetes.io/component=server | Identifies the Prometheus server component |
| app.kubernetes.io/component=selection-input | Identifies the selection input service |
| app.kubernetes.io/component=start | Identifies the Zitadel startup/init component |
| app.kubernetes.io/component=primary | Identifies the PostgreSQL primary node |
| app.kubernetes.io/component=controller-eligible | Identifies the Kafka controller-eligible node |
| app.kubernetes.io/component=alertmanager | Identifies the Prometheus Alertmanager |
| app.kubernetes.io/component=master | Identifies the Redis master node |
| app.kubernetes.io/component=replica | Identifies the Redis replica node |
Instance, Name, and Part-of Labels
| Label (key=value) | Description |
|---|---|
| app.kubernetes.io/instance=acd-manager | Helm release instance name (acd-manager) |
| app.kubernetes.io/instance=acd-cluster | Helm release instance name (acd-cluster) |
| app.kubernetes.io/name=acd-manager | Resource name: acd-manager |
| app.kubernetes.io/name=confd | Resource name: confd |
| app.kubernetes.io/name=grafana | Resource name: grafana |
| app.kubernetes.io/name=mib-frontend | Resource name: mib-frontend |
| app.kubernetes.io/name=prometheus | Resource name: prometheus |
| app.kubernetes.io/name=telegraf | Resource name: telegraf |
| app.kubernetes.io/name=zitadel | Resource name: zitadel |
| app.kubernetes.io/name=postgresql | Resource name: postgresql |
| app.kubernetes.io/name=kafka | Resource name: kafka |
| app.kubernetes.io/name=redis | Resource name: redis |
| app.kubernetes.io/name=victoria-metrics-single | Resource name: victoria-metrics-single |
| app.kubernetes.io/part-of=prometheus | Part of the Prometheus stack |
| app.kubernetes.io/part-of=kafka | Part of the Kafka stack |
Restarting a Pod
Since Kubernetes maintains a fixed number of replicas for each Deployment or ReplicaSet, deleting a
pod will cause Kubernetes to immediately recreate it, effectively restarting the pod. For example,
to restart the pod acd-manager-6c85ddd747-5j5gt, run:
kubectl delete pod acd-manager-6c85ddd747-5j5gt
Kubernetes will automatically detach that pod from any associated Service, preventing new connections from reaching it. It then spawns a new instance, which goes through startup, liveness, and readiness probes. Once the new pod passes the readiness probes and is marked as ready, the Service will start forwarding new traffic to it.
If multiple replicas are running, traffic will be distributed among the existing pods while the new pod is initializing, ensuring a seamless, zero-downtime operation.
Stopping and Starting a Deployment
Unlike traditional services, Kubernetes does not have a concept of stopping a service directly. Instead, you can temporarily scale a Deployment to zero replicas, which has the same effect.
For example, to stop the acd-manager Deployment, run:
kubectl scale deployment acd-manager --replicas=0
To restart it later, scale the deployment back to its original number of replicas, e.g.,
kubectl scale deployment acd-manager --replicas=1
If you want to perform a hard restart of all pods within a deployment, you can delete all pods with a specific label, and Kubernetes will automatically recreate them. For example, to restart all pods with the component label “manager,” use:
kubectl delete pod -l app.kubernetes.io/component=manager
This command causes Kubernetes to delete all matching pods, which are then recreated, effectively restarting the service without changing the deployment configuration.
If you want to perform a graceful restart of all pods within a deployment or statefulset, you can use the
rollout restart command to do so.
kubectl rollout restart deployment acd-manager
Or for a statefulset such as kafka.
kubectl rollout restart statefulset acd-manager-kafka-controller
Running command inside a pod
Sometimes it is necessary to run a command inside an existing Pod such as obtaining a bash shell.
Using the kubectl exec -it <podname> -- <command> can be used to do just that. Assuming we need to
run the confcli tool inside the confd pod acd-manager-confd-558f49ffb5-n8dmr that can be accomplished
using the following command:
kubectl exec -it acd-manager-confd-558f49ffb5-n8dmr -- /usr/bin/python3.11 /usr/local/bin/confcli
Note: The confd container does not have a shell, so specifying the python interpreter is necessary on this image.
Monitoring resource usage
Kubernetes includes an internal metrics API which can give some insight into the resource usage of the Pods and of the Nodes.
To list the current usage of the Pods in the cluster issue the following:
kubectl top pods
This will give output similar to the following:
NAME CPU(cores) MEMORY(bytes)
acd-cluster-postgresql-0 3m 44Mi
acd-manager-6c85ddd747-rdlg6 4m 15Mi
acd-manager-confd-558f49ffb5-n8dmr 1m 47Mi
acd-manager-gateway-7594479477-z4bbr 0m 10Mi
acd-manager-grafana-78c76d8c5-c2tl6 18m 144Mi
acd-manager-kafka-controller-0 19m 763Mi
acd-manager-kafka-controller-1 19m 967Mi
acd-manager-kafka-controller-2 25m 1127Mi
acd-manager-metrics-aggregator-f6ff99654-tjbfs 4m 2Mi
acd-manager-mib-frontend-67678c69df-tkklr 1m 26Mi
acd-manager-prometheus-alertmanager-0 2m 25Mi
acd-manager-prometheus-server-768f5d5c-q78xb 5m 53Mi
acd-manager-redis-master-0 12m 18Mi
acd-manager-redis-replicas-0 15m 14Mi
acd-manager-selection-input-844599bc4d-x7dct 3m 3Mi
acd-manager-telegraf-585dfc5ff8-n8m5c 1m 27Mi
acd-manager-victoria-metrics-single-server-0 2m 10Mi
acd-manager-zitadel-69b6546f8f-v9lkp 1m 76Mi
acd-manager-zitadel-69b6546f8f-wwcmx 1m 72Mi
Querying the metrics API for the nodes gives the aggregated totals for each node:
kubectl top nodes
Yields output similar to the following:
NAME CPU(cores) CPU(%) MEMORY(bytes) MEMORY(%)
k3d-local-agent-0 118m 0% 1698Mi 21%
k3d-local-agent-1 120m 0% 661Mi 8%
k3d-local-agent-2 84m 0% 1054Mi 13%
k3d-local-server-0 115m 0% 1959Mi 25%
Taking a node out of service
To temporarily take a node out of service for maintenance, you can do so with minimal downtime, provided there are enough resources on other nodes in the cluster to handle the pods from the target node.
Step 1: Cordon the node.
This prevents new pods from being scheduled on the node:
kubectl cordon <node-name>
Step 2: Drain the node.
This moves existing pods off the node, respecting DaemonSets and local data:
kubectl drain <node-name> --ignore-daemonsets --delete-local-data
- The
--ignore-daemonsetsflag skips DaemonSet-managed pods, which are typically managed separately. - The
--delete-local-dataflag removes any local ephemeral data stored on the node.
Once drained, the node is effectively out of service.
To bring the node back into service:
Uncordon the node with:
kubectl uncordon <node-name>
This allows Kubernetes to schedule new pods on the node. It won’t automatically move existing pods back; you may need to manually restart or reschedule pods if desired. Since the node now has more available resources, Kubernetes will attempt to schedule new pods there to balance the load across the cluster.
Backup and restore of persistent volumes
The Longhorn storage driver, which provides the persistent storage used in the cluster, (See the Storage Guide for more details) provides built-in mechanisms for backup, restore, and snapshotting volumes. This can be performed entirely from within the Longhorn WebUI. See the relevant section of the Storage Guide for details on accessing that UI, since it requires setting up a port forward, which is described there.
See the relevant Longhorn Documentation for how to configure Longhorn and to manage Snapshotting and Backup and Restore.
9.10 - API Guides
9.10.1 - Healthcheck API
This API provides endpoints to verify the liveness and readiness of the service.
Liveness Check
Endpoint:GET /api/v1/health/alive
Purpose:
Ensures that the service is running and accepting connections. This check does not verify
dependencies or internal health, only that the service process is alive and listening.
Response:
- Success (200 OK):
{
"status": "ok"
}
- Failure (503 Service Unavailable):
Indicates the service is not alive, possibly due to a critical failure.
Example Request
GET /api/v1/health/alive HTTP/1.1
Host: your-host
Accept: */*
Example Response
HTTP/1.1 200 OK
Content-Type: application/json
{
"status": "ok"
}
Readiness Check
Endpoint:GET /api/v1/health/ready
Purpose:
Verifies if the service is ready to handle requests, including whether all dependencies (such as
databases or external services) are operational.
Response:
- Success (200 OK):
{
"status": "ok"
}
- Failure (503 Service Unavailable):
Indicates the service or its dependencies are not yet ready.
Example Request
GET /api/v1/health/ready HTTP/1.1
Host: your-host
Accept: */*
Example Response
HTTP/1.1 200 OK
Content-Type: application/json
{
"status": "ok"
}
Notes
- These endpoints are typically used by load balancers, orchestrators like Kubernetes, or monitoring systems to assess service health.
- The liveness endpoint confirms the process is running; the readiness endpoint confirms the service and its dependencies are fully operational and ready to serve traffic.
9.10.2 - Authentication API
The manager offers a simplified authentication and authorization API that integrates with the Zitadel IAM system. This flow is a streamlined custom OAuth2-inspired process:
Session Establishment:
Users authenticate by sending their credentials to the Login endpoint, which returns a session ID and session token.Token Exchange:
The session token is exchanged for a short-lived, signed JWT access token via the Token Grant flow. This access token can be used to authorize API requests, and its scopes determine what resources and actions are permitted. The token should be protected, as it grants the bearer the rights specified by its scopes as long as it is valid.
Login
Send user credentials to initiate a session:
POST /api/v1/auth/login HTTP/1.1
Accept: application/json, */*;q=0.5
Content-Type: application/json
Host: localhost:4464
{
"email": "test@example.com",
"password": "test"
}
Response:
{
"expires_at": "2025-01-29T15:49:47.062354+00:00",
"session_id": "304646367786041347",
"session_token": "12II6yYYfN8UJ5ij-bac6IRRXX6t9qG_Flrlow_fukXKqvo9HFDVZ7a76Exj7Gn-uVRx04_reCaXew",
"verified_at": "2025-01-28T15:49:47.054169+00:00"
}
Logout
To terminate a session, send:
POST /api/v1/auth/logout HTTP/1.1
Accept: application/json
Content-Type: application/json
Host: localhost:4464
{
"session_id": "304646367786041347",
"session_token": "12II6yYYfN8UJ5ij-bac6IRRXX6t9qG_Flrlow_fukXKqvo9HFDVZ7a76Exj7Gn-uVRx04_reCaXew"
}
Response:
{
"status": "Ok"
}
Token Grant
After establishing a session, exchange the session token for a short-lived access token:
POST /api/v1/auth/token HTTP/1.1
Accept: application/json
Content-Type: application/json
Host: localhost:4464
{
"grant_type": "session",
"scope": "foo bar baz",
"session_id": "304646818908602371",
"session_token": "wfCelUhfSb4DKJbLCwg9dr59rTeaC13LF2TXH1tMqXz68ojL8LE9M-dCcwsKgrwjcXkjj9y49wWvdQ"
}
Note: The scope parameter is a space-delimited string defining the permissions requested. The
API responds with an access token, which is a JWT that contains embedded scopes and other claims,
and must be kept secret.
Response example:
{
"access_token": "eyJ0eXAiOiJKV1QiLCJhbGciOiJFUzI1NiIsImp3ayI6eyJ1c2UiOiJzaWciLCJhbGciOiJFUzI1NiIsImtpZCI6ImFjZC1tYW5hZ2VyLWVzMjU2LWtleSIsImt0eSI6IkVDIiwiY3J2IjoiUC0yNTYiLCJ4IjoiWWxpYVVoSXpnaTk1SjV4NXdaU0tGRUhyWldFUTdwZDZUR2JrTEN6MGxLcyIsInkiOiJDcWNWY1MzQ1pFMjB2enZiWFdxRERRby00UXEzYnFfLUlPZWNPMlZudkFzIn0sImtpZCI6ImFjZC1tYW5hZ2VyLWVzMjU2LWtleSJ9.eyJleHAiOjE3MzgwODAwMjIsImlhdCI6MTczODA3OTcyMiwibmJmIjoxNzM4MDc5NzIyLCJzdWIiOiJ0ZXN0QGV4YW1wbGUuY29tIiwiZ2l2ZW5fbmFtZSI6IiIsImZhbWlseV9uYW1lIjoiVGVzdCBVc2VyIiwiZW1haWwiOiJ0ZXN0QGV4YW1wbGUuY29tIiwic2NvcGUiOiJmb28gYmFyIGJheiJ9.uRmmszZfkrbJpQxIRpxmHf4gL6omvsOQHeuQYd00Bj8PNwQejNA2ZJO3Q_PsE0qb1IrMX5bsCC_k9lWUFMNQ1w",
"expires_in": 300,
"scope": "foo bar baz",
"token_type": "bearer"
}
The access token can then be included in API requests via the Authorization header as Bearer <token>.
9.10.3 - Router API
The /api/v1/routing/validate endpoint evaluates routing rules for a specified IP
address. If the IP is blocked according to the configured rules, the endpoint
responds with a 401 Unauthorized.
Limitations
- Supported Classifier Types: Only classifiers of type GeoIP, Anonymous IP, and IPRange are supported. Other classifiers require additional information which is not available to the Manager, so they are assumed not to match.
- Policy Behavior: Since the exact path taken through the rules during the initial
request is unknown, a “default allow” policy is in effect. This means that unless
an IP explicitly matches a rule that denies it, the response will be
200 OK, indicating the IP is allowed.
Request
Method:GET /api/v1/routing/validate?ip=<IP_ADDRESS>
Headers:
Accept: */* (or as needed)
Example:
GET /api/v1/routing/validate?ip=1.1.1.1 HTTP/1.1
Accept: */*
Host: localhost
User-Agent: HTTPie/3.2.4
Response
- Blocked IP:
Returns401 Unauthorizedif the IP matches a block rule.
HTTP/1.1 401 Unauthorized
- Allowed IP:
Returns200 OKif the IP does not match a block rule (or if no matching rule is found due to the “default allow” policy).
HTTP/1.1 200 OK
Default-Allow Policy
The routing validation API uses a default-allow policy: if a request does not match any rule, it is allowed. This approach is intentional and designed to prevent valid sessions from being accidentally dropped if your configuration uses advanced features or rule types that are not fully supported by the Manager. Since the Manager only supports a subset of all possible classifier types and rule logic, it cannot always determine the exact path a request would take through the full configuration. By defaulting to allow, the system avoids inadvertently blocking legitimate traffic due to unsupported or unrecognized configuration elements.
To ensure sensitive or restricted IPs are blocked, you must add explicit deny
rules at the top of your ruleset. Rules are evaluated in order, and the first match
applies.
Best Practice: Place your most specific
denyrules first, followed by generalallowrules. This ensures that deny conditions are always checked before any allow conditions.
Example Ruleset (confd/confcli syntax)
{
"rules": [
{
"name": "deny-restricted",
"type": "deny",
"condition": "in_session_group('Restricted')",
"onMiss": "allow-general"
},
{
"name": "allow-general",
"type": "allow",
"condition": "always()",
"onMatch": "main-host"
}
]
}
- The first rule denies requests from the
Restrictedsession group. - The second rule allows all other requests.
Note: With a default-allow policy, any request not explicitly denied will be permitted. Always review your ruleset to ensure that deny rules are comprehensive and prioritized.
9.10.4 - Selection Input API
This API allows you to store arbitrary JSON data in synchronization across all Director instances via Kafka. It is based on the Selection Input API provided by the Director. You can create, delete, and fetch selection input entries at arbitrary paths.
Known Limitations
- Parent Path Access: Accessing a parent path (e.g.,
/foo) will not return all nested structures under that path. - Field Access Limitation: It is not possible to query nested fields directly. For example, if
/foo/barcontains{"baz": {"bam": "boom"}}, querying/foo/bar/baz/bamwill not return"boom". You can only query/foo/bar/bazto retrieve{"bam": "boom"}.
API Usage
Create New Keys
Create multiple entries under a specified path by POSTing a JSON object where each key-value pair corresponds to a key and its associated data.
Request:
POST /api/v1/selection_input/<path>
Body Example:
{
"key1": {...},
"key2": {...}
}
Example:
POST to /api/v1/selection_input/modules/keys with the above body creates:
/modules/keys/key1with value{...}/modules/keys/key2with value{...}
Delete a Key
Remove a specific key at a given path.
Request:
DELETE /api/v1/selection_input/<path>/<key>
Example:
To delete key2 under /modules/keys:
DELETE /api/v1/selection_input/modules/keys/key2
Fetch a Key
Retrieve the data stored under a specific key.
Request:
GET /api/v1/selection_input/<path>/<key>
Example:
To fetch key1 under /modules/keys:
GET /api/v1/selection_input/modules/keys/key1
Response:
{
"key1": {...}
}
Fetch All Keys Under a Path
Retrieve all selection input data stored under a parent path.
Request:
GET /api/v1/selection_input/<path>
Example:
To get all keys under /modules/keys:
GET /api/v1/selection_input/modules/keys
Response:
{
"key1": {...},
"key2": {...}
}
Filtering, Sorting, and Limiting Results
You can refine the list of keys returned by adding query parameters:
search=<string>: Filter results to include only keys matching the search string.sort=<asc|desc>: Sort keys in ascending or descending order before filtering.limit=<number>: Limit the number of results returned (positive integer).
Note:
- Sorting occurs prior to filtering and limiting.
- The order of query parameters does not affect the request.
Example:
GET /api/v1/selection_input/modules/keys?search=foo&sort=asc&limit=10
9.10.5 - Operator UI API
This API provides endpoints to retrieve and manage blocked tokens, user agents, and referrers used within the Operator UI.
Endpoints
Retrieve List of Blocked Tokens
GET /api/v1/operator_ui/modules/blocked_tokens/
Fetches a list of blocked tokens, supporting optional filtering, sorting, and limiting.
Query Parameters:
search(optional): Filter tokens matching the search term.limit(optional): Limit number of results.sort(optional): Sort order,"asc"or"desc"(default:"asc").
Responses:
200 OKwith JSON array of blocked tokens.404 Not Foundif no tokens found.500 Internal Server Erroron failure.
Retrieve a Specific Blocked Token
GET /api/v1/operator_ui/modules/blocked_tokens/{token}
Fetches details of a specific blocked token.
Path Parameter:
token: The token string to retrieve.
Responses:
200 OKwith JSON object of the token.404 Not Foundif token does not exist.500 Internal Server Erroron failure.
Retrieve List of Blocked User Agents
GET /api/v1/operator_ui/modules/blocked_user_agents/
Fetches a list of blocked user agents, with optional sorting and limiting.
Query Parameters:
limit(optional): Limit number of results.sort(optional):"asc"or"desc"(default:"asc").
Responses:
200 OKwith JSON array of user agents.404 Not Foundif none found.500 Internal Server Erroron failure.
Retrieve a Specific Blocked User Agent
GET /api/v1/operator_ui/modules/blocked_user_agents/{user_agent}
Retrieves details of a specific blocked user agent.
Path Parameter:
user_agent: URL-safe Base64 encoded string (without padding). Decode before use; if decoding fails, the server returns400 Bad Request.
Responses:
200 OKwith JSON object of the user agent.404 Not Foundif not found.500 Internal Server Erroron failure.
Retrieve List of Blocked Referrers
GET /api/v1/operator_ui/modules/blocked_referrers/
Fetches a list of blocked referrers, with optional sorting and limiting.
Query Parameters:
limit(optional): Limit number of results.sort(optional):"asc"or"desc"(default:"asc").
Responses:
200 OKwith JSON array of referrers.404 Not Foundif none found.500 Internal Server Erroron failure.
Retrieve a Specific Blocked Referrer
GET /api/v1/operator_ui/modules/blocked_referrers/{referrer}
Retrieves details of a specific blocked referrer.
Path Parameter:
referrer: URL-safe Base64 encoded string (without padding). Decode before use; if decoding fails, return400 Bad Request. The response includes the decoded referrer.
Responses:
200 OKwith JSON object containing the referrer.404 Not Foundif not found.500 Internal Server Erroron failure.
Additional Notes
- For User Agents and Referrers, the path parameters are URL-safe Base64 encoded (per RFC 4648,
using
-and_instead of+and/) with padding (=) removed. Clients should remove padding when constructing requests and restore it before decoding. - All endpoints returning specific items will respond with
404 Not Foundif the item does not exist. - Errors during processing will return
500 Internal Server Errorwith an error message.
9.11 - Use Cases
9.11.1 - Custom Deployments
In some environments, it may not be necessary to run all components of the ESB3027 AgileTV CDN Manager—such as when certain features are not used, or when components like the MIB Frontend Configuration GUI are hosted separately, for example, in a public cloud environment. The examples in this guide illustrate scenarios and the configuration properties needed to achieve specific configurations.
Manager Without Metrics and Monitoring Support
If metrics and monitoring are not required—perhaps because an existing monitoring solution is in place—it is possible to disable the deployment of Telegraf, Prometheus, Grafana, and VictoriaMetrics. You can choose to skip the entire metrics suite or disable individual components as needed.
Keep in mind, that disabling certain components may require adjustments elsewhere in the configuration. For example, disabling Prometheus will necessitate modifications to Grafana and VictoriaMetrics configurations, since they depend on Prometheus being available.
To disable all metrics components, set:
acd-metrics.enabled: false
Applying this configuration will prevent the deployment of the entire metrics suite. To disable
individual components within the metrics framework, set their respective enabled flags to false.
For example, to disable only Grafana but keep other metrics components active:
acd-metrics.grafana.enabled: false
Manager Without the MIB Frontend Configuration GUI
If the MIB-Frontend GUI will not be used to configure the ESB3024 AgileTV CDN Director instances, this component can be disabled by setting:
mib-frontend.enabled: false
This is also useful if the frontend is hosted in a separate cluster—such as in a public cloud like AWS —or if the manager is deployed within a customer’s network without the frontend.
9.12 - Common Issues
Installation
AttachVolume.Attach failed for volume…
When describing a pod that fails to deploy, the message “AttachVolume.Attach failed for volume … is not ready for workloads” may appear in the event log.
This means that the Persistent Volume Claim was created but unable to be successfully mounted in the pod. This is typically caused by a network issue, as Longhorn requires both iSCSI and NFS to work.
Also ensure that Longhorn is healthy and that the correct storage class is configured for your Persistent Volume Claims.
Check the firewall to ensure that the proper ports have been opened. See the Networking Guide for details.
9.13 - Troubleshooting Guide
This guide helps diagnose common issues with the acd-manager deployment and its associated pods.
1. Check Pod Status
Verify all pods are running:
kubectl get pods
Expected:
- Most pods should be in
Runningstate withREADYas1/1or2/2. - Pods marked as
0/1or0/2are not fully ready, indicating potential issues.
2. Investigate Unready or Failed Pods
Example:
kubectl describe pod acd-manager-6c85ddd747-rdlg6
- Look for events such as
CrashLoopBackOff,ImagePullBackOff, orErrImagePull. - Check container statuses for error messages.
3. Check Pod Logs
Fetch logs for troubleshooting:
kubectl logs acd-manager-6c85ddd747-rdlg6
- For pods with multiple containers:
kubectl logs acd-manager-<pod_name> -c <container_name>
- Focus on recent errors or exceptions.
4. Verify Connectivity and Dependencies
- PostgreSQL: Confirm the
acd-cluster-postgresql-0pod is healthy and accepting connections. - Kafka: Check
kafka-controllerpods are running and not experiencing issues. - Redis: Ensure Redis master and replicas are healthy.
- Grafana, Prometheus, VictoriaMetrics: Confirm these services are operational.
5. Check Resource Usage
High CPU or memory can cause pods to crash or become unresponsive:
kubectl top pods
Actions:
- Scale resources if needed.
- Review resource quotas and limits.
6. Check Events in Namespace
kubectl get events --sort-by='.lastTimestamp'
- Look for warnings or errors related to pod scheduling, network issues, or resource constraints.
7. Restart Problematic Pods
Sometimes, restarting pods can resolve transient issues:
kubectl delete pod <pod_name>
Kubernetes will automatically recreate the pod.
8. Verify Configurations and Secrets
- Check ConfigMaps and Secrets for correctness:
kubectl get configmaps
kubectl get secrets
- Confirm environment variables and mounted volumes are correctly configured.
9. Check Cluster Network
- Ensure network policies or firewalls are not blocking communication between pods and external services.
10. Additional Tips
- Upgrade or Rollback: If recent changes caused issues, consider rolling back or upgrading the deployment.
- Monitoring: Use Grafana and VictoriaMetrics dashboards for real-time insights.
- Documentation: Consult application-specific logs and documentation for known issues.
Summary Table
| Issue Type | Common Checks | Commands |
|---|---|---|
| Pod Not Ready | Describe pod, check logs | kubectl describe pod, kubectl logs |
| Connectivity | Verify service endpoints | kubectl get svc, curl from within pods |
| Resource Limits | Monitor resource usage | kubectl top pods |
| Events & Errors | Check cluster events | kubectl get events |
| Configuration | Validate configs and secrets | kubectl get configmaps, kubectl get secrets |
If issues persist, consider scaling down and up components or consulting logs and metrics for deeper analysis.
9.14 - Glossary
- Access Token
- A credential used to authenticate and authorize access to resources or APIs on behalf of a user, usually issued by an authorization server as part of an OAuth 2.0 flow. It contains the necessary information to verify the user’s identity and define the permissions granted to the token holder.
- Bearer Token
- A type of access token that allows the holder to access
protected resources without needing to provide additional
credentials. It’s typically included in the HTTP Authorization
header as
Authorization: Bearer <token>, and grants access to any resource that recognizes the token. - Chart
- A Helm Chart is a collection of files that describe a related set of Kubernetes resources required to deploy an application, tool, or service. It provides a structured way to package, configure, and manage Kubernetes applications.
- Cluster
- A group of interconnected computers or nodes that work together as a single system to provide high availability, scalability and redundancy for applications or services. In Kubernetes, a cluster usually consists of one primary node, and multiple worker or agent nodes.
- Confd
- An AgileTV backend service that hosts the service configuration. Comes with an API, a CLI and a GUI.
- ConfigMap (Kubernetes)
- A Kubernetes resource used to store non-sensitive configuration data in key-value pairs, allowing applications to access configuration settings without hardcoding them into the container images.
- Containerization
- The practice of packaging applications and their dependencies into lightweight portable containers that can run consistently across different computing environments.
- Deployment (Kubernetes)
- A resource object that provides declarative updates to applications by managing the creation and scaling of a set of Pods.
- Director
- The AgileTV Delivery OTT router and related services.
- ESB
- A software bundle that can be separately installed and upgraded, and is released as one entity with one change log. Each ESB is identified with a number. Over time, features and functions within an ESB can change.
- Helm
- A package manager for Kubernetes that simplifies the development and management of applications by using pre-configured templates called charts. It enables users to define, install, and upgrade complex applications on Kubernetes.
- Ingress
- A Kubernetes resource that manages external access to services within a cluster, typically HTTP. It provides routing rules to manage traffic to various services based on hostnames and paths.
- K3s
- A lightweight Kubernetes cluster developed by Rancher Labs. This is a complete Kubernetes system deployed as a single portable binary.
- K8s
- A common abbreviation for Kubernetes.
- Kafka
- Apache Kafka is an open-source distributed event streaming platform designed for building real-time data pipelines and streaming applications. It enables the publication, subscription, storage, and processing of streams of records in a fault-tolerant and scalable manner.
- Kubectl
- The command-line tool for interacting with Kubernetes clusters, allowing users to deploy applications, manage cluster resources, and inspect logs or configurations.
- Kubernetes
- An open-source container orchestration platform designed to automate scaling, and management of containerized applications. It enables developers and operations teams to manage complex applications consistently across various environments.
- LoadBalancer
- A networking tool that distributes network traffic across multiple servers or Pods to ensure no single server becomes overwhelmed, improving reliability and performance.
- Manager
- The AgileTV Management Software and related services.
- Namespace
- A mechanism for isolating resources within a Kubernetes cluster, allowing multiple teams or applications to coexist without conflict by providing a scope for names.
- OAuth2
- An open standard for authorization that allows third-party applications to gain limited access to a user’s resources on a server without exposing the user’s credentials.
- Pod
- The smallest deployable unit in Kubernetes that encapsulates one or more containers, sharing the same network and storage resources. It serves as a logical host for tightly coupled applications, allowing them to communicate and function effectively within a cluster.
- Router
- Unless otherwise specified, an HTTP router that manages an OTT session using HTTP redirect. There are also ways to use DNS instead of HTTP.
- Secret (Kubernetes)
- A resource used to store sensitive information, such as passwords, API keys, or tokens in a secure manner. Secrets are encoded in base64 and can be made available to Pods as environment variables or mounted as files, ensuring that sensitive data is not exposed in the application code or configuration files.
- Service (Kubernetes)
- An abstraction that defines a logical set of Pods and a policy to access them, enabling stable networking and load balancing to ensure reliable communication among application components.
- Session Token
- A session token is a temporary, unique identifier generated by a server and issued to a user upon successful authentication.
- Stateful Set (Kubernetes)
- A Kubernetes deployment which guarantees ordering and uniqueness of Pods, typically used for applications that require stable network identities and persistent storage such as with databases.
- Topic (Kafka)
- A category or feed name to which records (messages) are published. Messages flow through a topic in the order in which they are produced, and multiple consumers can subscribe to the stream to process the records in real time.
- Volume (Kubernetes)
- A persistent storage resource in Kubernetes that allows data to be stored and preserved beyond the lifecycle of individual Pods, facilitating data sharing and durability.
- Zitadel
- An open-source identity and access management (IAM) platform designed to handle user authentication and authorization for applications. It provides features like single-sign-on (SSO), multi-factor authentication (MFA), and support for various authentication protocols.
10 - AgileTV CDN Manager (esb3027)
10.1 - Getting Started
Overview
The AgileTV CDN Manager (product code ESB3027) is a cloud-native control plane for managing CDN deployments. It provides centralized orchestration for authentication, configuration, routing, and metrics collection across CDN infrastructure.
Before You Start:
- Deployment type: Lab (single-node) or Production (multi-node)? See Installation Guide
- Hardware: Nodes meeting specifications for your deployment type
- OS: RHEL 9 or compatible clone (Oracle Linux, AlmaLinux, Rocky Linux)
- Software: Installation ISO from AgileTV customer portal; Extras ISO for air-gapped
- Network: Firewall ports configured per Networking Guide
Deployment Models
| Deployment Model | Description | Typical Use Case |
|---|---|---|
| Self-Hosted | K3s Kubernetes cluster on customer premises | Production deployments |
| Lab/Single-Node | Minimal single-node installation | Acceptance testing, demonstrations, development |
Functionality remains consistent across deployment models.
Prerequisites
- Installation ISO: Obtain
esb3027-acd-manager-X.Y.Z.isofrom AgileTV customer portal - Extras ISO (air-gapped): Obtain
esb3027-acd-manager-extras-X.Y.Z.isofor offline installations - OS: RHEL 9 or compatible clone (Oracle Linux, AlmaLinux, Rocky Linux)
- Kubernetes familiarity: Basic understanding of pods, deployments, and Helm charts
For detailed hardware, network, and operating system requirements, see the System Requirements Guide.
Installation
Ready to install? The Installation Guide provides step-by-step procedures for both lab and production deployments:
- Lab/Single-Node: Quick deployment for testing and demonstrations
- Production/Multi-Node: High-availability cluster with 3+ nodes
See the Installation Guide to get started.
Accessing the System
Following successful deployment, the following interfaces are available:
| Service | URL Path | Authentication |
|---|---|---|
| MIB Frontend | /gui | Zitadel SSO |
| API Gateway | /api | Bearer token |
| Zitadel Console | /ui/console | See Glossary |
| Grafana | /grafana | See Glossary |
All services are accessed via https://<cluster-host><path>.
Note: A self-signed SSL certificate is deployed by default. When accessing services through a browser, you will need to accept the self-signed certificate warning. For production deployments, configure a valid SSL certificate before exposing the system to users.
Initial user configuration is performed through Zitadel. Refer to the Configuration Guide for authentication setup procedures. For detailed guidance on managing users, roles, and permissions in the Zitadel Console, see Zitadel’s User Management Documentation.
Documentation Navigation
The following guides provide detailed information for specific operational tasks:
| Guide | Description |
|---|---|
| System Requirements | Hardware, operating system, and network specifications |
| Architecture | Detailed system architecture and scaling guidance |
| Installation | Step-by-step installation and upgrade procedures |
| Configuration | System configuration and customization |
| Performance Tuning | Optimization tips for improved performance |
| API Guide | REST API reference and integration examples |
| Operations | Day-to-day operational procedures |
| Metrics & Monitoring | Monitoring dashboards and alerting configuration |
| Troubleshooting | Common issues and resolution procedures |
| Glossary | Definitions of technical terms |
| Release Notes | Version-specific changes and known issues |
10.2 - System Requirements Guide
Overview
This document specifies the hardware, operating system, and networking requirements for deploying the AgileTV CDN Manager (ESB3027). Requirements vary based on deployment type and node role within the cluster.
Cluster Sizing
Production Deployments
Production deployments require a minimum of three nodes to achieve high availability. The cluster architecture employs distinct node roles:
| Role | Description |
|---|---|
| Server Node (Control Plane Only) | Runs control plane components (etcd, Kubernetes API server) only; does not host application workloads; requires separate Agent nodes |
| Server Node (Combined) | Runs control plane components and hosts application workloads; default configuration |
| Agent Node | Executes application workloads only; does not participate in cluster quorum |
Server nodes can be deployed in either Control Plane Only or Combined role configurations. The choice depends on your deployment requirements:
- Control Plane Only: Dedicated control plane nodes with lower resource requirements; requires separate Agent nodes for workloads
- Combined: Server nodes run both control plane and workloads; minimum 3 nodes required for HA
Why Use Control Plane Only Nodes?
Dedicated Control Plane Only nodes provide several benefits for larger deployments:
- Resource Isolation: Control plane components (etcd, API server, scheduler) run on dedicated hardware without competing with application workloads for CPU and memory
- Stability: Application workload spikes or misbehaving pods cannot impact control plane performance
- Security: Smaller attack surface on control plane nodes; fewer containers and services running
- Predictable Performance: Control plane responsiveness remains consistent regardless of application load
- Flexible Sizing: Control Plane Only nodes can use lower-specification hardware (2 cores, 4 GiB) since they don’t run application workloads
For most small to medium deployments, Combined role servers are simpler and more cost-effective. Control Plane Only nodes are recommended for larger deployments with significant workload requirements or where control plane stability is critical.
High Availability Considerations
Production deployments require 3 nodes running control plane (etcd) and 3 nodes capable of running workloads. These can be the same nodes (Combined role) or separate nodes (CP-Only + Agent).
Node Role Combinations:
| Configuration | Control Plane Nodes | Workload Nodes | Total Nodes |
|---|---|---|---|
| All Combined | 3 Combined servers | 3 Combined servers | 3 |
| Separated | 3 CP-Only servers | 3 Agent nodes | 6 |
| Hybrid | 2 CP-Only + 1 Combined | 1 Combined + 2 Agent | 5 |
Any combination works as long as you have 3 control plane nodes and 3 workload-capable nodes.
Note: Regardless of the deployment configuration, a minimum of 3 nodes capable of running workloads is required for production deployments. This ensures both high availability and sufficient capacity for application pods.
For detailed fault tolerance information and data replication strategies, see the Architecture Guide.
Hardware Requirements
Single-Node Lab Deployment
Lab deployments are intended for acceptance testing, demonstrations, and development only. These configurations are not suitable for production workloads.
| Resource | Minimum | Recommended |
|---|---|---|
| CPU | 8 cores | 12 cores |
| Memory | 16 GiB | 24 GiB |
| Disk* | 128 GiB | 128 GiB |
Production Cluster - Server Node (Control Plane Only)
Server nodes dedicated to control plane functions have modest resource requirements:
| Resource | Minimum | Recommended |
|---|---|---|
| CPU | 2 cores | 4 cores |
| Memory | 4 GiB | 8 GiB |
| Disk* | 64 GiB | 128 GiB |
These nodes run only control plane components and require separate Agent nodes to run application workloads.
Production Cluster - Server Node (Control Plane + Workloads)
Combined role nodes require resources for both control plane and application workloads:
| Resource | Minimum | Recommended |
|---|---|---|
| CPU | 4 cores | 16 cores |
| Memory | 8 GiB | 32 GiB |
| Disk* | 100 GiB | 500 GiB |
Production Cluster - Agent Node
Agent nodes execute application workloads and require the following resources:
| Resource | Minimum | Recommended |
|---|---|---|
| CPU | 4 cores | 16 cores |
| Memory | 8 GiB | 32 GiB |
| Disk* | 100 GiB | 500 GiB |
Storage Notes
* Disk Space: All disk space values must be available in the
/var/lib/longhornpartition. It is recommended that/var/lib/longhornbe a separate partition on a fast SSD for optimal performance, though SSD is not strictly required.Longhorn Capacity: Longhorn storage requires an additional 30% capacity headroom for internal operations and scaling. If less than 30% of the total partition capacity is available, Longhorn may mark volumes as “full” and prevent further writes. Plan disk capacity accordingly.
Storage Performance
For optimal performance, the following storage characteristics are recommended:
- Disk Type: SSD or NVMe storage for Longhorn volumes
- Filesystem: XFS or ext4 with default mount options
- Partition Layout: Dedicated
/var/lib/longhornpartition for persistent storage
Virtual machines and bare-metal hardware are both supported. Nested virtualization (running multiple nodes under a single hypervisor) may impact performance and is not recommended for production deployments.
Operating System Requirements
Supported Operating Systems
The CDN Manager supports Red Hat Enterprise Linux and compatible distributions:
| Operating System | Status |
|---|---|
| Red Hat Enterprise Linux 9 | Supported |
| Red Hat Enterprise Linux 10 | Untested |
| Red Hat Enterprise Linux 8 | Not supported |
Compatible Clones
The following RHEL-compatible distributions are supported when major version requirements are satisfied:
- Oracle Linux 9
- AlmaLinux 9
- Rocky Linux 9
Air-Gapped Deployments
Important: For air-gapped deployments (no internet access), the OS installation ISO must be mounted on all nodes before running the installer or join commands. The installer needs to install one or more packages from the distribution’s repository.
Oracle Linux UEK Kernel
Note: For Oracle Linux 9.7 and later using the Unbreakable Enterprise Kernel (UEK), you must install the
kernel-uek-modules-extra-netfilter-$(uname -r)package before running the installer:# Mount OS ISO first (required for air-gapped) mount -o loop /path/to/oracle-linux-9.iso /mnt/iso # Install required kernel modules dnf install kernel-uek-modules-extra-netfilter-$(uname -r)This package provides netfilter kernel modules required by K3s and Longhorn.
SELinux
SELinux is supported when installed in “Enforcing” mode. The installation process will configure appropriate SELinux policies automatically.
Networking Requirements
Network Interface
Each cluster node must have at least one network interface card (NIC) configured as the default gateway. If the node lacks a pre-configured default route, one must be established prior to installation.
Port Requirements
The cluster requires the following network connectivity:
| Category | Ports | Purpose |
|---|---|---|
| Inter-Node | 2379-2380, 6443, 8472/UDP, 10250, 5001, 9500, 8500 | etcd, API server, Flannel VXLAN, Kubelet, Spegel, Longhorn |
| External Access | 80, 443 | HTTP redirect and HTTPS ingress |
| Application (optional) | 6379, 8125 TCP/UDP, 9093, 9095 | Redis, Telegraf, Alertmanager, Kafka external |
Important: Complete port requirements, network ranges, and firewall configuration procedures are provided in the Networking Guide. Do not expose VictoriaMetrics (8428, 8429), Grafana (3000), or PostgreSQL (5432) directly—access these services only through the secure HTTPS ingress (port 443).
Resource Planning
Calculating Cluster Capacity
When planning cluster capacity, consider the following factors:
- Base Overhead: Kubernetes system components consume approximately 1-2 cores and 2-4 GiB memory per node
- Application Workloads: Refer to individual component resource requirements in the Architecture Guide
- Headroom: Maintain 20-30% resource headroom for workload spikes and automatic scaling
Scaling Considerations
The CDN Manager supports horizontal scaling for most components. The Horizontal Pod Autoscaler (HPA) can automatically adjust replica counts based on resource utilization. Detailed scaling guidance is available in the Architecture Guide.
Example Production Deployment
A minimal production deployment with 3 server nodes (combined role) and 2 agent nodes would require:
| Node Type | Count | CPU Total | Memory Total | Disk Total |
|---|---|---|---|---|
| Server (Combined) | 3 | 12 cores | 24 GiB | 300 GiB |
| Agent | 2 | 8 cores | 16 GiB | 200 GiB |
| Total | 5 | 20 cores | 40 GiB | 500 GiB |
This configuration provides:
- High availability (survives loss of 1 server node)
- Capacity for application workloads across all nodes
- Headroom for horizontal scaling
Next Steps
After verifying system requirements:
- Review the Installation Guide for deployment procedures
- Consult the Networking Guide for firewall configuration
- Examine the Architecture Guide for component resource requirements
10.3 - Networking Guide
Network Architecture
Physical Network
Each cluster node must have at least one network interface card (NIC) configured as the default gateway. If the node lacks a pre-configured default route, it must be established prior to installation.
K3s requires a default route to auto-detect the node’s primary IP and for kube-proxy ClusterIP routing to function properly. If no default route exists, create a dummy interface as a workaround:
ip link add dummy0 type dummy
ip link set dummy0 up
ip addr add 203.0.113.254/31 dev dummy0
ip route add default via 203.0.113.255 dev dummy0 metric 1000
Overlay Network
Kubernetes creates virtual network interfaces for pods that are typically not associated with any specific firewalld zone. The cluster uses the following network ranges:
| Network | CIDR | Purpose |
|---|---|---|
| Pod | 10.42.0.0/16 | Inter-pod communication |
| Service | 10.43.0.0/16 | Kubernetes service discovery |
Firewall regulations should target the primary physical interface. The overlay network traffic is handled by Flannel VXLAN.
Port Requirements
Inter-Node Communication
The following ports must be permitted between all cluster nodes for Kubernetes and cluster infrastructure:
| Port | Protocol | Source | Destination | Purpose |
|---|---|---|---|---|
| 2379-2380 | TCP | Server nodes | Server nodes | etcd cluster communication |
| 6443 | TCP | All nodes | Server nodes | Kubernetes API server |
| 8472 | UDP | All nodes | All nodes | Flannel VXLAN overlay network |
| 10250 | TCP | All nodes | All nodes | Kubelet metrics and management |
| 5001 | TCP | All nodes | Server nodes | Spegel registry mirror |
| 9500-9503 | TCP | All nodes | All nodes | Longhorn management API |
| 8500-8504 | TCP | All nodes | All nodes | Longhorn agent communication |
| 10000-30000 | TCP | All nodes | All nodes | Longhorn data replication |
| 3260 | TCP | All nodes | All nodes | Longhorn iSCSI |
| 2049 | TCP | All nodes | All nodes | Longhorn RWX (NFS) |
Application Services Ports
The following ports must be accessible for application services within the cluster:
| Port | Protocol | Service |
|---|---|---|
| 6379 | TCP | Redis |
| 9093 | TCP | Alertmanager |
| 9095 | TCP | Kafka |
| 8086 | TCP | Vector (InfluxDB line protocol listener) |
External Access Ports
The following ports must be accessible from external clients to cluster nodes:
| Port | Protocol | Service |
|---|---|---|
| 80 | TCP | HTTP ingress (Optional, redirects to HTTPS) |
| 443 | TCP | HTTPS ingress (Required, all services) |
| 9095 | TCP | Kafka (external client connections) |
| 6379 | TCP | Redis (external client connections) |
| 8086 | TCP | Vector (InfluxDB line protocol, external metrics senders) |
Network Configuration Guides
Deployment Type
Choose the guide that matches your deployment architecture:
| Guide | Description | Who Should Use This |
|---|---|---|
| Configuring Segregated Networks | Multi-NIC deployments with air-gapped cluster backplane | Most users - If you have separate interfaces for cluster traffic and external internet access |
| Shared Interface Setup | Single-NIC deployments where all traffic shares one interface | Users with a single network interface for both cluster traffic and external access |
Not sure which to use? If you have explicitly separate interfaces for cluster communication and external access, start with Configuring Segregated Networks. Only use the shared interface guide if your hardware is limited to a single NIC.
10.3.1 - Shared Interface Network Setup
Overview
This guide covers network configuration for standard single-NIC deployments. In this architecture, all traffic—including internal cluster communication (East-West) and external internet access (North-South)—is routed through a single network interface.
Security Warning: Because all traffic shares the same interface and firewall zone, there is no physical or logical isolation between cluster management traffic and public-facing service traffic. For production environments requiring security isolation, see Configuring Segregated Networks.
Note: The installer script automatically detects if firewalld is enabled. If so, it will verify that the required inter-node ports are open through the firewall in the default zone before proceeding. If any required ports are missing, the installer will report an error and exit. Application service ports (such as Kafka, VictoriaMetrics, and Vector) are not checked by the installer as they are configurable.
For network architecture, port requirements, and general information, see the Network Architecture Overview section in the main Networking Guide.
firewall Configuration
Assign Interface to Default Zone
Assign your primary network interface to the default zone:
firewall-cmd --permanent --zone=public --change-interface=<interface>
firewall-cmd --reload
Replace <interface> with your actual interface name (e.g., eth0).
Configure Firewall Rules
In a shared interface setup, you must manually configure firewall rules for both internal cluster traffic and external access, as K3s does not automatically manage the public zone.
# 1. Allow pod and service networks (Internal CIDRs)
firewall-cmd --permanent --zone=public --add-source=10.42.0.0/16
firewall-cmd --permanent --zone=public --add-source=10.43.0.0/16
# 2. Kubernetes and Cluster Infrastructure (East-West Traffic)
# These ports must be opened manually for the cluster to function on a single interface.
firewall-cmd --permanent --zone=public --add-port=2379-2380/tcp
firewall-cmd --permanent --zone=public --add-port=6443/tcp
firewall-cmd --permanent --zone=public --add-port=8472/udp
firewall-cmd --permanent --zone=public --add-port=10250/tcp
firewall-cmd --permanent --zone=public --add-port=5001/tcp
firewall-cmd --permanent --zone=public --add-port=9500-9503/tcp
firewall-cmd --permanent --zone=public --add-port=8500-8504/tcp
firewall-cmd --permanent --zone=public --add-port=10000-30000/tcp
firewall-cmd --permanent --zone=public --add-port=3260/tcp
firewall-cmd --permanent --zone=public --add-port=2049/tcp
# 3. External Access Ports (North-South Traffic)
firewall-cmd --permanent --zone=public --add-port=80/tcp
firewall-cmd --permanent --zone=public --add-port=443/tcp
firewall-cmd --permanent --zone=public --add-port=9095/tcp
firewall-cmd --permanent --zone=public --add-port=6379/tcp
firewall-cmd --permanent --zone=public --add-port=8086/tcp
# Apply changes
firewall-cmd --reload
Verification
Verify all port rules are applied:
firewall-cmd --zone=public --list-all
Expected output:
public (active)
target: default
icmp-block-inversion: no
interfaces: eth0
sources: 10.42.0.0/16 10.43.0.0/16
services: dhcpv6-client ssh
ports: 80/tcp 443/tcp 9095/tcp 6379/tcp 8086/tcp
protocols: 2379-2380/tcp 6443/tcp 8472/udp 10250/tcp 5001/tcp 9500-9503/tcp 8500-8504/tcp 10000-30000/tcp 3260/tcp 2049/tcp
masquerade: no
forward-ports:
source-ports:
icmp-blocks:
rich-rules:
Note: Additional interfaces may appear in the zone (e.g.,
eth0 eth1) if firewalld auto-assigned them based on network configuration. This is expected and does not affect functionality.
Verify the interface is correctly assigned to the public zone:
firewall-cmd --get-active-zones
Expected output will show eth0 listed under the public zone:
public (active)
interfaces: eth0
Troubleshooting
Expected output will show eth0 listed under the public zone:
public (active)
interfaces: eth0
Troubleshooting
Nodes Cannot Communicate
Verify firewall rules allow inter-node traffic in the public zone:
firewall-cmd --list-all
Test basic connectivity between nodes:
ping <node-ip>
Post-Installation Troubleshooting
Once the cluster is installed, if you encounter issues with pod-to-pod communication or service access, verify the following:
- Flannel Interface: Ensure the
flannel.1interface is up and has the correct IP addresses. - Network Routes: Verify that the pod and service CIDR routes are present in the routing table.
- Firewall Rules: Ensure all required Kubernetes and cluster ports are allowed in the
publiczone.
For detailed troubleshooting of Kubernetes-specific components (like Ingress or Pod connectivity), please refer to the Kubernetes Troubleshooting Guide.
10.3.2 - Configuring Segregated Networks
Overview
This guide covers configuring a cluster with separate interfaces for internal cluster communication and external internet access (also known as segregated or dual-homed deployments). In this setup, eth1 handles the internal cluster traffic (pod-to-pod, control plane) while eth0 provides public internet access.
Security Benefit: This configuration provides physical isolation between East-West (cluster) and North-South (external) traffic. The trusted zone allows unrestricted internal communication, while the public zone handles external access with controlled port exposure.
When configuring segregated networks with K3s, proper interface binding is essential. K3s uses the --flannel-iface flag to ensure pod traffic stays on the private network, and the --node-external-ip flag to advertise the public address for external access. Server nodes additionally require --advertise-address=<ETH1_IP> to ensure the API server advertises its internal/private address; without this flag, k3s promotes the external IP to the advertise address when --node-external-ip is set, causing the kubernetes service ClusterIP endpoint to register as an address that is unreachable from within the cluster.
Important: K3s manages pod masquerading and service routing automatically. You only need to configure firewalld zones correctly and pass the proper flags to the K3s installer.
Complete, step-by-step instructions follow.
Prerequisites
Before starting, ensure:
- Operating system is installed and updated on all nodes
- Network connectivity between nodes is available
- SSH access is configured for all cluster nodes
Configure Firewalld Zones
This guide configures separate zones for internal cluster traffic and external access.
Assign Interfaces to Zones
K3s uses trusted zone for the internal network to allow unrestricted pod-to-pod and control plane traffic:
# Assign eth0 (external/internet) to public zone
firewall-cmd --permanent --zone=public --change-interface=eth0
# Assign eth1 (internal/cluster) to trusted zone
firewall-cmd --permanent --zone=trusted --change-interface=eth1
# Allow pod and service CIDRs in trusted zone (required for pod communication)
firewall-cmd --permanent --zone=trusted --add-source=10.42.0.0/16
firewall-cmd --permanent --zone=trusted --add-source=10.43.0.0/16
# Reload firewall
firewall-cmd --reload
Configure Firewall Ports
Open the necessary ports on the public zone for external access:
# External access ports
firewall-cmd --permanent --zone=public --add-port=80/tcp
firewall-cmd --permanent --zone=public --add-port=443/tcp
firewall-cmd --permanent --zone=public --add-port=9095/tcp
firewall-cmd --permanent --zone=public --add-port=6379/tcp
firewall-cmd --permanent --zone=public --add-port=8086/tcp
# Apply changes
firewall-cmd --reload
Note: K3s automatically creates iptables rules for internal cluster ports (6443, 10250, 2379-2380, 8472, 5001, 9500-9503, 8500-8504, 10000-30000, 3260, 2049) when using
--flannel-iface=eth1. Pod and service CIDRs (10.42.0.0/16 and 10.43.0.0/16) are already allowed in the trusted zone via the--add-sourcecommands above.
Verify Zone Configuration
firewall-cmd --zone=public --list-all
firewall-cmd --zone=trusted --list-all
Expected output for public zone:
public (active)
target: default
icmp-block-inversion: no
interfaces: eth0 eth2
sources:
services: dhcpv6-client ssh cockpit
ports: 80/tcp 443/tcp 9095/tcp 6379/tcp 8086/tcp
protocols:
forward: yes
masquerade: no
forward-ports:
source-ports:
icmp-blocks:
rich rules:
Expected output for trusted zone:
trusted (active)
target: ACCEPT
icmp-block-inversion: no
interfaces: eth1
sources: 10.42.0.0/16 10.43.0.0/16
services: ssh mdns
ports:
protocols:
forward: yes
masquerade: no
forward-ports:
source-ports:
icmp-blocks:
rich rules:
Note: Additional interfaces may appear in a zone (e.g.,
eth0 eth2) if firewalld auto-assigned them based on network configuration. This is expected and does not affect functionality.
Single-NIC Alternative
If you only have a single network interface, see the Shared Interface Setup guide instead. This guide is specifically for multi-NIC deployments with separate interfaces for cluster and external traffic.
Troubleshooting
Verify Zone Configuration
If pods cannot communicate with services, verify the trusted zone has the correct sources configured:
firewall-cmd --zone=trusted --list-all
Expected output:
trusted (active)
target: ACCEPT
icmp-block-inversion: no
interfaces: eth1
sources: 10.42.0.0/16 10.43.0.0/16
services: ssh mdns
ports:
protocols:
forward: yes
masquerade: no
forward-ports:
source-ports:
icmp-blocks:
rich rules:
Ensure both 10.42.0.0/16 (pod network) and 10.43.0.0/16 (service network) are listed under sources. If missing, re-run:
firewall-cmd --permanent --zone=trusted --add-source=10.42.0.0/16
firewall-cmd --permanent --zone=trusted --add-source=10.43.0.0/16
firewall-cmd --reload
10.4 - Architecture Guide
Overview
The AgileTV CDN Manager (ESB3027) is a cloud-native Kubernetes application designed for managing CDN operations. This guide provides a detailed description of the system architecture, component interactions, and scaling considerations.
High-Level Architecture
The CDN Manager follows a microservices architecture deployed on Kubernetes. The system is organized into logical layers:
graph LR
Clients[API Clients] --> Ingress[Ingress Controller]
Ingress --> Manager[Core Manager]
Ingress --> Frontend[MIB Frontend]
Ingress --> Grafana[Grafana]
Manager --> Redis[(Redis)]
Manager --> Kafka[(Kafka)]
Manager --> PostgreSQL[(PostgreSQL)]
Manager --> Zitadel[Zitadel IAM]
Manager --> Confd[Configuration Service]
Grafana --> VM[(VictoriaMetrics)]
Confd -.-> Gateway[NGinx Gateway]
Gateway --> Director[CDN Director]Component Architecture
Ingress Layer
The ingress layer manages all incoming traffic to the cluster:
| Component | Role |
|---|---|
| Ingress Controller | Primary ingress for all cluster traffic; routes requests to internal services based on path |
| NGinx Gateway | Reverse proxy for routing traffic to external CDN Directors; used by MIB Frontend to communicate with remote Confd instances on CDN Director nodes |
Traffic flow:
- API clients and Operator UI connect via the Ingress Controller at
/apiand/guipaths respectively - Grafana dashboards are accessed via the Ingress Controller at
/grafana - Zitadel authentication console is accessed via the Ingress Controller at
/ui/console - MIB Frontend uses NGinx Gateway when communicating with external Confd instances on CDN Director nodes
Application Services
The application layer contains the core CDN Manager services:
| Component | Role | Scaling |
|---|---|---|
| Core Manager | Main REST API server (v1/v2 endpoints); handles authentication, configuration, routing, and discovery | Horizontally scalable via HPA |
| MIB Frontend | Web-based configuration GUI for operators | Horizontally scalable via HPA |
| Confd | Configuration service for routing configuration; synchronizes with Core Manager application | Single instance |
| Grafana | Monitoring and visualization dashboards | Single instance |
| Selection Input Worker | Consumes selection input events from Kafka and updates configuration | Single instance |
| Metrics Aggregator | Collects and aggregates metrics from CDN components | Single instance |
| Telegraf | System-level metrics collection from cluster nodes | DaemonSet (one per node) |
| Alertmanager | Alert routing and notification management | Single instance |
Data Layer
The data layer provides persistent and ephemeral storage:
| Component | Role | Scaling |
|---|---|---|
| Redis | In-memory caching, session storage, and ephemeral state | Master + replicas (read-only) |
| Kafka | Event streaming for selection input and metrics; provides durable message queue | Controller cluster (odd count) |
| PostgreSQL | Persistent configuration and state storage | 3-node cluster with HA |
| VictoriaMetrics (Analytics) | Real-time and short-term metrics for operational dashboards | Single instance |
| VictoriaMetrics (Billing) | Long-term metrics retention (1+ years) for billing and license compliance | Single instance |
External Integrations
| Component | Role |
|---|---|
| Zitadel IAM | Identity and access management; provides OAuth2/OIDC authentication |
| CDN Director (ESB3024) | Edge routing infrastructure; receives configuration from Confd |
Detailed Component Descriptions
Core Manager
The Core Manager is the central application server that exposes the REST API. It is implemented in Rust using the Actix-web framework.
Key Responsibilities:
- Authentication and session management via Zitadel
- Configuration document storage and retrieval
- Selection input CRUD operations
- Routing rule evaluation and GeoIP lookups
- Service discovery for CDN Directors and edge servers
- Operator UI helper endpoints
API Endpoints:
/api/v1/auth/*- Authentication (login, token, logout)/api/v1/configuration- Configuration management/api/v1/selection_input/*- Selection input operations/api/v2/selection_input/*- Enhanced selection input with list operations/api/v1/routing/*- Routing evaluation and validation/api/v1/discovery/*- Host and namespace discovery/api/v1/metrics- System metrics/api/v1/health/*- Liveness and readiness probes/api/v1/operator_ui/*- Operator helper endpoints
Runtime Modes: The Core Manager supports multiple runtime modes, each deployed as a separate container:
http-server- Primary HTTP API server (default)metrics-aggregator- Background worker for metrics collectionselection-input- Background worker for Kafka selection input consumption
MIB Frontend
The MIB Frontend provides a web-based GUI for configuration management.
Key Features:
- Intuitive web interface for CDN configuration
- Real-time configuration validation
- Integration with Zitadel for SSO authentication
- Uses NGinx Gateway for external Director communication
Confd (Configuration Service)
Confd provides routing configuration services and synchronizes with the Core Manager application.
Key Responsibilities:
- Hosts the service configuration for routing decisions
- Provides API and CLI for configuration management
- Synchronizes routing configuration with Core Manager
- Maintains configuration state in PostgreSQL
Selection Input Worker
The Selection Input Worker processes selection input events from the Kafka stream.
Key Responsibilities:
- Consumes messages from the
selection_inputKafka topic - Validates and transforms input data
- Updates configuration in the data store
- Maintains message ordering within partitions
Scaling Limitation: The Selection Input Worker cannot be scaled beyond a single consumer per Kafka partition, as message ordering must be preserved.
Metrics Aggregator
The Metrics Aggregator collects and processes metrics from CDN components.
Key Responsibilities:
- Polls metrics from Director instances
- Aggregates usage statistics
- Writes data to VictoriaMetrics (Analytics) for dashboards
- Writes long-term data to VictoriaMetrics (Billing) for compliance
Telegraf
Telegraf is deployed as a DaemonSet to collect host-level metrics.
Key Responsibilities:
- CPU, memory, disk, and network metrics from each node
- Container-level resource usage
- Kubernetes cluster metrics
- Forwards metrics to VictoriaMetrics
Grafana
Grafana provides visualization and dashboard capabilities.
Features:
- Pre-built dashboards for CDN monitoring
- Custom dashboard support
- VictoriaMetrics as data source
- Alerting integration with Alertmanager
Access: https://<host>/grafana
Alertmanager
Alertmanager handles alert routing and notifications.
Key Responsibilities:
- Receives alerts from Grafana and other sources
- Deduplicates and groups alerts
- Routes to notification channels (email, webhook, etc.)
- Manages alert silencing and inhibition
Data Storage
Redis
Redis provides in-memory storage for:
- User sessions and authentication tokens
- Ephemeral configuration cache
- Real-time state synchronization
Deployment: Master + read replicas for high availability
Kafka
Kafka provides durable event streaming for:
- Selection input events
- Metrics data streams
- Inter-service communication
Deployment: Controller cluster with 3 replicas for production, 1 replica for lab deployments
Node Affinity: Kafka replicas must be scheduled on separate nodes to ensure high availability. The Helm chart configures pod anti-affinity rules to enforce this distribution.
Topics:
selection_input- Selection input eventsmetrics- Metrics data streams
Note: For lab/single-node deployments, the Kafka replica count must be set to 1 in the Helm values. Production deployments require 3 replicas for fault tolerance.
PostgreSQL
PostgreSQL provides persistent storage for:
- Configuration documents
- User and permission data
- System state
Deployment: 3-node cluster managed by Cloudnative PG (CNPG) operator
High Availability: The CNPG operator manages automatic failover and ensures high availability:
- One primary node handles read/write operations
- Two replica nodes provide redundancy and can be promoted to primary on failure
- Automatic failover occurs within seconds of primary node failure
- Synchronous replication ensures data consistency
Note: The PostgreSQL cluster is deployed and managed automatically by the CNPG operator. Manual intervention is typically not required for normal operations.
VictoriaMetrics
Two VictoriaMetrics instances serve different purposes:
VictoriaMetrics (Analytics):
- Real-time and short-term metrics storage
- Supports Grafana dashboards
- Retention: Configurable (typically 30-90 days)
VictoriaMetrics (Billing):
- Long-term metrics retention
- Billing and license compliance data
- Retention: Minimum 1 year
Authentication and Authorization
Zitadel Integration
Zitadel provides identity and access management:
Authentication Flow:
- User accesses MIB Frontend or API
- Redirected to Zitadel for authentication
- Zitadel validates credentials and issues session token
- Session token exchanged for access token
- Access token included in API requests (Bearer authentication)
Default Credentials: See the Glossary for default login credentials.
Access Paths:
- Zitadel Console:
/ui/console - API authentication:
/api/v1/auth/*
CORS Configuration
Zitadel enforces Cross-Origin Resource Sharing (CORS) policies. The external hostname configured in Zitadel must match the first entry in global.hosts.manager in the Helm values.
Network Architecture
Traffic Flow
graph TB
External[External Clients] --> Ingress[Ingress Controller]
External --> Redis[(Redis)]
External --> Kafka[(Kafka)]
External --> Telegraf[Telegraf]
Ingress --> Manager[Core Manager]
Ingress --> Frontend[MIB Frontend]
Ingress --> Grafana[Grafana]
Ingress --> Zitadel[Zitadel]Note: Certain services (Redis, Kafka, Telegraf) can be accessed directly by external clients without traversing the ingress controller. This is typically used for metrics collection, event streaming, and direct data access scenarios.
Internal Communication
All internal services communicate over the Kubernetes overlay network (Flannel VXLAN). Services discover each other via Kubernetes DNS.
External Communication
- CDN Directors: Accessed via NGinx Gateway for simplified routing
- MaxMind GeoIP: Local database files (no external calls)
Scaling
Horizontal Pod Autoscaler (HPA)
The following components support automatic horizontal scaling via HPA:
| Component | Minimum | Maximum | Scale Metrics |
|---|---|---|---|
| Core Manager | 3 | 8 | CPU (50%), Memory (80%) |
| NGinx Gateway | 2 | 4 | CPU (75%), Memory (80%) |
| MIB Frontend | 2 | 4 | CPU (75%), Memory (90%) |
Note: HPA is enabled by default in the Helm chart. The default configuration is tuned for production deployments. Adjust min/max values based on expected load and available cluster capacity.
Manual Scaling
Components can also be scaled manually by setting replica counts in the Helm values:
manager:
replicaCount: 3
mib-frontend:
replicaCount: 2
Important: When manually setting replica counts, you must disable the Horizontal Pod Autoscaler (HPA) for the corresponding component. If HPA remains enabled, it will override manual replica settings. To disable HPA, set
autoscaling.hpa.enabled: falsefor the component in your Helm values.
Components That Do Not Scale
The following components do not support horizontal scaling:
| Component | Reason |
|---|---|
| Confd | Single instance required for configuration consistency |
| PostgreSQL | Cloudnative PG cluster; scaled by adding replicas via operator configuration |
| Kafka | Scaled by adding controllers, not via replica count |
| VictoriaMetrics | Stateful; single instance per role |
| Redis | Master is single; replicas are read-only |
| Grafana | Single instance sufficient for dashboard access |
| Alertmanager | Single instance for alert routing |
| Selection Input Worker | Kafka message ordering requires single consumer |
| Metrics Aggregator | Single instance for consistent metrics aggregation |
Node Scaling
Additional Agent nodes can be added to the cluster at any time to increase workload capacity. Kubernetes automatically schedules pods to nodes with available resources.
Cluster Balancing
The CDN Manager deployment includes the Kubernetes Descheduler to maintain balanced resource utilization across cluster nodes:
- Automatic Rebalancing: The descheduler periodically analyzes pod distribution and evicts pods from overutilized nodes
- Node Balance: Helps prevent resource hotspots by redistributing workloads across available nodes
- Integration with HPA: Works in conjunction with Horizontal Pod Autoscaler to optimize both pod count and placement
The descheduler runs as a background process and does not require manual intervention under normal operating conditions.
Resource Configuration
For detailed resource preset configurations and planning guidance, see the Configuration Guide.
High Availability
Server Node Redundancy
Production deployments require a minimum of 3 Server nodes:
- Survives loss of 1 server node
- Maintains quorum for etcd and Kafka
For enhanced availability, use 5 Server nodes:
- Survives loss of 2 server nodes
- Recommended for critical production environments
For large-scale deployments, 7 or more Server nodes can be used:
- Survives loss of 3+ server nodes
- Suitable for high-capacity production environments
Pod Distribution
Kubernetes automatically distributes pods across nodes to maximize availability:
- Pods with the same deployment are scheduled on different nodes when possible
- Pod Disruption Budgets (PDB) ensure minimum availability during maintenance
Data Replication
| Component | Replication Strategy |
|---|---|
| Redis | Single instance (backup via Longhorn snapshots) |
| Kafka | Replicated partitions (default: 3) |
| PostgreSQL | 3-node cluster via Cloudnative PG |
| VictoriaMetrics | Single instance (backup via snapshots) |
| Longhorn | Single replica with pod-node affinity |
Longhorn Storage: Longhorn volumes are configured with a single replica by default. Pod scheduling is configured with node affinity to prefer scheduling pods on the same node as their persistent volume data. This approach optimizes I/O performance while maintaining data locality.
Next Steps
After understanding the architecture:
- Installation Guide - Deploy the CDN Manager
- Configuration Guide - Configure components for your environment
- Operations Guide - Day-to-day operational procedures
- Performance Tuning Guide - Optimize system performance
- Metrics & Monitoring - Set up monitoring and alerting
10.5 - Installation Guide
Overview
This guide provides detailed instructions for installing the AgileTV CDN Manager (ESB3027) in various deployment scenarios. The installation process varies depending on the target environment and desired configuration.
Estimated Installation Time:
| Deployment Type | Time |
|---|---|
| Single-Node (Lab) | ~15 minutes |
| Multi-Node (3 servers) | ~30 minutes |
Actual installation time may vary depending on hardware performance, network speed, and whether air-gapped procedures are required.
Note: These estimates assume the operating system is already installed on all nodes. OS installation is outside the scope of this guide.
Installation Types
| Installation Type | Description | Use Case |
|---|---|---|
| Single-Node (Lab) | Minimal installation on a single host | Acceptance testing, demonstrations, development |
| Multi-Node (Production) | Full high-availability cluster with 3+ server nodes | Production deployments |
Installation Process Summary
The installation follows a sequential process:
- Prepare the host system - Verify requirements and mount the installation ISO
- Install the Kubernetes cluster - Deploy K3s, Longhorn storage, and PostgreSQL
- Join additional nodes (production only) - Expand the cluster for HA or capacity
- Deploy the Manager application - Install the CDN Manager Helm chart
- Post-installation configuration - Configure authentication, networking, and users
Quick Links
| Guide | Description |
|---|---|
| Installation Checklist | Step-by-step checklist to track progress |
| Single-Node Installation | Lab and acceptance testing deployment |
| Multi-Node Installation | Production high-availability deployment |
| Air-Gapped Deployment | Air-gapped environment installation |
| Helm Chart Installation | Common helm chart deployment steps |
| Upgrade Guide | Upgrading from previous versions |
| Next Steps | Post-installation configuration tasks |
Prerequisites
Before beginning installation, ensure the following requirements are met:
- Hardware: Nodes meeting the System Requirements including CPU, memory, and disk specifications
- Operating System: RHEL 9 or compatible clone (details); air-gapped deployments require the OS ISO mounted on all nodes
- Network: Proper firewall configuration between nodes (port requirements, firewall configuration)
- Software: Installation ISO obtained from AgileTV; air-gapped deployments also require the Extras ISO
- Kernel Tuning: For production deployments, apply recommended sysctl settings (Performance Tuning Guide)
We recommend using the Installation Checklist to track your progress through the installation process.
Getting Help
If you encounter issues during installation:
- Review the Troubleshooting Guide for common issues
- Check the System Requirements to verify your environment
- Consult the Release Notes for version-specific known issues
10.5.1 - Installation Checklist
Overview
Use this checklist to track your installation progress. Print this page or keep it open during your installation to ensure all steps are completed correctly.
Pre-Installation
Hardware and Software
- Verify hardware meets System Requirements
- Confirm operating system is supported (RHEL 9 or compatible clone)
- Configure firewall rules between nodes (details)
- Apply recommended sysctl settings (details)
- Obtain installation ISO (
esb3027-acd-manager-X.Y.Z.iso)
Air-Gapped Deployments
- Obtain Extras ISO (
esb3027-acd-manager-extras-X.Y.Z.iso) - Mount OS ISO on all nodes before installation
- Verify OS packages are accessible from mounted ISO
Special Requirements
- Oracle Linux UEK: Install
kernel-uek-modules-extra-netfilter-$(uname -r)package - Control Plane Only nodes: Set
SKIP_REQUIREMENTS_CHECK=1if below lab minimums - SELinux: Set to “Enforcing” mode before running installer (cannot enable after)
Cluster Installation
Single-Node Deployment
Follow the Single-Node Installation Guide.
- Mount installation ISO (Step 1)
- Install the base cluster (Step 2)
- Verify cluster status (Step 3)
- Air-gapped only: Load container images (Step 4)
- Create configuration file (Step 5)
- Optional: Load MaxMind GeoIP databases (Step 6)
- Deploy the Manager Helm chart (Step 7)
- Verify deployment (Step 8)
Multi-Node Deployment
Follow the Multi-Node Installation Guide.
Primary Server Node
- Mount installation ISO (Step 1)
- Install the base cluster (Step 2)
- Verify system pods are running (Step 2)
- Retrieve the node token (Step 3)
Additional Server Nodes
- Mount installation ISO (Step 5)
- Join the cluster (Step 5)
- Verify each node joins (Step 5)
- Optional: Taint Control Plane Only nodes (Step 5b)
Agent Nodes (Optional)
- Mount installation ISO (Step 6)
- Join the cluster as an agent (Step 6)
- Verify each agent joins (Step 6)
Cluster Verification
- Verify all nodes are ready (Step 7)
- Verify system pods running on all nodes (Step 7)
- Air-gapped only: Load container images on each node (Step 9)
Application Deployment
- Create configuration file (Step 10)
- Optional: Load MaxMind GeoIP databases (Step 11)
- Optional: Configure TLS certificates from trusted CA (Step 12)
- Deploy the Manager Helm chart (Step 13)
- Verify all pods are running and distributed (Step 14)
- Configure DNS records for manager hostname (Step 15)
Post-Installation
Initial Access
- Access the system via HTTPS
- Accept self-signed certificate warning (if using default certificate)
- Log in with default credentials (see Glossary)
Security Configuration
- Create new administrator account in Zitadel
- Delete or secure the default admin account
- Configure additional users and permissions
- Review Zitadel Administrator Documentation for role assignments
Monitoring and Operations
- Access Grafana dashboards at
/grafana - Review pre-built monitoring dashboards
- Configure alerting rules (optional)
- Set up notification channels (optional)
Next Steps
- Review Next Steps Guide for additional configuration
- Configure CDN routing rules
- Set up GeoIP-based routing (if using MaxMind databases)
- Review Operations Guide for day-to-day procedures
Troubleshooting
If you encounter issues during installation:
- Check pod status:
kubectl describe pod <pod-name> - Review logs:
kubectl logs <pod-name> - Check cluster events:
kubectl get events --sort-by='.lastTimestamp' - Review the Troubleshooting Guide for common issues
10.5.2 - Single-Node Installation
Warning: Single-node deployments are for lab environments, acceptance testing, and demonstrations only. This configuration is not suitable for production workloads. For production deployments, see the Multi-Node Installation Guide, which requires a minimum of 3 server nodes for high availability.
Air-Gapped Deployment? This guide assumes internet connectivity. For air-gapped deployments, see the Air-Gapped Deployment Guide for additional requirements and procedures.
Overview
This guide describes the installation of the AgileTV CDN Manager on a single node. This configuration is intended for lab environments, acceptance testing, and demonstrations only. It is not suitable for production workloads.
Prerequisites
Hardware Requirements
Refer to the System Requirements Guide for hardware specifications. Single-node deployments require the “Single-Node (Lab)” configuration.
Operating System
Refer to the System Requirements Guide for supported operating systems.
Software Access
- Installation ISO:
esb3027-acd-manager-X.Y.Z.iso - Extras ISO (air-gapped only):
esb3027-acd-manager-extras-X.Y.Z.iso
Network Configuration
Ensure that required firewall ports are configured before installation. See the Networking Guide for complete firewall configuration requirements.
SELinux
If SELinux is to be used, it must be set to “Enforcing” mode before running the installer script. The installer will configure appropriate SELinux policies automatically. SELinux cannot be enabled after installation.
Installation Steps
Step 1: Mount the ISO
Create a mount point and mount the installation ISO:
mkdir -p /mnt/esb3027
mount -o loop,ro esb3027-acd-manager-X.Y.Z.iso /mnt/esb3027
Replace X.Y.Z with the actual version number.
Step 2: Install the Base Cluster
Run the installer to set up the K3s Kubernetes cluster:
/mnt/esb3027/install
This installs:
- K3s Kubernetes distribution
- Longhorn distributed storage
- Cloudnative PG operator for PostgreSQL
- Base system dependencies
The installer will configure the node as both a server and agent node.
Step 3: Verify Cluster Status
After the installer completes, verify that all components are operational before proceeding. This verification serves as an important checkpoint to confirm the installation is progressing correctly.
1. Verify the node is ready:
kubectl get nodes
Expected output:
NAME STATUS ROLES AGE VERSION
k3s-server Ready control-plane,etcd,master 2m v1.33.4+k3s1
2. Verify system pods in both namespaces are running:
# Check kube-system namespace (Kubernetes core components)
kubectl get pods -n kube-system
# Check longhorn-system namespace (distributed storage)
kubectl get pods -n longhorn-system
All pods should show Running status. If any pods are still Pending or ContainerCreating, wait until they are ready. Proceeding with incomplete system pods can cause subsequent steps to fail in unpredictable ways.
This verification confirms:
- K3s cluster is operational
- Longhorn distributed storage is running
- Cloudnative PG operator is deployed
- All core components are healthy before continuing
Step 4: Air-Gapped Deployments (If Applicable)
If deploying in an air-gapped environment, load container images from the extras ISO:
mkdir -p /mnt/esb3027-extras
mount -o loop,ro esb3027-acd-manager-extras-X.Y.Z.iso /mnt/esb3027-extras
/mnt/esb3027-extras/load-images
Step 5: Deploy the Manager Helm Chart
For complete instructions on deploying the CDN Manager Helm chart, including configuration file setup, MaxMind GeoIP database loading, TLS certificate configuration, deployment commands, and verification steps, see the Helm Chart Installation Guide.
This guide covers the common deployment steps that apply to all installation types. After completing the helm chart installation steps, proceed to Post-Installation below.
Post-Installation
After installation completes, proceed to the Next Steps guide for:
- Initial user configuration
- Accessing the web interfaces
- Configuring authentication
- Setting up monitoring
Accessing the System
Refer to the Accessing the System section in the Getting Started guide for service URLs and default credentials.
Note: A self-signed SSL certificate is deployed by default. You will need to accept the certificate warning in your browser.
Troubleshooting
If pods fail to start:
- Check pod status:
kubectl describe pod <pod-name> - Review logs:
kubectl logs <pod-name> - Verify resources:
kubectl top pods
See the Troubleshooting Guide for additional assistance.
Next Steps
After successful installation:
- Next Steps Guide - Post-installation configuration
- Configuration Guide - System configuration
- Operations Guide - Day-to-day operations
Appendix: Lab Configuration File
The installation ISO includes a pre-built lab configuration at /mnt/esb3027/values-lab.yaml, designed specifically for single-node deployments. It handles single-replica settings for Kafka and Zitadel, resource sizing, and TLS configuration automatically.
Copy it as your starting point:
cp /mnt/esb3027/values-lab.yaml ~/values.yaml
At minimum, update these two fields to match your environment before deploying:
global:
hosts:
manager:
- host: manager.local # Replace with your hostname or IP
zitadel:
zitadel:
configmapConfig:
ExternalDomain: manager.local # Must match global.hosts.manager[0].host
These two values must match exactly or authentication will fail. For a full description of all available options in values-lab.yaml, see the Configuration Guide.
10.5.3 - Multi-Node Installation
Overview
This guide describes the installation of the AgileTV CDN Manager across multiple nodes for production deployments. This configuration provides high availability and horizontal scaling capabilities.
Air-Gapped Deployment? This guide assumes internet connectivity. For air-gapped deployments, see the Air-Gapped Deployment Guide for additional requirements and procedures.
Prerequisites
Hardware Requirements
Refer to the System Requirements Guide for hardware specifications. Production deployments require:
- Minimum 3 Server nodes (Control Plane Only or Combined role)
- Optional Agent nodes for additional workload capacity
Operating System
Refer to the System Requirements Guide for supported operating systems.
Software Access
- Installation ISO:
esb3027-acd-manager-X.Y.Z.iso(for each node) - Extras ISO (air-gapped only):
esb3027-acd-manager-extras-X.Y.Z.iso
Network Configuration
Ensure that required firewall ports are configured between all nodes before installation. See the Configuring Segregated Networks guide for the standard firewall configuration.
Note: When using segregated networks, the K3s API server on the primary node will be reachable via its internal/private interface. Consequently, when joining additional nodes, the <primary-server-ip> provided to the join script must be the internal/private IP address of the primary node to ensure the join request is routed correctly through the private network.
Single-NIC Deployments: If your nodes have only a single network interface, see the Shared Interface Setup guide instead. This guide assumes segregated networks with separate interfaces for cluster traffic (eth1) and external access (eth0).
Segregated Network Configuration
If your nodes have multiple network interfaces and you want to use a separate interface for cluster traffic (not the default route interface), configure the INSTALL_K3S_EXEC environment variable before installing the cluster or joining nodes.
For segregated networks (private cluster network on eth1 + public external access on eth0), set all three K3s flags:
# For server nodes
export INSTALL_K3S_EXEC="server --node-ip=<ETH1_IP> --node-external-ip=<ETH0_IP> --flannel-iface=eth1 --advertise-address=<ETH1_IP>"
# For agent nodes
export INSTALL_K3S_EXEC="agent --node-ip=<ETH1_IP> --node-external-ip=<ETH0_IP> --flannel-iface=eth1"
Where:
- Mode: Use
serverfor the primary node establishing the cluster, or for additional server nodes. Useagentfor agent nodes joining the cluster. --node-ip=<ETH1_IP>: The internal/private IP address of eth1 for cluster communication--node-external-ip=<ETH0_IP>: The public IP address of eth0 for external access (LoadBalancer services, ingress)--flannel-iface=eth1: The network interface name for Flannel VXLAN overlay traffic--advertise-address=<ETH1_IP>: The address the API server uses to advertise itself to cluster members. Must be set to the internal/private IP address in a segregated-network deployment; without this flag, k3s defaults to the external IP when--node-external-ipis set, causing thekubernetesservice endpoint to register as an unreachable address. This flag is required for server nodes only; agent nodes do not run an API server.
Set this variable on each node before running the install or join scripts.
SELinux
If SELinux is to be used, it must be set to “Enforcing” mode before running the installer script. The installer will configure appropriate SELinux policies automatically. SELinux cannot be enabled after installation.
Installation Steps
Step 1: Prepare the Primary Server Node
Mount the installation ISO on the primary server node:
mkdir -p /mnt/esb3027
mount -o loop,ro esb3027-acd-manager-X.Y.Z.iso /mnt/esb3027
Replace X.Y.Z with the actual version number.
Step 2: Install the Base Cluster on Primary Server
Segregated Networks: If your node has multiple network interfaces, set the
INSTALL_K3S_EXECenvironment variable with the complete segregated network configuration before running the installer (see Segregated Network Configuration):export INSTALL_K3S_EXEC="server --node-ip=<ETH1_IP> --node-external-ip=<ETH0_IP> --flannel-iface=eth1 --advertise-address=<ETH1_IP>"Replace
<ETH1_IP>with the internal/private IP address and<ETH0_IP>with the public IP address.
If your node has only a single network interface, do not set INSTALL_K3S_EXEC. K3s will use the default interface automatically.
Run the installer to set up the K3s Kubernetes cluster:
/mnt/esb3027/install
This installs:
- K3s Kubernetes distribution
- Longhorn distributed storage
- Cloudnative PG operator for PostgreSQL
- Base system dependencies
Important: After the installer completes, verify that all system pods in both namespaces are in the Running state before proceeding:
# Check kube-system namespace (Kubernetes core components)
kubectl get pods -n kube-system
# Check longhorn-system namespace (distributed storage)
kubectl get pods -n longhorn-system
All pods should show Running status. If any pods are still Pending or ContainerCreating, wait until they are ready. Proceeding with incomplete system pods can cause subsequent steps to fail in unpredictable ways.
This verification confirms:
- K3s cluster is operational
- Longhorn distributed storage is running
- Cloudnative PG operator is deployed
- All core components are healthy before continuing
Step 3: Retrieve the Node Token
Retrieve the node token for joining additional nodes:
cat /var/lib/rancher/k3s/server/node-token
Save this token for use on additional nodes. Also note the IP address of the primary server node.
Step 4: Server vs Agent Node Roles
Before joining additional nodes, determine which nodes will serve as Server nodes vs Agent nodes:
| Role | Control Plane | Workloads | HA Quorum | Use Case |
|---|---|---|---|---|
| Server Node (Combined) | Yes (etcd, API server) | Yes | Participates | Default production role; minimum 3 nodes |
| Server Node (Control Plane Only) | Yes (etcd, API server) | No | Participates | Dedicated control plane; requires separate Agent nodes |
| Agent Node | No | Yes | No | Additional workload capacity only |
Guidance:
- Combined role (default): Server nodes run both control plane and workloads; minimum 3 nodes required for HA
- Control Plane Only: Dedicate nodes to control plane functions; requires at least 3 Server nodes plus 3+ Agent nodes for workloads
- Agent nodes are required if using Control Plane Only servers; optional if using Combined role servers
- For most deployments, 3 Server nodes (Combined role) with no Agent nodes is sufficient
- Add Agent nodes to scale workload capacity without affecting control plane quorum
Proceed to Step 5 to join Server nodes. Agent nodes are joined after all Server nodes are ready.
Step 5: Join Additional Server Nodes
On each additional server node:
Mount the ISO:
mkdir -p /mnt/esb3027 mount -o loop,ro esb3027-acd-manager-X.Y.Z.iso /mnt/esb3027Join the cluster:
Segregated Networks: If your node has multiple network interfaces, set the
INSTALL_K3S_EXECenvironment variable with the complete segregated network configuration before running the join script (see Segregated Network Configuration):export INSTALL_K3S_EXEC="server --node-ip=<ETH1_IP> --node-external-ip=<ETH0_IP> --flannel-iface=eth1 --advertise-address=<ETH1_IP>"Replace
<ETH1_IP>with the internal/private IP address and<ETH0_IP>with the public IP address.
If your node has only a single network interface, do not set INSTALL_K3S_EXEC. K3s will use the default interface automatically.
Note for Segregated Networks: When joining nodes in a segregated network environment, ensure the
<primary-server-ip>used in the join command is the internal/private IP address (theeth1address) of the primary server. Using the external IP will cause the join attempt to fail as the service will be listening on the private interface.
Run the join script:
/mnt/esb3027/join-server https://<primary-server-ip>:6443 <node-token>
Replace <primary-server-ip> with the IP address of the primary server and <node-token> with the token retrieved in Step 3.
- Verify the node joined successfully:
kubectl get nodes
Repeat for each server node. A minimum of 3 server nodes is required for high availability.
Step 5b: Taint Control Plane Only Nodes (Optional)
If you are using dedicated Control Plane Only nodes (not Combined role), apply taints to prevent workload scheduling:
kubectl taint nodes <node-name> CriticalAddonsOnly=true:NoSchedule
Apply this taint to each Control Plane Only node. Verify taints are applied:
kubectl describe nodes | grep -A 5 "Taints"
Note: This step is only required if you want dedicated control plane nodes. For Combined role deployments, do not apply taints.
Important: Control Plane Only Server nodes can be deployed with lower hardware specifications (2 cores, 4 GiB, 64 GiB) than the installer’s default minimum requirements. If your Control Plane Only Server nodes do not meet the Single-Node Lab configuration minimums (8 cores, 16 GiB, 128 GiB), you must set the
SKIP_REQUIREMENTS_CHECKenvironment variable before running the installer or join command:# For the primary server node export SKIP_REQUIREMENTS_CHECK=1 /mnt/esb3027/install # For additional Control Plane Only Server nodes export SKIP_REQUIREMENTS_CHECK=1 /mnt/esb3027/join-server https://<primary-server-ip>:6443 <node-token>Note: This applies to Server nodes only. Agent nodes have separate minimum requirements.
Step 6: Join Agent Nodes (Optional)
On each agent node:
Mount the ISO:
mkdir -p /mnt/esb3027 mount -o loop,ro esb3027-acd-manager-X.Y.Z.iso /mnt/esb3027Join the cluster as an agent:
Segregated Networks: If your node has multiple network interfaces, set the
INSTALL_K3S_EXECenvironment variable with the complete segregated network configuration before running the join script (see Segregated Network Configuration):export INSTALL_K3S_EXEC="agent --node-ip=<ETH1_IP> --node-external-ip=<ETH0_IP> --flannel-iface=eth1"Replace
<ETH1_IP>with the internal/private IP address and<ETH0_IP>with the public IP address.
If your node has only a single network interface, do not set INSTALL_K3S_EXEC. K3s will use the default interface automatically.
Run the join script:
/mnt/esb3027/join-agent https://<primary-server-ip>:6443 <node-token>
Note for Segregated Networks: When joining nodes in a segregated network environment, ensure the
<primary-server-ip>used in the join command is the internal/private IP address (theeth1address) of the primary server. Using the external IP will cause the join attempt to fail as the service will be listening on the private interface.
- Verify the node joined successfully from an existing server node:
kubectl get nodes
Agent nodes provide additional workload capacity but do not participate in the control plane quorum.
Step 7: Verify Cluster Status
After all nodes are joined, verify the cluster is operational:
1. Verify all nodes are ready:
kubectl get nodes
Expected output:
NAME STATUS ROLES AGE VERSION
k3s-server-0 Ready control-plane,etcd,master 5m v1.33.4+k3s1
k3s-server-1 Ready control-plane,etcd,master 3m v1.33.4+k3s1
k3s-server-2 Ready control-plane,etcd,master 2m v1.33.4+k3s1
k3s-agent-1 Ready <none> 1m v1.33.4+k3s1
k3s-agent-2 Ready <none> 1m v1.33.4+k3s1
2. Verify system pods in both namespaces are running:
# Check kube-system namespace (Kubernetes core components)
kubectl get pods -n kube-system
# Check longhorn-system namespace (distributed storage)
kubectl get pods -n longhorn-system
All pods should show Running status. If any pods are still Pending or ContainerCreating, wait until they are ready.
This verification confirms:
- K3s cluster is operational across all nodes
- Longhorn distributed storage is running
- Cloudnative PG operator is deployed
- All core components are healthy before proceeding to application deployment
Step 9: Air-Gapped Deployments (If Applicable)
If deploying in an air-gapped environment, on each node:
mkdir -p /mnt/esb3027-extras
mount -o loop,ro esb3027-acd-manager-extras-X.Y.Z.iso /mnt/esb3027-extras
/mnt/esb3027-extras/load-images
Step 10: Deploy the Manager Helm Chart
For complete instructions on deploying the CDN Manager Helm chart, including configuration file setup, MaxMind GeoIP database loading, TLS certificate configuration, deployment commands, and verification steps, see the Helm Chart Installation Guide.
This guide covers the common deployment steps that apply to all installation types. After completing the helm chart installation steps, proceed to Post-Installation below.
Step 15: Configure DNS (Optional)
Add DNS records for the manager hostname. For high availability, configure multiple A records pointing to different server nodes:
manager.example.com. IN A <server-1-ip>
manager.example.com. IN A <server-2-ip>
manager.example.com. IN A <server-3-ip>
Alternatively, configure a load balancer to distribute traffic across nodes.
Post-Installation
After installation completes, proceed to the Next Steps guide for:
- Initial user configuration
- Accessing the web interfaces
- Configuring authentication
- Setting up monitoring
Accessing the System
Refer to the Accessing the System section in the Getting Started guide for service URLs and default credentials.
Note: A self-signed SSL certificate is deployed by default. For production deployments, configure a valid SSL certificate before exposing the system to users.
High Availability Considerations
Pod Distribution
The Helm chart configures pod anti-affinity rules to ensure:
- Kafka controllers are scheduled on separate nodes
- PostgreSQL cluster members are distributed across nodes
- Application pods are spread across available nodes
Data Replication and Failure Tolerance
For detailed information on data replication strategies and failure scenario tolerance, refer to the Architecture Guide and System Requirements Guide.
Troubleshooting
If pods fail to start or nodes fail to join:
- Check node status:
kubectl get nodes - Describe problematic pods:
kubectl describe pod <pod-name> - Review logs:
kubectl logs <pod-name> - Check cluster events:
kubectl get events --sort-by='.lastTimestamp'
Nodes Ready but Workloads Cannot Reach the API Server (Segregated Networks)
Symptom: All nodes show Ready status, but cluster components (kubelet, controller-manager, scheduler) or workloads fail to communicate with the API server. Pods in kube-system or longhorn-system may fail to start or remain in a crash loop.
Cause: This is caused by omitting --advertise-address from the server-node INSTALL_K3S_EXEC. When --node-external-ip is set without --advertise-address, k3s defaults the API server’s advertise address to the external IP (eth0). In a segregated-network topology where nodes are not routable to each other over eth0, the kubernetes service ClusterIP endpoint registers as an unreachable address.
Diagnostic check:
kubectl get endpoints kubernetes -n default
If the IP shown is the eth0 (external) address rather than the eth1 (internal) address, the cluster was installed without --advertise-address.
Remediation: The kubernetes service endpoint cannot be corrected by reconfiguration alone. K3s must be reinstalled on all server nodes with the correct flags:
export INSTALL_K3S_EXEC="server --node-ip=<ETH1_IP> --node-external-ip=<ETH0_IP> --flannel-iface=eth1 --advertise-address=<ETH1_IP>"
After reinstallation, re-run the diagnostic check to confirm the endpoint IP is now the eth1 (internal) address.
See the Troubleshooting Guide for additional assistance.
Next Steps
After successful installation:
- Next Steps Guide - Post-installation configuration
- Configuration Guide - System configuration
- Operations Guide - Day-to-day operations
10.5.4 - Air-Gapped Deployment
Overview
This guide describes the installation of the AgileTV CDN Manager in air-gapped environments (no internet access). Air-gapped deployments require additional preparation compared to connected deployments.
Key differences from connected deployments:
- Both Installation ISO and Extras ISO are required on all nodes
- OS installation ISO must be mounted on all nodes for package access
- Container images must be loaded from the Extras ISO on each node
- Additional firewall considerations for OS package repositories
Prerequisites
Required ISOs
Before beginning installation, obtain the following:
| ISO | Filename | Purpose |
|---|---|---|
| Installation ISO | esb3027-acd-manager-X.Y.Z.iso | Kubernetes cluster and Manager application |
| Extras ISO | esb3027-acd-manager-extras-X.Y.Z.iso | Container images for air-gapped environments |
| OS Installation ISO | RHEL 9 or compatible clone | Operating system packages (required on all nodes) |
Hardware Requirements
Refer to the System Requirements Guide for hardware specifications.
- Single-Node (Lab): Minimum 8 cores, 16 GiB RAM, 128 GiB disk
- Multi-Node (Production): Minimum 3 Server nodes for high availability
Network Configuration
Air-gapped environments may have internal network mirrors for OS packages. If no internal mirror exists, the OS installation ISO must be mounted on each node to provide packages during installation.
Ensure that required firewall ports are configured before installation. See the Networking Guide for complete firewall configuration requirements.
SELinux
If SELinux is to be used, it must be set to “Enforcing” mode before running the installer script. The installer will configure appropriate SELinux policies automatically. SELinux cannot be enabled after installation.
Installation Steps
Step 1: Prepare All Nodes
On each node (primary server, additional servers, and agents):
- Mount the OS installation ISO:
mkdir -p /mnt/os
mount -o loop,ro /path/to/rhel-9.iso /mnt/os
- Configure local repository (if no internal mirror):
cat > /etc/yum.repos.d/local.repo <<EOF
[local]
name=Local OS Repository
baseurl=file:///mnt/os/BaseOS
enabled=1
gpgcheck=0
EOF
# Also configure AppStream if needed
cat >> /etc/yum.repos.d/local.repo <<EOF
[appstream]
name=AppStream Repository
baseurl=file:///mnt/os/AppStream
enabled=1
gpgcheck=0
EOF
- Verify repository is accessible:
dnf repolist
dnf makecache
Step 2: Prepare the Primary Server Node
Mount the installation ISOs on the primary server node:
# Mount Installation ISO
mkdir -p /mnt/esb3027
mount -o loop,ro esb3027-acd-manager-X.Y.Z.iso /mnt/esb3027
# Mount Extras ISO
mkdir -p /mnt/esb3027-extras
mount -o loop,ro esb3027-acd-manager-extras-X.Y.Z.iso /mnt/esb3027-extras
Step 3: Install the Base Cluster on Primary Server
Run the installer to set up the K3s Kubernetes cluster:
/mnt/esb3027/install
This installs:
- K3s Kubernetes distribution
- Longhorn distributed storage
- Cloudnative PG operator for PostgreSQL
- Base system dependencies
Important: After the installer completes, verify that all system pods in both namespaces are in the Running state before proceeding:
# Check kube-system namespace (Kubernetes core components)
kubectl get pods -n kube-system
# Check longhorn-system namespace (distributed storage)
kubectl get pods -n longhorn-system
All pods should show Running status. If any pods are still Pending or ContainerCreating, wait until they are ready. Proceeding with incomplete system pods can cause subsequent steps to fail in unpredictable ways.
This verification confirms:
- K3s cluster is operational
- Longhorn distributed storage is running
- Cloudnative PG operator is deployed
- All core components are healthy before continuing
Step 4: Retrieve the Node Token
Retrieve the node token for joining additional nodes:
cat /var/lib/rancher/k3s/server/node-token
Save this token for use on additional nodes. Also note the IP address of the primary server node.
Step 5: Join Additional Server Nodes (Multi-Node Only)
On each additional server node:
- Mount the OS ISO:
mkdir -p /mnt/os
mount -o loop,ro /path/to/rhel-9.iso /mnt/os
# Configure local repository
cat > /etc/yum.repos.d/local.repo <<EOF
[local]
name=Local OS Repository
baseurl=file:///mnt/os/BaseOS
enabled=1
gpgcheck=0
[appstream]
name=AppStream Repository
baseurl=file:///mnt/os/AppStream
enabled=1
gpgcheck=0
EOF
dnf makecache
- Mount the Installation ISOs:
# Mount Installation ISO
mkdir -p /mnt/esb3027
mount -o loop,ro esb3027-acd-manager-X.Y.Z.iso /mnt/esb3027
# Mount Extras ISO
mkdir -p /mnt/esb3027-extras
mount -o loop,ro esb3027-acd-manager-extras-X.Y.Z.iso /mnt/esb3027-extras
- Join the cluster:
Run the join script:
/mnt/esb3027/join-server https://<primary-server-ip>:6443 <node-token>
Replace <primary-server-ip> with the IP address of the primary server and <node-token> with the token retrieved in Step 4.
- Verify the node joined successfully:
kubectl get nodes
Repeat for each server node. A minimum of 3 server nodes is required for high availability.
Step 6: Join Agent Nodes (Optional)
On each agent node:
- Mount the OS ISO:
mkdir -p /mnt/os
mount -o loop,ro /path/to/rhel-9.iso /mnt/os
# Configure local repository
cat > /etc/yum.repos.d/local.repo <<EOF
[local]
name=Local OS Repository
baseurl=file:///mnt/os/BaseOS
enabled=1
gpgcheck=0
[appstream]
name=AppStream Repository
baseurl=file:///mnt/os/AppStream
enabled=1
gpgcheck=0
EOF
dnf makecache
- Mount the Installation ISOs:
# Mount Installation ISO
mkdir -p /mnt/esb3027
mount -o loop,ro esb3027-acd-manager-X.Y.Z.iso /mnt/esb3027
# Mount Extras ISO
mkdir -p /mnt/esb3027-extras
mount -o loop,ro esb3027-acd-manager-extras-X.Y.Z.iso /mnt/esb3027-extras
- Join the cluster as an agent:
Run the join script:
/mnt/esb3027/join-agent https://<primary-server-ip>:6443 <node-token>
- Verify the node joined successfully from an existing server node:
kubectl get nodes
Agent nodes provide additional workload capacity but do not participate in the control plane quorum.
Step 7: Load Container Images
On each node in the cluster:
/mnt/esb3027-extras/load-images
This script loads all container images from the Extras ISO into the local container runtime.
Important: This step must be performed on every node (primary server, additional servers, and agents) before deploying the Manager application.
Step 8: Verify Cluster Status
After all nodes are joined and images are loaded, verify the cluster is operational:
1. Verify all nodes are ready:
kubectl get nodes
Expected output:
NAME STATUS ROLES AGE VERSION
k3s-server-0 Ready control-plane,etcd,master 5m v1.33.4+k3s1
k3s-server-1 Ready control-plane,etcd,master 3m v1.33.4+k3s1
k3s-server-2 Ready control-plane,etcd,master 2m v1.33.4+k3s1
k3s-agent-1 Ready <none> 1m v1.33.4+k3s1
2. Verify system pods in both namespaces are running:
# Check kube-system namespace (Kubernetes core components)
kubectl get pods -n kube-system
# Check longhorn-system namespace (distributed storage)
kubectl get pods -n longhorn-system
All pods should show Running status.
3. Verify container images are loaded:
crictl images | grep acd-manager
Step 9: Deploy the Manager Helm Chart
For complete instructions on deploying the CDN Manager Helm chart, including configuration file setup, MaxMind GeoIP database loading, TLS certificate configuration, deployment commands, and verification steps, see the Helm Chart Installation Guide.
This guide covers the common deployment steps that apply to all installation types. After completing the helm chart installation steps, proceed to Post-Installation below.
Post-Installation
After installation completes, proceed to the Next Steps guide for:
- Initial user configuration
- Accessing the web interfaces
- Configuring authentication
- Setting up monitoring
Accessing the System
Refer to the Accessing the System section in the Getting Started guide for service URLs and default credentials.
Note: A self-signed SSL certificate is deployed by default. You will need to accept the certificate warning in your browser.
Updating MaxMind GeoIP Databases
If using GeoIP-based routing, load the MaxMind databases:
/mnt/esb3027/generate-maxmind-volume
The utility will prompt for the database file locations and volume name. Reference the volume in your values.yaml:
manager:
maxmindDbVolume: maxmind-geoip-2026-04
See the Operations Guide for database update procedures.
Troubleshooting
Image Pull Errors
If pods fail with image pull errors:
- Verify the
load-imagesscript completed successfully on all nodes - Check container runtime image list:
crictl images | grep <image-name> - Ensure image tags in Helm chart match tags on the Extras ISO
OS Package Errors
If the installer reports missing OS packages:
- Verify OS ISO is mounted on the affected node
- Check repository configuration:
dnf repolist dnf info <package-name> - Ensure the ISO matches the installed OS version
Longhorn Volume Issues
If Longhorn volumes fail to mount:
- Verify all nodes have the
load-imagesscript completed - Check Longhorn system pods:
kubectl get pods -n longhorn-system - Review Longhorn UI via port-forward:
kubectl port-forward -n longhorn-system svc/longhorn-frontend 8080:80
Next Steps
After successful installation:
- Next Steps Guide - Post-installation configuration
- Configuration Guide - System configuration
- Operations Guide - Day-to-day operational procedures
- Troubleshooting Guide - Common issues and resolution
10.5.5 - Helm Chart Installation
Overview
This guide covers the common steps for deploying the CDN Manager Helm chart. These steps apply to all deployment types (single-node, multi-node, and air-gapped) after the Kubernetes cluster is fully operational.
Prerequisites: This guide assumes the Kubernetes cluster is already installed and all system pods are running. If you haven’t installed the cluster yet, refer to:
- Single-Node Installation for lab environments
- Multi-Node Installation for production deployments
- Air-Gapped Deployment for air-gapped environments
Prerequisites
Before proceeding, verify the following:
- Cluster operational: All nodes show
Readystatus - System pods running: All pods in
kube-systemandlonghorn-systemnamespaces areRunning - ISO mounted: Installation ISO is mounted at
/mnt/esb3027 - Extras ISO mounted (air-gapped only): Extras ISO is mounted at
/mnt/esb3027-extrasand images are loaded on all nodes
Step 1: Create Configuration File
The installation ISO includes environment-specific configuration files as the recommended starting points. Choose the file that matches your deployment type:
| Deployment | Starting file | Copy command |
|---|---|---|
| Single-node lab | /mnt/esb3027/values-lab.yaml | cp /mnt/esb3027/values-lab.yaml ~/values.yaml |
| Multi-node production | /mnt/esb3027/values-production.yaml | cp /mnt/esb3027/values-production.yaml ~/values.yaml |
After copying, edit ~/values.yaml for your environment. The two fields that must be updated in either file are:
global:
hosts:
manager:
- host: manager.example.com # Your manager hostname
zitadel:
zitadel:
configmapConfig:
ExternalDomain: manager.example.com # Must match global.hosts.manager[0].host exactly
Important:
global.hosts.manager[0].hostandzitadel.zitadel.configmapConfig.ExternalDomainmust match exactly or authentication will fail due to CORS policy violations.
For a full description of what each file configures and the complete list of required changes per environment, see the Configuration Guide.
Complete reference: /mnt/esb3027/values.yaml documents every available option with its default value. Use this as a reference, not as a starting point for your configuration.
Split configuration files: For better organisation, split your configuration into multiple files and specify them with repeated --values flags. Later files override earlier files:
helm install acd-manager /mnt/esb3027/charts/acd-manager \
--values ~/values.yaml \
--values ~/values-tls.yaml
Step 2: Load MaxMind GeoIP Databases (Optional)
If you plan to use GeoIP-based routing or validation features, load the MaxMind GeoIP databases. The following databases are used by the manager:
GeoIP2-City.mmdb- The City DatabaseGeoLite2-ASN.mmdb- The ASN DatabaseGeoIP2-Anonymous-IP.mmdb- The VPN and Anonymous IP Database
Create the Kubernetes volume using the helper utility:
/mnt/esb3027/generate-maxmind-volume
The utility will prompt for:
- Location of
GeoIP2-City.mmdb - Location of
GeoLite2-ASN.mmdb - Location of
GeoIP2-Anonymous-IP.mmdb - Name of the volume
After running this command, reference the volume in your configuration file:
manager:
maxmindDbVolume: maxmind-db-volume
Replace maxmind-db-volume with the volume name you specified when running the utility.
Tip: When naming the volume, include a revision number or date (e.g.,
maxmind-db-volume-2026-04ormaxmind-db-volume-v2). This simplifies future updates: create a new volume with an updated name, update thevalues.yamlto reference the new volume, and delete the old volume after verification.
Step 3: Configure TLS Certificates (Optional)
For production deployments, configure a valid TLS certificate from a trusted Certificate Authority (CA). A self-signed certificate is deployed by default if no certificate is provided.
Method 1: Create TLS Secret Manually
Create a Kubernetes TLS secret with your certificate and key:
kubectl create secret tls acd-manager-tls --cert=tls.crt --key=tls.key
Method 2: Helm-Managed Secret
Add the certificate directly to your values.yaml:
ingress:
secrets:
acd-manager-tls: |
-----BEGIN CERTIFICATE-----
...
-----END CERTIFICATE-----
tls:
- hosts:
- manager.example.com
secretName: acd-manager-tls
Configuring All Ingress Controllers
All ingress controllers must be configured with the same certificate secret and hostname:
ingress:
hostname: manager.example.com
tls: true
secretName: acd-manager-tls
zitadel:
ingress:
tls:
- hosts:
- manager.example.com
secretName: acd-manager-tls
confd:
ingress:
hostname: manager.example.com
tls: true
secretName: acd-manager-tls
mib-frontend:
ingress:
hostname: manager.example.com
tls: true
secretName: acd-manager-tls
Important: The hostname must match the first entry in
global.hosts.managerfor Zitadel CORS compatibility. The secret name has a maximum length of 53 characters.
Step 4: Deploy the Manager Helm Chart
Deploy the CDN Manager application:
helm install acd-manager /mnt/esb3027/charts/acd-manager --values ~/values.yaml
Real-time output: By default, helm install runs silently until completion. To see real-time output during deployment, add the --debug flag:
helm install acd-manager /mnt/esb3027/charts/acd-manager --values ~/values.yaml --debug
Monitor deployment:
kubectl get pods --watch
Wait for all pods to show Running status before proceeding.
Timeout handling: The default Helm timeout is 5 minutes. If the installation fails due to a rollout timeout, retry with a larger timeout value:
helm install acd-manager /mnt/esb3027/charts/acd-manager --values ~/values.yaml --timeout 10m
Retry failed installation: If a previous installation attempt failed and you receive an error that the release name is already in use, uninstall the previous release before retrying:
helm uninstall acd-manager
helm install acd-manager /mnt/esb3027/charts/acd-manager --values ~/values.yaml
Step 5: Verify Deployment
Verify all application pods are running:
kubectl get pods
Expected Output: Single-Node
NAME READY STATUS RESTARTS AGE
acd-manager-5b98d569d9-abc12 1/1 Running 0 3m
acd-manager-confd-6fb78548c4-xnrh4 1/1 Running 0 3m
acd-manager-gateway-8bc8446fc-chs26 1/1 Running 0 3m
acd-manager-kafka-controller-0 2/2 Running 0 3m
acd-manager-metrics-aggregator-76d96c4964-lwdcj 1/1 Running 0 3m
acd-manager-mib-frontend-7bdb69684b-6qxn8 1/1 Running 0 3m
acd-manager-postgresql-0 1/1 Running 0 3m
acd-manager-redis-master-0 2/2 Running 0 3m
acd-manager-redis-replicas-0 2/2 Running 0 3m
acd-manager-selection-input-5fb694b857-qxt67 1/1 Running 0 3m
acd-manager-zitadel-8448b4c4fc-2pkd8 1/1 Running 0 3m
acd-manager-zitadel-init-hh6j7 0/1 Completed 0 4m
acd-manager-zitadel-setup-nwp8k 0/2 Completed 0 4m
alertmanager-0 1/1 Running 0 3m
grafana-6d948cfdc6-77ggk 1/1 Running 0 3m
victoria-metrics-agent-dc87df588-tn8wv 1/1 Running 0 3m
victoria-metrics-alert-757c44c58f-kk9lp 1/1 Running 0 3m
victoria-metrics-longterm-server-0 1/1 Running 0 3m
victoria-metrics-server-0 1/1 Running 0 3m
Expected Output: Multi-Node
NAME READY STATUS RESTARTS AGE
acd-cluster-postgresql-1 1/1 Running 0 11m
acd-cluster-postgresql-2 1/1 Running 0 11m
acd-cluster-postgresql-3 1/1 Running 0 10m
acd-manager-5b98d569d9-2pbph 1/1 Running 0 3m
acd-manager-5b98d569d9-m54f9 1/1 Running 0 3m
acd-manager-5b98d569d9-pq26f 1/1 Running 0 3m
acd-manager-confd-6fb78548c4-xnrh4 1/1 Running 0 3m
acd-manager-gateway-8bc8446fc-chs26 1/1 Running 0 3m
acd-manager-gateway-8bc8446fc-wzrml 1/1 Running 0 3m
acd-manager-kafka-controller-0 2/2 Running 0 3m
acd-manager-kafka-controller-1 2/2 Running 0 3m
acd-manager-kafka-controller-2 2/2 Running 0 3m
acd-manager-metrics-aggregator-76d96c4964-lwdcj 1/1 Running 2 3m
acd-manager-mib-frontend-7bdb69684b-6qxn8 1/1 Running 0 3m
acd-manager-mib-frontend-7bdb69684b-pkjrw 1/1 Running 0 3m
acd-manager-redis-master-0 2/2 Running 0 3m
acd-manager-redis-replicas-0 2/2 Running 0 3m
acd-manager-selection-input-5fb694b857-qxt67 1/1 Running 2 3m
acd-manager-zitadel-8448b4c4fc-2pkd8 1/1 Running 0 3m
acd-manager-zitadel-8448b4c4fc-vchp9 1/1 Running 0 3m
acd-manager-zitadel-init-hh6j7 0/1 Completed 0 4m
acd-manager-zitadel-setup-nwp8k 0/2 Completed 0 4m
alertmanager-0 1/1 Running 0 3m
grafana-6d948cfdc6-77ggk 1/1 Running 0 3m
telegraf-54779f5f46-2jfj5 1/1 Running 0 3m
victoria-metrics-agent-dc87df588-tn8wv 1/1 Running 0 3m
victoria-metrics-alert-757c44c58f-kk9lp 1/1 Running 0 3m
victoria-metrics-longterm-server-0 1/1 Running 0 3m
victoria-metrics-server-0 1/1 Running 0 3m
Pod Distribution Verification
Verify pods are distributed across nodes:
kubectl get pods -o wide
Expected Behavior
- Init pods (such as
zitadel-initandzitadel-setup) will showCompletedstatus after successful initialization. This is expected behavior. - Multi-node deployments: Some pods may enter
CrashLoopBackoffstate during initial deployment depending on the timing of other containers starting up. This is expected behavior as some services wait for dependencies (such as databases or Kafka) to become available. The deployment should stabilize automatically after a few minutes. - Restart counts: Some pods may show restart counts as they wait for dependencies to become available. This is normal during initial deployment.
Next Steps
After successful deployment:
- Next Steps Guide - Post-installation configuration
- Getting Started Guide - Accessing the system
- Configuration Guide - System configuration
- Operations Guide - Day-to-day operations
10.5.6 - Upgrade Guide
Overview
This guide describes the procedure for upgrading the AgileTV CDN Manager (ESB3027) to a newer version. The upgrade process involves updating the Kubernetes cluster components and redeploying the Helm chart with the new version.
Prerequisites
Backup Requirements
Before beginning any upgrade, ensure you have:
- PostgreSQL Backup: Verify recent backups are available via the Cloudnative PG operator
- Configuration Backup: Save your current
values.yamlfile(s) - TLS Certificates: Ensure certificate files are backed up
- MaxMind Volumes: Note the current volume names if using GeoIP databases
Version Compatibility
Review the Release Notes for the target version to check for:
- Breaking changes requiring manual intervention
- Required intermediate upgrade steps
- New configuration options that should be set
Cluster Health
Verify the cluster is healthy before upgrading:
kubectl get nodes
kubectl get pods
kubectl get pvc
All nodes should show Ready status and all pods should be Running (or Completed for job pods).
Upgrade Methods
There are three upgrade methods available. Choose the one that best fits your situation:
| Method | Downtime | Use Case |
|---|---|---|
| Rolling Upgrade | Minimal | Patch releases; minor version upgrades; configuration updates |
| Clean Upgrade | Brief | Major version upgrades; component changes; troubleshooting |
| Full Reinstall | Extended | Cluster rebuilds; troubleshooting persistent issues; ensuring clean state |
Method Selection Guidance:
Rolling Upgrade (Method 1) is the default choice for most upgrades. Use this for patch releases (e.g., 1.6.0 → 1.6.1) and even minor version upgrades (e.g., 1.4.0 → 1.6.0) where no breaking changes are documented. This method preserves all existing resources and performs an in-place update. Note: This method supports Helm’s automatic rollback (
helm rollback) if the upgrade fails, allowing quick recovery to the previous state.Clean Upgrade (Method 2) is recommended for major version upgrades (e.g., 1.x → 2.x) or when the release notes indicate significant component changes. This method ensures all resources are recreated with the new version, avoiding potential issues with stale configurations. Also use this method when troubleshooting upgrade failures from Method 1.
Full Reinstall (Method 3) should only be used when a completely clean cluster state is required. This includes troubleshooting persistent cluster-level issues, recovering from failed upgrades that cannot be rolled back, or when migrating between significantly different deployment configurations. This method requires verified backups and should be planned for extended downtime.
Upgrade Steps
Method 1: Rolling Upgrade (Recommended)
This method performs an in-place rolling upgrade with minimal downtime. All upgrade commands are executed from the primary server node.
Step 1: Obtain the New Installation ISO
Unmount the old ISO (if mounted) and mount the new installation ISO:
umount /mnt/esb3027 2>/dev/null || true
mount -o loop,ro esb3027-acd-manager-X.Y.Z.iso /mnt/esb3027
Replace X.Y.Z with the target version number.
Step 2: Update Containers and Cluster Software
Run the installation script to update the container images and cluster software:
/mnt/esb3027/install
Wait for the script to complete.
Step 2b: Air-Gapped Environments (If Applicable)
If deploying in an air-gapped environment, also mount and load the extras ISO:
# Mount the Extras ISO
mkdir -p /mnt/esb3027-extras
mount -o loop,ro esb3027-acd-manager-extras-X.Y.Z.iso /mnt/esb3027-extras
# Load container images from the extras ISO
/mnt/esb3027-extras/load-images
Replace X.Y.Z with the target version number.
Step 4: Review and Update Configuration
Compare the default values.yaml from the new ISO with your current configuration:
diff /mnt/esb3027/values.yaml ~/values.yaml
Update your configuration file to include any new required settings. Common updates include:
# ~/values.yaml
global:
hosts:
manager:
- host: manager.example.com
routers:
- name: director-1
address: 192.0.2.1
zitadel:
zitadel:
ExternalDomain: manager.example.com
# Add any new required settings for the target version
Important: Do not modify settings unrelated to the upgrade unless specifically documented in the release notes.
Step 5: Update MaxMind GeoIP Volumes (If Applicable)
If you use MaxMind GeoIP databases, use the utility from the new ISO to create an updated volume:
/mnt/esb3027/generate-maxmind-volume
Update your values.yaml to reference the new volume name:
manager:
maxmindDbVolume: maxmind-geoip-2026-04
Tip: Using dated or versioned volume names (e.g.,
maxmind-geoip-2026-04) allows you to create new volumes during upgrades and delete old ones after verification.
Step 6: Update TLS Certificates (If Needed)
If your TLS certificates need renewal or the new version requires certificate updates, create or update the secret:
kubectl create secret tls acd-manager-tls --cert=tls.crt --key=tls.key --dry-run=client -o yaml | kubectl apply -f -
Step 7: Upgrade the Helm Release
Perform a Helm upgrade with the new chart:
helm upgrade acd-manager /mnt/esb3027/charts/acd-manager \
--values ~/values.yaml
Note: The upgrade performs a rolling update of each deployment in the chart. Deployments are upgraded one at a time, with pods being terminated and recreated sequentially. StatefulSets (PostgreSQL, Kafka, Redis) roll out one pod at a time to maintain data availability.
Monitor the upgrade progress:
kubectl get pods --watch
Wait for all pods to stabilize and show Running status before considering the upgrade complete. Some pods may temporarily enter CrashLoopBackoff during the transition as they wait for dependencies to become available.
Step 8: Verify the Upgrade
Check the deployed version:
helm list
kubectl get deployments -o wide
Verify application functionality:
- Access the MIB Frontend and confirm it loads
- Test API connectivity
- Verify Grafana dashboards are accessible
- Check that Zitadel authentication is working
Step 9: Clean Up
After confirming the upgrade is successful:
Unmount the old ISO (if still mounted):
umount /mnt/esb3027Delete old MaxMind volumes (if replaced):
kubectl get pvc kubectl delete pvc <old-volume-name>Remove old configuration files if no longer needed.
Method 2: Clean Upgrade (Helm Uninstall/Install)
This method removes the existing Helm release before installing the new version. This is useful for major version upgrades or when troubleshooting upgrade issues. All upgrade commands are executed from the primary server node.
Warning: This method causes brief downtime as all resources are deleted before reinstallation.
Step 1: Obtain the New Installation ISO
Mount the new installation ISO:
umount /mnt/esb3027 2>/dev/null || true
mount -o loop,ro esb3027-acd-manager-X.Y.Z.iso /mnt/esb3027
Step 2: Backup Configuration
Save your current Helm values:
helm get values acd-manager -o yaml > ~/values-backup.yaml
Step 3: Uninstall the Existing Release
Remove the existing Helm release:
helm uninstall acd-manager
Wait for pods to terminate:
kubectl get pods --watch
Note: Helm uninstall does not remove PersistentVolumes (PVs) or PersistentVolumeClaims (PVCs). All data stored in PostgreSQL, Kafka, Redis, and Longhorn volumes is preserved during the uninstall process. When the new version is installed, it will reattach to the existing PVCs and restore data automatically.
Step 4: Review and Update Configuration
Compare the default values.yaml from the new ISO with your configuration:
diff /mnt/esb3027/values.yaml ~/values.yaml
Update your configuration file as needed.
Step 5: Install the New Release
Install the new version:
helm install acd-manager /mnt/esb3027/charts/acd-manager \
--values ~/values.yaml
Monitor the deployment:
kubectl get pods --watch
Wait for all pods to stabilize before proceeding.
Step 6: Verify the Upgrade
Verify the upgrade as described in Method 1, Step 8.
Method 3: Full Reinstall (Cluster Rebuild)
This method completely removes Kubernetes and reinstalls from scratch. Use only for cluster rebuilds or when other upgrade methods fail.
Warning: This method causes extended downtime and permanent data loss. The K3s uninstall process destroys all Longhorn PersistentVolumes (PVs) and PersistentVolumeClaims (PVCs). All data stored in PostgreSQL, Kafka, Redis, and application volumes will be permanently lost. Verified backups are required before proceeding.
Warning: This method should only be used when necessary. Ensure you have verified backups before proceeding.
Step 1: Stop Kubernetes Services
On all nodes (server and agent), stop the K3s service:
systemctl stop k3s
Step 2: Uninstall K3s (Server Nodes Only)
On the primary server node first, then each additional server node:
/usr/local/bin/k3s-uninstall.sh
Step 3: Clean Up Residual State (All Nodes)
On all nodes, remove residual state:
/usr/local/bin/k3s-kill-all.sh
rm -rf /var/lib/rancher/k3s/*
Warning: This removes all cluster data including Longhorn PersistentVolumes (PVs) and PersistentVolumeClaims (PVCs). All data stored in PostgreSQL, Kafka, Redis, and application volumes will be permanently lost. Ensure verified backups are available before proceeding.
Step 4: Reinstall K3s Cluster and Deploy Manager
Follow the installation procedure in the Installation Guide to reinstall the cluster and deploy the Helm chart. At this point, you are in the same state as a fresh installation:
- Primary server installation
- Additional server joins (if applicable)
- Agent joins (if applicable)
- Helm chart deployment
Note: The K3s node token is regenerated during reinstallation. Retrieve the new token from /var/lib/rancher/k3s/server/node-token on the primary server after installation if you need to join additional nodes.
Rollback Procedure
Rollback procedures vary by upgrade method:
Method 1 (Rolling Upgrade)
Use Helm’s built-in rollback command:
helm rollback acd-manager
This reverts to the previous Helm release revision automatically.
Or manually redeploy the previous version:
helm upgrade acd-manager /mnt/esb3027-old/helm/charts/acd-manager \
--values ~/values.yaml
Note: If you use multiple --values files for organization, ensure they are specified in the same order as the original installation.
Method 2 (Clean Upgrade)
Reinstall the previous version:
helm uninstall acd-manager
helm install acd-manager /mnt/esb3027-old/helm/charts/acd-manager \
--values ~/values-backup.yaml
Method 3 (Full Reinstall)
Rollback requires repeating the full cluster reinstall procedure using the old installation ISO. Follow Method 3 steps with the previous version’s ISO. Ensure verified backups are available before attempting.
Troubleshooting
Pods Fail to Start
Check pod status and events:
kubectl describe pod <pod-name> kubectl get events --sort-by='.lastTimestamp'Review pod logs:
kubectl logs <pod-name> kubectl logs <pod-name> -p # Previous instance logs
Database Migration Issues
If PostgreSQL migrations fail:
Check Cloudnative PG cluster status:
kubectl get clusters kubectl describe cluster <cluster-name>Review migration job logs:
kubectl get jobs kubectl logs job/<migration-job-name>
Helm Upgrade Fails
If helm upgrade fails:
Check Helm release status:
helm status acd-manager helm history acd-managerReview the error message for specific failures
Attempt rollback if necessary
Post-Upgrade
After a successful upgrade:
- Review the Release Notes for any post-upgrade tasks
- Update monitoring dashboards if new metrics are available
- Test all critical functionality
- Document the upgrade in your change management system
Next Steps
After completing the upgrade:
- Next Steps Guide - Review post-installation tasks
- Operations Guide - Day-to-day operational procedures
- Release Notes - Review new features and changes
10.5.7 - Next Steps
Overview
After completing the installation of the AgileTV CDN Manager (ESB3027), several post-installation configuration tasks must be performed before the system is ready for production use. This guide walks you through the essential next steps.
Prerequisites
Before proceeding, ensure:
- The CDN Manager Helm chart is successfully deployed
- All pods are in
Runningstatus - You have network access to the cluster hostname or IP
- You have the default credentials available
Step 1: Access Zitadel Console
The first step is to configure user authentication through Zitadel Identity and Access Management (IAM).
Navigate to the Zitadel Console:
https://<manager-host>/ui/consoleReplace
<manager-host>with your configured hostname (e.g.,manager.localormanager.example.com).Important: The
<manager-host>must match the first entry inglobal.hosts.managerfrom your Helm values exactly. Zitadel uses name-based virtual hosting and CORS validation. If the hostname does not match, authentication will fail.Log in with the default administrator credentials (also listed in the Glossary):
- Username:
admin@agiletv.dev - Password:
Password1!
- Username:
Important: If prompted to configure Multi-Factor Authentication (MFA), you must skip this step for now. MFA is not currently supported. Attempting to configure MFA may lock you out of the administrator account.
Security Recommendation: After logging in, create a new administrator account with proper roles. Once verified, disable or delete the default
admin@agiletv.devaccount. For details on required roles and administrator permissions, see Zitadel’s Administrator Documentation.
Step 2: Configure SMTP Settings (Recommended)
Zitadel requires an SMTP server to send email notifications and perform email validations.
In the Zitadel Console, navigate to Settings > Default Settings
Configure the SMTP settings:
- SMTP Host: Your mail server hostname
- SMTP Port: Typically 587 (TLS) or 465 (SSL)
- SMTP Username: Mail account username
- SMTP Password: Mail account password
- Sender Address: Email address for outgoing mail (e.g.,
noreply@example.com)
Save the configuration
Note: Without SMTP configuration, email-based user validation and password recovery features will not function.
Step 3: Create Additional User Accounts
Create user accounts for operators and administrators:
Tip: For detailed guidance on managing users, roles, and permissions in the Zitadel Console, see Zitadel’s User Management Documentation.
In the Zitadel Console, navigate to Users > Add User
Fill in the user details:
- Username: Unique username
- First Name: User’s first name
- Last Name: User’s last name
- Email: User’s email address (this is their login username)
Known Issue: Due to a limitation in this release of Zitadel, the username must match the local part (the portion before the
@) of the email address. For example, if the email isfoo@example.com, the username must befoo.If these do not match, Zitadel may allow login with the mismatched local part while blocking the full email address. For instance, if username is
foobut email isfoo.bar@example.com, login withfoo@example.commay succeed whilefoo.bar@example.comis blocked.Workaround: Always ensure the username matches the email local part exactly.
Important: The following options must be configured:
- Email Verified: Check this box to skip email verification
- Set Initial Password: Enter a temporary password for the user
Note: If you configured SMTP settings in Step 2, the user will receive an email asking to verify their address and set their initial password. If SMTP is not configured, you must check the “Email Verified” box and set an initial password manually, otherwise the user account will not be enabled.
Click Create User
Provide the user with:
- Their username
- The temporary password (if set manually)
- The Zitadel Console URL
Instruct the user to change their password on first login
Step 4: Configure User Roles and Permissions
Zitadel manages roles and permissions for accessing the CDN Manager:
In the Zitadel Console, navigate to Roles
Assign appropriate roles to users:
- Admin: Full administrative access
- Operator: Operational access without administrative functions
- Viewer: Read-only access
To assign a role:
- Select the user
- Click Add Role
- Select the appropriate role
- Save the assignment
Step 5: Access the MIB Frontend
The MIB Frontend is the web-based configuration GUI for CDN operators:
Navigate to the MIB Frontend:
https://<manager-host>/guiLog in using your Zitadel credentials
Verify you can access the configuration interface
Step 6: Verify API Access
Test API connectivity to ensure the system is functioning:
curl -k https://<manager-host>/api/v1/health/ready
Expected response:
{
"status": "ready"
}
See the API Guide for detailed API documentation.
Step 7: Configure TLS Certificates (If Not Done During Installation)
For production deployments, a valid TLS certificate from a trusted Certificate Authority should be configured. If you did not configure TLS certificates during installation, refer to Step 12: Configure TLS Certificates in the Installation Guide.
Step 8: Set Up Monitoring and Alerting
Configure monitoring dashboards and alerting:
Access Grafana:
- Navigate to
https://<manager-host>/grafana - Log in with default credentials (also listed in the Glossary):
- Username:
admin - Password:
edgeware
- Username:
- Navigate to
Review Pre-built Dashboards:
- System health dashboards are included by default
- CDN metrics dashboards show routing and usage statistics
Note: CDN Director instances automatically have DNS names configured for use in Grafana dashboards. The DNS name is derived from the
namefield inglobal.hosts.routerswith.externalappended. For example, a router namedmy-router-1will have the DNS namemy-router-1.externalin Grafana configuration.
Step 9: Verify Kafka and PostgreSQL Health
Ensure the data layer components are healthy:
kubectl get pods
Verify the following pods are running:
| Component | Pod Name Pattern | Expected Status |
|---|---|---|
| Kafka | acd-manager-kafka-controller-* | Running (3 pods for production) |
| PostgreSQL | acd-cluster-postgresql-0, acd-cluster-postgresql-1, acd-cluster-postgresql-2 | Running (3-node HA cluster) |
| Redis | acd-manager-redis-master-* | Running |
All pods should show Running status with no restarts.
Step 10: Configure Availability Zones (Optional)
For improved network performance, configure availability zones to enable Topology Aware Hints. This optimizes service-to-pod routing by keeping traffic within the same zone when possible.
See the Performance Tuning Guide for detailed instructions on:
- Labeling nodes with zone and region topology
- Verifying topology configuration
- Requirements for Topology Aware Hints to activate
- Integration with pod anti-affinity rules
Note: This step is optional. If zone labels are not configured, the system will fall back to random load-balancing.
Step 11: Review System Configuration
Verify the initial configuration:
Review Helm Values:
helm get values acd-manager -o yamlCheck Ingress Configuration:
kubectl get ingressVerify Service Endpoints:
kubectl get endpoints
Step 12: Document Your Deployment
Maintain documentation for your deployment:
- Cluster hostname and IP addresses
- Configuration file locations
- User accounts and roles created
- TLS certificate expiration dates
- Backup procedures and schedules
- Monitoring and alerting contacts
Next Steps
After completing post-installation configuration:
- Configuration Guide - Detailed system configuration options
- Operations Guide - Day-to-day operational procedures
- Metrics & Monitoring Guide - Comprehensive monitoring setup
- API Guide - REST API reference and integration examples
Troubleshooting
Cannot Access Zitadel Console
- Verify DNS resolution or hosts file configuration
- Check that Traefik ingress is running:
kubectl get pods -n kube-system | grep traefik - Review Traefik logs:
kubectl logs -n kube-system -l app.kubernetes.io/name=traefik
Authentication Failures
- Verify Zitadel pods are healthy:
kubectl get pods | grep zitadel - Check Zitadel logs:
kubectl logs <zitadel-pod-name> - Ensure the external domain matches your hostname in Zitadel configuration
MIB Frontend Not Loading
- Verify MIB Frontend pods are running:
kubectl get pods | grep mib-frontend - Check for connectivity issues to Confd and API services
- Review browser console for JavaScript errors
API Returns 401 Unauthorized
- Verify you have a valid bearer token
- Check token expiration
- Ensure Zitadel authentication is functioning
For additional troubleshooting assistance, refer to the Troubleshooting Guide.
10.6 - Configuration Guide
Overview
The CDN Manager is deployed via Helm chart with configuration supplied through values.yaml files. This guide explains the configuration structure, how to apply changes, and provides a reference for all configurable options.
Configuration Files
The installation ISO provides three configuration files at /mnt/esb3027/:
| File | Purpose |
|---|---|
values-lab.yaml | Recommended starting point for single-node lab deployments |
values-production.yaml | Recommended starting point for multi-node production deployments |
values.yaml | Complete reference of all configurable options with their defaults |
You only need to specify fields that differ from the defaults. Helm applies configuration hierarchically — values from your file override the chart’s built-in defaults, and any key you omit retains its default value.
Lab Configuration (values-lab.yaml)
values-lab.yaml is the recommended starting point for single-node lab, acceptance testing, and demonstration deployments. It pre-configures settings appropriate for a constrained single-node environment:
- Single Kafka controller replica (the default 3 replicas require 3 separate nodes to satisfy pod anti-affinity rules)
- Single Zitadel replica
- Self-signed TLS by default, with real certificate configuration commented out for reference
- Minimal resource requests suited to a single node
Copy the file to a writable location and edit it before deploying:
cp /mnt/esb3027/values-lab.yaml ~/values.yaml
The minimum required changes are:
- Set
global.hosts.manager[0].hostto your node’s hostname or IP address - Set
zitadel.zitadel.configmapConfig.ExternalDomainto the same value
These two values must match exactly or authentication will fail due to CORS policy violations. See Global Settings for details.
Production Configuration (values-production.yaml)
values-production.yaml is the recommended starting point for multi-node production deployments across a minimum three-node cluster. It pre-configures settings appropriate for a high-availability environment:
- Three Zitadel replicas spread across nodes for HA
- Production-grade resource requests and limits for all major components
- Kafka with a dedicated single-replica StorageClass (avoiding unnecessary triple-redundancy on top of Kafka’s own quorum)
- Manager HPA configured to scale between 3 and 8 replicas
- TLS certificate configuration with clearly marked placeholders
Copy the file to a writable location and edit it before deploying:
cp /mnt/esb3027/values-production.yaml ~/values.yaml
The minimum required changes before deploying are:
- Set
global.hosts.manager[0].hostto your primary manager hostname - Set
zitadel.zitadel.configmapConfig.ExternalDomainto the same hostname - Replace the placeholder TLS certificate and key in the
ingress.secretssection, and update thesecretNamevalues inmibFrontend.ingress.extraTlsandzitadel.ingress.tlsto match - Update
global.hosts.routerswith your CDN Director instances
See TLS Configuration and Global Settings for full details.
Hardware requirements: For per-node hardware specifications, refer to the System Requirements Guide. The System Requirements Guide is the authoritative source — the hardware comments in the header of
values-production.yamlmay not reflect the current requirements.
Complete Reference (values.yaml)
The full default values file at /mnt/esb3027/values.yaml documents every configurable option with its default value and inline comments. Use this as a reference when looking up available settings or understanding what the environment-specific files override.
Note:
values.yamlis not intended to be used directly as your deployment configuration. Usevalues-lab.yamlorvalues-production.yamlas your starting point instead.
Configuration Merging
Helm merges configuration files from left to right, with later files overriding earlier values. This allows you to split your configuration into multiple files — for example, keeping TLS certificates separate from the main configuration:
# Multiple files merged left-to-right
helm install acd-manager /mnt/esb3027/charts/acd-manager \
--values ~/values.yaml \
--values ~/values-tls.yaml
Individual Value Overrides
For temporary changes, you can override individual values with --set:
helm upgrade acd-manager /mnt/esb3027/helm/charts/acd-manager \
--values ~/values.yaml \
--set manager.logLevel=debug
Note: Using --set is discouraged for permanent changes, as the same arguments must be specified for every Helm operation.
Applying Configuration
Initial Installation
helm install acd-manager /mnt/esb3027/charts/acd-manager \
--values ~/values.yaml
Updating Configuration
helm upgrade acd-manager /mnt/esb3027/helm/charts/acd-manager \
--values ~/values.yaml
Dry Run
Before applying changes, validate the configuration with a dry run:
helm upgrade acd-manager /mnt/esb3027/helm/charts/acd-manager \
--values ~/values.yaml \
--dry-run
Rollback
If an upgrade fails, rollback to the previous revision:
# View revision history
helm history acd-manager
# Rollback to previous revision
helm rollback acd-manager
# Rollback to specific revision
helm rollback acd-manager <revision_number>
Note: Rollback reverts the Helm release but does not modify your values.yaml file. You must manually revert configuration file changes.
Force Reinstall
If an upgrade fails and rollback is not sufficient, you can perform a clean reinstall:
helm uninstall acd-manager
helm install acd-manager /mnt/esb3027/charts/acd-manager \
--values ~/values.yaml
Warning: This is service-affecting as all pods will be destroyed and recreated.
Configuration Reference
Global Settings
The global section contains cluster-wide settings. The most critical configuration is global.hosts.
global:
hosts:
manager:
- host: manager.local
routers:
- name: default
address: 127.0.0.1
edns_proxy: []
geoip: []
| Key | Type | Description |
|---|---|---|
global.hosts.manager | Array | External IP addresses or DNS hostnames for all Manager cluster nodes |
global.hosts.routers | Array | CDN Director (ESB3024) instances |
global.hosts.edns_proxy | Array | EDNS Proxy addresses (currently unused) |
global.hosts.geoip | Array | GeoIP Proxy addresses for Frontend GUI |
Important: The first entry in global.hosts.manager must match zitadel.zitadel.ExternalDomain exactly. Zitadel enforces CORS protection, and authentication will fail if these do not match.
Manager Configuration
Core Manager API server settings:
| Key | Type | Default | Description |
|---|---|---|---|
manager.image.registry | String | ghcr.io | Container image registry |
manager.image.repository | String | edgeware/acd-manager | Container image repository |
manager.image.tag | String | Image tag override (uses latest if empty) | |
manager.logLevel | String | info | Log level (trace, debug, info, warn, error) |
manager.replicaCount | Number | 1 | Number of replicas (HPA manages this when enabled) |
manager.containerPorts.http | Number | 80 | HTTP container port |
manager.maxmindDbVolume | String | Name of PVC containing MaxMind GeoIP databases |
Manager Resources
The chart supports both resource presets and explicit resource specifications:
| Key | Type | Default | Description |
|---|---|---|---|
manager.resourcesPreset | String | `` (empty) | Resource preset (see Resource Presets table). Ignored if manager.resources is set. |
manager.resources.requests.cpu | String | 300m | CPU request |
manager.resources.requests.memory | String | 512Mi | Memory request |
manager.resources.limits.cpu | String | 1 | CPU limit |
manager.resources.limits.memory | String | 4Gi | Memory limit |
Note: For production workloads, explicitly set manager.resources rather than using presets.
Manager Datastore
manager:
datastore:
type: redis
namespace: "cdn_manager_ds"
default_ttl: ""
compression: zstd
| Key | Type | Default | Description |
|---|---|---|---|
manager.datastore.type | String | redis | Datastore backend type |
manager.datastore.namespace | String | cdn_manager_ds | Redis namespace for manager data |
manager.datastore.default_ttl | String | `` (empty) | Default TTL for entries |
manager.datastore.compression | String | zstd | Compression algorithm (none, zstd, etc.) |
Manager Discovery
manager:
discovery: []
# Example:
# - namespace: "other"
# hosts:
# - other-host1
# - other-host2
# pattern: "other-.*"
| Key | Type | Description |
|---|---|---|
manager.discovery | Array | Array of discovery host configurations. Each entry can specify hosts (list of hostnames), pattern (regex pattern), or both |
Manager Tuning
manager:
tuning:
enable_cache_control: true
cache_control_max_age: "5m"
cache_control_miss_max_age: ""
| Key | Type | Default | Description |
|---|---|---|---|
manager.tuning.enable_cache_control | Boolean | true | Enable cache control headers in responses |
manager.tuning.cache_control_max_age | String | 5m | Maximum age for cache control headers |
manager.tuning.cache_control_miss_max_age | String | `` (empty) | Maximum age for cache control headers on cache misses |
Manager Container Arguments
manager:
args:
- --config-file=/etc/manager/config.toml
- http-server
Gateway Configuration
NGinx Gateway settings for external Director communication:
| Key | Type | Default | Description |
|---|---|---|---|
gateway.replicaCount | Number | 1 | Number of gateway replicas |
gateway.resources.requests.cpu | String | 100m | CPU request |
gateway.resources.requests.memory | String | 128Mi | Memory request |
gateway.resources.limits.cpu | String | 150m | CPU limit |
gateway.resources.limits.memory | String | 192Mi | Memory limit |
gateway.service.type | String | ClusterIP | Service type |
MIB Frontend Configuration
Web-based configuration GUI settings:
| Key | Type | Default | Description |
|---|---|---|---|
mib-frontend.enabled | Boolean | true | Enable the frontend GUI |
mib-frontend.frontend.resourcePreset | String | nano | Resource preset |
mib-frontend.frontend.autoscaling.hpa.enabled | Boolean | true | Enable HPA |
mib-frontend.frontend.autoscaling.hpa.minReplicas | Number | 2 | Minimum replicas |
mib-frontend.frontend.autoscaling.hpa.maxReplicas | Number | 4 | Maximum replicas |
Confd Configuration
Confd settings for configuration management:
| Key | Type | Default | Description |
|---|---|---|---|
confd.enabled | Boolean | true | Enable Confd |
confd.service.ports.internal | Number | 15000 | Internal service port |
VictoriaMetrics Configuration
Time-series database for metrics:
| Key | Type | Default | Description |
|---|---|---|---|
acd-metrics.enabled | Boolean | true | Enable metrics components |
acd-metrics.victoria-metrics-single.enabled | Boolean | true | Enable VictoriaMetrics |
acd-metrics.grafana.enabled | Boolean | true | Enable Grafana |
acd-metrics.telegraf.enabled | Boolean | true | Enable Telegraf |
acd-metrics.prometheus.enabled | Boolean | true | Enable Prometheus metrics |
Ingress Configuration
Traffic exposure settings:
| Key | Type | Default | Description |
|---|---|---|---|
ingress.enabled | Boolean | true | Enable ingress record generation |
ingress.pathType | String | Prefix | Ingress path type |
ingress.hostname | String | `` (empty) | Primary hostname (defaults to manager.local via global.hosts) |
ingress.path | String | /api | Default path for ingress |
ingress.tls | Boolean | false | Enable TLS configuration |
ingress.selfSigned | Boolean | false | Generate self-signed certificate via Helm |
ingress.secrets | Array | Custom TLS certificate secrets |
Ingress Extra Paths
The chart includes default extra paths for Confd and GeoIP:
ingress:
extraPaths:
- path: /confd
pathType: Prefix
backend:
service:
name: acd-manager-gateway
port:
name: http
- path: /geoip
pathType: Prefix
backend:
service:
name: acd-manager-gateway
port:
name: http
TLS Certificate Secrets
For production TLS certificates:
ingress:
secrets:
- name: manager.local-tls
key: |-
-----BEGIN RSA PRIVATE KEY-----
...
-----END RSA PRIVATE KEY-----
certificate: |-
-----BEGIN CERTIFICATE-----
...
-----END CERTIFICATE-----
tls: true
Resource Configuration
Resource Presets
Predefined resource configurations for common deployment sizes:
| Preset | Request CPU | Request Memory | Limit CPU | Limit Memory | Ephemeral Storage Limit |
|---|---|---|---|---|---|
nano | 100m | 128Mi | 150m | 192Mi | 2Gi |
micro | 250m | 256Mi | 375m | 384Mi | 2Gi |
small | 500m | 512Mi | 750m | 768Mi | 2Gi |
medium | 500m | 1024Mi | 750m | 1536Mi | 2Gi |
large | 1000m | 2048Mi | 1500m | 3072Mi | 2Gi |
xlarge | 1000m | 3072Mi | 3000m | 6144Mi | 2Gi |
2xlarge | 1000m | 3072Mi | 6000m | 12288Mi | 2Gi |
Note: Limits are calculated as requests plus 50% (except for xlarge/2xlarge and ephemeral-storage).
Custom Resources
Override preset with custom values:
manager:
resources:
requests:
cpu: "300m"
memory: "512Mi"
limits:
cpu: "1"
memory: "1Gi"
Note:
- CPU values use millicores (1000m = 1 core)
- Memory values use binary SI units (1024Mi = 1GiB)
- Requests represent minimum guaranteed resources
- Limits represent maximum consumable resources
Capacity Planning
When sizing resources:
- Requests determine scheduling (node must have available capacity)
- Limits prevent resource starvation
- Maintain 20-30% cluster headroom for scaling
- Total capacity = sum of all requests × replica count + headroom
Security Contexts
Pod Security Context
manager:
podSecurityContext:
enabled: true
fsGroup: 1001
fsGroupChangePolicy: Always
sysctls: []
supplementalGroups: []
Container Security Context
manager:
containerSecurityContext:
enabled: true
runAsUser: 1001
runAsGroup: 1001
runAsNonRoot: true
readOnlyRootFilesystem: true
privileged: false
allowPrivilegeEscalation: false
capabilities:
drop: ["ALL"]
seccompProfile:
type: "RuntimeDefault"
Health Probes
Probe Types
| Probe | Purpose | Failure Action |
|---|---|---|
startupProbe | Initial startup verification | Container restart |
readinessProbe | Traffic readiness check | Remove from load balancer |
livenessProbe | Health monitoring | Container restart |
Default Probe Configuration
Liveness Probe
manager:
livenessProbe:
enabled: true
initialDelaySeconds: 5
periodSeconds: 30
timeoutSeconds: 10
failureThreshold: 5
successThreshold: 1
httpGet:
path: /api/v1/health/alive
port: http
Readiness Probe
manager:
readinessProbe:
enabled: true
initialDelaySeconds: 5
periodSeconds: 10
timeoutSeconds: 7
failureThreshold: 3
successThreshold: 1
httpGet:
path: /api/v1/health/ready
port: http
Startup Probe
manager:
startupProbe:
enabled: true
initialDelaySeconds: 0
periodSeconds: 5
timeoutSeconds: 3
failureThreshold: 10
successThreshold: 1
httpGet:
path: /api/v1/health/alive
port: http
Autoscaling Configuration
Horizontal Pod Autoscaler (HPA)
manager:
autoscaling:
hpa:
enabled: true
minReplicas: 3
maxReplicas: 8
targetCPU: 50
targetMemory: 80
| Key | Type | Default | Description |
|---|---|---|---|
manager.autoscaling.hpa.enabled | Boolean | true | Enable HPA |
manager.autoscaling.hpa.minReplicas | Number | 3 | Minimum number of replicas |
manager.autoscaling.hpa.maxReplicas | Number | 8 | Maximum number of replicas |
manager.autoscaling.hpa.targetCPU | Number | 50 | Target CPU utilization percentage |
manager.autoscaling.hpa.targetMemory | Number | 80 | Target Memory utilization percentage |
Network Policy
networkPolicy:
enabled: true
allowExternal: true
allowExternalEgress: true
addExternalClientAccess: true
| Key | Type | Default | Description |
|---|---|---|---|
networkPolicy.enabled | Boolean | true | Enable NetworkPolicy |
networkPolicy.allowExternal | Boolean | true | Allow connections from any source (don’t require pod label) |
networkPolicy.allowExternalEgress | Boolean | true | Allow pod to access any range of port and destinations |
networkPolicy.addExternalClientAccess | Boolean | true | Allow access from pods with client label set to “true” |
Pod Affinity and Anti-Affinity
manager:
podAffinityPreset: ""
podAntiAffinityPreset: soft
nodeAffinityPreset:
type: ""
key: ""
values: []
affinity: {}
| Key | Type | Default | Description |
|---|---|---|---|
manager.podAffinityPreset | String | `` (empty) | Pod affinity preset (soft or hard). Ignored if affinity is set |
manager.podAntiAffinityPreset | String | soft | Pod anti-affinity preset (soft or hard). Ignored if affinity is set |
manager.nodeAffinityPreset.type | String | `` (empty) | Node affinity preset type (soft or hard) |
manager.affinity | Object | {} | Custom affinity rules (overrides presets) |
Service Configuration
service:
type: ClusterIP
ports:
http: 80
annotations:
service.kubernetes.io/topology-mode: Auto
externalTrafficPolicy: Cluster
sessionAffinity: None
| Key | Type | Default | Description |
|---|---|---|---|
service.type | String | ClusterIP | Service type |
service.ports.http | Number | 80 | HTTP service port |
service.annotations | Object | service.kubernetes.io/topology-mode: Auto | Service annotations |
service.externalTrafficPolicy | String | Cluster | External traffic policy |
Persistence Configuration
persistence:
enabled: false
mountPath: /agiletv/manager/data
storageClass: ""
accessModes:
- ReadWriteOnce
size: 8Gi
| Key | Type | Default | Description |
|---|---|---|---|
persistence.enabled | Boolean | false | Enable persistence using PVC |
persistence.mountPath | String | /agiletv/manager/data | Mount path |
persistence.storageClass | String | `` (empty) | Storage class (uses cluster default if empty) |
persistence.size | String | 8Gi | Size of data volume |
RBAC and Service Account
rbac:
create: false
rules: []
serviceAccount:
create: true
name: ""
automountServiceAccountToken: true
annotations: {}
Metrics
metrics:
enabled: false
serviceMonitor:
enabled: false
namespace: ""
annotations: {}
labels: {}
interval: ""
scrapeTimeout: ""
| Key | Type | Default | Description |
|---|---|---|---|
metrics.enabled | Boolean | false | Enable Prometheus metrics export |
metrics.serviceMonitor.enabled | Boolean | false | Create Prometheus Operator ServiceMonitor |
Next Steps
After configuration:
- Installation Guide - Deploy with your configuration
- Operations Guide - Day-to-day management
- Performance Tuning Guide - Optimize system performance
- Architecture Guide - Understand component relationships
10.7 - Performance Tuning Guide
Overview
This guide provides performance tuning recommendations for the AgileTV CDN Manager (ESB3027). While the default configuration is suitable for most deployments, certain environments may benefit from additional optimizations.
Network Topology Optimization
Topology Aware Hints
The CDN Manager uses Kubernetes Topology Aware Hints to prefer routing pods in the same zone as the source of network traffic. This reduces cross-zone latency and improves overall system responsiveness.
How It Works
When nodes are labeled with topology zones, Kubernetes automatically routes traffic to pods in the same zone when possible. This is particularly beneficial for:
- Low-latency requirements: Keeps traffic local to reduce round-trip time
- Cost optimization: Reduces cross-zone data transfer costs in cloud environments
- Load distribution: Prevents hotspots by distributing load across zones
Configuring Availability Zones
Each node must have zone and region labels applied for Topology Aware Hints to function:
# Label a node with a zone
kubectl label nodes <node-name> topology.kubernetes.io/zone=us-east-1a
# Label a node with a region
kubectl label nodes <node-name> topology.kubernetes.io/region=us-east-1
Replace <node-name> with your actual node names and adjust the zone/region values to match your deployment geography.
Note: Labels applied via kubectl label are automatically persistent and will survive node restarts.
Verify Topology Configuration
Verify labels are applied:
kubectl get nodes --show-labels | grep topology.kubernetes.io
Verify EndpointSlices are being generated with hints:
kubectl get endpointslices
Requirements for Topology Aware Hints
For Topology Aware Hints to activate:
- Minimum Nodes: At least one node must be labeled with each zone referenced by endpoints
- Symmetry: The control plane checks for sufficient CPU capacity across zones to balance traffic
- Zone Coverage: All zones with endpoints should have at least one ready node
Integration with Pod Anti-Affinity
Topology labels complement the pod anti-affinity rules already configured in the Helm chart:
- Pod Anti-Affinity: Handles pod-to-node placement to ensure high availability
- Topology Aware Hints: Handles service-to-pod traffic routing to keep requests within the same zone
Together, these features optimize both placement and routing for improved performance.
Fallback Behavior
If zone labels are not configured, the system falls back to random load-balancing across all available pods. This is functionally correct but may result in:
- Increased cross-zone traffic
- Higher latency for some requests
- Less predictable performance characteristics
Kernel Network Tuning (sysctl)
For high-throughput deployments, tuning Linux kernel network parameters can significantly improve connection handling and overall system performance. These settings are particularly beneficial for environments with high connection rates or large numbers of concurrent connections.
Recommended sysctl Settings
Apply the following settings to optimize network performance:
# Networking
net.core.somaxconn = 1024
net.core.netdev_max_backlog = 2048
net.ipv4.tcp_max_syn_backlog = 2048
# Connection Tracking
net.netfilter.nf_conntrack_max = 131072
net.netfilter.nf_conntrack_tcp_timeout_established = 1200
# Port Reuse
net.ipv4.ip_local_port_range = 10240 65535
net.ipv4.tcp_tw_reuse = 1
# Memory Buffers
net.core.rmem_max = 8388608
net.core.wmem_max = 8388608
Setting Descriptions
| Parameter | Recommended Value | Purpose |
|---|---|---|
net.core.somaxconn | 1024 | Maximum socket listen backlog. Increases pending connection queue size. |
net.core.netdev_max_backlog | 2048 | Maximum packets queued at network device level. Helps handle burst traffic. |
net.ipv4.tcp_max_syn_backlog | 2048 | Maximum SYN requests queued. Improves handling of connection floods. |
net.netfilter.nf_conntrack_max | 131072 | Maximum tracked connections. Prevents connection tracking table exhaustion. |
net.netfilter.nf_conntrack_tcp_timeout_established | 1200 | Timeout for established connections (seconds). Reduces stale entry buildup. |
net.ipv4.ip_local_port_range | 10240 65535 | Range of local ports for outbound connections. Expands available ephemeral ports. |
net.ipv4.tcp_tw_reuse | 1 | Allows reusing TIME_WAIT sockets. Reduces port exhaustion under high load. |
net.core.rmem_max | 8388608 | Maximum receive socket buffer size (8MB). Improves high-bandwidth transfers. |
net.core.wmem_max | 8388608 | Maximum send socket buffer size (8MB). Improves high-bandwidth transfers. |
Applying Settings
Temporary (Until Reboot)
Apply settings immediately but they will be lost on reboot:
sudo sysctl -w net.core.somaxconn=1024
sudo sysctl -w net.core.netdev_max_backlog=2048
# ... repeat for each parameter
Persistent (Across Reboots)
Add settings to /etc/sysctl.conf or a file in /etc/sysctl.d/:
# Create a dedicated config file
cat <<EOF | sudo tee /etc/sysctl.d/99-cdn-manager.conf
# CDN Manager Network Tuning
net.core.somaxconn = 1024
net.core.netdev_max_backlog = 2048
net.ipv4.tcp_max_syn_backlog = 2048
net.netfilter.nf_conntrack_max = 131072
net.netfilter.nf_conntrack_tcp_timeout_established = 1200
net.ipv4.ip_local_port_range = 10240 65535
net.ipv4.tcp_tw_reuse = 1
net.core.rmem_max = 8388608
net.core.wmem_max = 8388608
EOF
# Apply all settings
sudo sysctl -p /etc/sysctl.d/99-cdn-manager.conf
Kubernetes Considerations
For Kubernetes deployments, these sysctl settings can be applied via:
- Node-level configuration: Use DaemonSets or node provisioning scripts
- Pod-level safe sysctls: Some sysctls can be set per-pod via
securityContext.sysctls - Container runtime configuration: Configure via container runtime options
Note that some sysctls require privileged containers or node-level configuration.
Monitoring Impact
After applying these settings, monitor:
- Connection establishment rates
- TIME_WAIT socket count:
netstat -n | grep TIME_WAIT | wc -l - Connection tracking table usage:
cat /proc/sys/net/netfilter/nf_conntrack_count - Network buffer utilization via Grafana dashboards
Resource Configuration
Horizontal Pod Autoscaler (HPA)
The default HPA configuration is tuned for production workloads. For environments with variable load, consider adjusting the scale metrics:
| Component | Default Scale Metrics | Tuning Consideration |
|---|---|---|
| Core Manager | CPU 50%, Memory 80% | Lower CPU threshold for faster scale-out |
| NGinx Gateway | CPU 75%, Memory 80% | Increase for cost optimization |
| MIB Frontend | CPU 75%, Memory 90% | Adjust based on operator concurrency |
For detailed HPA configuration, see the Architecture Guide.
Resource Requests and Limits
Ensure resource requests and limits are appropriately sized for your workload. Under-provisioned resources can cause:
- Pod evictions during high load
- Increased latency due to CPU throttling
- Slow scaling responses
Refer to the Configuration Guide for preset configurations and planning guidance.
Database Optimization
PostgreSQL
The PostgreSQL cluster is managed by the Cloudnative PG operator. For improved performance:
- Connection Pooling: The application uses connection pooling by default
- Replica Usage: Read queries can be offloaded to replicas for read-heavy workloads
- Backup Scheduling: Schedule backups during low-traffic periods to minimize I/O impact
Redis
Redis provides in-memory caching for sessions and ephemeral state:
- Memory Allocation: Ensure sufficient memory for cache hit rates
- Persistence: RDB snapshots are enabled; adjust frequency based on durability needs
Kafka
Kafka handles event streaming for selection input and metrics:
- Partition Count: Default partitions are sized for typical workloads
- Replication Factor: Production deployments use 3 replicas for fault tolerance
- Consumer Groups: The Selection Input Worker is limited to one consumer per partition
Monitoring Performance
Key Metrics to Watch
Monitor the following metrics for performance insights:
- API Response Time: Track via Grafana dashboards
- Pod CPU/Memory Usage: Identify resource bottlenecks
- Kafka Lag: Monitor consumer lag for selection input processing
- Database Connections: Watch for connection pool exhaustion
Grafana Dashboards
Pre-built dashboards are available at https://<manager-host>/grafana:
- System Health: Overall cluster and application health
- CDN Metrics: Routing and usage statistics
- Resource Utilization: CPU, memory, and network usage per component
Troubleshooting Performance Issues
High Latency
- Check pod distribution across nodes:
kubectl get pods -o wide - Verify topology labels are applied:
kubectl get nodes --show-labels - Review network latency between nodes
- Check for resource contention:
kubectl top pods
Slow Scaling
- Verify HPA is enabled:
kubectl get hpa - Check cluster capacity for scheduling new pods
- Review HPA metrics:
kubectl describe hpa acd-manager
Database Performance
- Check PostgreSQL cluster status:
kubectl get pods -l app=postgresql - Review slow query logs (if enabled)
- Monitor connection pool usage
Next Steps
After reviewing performance tuning:
- Architecture Guide - Understand component interactions
- Configuration Guide - Detailed configuration options
- Metrics & Monitoring Guide - Comprehensive monitoring setup
- Troubleshooting Guide - Resolve performance issues
10.8 - Operations Guide
Overview
This guide covers day-to-day operational procedures for managing the AgileTV CDN Manager (ESB3027). Topics include routine maintenance, backup procedures, log management, and common operational tasks.
Prerequisites
Before performing operations, ensure you have:
kubectlaccess to the clusterhelmCLI installed- Access to the node where
values.yamlis stored - Appropriate RBAC permissions for administrative tasks
Cluster Access
There are two supported methods for accessing the Kubernetes cluster:
- SSH to a Server Node (Recommended for operations staff) - SSH into any Server node and run
kubectlcommands directly - Remote kubectl - Install
kubectlon your local machine and configure it to connect to the cluster remotely
Method 1: SSH to Server Node (Recommended)
The kubectl command-line tool is pre-configured on all Server nodes and can be used directly without additional setup:
# SSH to any Server node
ssh root@<server-ip>
# Run kubectl commands directly
kubectl get nodes
kubectl get pods
This method is recommended for day-to-day operations as it requires no local configuration and provides direct access to the cluster.
Method 2: Remote kubectl from Local Machine
To use kubectl from your local workstation or laptop:
Step 1: Install kubectl
Download and install kubectl for your operating system:
- Official Documentation: Install kubectl
- macOS (Homebrew):
brew install kubectl - Linux: Download from the official Kubernetes release page
- Windows: Download from the official Kubernetes release page
Step 2: Copy kubeconfig from Server Node
# Copy kubeconfig from any Server node
scp root@<server-ip>:/etc/rancher/k3s/k3s.yaml ~/.kube/config
Step 3: Update kubeconfig
Edit the kubeconfig file to point to the correct server address:
# Replace localhost with the actual server IP
# macOS/Linux:
sed -i '' 's/127.0.0.1/<server-ip>/g' ~/.kube/config # macOS
sed -i 's/127.0.0.1/<server-ip>/g' ~/.kube/config # Linux
# Or manually edit ~/.kube/config and change:
# server: https://127.0.0.1:6443
# to:
# server: https://<server-ip>:6443
Step 4: Verify connectivity
kubectl get nodes
Managing Multiple Clusters
If you manage multiple Kubernetes clusters from the same machine, you can maintain multiple kubeconfig files:
# Set KUBECONFIG environment variable to include multiple config files
export KUBECONFIG=~/.kube/config-prod:~/.kube/config-lab
# View all contexts
kubectl config get-contexts
# Switch between clusters
kubectl config use-context <context-name>
# View current context
kubectl config current-context
For more information, see the official Kubernetes documentation: Organizing Cluster Access
Helm Commands
Helm releases are managed cluster-wide:
# List all releases
helm list
# View release history
helm history acd-manager
# Get deployed values
helm get values acd-manager -o yaml
# Get deployed manifest
helm get manifest acd-manager
Note: If using remote kubectl, ensure helm is installed on your local machine. See Helm Installation for instructions.
Helm Commands
Helm releases are managed cluster-wide:
# List all releases
helm list
# View release history
helm history acd-manager
# Get deployed values
helm get values acd-manager -o yaml
# Get deployed manifest
helm get manifest acd-manager
Backup Procedures
PostgreSQL Backup
PostgreSQL is managed by the Cloudnative PG operator, which provides continuous backup capabilities.
# Check backup status
kubectl get backup
# Create manual backup
kubectl apply -f - <<EOF
apiVersion: postgresql.cnpg.io/v1
kind: Backup
metadata:
name: manual-backup-$(date +%Y%m%d-%H%M%S)
spec:
cluster:
name: acd-cluster-postgresql
EOF
# List available backups
kubectl get backup -o wide
# Restore from backup (requires downtime)
# See Upgrade Guide for restore procedures
Longhorn Volume Backups
Longhorn provides snapshot and backup capabilities for persistent volumes:
# List all volumes
kubectl get volumes -n longhorn-system
# Create snapshot via Longhorn UI
# Port-forward to Longhorn UI (do not expose via ingress)
kubectl port-forward -n longhorn-system svc/longhorn-frontend 8080:80
# Access: http://localhost:8080
# WARNING: Longhorn UI grants access to sensitive storage information
# and should never be exposed through the ingress controller
Accessing Internal Services
For debugging and troubleshooting, you may need direct access to internal services.
PostgreSQL
PostgreSQL is managed by the Cloudnative PG operator. Connection details are stored in the acd-cluster-postgresql-app Secret:
# View connection details
kubectl describe secret acd-cluster-postgresql-app
# Extract individual fields
PG_HOST=$(kubectl get secret acd-cluster-postgresql-app -o jsonpath='{.data.host}' | base64 -d)
PG_USER=$(kubectl get secret acd-cluster-postgresql-app -o jsonpath='{.data.username}' | base64 -d)
PG_PASS=$(kubectl get secret acd-cluster-postgresql-app -o jsonpath='{.data.password}' | base64 -d)
PG_DB=$(kubectl get secret acd-cluster-postgresql-app -o jsonpath='{.data.dbname}' | base64 -d)
# Connect via psql
kubectl exec -it acd-cluster-postgresql-0 -- psql -U $PG_USER -d $PG_DB
Secret fields: The CNPG operator populates the following fields: username, password, host, port, dbname, uri, jdbc-uri, fqdn-uri, fqdn-jdbc-uri, pgpass.
Redis
Redis runs on port 6379 with no authentication:
# Connect via redis-cli
kubectl exec -it acd-manager-redis-master-0 -- redis-cli
# Or connect from another pod
kubectl run redis-test --rm -it --image=redis -- redis-cli -h acd-manager-redis-master
Kafka
kafka-topics.sh –bootstrap-server
The selection_input topic is pre-configured for selection input events.
Kubernetes Port Forwarding
For accessing internal Kubernetes services that are not exposed via ingress or services, use kubectl port-forward to create a secure tunnel from your local machine to the service.
Basic Port Forwarding
# Forward local port to a service
kubectl port-forward -n <namespace> svc/<service-name> <local-port>:<service-port>
# Example: Forward local port 8080 to Grafana (port 3000)
kubectl port-forward -n default svc/acd-manager-grafana 8080:3000
Note: “Local” refers to the machine where you run kubectl. This can be:
- A Server node in the cluster (common for administrative tasks)
- A remote machine with
kubectlconfigured to access the cluster
Accessing the Forwarded Service
Once the port-forward is established, access the service at http://localhost:<local-port> from the machine where you ran kubectl port-forward.
If running on a Server node: To access the forwarded port from your local workstation:
- Ensure the firewall on the Server node allows traffic on the forwarded port from your network
- Use the Server node’s IP address instead of
localhostfrom your workstation
# From your workstation (if firewall allows)
curl http://<server-node-ip>:<local-port>
For simplicity, consider running port-forward from your local machine (if kubectl is configured for remote cluster access) rather than from a Server node.
Background Port Forwarding
To run port-forward in the background:
kubectl port-forward -n <namespace> svc/<service-name> <local-port>:<service-port> &
Security Considerations
Port forwarding is recommended for:
- Administrative interfaces (e.g., Longhorn UI) that should not be publicly exposed
- Debugging and troubleshooting internal services
- Temporary access to services without modifying ingress configuration
The port-forward tunnel remains active only while the kubectl port-forward command is running. Press Ctrl+C to terminate the tunnel.
Example: The Longhorn storage UI is intentionally not exposed via ingress due to security risks. Access it via port-forward:
kubectl port-forward -n longhorn-system svc/longhorn-frontend 8080:80Then navigate to
http://localhost:8080in your browser.
Longhorn Storage
Longhorn is a distributed block storage system for Kubernetes that provides persistent volumes for stateful applications such as PostgreSQL and Kafka.
Architecture
Longhorn deploys controller and replica engines on each node, forming a distributed storage system. When a volume is created, Longhorn replicates data across multiple nodes to ensure durability even in the event of node failures.
Storage Protocols:
- iSCSI: Used for standard Read-Write-Once (RWO) volumes
- NFS: Used for Read-Write-Many (RWX) volumes that can be mounted by multiple pods simultaneously
Configuration
The CDN Manager deploys Longhorn with a single replica configuration, which differs from the Longhorn default of 3 replicas. This configuration is optimized for the cluster architecture where:
- Pod-node affinity is configured to schedule pods on the same node as their persistent volume data
- This optimizes I/O performance by reducing network traffic
- Data locality is maintained while still providing volume portability
Capacity Planning
Longhorn storage requires an additional 30% capacity headroom for internal operations and scaling. If less than 30% of the total partition capacity is available, Longhorn may mark volumes as “full” and prevent further writes.
For detailed storage requirements and disk partitioning guidance, see the System Requirements Guide.
Configuration Backup
Always backup your Helm values before making changes:
# Export current values
helm get values acd-manager -o yaml > ~/values-backup-$(date +%Y%m%d).yaml
# Backup custom values files
cp ~/values.yaml ~/values-backup-$(date +%Y%m%d).yaml
Backup Schedule Recommendations
| Component | Frequency | Retention |
|---|---|---|
| PostgreSQL | Daily | 30 days |
| Longhorn Snapshots | Before changes | 7 days |
| Configuration | Before each change | Indefinite |
Updating MaxMind GeoIP Databases
The MaxMind GeoIP databases (GeoIP2-City, GeoLite2-ASN, GeoIP2-Anonymous-IP) are used for GeoIP-based routing and validation features. These databases should be updated periodically to ensure accurate IP geolocation data.
Prerequisites
- Updated MaxMind database files (
.mmdbformat) obtained from MaxMind - Access to the cluster via
kubectl - Helm CLI installed
Update Procedure
Step 1: Create New Volume with Updated Databases
Run the volume generation utility with a unique volume name that includes a revision identifier:
# Mount the installation ISO if not already mounted
mkdir -p /mnt/esb3027
mount -o loop,ro esb3027-acd-manager-X.Y.Z.iso /mnt/esb3027
# Generate new volume with updated databases
/mnt/esb3027/generate-maxmind-volume
When prompted:
- Provide the paths to the three database files:
GeoIP2-City.mmdbGeoLite2-ASN.mmdbGeoIP2-Anonymous-IP.mmdb
- Enter a unique volume name with a revision number or date, for example:
maxmind-geoip-2026-04maxmind-geoip-v2
Tip: Using a revision-based naming convention simplifies rollback if needed.
Step 2: Update Helm Configuration
Edit your values.yaml file to reference the new volume:
manager:
maxmindDbVolume: maxmind-geoip-2026-04
Replace maxmind-geoip-2026-04 with the volume name you specified in Step 1.
Step 3: Apply Configuration Update
Upgrade the Helm release with the updated configuration:
helm upgrade acd-manager /mnt/esb3027/charts/acd-manager --values ~/values.yaml
Step 4: Rolling Restart (Optional)
To ensure all pods immediately use the new database files, perform a rolling restart of the manager deployment:
kubectl rollout restart deployment acd-manager
Monitor the rollout status:
kubectl rollout status deployment acd-manager
Step 5: Verify Update
Verify the pods are running with the new volume:
kubectl get pods
kubectl describe pod -l app.kubernetes.io/component=manager | grep -A 5 "Volumes"
Step 6: Clean Up Old Volume (Optional)
After verifying the new databases are working correctly, you can delete the old persistent volume:
# List persistent volumes to find the old one
kubectl get pv
# Delete the old volume
kubectl delete pv <old-volume-name>
Caution: Ensure the new volume is functioning correctly before deleting the old volume. Keep the old volume for at least 24-48 hours as a rollback option.
Rollback Procedure
If issues occur after updating the databases:
- Revert the
maxmindDbVolumevalue in yourvalues.yamlto the previous volume name - Run
helm upgradewith the reverted configuration - Optionally restart the deployment:
kubectl rollout restart deployment acd-manager
Update Frequency Recommendations
| Database | Recommended Update Frequency |
|---|---|
| GeoIP2-City | Weekly or monthly |
| GeoLite2-ASN | Monthly |
| GeoIP2-Anonymous-IP | Weekly or monthly |
MaxMind releases database updates on a regular schedule. Subscribe to MaxMind notifications to stay informed of new releases.
Log Management
Application Logs
# View manager logs
kubectl logs -l app.kubernetes.io/component=manager
# Follow logs in real-time
kubectl logs -l app.kubernetes.io/component=manager -f
# View logs from specific pod
kubectl logs <pod-name>
# View previous instance logs (after crash)
kubectl logs <pod-name> -p
# View logs with timestamps
kubectl logs <pod-name> --timestamps
# View logs from all containers in pod
kubectl logs <pod-name> --all-containers
Component-Specific Logs
# Zitadel logs
kubectl logs -l app.kubernetes.io/name=zitadel
# Gateway logs
kubectl logs -l app.kubernetes.io/component=gateway
# Confd logs
kubectl logs -l app.kubernetes.io/component=confd
# MIB Frontend logs
kubectl logs -l app.kubernetes.io/component=mib-frontend
# PostgreSQL logs
kubectl logs -l app.kubernetes.io/name=postgresql
# Kafka logs
kubectl logs -l app.kubernetes.io/name=kafka
# Redis logs
kubectl logs -l app.kubernetes.io/name=redis
Log Aggregation
Logs are collected by Telegraf and sent to VictoriaMetrics:
# Access Grafana for log visualization
# https://<manager-host>/grafana
# Query logs via Grafana Explore
# Select VictoriaMetrics datasource and use log queries
Log Rotation
Container logs are automatically rotated by Kubernetes:
- Default max size: 10MB per container
- Default max files: 5 rotated files
- Total per pod: ~50MB maximum
Scaling Operations
Manual Scaling
Note: If HPA (Horizontal Pod Autoscaler) is enabled for a deployment, manual scaling changes will be overridden by the HPA. To manually scale, you must first disable the HPA.
# Check if HPA is enabled
kubectl get hpa
# Disable HPA before manual scaling
kubectl patch hpa acd-manager -p '{"spec": {"minReplicas": null, "maxReplicas": null}}'
# Or delete the HPA entirely
kubectl delete hpa acd-manager
# Scale manager replicas
kubectl scale deployment acd-manager --replicas=3
# Scale gateway replicas
kubectl scale deployment acd-manager-gateway --replicas=2
# Scale MIB frontend replicas
kubectl scale deployment acd-manager-mib-frontend --replicas=2
HPA Configuration
# View HPA status
kubectl get hpa
# Describe HPA details
kubectl describe hpa acd-manager
# Edit HPA configuration
kubectl edit hpa acd-manager
Configuration Updates
Updating Helm Values
# Edit values file
vi ~/values.yaml
# Validate with dry-run
helm upgrade acd-manager /mnt/esb3027/charts/acd-manager \
--values ~/values.yaml \
--dry-run
# Apply changes
helm upgrade acd-manager /mnt/esb3027/charts/acd-manager \
--values ~/values.yaml
# Verify rollout
kubectl rollout status deployment/acd-manager
Rolling Back Changes
# View revision history
helm history acd-manager
# Rollback to previous revision
helm rollback acd-manager
# Rollback to specific revision
helm rollback acd-manager <revision>
# Verify rollback
helm history acd-manager
Certificate Management
Checking Certificate Expiration
# Check TLS secret expiration
kubectl get secret acd-manager-tls -o jsonpath='{.data.tls\.crt}' | base64 -d | openssl x509 -noout -dates
# Check via Grafana dashboard
# Certificate expiration metrics are available in Grafana
Renewing Certificates
# For Helm-managed self-signed certificates
helm upgrade acd-manager /mnt/esb3027/charts/acd-manager \
--values ~/values.yaml \
--set ingress.selfSigned=true
# For manual certificates, update the secret
kubectl create secret tls acd-manager-tls \
--cert=new-tls.crt \
--key=new-tls.key \
--dry-run=client -o yaml | kubectl apply -f -
# Restart pods to pick up new certificate
kubectl rollout restart deployment acd-manager
Health Checks
Component Health
# Check all pods
kubectl get pods
# Check specific component
kubectl get pods -l app.kubernetes.io/component=manager
# Check persistent volumes
kubectl get pvc
# Check cluster status
kubectl get nodes
# Check ingress
kubectl get ingress
API Health Endpoints
# Liveness check
curl -k https://<manager-host>/api/v1/health/alive
# Readiness check
curl -k https://<manager-host>/api/v1/health/ready
Database Health
# PostgreSQL cluster status
kubectl get clusters -n default
# Check PostgreSQL pods
kubectl get pods -l app.kubernetes.io/name=postgresql
# Kafka cluster status
kubectl get pods -l app.kubernetes.io/name=kafka
# Redis status
kubectl get pods -l app.kubernetes.io/name=redis
Maintenance Windows
Planned Maintenance
Before performing maintenance:
- Notify users of potential service impact
- Verify backups are current
- Document the maintenance procedure
- Prepare rollback plan
Node Maintenance
# Cordon node to prevent new pods
kubectl cordon <node-name>
# Drain node (evict pods)
kubectl drain <node-name> --ignore-daemonsets --delete-emptydir-data
# Perform maintenance
# Uncordon node
kubectl uncordon <node-name>
Cluster Upgrades
See the Upgrade Guide for cluster upgrade procedures.
Troubleshooting Quick Reference
Common Commands
# Describe problematic pod
kubectl describe pod <pod-name>
# View pod events
kubectl get events --sort-by='.lastTimestamp'
# Check resource usage
kubectl top pods
kubectl top nodes
# Exec into container
kubectl exec -it <pod-name> -- /bin/sh
# Check network policies
kubectl get networkpolicies
# Check service endpoints
kubectl get endpoints
Restarting Components
# Restart deployment
kubectl rollout restart deployment/<deployment-name>
# Restart statefulset
kubectl rollout restart statefulset/<statefulset-name>
# Delete pod (auto-recreated)
kubectl delete pod <pod-name>
Security Operations
Rotating Service Account Tokens
# Delete service account secret (auto-regenerated)
kubectl delete secret <service-account-token-secret>
# Tokens are automatically regenerated
Updating RBAC Permissions
# View current roles
kubectl get roles
kubectl get clusterroles
# View role bindings
kubectl get rolebindings
kubectl get clusterrolebindings
# Edit role
kubectl edit role <role-name>
Audit Log Access
# K3s audit logs location
/var/lib/rancher/k3s/server/logs/audit.log
# View recent audit events
tail -f /var/lib/rancher/k3s/server/logs/audit.log
Disaster Recovery
Pod Recovery
Pods are automatically recreated if they fail:
# Check pod status
kubectl get pods
# If pod is stuck in Terminating
kubectl delete pod <pod-name> --force --grace-period=0
# If pod is stuck in Pending, check resources
kubectl describe pod <pod-name>
kubectl get events --sort-by='.lastTimestamp'
Node Failure Recovery
When a node fails:
- Automatic: Pods are rescheduled on healthy nodes (after timeout)
- Manual: Force delete stuck pods
# Force delete pods on failed node
kubectl delete pod --all --force --grace-period=0 \
--field-selector spec.nodeName=<failed-node>
Data Recovery
For data recovery scenarios, refer to:
- PostgreSQL: Cloudnative PG backup/restore procedures
- Longhorn: Volume snapshot restoration
- Kafka: Partition replication handles node failures
Routine Maintenance Checklist
Daily
- Review Grafana dashboards for anomalies
- Check alert notifications
- Verify backup completion
Weekly
- Review pod restart counts
- Check certificate expiration dates
- Review log storage usage
- Verify HPA is functioning correctly
Monthly
- Test backup restoration procedure
- Review and rotate credentials if needed
- Update documentation if configuration changed
- Review resource utilization trends
Next Steps
After mastering operations:
- Troubleshooting Guide - Deep dive into problem resolution
- Performance Tuning Guide - Optimize system performance
- Metrics & Monitoring Guide - Comprehensive monitoring setup
- API Guide - REST API reference and automation
10.9 - Metrics & Monitoring Guide
Overview
The CDN Manager includes a comprehensive monitoring stack based on VictoriaMetrics for time-series data storage, Telegraf for metrics collection, and Grafana for visualization. This guide describes the monitoring architecture and how to access and use the monitoring capabilities.
Quick Links
| Guide | Description |
|---|---|
| Grafana Dashboards | Using and customising the built-in and advanced Grafana dashboards |
| Grafana Authentication & Roles | Configuring Grafana authentication, roles, and permissions |
| Alerts & Alarms | Configuring and managing alerts and alarms |
Architecture
Components
| Component | Purpose |
|---|---|
| Telegraf | Metrics collector running on each node, gathering system and application metrics |
| VictoriaMetrics Agent | Metrics scraper and forwarder; scrapes Prometheus endpoints and forwards to VictoriaMetrics |
| VictoriaMetrics (Short-term) | Time-series database for operational dashboards (30-90 day retention) |
| VictoriaMetrics (Long-term) | Time-series database for billing and compliance (1+ year retention) |
| Grafana | Visualization and dashboard platform; deployed as two replicas for high availability |
| Alertmanager | Alert routing and notification management |
Metrics Flow
The following diagram illustrates how metrics flow through the monitoring stack:
flowchart TB
subgraph External["External Sources"]
Streamers[Streamers/External Clients]
end
subgraph Cluster["Kubernetes Cluster"]
Telegraf[Telegraf DaemonSet]
subgraph Applications["Application Components"]
Director[CDN Director]
Kafka[Kafka]
Redis[Redis]
Manager[ACD Manager]
Alertmanager[Alertmanager]
end
VMAgent[VictoriaMetrics Agent]
subgraph Storage["Storage"]
VMShort[VictoriaMetrics<br/>Short-term]
VMLong[VictoriaMetrics<br/>Long-term]
end
Grafana[Grafana<br/>2 replicas, HA]
PostgreSQL[(PostgreSQL)]
Zitadel[Zitadel]
end
Streamers -->|Push metrics| Telegraf
Telegraf -->|remote_write| VMShort
Telegraf -->|remote_write| VMLong
Director -->|Scrape| VMAgent
Kafka -->|Scrape| VMAgent
Redis -->|Scrape| VMAgent
Manager -->|Scrape| VMAgent
Alertmanager -->|Scrape| VMAgent
VMAgent -->|remote_write| VMShort
VMAgent -->|remote_write| VMLong
VMShort -->|Query| Grafana
VMLong -->|Query| Grafana
Grafana <-->|Shared state| PostgreSQL
Grafana -->|OAuth2 / OIDC| ZitadelMetrics Flow Summary:
External metrics ingestion:
- External clients (streamers) push metrics to Telegraf
- Telegraf forwards metrics via
remote_writeto both VictoriaMetrics instances
Internal metrics scraping:
- VictoriaMetrics Agent scrapes Prometheus endpoints from:
- CDN Director instances
- Kafka cluster
- Redis
- ACD Manager components
- Alertmanager
- VMAgent forwards scraped metrics via
remote_writeto both VictoriaMetrics instances
- VictoriaMetrics Agent scrapes Prometheus endpoints from:
Data visualization:
- Grafana queries both VictoriaMetrics databases depending on the dashboard requirements
- Operational dashboards use short-term storage
- Billing and compliance dashboards use long-term storage
Metrics Collection
Application Metrics
Applications expose metrics on Prometheus-compatible endpoints. VictoriaMetrics Agent (VMAgent) scrapes these endpoints and forwards metrics to VictoriaMetrics via remote_write.
System Metrics
Telegraf collects system-level metrics including:
- CPU usage
- Memory utilization
- Disk I/O
- Network statistics
- Process metrics
Kubernetes Metrics
Cluster metrics are collected including:
- Pod resource usage
- Node status
- Deployment status
- Persistent volume usage
Metrics Retention
VictoriaMetrics is configured with default retention policies. For custom retention settings, modify the VictoriaMetrics configuration in your values.yaml:
acd-metrics:
victoria-metrics-single:
retentionPeriod: "3" # Retention period in months
Troubleshooting
Metrics Not Appearing
If metrics are not appearing in Grafana:
Check Telegraf pods:
kubectl get pods -l app.kubernetes.io/component=telegrafCheck Telegraf logs:
kubectl logs -l app.kubernetes.io/component=telegrafVerify VictoriaMetrics is running:
kubectl get pods -l app.kubernetes.io/component=victoria-metricsCheck application metrics endpoints:
kubectl exec <pod-name> -- curl localhost:8080/metrics
For dashboard and authentication issues, see the Grafana Dashboards and Grafana Authentication & Roles guides.
Next Steps
After setting up monitoring:
- Grafana Authentication & Roles - Configure SSO and permissions before accessing Grafana
- Grafana Dashboards - Explore and customise dashboards
- Alerts & Alarms - Set up alerting and notifications
- Operations Guide - Day-to-day operational procedures
- Troubleshooting Guide - Resolve monitoring issues
- API Guide - Access metrics via API
10.9.1 - Grafana Authentication & Roles
Overview
Grafana authentication is delegated entirely to Zitadel via OAuth2/OIDC. Local username/password login is not available to end users. When a user logs into Grafana, they are redirected to Zitadel to authenticate, and their Grafana role is automatically determined by the Zitadel project roles assigned to their account.
The OIDC integration between Grafana and Zitadel is configured automatically at install time — no manual Zitadel application registration is required.
How It Works
During installation, an init container runs before Grafana starts and:
- Authenticates with Zitadel using a machine-account service key.
- Registers a
GrafanaOIDC application in the Zitadel project (or re-uses an existing one if already registered). - Writes the resulting
client_idandclient_secretinto a Kubernetes Secret, which Grafana picks up on startup.
This means the Grafana OIDC application in Zitadel is managed automatically and does not need to be created or modified manually.
Role Mapping
Grafana roles are mapped from Zitadel project roles using the following rule:
| Zitadel Project Role | Grafana Role |
|---|---|
grafana_admin | Admin — full access, can manage users, datasources, and dashboards |
| (any other role, or no role) | Viewer — read-only access to dashboards |
Note: There is no Grafana
Editorrole mapped by default. All authenticated users who are not explicitly grantedgrafana_adminreceive Viewer access. If you need an Editor tier, see Customising the Role Mapping.
The mapping is enforced on every login. If a user’s Zitadel role changes, the change takes effect the next time they log into Grafana.
Prerequisites
- Zitadel is configured and accessible at
https://<manager-host> - At least one Zitadel user account exists (see Next Steps — Create User Accounts)
- Grafana is accessed via the correct DNS hostname (see Accessing Grafana)
Accessing Grafana
Grafana is accessible at:
https://<manager-host>/grafana
Important: Grafana must be accessed using the DNS name specified in the first entry of
global.hosts.managerin your configuration. Accessing Grafana via an IP address or an alternative hostname will cause OAuth2 redirect URI mismatches and CORS errors, preventing login from completing successfully.
To log in:
- Navigate to
https://<manager-host>/grafana - Click “Login with Zitadel”
- Authenticate with your Zitadel account credentials
Granting Admin Access
By default, all Zitadel users who log into Grafana receive Viewer access. To grant a user Admin access, assign them the grafana_admin project role in Zitadel.
Step 1: Ensure the grafana_admin Role Exists
- Log into the Zitadel Console at
https://<manager-host>/ui/console - Navigate to Projects and open the ZITADEL project
- Click the Roles tab
- Check whether a role named
grafana_adminalready exists - If it does not exist, click New Role and create it:
- Key:
grafana_admin - Display Name: Grafana Admin (or any label you prefer)
- Click Save
- Key:
Step 2: Assign the Role to a User
- In the Zitadel Console, navigate to Users and open the user you want to grant admin access to
- Click the Authorizations tab
- Click New Authorization
- Select the ZITADEL project
- Select the
grafana_adminrole - Click Save
The user will have Grafana Admin access the next time they log in.
Revoking Admin Access
To demote a user back to Viewer, remove the grafana_admin authorization from their account:
- In the Zitadel Console, open the user’s Authorizations tab
- Find the
grafana_adminauthorization on the ZITADEL project - Click the delete icon to remove it
The change takes effect on their next Grafana login.
Customising the Role Mapping
The role mapping expression is configured in values.yaml under grafana."grafana.ini".auth.generic_oauth.role_attribute_path. It uses JMESPath syntax evaluated against the OIDC token’s role claims.
The default expression is:
grafana:
"grafana.ini":
auth.generic_oauth:
role_attribute_path: >-
contains(keys("urn:zitadel:iam:org:project:roles"), 'grafana_admin') && 'Admin' || 'Viewer'
Example: Adding an Editor Tier
To map a grafana_editor Zitadel role to Grafana’s Editor role, create the grafana_editor role in Zitadel (following the same steps as above) and extend the expression:
grafana:
"grafana.ini":
auth.generic_oauth:
role_attribute_path: >-
contains(keys("urn:zitadel:iam:org:project:roles"), 'grafana_admin') && 'Admin'
|| contains(keys("urn:zitadel:iam:org:project:roles"), 'grafana_editor') && 'Editor'
|| 'Viewer'
Apply the change using the standard upgrade procedure in the Configuration Guide.
Blocking Unauthenticated Access
By default, role_attribute_strict is set to false, which means any authenticated Zitadel user can log into Grafana as a Viewer even if they have no explicit Grafana role assigned. To restrict Grafana access to only users who have been explicitly granted a role, set this to true:
grafana:
"grafana.ini":
auth.generic_oauth:
role_attribute_strict: true
With role_attribute_strict: true, users who do not match any role in the role_attribute_path expression will be denied access entirely.
Managing Users in Grafana
User accounts in Grafana are created automatically on first login via Zitadel. There is no need to pre-create users in the Grafana UI.
To view and manage users who have logged in:
- Log into Grafana as an Admin
- Navigate to Administration > Users and access > Users
From here you can see each user’s current role, last login time, and authentication provider. Role changes should always be made via Zitadel (as described above) rather than directly in Grafana, as they will be overwritten on the user’s next login.
Break-Glass Admin Access
A local Grafana admin account is available as a break-glass fallback for situations where Zitadel is unavailable. This account is not accessible via the standard login page (which only shows the Zitadel SSO button).
To use the local admin account, navigate directly to:
https://<manager-host>/grafana/login
The default credentials are listed in the Glossary. Change the default password immediately after installation.
Security recommendation: The break-glass account should be used only for emergency access. Do not use it for routine administration.
Troubleshooting
OAuth2 Redirect URI Mismatch / CORS Errors
Grafana is registered in Zitadel with the redirect URI https://<manager-host>/grafana/login/generic_oauth, derived from the first entry of global.hosts.manager. Accessing Grafana via a different hostname or IP address will not match this URI and will cause the login to fail.
Resolution: Always access Grafana via the configured hostname. If the hostname has changed, re-run the helm upgrade to re-register the application with the updated URI.
User Receives Viewer Instead of Admin
The grafana_admin role is not included in the user’s Zitadel token.
Resolution:
- Confirm the
grafana_adminrole exists on the ZITADEL project in the Zitadel Console - Confirm the role is assigned to the user under their Authorizations tab
- Ask the user to log out of Grafana and log back in — role changes are applied on the next login, not the current session
Login Fails with “Role not found” or Access Denied
role_attribute_strict may be set to true and the user has no matching Zitadel role.
Resolution: Either assign the user an appropriate Zitadel project role, or set role_attribute_strict: false in values.yaml to allow all authenticated users Viewer access.
Admin Role Assigned in Zitadel but User Still Gets Viewer
The grafana_admin role is correctly assigned to the user in Zitadel, but Grafana still grants them Viewer access. This indicates that role claims are not being included in the Zitadel userinfo response.
Grafana determines roles by calling the Zitadel userinfo endpoint (/oidc/v1/userinfo) and evaluating the urn:zitadel:iam:org:project:roles claim. Zitadel only includes this claim when the Grafana OIDC application has Access Token Role Assertions enabled. If the claim is absent, the role_attribute_path expression always falls through to 'Viewer'.
To verify and fix:
- Log into the Zitadel Console at
https://<manager-host>/ui/console - Navigate to Projects > ZITADEL > Applications > Grafana
- Open the Token Settings tab
- Ensure Access Token Role Assertions is enabled
- Save the change
The fix takes effect on the user’s next login — no Grafana or Helm changes are required.
Grafana OIDC App Not Registered in Zitadel
If the init container failed during installation, the Grafana OIDC application may not have been created in Zitadel.
Resolution: Check the init container logs for errors:
kubectl logs -l app.kubernetes.io/component=grafana --previous -c zitadel-oauth-setup
Common causes are Zitadel not being ready when the init container ran, or a machine-key permission issue. Re-running the helm upgrade will re-trigger the init container and attempt registration again.
Next Steps
- Grafana Dashboards - Using and customising dashboards
- Alerts & Alarms - Configure alerting and notifications
- Metrics & Monitoring Overview - Return to the monitoring overview
10.9.2 - Grafana Dashboards
Overview
Grafana is the primary visualization platform for the CDN Manager monitoring stack. It provides pre-built dashboards for cluster health, application performance, and billing analytics, and is accessible via the manager ingress.
Prerequisites
- Grafana is deployed and running (verify with
kubectl get pods -l app.kubernetes.io/component=grafana) - A Zitadel user account is available for login
- Grafana is accessed via the correct DNS hostname (see Grafana Authentication & Roles)
Accessing Grafana
Grafana is accessible via the manager ingress:
URL: https://<manager-host>/grafana
To log in:
- Navigate to
https://<manager-host>/grafana - Click the “Login with Zitadel” button
- Authenticate with your Zitadel account credentials
Important: Grafana must be accessed using the DNS name specified in the first entry of
global.hosts.managerin your configuration. Accessing Grafana via an IP address or an alternative hostname will cause OAuth2 redirect URI mismatches and CORS errors, preventing login from completing successfully.
For details on authentication and role configuration, see Grafana Authentication & Roles.
Standard Dashboards
Accessing Dashboards
After logging into Grafana:
- Navigate to Dashboards in the left menu
- Browse the folder structure to find the dashboard you need
- Click on a dashboard to open it
Dashboards are organised into the following folders:
- Alerting — alert state history and alerting system health
- Billing — redirect counts for billing analytics
- CDN Manager — ACD Manager API performance
- Hardware — host-level CPU, memory, disk, and network telemetry
- Infrastructure — Kubernetes cluster, Kafka, Longhorn, and Redis health
- Streaming — CDN routing, streamer performance, and QoE
- Internal Debugging — low-level ACD Director diagnostics
Alerting
Active Alarms
A live view of all currently firing alerts. Shows the alert name, severity, affected host, and description. Use this as the first stop when investigating an active incident.
Alert Statistics
Historical view of alert firing activity over time. Shows which alert groups and individual rules have been firing, with timelines and trend charts. Useful for identifying recurring or flapping alerts.
vmalert
Operational health dashboard for the vmalert component itself. Covers evaluation rate, evaluation errors, alerting and recording rule counts, remote write throughput, and resource usage. Use this to verify the alerting pipeline is functioning correctly.
Billing
Billing Dashboard
Tracks redirect volumes for billing and usage analytics. Shows initial managed and unmanaged redirects, segment redirects, and endpoint redirects — both as totals and as ratios over time. Data is sourced from long-term VictoriaMetrics storage to support historical reporting.
CDN Manager
CDN Manager API
Health and performance dashboard for the ACD Manager REST API. Covers:
- Overview: API health status, active pod count, total request volume, 5xx error rate, and average latency
- Traffic: Request rate by pod, distribution across API endpoints
- Errors: 5xx errors per endpoint, response code breakdown per endpoint, error rate by pod
- Latency: P99 and average latency by endpoint, overall API response latency
- Resources & Auth: Route validation API activity
Hardware
HW Metrics
Condensed host hardware overview covering CPU usage and load averages, memory utilisation, network interface throughput, swap usage, and root filesystem disk space. Suitable for day-to-day health checks across all cluster nodes.
An expanded HW Metrics (Advanced) dashboard is available as part of the Advanced Dashboards licence.
Infrastructure
k3s Cluster Infrastructure
Kubernetes cluster health overview using node-exporter and kube-state-metrics. Covers:
- Cluster Overview: Node count, running pod count, OOMKilled containers, and overall cluster health status
- Compute: CPU usage, memory usage, and load average per node
- Network: Inbound and outbound bytes per node
- Disk: Read/write throughput and I/O pressure per node
- Longhorn PVC Disk Usage: Usage percentage per persistent volume
- Workload Health: Pod restart counts and OOMKill occurrences
Kafka
Kafka broker health using JMX exporter metrics. Covers:
- Cluster Health: Active controller, broker state, topic and partition counts, offline and under-replicated partitions, active and fenced broker counts, metadata log lag
- Throughput: Bytes in/out and messages in by topic, replication bytes in/out
- Internals: Request handler idle percentage, network processor idle percentage
Longhorn Storage
Persistent storage health for the Longhorn distributed block storage layer. Covers:
- Overview: Total, healthy, degraded, and faulted volume counts; nodes down
- Capacity: Total cluster capacity, used, and available storage
- Volume Detail: Usage percentage per volume, actual size per volume, volume robustness state, volumes approaching capacity (>85%)
- Node & Disk: Disk usage percentage and available bytes per node, node condition checks
Redis
Redis instance health using redis-exporter metrics. Covers:
- Instance Health: Status, uptime, connected and blocked clients, slow log length, rejected connections
- Memory: Usage and fragmentation ratio
- Throughput & Keyspace: Commands processed, network I/O, keyspace hit rate, keys per database
- Evictions & Persistence: Evictions, expirations, RDB unsaved changes
- CPU & Connections: CPU usage and connection metrics
- Command Analysis: Per-command breakdown
Streaming
Extended Monitoring
The primary operational dashboard for CDN routing activity. This is the home dashboard displayed on Grafana login. Covers:
- Latency Statistics: ACD router latency and CDN latency over time
- Redirects: Total redirect volume, status code breakdown, managed vs unmanaged ratio
- Content Popularity: Top 10 requested content and top 10 most rapidly increasing popularity scores
- CDN Selection: Redirect distribution across CDN endpoints, current and historical ratios
- CDN Failovers and Retries: Failover events and retry rates by CDN
- Host Selection: Endpoint request distribution
- Session Statistics: Active session counts and session type breakdown
- Client Responses: Client-facing HTTP status code distribution
- Incoming Requests: Raw request volume
- HTTPS Certificate Statistics: Certificate validity and expiry indicators
- Warnings & Errors: Application-level warnings and errors over time
- LUA Statistics: Lua exception counts and execution time
- Configuration Change History: Timeline of routing configuration changes
Router Monitoring
External-facing view of ACD Director routing activity. Shows the number of initial routing decisions made, HTTP status code distribution, incoming HTTP/HTTPS request volumes, and selection input metrics. Useful for a high-level view of traffic hitting the directors.
QoE Monitoring
Quality of Experience scoring dashboard. Shows average QoE scores per host, per session group, per CDN, and per agent, as well as the initial CDN selection rate. Use this to identify CDN providers or content hosts that are delivering a degraded experience.
Streamer Statistics
Condensed view of streamer node performance, covering network ingress/egress throughput, TCP and HTTP connection counts, active session counts, HTTP request rates and response codes, response times (ingress and egress), and storage/memory/CPU. Suitable for routine streamer health monitoring.
An expanded Streamer Statistics (Advanced) dashboard is available as part of the Advanced Dashboards licence.
Internal Debugging
These dashboards expose low-level ACD Director internals and are primarily intended for advanced diagnostics and support investigations.
Debugging Information
Lua runtime statistics from the ACD Director: exception counts, active Lua context count, time spent in Lua execution, and router latency. Use when investigating unexpected Director behaviour or Lua errors.
ACD: Incoming Internet Connections
SSL-level connection statistics at the Director: SSL warnings and errors, valid and invalid HTTP and HTTPS request counts from external clients. Use when investigating TLS handshake failures or unexpected rejection rates.
Performance Metrics
ACD Director process-level resource usage: router CPU utilisation, router memory usage, and Lua memory consumption. Useful for identifying resource pressure on the Director process itself rather than the host.
Prometheus: ACD
ACD application metrics exposed via Prometheus: active and total session counts, session type breakdown, managed and unmanaged redirect counts, QoE corrections, manifest parse failures, initial endpoint request counts, HTTP request rates, and logged warnings and errors.
CDN Failures
CDN-level failure tracking: response code distribution from CDN backends, CDN-level failover events, host-level failovers, and host retry counts. Use when investigating CDN reliability issues or failover behaviour.
ACD: CDN Latencies Detail
Detailed CDN latency analysis with configurable percentile plots and a full latency histogram. Use when investigating tail latency issues on specific CDN backends.
ACD: Router Latencies
ACD Director routing latency distributions for both 2xx (successful) and 3xx (redirect) responses, visualised as heatmap buckets over time. Use alongside CDN Latencies Detail to separate router processing time from CDN response time.
Prometheus/ACD: SubRunners
Internal async processing queue depth and throughput metrics for the ACD Director subrunner system: client connection counts, low/medium/high priority queue depths (current and max), send/receive data block usage, wakeup counts, overload events, and autopause activations. Use when investigating Director throughput bottlenecks or queue backpressure.
Advanced Dashboards
Advanced dashboards are a paid add-on that unlocks more detailed variants of two standard dashboards, providing deeper visibility for performance investigation and capacity planning.
Licensing: Advanced dashboards require a separate licence key. To obtain a key for your deployment, contact your AgileTV account representative.
Enabling Advanced Dashboards
Once you have your licence key, add the following to your values.yaml:
dashboards:
advanced:
licenceKey: "<your-licence-key>"
Then apply the change by following the upgrade procedure in the Configuration Guide. The advanced dashboards will become available in Grafana automatically once the upgrade completes.
HW Metrics (Advanced)
Expanded hardware telemetry that supplements the standard HW Metrics dashboard with additional depth and additional sections: kernel metrics, TCP and UDP network stack statistics, per-interface error counters, disk IOPS, and metrics collection velocity. Use this when investigating performance anomalies surfaced by the standard dashboard or by alerts.
Streamer Statistics (Advanced)
Full streamer telemetry that supplements the standard Streamer Statistics dashboard. Includes all standard metrics plus:
- OTT JCQ: Server group and node request rates and ratios, circuit breaker state (closed/open backends), global backend stats, pending requests per backend, and pop-out per backend
- Account Records: Session counts, total traffic in/out, HTTP request rates (ingress/egress), cache hit ratio, backend request rates, and response times
- Detailed network error and drop counters from
/proc/net/dev
CDN Director Metrics
Director DNS Names in Grafana
CDN Director instances are identified in Grafana by their DNS name, which is derived from the name field in global.hosts.routers:
global:
hosts:
routers:
- name: my-router-1
address: 192.0.2.1
The DNS name used in Grafana dashboards will be: my-router-1.external
This naming convention is automatically applied for all configured directors.
Customising Dashboards
Permissions: Creating and importing dashboards requires Grafana Admin access. See Grafana Authentication & Roles for details on granting admin rights.
The pre-provisioned dashboards are read-only and managed by the Helm chart — changes made to them in the Grafana UI will not persist across upgrades. To create persistent custom dashboards:
- In Grafana, navigate to Dashboards > New > New Dashboard
- Add panels using the VictoriaMetrics or Prometheus datasource
- Save the dashboard to a folder of your choice
Custom dashboards saved this way are stored in the Grafana PostgreSQL database and are unaffected by Helm upgrades.
Note: Do not save custom dashboards into the provisioned folders (Alerting, Billing, CDN Manager, etc.). Grafana marks these folders as provisioned and may behave unexpectedly if user dashboards are mixed in.
Customising a Pre-provisioned Dashboard
If you want a modified version of one of the built-in dashboards as a starting point:
- Open the dashboard you want to customise
- Click the Share icon (top toolbar) > Export > Save to file to download the dashboard JSON
- In Grafana, navigate to Dashboards > New > Import
- Upload the downloaded JSON file
- On the import screen, give the dashboard a new name to distinguish it from the original, and choose a destination folder outside the provisioned set
- Click Import
You now have an independently editable copy. The original provisioned dashboard remains unchanged and will continue to be updated by future Helm upgrades. Your copy is stored in PostgreSQL and persists across upgrades independently.
Troubleshooting
Dashboard Loading Issues
If dashboards fail to load:
Check Grafana pods:
kubectl get pods -l app.kubernetes.io/component=grafanaReview Grafana logs:
kubectl logs -l app.kubernetes.io/component=grafanaVerify datasource configuration in Grafana UI
For login and authentication issues, see Grafana Authentication & Roles.
Next Steps
- Alerts & Alarms - Set up alerting and notifications
- Operations Guide - Day-to-day operational procedures
- Metrics & Monitoring Overview - Return to the monitoring overview
10.9.3 - Alerts & Alarms
Overview
The CDN Manager ships a set of pre-configured alerting rules evaluated by vmalert against VictoriaMetrics. When a rule fires, the alert is routed to Alertmanager, which handles deduplication, grouping, silencing, and delivery to configured notification channels.
This page documents every built-in alert rule, what it means, its severity, and the recommended operator action.
Alert Severity Levels
| Severity | Meaning |
|---|---|
| critical | Immediate action required. The condition poses a risk to data integrity, service availability, or active traffic. |
| warning | Investigate soon. The condition is not immediately harmful but will degrade into a critical state if left unattended. |
Alert Groups
Alerts are organised into the following groups, each evaluated on a 15-second interval.
- infra-disk — Disk space and I/O
- infra-compute — CPU and memory
- infra-network — Network errors and traffic anomalies
- longhorn — Persistent storage health
infra-disk
Monitors disk space utilisation and I/O latency on cluster nodes.
StorageFillingUp
| Property | Value |
|---|---|
| Severity | warning |
| Condition | Root filesystem usage exceeds 85% |
| Must persist for | 2 minutes |
What it means: A node’s root filesystem is running low on space. If left unchecked this will progress to a full disk, which can cause pod evictions, write failures, and potential data loss.
Recommended actions:
- Identify the node from the
hostlabel in the alert. - Log into the node and check disk usage:
df -h / du -sh /var/log/* | sort -rh | head -20 - Clear old log files, unused container images, or temporary files:
# On the node journalctl --vacuum-size=500M crictl rmi --prune - If disk usage is due to application data growth, consider expanding the volume or adjusting retention settings. See Metrics Retention.
HighDiskLatency
| Property | Value |
|---|---|
| Severity | warning |
| Condition | Average disk write latency exceeds 100 ms |
| Must persist for | 2 minutes |
What it means: Disk write operations are taking longer than 100 ms on average. High disk latency can degrade database performance (PostgreSQL, VictoriaMetrics) and cause timeouts in write-heavy components.
Recommended actions:
- Identify the affected disk from the
namelabel in the alert. - Check for I/O-intensive processes on the node:
iostat -x 2 5 iotop -o - Check for Longhorn replica rebuilds or rebalancing activity, which can saturate disk I/O.
- If the issue persists on a production node, review whether the storage hardware meets the System Requirements.
infra-compute
Monitors CPU and memory utilisation on cluster nodes.
CpuSaturation
| Property | Value |
|---|---|
| Severity | warning |
| Condition | Total CPU usage exceeds 90% |
| Must persist for | 5 minutes |
What it means: A node is running at near-full CPU capacity. Sustained CPU saturation causes request latency increases across all workloads on that node and may result in pod throttling.
Recommended actions:
- Identify the saturated node from the
hostlabel in the alert. - Check which pods are consuming CPU:
kubectl top pods --sort-by=cpu -A - Check for runaway processes on the node:
top -b -n 1 | head -20 - If saturation is caused by a legitimate workload spike (e.g. CDN traffic burst), consider scaling the deployment or redistributing load across nodes.
MemoryCriticallyLow
| Property | Value |
|---|---|
| Severity | critical |
| Condition | Available RAM falls below 10% |
| Must persist for | 2 minutes |
What it means: The node has very little free memory remaining. The Linux OOM killer may begin terminating processes, which can cause abrupt pod restarts, data corruption in in-memory caches, and service unavailability.
Recommended actions:
- Identify the affected node from the
hostlabel in the alert. - Immediately check for memory-leaking or oversized pods:
kubectl top pods --sort-by=memory -A - Identify and restart any pods showing abnormal memory consumption:
kubectl rollout restart deployment/<name> - Check kernel OOM kill log for any processes already killed:
dmesg | grep -i "oom\|killed" - Review memory resource limits and requests for affected deployments and adjust if necessary.
SwapUsageDetected
| Property | Value |
|---|---|
| Severity | warning |
| Condition | Swap usage exceeds 5% |
| Must persist for | 1 minute |
What it means: The node is swapping memory to disk. Swap usage in a Kubernetes cluster is a strong indicator of memory pressure. It degrades performance significantly and may mask an underlying memory shortage that could escalate to a MemoryCriticallyLow event.
Recommended actions:
- Treat this as an early warning for the same conditions as
MemoryCriticallyLow. - Identify memory-intensive pods and investigate whether resource limits are configured appropriately.
- Swap should ideally never be active on a production Kubernetes node. If it persists, escalate to a memory capacity review.
infra-network
Monitors network interface errors and traffic anomalies on cluster nodes.
NetworkInterfaceErrors
| Property | Value |
|---|---|
| Severity | critical |
| Condition | Any non-zero rate of inbound or outbound packet errors on a network interface |
| Must persist for | 1 minute |
What it means: A network interface is dropping or corrupting packets. Even a low error rate can cause TCP retransmissions, increased latency, and connection failures — directly impacting CDN Director communication and external traffic delivery.
Recommended actions:
- Identify the affected host and interface from the
hostandinterfacelabels in the alert. - Check interface error counters on the node:
ip -s link show <interface> ethtool -S <interface> | grep -i error - Check for duplex/speed mismatches between the node NIC and the upstream switch:
ethtool <interface> | grep -E "Speed|Duplex" - Escalate to network/hardware team if errors are persistent and cannot be attributed to a software configuration issue.
SuddenNetworkEgressDrop
| Property | Value |
|---|---|
| Severity | critical |
| Condition | Egress throughput drops to less than 50% of the 2-minute baseline, when baseline traffic is above 1 Mbit/s |
| Must persist for | 1 minute |
What it means: A significant, sudden reduction in outbound traffic has been detected. This typically indicates a upstream network failure, link fault, or a routing issue. A CDN node that stops transmitting traffic is effectively out of service.
Recommended actions:
- Identify the affected node and interface from the alert labels.
- Verify the node’s network connectivity:
ping <gateway-ip> traceroute <upstream-endpoint> - Check for interface errors or link-down events:
ip link show dmesg | grep -i "link\|eth\|nic" - Verify that upstream routing and firewall rules have not changed.
- If the node is healthy and traffic has legitimately dropped (e.g. a CDN traffic shift), the alert can be silenced if the traffic reduction is expected and understood.
SuddenNetworkIngressSpike
| Property | Value |
|---|---|
| Severity | warning |
| Condition | Ingress throughput exceeds twice the 5-minute baseline |
| Must persist for | 1 minute |
What it means: A sudden surge of inbound traffic has been detected. This may indicate a legitimate traffic event (e.g. a large stream audience spike), a DDoS attempt, or a misconfigured client sending unexpected volume.
Recommended actions:
- Identify the affected node and interface from the alert labels.
- Review active connections and top talkers:
ss -s netstat -an | awk '{print $5}' | cut -d: -f1 | sort | uniq -c | sort -rn | head - Correlate with CDN Director metrics in Grafana to determine whether the spike is legitimate CDN traffic.
- If the spike is unexpected and sustained, consider rate-limiting or blocking the source at the network edge.
longhorn
Monitors the health of Longhorn distributed block storage, which backs persistent volumes for PostgreSQL, VictoriaMetrics, and other stateful components.
Note: Longhorn alert rules are always present in the alert configuration, but will not fire in environments where Longhorn is not installed (e.g. cloud deployments using external storage).
LonghornVolumeDegraded
| Property | Value |
|---|---|
| Severity | warning |
| Condition | A Longhorn volume’s robustness state is Degraded |
| Must persist for | 2 minutes |
What it means: A Longhorn volume has fewer healthy replicas than its configured replication factor. Data is not at immediate risk, but the volume has reduced redundancy. A single additional node or disk failure could result in data loss or volume unavailability.
Recommended actions:
- Identify the affected volume from the
volumelabel in the alert. - Open the Longhorn UI and inspect the volume’s replica status.
- Check whether a replica is in the process of rebuilding (this is normal after a node restart). Rebuilding may take several minutes depending on volume size.
- If a replica has failed and is not rebuilding, attempt to evict and re-schedule it via the Longhorn UI.
- Investigate the health of the node that hosted the failed replica:
kubectl get nodes kubectl describe node <node-name>
LonghornVolumeFaulted
| Property | Value |
|---|---|
| Severity | critical |
| Condition | A Longhorn volume’s robustness state is Faulted |
| Must persist for | 1 minute |
What it means: A Longhorn volume has lost all healthy replicas and is no longer accessible. Any workload that depends on this volume (e.g. PostgreSQL, VictoriaMetrics) will be unable to write and may crash. Data may be at risk.
Recommended actions:
- Identify the affected volume from the
volumelabel. - Immediately check which pods are using the volume:
kubectl get pods -A -o wide | grep -i <volume-name> - Open the Longhorn UI. Check whether any replicas are still present and whether they can be recovered.
- Do not delete faulted replicas without first attempting recovery — they may contain the only copy of the data.
- Contact AgileTV support if the volume cannot be recovered, providing Longhorn UI screenshots and node logs.
LonghornNodeDown
| Property | Value |
|---|---|
| Severity | critical |
| Condition | A Longhorn node reports a non-ready state |
| Must persist for | 2 minutes |
What it means: A storage node is unreachable or unhealthy from Longhorn’s perspective. All volumes with replicas on this node are at reduced redundancy. If more than one node goes down simultaneously, faulted volumes and data loss become a risk.
Recommended actions:
- Identify the affected node from the
nodelabel in the alert. - Check the node’s status in Kubernetes:
kubectl get nodes kubectl describe node <node-name> - Attempt to SSH to the node and check system health:
ssh root@<node-ip> systemctl status k3s - If the node has crashed and cannot be recovered quickly, consider evicting its Longhorn replicas to allow rebuilding on healthy nodes — but only if the remaining healthy nodes have sufficient capacity.
LonghornDiskSpaceLow
| Property | Value |
|---|---|
| Severity | warning |
| Condition | Available Longhorn disk space on a node falls below 15% |
| Must persist for | 2 minutes |
What it means: A node’s Longhorn-managed disk is running low on storage. When Longhorn disk space is exhausted, it cannot schedule new replicas or accommodate volume growth, which can lead to LonghornVolumeDegraded or LonghornVolumeFaulted conditions.
Recommended actions:
- Identify the affected node and disk from the
nodeanddisklabels in the alert. - Open the Longhorn UI and check which volumes have replicas on this disk.
- Check for snapshots or backups that can be cleaned up to reclaim space.
- If space cannot be reclaimed, consider adding a disk to the node or expanding the underlying block device.
- Review Metrics Retention settings — reducing VictoriaMetrics retention is often the fastest way to reclaim Longhorn disk space in a monitoring-heavy deployment.
Adding Custom Alert Rules
Additional alert rules can be defined by extending the victoria_metrics_alert.server.config.alerts.groups list in your values.yaml. Rules follow the Prometheus alerting rule format.
Example: Adding a Custom Alert
The following example adds an alert group that fires when a Kafka consumer lag exceeds a threshold:
victoria_metrics_alert:
server:
config:
alerts:
groups:
# ... existing groups are preserved alongside your additions ...
- name: kafka
interval: 15s
rules:
- alert: KafkaConsumerLagHigh
expr: kafka_consumer_group_lag > 10000
for: 5m
labels:
severity: warning
annotations:
summary: "High consumer lag on {{ $labels.topic }}"
description: "Consumer group {{ $labels.group }} is {{ $value }} messages behind on topic {{ $labels.topic }}."
Apply the change using the standard upgrade procedure in the Configuration Guide.
Rule Fields Reference
| Field | Required | Description |
|---|---|---|
alert | Yes | Alert name. Must be unique within the group. |
expr | Yes | PromQL expression. The alert fires when this evaluates to a non-zero/non-empty result. |
for | No | How long the condition must hold before the alert fires. Omitting this fires immediately. |
labels.severity | Recommended | Set to critical or warning to match the built-in routing rules. |
annotations.summary | Recommended | Short human-readable description. Supports Go template labels (e.g. {{ $labels.host }}). |
annotations.description | Recommended | Detailed description with context for the on-call operator. |
Tip: Use the Alertmanager UI (
https://<manager-host>/alertmanager) to verify that fired alerts are being received and routed correctly after adding new rules.
Configuring Alert Routes
By default, all alerts are routed to the built-in null receiver, which silently discards them. To receive alerts, configure one or more receivers and update the routing rules — all within the alertmanager.config section of your values.yaml.
Route Structure
The top-level route defines the default behaviour. Child routes under routes match alerts by label and direct them to specific receivers:
alertmanager:
config:
route:
receiver: 'null' # Default: discard unmatched alerts
group_by: ['alertname']
group_wait: 10s # Wait before sending first notification for a new group
group_interval: 10s # Wait before sending updated notifications for a group
repeat_interval: 1h # Re-notify if an alert is still firing after this period
routes:
- matchers:
- severity="critical"
receiver: 'slack'
- matchers:
- severity="warning"
receiver: 'email-warning'
Routes are evaluated top-to-bottom. The first matching route wins unless continue: true is set on the route.
Notification Channels
Email requires an SMTP server to be configured globally. Both a critical and warning receiver can be defined independently.
alertmanager:
config:
global:
smtp_smarthost: 'smtp.example.com:587'
smtp_from: 'alertmanager@example.com'
smtp_require_tls: true
route:
routes:
- matchers:
- severity="critical"
receiver: 'email-critical'
- matchers:
- severity="warning"
receiver: 'email-warning'
receivers:
- name: 'null'
- name: 'email-critical'
email_configs:
- to: 'oncall@example.com'
send_resolved: true
- name: 'email-warning'
email_configs:
- to: 'alerts@example.com'
send_resolved: true
Slack
Requires an incoming webhook URL created in your Slack workspace.
alertmanager:
config:
route:
routes:
- matchers:
- severity="critical"
receiver: 'slack'
receivers:
- name: 'null'
- name: 'slack'
slack_configs:
- api_url: 'https://hooks.slack.com/services/YOUR/WEBHOOK/URL'
channel: '#alerts'
send_resolved: true
title: '[{{ .Status | toUpper }}] {{ .CommonLabels.alertname }}'
text: |
*Severity:* {{ .CommonLabels.severity }}
*Host:* {{ .CommonLabels.host }}
{{ range .Alerts }}{{ .Annotations.description }}{{ end }}
Telegram
Requires a Telegram bot token and a channel/group chat ID. Create a bot via @BotFather and add it to your alert channel before configuring.
alertmanager:
config:
route:
routes:
- matchers:
- severity="critical"
receiver: 'telegram'
receivers:
- name: 'null'
- name: 'telegram'
telegram_configs:
- bot_token: 'your-bot-token'
chat_id: -1234567890
parse_mode: 'Markdown'
send_resolved: true
message: |
*Alert:* {{ .CommonLabels.alertname }}
*Severity:* {{ .CommonLabels.severity }}
*Host:* {{ .CommonLabels.host }}
{{ range .Alerts }}
{{ .Annotations.description }}
{{ end }}
Finding your chat ID: Add your bot to the channel or group, send a message, then call
https://api.telegram.org/bot<token>/getUpdatesand read thechat.idfrom the response. Note that group and channel chat IDs are negative numbers.
Combining Multiple Receivers
Routes and receivers can be combined to send different alert severities to different channels simultaneously. For example, critical alerts to PagerDuty and Slack, warnings to email only:
alertmanager:
config:
route:
receiver: 'null'
routes:
- matchers:
- severity="critical"
receiver: 'slack'
continue: true # Continue matching so the next route also fires
- matchers:
- severity="critical"
receiver: 'email-critical'
- matchers:
- severity="warning"
receiver: 'email-warning'
receivers:
- name: 'null'
- name: 'slack'
slack_configs:
- api_url: 'https://hooks.slack.com/services/YOUR/WEBHOOK/URL'
channel: '#critical-alerts'
send_resolved: true
- name: 'email-critical'
email_configs:
- to: 'oncall@example.com'
send_resolved: true
- name: 'email-warning'
email_configs:
- to: 'alerts@example.com'
send_resolved: true
Apply any receiver or routing changes using the standard upgrade procedure in the Configuration Guide.
Silencing Alerts
Silences suppress alert notifications for a defined time window without disabling the underlying alert rule. They are useful during planned maintenance, known incidents, or when investigating a non-urgent condition.
Silences are managed via the Alertmanager UI, accessible at:
https://<manager-host>/alertmanager
Creating a Silence
- Navigate to the Alertmanager UI and click Silences in the top navigation.
- Click Create Silence.
- Set the Start and End times for the silence window.
- Add one or more matchers to scope which alerts are suppressed. For example:
alertname = StorageFillingUp— silence a specific alertseverity = warning— silence all warningshost = node-01— silence all alerts from a specific host
- Add a Comment describing the reason for the silence (e.g.
Planned disk expansion on node-01). - Click Create. The silence takes effect immediately.
Expiring a Silence
Silences expire automatically at the configured end time. To remove a silence early, navigate to Silences in the Alertmanager UI, locate the silence, and click Expire.
Next Steps
- Operations Guide - Day-to-day operational procedures
- Troubleshooting Guide - Resolve underlying issues surfaced by alerts
- Metrics & Monitoring Overview - Return to the monitoring overview
10.10 - API Guide
Overview
The CDN Manager exposes versioned HTTP APIs under /api (v1 and v2), using JSON payloads by default. When sending request bodies, set Content-Type: application/json. Server errors typically respond with { "message": "..." } where available, or an empty body with the relevant status code.
Authentication uses a two-step flow:
- Create a session
- Exchange that session for an access token with
grant_type=session
Use the access token in Authorization: Bearer <token> when calling bearer-protected routes. CORS preflight (OPTIONS) is supported and wildcard origins are accepted by default.
Durations such as TTLs use humantime strings (for example, 60s, 5m, 1h).
Base URL
All API endpoints are relative to:
https://<manager-host>/api
API Reference Guides
The API documentation is organized by functional area:
| Guide | Description |
|---|---|
| Authentication API | Login, token exchange, logout, and session management |
| Health API | Liveness and readiness probes |
| Selection Input API | Key-value and list storage with search capabilities |
| Data Store API | Generic JSON key/value storage |
| Subnets API | CIDR-to-value mappings for routing decisions |
| Routing API | GeoIP lookups and IP validation |
| Discovery API | Host and namespace discovery |
| Metrics API | Metrics submission and aggregation |
| Configuration API | Configuration document management |
| Operator UI API | Blocked tokens, user agents, and referrers |
| OpenAPI Specification | Complete OpenAPI 3.0 specification |
Authentication Flow
All authenticated API calls follow the same authentication flow. For detailed instructions, see the Authentication API Guide.
Quick Start:
# Step 1: Login to get session
curl -s -X POST "https://cdn-manager/api/v1/auth/login" \
-H "Content-Type: application/json" \
-d '{
"email": "user@example.com",
"password": "Password1!"
}' | tee /tmp/session.json
SESSION_ID=$(jq -r '.session_id' /tmp/session.json)
SESSION_TOKEN=$(jq -r '.session_token' /tmp/session.json)
# Step 2: Exchange session for access token
curl -s -X POST "https://cdn-manager/api/v1/auth/token" \
-H "Content-Type: application/json" \
-d "$(jq -nc --arg sid "$SESSION_ID" --arg st "$SESSION_TOKEN" \
'{session_id:$sid,session_token:$st,grant_type:"session",scope:"openid"}')" \
| tee /tmp/token.json
ACCESS_TOKEN=$(jq -r '.access_token' /tmp/token.json)
# Step 3: Call a protected endpoint
curl -s "https://cdn-manager/api/v1/metrics" \
-H "Authorization: Bearer ${ACCESS_TOKEN}"
Error Responses
The API uses standard HTTP response codes to indicate the success or failure of an API request.
Most errors return an empty response body with the relevant HTTP status code (e.g., 404 Not Found or 409 Conflict).
In some cases, the server may return a JSON body containing a user-facing error message:
{
"message": "Human-readable error message"
}
Next Steps
After learning the API:
- Operations Guide - Day-to-day operational procedures
- Troubleshooting Guide - Resolve API issues
- Configuration Guide - Full configuration reference
10.10.1 - Authentication API
Overview
The Authentication API provides endpoints for user authentication, session management, and token exchange. All authenticated API calls require a valid access token obtained through the authentication flow.
Base URL
https://<manager-host>/api/v1/auth
Endpoints
POST /api/v1/auth/login
Create a session from email/password credentials.
Request:
POST /api/v1/auth/login
Content-Type: application/json
{
"email": "user@example.com",
"password": "Password1!"
}
Success Response (200):
{
"session_id": "session-1",
"session_token": "token-1",
"verified_at": "2024-01-01T00:00:00Z",
"expires_at": "2024-01-01T01:00:00Z"
}
Errors:
401- Authentication failure (invalid credentials)500- Backend/state errors
POST /api/v1/auth/token
Exchange a session for an access token (required for bearer auth).
Request:
POST /api/v1/auth/token
Content-Type: application/json
{
"session_id": "session-1",
"session_token": "token-1",
"grant_type": "session",
"scope": "openid profile"
}
Success Response (200):
{
"access_token": "<token>",
"scope": "openid profile",
"expires_in": 3600,
"token_type": "bearer"
}
Token Scopes
The scope parameter in the token exchange request is a space-separated string of permissions requested for the access token.
Scope Resolution When a token is requested, the backend system filters the requested scopes against the user’s actual permissions. The resulting access token will only contain the subset of requested scopes that the user is authorized to possess.
Naming and Design
Scope names are defined by the applications that consume the tokens, not by the central IAM system. To prevent collisions between different applications or modules, it is highly recommended that application developers use URN-style prefixes for scope names (e.g., urn:acd:manager:config:read).
Errors:
401- Authentication failure (invalid session)500- Backend/state errors
POST /api/v1/auth/logout
Revoke a session. Note: This does not revoke issued access tokens; they remain valid until expiration.
Request:
POST /api/v1/auth/logout
Content-Type: application/json
{
"session_id": "session-1",
"session_token": "token-1"
}
Success Response (200):
{
"status": "Ok"
}
Errors:
400- Invalid session parameters500- Backend/state errors
Complete Authentication Flow Example
# Step 1: Login to get session
curl -s -X POST "https://cdn-manager/api/v1/auth/login" \
-H "Content-Type: application/json" \
-d '{
"email": "user@example.com",
"password": "Password1!"
}' | tee /tmp/session.json
SESSION_ID=$(jq -r '.session_id' /tmp/session.json)
SESSION_TOKEN=$(jq -r '.session_token' /tmp/session.json)
# Step 2: Exchange session for access token
curl -s -X POST "https://cdn-manager/api/v1/auth/token" \
-H "Content-Type: application/json" \
-d "$(jq -nc --arg sid "$SESSION_ID" --arg st "$SESSION_TOKEN" \
'{session_id:$sid,session_token:$st,grant_type:"session",scope:"openid"}')" \
| tee /tmp/token.json
ACCESS_TOKEN=$(jq -r '.access_token' /tmp/token.json)
# Step 3: Call a protected endpoint
curl -s "https://cdn-manager/api/v1/metrics" \
-H "Authorization: Bearer ${ACCESS_TOKEN}"
Using the Access Token
Once you have obtained an access token, include it in the Authorization header of all API requests:
Authorization: Bearer <access_token>
Example:
curl -s "https://cdn-manager/api/v1/configuration" \
-H "Authorization: Bearer ${ACCESS_TOKEN}"
Token Expiration
Access tokens expire after the duration specified in expires_in (typically 3600 seconds / 1 hour). When a token expires, you must re-authenticate to obtain a new token.
Next Steps
- Health API - Liveness and readiness probes
- Selection Input API - Key-value and list storage
- OpenAPI Specification - Complete API specification
10.10.2 - Health API
Overview
The Health API provides endpoints for Kubernetes health probes and service health checking.
Base URL
https://<manager-host>/api/v1/health
Endpoints
GET /api/v1/health/alive
Liveness probe that indicates whether the service is running. Always returns 200 OK.
Request:
GET /api/v1/health/alive
Response (200):
{
"status": "Ok"
}
Use Case: Kubernetes liveness probe to determine if the pod should be restarted.
GET /api/v1/health/ready
Readiness probe that checks service readiness including downstream dependencies.
Request:
GET /api/v1/health/ready
Success Response (200):
{
"status": "Ok"
}
Failure Response (503):
{
"status": "Fail"
}
Use Case: Kubernetes readiness probe to determine if the pod should receive traffic. Returns 503 if any downstream dependencies (database, Kafka, Redis) are unavailable.
Kubernetes Configuration
Example Kubernetes probe configuration:
livenessProbe:
httpGet:
path: /api/v1/health/alive
port: 8080
initialDelaySeconds: 10
periodSeconds: 10
readinessProbe:
httpGet:
path: /api/v1/health/ready
port: 8080
initialDelaySeconds: 5
periodSeconds: 5
Next Steps
- Authentication API - User authentication
- Selection Input API - Key-value and list storage
- OpenAPI Specification - Complete API specification
10.10.3 - Selection Input API
Overview
The Selection Input API provides JSON key/value storage with search capabilities. It supports two API versions (v1 and v2) with different operation models.
Base URL
https://<manager-host>/api/v1/selection_input
https://<manager-host>/api/v2/selection_input
Version Comparison
| Feature | v1 /api/v1/selection_input | v2 /api/v2/selection_input |
|---|---|---|
| Primary operation | Merge/UPSERT (POST) | Insert/Replace (PUT) |
| List append | N/A | POST to push to list |
| Search syntax | Wildcard prefix (foo* implicit) | Full wildcard (foo* explicit) |
| Query params | search, sort, limit, ttl | search, ttl, correlation_id |
| Sort support | Yes (asc/desc) | No |
| Limit support | Yes | No |
| Use case | Simple key-value with optional search | List-like operations, full wildcard |
When to Use Each Version
| Scenario | Recommended Version |
|---|---|
| Simple key-value storage | v1 |
| List/queue operations (append to array) | v2 POST |
| Full wildcard pattern matching | v2 |
| Need to sort or paginate results | v1 |
v1 Endpoints
GET /api/v1/selection_input/{path}
Fetch stored JSON. If value is an object, optional search/limit/sort applies to its keys.
Query Parameters:
search- Wildcard prefix search (adds*implicitly)sort- Sort order (ascordesc)limit- Maximum results (must be > 0)
Success Response (200):
{
"foo": 1,
"foobar": 2
}
Errors:
404- Path does not exist400- Invalid search/sort/limit parameters500- Backend failure
Example:
curl -s "https://cdn-manager/api/v1/selection_input/config?search=foo&limit=2"
POST /api/v1/selection_input/{path}
Upsert (merge) JSON at path. Nested objects are merged recursively.
Query Parameters:
ttl- Expiry time as humantime string (e.g.,10m,1h)
Request:
{
"feature_flag": true,
"ratio": 0.5
}
Success: 201 Created echoing the payload
Errors:
500/503- Backend failure
Example:
curl -s -X POST "https://cdn-manager/api/v1/selection_input/config?ttl=10m" \
-H "Content-Type: application/json" \
-d '{
"feature_flag": true,
"ratio": 0.5
}'
DELETE /api/v1/selection_input/{path}
Delete stored value.
Success: 204 No Content
Errors: 503 - Backend failure
v2 Endpoints
GET /api/v2/selection_input/{path}
Fetch stored JSON with optional wildcard filtering.
Query Parameters:
search- Full wildcard pattern (e.g.,foo*,*bar*)correlation_id- Accepted but currently ignored (logging only)
Success Response (200):
{
"foo": 1,
"foobar": 2
}
Errors:
400- Invalid search pattern404- Path does not exist500- Backend failure
Example:
curl -s "https://cdn-manager/api/v2/selection_input/config?search=foo*"
PUT /api/v2/selection_input/{path}
Insert/replace value. Old value is discarded.
Query Parameters:
ttl- Expiry time as humantime string
Request:
{
"items": ["a", "b", "c"]
}
Success: 200 OK
Example:
curl -s -X PUT "https://cdn-manager/api/v2/selection_input/catalog" \
-H "Content-Type: application/json" \
-d '{
"items": ["a", "b", "c"]
}'
POST /api/v2/selection_input/{path}
Push a value to the back of a list-like entry (append to array).
Query Parameters:
ttl- Expiry time as humantime string
Request (any JSON value):
{
"item": 42
}
Or a simple string:
"ready-for-publish"
Success: 200 OK
Example:
curl -s -X POST "https://cdn-manager/api/v2/selection_input/queue" \
-H "Content-Type: application/json" \
-d '"ready-for-publish"'
DELETE /api/v2/selection_input/{path}
Delete stored value.
Success: 204 No Content
Next Steps
- Data Store API - Generic key/value storage
- Subnets API - CIDR-to-value mappings
- OpenAPI Specification - Complete API specification
10.10.4 - Data Store API
Overview
The Data Store API provides generic JSON key/value storage for short-lived or simple structured data.
Base URL
https://<manager-host>/api/v1/datastore
Endpoints
GET /api/v1/datastore
List all known keys.
Query Parameters:
show_hidden- Boolean (defaultfalse). Whentrue, includes internal keys starting with_.
Success Response (200):
["user:123", "config:settings", "session:abc"]
Hidden Keys: Keys starting with _ are reserved for internal use (e.g., subnet service). Writing to hidden keys via the datastore API returns 400 Bad Request.
GET /api/v1/datastore/{key}
Retrieve the JSON value for a specific key.
Success Response (200): The stored JSON value
Errors:
404- Key does not exist500- Backend failure
Example:
curl -s "https://cdn-manager/api/v1/datastore/user:123"
POST /api/v1/datastore/{key}
Create a new JSON value at the specified key. Fails if the key already exists.
Query Parameters:
ttl- Expiry time as humantime string (e.g.,60s,1h)
Request:
{
"id": 123,
"name": "alice"
}
Success: 201 Created
Errors:
409 Conflict- Key already exists500- Backend failure
Example:
curl -s -X POST "https://cdn-manager/api/v1/datastore/user:123?ttl=1h" \
-H "Content-Type: application/json" \
-d '{"id":123,"name":"alice"}'
PUT /api/v1/datastore/{key}
Update or replace the JSON value at an existing key.
Query Parameters:
ttl- Expiry time as humantime string
Success: 200 OK
Errors:
404- Key does not exist500- Backend failure
Example:
curl -s -X PUT "https://cdn-manager/api/v1/datastore/user:123" \
-H "Content-Type: application/json" \
-d '{"id":123,"name":"alice-updated"}'
DELETE /api/v1/datastore/{key}
Delete the value at the specified key. Idempotent operation.
Success: 204 No Content
Errors: 500 - Backend failure
Example:
curl -s -X DELETE "https://cdn-manager/api/v1/datastore/user:123"
Next Steps
- Subnets API - CIDR-to-value mappings
- Routing API - GeoIP lookups
- OpenAPI Specification - Complete API specification
10.10.5 - Subnets API
Overview
The Subnets API manages CIDR-to-value mappings used for routing decisions. This allows classification of IP ranges for routing purposes.
Base URL
https://<manager-host>/api/v1/subnets
Endpoints
PUT /api/v1/subnets
Create or update subnet mappings.
Request:
{
"192.168.1.0/24": "office",
"10.0.0.0/8": "internal",
"203.0.113.0/24": "external"
}
Success: 200 OK
Errors:
400- Invalid CIDR format500- Backend failure
Example:
curl -s -X PUT "https://cdn-manager/api/v1/subnets" \
-H "Content-Type: application/json" \
-d '{
"192.168.1.0/24": "office",
"10.0.0.0/8": "internal"
}'
GET /api/v1/subnets
List all subnet mappings.
Success Response (200): JSON object of CIDR-to-value mappings
Example:
curl -s "https://cdn-manager/api/v1/subnets" | jq '.'
DELETE /api/v1/subnets
Delete all subnet mappings.
Success: 204 No Content
GET /api/v1/subnets/byKey/{subnet}
Retrieve subnet mappings whose CIDR begins with the given prefix.
Example:
curl -s "https://cdn-manager/api/v1/subnets/byKey/192.168" | jq '.'
GET /api/v1/subnets/byValue/{value}
Retrieve subnet mappings with the given classification value.
Example:
curl -s "https://cdn-manager/api/v1/subnets/byValue/office" | jq '.'
DELETE /api/v1/subnets/byKey/{subnet}
Delete subnet mappings whose CIDR begins with the given prefix.
DELETE /api/v1/subnets/byValue/{value}
Delete subnet mappings with the given classification value.
Next Steps
- Routing API - GeoIP lookups and IP validation
- Discovery API - Host and namespace discovery
- OpenAPI Specification - Complete API specification
10.10.6 - Routing API
Overview
The Routing API provides GeoIP information lookup and IP address validation for routing decisions.
Base URL
https://<manager-host>/api/v1/routing
Endpoints
GET /api/v1/routing/geoip
Look up GeoIP information for an IP address.
Query Parameters:
ip- IP address to look up
Success Response (200):
{
"city": {
"name": "Washington"
},
"asn": 64512
}
Errors:
400- Invalid IP format500- Backend failure
Caching: Cache-Control: public, max-age=86400 (24 hours)
Example:
curl -s "https://cdn-manager/api/v1/routing/geoip?ip=149.101.100.0"
GET /api/v1/routing/validate
Validate if an IP address is allowed (not blocked).
Query Parameters:
ip- IP address to validate
Success Response (200): Empty body (IP is allowed)
Forbidden Response (403):
Access Denied
Errors:
400- Invalid IP format500- Backend failure
Caching: Cache-Control headers included (default: max-age=300, configurable via [tuning] section)
Example:
curl -i "https://cdn-manager/api/v1/routing/validate?ip=149.101.100.0"
Use Cases
GeoIP-Based Routing
Use the /geoip endpoint to determine the geographic location and ASN of an IP address for routing decisions:
# Get location data for routing
IP_INFO=$(curl -s "https://cdn-manager/api/v1/routing/geoip?ip=203.0.113.50")
CITY=$(echo "$IP_INFO" | jq -r '.city.name')
ASN=$(echo "$IP_INFO" | jq -r '.asn')
echo "Routing based on city: $CITY, ASN: $ASN"
IP Validation
Use the /validate endpoint to check if an IP is allowed before processing requests:
# Check if IP is allowed
RESPONSE=$(curl -s -o /dev/null -w "%{http_code}" \
"https://cdn-manager/api/v1/routing/validate?ip=203.0.113.50")
if [ "$RESPONSE" = "200" ]; then
echo "IP is allowed"
elif [ "$RESPONSE" = "403" ]; then
echo "IP is blocked"
fi
Next Steps
- Discovery API - Host and namespace discovery
- Metrics API - Metrics submission and aggregation
- OpenAPI Specification - Complete API specification
10.10.7 - Discovery API
Overview
The Discovery API provides information about discovered hosts and namespaces. Discovery is configured via the Helm chart values.yaml file. Each entry defines a namespace with a list of hostnames.
Base URL
https://<manager-host>/api/v1/discovery
Endpoints
GET /api/v1/discovery/hosts
Return discovered hosts grouped by namespace.
Success Response (200):
{
"directors": [
{ "name": "director-1.example.com" }
],
"edge-servers": [
{ "name": "cdn1.example.com" },
{ "name": "cdn2.example.com" }
]
}
Example:
curl -s "https://cdn-manager/api/v1/discovery/hosts"
GET /api/v1/discovery/namespaces
Return discovery namespaces with their corresponding Confd URIs.
Success Response (200):
[
{
"namespace": "edge-servers",
"confd_uri": "/api/v1/confd/edge-servers"
},
{
"namespace": "directors",
"confd_uri": "/api/v1/confd/directors"
}
]
Example:
curl -s "https://cdn-manager/api/v1/discovery/namespaces"
Configuration
Discovery is configured via the Helm chart values.yaml file under manager.discovery:
manager:
discovery:
- namespace: "directors"
hosts:
- director-1.example.com
- director-2.example.com
- namespace: "edge-servers"
hosts:
- cdn1.example.com
- cdn2.example.com
Each entry defines a namespace with a list of hostnames. Optionally, a pattern field can be specified for regex-based host matching.
Next Steps
- Metrics API - Metrics submission and aggregation
- Configuration API - Configuration document management
- OpenAPI Specification - Complete API specification
10.10.8 - Metrics API
Overview
The Metrics API allows submission and retrieval of metrics data from CDN components.
Base URL
https://<manager-host>/api/v1/metrics
Endpoints
POST /api/v1/metrics
Submit metrics data.
Request:
{
"example.com": {
"metric1": 100,
"metric2": 200
}
}
Success: 200 OK
Errors: 500 - Validation/backend errors
Example:
curl -s -X POST "https://cdn-manager/api/v1/metrics" \
-H "Content-Type: application/json" \
-d '{
"example.com": {
"metric1": 100,
"metric2": 200
}
}'
GET /api/v1/metrics
Return aggregated metrics per host.
Response: JSON object with aggregated metrics per host
Note: Metrics are stored per host for up to 5 minutes. Hosts that stop reporting disappear from aggregation after that window. When no metrics are being reported, returns empty object {}.
Example:
curl -s "https://cdn-manager/api/v1/metrics"
Metrics Retention
- Metrics are stored for up to 5 minutes in the aggregation layer
- For long-term metrics storage, data is forwarded to VictoriaMetrics
- Query historical metrics via Grafana dashboards at
/grafana
Next Steps
- Configuration API - Configuration document management
- Operator UI API - Blocked tokens, user agents, and referrers
- OpenAPI Specification - Complete API specification
10.10.9 - Configuration API
Overview
The Configuration API provides endpoints for managing the system configuration document. ETag is supported; send If-None-Match for conditional GET (may return 304).
Operational Note: This API is intended for internal verification only. Behavior is undefined in multi-replica clusters because pods do not coordinate config writes.
Base URL
https://<manager-host>/api/v1/configuration
Endpoints
GET /api/v1/configuration
Retrieve the configuration document.
Success: 200 OK with configuration JSON
Conditional GET: Returns 304 Not Modified if If-None-Match header matches current ETag
Example:
# Get ETag from response headers
etag=$(curl -s -D- "https://cdn-manager/api/v1/configuration" | awk '/ETag/{print $2}')
# Conditional GET - returns 304 if config unchanged
curl -s -H "If-None-Match: $etag" "https://cdn-manager/api/v1/configuration" -o /tmp/cfg.json -w "%{http_code}\n"
PUT /api/v1/configuration
Replace the configuration document.
Request:
{
"feature_flag": false,
"ratio": 0.25
}
Success: 200 OK
Errors:
400- Invalid configuration format500- Backend failure
DELETE /api/v1/configuration
Delete the configuration document.
Success: 200 OK
ETag Usage
The configuration API supports ETags for optimistic concurrency control:
# 1. Get current config and ETag
response=$(curl -s -D headers.txt "https://cdn-manager/api/v1/configuration")
etag=$(grep -i ETag headers.txt | cut -d' ' -f2 | tr -d '\r')
# 2. Modify the config as needed
modified_config=$(echo "$response" | jq '.feature_flag = true')
# 3. Update with ETag to prevent overwriting concurrent changes
curl -s -X PUT "https://cdn-manager/api/v1/configuration" \
-H "Content-Type: application/json" \
-H "If-Match: $etag" \
-d "$modified_config"
Next Steps
- Operator UI API - Blocked tokens, user agents, and referrers
- OpenAPI Specification - Complete API specification
10.10.10 - Operator UI API
Overview
The Operator UI API provides read-only helpers exposing curated selection input content for the operator interface.
Query Parameters: search, sort, limit (same as selection input v1)
Note: Stored keys for user agents/referrers are URL-safe base64; responses decode them to human-readable values.
Base URL
https://<manager-host>/api/v1/operator_ui
Endpoints
Blocked Household Tokens
GET /api/v1/operator_ui/modules/blocked_tokens
List all blocked household tokens.
Success Response (200):
[
{
"household_token": "house-001_token-abc",
"expire_time": 1625247600
}
]
GET /api/v1/operator_ui/modules/blocked_tokens/{token}
Get details for a specific blocked token.
Success Response (200):
{
"household_token": "house-001_token-abc",
"expire_time": 1625247600
}
Blocked User Agents
GET /api/v1/operator_ui/modules/blocked_user_agents
List all blocked user agents.
Success Response (200):
[
{
"user_agent": "Mozilla/5.0 (Windows NT 10.0; Win64; x64)"
},
{
"user_agent": "curl/7.68.0"
}
]
GET /api/v1/operator_ui/modules/blocked_user_agents/{encoded}
Get details for a specific blocked user agent. The path variable is URL-safe base64 encoded.
Example:
# Encode the user agent
ENC=$(python3 -c "import base64; print(base64.urlsafe_b64encode(b'curl/7.68.0').decode().rstrip('='))")
# Get details
curl -s "https://cdn-manager/api/v1/operator_ui/modules/blocked_user_agents/$ENC"
Blocked Referrers
GET /api/v1/operator_ui/modules/blocked_referrers
List all blocked referrers.
Success Response (200):
[
{
"referrer": "https://spam-example.com"
}
]
GET /api/v1/operator_ui/modules/blocked_referrers/{encoded}
Get details for a specific blocked referrer. The path variable is URL-safe base64 encoded.
Example:
# Encode the referrer
ENC=$(python3 -c "import base64; print(base64.urlsafe_b64encode(b'spam-example.com').decode().rstrip('='))")
# Get details
curl -s "https://cdn-manager/api/v1/operator_ui/modules/blocked_referrers/$ENC"
URL-Safe Base64 Encoding
The Operator UI API uses URL-safe base64 encoding for path parameters. To encode values:
Python:
import base64
# Encode
encoded = base64.urlsafe_b64encode(b'value').decode().rstrip('=')
# Decode
decoded = base64.urlsafe_b64decode(encoded + '=' * (-len(encoded) % 4)).decode()
Bash (with openssl):
# Encode
echo -n "value" | openssl base64 -urlsafe | tr -d '='
# Decode
echo "encoded" | openssl base64 -urlsafe -d
Next Steps
- OpenAPI Specification - Complete API specification
10.10.11 - OpenAPI Specification
Overview
The CDN Manager API is documented using the OpenAPI 3.0 specification. This appendix provides the complete specification for reference and for generating API clients.
OpenAPI Specification (YAML)
openapi: 3.0.3
info:
title: AgileTV CDN Manager API
version: "1.0"
servers:
- url: https://<manager-host>/api
description: CDN Manager API server
paths:
/v1/auth/login:
post:
summary: Login and create session
requestBody:
required: true
content:
application/json:
schema:
$ref: '#/components/schemas/LoginRequest'
responses:
'200':
description: Session created
content:
application/json:
schema:
$ref: '#/components/schemas/LoginResponse'
'401': { description: Unauthorized, content: { application/json: { schema: { $ref: '#/components/schemas/ErrorResponse' } } } }
'500': { description: Internal error, content: { application/json: { schema: { $ref: '#/components/schemas/ErrorResponse' } } } }
/v1/auth/token:
post:
summary: Exchange session for access token
requestBody:
required: true
content:
application/json:
schema:
$ref: '#/components/schemas/TokenRequest'
responses:
'200':
description: Access token
content:
application/json:
schema:
$ref: '#/components/schemas/TokenResponse'
'401': { description: Unauthorized, content: { application/json: { schema: { $ref: '#/components/schemas/ErrorResponse' } } } }
'500': { description: Internal error, content: { application/json: { schema: { $ref: '#/components/schemas/ErrorResponse' } } } }
/v1/auth/logout:
post:
summary: Revoke session
requestBody:
required: true
content:
application/json:
schema:
$ref: '#/components/schemas/LogoutRequest'
responses:
'200': { description: Revoked, content: { application/json: { schema: { $ref: '#/components/schemas/LogoutResponse' } } } }
'401': { description: Unauthorized, content: { application/json: { schema: { $ref: '#/components/schemas/ErrorResponse' } } } }
'500': { description: Internal error, content: { application/json: { schema: { $ref: '#/components/schemas/ErrorResponse' } } } }
/v1/selection_input{tail}:
get:
summary: Read selection input
parameters:
- $ref: '#/components/parameters/Tail'
- $ref: '#/components/parameters/Search'
- $ref: '#/components/parameters/Sort'
- $ref: '#/components/parameters/Limit'
responses:
'200': { description: JSON value }
'400': { description: Bad request, content: { application/json: { schema: { $ref: '#/components/schemas/ErrorResponse' } } } }
'404': { description: Not found }
'500': { description: Backend failure }
post:
summary: Merge selection input
parameters:
- $ref: '#/components/parameters/Tail'
- $ref: '#/components/parameters/Ttl'
requestBody:
required: true
content:
application/json:
schema:
$ref: '#/components/schemas/AnyJson'
responses:
'201': { description: Created, content: { application/json: { schema: { $ref: '#/components/schemas/AnyJson' } } } }
'500': { description: Backend failure }
'503': { description: Service unavailable }
delete:
summary: Delete selection input
parameters:
- $ref: '#/components/parameters/Tail'
responses:
'204': { description: Deleted }
'503': { description: Service unavailable }
/v2/selection_input{tail}:
get:
summary: Read selection input v2
parameters:
- $ref: '#/components/parameters/TailV2'
- $ref: '#/components/parameters/Search'
responses:
'200': { description: JSON value }
'400': { description: Invalid search pattern }
'404': { description: Not found }
'500': { description: Backend failure }
put:
summary: Replace selection input v2
parameters:
- $ref: '#/components/parameters/TailV2'
- $ref: '#/components/parameters/Ttl'
- $ref: '#/components/parameters/CorrelationId'
requestBody:
required: true
content:
application/json:
schema:
$ref: '#/components/schemas/AnyJson'
responses:
'200': { description: Updated }
'500': { description: Backend failure }
post:
summary: Push to selection input v2
parameters:
- $ref: '#/components/parameters/TailV2'
- $ref: '#/components/parameters/Ttl'
- $ref: '#/components/parameters/CorrelationId'
requestBody:
required: true
content:
application/json:
schema:
$ref: '#/components/schemas/AnyJson'
responses:
'200': { description: Pushed }
'500': { description: Backend failure }
delete:
summary: Delete selection input v2
parameters:
- $ref: '#/components/parameters/TailV2'
responses:
'204': { description: Deleted }
'500': { description: Backend failure }
/v1/configuration:
get:
summary: Read configuration
responses:
'200': { description: Configuration, content: { application/json: { schema: { $ref: '#/components/schemas/AnyJson' } } }, headers: { ETag: { schema: { type: string } } } }
'304': { description: Not modified }
'500': { description: Backend failure }
put:
summary: Replace configuration
requestBody:
required: true
content:
application/json:
schema:
$ref: '#/components/schemas/AnyJson'
responses:
'200': { description: Replaced }
'500': { description: Backend failure }
delete:
summary: Delete configuration
responses:
'200': { description: Deleted }
'500': { description: Backend failure }
/v1/routing/geoip:
get:
summary: GeoIP lookup
parameters:
- name: ip
in: query
required: true
schema: { type: string }
responses:
'200': { description: GeoIP data, content: { application/json: { schema: { $ref: '#/components/schemas/GeoIpResponse' } } } }
'400': { description: Invalid IP }
'500': { description: Backend failure }
/v1/routing/validate:
get:
summary: Validate routing
parameters:
- name: ip
in: query
required: true
schema: { type: string }
responses:
'200': { description: Allowed }
'403': { description: Access Denied }
'400': { description: Invalid IP }
'500': { description: Backend failure }
/v1/metrics:
post:
summary: Ingest metrics
requestBody:
required: true
content:
application/json:
schema:
$ref: '#/components/schemas/MetricsIngress'
responses:
'200': { description: Stored }
'500': { description: Validation/back-end error }
get:
summary: Aggregate metrics
responses:
'200': { description: Aggregated metrics, content: { application/json: { schema: { $ref: '#/components/schemas/AnyJson' } } } }
'500': { description: Backend failure }
/v1/discovery/hosts:
get:
summary: List discovered hosts by namespace
responses:
'200':
description: Discovered hosts keyed by namespace
content:
application/json:
schema:
type: object
additionalProperties:
type: array
items:
$ref: '#/components/schemas/DiscoveryHost'
'500': { description: Backend failure }
/v1/discovery/namespaces:
get:
summary: List discovery namespaces with Confd URIs
responses:
'200':
description: Namespaces with Confd links
content:
application/json:
schema:
type: array
items:
$ref: '#/components/schemas/DiscoveryNamespace'
'500': { description: Backend failure }
/v1/datastore:
get:
summary: List datastore keys
responses:
'200': { description: Keys list, content: { application/json: { schema: { type: array, items: { type: string } } } } }
'500': { description: Backend failure }
/v1/datastore/{key}:
get:
summary: Get a JSON value by key
parameters:
- name: key
in: path
required: true
schema: { type: string }
responses:
'200': { description: JSON value, content: { application/json: { schema: { $ref: '#/components/schemas/AnyJson' } } } }
'404': { description: Not found }
'500': { description: Backend failure }
post:
summary: Create a JSON value at key
parameters:
- name: key
in: path
required: true
schema: { type: string }
- $ref: '#/components/parameters/Ttl'
requestBody:
required: true
content:
application/json:
schema:
$ref: '#/components/schemas/AnyJson'
responses:
'201': { description: Created }
'409': { description: Conflict (already exists) }
'500': { description: Backend failure }
put:
summary: Update/replace a JSON value at key
parameters:
- name: key
in: path
required: true
schema: { type: string }
- $ref: '#/components/parameters/Ttl'
requestBody:
required: true
content:
application/json:
schema:
$ref: '#/components/schemas/AnyJson'
responses:
'200': { description: Updated }
'404': { description: Not found }
'500': { description: Backend failure }
delete:
summary: Delete a datastore key
parameters:
- name: key
in: path
required: true
schema: { type: string }
responses:
'204': { description: Deleted }
'500': { description: Backend failure }
/v1/subnets:
get:
summary: List all subnet mappings
responses:
'200': { description: Subnet mappings, content: { application/json: { schema: { type: object, additionalProperties: { type: string } } } } }
'500': { description: Backend failure }
put:
summary: Create or update subnet mappings
requestBody:
required: true
content:
application/json:
schema:
type: object
additionalProperties:
type: string
description: Map of CIDR strings to classification values
responses:
'200': { description: Created }
'400': { description: Invalid CIDR format }
'500': { description: Backend failure }
delete:
summary: Delete all subnet mappings
responses:
'204': { description: Deleted }
'500': { description: Backend failure }
/v1/subnets/byKey/{subnet}:
get:
summary: Get subnet mappings by CIDR prefix
parameters:
- name: subnet
in: path
required: true
schema: { type: string }
responses:
'200': { description: Subnet mappings, content: { application/json: { schema: { type: object, additionalProperties: { type: string } } } } }
'500': { description: Backend failure }
delete:
summary: Delete subnet mappings by CIDR prefix
parameters:
- name: subnet
in: path
required: true
schema: { type: string }
responses:
'204': { description: Deleted }
'500': { description: Backend failure }
/v1/subnets/byValue/{value}:
get:
summary: Get subnet mappings by value
parameters:
- name: value
in: path
required: true
schema: { type: string }
responses:
'200': { description: Subnet mappings, content: { application/json: { schema: { type: object, additionalProperties: { type: string } } } } }
'500': { description: Backend failure }
delete:
summary: Delete subnet mappings by value
parameters:
- name: value
in: path
required: true
schema: { type: string }
responses:
'204': { description: Deleted }
'500': { description: Backend failure }
/v1/operator_ui/modules/blocked_tokens:
get:
summary: List blocked tokens
parameters:
- $ref: '#/components/parameters/Search'
- $ref: '#/components/parameters/Sort'
- $ref: '#/components/parameters/Limit'
responses:
'200': { description: Blocked tokens, content: { application/json: { schema: { type: array, items: { $ref: '#/components/schemas/BlockedToken' } } } } }
'400': { description: Parse error, content: { application/json: { schema: { $ref: '#/components/schemas/ErrorResponse' } } } }
/v1/operator_ui/modules/blocked_tokens/{token}:
get:
summary: Get blocked token
parameters:
- name: token
in: path
required: true
schema: { type: string }
responses:
'200': { description: Blocked token, content: { application/json: { schema: { $ref: '#/components/schemas/BlockedToken' } } } }
'404': { description: Not found }
'400': { description: Parse error, content: { application/json: { schema: { $ref: '#/components/schemas/ErrorResponse' } } } }
/v1/operator_ui/modules/blocked_user_agents:
get:
summary: List blocked user agents
parameters:
- $ref: '#/components/parameters/Search'
- $ref: '#/components/parameters/Sort'
- $ref: '#/components/parameters/Limit'
responses:
'200': { description: Blocked user agents, content: { application/json: { schema: { type: array, items: { $ref: '#/components/schemas/BlockedUserAgent' } } } } }
'400': { description: Parse error, content: { application/json: { schema: { $ref: '#/components/schemas/ErrorResponse' } } } }
/v1/operator_ui/modules/blocked_user_agents/{encoded}:
get:
summary: Get blocked user agent
parameters:
- name: encoded
in: path
required: true
schema: { type: string }
responses:
'200': { description: Blocked user agent, content: { application/json: { schema: { $ref: '#/components/schemas/BlockedUserAgent' } } } }
'400': { description: Parse error, content: { application/json: { schema: { $ref: '#/components/schemas/ErrorResponse' } } } }
/v1/operator_ui/modules/blocked_referrers:
get:
summary: List blocked referrers
parameters:
- $ref: '#/components/parameters/Search'
- $ref: '#/components/parameters/Sort'
- $ref: '#/components/parameters/Limit'
responses:
'200': { description: Blocked referrers, content: { application/json: { schema: { type: array, items: { $ref: '#/components/schemas/BlockedReferrer' } } } } }
'400': { description: Parse error, content: { application/json: { schema: { $ref: '#/components/schemas/ErrorResponse' } } } }
/v1/operator_ui/modules/blocked_referrers/{encoded}:
get:
summary: Get blocked referrer
parameters:
- name: encoded
in: path
required: true
schema: { type: string }
responses:
'200': { description: Blocked referrer, content: { application/json: { schema: { $ref: '#/components/schemas/BlockedReferrer' } } } }
'400': { description: Parse error, content: { application/json: { schema: { $ref: '#/components/schemas/ErrorResponse' } } } }
/v1/health/alive:
get:
summary: Liveness check
responses:
'200': { description: Alive, content: { application/json: { schema: { $ref: '#/components/schemas/HealthStatus' } } } }
/v1/health/ready:
get:
summary: Readiness check
responses:
'200': { description: Ready, content: { application/json: { schema: { $ref: '#/components/schemas/HealthStatus' } } } }
'503': { description: Unready, content: { application/json: { schema: { $ref: '#/components/schemas/HealthStatus' } } } }
components:
parameters:
Tail:
name: tail
in: path
required: true
schema: { type: string }
TailV2:
name: tail
in: path
required: true
schema: { type: string }
Search:
name: search
in: query
required: false
schema: { type: string }
Sort:
name: sort
in: query
required: false
schema: { type: string, enum: [asc, desc] }
Limit:
name: limit
in: query
required: false
schema: { type: integer, minimum: 1 }
Ttl:
name: ttl
in: query
required: false
schema: { type: string, description: Humantime duration }
CorrelationId:
name: correlation_id
in: query
required: false
schema: { type: string }
schemas:
LoginRequest:
type: object
required: [email, password]
properties:
email: { type: string, format: email }
password: { type: string, format: password }
LoginResponse:
type: object
properties:
session_id: { type: string }
session_token: { type: string }
verified_at: { type: string, format: date-time }
expires_at: { type: string, format: date-time }
LogoutRequest:
type: object
required: [session_id]
properties:
session_id: { type: string }
session_token: { type: string }
LogoutResponse:
type: object
properties:
status: { $ref: '#/components/schemas/StatusValue' }
TokenRequest:
type: object
required: [session_id, session_token, grant_type]
properties:
session_id: { type: string }
session_token: { type: string }
scope: { type: string }
grant_type: { type: string, enum: [session] }
TokenResponse:
type: object
required: [access_token, scope, expires_in, token_type]
properties:
access_token: { type: string }
scope: { type: string }
expires_in: { type: integer, format: int64 }
token_type: { type: string, enum: [bearer] }
ErrorResponse:
type: object
properties:
message: { type: string }
AnyJson:
description: Arbitrary JSON value
MetricsIngress:
type: object
additionalProperties:
type: object
additionalProperties: { type: number }
GeoIpResponse:
type: object
properties:
city:
type: object
properties:
name: { type: string }
asn: { type: integer }
is_anonymous: { type: boolean }
BlockedToken:
type: object
properties:
household_token: { type: string }
expire_time: { type: integer, format: int64 }
BlockedUserAgent:
type: object
properties:
user_agent: { type: string }
BlockedReferrer:
type: object
properties:
referrer: { type: string }
DiscoveryHost:
type: object
properties:
name: { type: string }
DiscoveryNamespace:
type: object
properties:
namespace: { type: string }
confd_uri: { type: string }
HealthStatus:
type: object
properties:
status: { $ref: '#/components/schemas/StatusValue' }
StatusValue:
type: string
enum: [Ok, Fail]
Using the OpenAPI Specification
Generating API Clients
The OpenAPI specification can be used to generate client libraries in multiple languages:
Using openapi-generator:
# Generate Python client
openapi-generator generate -i openapi.yaml -g python -o ./python-client
# Generate TypeScript client
openapi-generator generate -i openapi.yaml -g typescript-axios -o ./typescript-client
# Generate Go client
openapi-generator generate -i openapi.yaml -g go -o ./go-client
Using swagger-codegen:
swagger-codegen generate -i openapi.yaml -l python -o ./python-client
Validating the Specification
To validate the OpenAPI specification:
# Using swagger-cli
swagger-cli validate openapi.yaml
# Using spectral
spectral lint openapi.yaml
Next Steps
- Authentication API - Detailed authentication flow
- API Guide Index - Browse all API documentation
- Operations Guide - Day-to-day operational procedures
10.11 - Troubleshooting Guide
Overview
This guide provides troubleshooting procedures for common issues encountered when operating the AgileTV CDN Manager (ESB3027). Use the diagnostic commands and resolution steps to identify and resolve problems.
Diagnostic Tools
Cluster Status
# Check node status
kubectl get nodes
# Check all pods
kubectl get pods -A
# Check events sorted by time
kubectl get events --sort-by='.lastTimestamp'
# Check resource usage
kubectl top nodes
kubectl top pods
Component Status
# Check deployments
kubectl get deployments
# Check statefulsets
kubectl get statefulsets
# Check persistent volumes
kubectl get pvc
kubectl get pv
# Check services
kubectl get services
# Check ingress
kubectl get ingress
Common Issues
Pods Stuck in Pending State
Symptoms: Pods remain in Pending state indefinitely.
Causes:
- Insufficient cluster resources (CPU/memory)
- No nodes match scheduling constraints
- PersistentVolume not available
Diagnosis:
# Describe the pending pod
kubectl describe pod <pod-name>
# Check events for scheduling failures
kubectl get events --field-selector reason=FailedScheduling
# Check node capacity
kubectl describe nodes | grep -A 5 "Allocated resources"
# Check available PVs
kubectl get pv
Resolution:
# Free up resources by scaling down non-critical workloads
kubectl scale deployment <deployment> --replicas=0
# Or add additional nodes to the cluster
# If PV is stuck, delete and recreate
kubectl delete pvc <pvc-name>
kubectl delete pod <pod-name>
Pods Stuck in ContainerCreating
Symptoms: Pods remain in ContainerCreating state.
Causes:
- Image pull failures
- Volume mount issues
- Network configuration problems
Diagnosis:
kubectl describe pod <pod-name>
# Check for image pull errors
kubectl get events | grep -i "failed to pull"
# Check volume mount status
kubectl get events | grep -i "mount"
Resolution:
# For image pull issues, verify image exists and credentials
kubectl get secret <pull-secret-name> -o yaml
# For volume issues, check Longhorn volume status
kubectl get volumes -n longhorn-system
# Delete stuck pod to trigger recreation
kubectl delete pod <pod-name> --force --grace-period=0
Persistent Volume Mount Failures
Symptoms: Pod fails to start with error “AttachVolume.Attach failed for volume… is not ready for workloads” or similar volume attachment errors.
Causes:
- Longhorn volume created but unable to be successfully mounted
- Network connectivity issues between nodes (Longhorn requires iSCSI and NFS traffic)
- Longhorn service unhealthy
- Incorrect storage class configuration
Diagnosis:
# Describe the failing pod to see the error
kubectl describe pod <pod-name>
# Check Longhorn volumes status
kubectl get volumes -n longhorn-system
# Check Longhorn UI for detailed volume status
kubectl port-forward -n longhorn-system svc/longhorn-frontend 8080:80
# Access: http://localhost:8080
Resolution:
# Verify firewall allows Longhorn traffic between nodes
# Ports 9500 and 8500 must be open (see Networking Guide)
# Check Longhorn is healthy
kubectl get pods -n longhorn-system
# If volume is stuck, delete PVC and pod to trigger recreation
kubectl delete pvc <pvc-name>
kubectl delete pod <pod-name>
Pods in CrashLoopBackOff
Symptoms: Pods repeatedly crash and restart.
Causes:
- Application configuration errors
- Missing dependencies (database not ready)
- Resource limits too low
- Liveness probe failures
Diagnosis:
# View current logs
kubectl logs <pod-name>
# View previous instance logs
kubectl logs <pod-name> -p
# Describe pod for restart reasons
kubectl describe pod <pod-name>
# Check if dependencies are healthy
kubectl get pods | grep -E "(postgres|kafka|redis)"
Resolution:
# For dependency issues, wait for dependencies to be ready
kubectl wait --for=condition=Ready pod/<dependency-pod> --timeout=300s
# For resource issues, increase limits
kubectl edit deployment <deployment-name>
# For configuration issues, check ConfigMaps and Secrets
kubectl get configmap <configmap-name> -o yaml
kubectl get secret <secret-name> -o yaml
# Restart the deployment
kubectl rollout restart deployment/<deployment-name>
Pods in Terminating State
Symptoms: Pods stuck in Terminating state indefinitely.
Causes:
- Volume detachment issues
- Node communication problems
- Finalizer blocking deletion
Diagnosis:
kubectl describe pod <pod-name>
# Check if node is reachable
kubectl get nodes
# Check finalizers
kubectl get pod <pod-name> -o jsonpath='{.metadata.finalizers}'
Resolution:
# Force delete the pod
kubectl delete pod <pod-name> --force --grace-period=0
# If node is unreachable, drain and remove from cluster
kubectl drain <node-name> --ignore-daemonsets --force
kubectl delete node <node-name>
Service Unreachable
Symptoms: Service endpoints not accessible.
Causes:
- No ready pods backing the service
- Network policy blocking traffic
- Service port mismatch
Diagnosis:
# Check service endpoints
kubectl get endpoints <service-name>
# Check if pods are ready
kubectl get pods -l app=<label>
# Check network policies
kubectl get networkpolicies
# Test connectivity from within cluster
kubectl run test --rm -it --image=busybox -- wget -O- <service-name>:<port>
Resolution:
# Ensure pods are ready and matching service selector
kubectl get pods --show-labels
# Check service selector matches pod labels
kubectl get service <service-name> -o jsonpath='{.spec.selector}'
# Temporarily disable network policy for testing
kubectl edit networkpolicy <policy-name>
Ingress Not Working
Symptoms: External access via ingress fails.
Causes:
- Traefik ingress controller not running
- Ingress configuration errors
- TLS certificate issues
- DNS resolution problems
Diagnosis:
# Check Traefik pods
kubectl get pods -n kube-system -l app.kubernetes.io/name=traefik
# Check ingress resources
kubectl get ingress
# Describe ingress for errors
kubectl describe ingress <ingress-name>
# Check Traefik logs
kubectl logs -n kube-system -l app.kubernetes.io/name=traefik
# Test DNS resolution
nslookup <hostname>
Resolution:
# Restart Traefik
kubectl rollout restart deployment -n kube-system traefik
# Fix ingress configuration
kubectl edit ingress <ingress-name>
# Renew or recreate TLS secret
kubectl create secret tls <secret-name> --cert=tls.crt --key=tls.key \
--dry-run=client -o yaml | kubectl apply -f -
# Verify hostname matches certificate
openssl x509 -in tls.crt -noout -subject -issuer
Database Connection Failures
Symptoms: Application cannot connect to PostgreSQL.
Causes:
- PostgreSQL cluster not ready
- Connection pool exhausted
- Network connectivity issues
- Authentication failures
Diagnosis:
# Check PostgreSQL cluster status
kubectl get clusters
# Check PostgreSQL pods
kubectl get pods -l app.kubernetes.io/name=postgresql
# Check PostgreSQL logs
kubectl logs -l app.kubernetes.io/name=postgresql
# Test connectivity
kubectl exec -it <app-pod> -- psql -h <postgres-service> -U <user> -d <database>
Resolution:
# Wait for PostgreSQL to be ready
kubectl wait --for=condition=Ready pod -l app.kubernetes.io/name=postgresql --timeout=300s
# Check connection string in application config
kubectl get secret <secret-name> -o jsonpath='{.data}' | base64 -d
# Restart application pods
kubectl rollout restart deployment/<deployment-name>
Kafka Connection Issues
Symptoms: Application cannot connect to Kafka.
Causes:
- Kafka controllers not ready
- Topic not created
- Network connectivity issues
Diagnosis:
# Check Kafka pods
kubectl get pods -l app.kubernetes.io/name=kafka
# Check Kafka logs
kubectl logs -l app.kubernetes.io/name=kafka
# List topics
kubectl exec -it <kafka-pod> -- kafka-topics.sh --bootstrap-server localhost:9092 --list
Resolution:
# Wait for Kafka controllers to be ready
kubectl wait --for=condition=Ready pod -l app.kubernetes.io/name=kafka --timeout=300s
# Create missing topic
kubectl exec -it <kafka-pod> -- kafka-topics.sh --bootstrap-server localhost:9092 \
--create --topic <topic-name> --partitions 3 --replication-factor 3
# Restart application to reconnect
kubectl rollout restart deployment/<deployment-name>
Redis Connection Issues
Symptoms: Application cannot connect to Redis.
Diagnosis:
# Check Redis pods
kubectl get pods -l app.kubernetes.io/name=redis
# Check Redis logs
kubectl logs -l app.kubernetes.io/name=redis
# Test connectivity
kubectl exec -it <redis-pod> -- redis-cli ping
Resolution:
# Wait for Redis to be ready
kubectl wait --for=condition=Ready pod -l app.kubernetes.io/name=redis --timeout=300s
# Restart application
kubectl rollout restart deployment/<deployment-name>
High Memory Usage
Symptoms: Pods approaching or hitting memory limits.
Diagnosis:
# Check memory usage
kubectl top pods
# Check OOMKilled pods
kubectl get pods --field-selector=status.phase=Failed
# Check for memory leaks in logs
kubectl logs <pod-name> | grep -i "memory\|oom"
Resolution:
# Temporarily increase memory limit
kubectl edit deployment <deployment-name>
# Or scale horizontally if HPA is enabled
kubectl scale deployment <deployment-name> --replicas=<n>
# Long-term: Update values.yaml and perform helm upgrade
High CPU Usage
Symptoms: Pods consistently using high CPU.
Diagnosis:
# Check CPU usage
kubectl top pods
# Check for runaway processes
kubectl top pods --sort-by=cpu
Resolution:
# Scale horizontally if HPA is enabled
kubectl scale deployment <deployment-name> --replicas=<n>
# Or increase CPU limits
kubectl edit deployment <deployment-name>
Persistent Volume Issues
Symptoms: PVC not binding or volume errors.
Diagnosis:
# Check PVC status
kubectl get pvc
# Check PV status
kubectl get pv
# Check Longhorn volumes
kubectl get volumes -n longhorn-system
# Check Longhorn UI for details
kubectl port-forward -n longhorn-system svc/longhorn-frontend 8080:80
Resolution:
# For stuck PVC, delete and recreate
kubectl delete pvc <pvc-name>
kubectl delete pod <pod-name>
# For Longhorn issues, check Longhorn UI
# Access via http://localhost:8080
# Recreate Longhorn volume if necessary
Zitadel Authentication Failures
Symptoms: Users cannot authenticate via Zitadel.
Causes:
- CORS configuration mismatch
- External domain misconfigured
- Zitadel pods not healthy
Diagnosis:
# Check Zitadel pods
kubectl get pods -l app.kubernetes.io/name=zitadel
# Check Zitadel logs
kubectl logs -l app.kubernetes.io/name=zitadel
# Verify external domain configuration
helm get values acd-manager -o yaml | grep -A 5 zitadel
Resolution:
# Ensure global.hosts.manager[0].host matches zitadel.zitadel.ExternalDomain
# Update values.yaml if needed
helm upgrade acd-manager /mnt/esb3027/charts/acd-manager \
--values ~/values.yaml
# Restart Zitadel
kubectl rollout restart deployment -l app.kubernetes.io/name=zitadel
Certificate Errors
Symptoms: TLS/SSL errors in browser or API calls.
Diagnosis:
# Check certificate expiration
kubectl get secret <tls-secret> -o jsonpath='{.data.tls\.crt}' | base64 -d | \
openssl x509 -noout -dates
# Check certificate subject
kubectl get secret <tls-secret> -o jsonpath='{.data.tls\.crt}' | base64 -d | \
openssl x509 -noout -subject -issuer
Resolution:
# Renew self-signed certificate
helm upgrade acd-manager /mnt/esb3027/charts/acd-manager \
--values ~/values.yaml \
--set ingress.selfSigned=true
# Or update manual certificate
kubectl create secret tls <secret-name> \
--cert=new-cert.crt --key=new-key.key \
--dry-run=client -o yaml | kubectl apply -f -
# Restart pods to pick up new certificate
kubectl rollout restart deployment <deployment-name>
Log Collection
Collecting Logs for Support
# Capture timestamp once to ensure consistency
TS=$(date +%Y%m%d-%H%M%S)
# Create log collection directory
mkdir -p ~/cdn-logs-$TS
cd ~/cdn-logs-$TS
# Collect pod logs
for pod in $(kubectl get pods -o name); do
kubectl logs $pod > ${pod#pod/}.log 2>&1
kubectl logs $pod -p > ${pod#pod/}.previous.log 2>&1 || true
done
# Collect cluster events
kubectl get events --sort-by='.lastTimestamp' > events.log
# Collect pod descriptions
for pod in $(kubectl get pods -o name); do
kubectl describe $pod > ${pod#pod/}.describe.txt
done
# Compress for transfer
tar czf cdn-logs-$TS.tar.gz *.log *.txt
Emergency Procedures
Complete Cluster Recovery
If the cluster is completely down:
Assess node status:
kubectl get nodesRestart K3s on nodes:
# On each node systemctl restart k3sIf primary server failed:
- Promote another server node
- Update load balancer/DNS to point to new primary
Restore from backup if necessary:
- See Upgrade Guide for restore procedures
Data Recovery
For data recovery scenarios:
- PostgreSQL: Use Cloudnative PG backup/restore
- Longhorn: Restore from volume snapshots
- Kafka: Replication handles most failures
Getting Help
If issues persist:
- Collect logs using the procedure above
- Check release notes for known issues
- Contact support with log bundle and issue description
Next Steps
After resolving issues:
- Operations Guide - Preventive maintenance procedures
- Configuration Guide - Verify configuration is correct
- Architecture Guide - Understand component dependencies
10.12 - Glossary
Overview
This glossary defines key terms and acronyms used throughout the AgileTV CDN Manager (ESB3027) documentation.
A
ACD (Agile Content Delivery)
The overall CDN solution comprising the Manager (ESB3027) and Director (ESB3024) components.
Agent Node
A Kubernetes node that runs workloads but does not participate in the control plane. Agent nodes provide additional capacity for running application pods.
API Gateway
See NGinx Gateway.
ASN (Autonomous System Number)
A unique identifier for a network on the internet. Used in GeoIP-based routing decisions.
C
CDN Director
The Edge Server Business (ESB3024) component that handles actual content routing and delivery. Multiple Directors can be managed by a single CDN Manager.
Cloudnative PG (CNPG)
A Kubernetes operator that manages PostgreSQL clusters. Provides high availability, automatic failover, and backup capabilities for the Manager’s database layer.
Confd
Configuration daemon that synchronizes configuration from the Manager to CDN Directors. Runs as a sidecar or separate deployment.
CORS (Cross-Origin Resource Sharing)
A security mechanism that allows web applications to make requests to a different domain. Zitadel enforces CORS policies requiring the external domain to match the configured hostname.
CrashLoopBackOff
A Kubernetes pod state indicating the container is repeatedly crashing and being restarted. Typically indicates a configuration or dependency issue.
D
Datastore
The internal key-value storage system used by the Manager for short-lived or simple structured data. Backed by Redis.
Descheduler
A Kubernetes component that periodically analyzes pod distribution and evicts pods from overutilized nodes to optimize cluster balance.
Director
See CDN Director.
E
EDB (EnterpriseDB)
A company that provides PostgreSQL-related software and services. The Cloudnative PG operator was originally developed by EDB.
Ephemeral Storage
Temporary storage available to pods. Used for temporary files and caches. Not persistent across pod restarts.
ESB (Edge Server Business)
The product family designation for CDN components. ESB3027 is the Manager, ESB3024 is the Director.
etcd
A distributed key-value store used by Kubernetes for cluster state management. Runs on Server nodes as part of the control plane.
F
FailedScheduling
A Kubernetes event indicating a pod could not be scheduled due to insufficient resources or scheduling constraints.
Flannel
A network overlay solution for Kubernetes. Provides VXLAN-based networking for pod-to-pod communication.
Frontend GUI
See MIB Frontend.
G
GeoIP
Geographic IP lookup service using MaxMind databases. Used for location-based routing decisions.
Grafana
A visualization and dashboard platform for time-series data. Used to display metrics collected by Telegraf and stored in VictoriaMetrics.
H
Helm Chart
A package of pre-configured Kubernetes resources. The CDN Manager is deployed via a Helm chart that handles all component installation.
HPA (Horizontal Pod Autoscaler)
A Kubernetes feature that automatically scales the number of pods based on CPU/memory utilization or custom metrics.
HTTP Server
The main API server component of the Manager, built with Actix Web (Rust framework).
I
Ingress
A Kubernetes resource that exposes HTTP/HTTPS routes from outside the cluster to services within. The CDN Manager uses Traefik as the ingress controller.
Ingress Controller
A component that implements ingress rules. The CDN Manager uses Traefik for primary ingress and NGinx for external Director communication.
K
Kafka
A distributed event streaming platform used by the Manager for asynchronous communication and event processing.
K3s
A lightweight Kubernetes distribution optimized for edge and production deployments. Used as the underlying cluster technology.
Kubernetes (K8s)
An open-source container orchestration platform. The CDN Manager runs on a K3s-based Kubernetes cluster.
L
Longhorn
A distributed block storage system for Kubernetes. Provides persistent volumes for stateful components like PostgreSQL and Kafka.
Liveness Probe
A Kubernetes health check that determines if a container is running properly. Failed liveness probes trigger container restart.
M
Manager
The central management component (ESB3027) for configuring and monitoring CDN Directors.
MaxMind
A provider of IP intelligence databases including GeoIP City, GeoLite2 ASN, and Anonymous IP databases used by the Manager.
MIB Frontend
The web-based configuration GUI for CDN operators. Provides a user interface for managing streams, routers, and other configuration.
Multi-Factor Authentication (MFA)
An authentication method requiring multiple forms of verification. Note: MFA is not currently supported in the CDN Manager and should be skipped during setup.
N
Name-based Virtual Hosting
A technique where multiple hostnames are served from the same IP address. Zitadel uses this for CORS validation.
Namespace
A Kubernetes abstraction for organizing cluster resources. The CDN Manager uses namespaces to group related components.
NGinx Gateway
An NGinx-based gateway that handles external communication with CDN Directors.
Node Token
A secret token used to authenticate new nodes joining a K3s cluster. Located at /var/lib/rancher/k3s/server/node-token on Server nodes.
O
Operator
A method of packaging, deploying, and managing a Kubernetes application. Cloudnative PG is an operator for PostgreSQL.
OOMKilled
A Kubernetes pod state indicating the container was terminated due to exceeding memory limits.
P
PDB (Pod Disruption Budget)
A Kubernetes feature that ensures a minimum number of pods remain available during voluntary disruptions like maintenance.
PersistentVolume (PV)
A piece of storage in the Kubernetes cluster. Created dynamically by Longhorn for stateful components.
PersistentVolumeClaim (PVC)
A request for storage by a pod. Bound to a PersistentVolume.
Pod
The smallest deployable unit in Kubernetes. Contains one or more containers.
PostgreSQL
An open-source relational database. Used by the Manager for persistent data storage, managed by Cloudnative PG.
Probe
A Kubernetes health check mechanism. Types include liveness, readiness, and startup probes.
Prometheus
An open-source monitoring and alerting toolkit. Telegraf exports metrics in Prometheus format.
R
RBAC (Role-Based Access Control)
A method of regulating access to resources based on user roles. Used by Kubernetes for authorization.
Readiness Probe
A Kubernetes health check that determines if a container is ready to receive traffic. Failed readiness probes remove the pod from service load balancing.
Redis
An in-memory data structure store used for caching and as the datastore backend for the Manager.
Replica
A copy of a pod. Multiple replicas provide high availability and load distribution.
Resource Preset
Predefined resource configurations (nano, micro, small, medium, large, xlarge, 2xlarge) for common deployment sizes.
Rolling Update
A deployment strategy that updates pods one at a time to maintain availability during upgrades.
S
Selection Input
A key-value storage mechanism used for configuration data that can be queried with wildcard patterns. Available in v1 and v2 APIs with different semantics.
Server Node
A Kubernetes node that participates in the control plane (etcd, API server). Can also run workloads unless tainted.
Service
A Kubernetes abstraction that defines a logical set of pods and a policy for accessing them. Provides stable networking endpoints.
ServiceAccount
A Kubernetes identity for processes running in pods. Used for authentication between Kubernetes components.
StatefulSet
A Kubernetes workload API object for managing stateful applications. Used for PostgreSQL and Kafka deployments.
Startup Probe
A Kubernetes health check that determines if a container application has started. Disables liveness and readiness checks until it succeeds.
Stream
A content stream configuration defining source and routing parameters.
T
Telegraf
An agent for collecting, processing, aggregating, and writing metrics. Runs on each node to gather system and application metrics.
TLS (Transport Layer Security)
A cryptographic protocol for secure communication. The CDN Manager uses TLS for all external HTTPS connections.
Topology Aware Hints
A Kubernetes feature that prefers routing traffic to pods in the same zone as the source. Reduces latency by keeping traffic local.
Traefik
A modern HTTP reverse proxy and ingress controller. Used as the primary ingress controller for the CDN Manager.
TTL (Time To Live)
The duration after which data expires. Used in the datastore and selection input APIs.
V
Values.yaml
The Helm chart configuration file. Contains all configurable parameters for the CDN Manager deployment.
VictoriaMetrics
A time-series database used for storing metrics data. Provides long-term storage and querying capabilities.
VXLAN
Virtual Extensible LAN. A network virtualization technology used by Flannel for pod networking.
Z
Zitadel
An identity and access management (IAM) platform used for authentication and authorization in the CDN Manager. Provides OAuth2/OIDC capabilities.
Default Credentials
The following table lists all default credentials used by the CDN Manager. Change these defaults before deploying to production.
| Service | Username | Password | Notes |
|---|---|---|---|
| Zitadel Console | admin@agiletv.dev | Password1! | Primary identity management; accessed at /ui/console |
Security Warning: Use the default
admin@agiletv.devaccount only to create a new administrator account with proper roles. After verifying the new account works, disable or delete the default admin account before exposing the system to users. For details on required roles and administrator permissions, see Zitadel’s Administrator Documentation. See the Next Steps Guide for initial configuration procedures.
Common Abbreviations
| Abbreviation | Meaning |
|---|---|
| API | Application Programming Interface |
| ASN | Autonomous System Number |
| CORS | Cross-Origin Resource Sharing |
| CPU | Central Processing Unit |
| DNS | Domain Name System |
| EDB | EnterpriseDB |
| ESB | Edge Server Business |
| GUI | Graphical User Interface |
| HA | High Availability |
| Helm | Helm Package Manager |
| HPA | Horizontal Pod Autoscaler |
| HTTP | Hypertext Transfer Protocol |
| HTTPS | HTTP Secure |
| IAM | Identity and Access Management |
| IP | Internet Protocol |
| JSON | JavaScript Object Notation |
| K8s | Kubernetes |
| MFA | Multi-Factor Authentication |
| MIB | Management Information Base |
| NIC | Network Interface Card |
| OAuth | Open Authorization |
| OIDC | OpenID Connect |
| PVC | PersistentVolumeClaim |
| PV | PersistentVolume |
| RBAC | Role-Based Access Control |
| SSL | Secure Sockets Layer |
| TCP | Transmission Control Protocol |
| TLS | Transport Layer Security |
| TTL | Time To Live |
| UDP | User Datagram Protocol |
| UI | User Interface |
| VPA | Vertical Pod Autoscaler |
| VXLAN | Virtual Extensible LAN |
Next Steps
After reviewing terminology:
- Architecture Guide - Understand component relationships
- Configuration Guide - Full configuration reference
- Operations Guide - Day-to-day operational procedures
11 - AgileTV CDN Manager (esb3027)
11.1 - Getting Started
Overview
The AgileTV CDN Manager (product code ESB3027) is a cloud-native control plane for managing CDN deployments. It provides centralized orchestration for authentication, configuration, routing, and metrics collection across CDN infrastructure.
Before You Start:
- Deployment type: Lab (single-node) or Production (multi-node)? See Installation Guide
- Hardware: Nodes meeting specifications for your deployment type
- OS: RHEL 9 or compatible clone (Oracle Linux, AlmaLinux, Rocky Linux)
- Software: Installation ISO from AgileTV customer portal; Extras ISO for air-gapped
- Network: Firewall ports configured per Networking Guide
Deployment Models
| Deployment Model | Description | Typical Use Case |
|---|---|---|
| Self-Hosted | K3s Kubernetes cluster on customer premises | Production deployments |
| Lab/Single-Node | Minimal single-node installation | Acceptance testing, demonstrations, development |
Functionality remains consistent across deployment models.
Prerequisites
- Installation ISO: Obtain
esb3027-acd-manager-X.Y.Z.isofrom AgileTV customer portal - Extras ISO (air-gapped): Obtain
esb3027-acd-manager-extras-X.Y.Z.isofor offline installations - OS: RHEL 9 or compatible clone (Oracle Linux, AlmaLinux, Rocky Linux)
- Kubernetes familiarity: Basic understanding of pods, deployments, and Helm charts
For detailed hardware, network, and operating system requirements, see the System Requirements Guide.
Installation
Ready to install? The Installation Guide provides step-by-step procedures for both lab and production deployments:
- Lab/Single-Node: Quick deployment for testing and demonstrations
- Production/Multi-Node: High-availability cluster with 3+ nodes
See the Installation Guide to get started.
Accessing the System
Following successful deployment, the following interfaces are available:
| Service | URL Path | Authentication |
|---|---|---|
| MIB Frontend | /gui | Zitadel SSO |
| API Gateway | /api | Bearer token |
| Zitadel Console | /ui/console | See Glossary |
| Grafana | /grafana | See Glossary |
All services are accessed via https://<cluster-host><path>.
Note: A self-signed SSL certificate is deployed by default. When accessing services through a browser, you will need to accept the self-signed certificate warning. For production deployments, configure a valid SSL certificate before exposing the system to users.
Initial user configuration is performed through Zitadel. Refer to the Configuration Guide for authentication setup procedures. For detailed guidance on managing users, roles, and permissions in the Zitadel Console, see Zitadel’s User Management Documentation.
Documentation Navigation
The following guides provide detailed information for specific operational tasks:
| Guide | Description |
|---|---|
| System Requirements | Hardware, operating system, and network specifications |
| Architecture | Detailed system architecture and scaling guidance |
| Installation | Step-by-step installation and upgrade procedures |
| Configuration | System configuration and customization |
| Performance Tuning | Optimization tips for improved performance |
| API Guide | REST API reference and integration examples |
| Operations | Day-to-day operational procedures |
| Metrics & Monitoring | Monitoring dashboards and alerting configuration |
| Troubleshooting | Common issues and resolution procedures |
| Glossary | Definitions of technical terms |
| Release Notes | Version-specific changes and known issues |
11.2 - System Requirements Guide
Overview
This document specifies the hardware, operating system, and networking requirements for deploying the AgileTV CDN Manager (ESB3027). Requirements vary based on deployment type and node role within the cluster.
Cluster Sizing
Production Deployments
Production deployments require a minimum of three nodes to achieve high availability. The cluster architecture employs distinct node roles:
| Role | Description |
|---|---|
| Server Node (Control Plane Only) | Runs control plane components (etcd, Kubernetes API server) only; does not host application workloads; requires separate Agent nodes |
| Server Node (Combined) | Runs control plane components and hosts application workloads; default configuration |
| Agent Node | Executes application workloads only; does not participate in cluster quorum |
Server nodes can be deployed in either Control Plane Only or Combined role configurations. The choice depends on your deployment requirements:
- Control Plane Only: Dedicated control plane nodes with lower resource requirements; requires separate Agent nodes for workloads
- Combined: Server nodes run both control plane and workloads; minimum 3 nodes required for HA
Why Use Control Plane Only Nodes?
Dedicated Control Plane Only nodes provide several benefits for larger deployments:
- Resource Isolation: Control plane components (etcd, API server, scheduler) run on dedicated hardware without competing with application workloads for CPU and memory
- Stability: Application workload spikes or misbehaving pods cannot impact control plane performance
- Security: Smaller attack surface on control plane nodes; fewer containers and services running
- Predictable Performance: Control plane responsiveness remains consistent regardless of application load
- Flexible Sizing: Control Plane Only nodes can use lower-specification hardware (2 cores, 4 GiB) since they don’t run application workloads
For most small to medium deployments, Combined role servers are simpler and more cost-effective. Control Plane Only nodes are recommended for larger deployments with significant workload requirements or where control plane stability is critical.
High Availability Considerations
Production deployments require 3 nodes running control plane (etcd) and 3 nodes capable of running workloads. These can be the same nodes (Combined role) or separate nodes (CP-Only + Agent).
Node Role Combinations:
| Configuration | Control Plane Nodes | Workload Nodes | Total Nodes |
|---|---|---|---|
| All Combined | 3 Combined servers | 3 Combined servers | 3 |
| Separated | 3 CP-Only servers | 3 Agent nodes | 6 |
| Hybrid | 2 CP-Only + 1 Combined | 1 Combined + 2 Agent | 5 |
Any combination works as long as you have 3 control plane nodes and 3 workload-capable nodes.
Note: Regardless of the deployment configuration, a minimum of 3 nodes capable of running workloads is required for production deployments. This ensures both high availability and sufficient capacity for application pods.
For detailed fault tolerance information and data replication strategies, see the Architecture Guide.
Hardware Requirements
Single-Node Lab Deployment
Lab deployments are intended for acceptance testing, demonstrations, and development only. These configurations are not suitable for production workloads.
| Resource | Minimum | Recommended |
|---|---|---|
| CPU | 8 cores | 12 cores |
| Memory | 16 GiB | 24 GiB |
| Disk* | 128 GiB | 128 GiB |
Production Cluster - Server Node (Control Plane Only)
Server nodes dedicated to control plane functions have modest resource requirements:
| Resource | Minimum | Recommended |
|---|---|---|
| CPU | 2 cores | 4 cores |
| Memory | 4 GiB | 8 GiB |
| Disk* | 64 GiB | 128 GiB |
These nodes run only control plane components and require separate Agent nodes to run application workloads.
Production Cluster - Server Node (Control Plane + Workloads)
Combined role nodes require resources for both control plane and application workloads:
| Resource | Minimum | Recommended |
|---|---|---|
| CPU | 4 cores | 16 cores |
| Memory | 8 GiB | 32 GiB |
| Disk* | 100 GiB | 500 GiB |
Production Cluster - Agent Node
Agent nodes execute application workloads and require the following resources:
| Resource | Minimum | Recommended |
|---|---|---|
| CPU | 4 cores | 16 cores |
| Memory | 8 GiB | 32 GiB |
| Disk* | 100 GiB | 500 GiB |
Storage Notes
* Disk Space: All disk space values must be available in the
/var/lib/longhornpartition. It is recommended that/var/lib/longhornbe a separate partition on a fast SSD for optimal performance, though SSD is not strictly required.Longhorn Capacity: Longhorn storage requires an additional 30% capacity headroom for internal operations and scaling. If less than 30% of the total partition capacity is available, Longhorn may mark volumes as “full” and prevent further writes. Plan disk capacity accordingly.
Storage Performance
For optimal performance, the following storage characteristics are recommended:
- Disk Type: SSD or NVMe storage for Longhorn volumes
- Filesystem: XFS or ext4 with default mount options
- Partition Layout: Dedicated
/var/lib/longhornpartition for persistent storage
Virtual machines and bare-metal hardware are both supported. Nested virtualization (running multiple nodes under a single hypervisor) may impact performance and is not recommended for production deployments.
Operating System Requirements
Supported Operating Systems
The CDN Manager supports Red Hat Enterprise Linux and compatible distributions:
| Operating System | Status |
|---|---|
| Red Hat Enterprise Linux 9 | Supported |
| Red Hat Enterprise Linux 10 | Untested |
| Red Hat Enterprise Linux 8 | Not supported |
Compatible Clones
The following RHEL-compatible distributions are supported when major version requirements are satisfied:
- Oracle Linux 9
- AlmaLinux 9
- Rocky Linux 9
Air-Gapped Deployments
Important: For air-gapped deployments (no internet access), the OS installation ISO must be mounted on all nodes before running the installer or join commands. The installer needs to install one or more packages from the distribution’s repository.
Oracle Linux UEK Kernel
Note: For Oracle Linux 9.7 and later using the Unbreakable Enterprise Kernel (UEK), you must install the
kernel-uek-modules-extra-netfilter-$(uname -r)package before running the installer:# Mount OS ISO first (required for air-gapped) mount -o loop /path/to/oracle-linux-9.iso /mnt/iso # Install required kernel modules dnf install kernel-uek-modules-extra-netfilter-$(uname -r)This package provides netfilter kernel modules required by K3s and Longhorn.
SELinux
SELinux is supported when installed in “Enforcing” mode. The installation process will configure appropriate SELinux policies automatically.
Networking Requirements
Network Interface
Each cluster node must have at least one network interface card (NIC) configured as the default gateway. If the node lacks a pre-configured default route, one must be established prior to installation.
Port Requirements
The cluster requires the following network connectivity:
| Category | Ports | Purpose |
|---|---|---|
| Inter-Node | 2379-2380, 6443, 8472/UDP, 10250, 5001, 9500, 8500 | etcd, API server, Flannel VXLAN, Kubelet, Spegel, Longhorn |
| External Access | 80, 443 | HTTP redirect and HTTPS ingress |
| Application (optional) | 6379, 8125 TCP/UDP, 9093, 9095 | Redis, Telegraf, Alertmanager, Kafka external |
Important: Complete port requirements, network ranges, and firewall configuration procedures are provided in the Networking Guide. Do not expose VictoriaMetrics (8428, 8429), Grafana (3000), or PostgreSQL (5432) directly—access these services only through the secure HTTPS ingress (port 443).
Resource Planning
Calculating Cluster Capacity
When planning cluster capacity, consider the following factors:
- Base Overhead: Kubernetes system components consume approximately 1-2 cores and 2-4 GiB memory per node
- Application Workloads: Refer to individual component resource requirements in the Architecture Guide
- Headroom: Maintain 20-30% resource headroom for workload spikes and automatic scaling
Scaling Considerations
The CDN Manager supports horizontal scaling for most components. The Horizontal Pod Autoscaler (HPA) can automatically adjust replica counts based on resource utilization. Detailed scaling guidance is available in the Architecture Guide.
Example Production Deployment
A minimal production deployment with 3 server nodes (combined role) and 2 agent nodes would require:
| Node Type | Count | CPU Total | Memory Total | Disk Total |
|---|---|---|---|---|
| Server (Combined) | 3 | 12 cores | 24 GiB | 300 GiB |
| Agent | 2 | 8 cores | 16 GiB | 200 GiB |
| Total | 5 | 20 cores | 40 GiB | 500 GiB |
This configuration provides:
- High availability (survives loss of 1 server node)
- Capacity for application workloads across all nodes
- Headroom for horizontal scaling
Next Steps
After verifying system requirements:
- Review the Installation Guide for deployment procedures
- Consult the Networking Guide for firewall configuration
- Examine the Architecture Guide for component resource requirements
11.3 - Networking Guide
Network Architecture
Physical Network
Each cluster node must have at least one network interface card (NIC) configured as the default gateway. If the node lacks a pre-configured default route, it must be established prior to installation.
K3s requires a default route to auto-detect the node’s primary IP and for kube-proxy ClusterIP routing to function properly. If no default route exists, create a dummy interface as a workaround:
ip link add dummy0 type dummy
ip link set dummy0 up
ip addr add 203.0.113.254/31 dev dummy0
ip route add default via 203.0.113.255 dev dummy0 metric 1000
Overlay Network
Kubernetes creates virtual network interfaces for pods that are typically not associated with any specific firewalld zone. The cluster uses the following network ranges:
| Network | CIDR | Purpose |
|---|---|---|
| Pod | 10.42.0.0/16 | Inter-pod communication |
| Service | 10.43.0.0/16 | Kubernetes service discovery |
Firewall regulations should target the primary physical interface. The overlay network traffic is handled by Flannel VXLAN.
Port Requirements
Inter-Node Communication
The following ports must be permitted between all cluster nodes for Kubernetes and cluster infrastructure:
| Port | Protocol | Source | Destination | Purpose |
|---|---|---|---|---|
| 2379-2380 | TCP | Server nodes | Server nodes | etcd cluster communication |
| 6443 | TCP | All nodes | Server nodes | Kubernetes API server |
| 8472 | UDP | All nodes | All nodes | Flannel VXLAN overlay network |
| 10250 | TCP | All nodes | All nodes | Kubelet metrics and management |
| 5001 | TCP | All nodes | Server nodes | Spegel registry mirror |
| 9500-9503 | TCP | All nodes | All nodes | Longhorn management API |
| 8500-8504 | TCP | All nodes | All nodes | Longhorn agent communication |
| 10000-30000 | TCP | All nodes | All nodes | Longhorn data replication |
| 3260 | TCP | All nodes | All nodes | Longhorn iSCSI |
| 2049 | TCP | All nodes | All nodes | Longhorn RWX (NFS) |
Application Services Ports
The following ports must be accessible for application services within the cluster:
| Port | Protocol | Service |
|---|---|---|
| 6379 | TCP | Redis |
| 9093 | TCP | Alertmanager |
| 9095 | TCP | Kafka |
| 8086 | TCP | Vector (InfluxDB line protocol listener) |
External Access Ports
The following ports must be accessible from external clients to cluster nodes:
| Port | Protocol | Service |
|---|---|---|
| 80 | TCP | HTTP ingress (Optional, redirects to HTTPS) |
| 443 | TCP | HTTPS ingress (Required, all services) |
| 9095 | TCP | Kafka (external client connections) |
| 6379 | TCP | Redis (external client connections) |
| 8086 | TCP | Vector (InfluxDB line protocol, external metrics senders) |
Network Configuration Guides
Deployment Type
Choose the guide that matches your deployment architecture:
| Guide | Description | Who Should Use This |
|---|---|---|
| Configuring Segregated Networks | Multi-NIC deployments with air-gapped cluster backplane | Most users - If you have separate interfaces for cluster traffic and external internet access |
| Shared Interface Setup | Single-NIC deployments where all traffic shares one interface | Users with a single network interface for both cluster traffic and external access |
Not sure which to use? If you have explicitly separate interfaces for cluster communication and external access, start with Configuring Segregated Networks. Only use the shared interface guide if your hardware is limited to a single NIC.
11.3.1 - Shared Interface Network Setup
Overview
This guide covers network configuration for standard single-NIC deployments. In this architecture, all traffic—including internal cluster communication (East-West) and external internet access (North-South)—is routed through a single network interface.
Security Warning: Because all traffic shares the same interface and firewall zone, there is no physical or logical isolation between cluster management traffic and public-facing service traffic. For production environments requiring security isolation, see Configuring Segregated Networks.
Note: The installer script automatically detects if firewalld is enabled. If so, it will verify that the required inter-node ports are open through the firewall in the default zone before proceeding. If any required ports are missing, the installer will report an error and exit. Application service ports (such as Kafka, VictoriaMetrics, and Vector) are not checked by the installer as they are configurable.
For network architecture, port requirements, and general information, see the Network Architecture Overview section in the main Networking Guide.
firewall Configuration
Assign Interface to Default Zone
Assign your primary network interface to the default zone:
firewall-cmd --permanent --zone=public --change-interface=<interface>
firewall-cmd --reload
Replace <interface> with your actual interface name (e.g., eth0).
Configure Firewall Rules
In a shared interface setup, you must manually configure firewall rules for both internal cluster traffic and external access, as K3s does not automatically manage the public zone.
# 1. Allow pod and service networks (Internal CIDRs)
firewall-cmd --permanent --zone=public --add-source=10.42.0.0/16
firewall-cmd --permanent --zone=public --add-source=10.43.0.0/16
# 2. Kubernetes and Cluster Infrastructure (East-West Traffic)
# These ports must be opened manually for the cluster to function on a single interface.
firewall-cmd --permanent --zone=public --add-port=2379-2380/tcp
firewall-cmd --permanent --zone=public --add-port=6443/tcp
firewall-cmd --permanent --zone=public --add-port=8472/udp
firewall-cmd --permanent --zone=public --add-port=10250/tcp
firewall-cmd --permanent --zone=public --add-port=5001/tcp
firewall-cmd --permanent --zone=public --add-port=9500-9503/tcp
firewall-cmd --permanent --zone=public --add-port=8500-8504/tcp
firewall-cmd --permanent --zone=public --add-port=10000-30000/tcp
firewall-cmd --permanent --zone=public --add-port=3260/tcp
firewall-cmd --permanent --zone=public --add-port=2049/tcp
# 3. External Access Ports (North-South Traffic)
firewall-cmd --permanent --zone=public --add-port=80/tcp
firewall-cmd --permanent --zone=public --add-port=443/tcp
firewall-cmd --permanent --zone=public --add-port=9095/tcp
firewall-cmd --permanent --zone=public --add-port=6379/tcp
firewall-cmd --permanent --zone=public --add-port=8086/tcp
# Apply changes
firewall-cmd --reload
Verification
Verify all port rules are applied:
firewall-cmd --zone=public --list-all
Expected output:
public (active)
target: default
icmp-block-inversion: no
interfaces: eth0
sources: 10.42.0.0/16 10.43.0.0/16
services: dhcpv6-client ssh
ports: 80/tcp 443/tcp 9095/tcp 6379/tcp 8086/tcp
protocols: 2379-2380/tcp 6443/tcp 8472/udp 10250/tcp 5001/tcp 9500-9503/tcp 8500-8504/tcp 10000-30000/tcp 3260/tcp 2049/tcp
masquerade: no
forward-ports:
source-ports:
icmp-blocks:
rich-rules:
Note: Additional interfaces may appear in the zone (e.g.,
eth0 eth1) if firewalld auto-assigned them based on network configuration. This is expected and does not affect functionality.
Verify the interface is correctly assigned to the public zone:
firewall-cmd --get-active-zones
Expected output will show eth0 listed under the public zone:
public (active)
interfaces: eth0
Troubleshooting
Expected output will show eth0 listed under the public zone:
public (active)
interfaces: eth0
Troubleshooting
Nodes Cannot Communicate
Verify firewall rules allow inter-node traffic in the public zone:
firewall-cmd --list-all
Test basic connectivity between nodes:
ping <node-ip>
Post-Installation Troubleshooting
Once the cluster is installed, if you encounter issues with pod-to-pod communication or service access, verify the following:
- Flannel Interface: Ensure the
flannel.1interface is up and has the correct IP addresses. - Network Routes: Verify that the pod and service CIDR routes are present in the routing table.
- Firewall Rules: Ensure all required Kubernetes and cluster ports are allowed in the
publiczone.
For detailed troubleshooting of Kubernetes-specific components (like Ingress or Pod connectivity), please refer to the Kubernetes Troubleshooting Guide.
11.3.2 - Configuring Segregated Networks
Overview
This guide covers configuring a cluster with separate interfaces for internal cluster communication and external internet access (also known as segregated or dual-homed deployments). In this setup, eth1 handles the internal cluster traffic (pod-to-pod, control plane) while eth0 provides public internet access.
Security Benefit: This configuration provides physical isolation between East-West (cluster) and North-South (external) traffic. The trusted zone allows unrestricted internal communication, while the public zone handles external access with controlled port exposure.
When configuring segregated networks with K3s, proper interface binding is essential. K3s uses the --flannel-iface flag to ensure pod traffic stays on the private network, and the --node-external-ip flag to advertise the public address for external access. Server nodes additionally require --advertise-address=<ETH1_IP> to ensure the API server advertises its internal/private address; without this flag, k3s promotes the external IP to the advertise address when --node-external-ip is set, causing the kubernetes service ClusterIP endpoint to register as an address that is unreachable from within the cluster.
Important: K3s manages pod masquerading and service routing automatically. You only need to configure firewalld zones correctly and pass the proper flags to the K3s installer.
Complete, step-by-step instructions follow.
Prerequisites
Before starting, ensure:
- Operating system is installed and updated on all nodes
- Network connectivity between nodes is available
- SSH access is configured for all cluster nodes
Configure Firewalld Zones
This guide configures separate zones for internal cluster traffic and external access.
Assign Interfaces to Zones
K3s uses trusted zone for the internal network to allow unrestricted pod-to-pod and control plane traffic:
# Assign eth0 (external/internet) to public zone
firewall-cmd --permanent --zone=public --change-interface=eth0
# Assign eth1 (internal/cluster) to trusted zone
firewall-cmd --permanent --zone=trusted --change-interface=eth1
# Allow pod and service CIDRs in trusted zone (required for pod communication)
firewall-cmd --permanent --zone=trusted --add-source=10.42.0.0/16
firewall-cmd --permanent --zone=trusted --add-source=10.43.0.0/16
# Reload firewall
firewall-cmd --reload
Configure Firewall Ports
Open the necessary ports on the public zone for external access:
# External access ports
firewall-cmd --permanent --zone=public --add-port=80/tcp
firewall-cmd --permanent --zone=public --add-port=443/tcp
firewall-cmd --permanent --zone=public --add-port=9095/tcp
firewall-cmd --permanent --zone=public --add-port=6379/tcp
firewall-cmd --permanent --zone=public --add-port=8086/tcp
# Apply changes
firewall-cmd --reload
Note: K3s automatically creates iptables rules for internal cluster ports (6443, 10250, 2379-2380, 8472, 5001, 9500-9503, 8500-8504, 10000-30000, 3260, 2049) when using
--flannel-iface=eth1. Pod and service CIDRs (10.42.0.0/16 and 10.43.0.0/16) are already allowed in the trusted zone via the--add-sourcecommands above.
Verify Zone Configuration
firewall-cmd --zone=public --list-all
firewall-cmd --zone=trusted --list-all
Expected output for public zone:
public (active)
target: default
icmp-block-inversion: no
interfaces: eth0 eth2
sources:
services: dhcpv6-client ssh cockpit
ports: 80/tcp 443/tcp 9095/tcp 6379/tcp 8086/tcp
protocols:
forward: yes
masquerade: no
forward-ports:
source-ports:
icmp-blocks:
rich rules:
Expected output for trusted zone:
trusted (active)
target: ACCEPT
icmp-block-inversion: no
interfaces: eth1
sources: 10.42.0.0/16 10.43.0.0/16
services: ssh mdns
ports:
protocols:
forward: yes
masquerade: no
forward-ports:
source-ports:
icmp-blocks:
rich rules:
Note: Additional interfaces may appear in a zone (e.g.,
eth0 eth2) if firewalld auto-assigned them based on network configuration. This is expected and does not affect functionality.
Single-NIC Alternative
If you only have a single network interface, see the Shared Interface Setup guide instead. This guide is specifically for multi-NIC deployments with separate interfaces for cluster and external traffic.
Troubleshooting
Verify Zone Configuration
If pods cannot communicate with services, verify the trusted zone has the correct sources configured:
firewall-cmd --zone=trusted --list-all
Expected output:
trusted (active)
target: ACCEPT
icmp-block-inversion: no
interfaces: eth1
sources: 10.42.0.0/16 10.43.0.0/16
services: ssh mdns
ports:
protocols:
forward: yes
masquerade: no
forward-ports:
source-ports:
icmp-blocks:
rich rules:
Ensure both 10.42.0.0/16 (pod network) and 10.43.0.0/16 (service network) are listed under sources. If missing, re-run:
firewall-cmd --permanent --zone=trusted --add-source=10.42.0.0/16
firewall-cmd --permanent --zone=trusted --add-source=10.43.0.0/16
firewall-cmd --reload
11.4 - Architecture Guide
Overview
The AgileTV CDN Manager (ESB3027) is a cloud-native Kubernetes application designed for managing CDN operations. This guide provides a detailed description of the system architecture, component interactions, and scaling considerations.
High-Level Architecture
The CDN Manager follows a microservices architecture deployed on Kubernetes. The system is organized into logical layers:
graph LR
Clients[API Clients] --> Ingress[Ingress Controller]
Ingress --> Manager[Core Manager]
Ingress --> Frontend[MIB Frontend]
Ingress --> Grafana[Grafana]
Manager --> Redis[(Redis)]
Manager --> Kafka[(Kafka)]
Manager --> PostgreSQL[(PostgreSQL)]
Manager --> Zitadel[Zitadel IAM]
Manager --> Confd[Configuration Service]
Grafana --> VM[(VictoriaMetrics)]
Confd -.-> Gateway[NGinx Gateway]
Gateway --> Director[CDN Director]Component Architecture
Ingress Layer
The ingress layer manages all incoming traffic to the cluster:
| Component | Role |
|---|---|
| Ingress Controller | Primary ingress for all cluster traffic; routes requests to internal services based on path |
| NGinx Gateway | Reverse proxy for routing traffic to external CDN Directors; used by MIB Frontend to communicate with remote Confd instances on CDN Director nodes |
Traffic flow:
- API clients and Operator UI connect via the Ingress Controller at
/apiand/guipaths respectively - Grafana dashboards are accessed via the Ingress Controller at
/grafana - Zitadel authentication console is accessed via the Ingress Controller at
/ui/console - MIB Frontend uses NGinx Gateway when communicating with external Confd instances on CDN Director nodes
Application Services
The application layer contains the core CDN Manager services:
| Component | Role | Scaling |
|---|---|---|
| Core Manager | Main REST API server (v1/v2 endpoints); handles authentication, configuration, routing, and discovery | Horizontally scalable via HPA |
| MIB Frontend | Web-based configuration GUI for operators | Horizontally scalable via HPA |
| Confd | Configuration service for routing configuration; synchronizes with Core Manager application | Single instance |
| Grafana | Monitoring and visualization dashboards | Single instance |
| Selection Input Worker | Consumes selection input events from Kafka and updates configuration | Single instance |
| Metrics Aggregator | Collects and aggregates metrics from CDN components | Single instance |
| Telegraf | System-level metrics collection from cluster nodes | DaemonSet (one per node) |
| Alertmanager | Alert routing and notification management | Single instance |
Data Layer
The data layer provides persistent and ephemeral storage:
| Component | Role | Scaling |
|---|---|---|
| Redis | In-memory caching, session storage, and ephemeral state | Master + replicas (read-only) |
| Kafka | Event streaming for selection input and metrics; provides durable message queue | Controller cluster (odd count) |
| PostgreSQL | Persistent configuration and state storage | 3-node cluster with HA |
| VictoriaMetrics (Analytics) | Real-time and short-term metrics for operational dashboards | Single instance |
| VictoriaMetrics (Billing) | Long-term metrics retention (1+ years) for billing and license compliance | Single instance |
External Integrations
| Component | Role |
|---|---|
| Zitadel IAM | Identity and access management; provides OAuth2/OIDC authentication |
| CDN Director (ESB3024) | Edge routing infrastructure; receives configuration from Confd |
Detailed Component Descriptions
Core Manager
The Core Manager is the central application server that exposes the REST API. It is implemented in Rust using the Actix-web framework.
Key Responsibilities:
- Authentication and session management via Zitadel
- Configuration document storage and retrieval
- Selection input CRUD operations
- Routing rule evaluation and GeoIP lookups
- Service discovery for CDN Directors and edge servers
- Operator UI helper endpoints
API Endpoints:
/api/v1/auth/*- Authentication (login, token, logout)/api/v1/configuration- Configuration management/api/v1/selection_input/*- Selection input operations/api/v2/selection_input/*- Enhanced selection input with list operations/api/v1/routing/*- Routing evaluation and validation/api/v1/discovery/*- Host and namespace discovery/api/v1/metrics- System metrics/api/v1/health/*- Liveness and readiness probes/api/v1/operator_ui/*- Operator helper endpoints
Runtime Modes: The Core Manager supports multiple runtime modes, each deployed as a separate container:
http-server- Primary HTTP API server (default)metrics-aggregator- Background worker for metrics collectionselection-input- Background worker for Kafka selection input consumption
MIB Frontend
The MIB Frontend provides a web-based GUI for configuration management.
Key Features:
- Intuitive web interface for CDN configuration
- Real-time configuration validation
- Integration with Zitadel for SSO authentication
- Uses NGinx Gateway for external Director communication
Confd (Configuration Service)
Confd provides routing configuration services and synchronizes with the Core Manager application.
Key Responsibilities:
- Hosts the service configuration for routing decisions
- Provides API and CLI for configuration management
- Synchronizes routing configuration with Core Manager
- Maintains configuration state in PostgreSQL
Selection Input Worker
The Selection Input Worker processes selection input events from the Kafka stream.
Key Responsibilities:
- Consumes messages from the
selection_inputKafka topic - Validates and transforms input data
- Updates configuration in the data store
- Maintains message ordering within partitions
Scaling Limitation: The Selection Input Worker cannot be scaled beyond a single consumer per Kafka partition, as message ordering must be preserved.
Metrics Aggregator
The Metrics Aggregator collects and processes metrics from CDN components.
Key Responsibilities:
- Polls metrics from Director instances
- Aggregates usage statistics
- Writes data to VictoriaMetrics (Analytics) for dashboards
- Writes long-term data to VictoriaMetrics (Billing) for compliance
Telegraf
Telegraf is deployed as a DaemonSet to collect host-level metrics.
Key Responsibilities:
- CPU, memory, disk, and network metrics from each node
- Container-level resource usage
- Kubernetes cluster metrics
- Forwards metrics to VictoriaMetrics
Grafana
Grafana provides visualization and dashboard capabilities.
Features:
- Pre-built dashboards for CDN monitoring
- Custom dashboard support
- VictoriaMetrics as data source
- Alerting integration with Alertmanager
Access: https://<host>/grafana
Alertmanager
Alertmanager handles alert routing and notifications.
Key Responsibilities:
- Receives alerts from Grafana and other sources
- Deduplicates and groups alerts
- Routes to notification channels (email, webhook, etc.)
- Manages alert silencing and inhibition
Data Storage
Redis
Redis provides in-memory storage for:
- User sessions and authentication tokens
- Ephemeral configuration cache
- Real-time state synchronization
Deployment: Master + read replicas for high availability
Kafka
Kafka provides durable event streaming for:
- Selection input events
- Metrics data streams
- Inter-service communication
Deployment: Controller cluster with 3 replicas for production, 1 replica for lab deployments
Node Affinity: Kafka replicas must be scheduled on separate nodes to ensure high availability. The Helm chart configures pod anti-affinity rules to enforce this distribution.
Topics:
selection_input- Selection input eventsmetrics- Metrics data streams
Note: For lab/single-node deployments, the Kafka replica count must be set to 1 in the Helm values. Production deployments require 3 replicas for fault tolerance.
PostgreSQL
PostgreSQL provides persistent storage for:
- Configuration documents
- User and permission data
- System state
Deployment: 3-node cluster managed by Cloudnative PG (CNPG) operator
High Availability: The CNPG operator manages automatic failover and ensures high availability:
- One primary node handles read/write operations
- Two replica nodes provide redundancy and can be promoted to primary on failure
- Automatic failover occurs within seconds of primary node failure
- Synchronous replication ensures data consistency
Note: The PostgreSQL cluster is deployed and managed automatically by the CNPG operator. Manual intervention is typically not required for normal operations.
VictoriaMetrics
Two VictoriaMetrics instances serve different purposes:
VictoriaMetrics (Analytics):
- Real-time and short-term metrics storage
- Supports Grafana dashboards
- Retention: Configurable (typically 30-90 days)
VictoriaMetrics (Billing):
- Long-term metrics retention
- Billing and license compliance data
- Retention: Minimum 1 year
Authentication and Authorization
Zitadel Integration
Zitadel provides identity and access management:
Authentication Flow:
- User accesses MIB Frontend or API
- Redirected to Zitadel for authentication
- Zitadel validates credentials and issues session token
- Session token exchanged for access token
- Access token included in API requests (Bearer authentication)
Default Credentials: See the Glossary for default login credentials.
Access Paths:
- Zitadel Console:
/ui/console - API authentication:
/api/v1/auth/*
CORS Configuration
Zitadel enforces Cross-Origin Resource Sharing (CORS) policies. The external hostname configured in Zitadel must match the first entry in global.hosts.manager in the Helm values.
Network Architecture
Traffic Flow
graph TB
External[External Clients] --> Ingress[Ingress Controller]
External --> Redis[(Redis)]
External --> Kafka[(Kafka)]
External --> Telegraf[Telegraf]
Ingress --> Manager[Core Manager]
Ingress --> Frontend[MIB Frontend]
Ingress --> Grafana[Grafana]
Ingress --> Zitadel[Zitadel]Note: Certain services (Redis, Kafka, Telegraf) can be accessed directly by external clients without traversing the ingress controller. This is typically used for metrics collection, event streaming, and direct data access scenarios.
Internal Communication
All internal services communicate over the Kubernetes overlay network (Flannel VXLAN). Services discover each other via Kubernetes DNS.
External Communication
- CDN Directors: Accessed via NGinx Gateway for simplified routing
- MaxMind GeoIP: Local database files (no external calls)
Scaling
Horizontal Pod Autoscaler (HPA)
The following components support automatic horizontal scaling via HPA:
| Component | Minimum | Maximum | Scale Metrics |
|---|---|---|---|
| Core Manager | 3 | 8 | CPU (50%), Memory (80%) |
| NGinx Gateway | 2 | 4 | CPU (75%), Memory (80%) |
| MIB Frontend | 2 | 4 | CPU (75%), Memory (90%) |
Note: HPA is enabled by default in the Helm chart. The default configuration is tuned for production deployments. Adjust min/max values based on expected load and available cluster capacity.
Manual Scaling
Components can also be scaled manually by setting replica counts in the Helm values:
manager:
replicaCount: 3
mib-frontend:
replicaCount: 2
Important: When manually setting replica counts, you must disable the Horizontal Pod Autoscaler (HPA) for the corresponding component. If HPA remains enabled, it will override manual replica settings. To disable HPA, set
autoscaling.hpa.enabled: falsefor the component in your Helm values.
Components That Do Not Scale
The following components do not support horizontal scaling:
| Component | Reason |
|---|---|
| Confd | Single instance required for configuration consistency |
| PostgreSQL | Cloudnative PG cluster; scaled by adding replicas via operator configuration |
| Kafka | Scaled by adding controllers, not via replica count |
| VictoriaMetrics | Stateful; single instance per role |
| Redis | Master is single; replicas are read-only |
| Grafana | Single instance sufficient for dashboard access |
| Alertmanager | Single instance for alert routing |
| Selection Input Worker | Kafka message ordering requires single consumer |
| Metrics Aggregator | Single instance for consistent metrics aggregation |
Node Scaling
Additional Agent nodes can be added to the cluster at any time to increase workload capacity. Kubernetes automatically schedules pods to nodes with available resources.
Cluster Balancing
The CDN Manager deployment includes the Kubernetes Descheduler to maintain balanced resource utilization across cluster nodes:
- Automatic Rebalancing: The descheduler periodically analyzes pod distribution and evicts pods from overutilized nodes
- Node Balance: Helps prevent resource hotspots by redistributing workloads across available nodes
- Integration with HPA: Works in conjunction with Horizontal Pod Autoscaler to optimize both pod count and placement
The descheduler runs as a background process and does not require manual intervention under normal operating conditions.
Resource Configuration
For detailed resource preset configurations and planning guidance, see the Configuration Guide.
High Availability
Server Node Redundancy
Production deployments require a minimum of 3 Server nodes:
- Survives loss of 1 server node
- Maintains quorum for etcd and Kafka
For enhanced availability, use 5 Server nodes:
- Survives loss of 2 server nodes
- Recommended for critical production environments
For large-scale deployments, 7 or more Server nodes can be used:
- Survives loss of 3+ server nodes
- Suitable for high-capacity production environments
Pod Distribution
Kubernetes automatically distributes pods across nodes to maximize availability:
- Pods with the same deployment are scheduled on different nodes when possible
- Pod Disruption Budgets (PDB) ensure minimum availability during maintenance
Data Replication
| Component | Replication Strategy |
|---|---|
| Redis | Single instance (backup via Longhorn snapshots) |
| Kafka | Replicated partitions (default: 3) |
| PostgreSQL | 3-node cluster via Cloudnative PG |
| VictoriaMetrics | Single instance (backup via snapshots) |
| Longhorn | Single replica with pod-node affinity |
Longhorn Storage: Longhorn volumes are configured with a single replica by default. Pod scheduling is configured with node affinity to prefer scheduling pods on the same node as their persistent volume data. This approach optimizes I/O performance while maintaining data locality.
Next Steps
After understanding the architecture:
- Installation Guide - Deploy the CDN Manager
- Configuration Guide - Configure components for your environment
- Operations Guide - Day-to-day operational procedures
- Performance Tuning Guide - Optimize system performance
- Metrics & Monitoring - Set up monitoring and alerting
11.5 - Installation Guide
Overview
This guide provides detailed instructions for installing the AgileTV CDN Manager (ESB3027) in various deployment scenarios. The installation process varies depending on the target environment and desired configuration.
Estimated Installation Time:
| Deployment Type | Time |
|---|---|
| Single-Node (Lab) | ~15 minutes |
| Multi-Node (3 servers) | ~30 minutes |
Actual installation time may vary depending on hardware performance, network speed, and whether air-gapped procedures are required.
Note: These estimates assume the operating system is already installed on all nodes. OS installation is outside the scope of this guide.
Installation Types
| Installation Type | Description | Use Case |
|---|---|---|
| Single-Node (Lab) | Minimal installation on a single host | Acceptance testing, demonstrations, development |
| Multi-Node (Production) | Full high-availability cluster with 3+ server nodes | Production deployments |
Installation Process Summary
The installation follows a sequential process:
- Prepare the host system - Verify requirements and mount the installation ISO
- Install the Kubernetes cluster - Deploy K3s, Longhorn storage, and PostgreSQL
- Join additional nodes (production only) - Expand the cluster for HA or capacity
- Deploy the Manager application - Install the CDN Manager Helm chart
- Post-installation configuration - Configure authentication, networking, and users
Quick Links
| Guide | Description |
|---|---|
| Installation Checklist | Step-by-step checklist to track progress |
| Single-Node Installation | Lab and acceptance testing deployment |
| Multi-Node Installation | Production high-availability deployment |
| Air-Gapped Deployment | Air-gapped environment installation |
| Helm Chart Installation | Common helm chart deployment steps |
| Upgrade Guide | Upgrading from previous versions |
| Next Steps | Post-installation configuration tasks |
Prerequisites
Before beginning installation, ensure the following requirements are met:
- Hardware: Nodes meeting the System Requirements including CPU, memory, and disk specifications
- Operating System: RHEL 9 or compatible clone (details); air-gapped deployments require the OS ISO mounted on all nodes
- Network: Proper firewall configuration between nodes (port requirements, firewall configuration)
- Software: Installation ISO obtained from AgileTV; air-gapped deployments also require the Extras ISO
- Kernel Tuning: For production deployments, apply recommended sysctl settings (Performance Tuning Guide)
We recommend using the Installation Checklist to track your progress through the installation process.
Getting Help
If you encounter issues during installation:
- Review the Troubleshooting Guide for common issues
- Check the System Requirements to verify your environment
- Consult the Release Notes for version-specific known issues
11.5.1 - Installation Checklist
Overview
Use this checklist to track your installation progress. Print this page or keep it open during your installation to ensure all steps are completed correctly.
Pre-Installation
Hardware and Software
- Verify hardware meets System Requirements
- Confirm operating system is supported (RHEL 9 or compatible clone)
- Configure firewall rules between nodes (details)
- Apply recommended sysctl settings (details)
- Obtain installation ISO (
esb3027-acd-manager-X.Y.Z.iso)
Air-Gapped Deployments
- Obtain Extras ISO (
esb3027-acd-manager-extras-X.Y.Z.iso) - Mount OS ISO on all nodes before installation
- Verify OS packages are accessible from mounted ISO
Special Requirements
- Oracle Linux UEK: Install
kernel-uek-modules-extra-netfilter-$(uname -r)package - Control Plane Only nodes: Set
SKIP_REQUIREMENTS_CHECK=1if below lab minimums - SELinux: Set to “Enforcing” mode before running installer (cannot enable after)
Cluster Installation
Single-Node Deployment
Follow the Single-Node Installation Guide.
- Mount installation ISO (Step 1)
- Install the base cluster (Step 2)
- Verify cluster status (Step 3)
- Air-gapped only: Load container images (Step 4)
- Create configuration file (Step 5)
- Optional: Load MaxMind GeoIP databases (Step 6)
- Deploy the Manager Helm chart (Step 7)
- Verify deployment (Step 8)
Multi-Node Deployment
Follow the Multi-Node Installation Guide.
Primary Server Node
- Mount installation ISO (Step 1)
- Install the base cluster (Step 2)
- Verify system pods are running (Step 2)
- Retrieve the node token (Step 3)
Additional Server Nodes
- Mount installation ISO (Step 5)
- Join the cluster (Step 5)
- Verify each node joins (Step 5)
- Optional: Taint Control Plane Only nodes (Step 5b)
Agent Nodes (Optional)
- Mount installation ISO (Step 6)
- Join the cluster as an agent (Step 6)
- Verify each agent joins (Step 6)
Cluster Verification
- Verify all nodes are ready (Step 7)
- Verify system pods running on all nodes (Step 7)
- Air-gapped only: Load container images on each node (Step 9)
Application Deployment
- Create configuration file (Step 10)
- Optional: Load MaxMind GeoIP databases (Step 11)
- Optional: Configure TLS certificates from trusted CA (Step 12)
- Deploy the Manager Helm chart (Step 13)
- Verify all pods are running and distributed (Step 14)
- Configure DNS records for manager hostname (Step 15)
Post-Installation
Initial Access
- Access the system via HTTPS
- Accept self-signed certificate warning (if using default certificate)
- Log in with default credentials (see Glossary)
Security Configuration
- Create new administrator account in Zitadel
- Delete or secure the default admin account
- Configure additional users and permissions
- Review Zitadel Administrator Documentation for role assignments
Monitoring and Operations
- Access Grafana dashboards at
/grafana - Review pre-built monitoring dashboards
- Configure alerting rules (optional)
- Set up notification channels (optional)
Next Steps
- Review Next Steps Guide for additional configuration
- Configure CDN routing rules
- Set up GeoIP-based routing (if using MaxMind databases)
- Review Operations Guide for day-to-day procedures
Troubleshooting
If you encounter issues during installation:
- Check pod status:
kubectl describe pod <pod-name> - Review logs:
kubectl logs <pod-name> - Check cluster events:
kubectl get events --sort-by='.lastTimestamp' - Review the Troubleshooting Guide for common issues
11.5.2 - Single-Node Installation
Warning: Single-node deployments are for lab environments, acceptance testing, and demonstrations only. This configuration is not suitable for production workloads. For production deployments, see the Multi-Node Installation Guide, which requires a minimum of 3 server nodes for high availability.
Air-Gapped Deployment? This guide assumes internet connectivity. For air-gapped deployments, see the Air-Gapped Deployment Guide for additional requirements and procedures.
Overview
This guide describes the installation of the AgileTV CDN Manager on a single node. This configuration is intended for lab environments, acceptance testing, and demonstrations only. It is not suitable for production workloads.
Prerequisites
Hardware Requirements
Refer to the System Requirements Guide for hardware specifications. Single-node deployments require the “Single-Node (Lab)” configuration.
Operating System
Refer to the System Requirements Guide for supported operating systems.
Software Access
- Installation ISO:
esb3027-acd-manager-X.Y.Z.iso - Extras ISO (air-gapped only):
esb3027-acd-manager-extras-X.Y.Z.iso
Network Configuration
Ensure that required firewall ports are configured before installation. See the Networking Guide for complete firewall configuration requirements.
SELinux
If SELinux is to be used, it must be set to “Enforcing” mode before running the installer script. The installer will configure appropriate SELinux policies automatically. SELinux cannot be enabled after installation.
Installation Steps
Step 1: Mount the ISO
Create a mount point and mount the installation ISO:
mkdir -p /mnt/esb3027
mount -o loop,ro esb3027-acd-manager-X.Y.Z.iso /mnt/esb3027
Replace X.Y.Z with the actual version number.
Step 2: Install the Base Cluster
Run the installer to set up the K3s Kubernetes cluster:
/mnt/esb3027/install
This installs:
- K3s Kubernetes distribution
- Longhorn distributed storage
- Cloudnative PG operator for PostgreSQL
- Base system dependencies
The installer will configure the node as both a server and agent node.
Step 3: Verify Cluster Status
After the installer completes, verify that all components are operational before proceeding. This verification serves as an important checkpoint to confirm the installation is progressing correctly.
1. Verify the node is ready:
kubectl get nodes
Expected output:
NAME STATUS ROLES AGE VERSION
k3s-server Ready control-plane,etcd,master 2m v1.33.4+k3s1
2. Verify system pods in both namespaces are running:
# Check kube-system namespace (Kubernetes core components)
kubectl get pods -n kube-system
# Check longhorn-system namespace (distributed storage)
kubectl get pods -n longhorn-system
All pods should show Running status. If any pods are still Pending or ContainerCreating, wait until they are ready. Proceeding with incomplete system pods can cause subsequent steps to fail in unpredictable ways.
This verification confirms:
- K3s cluster is operational
- Longhorn distributed storage is running
- Cloudnative PG operator is deployed
- All core components are healthy before continuing
Step 4: Air-Gapped Deployments (If Applicable)
If deploying in an air-gapped environment, load container images from the extras ISO:
mkdir -p /mnt/esb3027-extras
mount -o loop,ro esb3027-acd-manager-extras-X.Y.Z.iso /mnt/esb3027-extras
/mnt/esb3027-extras/load-images
Step 5: Deploy the Manager Helm Chart
For complete instructions on deploying the CDN Manager Helm chart, including configuration file setup, MaxMind GeoIP database loading, TLS certificate configuration, deployment commands, and verification steps, see the Helm Chart Installation Guide.
This guide covers the common deployment steps that apply to all installation types. After completing the helm chart installation steps, proceed to Post-Installation below.
Post-Installation
After installation completes, proceed to the Next Steps guide for:
- Initial user configuration
- Accessing the web interfaces
- Configuring authentication
- Setting up monitoring
Accessing the System
Refer to the Accessing the System section in the Getting Started guide for service URLs and default credentials.
Note: A self-signed SSL certificate is deployed by default. You will need to accept the certificate warning in your browser.
Troubleshooting
If pods fail to start:
- Check pod status:
kubectl describe pod <pod-name> - Review logs:
kubectl logs <pod-name> - Verify resources:
kubectl top pods
See the Troubleshooting Guide for additional assistance.
Next Steps
After successful installation:
- Next Steps Guide - Post-installation configuration
- Configuration Guide - System configuration
- Operations Guide - Day-to-day operations
Appendix: Lab Configuration File
The installation ISO includes a pre-built lab configuration at /mnt/esb3027/values-lab.yaml, designed specifically for single-node deployments. It handles single-replica settings for Kafka and Zitadel, resource sizing, and TLS configuration automatically.
Copy it as your starting point:
cp /mnt/esb3027/values-lab.yaml ~/values.yaml
At minimum, update these two fields to match your environment before deploying:
global:
hosts:
manager:
- host: manager.local # Replace with your hostname or IP
zitadel:
zitadel:
configmapConfig:
ExternalDomain: manager.local # Must match global.hosts.manager[0].host
These two values must match exactly or authentication will fail. For a full description of all available options in values-lab.yaml, see the Configuration Guide.
11.5.3 - Multi-Node Installation
Overview
This guide describes the installation of the AgileTV CDN Manager across multiple nodes for production deployments. This configuration provides high availability and horizontal scaling capabilities.
Air-Gapped Deployment? This guide assumes internet connectivity. For air-gapped deployments, see the Air-Gapped Deployment Guide for additional requirements and procedures.
Prerequisites
Hardware Requirements
Refer to the System Requirements Guide for hardware specifications. Production deployments require:
- Minimum 3 Server nodes (Control Plane Only or Combined role)
- Optional Agent nodes for additional workload capacity
Operating System
Refer to the System Requirements Guide for supported operating systems.
Software Access
- Installation ISO:
esb3027-acd-manager-X.Y.Z.iso(for each node) - Extras ISO (air-gapped only):
esb3027-acd-manager-extras-X.Y.Z.iso
Network Configuration
Ensure that required firewall ports are configured between all nodes before installation. See the Configuring Segregated Networks guide for the standard firewall configuration.
Note: When using segregated networks, the K3s API server on the primary node will be reachable via its internal/private interface. Consequently, when joining additional nodes, the <primary-server-ip> provided to the join script must be the internal/private IP address of the primary node to ensure the join request is routed correctly through the private network.
Single-NIC Deployments: If your nodes have only a single network interface, see the Shared Interface Setup guide instead. This guide assumes segregated networks with separate interfaces for cluster traffic (eth1) and external access (eth0).
Segregated Network Configuration
If your nodes have multiple network interfaces and you want to use a separate interface for cluster traffic (not the default route interface), configure the INSTALL_K3S_EXEC environment variable before installing the cluster or joining nodes.
For segregated networks (private cluster network on eth1 + public external access on eth0), set all three K3s flags:
# For server nodes
export INSTALL_K3S_EXEC="server --node-ip=<ETH1_IP> --node-external-ip=<ETH0_IP> --flannel-iface=eth1 --advertise-address=<ETH1_IP>"
# For agent nodes
export INSTALL_K3S_EXEC="agent --node-ip=<ETH1_IP> --node-external-ip=<ETH0_IP> --flannel-iface=eth1"
Where:
- Mode: Use
serverfor the primary node establishing the cluster, or for additional server nodes. Useagentfor agent nodes joining the cluster. --node-ip=<ETH1_IP>: The internal/private IP address of eth1 for cluster communication--node-external-ip=<ETH0_IP>: The public IP address of eth0 for external access (LoadBalancer services, ingress)--flannel-iface=eth1: The network interface name for Flannel VXLAN overlay traffic--advertise-address=<ETH1_IP>: The address the API server uses to advertise itself to cluster members. Must be set to the internal/private IP address in a segregated-network deployment; without this flag, k3s defaults to the external IP when--node-external-ipis set, causing thekubernetesservice endpoint to register as an unreachable address. This flag is required for server nodes only; agent nodes do not run an API server.
Set this variable on each node before running the install or join scripts.
SELinux
If SELinux is to be used, it must be set to “Enforcing” mode before running the installer script. The installer will configure appropriate SELinux policies automatically. SELinux cannot be enabled after installation.
Installation Steps
Step 1: Prepare the Primary Server Node
Mount the installation ISO on the primary server node:
mkdir -p /mnt/esb3027
mount -o loop,ro esb3027-acd-manager-X.Y.Z.iso /mnt/esb3027
Replace X.Y.Z with the actual version number.
Step 2: Install the Base Cluster on Primary Server
Segregated Networks: If your node has multiple network interfaces, set the
INSTALL_K3S_EXECenvironment variable with the complete segregated network configuration before running the installer (see Segregated Network Configuration):export INSTALL_K3S_EXEC="server --node-ip=<ETH1_IP> --node-external-ip=<ETH0_IP> --flannel-iface=eth1 --advertise-address=<ETH1_IP>"Replace
<ETH1_IP>with the internal/private IP address and<ETH0_IP>with the public IP address.
If your node has only a single network interface, do not set INSTALL_K3S_EXEC. K3s will use the default interface automatically.
Run the installer to set up the K3s Kubernetes cluster:
/mnt/esb3027/install
This installs:
- K3s Kubernetes distribution
- Longhorn distributed storage
- Cloudnative PG operator for PostgreSQL
- Base system dependencies
Important: After the installer completes, verify that all system pods in both namespaces are in the Running state before proceeding:
# Check kube-system namespace (Kubernetes core components)
kubectl get pods -n kube-system
# Check longhorn-system namespace (distributed storage)
kubectl get pods -n longhorn-system
All pods should show Running status. If any pods are still Pending or ContainerCreating, wait until they are ready. Proceeding with incomplete system pods can cause subsequent steps to fail in unpredictable ways.
This verification confirms:
- K3s cluster is operational
- Longhorn distributed storage is running
- Cloudnative PG operator is deployed
- All core components are healthy before continuing
Step 3: Retrieve the Node Token
Retrieve the node token for joining additional nodes:
cat /var/lib/rancher/k3s/server/node-token
Save this token for use on additional nodes. Also note the IP address of the primary server node.
Step 4: Server vs Agent Node Roles
Before joining additional nodes, determine which nodes will serve as Server nodes vs Agent nodes:
| Role | Control Plane | Workloads | HA Quorum | Use Case |
|---|---|---|---|---|
| Server Node (Combined) | Yes (etcd, API server) | Yes | Participates | Default production role; minimum 3 nodes |
| Server Node (Control Plane Only) | Yes (etcd, API server) | No | Participates | Dedicated control plane; requires separate Agent nodes |
| Agent Node | No | Yes | No | Additional workload capacity only |
Guidance:
- Combined role (default): Server nodes run both control plane and workloads; minimum 3 nodes required for HA
- Control Plane Only: Dedicate nodes to control plane functions; requires at least 3 Server nodes plus 3+ Agent nodes for workloads
- Agent nodes are required if using Control Plane Only servers; optional if using Combined role servers
- For most deployments, 3 Server nodes (Combined role) with no Agent nodes is sufficient
- Add Agent nodes to scale workload capacity without affecting control plane quorum
Proceed to Step 5 to join Server nodes. Agent nodes are joined after all Server nodes are ready.
Step 5: Join Additional Server Nodes
On each additional server node:
Mount the ISO:
mkdir -p /mnt/esb3027 mount -o loop,ro esb3027-acd-manager-X.Y.Z.iso /mnt/esb3027Join the cluster:
Segregated Networks: If your node has multiple network interfaces, set the
INSTALL_K3S_EXECenvironment variable with the complete segregated network configuration before running the join script (see Segregated Network Configuration):export INSTALL_K3S_EXEC="server --node-ip=<ETH1_IP> --node-external-ip=<ETH0_IP> --flannel-iface=eth1 --advertise-address=<ETH1_IP>"Replace
<ETH1_IP>with the internal/private IP address and<ETH0_IP>with the public IP address.
If your node has only a single network interface, do not set INSTALL_K3S_EXEC. K3s will use the default interface automatically.
Note for Segregated Networks: When joining nodes in a segregated network environment, ensure the
<primary-server-ip>used in the join command is the internal/private IP address (theeth1address) of the primary server. Using the external IP will cause the join attempt to fail as the service will be listening on the private interface.
Run the join script:
/mnt/esb3027/join-server https://<primary-server-ip>:6443 <node-token>
Replace <primary-server-ip> with the IP address of the primary server and <node-token> with the token retrieved in Step 3.
- Verify the node joined successfully:
kubectl get nodes
Repeat for each server node. A minimum of 3 server nodes is required for high availability.
Step 5b: Taint Control Plane Only Nodes (Optional)
If you are using dedicated Control Plane Only nodes (not Combined role), apply taints to prevent workload scheduling:
kubectl taint nodes <node-name> CriticalAddonsOnly=true:NoSchedule
Apply this taint to each Control Plane Only node. Verify taints are applied:
kubectl describe nodes | grep -A 5 "Taints"
Note: This step is only required if you want dedicated control plane nodes. For Combined role deployments, do not apply taints.
Important: Control Plane Only Server nodes can be deployed with lower hardware specifications (2 cores, 4 GiB, 64 GiB) than the installer’s default minimum requirements. If your Control Plane Only Server nodes do not meet the Single-Node Lab configuration minimums (8 cores, 16 GiB, 128 GiB), you must set the
SKIP_REQUIREMENTS_CHECKenvironment variable before running the installer or join command:# For the primary server node export SKIP_REQUIREMENTS_CHECK=1 /mnt/esb3027/install # For additional Control Plane Only Server nodes export SKIP_REQUIREMENTS_CHECK=1 /mnt/esb3027/join-server https://<primary-server-ip>:6443 <node-token>Note: This applies to Server nodes only. Agent nodes have separate minimum requirements.
Step 6: Join Agent Nodes (Optional)
On each agent node:
Mount the ISO:
mkdir -p /mnt/esb3027 mount -o loop,ro esb3027-acd-manager-X.Y.Z.iso /mnt/esb3027Join the cluster as an agent:
Segregated Networks: If your node has multiple network interfaces, set the
INSTALL_K3S_EXECenvironment variable with the complete segregated network configuration before running the join script (see Segregated Network Configuration):export INSTALL_K3S_EXEC="agent --node-ip=<ETH1_IP> --node-external-ip=<ETH0_IP> --flannel-iface=eth1"Replace
<ETH1_IP>with the internal/private IP address and<ETH0_IP>with the public IP address.
If your node has only a single network interface, do not set INSTALL_K3S_EXEC. K3s will use the default interface automatically.
Run the join script:
/mnt/esb3027/join-agent https://<primary-server-ip>:6443 <node-token>
Note for Segregated Networks: When joining nodes in a segregated network environment, ensure the
<primary-server-ip>used in the join command is the internal/private IP address (theeth1address) of the primary server. Using the external IP will cause the join attempt to fail as the service will be listening on the private interface.
- Verify the node joined successfully from an existing server node:
kubectl get nodes
Agent nodes provide additional workload capacity but do not participate in the control plane quorum.
Step 7: Verify Cluster Status
After all nodes are joined, verify the cluster is operational:
1. Verify all nodes are ready:
kubectl get nodes
Expected output:
NAME STATUS ROLES AGE VERSION
k3s-server-0 Ready control-plane,etcd,master 5m v1.33.4+k3s1
k3s-server-1 Ready control-plane,etcd,master 3m v1.33.4+k3s1
k3s-server-2 Ready control-plane,etcd,master 2m v1.33.4+k3s1
k3s-agent-1 Ready <none> 1m v1.33.4+k3s1
k3s-agent-2 Ready <none> 1m v1.33.4+k3s1
2. Verify system pods in both namespaces are running:
# Check kube-system namespace (Kubernetes core components)
kubectl get pods -n kube-system
# Check longhorn-system namespace (distributed storage)
kubectl get pods -n longhorn-system
All pods should show Running status. If any pods are still Pending or ContainerCreating, wait until they are ready.
This verification confirms:
- K3s cluster is operational across all nodes
- Longhorn distributed storage is running
- Cloudnative PG operator is deployed
- All core components are healthy before proceeding to application deployment
Step 9: Air-Gapped Deployments (If Applicable)
If deploying in an air-gapped environment, on each node:
mkdir -p /mnt/esb3027-extras
mount -o loop,ro esb3027-acd-manager-extras-X.Y.Z.iso /mnt/esb3027-extras
/mnt/esb3027-extras/load-images
Step 10: Deploy the Manager Helm Chart
For complete instructions on deploying the CDN Manager Helm chart, including configuration file setup, MaxMind GeoIP database loading, TLS certificate configuration, deployment commands, and verification steps, see the Helm Chart Installation Guide.
This guide covers the common deployment steps that apply to all installation types. After completing the helm chart installation steps, proceed to Post-Installation below.
Step 15: Configure DNS (Optional)
Add DNS records for the manager hostname. For high availability, configure multiple A records pointing to different server nodes:
manager.example.com. IN A <server-1-ip>
manager.example.com. IN A <server-2-ip>
manager.example.com. IN A <server-3-ip>
Alternatively, configure a load balancer to distribute traffic across nodes.
Post-Installation
After installation completes, proceed to the Next Steps guide for:
- Initial user configuration
- Accessing the web interfaces
- Configuring authentication
- Setting up monitoring
Accessing the System
Refer to the Accessing the System section in the Getting Started guide for service URLs and default credentials.
Note: A self-signed SSL certificate is deployed by default. For production deployments, configure a valid SSL certificate before exposing the system to users.
High Availability Considerations
Pod Distribution
The Helm chart configures pod anti-affinity rules to ensure:
- Kafka controllers are scheduled on separate nodes
- PostgreSQL cluster members are distributed across nodes
- Application pods are spread across available nodes
Data Replication and Failure Tolerance
For detailed information on data replication strategies and failure scenario tolerance, refer to the Architecture Guide and System Requirements Guide.
Troubleshooting
If pods fail to start or nodes fail to join:
- Check node status:
kubectl get nodes - Describe problematic pods:
kubectl describe pod <pod-name> - Review logs:
kubectl logs <pod-name> - Check cluster events:
kubectl get events --sort-by='.lastTimestamp'
Nodes Ready but Workloads Cannot Reach the API Server (Segregated Networks)
Symptom: All nodes show Ready status, but cluster components (kubelet, controller-manager, scheduler) or workloads fail to communicate with the API server. Pods in kube-system or longhorn-system may fail to start or remain in a crash loop.
Cause: This is caused by omitting --advertise-address from the server-node INSTALL_K3S_EXEC. When --node-external-ip is set without --advertise-address, k3s defaults the API server’s advertise address to the external IP (eth0). In a segregated-network topology where nodes are not routable to each other over eth0, the kubernetes service ClusterIP endpoint registers as an unreachable address.
Diagnostic check:
kubectl get endpoints kubernetes -n default
If the IP shown is the eth0 (external) address rather than the eth1 (internal) address, the cluster was installed without --advertise-address.
Remediation: The kubernetes service endpoint cannot be corrected by reconfiguration alone. K3s must be reinstalled on all server nodes with the correct flags:
export INSTALL_K3S_EXEC="server --node-ip=<ETH1_IP> --node-external-ip=<ETH0_IP> --flannel-iface=eth1 --advertise-address=<ETH1_IP>"
After reinstallation, re-run the diagnostic check to confirm the endpoint IP is now the eth1 (internal) address.
See the Troubleshooting Guide for additional assistance.
Next Steps
After successful installation:
- Next Steps Guide - Post-installation configuration
- Configuration Guide - System configuration
- Operations Guide - Day-to-day operations
11.5.4 - Air-Gapped Deployment
Overview
This guide describes the installation of the AgileTV CDN Manager in air-gapped environments (no internet access). Air-gapped deployments require additional preparation compared to connected deployments.
Key differences from connected deployments:
- Both Installation ISO and Extras ISO are required on all nodes
- OS installation ISO must be mounted on all nodes for package access
- Container images must be loaded from the Extras ISO on each node
- Additional firewall considerations for OS package repositories
Prerequisites
Required ISOs
Before beginning installation, obtain the following:
| ISO | Filename | Purpose |
|---|---|---|
| Installation ISO | esb3027-acd-manager-X.Y.Z.iso | Kubernetes cluster and Manager application |
| Extras ISO | esb3027-acd-manager-extras-X.Y.Z.iso | Container images for air-gapped environments |
| OS Installation ISO | RHEL 9 or compatible clone | Operating system packages (required on all nodes) |
Hardware Requirements
Refer to the System Requirements Guide for hardware specifications.
- Single-Node (Lab): Minimum 8 cores, 16 GiB RAM, 128 GiB disk
- Multi-Node (Production): Minimum 3 Server nodes for high availability
Network Configuration
Air-gapped environments may have internal network mirrors for OS packages. If no internal mirror exists, the OS installation ISO must be mounted on each node to provide packages during installation.
Ensure that required firewall ports are configured before installation. See the Networking Guide for complete firewall configuration requirements.
SELinux
If SELinux is to be used, it must be set to “Enforcing” mode before running the installer script. The installer will configure appropriate SELinux policies automatically. SELinux cannot be enabled after installation.
Installation Steps
Step 1: Prepare All Nodes
On each node (primary server, additional servers, and agents):
- Mount the OS installation ISO:
mkdir -p /mnt/os
mount -o loop,ro /path/to/rhel-9.iso /mnt/os
- Configure local repository (if no internal mirror):
cat > /etc/yum.repos.d/local.repo <<EOF
[local]
name=Local OS Repository
baseurl=file:///mnt/os/BaseOS
enabled=1
gpgcheck=0
EOF
# Also configure AppStream if needed
cat >> /etc/yum.repos.d/local.repo <<EOF
[appstream]
name=AppStream Repository
baseurl=file:///mnt/os/AppStream
enabled=1
gpgcheck=0
EOF
- Verify repository is accessible:
dnf repolist
dnf makecache
Step 2: Prepare the Primary Server Node
Mount the installation ISOs on the primary server node:
# Mount Installation ISO
mkdir -p /mnt/esb3027
mount -o loop,ro esb3027-acd-manager-X.Y.Z.iso /mnt/esb3027
# Mount Extras ISO
mkdir -p /mnt/esb3027-extras
mount -o loop,ro esb3027-acd-manager-extras-X.Y.Z.iso /mnt/esb3027-extras
Step 3: Install the Base Cluster on Primary Server
Run the installer to set up the K3s Kubernetes cluster:
/mnt/esb3027/install
This installs:
- K3s Kubernetes distribution
- Longhorn distributed storage
- Cloudnative PG operator for PostgreSQL
- Base system dependencies
Important: After the installer completes, verify that all system pods in both namespaces are in the Running state before proceeding:
# Check kube-system namespace (Kubernetes core components)
kubectl get pods -n kube-system
# Check longhorn-system namespace (distributed storage)
kubectl get pods -n longhorn-system
All pods should show Running status. If any pods are still Pending or ContainerCreating, wait until they are ready. Proceeding with incomplete system pods can cause subsequent steps to fail in unpredictable ways.
This verification confirms:
- K3s cluster is operational
- Longhorn distributed storage is running
- Cloudnative PG operator is deployed
- All core components are healthy before continuing
Step 4: Retrieve the Node Token
Retrieve the node token for joining additional nodes:
cat /var/lib/rancher/k3s/server/node-token
Save this token for use on additional nodes. Also note the IP address of the primary server node.
Step 5: Join Additional Server Nodes (Multi-Node Only)
On each additional server node:
- Mount the OS ISO:
mkdir -p /mnt/os
mount -o loop,ro /path/to/rhel-9.iso /mnt/os
# Configure local repository
cat > /etc/yum.repos.d/local.repo <<EOF
[local]
name=Local OS Repository
baseurl=file:///mnt/os/BaseOS
enabled=1
gpgcheck=0
[appstream]
name=AppStream Repository
baseurl=file:///mnt/os/AppStream
enabled=1
gpgcheck=0
EOF
dnf makecache
- Mount the Installation ISOs:
# Mount Installation ISO
mkdir -p /mnt/esb3027
mount -o loop,ro esb3027-acd-manager-X.Y.Z.iso /mnt/esb3027
# Mount Extras ISO
mkdir -p /mnt/esb3027-extras
mount -o loop,ro esb3027-acd-manager-extras-X.Y.Z.iso /mnt/esb3027-extras
- Join the cluster:
Run the join script:
/mnt/esb3027/join-server https://<primary-server-ip>:6443 <node-token>
Replace <primary-server-ip> with the IP address of the primary server and <node-token> with the token retrieved in Step 4.
- Verify the node joined successfully:
kubectl get nodes
Repeat for each server node. A minimum of 3 server nodes is required for high availability.
Step 6: Join Agent Nodes (Optional)
On each agent node:
- Mount the OS ISO:
mkdir -p /mnt/os
mount -o loop,ro /path/to/rhel-9.iso /mnt/os
# Configure local repository
cat > /etc/yum.repos.d/local.repo <<EOF
[local]
name=Local OS Repository
baseurl=file:///mnt/os/BaseOS
enabled=1
gpgcheck=0
[appstream]
name=AppStream Repository
baseurl=file:///mnt/os/AppStream
enabled=1
gpgcheck=0
EOF
dnf makecache
- Mount the Installation ISOs:
# Mount Installation ISO
mkdir -p /mnt/esb3027
mount -o loop,ro esb3027-acd-manager-X.Y.Z.iso /mnt/esb3027
# Mount Extras ISO
mkdir -p /mnt/esb3027-extras
mount -o loop,ro esb3027-acd-manager-extras-X.Y.Z.iso /mnt/esb3027-extras
- Join the cluster as an agent:
Run the join script:
/mnt/esb3027/join-agent https://<primary-server-ip>:6443 <node-token>
- Verify the node joined successfully from an existing server node:
kubectl get nodes
Agent nodes provide additional workload capacity but do not participate in the control plane quorum.
Step 7: Load Container Images
On each node in the cluster:
/mnt/esb3027-extras/load-images
This script loads all container images from the Extras ISO into the local container runtime.
Important: This step must be performed on every node (primary server, additional servers, and agents) before deploying the Manager application.
Step 8: Verify Cluster Status
After all nodes are joined and images are loaded, verify the cluster is operational:
1. Verify all nodes are ready:
kubectl get nodes
Expected output:
NAME STATUS ROLES AGE VERSION
k3s-server-0 Ready control-plane,etcd,master 5m v1.33.4+k3s1
k3s-server-1 Ready control-plane,etcd,master 3m v1.33.4+k3s1
k3s-server-2 Ready control-plane,etcd,master 2m v1.33.4+k3s1
k3s-agent-1 Ready <none> 1m v1.33.4+k3s1
2. Verify system pods in both namespaces are running:
# Check kube-system namespace (Kubernetes core components)
kubectl get pods -n kube-system
# Check longhorn-system namespace (distributed storage)
kubectl get pods -n longhorn-system
All pods should show Running status.
3. Verify container images are loaded:
crictl images | grep acd-manager
Step 9: Deploy the Manager Helm Chart
For complete instructions on deploying the CDN Manager Helm chart, including configuration file setup, MaxMind GeoIP database loading, TLS certificate configuration, deployment commands, and verification steps, see the Helm Chart Installation Guide.
This guide covers the common deployment steps that apply to all installation types. After completing the helm chart installation steps, proceed to Post-Installation below.
Post-Installation
After installation completes, proceed to the Next Steps guide for:
- Initial user configuration
- Accessing the web interfaces
- Configuring authentication
- Setting up monitoring
Accessing the System
Refer to the Accessing the System section in the Getting Started guide for service URLs and default credentials.
Note: A self-signed SSL certificate is deployed by default. You will need to accept the certificate warning in your browser.
Updating MaxMind GeoIP Databases
If using GeoIP-based routing, load the MaxMind databases:
/mnt/esb3027/generate-maxmind-volume
The utility will prompt for the database file locations and volume name. Reference the volume in your values.yaml:
manager:
maxmindDbVolume: maxmind-geoip-2026-04
See the Operations Guide for database update procedures.
Troubleshooting
Image Pull Errors
If pods fail with image pull errors:
- Verify the
load-imagesscript completed successfully on all nodes - Check container runtime image list:
crictl images | grep <image-name> - Ensure image tags in Helm chart match tags on the Extras ISO
OS Package Errors
If the installer reports missing OS packages:
- Verify OS ISO is mounted on the affected node
- Check repository configuration:
dnf repolist dnf info <package-name> - Ensure the ISO matches the installed OS version
Longhorn Volume Issues
If Longhorn volumes fail to mount:
- Verify all nodes have the
load-imagesscript completed - Check Longhorn system pods:
kubectl get pods -n longhorn-system - Review Longhorn UI via port-forward:
kubectl port-forward -n longhorn-system svc/longhorn-frontend 8080:80
Next Steps
After successful installation:
- Next Steps Guide - Post-installation configuration
- Configuration Guide - System configuration
- Operations Guide - Day-to-day operational procedures
- Troubleshooting Guide - Common issues and resolution
11.5.5 - Helm Chart Installation
Overview
This guide covers the common steps for deploying the CDN Manager Helm chart. These steps apply to all deployment types (single-node, multi-node, and air-gapped) after the Kubernetes cluster is fully operational.
Prerequisites: This guide assumes the Kubernetes cluster is already installed and all system pods are running. If you haven’t installed the cluster yet, refer to:
- Single-Node Installation for lab environments
- Multi-Node Installation for production deployments
- Air-Gapped Deployment for air-gapped environments
Prerequisites
Before proceeding, verify the following:
- Cluster operational: All nodes show
Readystatus - System pods running: All pods in
kube-systemandlonghorn-systemnamespaces areRunning - ISO mounted: Installation ISO is mounted at
/mnt/esb3027 - Extras ISO mounted (air-gapped only): Extras ISO is mounted at
/mnt/esb3027-extrasand images are loaded on all nodes
Step 1: Create Configuration File
The installation ISO includes environment-specific configuration files as the recommended starting points. Choose the file that matches your deployment type:
| Deployment | Starting file | Copy command |
|---|---|---|
| Single-node lab | /mnt/esb3027/values-lab.yaml | cp /mnt/esb3027/values-lab.yaml ~/values.yaml |
| Multi-node production | /mnt/esb3027/values-production.yaml | cp /mnt/esb3027/values-production.yaml ~/values.yaml |
After copying, edit ~/values.yaml for your environment. The two fields that must be updated in either file are:
global:
hosts:
manager:
- host: manager.example.com # Your manager hostname
zitadel:
zitadel:
configmapConfig:
ExternalDomain: manager.example.com # Must match global.hosts.manager[0].host exactly
Important:
global.hosts.manager[0].hostandzitadel.zitadel.configmapConfig.ExternalDomainmust match exactly or authentication will fail due to CORS policy violations.
For a full description of what each file configures and the complete list of required changes per environment, see the Configuration Guide.
Complete reference: /mnt/esb3027/values.yaml documents every available option with its default value. Use this as a reference, not as a starting point for your configuration.
Split configuration files: For better organisation, split your configuration into multiple files and specify them with repeated --values flags. Later files override earlier files:
helm install acd-manager /mnt/esb3027/charts/acd-manager \
--values ~/values.yaml \
--values ~/values-tls.yaml
Step 2: Load MaxMind GeoIP Databases (Optional)
If you plan to use GeoIP-based routing or validation features, load the MaxMind GeoIP databases. The following databases are used by the manager:
GeoIP2-City.mmdb- The City DatabaseGeoLite2-ASN.mmdb- The ASN DatabaseGeoIP2-Anonymous-IP.mmdb- The VPN and Anonymous IP Database
Create the Kubernetes volume using the helper utility:
/mnt/esb3027/generate-maxmind-volume
The utility will prompt for:
- Location of
GeoIP2-City.mmdb - Location of
GeoLite2-ASN.mmdb - Location of
GeoIP2-Anonymous-IP.mmdb - Name of the volume
After running this command, reference the volume in your configuration file:
manager:
maxmindDbVolume: maxmind-db-volume
Replace maxmind-db-volume with the volume name you specified when running the utility.
Tip: When naming the volume, include a revision number or date (e.g.,
maxmind-db-volume-2026-04ormaxmind-db-volume-v2). This simplifies future updates: create a new volume with an updated name, update thevalues.yamlto reference the new volume, and delete the old volume after verification.
Step 3: Configure TLS Certificates (Optional)
For production deployments, configure a valid TLS certificate from a trusted Certificate Authority (CA). A self-signed certificate is deployed by default if no certificate is provided.
Method 1: Create TLS Secret Manually
Create a Kubernetes TLS secret with your certificate and key:
kubectl create secret tls acd-manager-tls --cert=tls.crt --key=tls.key
Method 2: Helm-Managed Secret
Add the certificate directly to your values.yaml:
ingress:
secrets:
acd-manager-tls: |
-----BEGIN CERTIFICATE-----
...
-----END CERTIFICATE-----
tls:
- hosts:
- manager.example.com
secretName: acd-manager-tls
Configuring All Ingress Controllers
All ingress controllers must be configured with the same certificate secret and hostname:
ingress:
hostname: manager.example.com
tls: true
secretName: acd-manager-tls
zitadel:
ingress:
tls:
- hosts:
- manager.example.com
secretName: acd-manager-tls
confd:
ingress:
hostname: manager.example.com
tls: true
secretName: acd-manager-tls
mib-frontend:
ingress:
hostname: manager.example.com
tls: true
secretName: acd-manager-tls
Important: The hostname must match the first entry in
global.hosts.managerfor Zitadel CORS compatibility. The secret name has a maximum length of 53 characters.
Step 4: Deploy the Manager Helm Chart
Deploy the CDN Manager application:
helm install acd-manager /mnt/esb3027/charts/acd-manager --values ~/values.yaml
Real-time output: By default, helm install runs silently until completion. To see real-time output during deployment, add the --debug flag:
helm install acd-manager /mnt/esb3027/charts/acd-manager --values ~/values.yaml --debug
Monitor deployment:
kubectl get pods --watch
Wait for all pods to show Running status before proceeding.
Timeout handling: The default Helm timeout is 5 minutes. If the installation fails due to a rollout timeout, retry with a larger timeout value:
helm install acd-manager /mnt/esb3027/charts/acd-manager --values ~/values.yaml --timeout 10m
Retry failed installation: If a previous installation attempt failed and you receive an error that the release name is already in use, uninstall the previous release before retrying:
helm uninstall acd-manager
helm install acd-manager /mnt/esb3027/charts/acd-manager --values ~/values.yaml
Step 5: Verify Deployment
Verify all application pods are running:
kubectl get pods
Expected Output: Single-Node
NAME READY STATUS RESTARTS AGE
acd-manager-5b98d569d9-abc12 1/1 Running 0 3m
acd-manager-confd-6fb78548c4-xnrh4 1/1 Running 0 3m
acd-manager-gateway-8bc8446fc-chs26 1/1 Running 0 3m
acd-manager-kafka-controller-0 2/2 Running 0 3m
acd-manager-metrics-aggregator-76d96c4964-lwdcj 1/1 Running 0 3m
acd-manager-mib-frontend-7bdb69684b-6qxn8 1/1 Running 0 3m
acd-manager-postgresql-0 1/1 Running 0 3m
acd-manager-redis-master-0 2/2 Running 0 3m
acd-manager-redis-replicas-0 2/2 Running 0 3m
acd-manager-selection-input-5fb694b857-qxt67 1/1 Running 0 3m
acd-manager-zitadel-8448b4c4fc-2pkd8 1/1 Running 0 3m
acd-manager-zitadel-init-hh6j7 0/1 Completed 0 4m
acd-manager-zitadel-setup-nwp8k 0/2 Completed 0 4m
alertmanager-0 1/1 Running 0 3m
grafana-6d948cfdc6-77ggk 1/1 Running 0 3m
victoria-metrics-agent-dc87df588-tn8wv 1/1 Running 0 3m
victoria-metrics-alert-757c44c58f-kk9lp 1/1 Running 0 3m
victoria-metrics-longterm-server-0 1/1 Running 0 3m
victoria-metrics-server-0 1/1 Running 0 3m
Expected Output: Multi-Node
NAME READY STATUS RESTARTS AGE
acd-cluster-postgresql-1 1/1 Running 0 11m
acd-cluster-postgresql-2 1/1 Running 0 11m
acd-cluster-postgresql-3 1/1 Running 0 10m
acd-manager-5b98d569d9-2pbph 1/1 Running 0 3m
acd-manager-5b98d569d9-m54f9 1/1 Running 0 3m
acd-manager-5b98d569d9-pq26f 1/1 Running 0 3m
acd-manager-confd-6fb78548c4-xnrh4 1/1 Running 0 3m
acd-manager-gateway-8bc8446fc-chs26 1/1 Running 0 3m
acd-manager-gateway-8bc8446fc-wzrml 1/1 Running 0 3m
acd-manager-kafka-controller-0 2/2 Running 0 3m
acd-manager-kafka-controller-1 2/2 Running 0 3m
acd-manager-kafka-controller-2 2/2 Running 0 3m
acd-manager-metrics-aggregator-76d96c4964-lwdcj 1/1 Running 2 3m
acd-manager-mib-frontend-7bdb69684b-6qxn8 1/1 Running 0 3m
acd-manager-mib-frontend-7bdb69684b-pkjrw 1/1 Running 0 3m
acd-manager-redis-master-0 2/2 Running 0 3m
acd-manager-redis-replicas-0 2/2 Running 0 3m
acd-manager-selection-input-5fb694b857-qxt67 1/1 Running 2 3m
acd-manager-zitadel-8448b4c4fc-2pkd8 1/1 Running 0 3m
acd-manager-zitadel-8448b4c4fc-vchp9 1/1 Running 0 3m
acd-manager-zitadel-init-hh6j7 0/1 Completed 0 4m
acd-manager-zitadel-setup-nwp8k 0/2 Completed 0 4m
alertmanager-0 1/1 Running 0 3m
grafana-6d948cfdc6-77ggk 1/1 Running 0 3m
telegraf-54779f5f46-2jfj5 1/1 Running 0 3m
victoria-metrics-agent-dc87df588-tn8wv 1/1 Running 0 3m
victoria-metrics-alert-757c44c58f-kk9lp 1/1 Running 0 3m
victoria-metrics-longterm-server-0 1/1 Running 0 3m
victoria-metrics-server-0 1/1 Running 0 3m
Pod Distribution Verification
Verify pods are distributed across nodes:
kubectl get pods -o wide
Expected Behavior
- Init pods (such as
zitadel-initandzitadel-setup) will showCompletedstatus after successful initialization. This is expected behavior. - Multi-node deployments: Some pods may enter
CrashLoopBackoffstate during initial deployment depending on the timing of other containers starting up. This is expected behavior as some services wait for dependencies (such as databases or Kafka) to become available. The deployment should stabilize automatically after a few minutes. - Restart counts: Some pods may show restart counts as they wait for dependencies to become available. This is normal during initial deployment.
Next Steps
After successful deployment:
- Next Steps Guide - Post-installation configuration
- Getting Started Guide - Accessing the system
- Configuration Guide - System configuration
- Operations Guide - Day-to-day operations
11.5.6 - Upgrade Guide
Overview
This guide describes the procedure for upgrading the AgileTV CDN Manager (ESB3027) to a newer version. The upgrade process involves updating the Kubernetes cluster components and redeploying the Helm chart with the new version.
Prerequisites
Backup Requirements
Before beginning any upgrade, ensure you have:
- PostgreSQL Backup: Verify recent backups are available via the Cloudnative PG operator
- Configuration Backup: Save your current
values.yamlfile(s) - TLS Certificates: Ensure certificate files are backed up
- MaxMind Volumes: Note the current volume names if using GeoIP databases
Version Compatibility
Review the Release Notes for the target version to check for:
- Breaking changes requiring manual intervention
- Required intermediate upgrade steps
- New configuration options that should be set
Cluster Health
Verify the cluster is healthy before upgrading:
kubectl get nodes
kubectl get pods
kubectl get pvc
All nodes should show Ready status and all pods should be Running (or Completed for job pods).
Upgrade Methods
There are three upgrade methods available. Choose the one that best fits your situation:
| Method | Downtime | Use Case |
|---|---|---|
| Rolling Upgrade | Minimal | Patch releases; minor version upgrades; configuration updates |
| Clean Upgrade | Brief | Major version upgrades; component changes; troubleshooting |
| Full Reinstall | Extended | Cluster rebuilds; troubleshooting persistent issues; ensuring clean state |
Method Selection Guidance:
Rolling Upgrade (Method 1) is the default choice for most upgrades. Use this for patch releases (e.g., 1.6.0 → 1.6.1) and even minor version upgrades (e.g., 1.4.0 → 1.6.0) where no breaking changes are documented. This method preserves all existing resources and performs an in-place update. Note: This method supports Helm’s automatic rollback (
helm rollback) if the upgrade fails, allowing quick recovery to the previous state.Clean Upgrade (Method 2) is recommended for major version upgrades (e.g., 1.x → 2.x) or when the release notes indicate significant component changes. This method ensures all resources are recreated with the new version, avoiding potential issues with stale configurations. Also use this method when troubleshooting upgrade failures from Method 1.
Full Reinstall (Method 3) should only be used when a completely clean cluster state is required. This includes troubleshooting persistent cluster-level issues, recovering from failed upgrades that cannot be rolled back, or when migrating between significantly different deployment configurations. This method requires verified backups and should be planned for extended downtime.
Upgrade Steps
Method 1: Rolling Upgrade (Recommended)
This method performs an in-place rolling upgrade with minimal downtime. All upgrade commands are executed from the primary server node.
Step 1: Obtain the New Installation ISO
Unmount the old ISO (if mounted) and mount the new installation ISO:
umount /mnt/esb3027 2>/dev/null || true
mount -o loop,ro esb3027-acd-manager-X.Y.Z.iso /mnt/esb3027
Replace X.Y.Z with the target version number.
Step 2: Update Containers and Cluster Software
Run the installation script to update the container images and cluster software:
/mnt/esb3027/install
Wait for the script to complete.
Step 2b: Air-Gapped Environments (If Applicable)
If deploying in an air-gapped environment, also mount and load the extras ISO:
# Mount the Extras ISO
mkdir -p /mnt/esb3027-extras
mount -o loop,ro esb3027-acd-manager-extras-X.Y.Z.iso /mnt/esb3027-extras
# Load container images from the extras ISO
/mnt/esb3027-extras/load-images
Replace X.Y.Z with the target version number.
Step 4: Review and Update Configuration
Compare the default values.yaml from the new ISO with your current configuration:
diff /mnt/esb3027/values.yaml ~/values.yaml
Update your configuration file to include any new required settings. Common updates include:
# ~/values.yaml
global:
hosts:
manager:
- host: manager.example.com
routers:
- name: director-1
address: 192.0.2.1
zitadel:
zitadel:
ExternalDomain: manager.example.com
# Add any new required settings for the target version
Important: Do not modify settings unrelated to the upgrade unless specifically documented in the release notes.
Step 5: Update MaxMind GeoIP Volumes (If Applicable)
If you use MaxMind GeoIP databases, use the utility from the new ISO to create an updated volume:
/mnt/esb3027/generate-maxmind-volume
Update your values.yaml to reference the new volume name:
manager:
maxmindDbVolume: maxmind-geoip-2026-04
Tip: Using dated or versioned volume names (e.g.,
maxmind-geoip-2026-04) allows you to create new volumes during upgrades and delete old ones after verification.
Step 6: Update TLS Certificates (If Needed)
If your TLS certificates need renewal or the new version requires certificate updates, create or update the secret:
kubectl create secret tls acd-manager-tls --cert=tls.crt --key=tls.key --dry-run=client -o yaml | kubectl apply -f -
Step 7: Upgrade the Helm Release
Perform a Helm upgrade with the new chart:
helm upgrade acd-manager /mnt/esb3027/charts/acd-manager \
--values ~/values.yaml
Note: The upgrade performs a rolling update of each deployment in the chart. Deployments are upgraded one at a time, with pods being terminated and recreated sequentially. StatefulSets (PostgreSQL, Kafka, Redis) roll out one pod at a time to maintain data availability.
Monitor the upgrade progress:
kubectl get pods --watch
Wait for all pods to stabilize and show Running status before considering the upgrade complete. Some pods may temporarily enter CrashLoopBackoff during the transition as they wait for dependencies to become available.
Step 8: Verify the Upgrade
Check the deployed version:
helm list
kubectl get deployments -o wide
Verify application functionality:
- Access the MIB Frontend and confirm it loads
- Test API connectivity
- Verify Grafana dashboards are accessible
- Check that Zitadel authentication is working
Step 9: Clean Up
After confirming the upgrade is successful:
Unmount the old ISO (if still mounted):
umount /mnt/esb3027Delete old MaxMind volumes (if replaced):
kubectl get pvc kubectl delete pvc <old-volume-name>Remove old configuration files if no longer needed.
Method 2: Clean Upgrade (Helm Uninstall/Install)
This method removes the existing Helm release before installing the new version. This is useful for major version upgrades or when troubleshooting upgrade issues. All upgrade commands are executed from the primary server node.
Warning: This method causes brief downtime as all resources are deleted before reinstallation.
Step 1: Obtain the New Installation ISO
Mount the new installation ISO:
umount /mnt/esb3027 2>/dev/null || true
mount -o loop,ro esb3027-acd-manager-X.Y.Z.iso /mnt/esb3027
Step 2: Backup Configuration
Save your current Helm values:
helm get values acd-manager -o yaml > ~/values-backup.yaml
Step 3: Uninstall the Existing Release
Remove the existing Helm release:
helm uninstall acd-manager
Wait for pods to terminate:
kubectl get pods --watch
Note: Helm uninstall does not remove PersistentVolumes (PVs) or PersistentVolumeClaims (PVCs). All data stored in PostgreSQL, Kafka, Redis, and Longhorn volumes is preserved during the uninstall process. When the new version is installed, it will reattach to the existing PVCs and restore data automatically.
Step 4: Review and Update Configuration
Compare the default values.yaml from the new ISO with your configuration:
diff /mnt/esb3027/values.yaml ~/values.yaml
Update your configuration file as needed.
Step 5: Install the New Release
Install the new version:
helm install acd-manager /mnt/esb3027/charts/acd-manager \
--values ~/values.yaml
Monitor the deployment:
kubectl get pods --watch
Wait for all pods to stabilize before proceeding.
Step 6: Verify the Upgrade
Verify the upgrade as described in Method 1, Step 8.
Method 3: Full Reinstall (Cluster Rebuild)
This method completely removes Kubernetes and reinstalls from scratch. Use only for cluster rebuilds or when other upgrade methods fail.
Warning: This method causes extended downtime and permanent data loss. The K3s uninstall process destroys all Longhorn PersistentVolumes (PVs) and PersistentVolumeClaims (PVCs). All data stored in PostgreSQL, Kafka, Redis, and application volumes will be permanently lost. Verified backups are required before proceeding.
Warning: This method should only be used when necessary. Ensure you have verified backups before proceeding.
Step 1: Stop Kubernetes Services
On all nodes (server and agent), stop the K3s service:
systemctl stop k3s
Step 2: Uninstall K3s (Server Nodes Only)
On the primary server node first, then each additional server node:
/usr/local/bin/k3s-uninstall.sh
Step 3: Clean Up Residual State (All Nodes)
On all nodes, remove residual state:
/usr/local/bin/k3s-kill-all.sh
rm -rf /var/lib/rancher/k3s/*
Warning: This removes all cluster data including Longhorn PersistentVolumes (PVs) and PersistentVolumeClaims (PVCs). All data stored in PostgreSQL, Kafka, Redis, and application volumes will be permanently lost. Ensure verified backups are available before proceeding.
Step 4: Reinstall K3s Cluster and Deploy Manager
Follow the installation procedure in the Installation Guide to reinstall the cluster and deploy the Helm chart. At this point, you are in the same state as a fresh installation:
- Primary server installation
- Additional server joins (if applicable)
- Agent joins (if applicable)
- Helm chart deployment
Note: The K3s node token is regenerated during reinstallation. Retrieve the new token from /var/lib/rancher/k3s/server/node-token on the primary server after installation if you need to join additional nodes.
Rollback Procedure
Rollback procedures vary by upgrade method:
Method 1 (Rolling Upgrade)
Use Helm’s built-in rollback command:
helm rollback acd-manager
This reverts to the previous Helm release revision automatically.
Or manually redeploy the previous version:
helm upgrade acd-manager /mnt/esb3027-old/helm/charts/acd-manager \
--values ~/values.yaml
Note: If you use multiple --values files for organization, ensure they are specified in the same order as the original installation.
Method 2 (Clean Upgrade)
Reinstall the previous version:
helm uninstall acd-manager
helm install acd-manager /mnt/esb3027-old/helm/charts/acd-manager \
--values ~/values-backup.yaml
Method 3 (Full Reinstall)
Rollback requires repeating the full cluster reinstall procedure using the old installation ISO. Follow Method 3 steps with the previous version’s ISO. Ensure verified backups are available before attempting.
Troubleshooting
Pods Fail to Start
Check pod status and events:
kubectl describe pod <pod-name> kubectl get events --sort-by='.lastTimestamp'Review pod logs:
kubectl logs <pod-name> kubectl logs <pod-name> -p # Previous instance logs
Database Migration Issues
If PostgreSQL migrations fail:
Check Cloudnative PG cluster status:
kubectl get clusters kubectl describe cluster <cluster-name>Review migration job logs:
kubectl get jobs kubectl logs job/<migration-job-name>
Helm Upgrade Fails
If helm upgrade fails:
Check Helm release status:
helm status acd-manager helm history acd-managerReview the error message for specific failures
Attempt rollback if necessary
Post-Upgrade
After a successful upgrade:
- Review the Release Notes for any post-upgrade tasks
- Update monitoring dashboards if new metrics are available
- Test all critical functionality
- Document the upgrade in your change management system
Next Steps
After completing the upgrade:
- Next Steps Guide - Review post-installation tasks
- Operations Guide - Day-to-day operational procedures
- Release Notes - Review new features and changes
11.5.7 - Next Steps
Overview
After completing the installation of the AgileTV CDN Manager (ESB3027), several post-installation configuration tasks must be performed before the system is ready for production use. This guide walks you through the essential next steps.
Prerequisites
Before proceeding, ensure:
- The CDN Manager Helm chart is successfully deployed
- All pods are in
Runningstatus - You have network access to the cluster hostname or IP
- You have the default credentials available
Step 1: Access Zitadel Console
The first step is to configure user authentication through Zitadel Identity and Access Management (IAM).
Navigate to the Zitadel Console:
https://<manager-host>/ui/consoleReplace
<manager-host>with your configured hostname (e.g.,manager.localormanager.example.com).Important: The
<manager-host>must match the first entry inglobal.hosts.managerfrom your Helm values exactly. Zitadel uses name-based virtual hosting and CORS validation. If the hostname does not match, authentication will fail.Log in with the default administrator credentials (also listed in the Glossary):
- Username:
admin@agiletv.dev - Password:
Password1!
- Username:
Important: If prompted to configure Multi-Factor Authentication (MFA), you must skip this step for now. MFA is not currently supported. Attempting to configure MFA may lock you out of the administrator account.
Security Recommendation: After logging in, create a new administrator account with proper roles. Once verified, disable or delete the default
admin@agiletv.devaccount. For details on required roles and administrator permissions, see Zitadel’s Administrator Documentation.
Step 2: Configure SMTP Settings (Recommended)
Zitadel requires an SMTP server to send email notifications and perform email validations.
In the Zitadel Console, navigate to Settings > Default Settings
Configure the SMTP settings:
- SMTP Host: Your mail server hostname
- SMTP Port: Typically 587 (TLS) or 465 (SSL)
- SMTP Username: Mail account username
- SMTP Password: Mail account password
- Sender Address: Email address for outgoing mail (e.g.,
noreply@example.com)
Save the configuration
Note: Without SMTP configuration, email-based user validation and password recovery features will not function.
Step 3: Create Additional User Accounts
Create user accounts for operators and administrators:
Tip: For detailed guidance on managing users, roles, and permissions in the Zitadel Console, see Zitadel’s User Management Documentation.
In the Zitadel Console, navigate to Users > Add User
Fill in the user details:
- Username: Unique username
- First Name: User’s first name
- Last Name: User’s last name
- Email: User’s email address (this is their login username)
Known Issue: Due to a limitation in this release of Zitadel, the username must match the local part (the portion before the
@) of the email address. For example, if the email isfoo@example.com, the username must befoo.If these do not match, Zitadel may allow login with the mismatched local part while blocking the full email address. For instance, if username is
foobut email isfoo.bar@example.com, login withfoo@example.commay succeed whilefoo.bar@example.comis blocked.Workaround: Always ensure the username matches the email local part exactly.
Important: The following options must be configured:
- Email Verified: Check this box to skip email verification
- Set Initial Password: Enter a temporary password for the user
Note: If you configured SMTP settings in Step 2, the user will receive an email asking to verify their address and set their initial password. If SMTP is not configured, you must check the “Email Verified” box and set an initial password manually, otherwise the user account will not be enabled.
Click Create User
Provide the user with:
- Their username
- The temporary password (if set manually)
- The Zitadel Console URL
Instruct the user to change their password on first login
Step 4: Configure User Roles and Permissions
Zitadel manages roles and permissions for accessing the CDN Manager:
In the Zitadel Console, navigate to Roles
Assign appropriate roles to users:
- Admin: Full administrative access
- Operator: Operational access without administrative functions
- Viewer: Read-only access
To assign a role:
- Select the user
- Click Add Role
- Select the appropriate role
- Save the assignment
Step 5: Access the MIB Frontend
The MIB Frontend is the web-based configuration GUI for CDN operators:
Navigate to the MIB Frontend:
https://<manager-host>/guiLog in using your Zitadel credentials
Verify you can access the configuration interface
Step 6: Verify API Access
Test API connectivity to ensure the system is functioning:
curl -k https://<manager-host>/api/v1/health/ready
Expected response:
{
"status": "ready"
}
See the API Guide for detailed API documentation.
Step 7: Configure TLS Certificates (If Not Done During Installation)
For production deployments, a valid TLS certificate from a trusted Certificate Authority should be configured. If you did not configure TLS certificates during installation, refer to Step 12: Configure TLS Certificates in the Installation Guide.
Step 8: Set Up Monitoring and Alerting
Configure monitoring dashboards and alerting:
Access Grafana:
- Navigate to
https://<manager-host>/grafana - Log in with default credentials (also listed in the Glossary):
- Username:
admin - Password:
edgeware
- Username:
- Navigate to
Review Pre-built Dashboards:
- System health dashboards are included by default
- CDN metrics dashboards show routing and usage statistics
Note: CDN Director instances automatically have DNS names configured for use in Grafana dashboards. The DNS name is derived from the
namefield inglobal.hosts.routerswith.externalappended. For example, a router namedmy-router-1will have the DNS namemy-router-1.externalin Grafana configuration.
Step 9: Verify Kafka and PostgreSQL Health
Ensure the data layer components are healthy:
kubectl get pods
Verify the following pods are running:
| Component | Pod Name Pattern | Expected Status |
|---|---|---|
| Kafka | acd-manager-kafka-controller-* | Running (3 pods for production) |
| PostgreSQL | acd-cluster-postgresql-0, acd-cluster-postgresql-1, acd-cluster-postgresql-2 | Running (3-node HA cluster) |
| Redis | acd-manager-redis-master-* | Running |
All pods should show Running status with no restarts.
Step 10: Configure Availability Zones (Optional)
For improved network performance, configure availability zones to enable Topology Aware Hints. This optimizes service-to-pod routing by keeping traffic within the same zone when possible.
See the Performance Tuning Guide for detailed instructions on:
- Labeling nodes with zone and region topology
- Verifying topology configuration
- Requirements for Topology Aware Hints to activate
- Integration with pod anti-affinity rules
Note: This step is optional. If zone labels are not configured, the system will fall back to random load-balancing.
Step 11: Review System Configuration
Verify the initial configuration:
Review Helm Values:
helm get values acd-manager -o yamlCheck Ingress Configuration:
kubectl get ingressVerify Service Endpoints:
kubectl get endpoints
Step 12: Document Your Deployment
Maintain documentation for your deployment:
- Cluster hostname and IP addresses
- Configuration file locations
- User accounts and roles created
- TLS certificate expiration dates
- Backup procedures and schedules
- Monitoring and alerting contacts
Next Steps
After completing post-installation configuration:
- Configuration Guide - Detailed system configuration options
- Operations Guide - Day-to-day operational procedures
- Metrics & Monitoring Guide - Comprehensive monitoring setup
- API Guide - REST API reference and integration examples
Troubleshooting
Cannot Access Zitadel Console
- Verify DNS resolution or hosts file configuration
- Check that Traefik ingress is running:
kubectl get pods -n kube-system | grep traefik - Review Traefik logs:
kubectl logs -n kube-system -l app.kubernetes.io/name=traefik
Authentication Failures
- Verify Zitadel pods are healthy:
kubectl get pods | grep zitadel - Check Zitadel logs:
kubectl logs <zitadel-pod-name> - Ensure the external domain matches your hostname in Zitadel configuration
MIB Frontend Not Loading
- Verify MIB Frontend pods are running:
kubectl get pods | grep mib-frontend - Check for connectivity issues to Confd and API services
- Review browser console for JavaScript errors
API Returns 401 Unauthorized
- Verify you have a valid bearer token
- Check token expiration
- Ensure Zitadel authentication is functioning
For additional troubleshooting assistance, refer to the Troubleshooting Guide.
11.6 - Configuration Guide
Overview
The CDN Manager is deployed via Helm chart with configuration supplied through values.yaml files. This guide explains the configuration structure, how to apply changes, and provides a reference for all configurable options.
Configuration Files
The installation ISO provides three configuration files at /mnt/esb3027/:
| File | Purpose |
|---|---|
values-lab.yaml | Recommended starting point for single-node lab deployments |
values-production.yaml | Recommended starting point for multi-node production deployments |
values.yaml | Complete reference of all configurable options with their defaults |
You only need to specify fields that differ from the defaults. Helm applies configuration hierarchically — values from your file override the chart’s built-in defaults, and any key you omit retains its default value.
Lab Configuration (values-lab.yaml)
values-lab.yaml is the recommended starting point for single-node lab, acceptance testing, and demonstration deployments. It pre-configures settings appropriate for a constrained single-node environment:
- Single Kafka controller replica (the default 3 replicas require 3 separate nodes to satisfy pod anti-affinity rules)
- Single Zitadel replica
- Self-signed TLS by default, with real certificate configuration commented out for reference
- Minimal resource requests suited to a single node
Copy the file to a writable location and edit it before deploying:
cp /mnt/esb3027/values-lab.yaml ~/values.yaml
The minimum required changes are:
- Set
global.hosts.manager[0].hostto your node’s hostname or IP address - Set
zitadel.zitadel.configmapConfig.ExternalDomainto the same value
These two values must match exactly or authentication will fail due to CORS policy violations. See Global Settings for details.
Production Configuration (values-production.yaml)
values-production.yaml is the recommended starting point for multi-node production deployments across a minimum three-node cluster. It pre-configures settings appropriate for a high-availability environment:
- Three Zitadel replicas spread across nodes for HA
- Production-grade resource requests and limits for all major components
- Kafka with a dedicated single-replica StorageClass (avoiding unnecessary triple-redundancy on top of Kafka’s own quorum)
- Manager HPA configured to scale between 3 and 8 replicas
- TLS certificate configuration with clearly marked placeholders
Copy the file to a writable location and edit it before deploying:
cp /mnt/esb3027/values-production.yaml ~/values.yaml
The minimum required changes before deploying are:
- Set
global.hosts.manager[0].hostto your primary manager hostname - Set
zitadel.zitadel.configmapConfig.ExternalDomainto the same hostname - Replace the placeholder TLS certificate and key in the
ingress.secretssection, and update thesecretNamevalues inmibFrontend.ingress.extraTlsandzitadel.ingress.tlsto match - Update
global.hosts.routerswith your CDN Director instances
See TLS Configuration and Global Settings for full details.
Hardware requirements: For per-node hardware specifications, refer to the System Requirements Guide. The System Requirements Guide is the authoritative source — the hardware comments in the header of
values-production.yamlmay not reflect the current requirements.
Complete Reference (values.yaml)
The full default values file at /mnt/esb3027/values.yaml documents every configurable option with its default value and inline comments. Use this as a reference when looking up available settings or understanding what the environment-specific files override.
Note:
values.yamlis not intended to be used directly as your deployment configuration. Usevalues-lab.yamlorvalues-production.yamlas your starting point instead.
Configuration Merging
Helm merges configuration files from left to right, with later files overriding earlier values. This allows you to split your configuration into multiple files — for example, keeping TLS certificates separate from the main configuration:
# Multiple files merged left-to-right
helm install acd-manager /mnt/esb3027/charts/acd-manager \
--values ~/values.yaml \
--values ~/values-tls.yaml
Individual Value Overrides
For temporary changes, you can override individual values with --set:
helm upgrade acd-manager /mnt/esb3027/helm/charts/acd-manager \
--values ~/values.yaml \
--set manager.logLevel=debug
Note: Using --set is discouraged for permanent changes, as the same arguments must be specified for every Helm operation.
Applying Configuration
Initial Installation
helm install acd-manager /mnt/esb3027/charts/acd-manager \
--values ~/values.yaml
Updating Configuration
helm upgrade acd-manager /mnt/esb3027/helm/charts/acd-manager \
--values ~/values.yaml
Dry Run
Before applying changes, validate the configuration with a dry run:
helm upgrade acd-manager /mnt/esb3027/helm/charts/acd-manager \
--values ~/values.yaml \
--dry-run
Rollback
If an upgrade fails, rollback to the previous revision:
# View revision history
helm history acd-manager
# Rollback to previous revision
helm rollback acd-manager
# Rollback to specific revision
helm rollback acd-manager <revision_number>
Note: Rollback reverts the Helm release but does not modify your values.yaml file. You must manually revert configuration file changes.
Force Reinstall
If an upgrade fails and rollback is not sufficient, you can perform a clean reinstall:
helm uninstall acd-manager
helm install acd-manager /mnt/esb3027/charts/acd-manager \
--values ~/values.yaml
Warning: This is service-affecting as all pods will be destroyed and recreated.
Configuration Reference
Global Settings
The global section contains cluster-wide settings. The most critical configuration is global.hosts.
global:
hosts:
manager:
- host: manager.local
routers:
- name: default
address: 127.0.0.1
edns_proxy: []
geoip: []
| Key | Type | Description |
|---|---|---|
global.hosts.manager | Array | External IP addresses or DNS hostnames for all Manager cluster nodes |
global.hosts.routers | Array | CDN Director (ESB3024) instances |
global.hosts.edns_proxy | Array | EDNS Proxy addresses (currently unused) |
global.hosts.geoip | Array | GeoIP Proxy addresses for Frontend GUI |
Important: The first entry in global.hosts.manager must match zitadel.zitadel.ExternalDomain exactly. Zitadel enforces CORS protection, and authentication will fail if these do not match.
Manager Configuration
Core Manager API server settings:
| Key | Type | Default | Description |
|---|---|---|---|
manager.image.registry | String | ghcr.io | Container image registry |
manager.image.repository | String | edgeware/acd-manager | Container image repository |
manager.image.tag | String | Image tag override (uses latest if empty) | |
manager.logLevel | String | info | Log level (trace, debug, info, warn, error) |
manager.replicaCount | Number | 1 | Number of replicas (HPA manages this when enabled) |
manager.containerPorts.http | Number | 80 | HTTP container port |
manager.maxmindDbVolume | String | Name of PVC containing MaxMind GeoIP databases |
Manager Resources
The chart supports both resource presets and explicit resource specifications:
| Key | Type | Default | Description |
|---|---|---|---|
manager.resourcesPreset | String | `` (empty) | Resource preset (see Resource Presets table). Ignored if manager.resources is set. |
manager.resources.requests.cpu | String | 300m | CPU request |
manager.resources.requests.memory | String | 512Mi | Memory request |
manager.resources.limits.cpu | String | 1 | CPU limit |
manager.resources.limits.memory | String | 4Gi | Memory limit |
Note: For production workloads, explicitly set manager.resources rather than using presets.
Manager Datastore
manager:
datastore:
type: redis
namespace: "cdn_manager_ds"
default_ttl: ""
compression: zstd
| Key | Type | Default | Description |
|---|---|---|---|
manager.datastore.type | String | redis | Datastore backend type |
manager.datastore.namespace | String | cdn_manager_ds | Redis namespace for manager data |
manager.datastore.default_ttl | String | `` (empty) | Default TTL for entries |
manager.datastore.compression | String | zstd | Compression algorithm (none, zstd, etc.) |
Manager Discovery
manager:
discovery: []
# Example:
# - namespace: "other"
# hosts:
# - other-host1
# - other-host2
# pattern: "other-.*"
| Key | Type | Description |
|---|---|---|
manager.discovery | Array | Array of discovery host configurations. Each entry can specify hosts (list of hostnames), pattern (regex pattern), or both |
Manager Tuning
manager:
tuning:
enable_cache_control: true
cache_control_max_age: "5m"
cache_control_miss_max_age: ""
| Key | Type | Default | Description |
|---|---|---|---|
manager.tuning.enable_cache_control | Boolean | true | Enable cache control headers in responses |
manager.tuning.cache_control_max_age | String | 5m | Maximum age for cache control headers |
manager.tuning.cache_control_miss_max_age | String | `` (empty) | Maximum age for cache control headers on cache misses |
Manager Container Arguments
manager:
args:
- --config-file=/etc/manager/config.toml
- http-server
Gateway Configuration
NGinx Gateway settings for external Director communication:
| Key | Type | Default | Description |
|---|---|---|---|
gateway.replicaCount | Number | 1 | Number of gateway replicas |
gateway.resources.requests.cpu | String | 100m | CPU request |
gateway.resources.requests.memory | String | 128Mi | Memory request |
gateway.resources.limits.cpu | String | 150m | CPU limit |
gateway.resources.limits.memory | String | 192Mi | Memory limit |
gateway.service.type | String | ClusterIP | Service type |
MIB Frontend Configuration
Web-based configuration GUI settings:
| Key | Type | Default | Description |
|---|---|---|---|
mib-frontend.enabled | Boolean | true | Enable the frontend GUI |
mib-frontend.frontend.resourcePreset | String | nano | Resource preset |
mib-frontend.frontend.autoscaling.hpa.enabled | Boolean | true | Enable HPA |
mib-frontend.frontend.autoscaling.hpa.minReplicas | Number | 2 | Minimum replicas |
mib-frontend.frontend.autoscaling.hpa.maxReplicas | Number | 4 | Maximum replicas |
Confd Configuration
Confd settings for configuration management:
| Key | Type | Default | Description |
|---|---|---|---|
confd.enabled | Boolean | true | Enable Confd |
confd.service.ports.internal | Number | 15000 | Internal service port |
VictoriaMetrics Configuration
Time-series database for metrics:
| Key | Type | Default | Description |
|---|---|---|---|
acd-metrics.enabled | Boolean | true | Enable metrics components |
acd-metrics.victoria-metrics-single.enabled | Boolean | true | Enable VictoriaMetrics |
acd-metrics.grafana.enabled | Boolean | true | Enable Grafana |
acd-metrics.telegraf.enabled | Boolean | true | Enable Telegraf |
acd-metrics.prometheus.enabled | Boolean | true | Enable Prometheus metrics |
Ingress Configuration
Traffic exposure settings:
| Key | Type | Default | Description |
|---|---|---|---|
ingress.enabled | Boolean | true | Enable ingress record generation |
ingress.pathType | String | Prefix | Ingress path type |
ingress.hostname | String | `` (empty) | Primary hostname (defaults to manager.local via global.hosts) |
ingress.path | String | /api | Default path for ingress |
ingress.tls | Boolean | false | Enable TLS configuration |
ingress.selfSigned | Boolean | false | Generate self-signed certificate via Helm |
ingress.secrets | Array | Custom TLS certificate secrets |
Ingress Extra Paths
The chart includes default extra paths for Confd and GeoIP:
ingress:
extraPaths:
- path: /confd
pathType: Prefix
backend:
service:
name: acd-manager-gateway
port:
name: http
- path: /geoip
pathType: Prefix
backend:
service:
name: acd-manager-gateway
port:
name: http
TLS Certificate Secrets
For production TLS certificates:
ingress:
secrets:
- name: manager.local-tls
key: |-
-----BEGIN RSA PRIVATE KEY-----
...
-----END RSA PRIVATE KEY-----
certificate: |-
-----BEGIN CERTIFICATE-----
...
-----END CERTIFICATE-----
tls: true
Resource Configuration
Resource Presets
Predefined resource configurations for common deployment sizes:
| Preset | Request CPU | Request Memory | Limit CPU | Limit Memory | Ephemeral Storage Limit |
|---|---|---|---|---|---|
nano | 100m | 128Mi | 150m | 192Mi | 2Gi |
micro | 250m | 256Mi | 375m | 384Mi | 2Gi |
small | 500m | 512Mi | 750m | 768Mi | 2Gi |
medium | 500m | 1024Mi | 750m | 1536Mi | 2Gi |
large | 1000m | 2048Mi | 1500m | 3072Mi | 2Gi |
xlarge | 1000m | 3072Mi | 3000m | 6144Mi | 2Gi |
2xlarge | 1000m | 3072Mi | 6000m | 12288Mi | 2Gi |
Note: Limits are calculated as requests plus 50% (except for xlarge/2xlarge and ephemeral-storage).
Custom Resources
Override preset with custom values:
manager:
resources:
requests:
cpu: "300m"
memory: "512Mi"
limits:
cpu: "1"
memory: "1Gi"
Note:
- CPU values use millicores (1000m = 1 core)
- Memory values use binary SI units (1024Mi = 1GiB)
- Requests represent minimum guaranteed resources
- Limits represent maximum consumable resources
Capacity Planning
When sizing resources:
- Requests determine scheduling (node must have available capacity)
- Limits prevent resource starvation
- Maintain 20-30% cluster headroom for scaling
- Total capacity = sum of all requests × replica count + headroom
Security Contexts
Pod Security Context
manager:
podSecurityContext:
enabled: true
fsGroup: 1001
fsGroupChangePolicy: Always
sysctls: []
supplementalGroups: []
Container Security Context
manager:
containerSecurityContext:
enabled: true
runAsUser: 1001
runAsGroup: 1001
runAsNonRoot: true
readOnlyRootFilesystem: true
privileged: false
allowPrivilegeEscalation: false
capabilities:
drop: ["ALL"]
seccompProfile:
type: "RuntimeDefault"
Health Probes
Probe Types
| Probe | Purpose | Failure Action |
|---|---|---|
startupProbe | Initial startup verification | Container restart |
readinessProbe | Traffic readiness check | Remove from load balancer |
livenessProbe | Health monitoring | Container restart |
Default Probe Configuration
Liveness Probe
manager:
livenessProbe:
enabled: true
initialDelaySeconds: 5
periodSeconds: 30
timeoutSeconds: 10
failureThreshold: 5
successThreshold: 1
httpGet:
path: /api/v1/health/alive
port: http
Readiness Probe
manager:
readinessProbe:
enabled: true
initialDelaySeconds: 5
periodSeconds: 10
timeoutSeconds: 7
failureThreshold: 3
successThreshold: 1
httpGet:
path: /api/v1/health/ready
port: http
Startup Probe
manager:
startupProbe:
enabled: true
initialDelaySeconds: 0
periodSeconds: 5
timeoutSeconds: 3
failureThreshold: 10
successThreshold: 1
httpGet:
path: /api/v1/health/alive
port: http
Autoscaling Configuration
Horizontal Pod Autoscaler (HPA)
manager:
autoscaling:
hpa:
enabled: true
minReplicas: 3
maxReplicas: 8
targetCPU: 50
targetMemory: 80
| Key | Type | Default | Description |
|---|---|---|---|
manager.autoscaling.hpa.enabled | Boolean | true | Enable HPA |
manager.autoscaling.hpa.minReplicas | Number | 3 | Minimum number of replicas |
manager.autoscaling.hpa.maxReplicas | Number | 8 | Maximum number of replicas |
manager.autoscaling.hpa.targetCPU | Number | 50 | Target CPU utilization percentage |
manager.autoscaling.hpa.targetMemory | Number | 80 | Target Memory utilization percentage |
Network Policy
networkPolicy:
enabled: true
allowExternal: true
allowExternalEgress: true
addExternalClientAccess: true
| Key | Type | Default | Description |
|---|---|---|---|
networkPolicy.enabled | Boolean | true | Enable NetworkPolicy |
networkPolicy.allowExternal | Boolean | true | Allow connections from any source (don’t require pod label) |
networkPolicy.allowExternalEgress | Boolean | true | Allow pod to access any range of port and destinations |
networkPolicy.addExternalClientAccess | Boolean | true | Allow access from pods with client label set to “true” |
Pod Affinity and Anti-Affinity
manager:
podAffinityPreset: ""
podAntiAffinityPreset: soft
nodeAffinityPreset:
type: ""
key: ""
values: []
affinity: {}
| Key | Type | Default | Description |
|---|---|---|---|
manager.podAffinityPreset | String | `` (empty) | Pod affinity preset (soft or hard). Ignored if affinity is set |
manager.podAntiAffinityPreset | String | soft | Pod anti-affinity preset (soft or hard). Ignored if affinity is set |
manager.nodeAffinityPreset.type | String | `` (empty) | Node affinity preset type (soft or hard) |
manager.affinity | Object | {} | Custom affinity rules (overrides presets) |
Service Configuration
service:
type: ClusterIP
ports:
http: 80
annotations:
service.kubernetes.io/topology-mode: Auto
externalTrafficPolicy: Cluster
sessionAffinity: None
| Key | Type | Default | Description |
|---|---|---|---|
service.type | String | ClusterIP | Service type |
service.ports.http | Number | 80 | HTTP service port |
service.annotations | Object | service.kubernetes.io/topology-mode: Auto | Service annotations |
service.externalTrafficPolicy | String | Cluster | External traffic policy |
Persistence Configuration
persistence:
enabled: false
mountPath: /agiletv/manager/data
storageClass: ""
accessModes:
- ReadWriteOnce
size: 8Gi
| Key | Type | Default | Description |
|---|---|---|---|
persistence.enabled | Boolean | false | Enable persistence using PVC |
persistence.mountPath | String | /agiletv/manager/data | Mount path |
persistence.storageClass | String | `` (empty) | Storage class (uses cluster default if empty) |
persistence.size | String | 8Gi | Size of data volume |
RBAC and Service Account
rbac:
create: false
rules: []
serviceAccount:
create: true
name: ""
automountServiceAccountToken: true
annotations: {}
Metrics
metrics:
enabled: false
serviceMonitor:
enabled: false
namespace: ""
annotations: {}
labels: {}
interval: ""
scrapeTimeout: ""
| Key | Type | Default | Description |
|---|---|---|---|
metrics.enabled | Boolean | false | Enable Prometheus metrics export |
metrics.serviceMonitor.enabled | Boolean | false | Create Prometheus Operator ServiceMonitor |
Next Steps
After configuration:
- Installation Guide - Deploy with your configuration
- Operations Guide - Day-to-day management
- Performance Tuning Guide - Optimize system performance
- Architecture Guide - Understand component relationships
11.7 - Performance Tuning Guide
Overview
This guide provides performance tuning recommendations for the AgileTV CDN Manager (ESB3027). While the default configuration is suitable for most deployments, certain environments may benefit from additional optimizations.
Network Topology Optimization
Topology Aware Hints
The CDN Manager uses Kubernetes Topology Aware Hints to prefer routing pods in the same zone as the source of network traffic. This reduces cross-zone latency and improves overall system responsiveness.
How It Works
When nodes are labeled with topology zones, Kubernetes automatically routes traffic to pods in the same zone when possible. This is particularly beneficial for:
- Low-latency requirements: Keeps traffic local to reduce round-trip time
- Cost optimization: Reduces cross-zone data transfer costs in cloud environments
- Load distribution: Prevents hotspots by distributing load across zones
Configuring Availability Zones
Each node must have zone and region labels applied for Topology Aware Hints to function:
# Label a node with a zone
kubectl label nodes <node-name> topology.kubernetes.io/zone=us-east-1a
# Label a node with a region
kubectl label nodes <node-name> topology.kubernetes.io/region=us-east-1
Replace <node-name> with your actual node names and adjust the zone/region values to match your deployment geography.
Note: Labels applied via kubectl label are automatically persistent and will survive node restarts.
Verify Topology Configuration
Verify labels are applied:
kubectl get nodes --show-labels | grep topology.kubernetes.io
Verify EndpointSlices are being generated with hints:
kubectl get endpointslices
Requirements for Topology Aware Hints
For Topology Aware Hints to activate:
- Minimum Nodes: At least one node must be labeled with each zone referenced by endpoints
- Symmetry: The control plane checks for sufficient CPU capacity across zones to balance traffic
- Zone Coverage: All zones with endpoints should have at least one ready node
Integration with Pod Anti-Affinity
Topology labels complement the pod anti-affinity rules already configured in the Helm chart:
- Pod Anti-Affinity: Handles pod-to-node placement to ensure high availability
- Topology Aware Hints: Handles service-to-pod traffic routing to keep requests within the same zone
Together, these features optimize both placement and routing for improved performance.
Fallback Behavior
If zone labels are not configured, the system falls back to random load-balancing across all available pods. This is functionally correct but may result in:
- Increased cross-zone traffic
- Higher latency for some requests
- Less predictable performance characteristics
Kernel Network Tuning (sysctl)
For high-throughput deployments, tuning Linux kernel network parameters can significantly improve connection handling and overall system performance. These settings are particularly beneficial for environments with high connection rates or large numbers of concurrent connections.
Recommended sysctl Settings
Apply the following settings to optimize network performance:
# Networking
net.core.somaxconn = 1024
net.core.netdev_max_backlog = 2048
net.ipv4.tcp_max_syn_backlog = 2048
# Connection Tracking
net.netfilter.nf_conntrack_max = 131072
net.netfilter.nf_conntrack_tcp_timeout_established = 1200
# Port Reuse
net.ipv4.ip_local_port_range = 10240 65535
net.ipv4.tcp_tw_reuse = 1
# Memory Buffers
net.core.rmem_max = 8388608
net.core.wmem_max = 8388608
Setting Descriptions
| Parameter | Recommended Value | Purpose |
|---|---|---|
net.core.somaxconn | 1024 | Maximum socket listen backlog. Increases pending connection queue size. |
net.core.netdev_max_backlog | 2048 | Maximum packets queued at network device level. Helps handle burst traffic. |
net.ipv4.tcp_max_syn_backlog | 2048 | Maximum SYN requests queued. Improves handling of connection floods. |
net.netfilter.nf_conntrack_max | 131072 | Maximum tracked connections. Prevents connection tracking table exhaustion. |
net.netfilter.nf_conntrack_tcp_timeout_established | 1200 | Timeout for established connections (seconds). Reduces stale entry buildup. |
net.ipv4.ip_local_port_range | 10240 65535 | Range of local ports for outbound connections. Expands available ephemeral ports. |
net.ipv4.tcp_tw_reuse | 1 | Allows reusing TIME_WAIT sockets. Reduces port exhaustion under high load. |
net.core.rmem_max | 8388608 | Maximum receive socket buffer size (8MB). Improves high-bandwidth transfers. |
net.core.wmem_max | 8388608 | Maximum send socket buffer size (8MB). Improves high-bandwidth transfers. |
Applying Settings
Temporary (Until Reboot)
Apply settings immediately but they will be lost on reboot:
sudo sysctl -w net.core.somaxconn=1024
sudo sysctl -w net.core.netdev_max_backlog=2048
# ... repeat for each parameter
Persistent (Across Reboots)
Add settings to /etc/sysctl.conf or a file in /etc/sysctl.d/:
# Create a dedicated config file
cat <<EOF | sudo tee /etc/sysctl.d/99-cdn-manager.conf
# CDN Manager Network Tuning
net.core.somaxconn = 1024
net.core.netdev_max_backlog = 2048
net.ipv4.tcp_max_syn_backlog = 2048
net.netfilter.nf_conntrack_max = 131072
net.netfilter.nf_conntrack_tcp_timeout_established = 1200
net.ipv4.ip_local_port_range = 10240 65535
net.ipv4.tcp_tw_reuse = 1
net.core.rmem_max = 8388608
net.core.wmem_max = 8388608
EOF
# Apply all settings
sudo sysctl -p /etc/sysctl.d/99-cdn-manager.conf
Kubernetes Considerations
For Kubernetes deployments, these sysctl settings can be applied via:
- Node-level configuration: Use DaemonSets or node provisioning scripts
- Pod-level safe sysctls: Some sysctls can be set per-pod via
securityContext.sysctls - Container runtime configuration: Configure via container runtime options
Note that some sysctls require privileged containers or node-level configuration.
Monitoring Impact
After applying these settings, monitor:
- Connection establishment rates
- TIME_WAIT socket count:
netstat -n | grep TIME_WAIT | wc -l - Connection tracking table usage:
cat /proc/sys/net/netfilter/nf_conntrack_count - Network buffer utilization via Grafana dashboards
Resource Configuration
Horizontal Pod Autoscaler (HPA)
The default HPA configuration is tuned for production workloads. For environments with variable load, consider adjusting the scale metrics:
| Component | Default Scale Metrics | Tuning Consideration |
|---|---|---|
| Core Manager | CPU 50%, Memory 80% | Lower CPU threshold for faster scale-out |
| NGinx Gateway | CPU 75%, Memory 80% | Increase for cost optimization |
| MIB Frontend | CPU 75%, Memory 90% | Adjust based on operator concurrency |
For detailed HPA configuration, see the Architecture Guide.
Resource Requests and Limits
Ensure resource requests and limits are appropriately sized for your workload. Under-provisioned resources can cause:
- Pod evictions during high load
- Increased latency due to CPU throttling
- Slow scaling responses
Refer to the Configuration Guide for preset configurations and planning guidance.
Database Optimization
PostgreSQL
The PostgreSQL cluster is managed by the Cloudnative PG operator. For improved performance:
- Connection Pooling: The application uses connection pooling by default
- Replica Usage: Read queries can be offloaded to replicas for read-heavy workloads
- Backup Scheduling: Schedule backups during low-traffic periods to minimize I/O impact
Redis
Redis provides in-memory caching for sessions and ephemeral state:
- Memory Allocation: Ensure sufficient memory for cache hit rates
- Persistence: RDB snapshots are enabled; adjust frequency based on durability needs
Kafka
Kafka handles event streaming for selection input and metrics:
- Partition Count: Default partitions are sized for typical workloads
- Replication Factor: Production deployments use 3 replicas for fault tolerance
- Consumer Groups: The Selection Input Worker is limited to one consumer per partition
Monitoring Performance
Key Metrics to Watch
Monitor the following metrics for performance insights:
- API Response Time: Track via Grafana dashboards
- Pod CPU/Memory Usage: Identify resource bottlenecks
- Kafka Lag: Monitor consumer lag for selection input processing
- Database Connections: Watch for connection pool exhaustion
Grafana Dashboards
Pre-built dashboards are available at https://<manager-host>/grafana:
- System Health: Overall cluster and application health
- CDN Metrics: Routing and usage statistics
- Resource Utilization: CPU, memory, and network usage per component
Troubleshooting Performance Issues
High Latency
- Check pod distribution across nodes:
kubectl get pods -o wide - Verify topology labels are applied:
kubectl get nodes --show-labels - Review network latency between nodes
- Check for resource contention:
kubectl top pods
Slow Scaling
- Verify HPA is enabled:
kubectl get hpa - Check cluster capacity for scheduling new pods
- Review HPA metrics:
kubectl describe hpa acd-manager
Database Performance
- Check PostgreSQL cluster status:
kubectl get pods -l app=postgresql - Review slow query logs (if enabled)
- Monitor connection pool usage
Next Steps
After reviewing performance tuning:
- Architecture Guide - Understand component interactions
- Configuration Guide - Detailed configuration options
- Metrics & Monitoring Guide - Comprehensive monitoring setup
- Troubleshooting Guide - Resolve performance issues
11.8 - Operations Guide
Overview
This guide covers day-to-day operational procedures for managing the AgileTV CDN Manager (ESB3027). Topics include routine maintenance, backup procedures, log management, and common operational tasks.
Prerequisites
Before performing operations, ensure you have:
kubectlaccess to the clusterhelmCLI installed- Access to the node where
values.yamlis stored - Appropriate RBAC permissions for administrative tasks
Cluster Access
There are two supported methods for accessing the Kubernetes cluster:
- SSH to a Server Node (Recommended for operations staff) - SSH into any Server node and run
kubectlcommands directly - Remote kubectl - Install
kubectlon your local machine and configure it to connect to the cluster remotely
Method 1: SSH to Server Node (Recommended)
The kubectl command-line tool is pre-configured on all Server nodes and can be used directly without additional setup:
# SSH to any Server node
ssh root@<server-ip>
# Run kubectl commands directly
kubectl get nodes
kubectl get pods
This method is recommended for day-to-day operations as it requires no local configuration and provides direct access to the cluster.
Method 2: Remote kubectl from Local Machine
To use kubectl from your local workstation or laptop:
Step 1: Install kubectl
Download and install kubectl for your operating system:
- Official Documentation: Install kubectl
- macOS (Homebrew):
brew install kubectl - Linux: Download from the official Kubernetes release page
- Windows: Download from the official Kubernetes release page
Step 2: Copy kubeconfig from Server Node
# Copy kubeconfig from any Server node
scp root@<server-ip>:/etc/rancher/k3s/k3s.yaml ~/.kube/config
Step 3: Update kubeconfig
Edit the kubeconfig file to point to the correct server address:
# Replace localhost with the actual server IP
# macOS/Linux:
sed -i '' 's/127.0.0.1/<server-ip>/g' ~/.kube/config # macOS
sed -i 's/127.0.0.1/<server-ip>/g' ~/.kube/config # Linux
# Or manually edit ~/.kube/config and change:
# server: https://127.0.0.1:6443
# to:
# server: https://<server-ip>:6443
Step 4: Verify connectivity
kubectl get nodes
Managing Multiple Clusters
If you manage multiple Kubernetes clusters from the same machine, you can maintain multiple kubeconfig files:
# Set KUBECONFIG environment variable to include multiple config files
export KUBECONFIG=~/.kube/config-prod:~/.kube/config-lab
# View all contexts
kubectl config get-contexts
# Switch between clusters
kubectl config use-context <context-name>
# View current context
kubectl config current-context
For more information, see the official Kubernetes documentation: Organizing Cluster Access
Helm Commands
Helm releases are managed cluster-wide:
# List all releases
helm list
# View release history
helm history acd-manager
# Get deployed values
helm get values acd-manager -o yaml
# Get deployed manifest
helm get manifest acd-manager
Note: If using remote kubectl, ensure helm is installed on your local machine. See Helm Installation for instructions.
Helm Commands
Helm releases are managed cluster-wide:
# List all releases
helm list
# View release history
helm history acd-manager
# Get deployed values
helm get values acd-manager -o yaml
# Get deployed manifest
helm get manifest acd-manager
Backup Procedures
PostgreSQL Backup
PostgreSQL is managed by the Cloudnative PG operator, which provides continuous backup capabilities.
# Check backup status
kubectl get backup
# Create manual backup
kubectl apply -f - <<EOF
apiVersion: postgresql.cnpg.io/v1
kind: Backup
metadata:
name: manual-backup-$(date +%Y%m%d-%H%M%S)
spec:
cluster:
name: acd-cluster-postgresql
EOF
# List available backups
kubectl get backup -o wide
# Restore from backup (requires downtime)
# See Upgrade Guide for restore procedures
Longhorn Volume Backups
Longhorn provides snapshot and backup capabilities for persistent volumes:
# List all volumes
kubectl get volumes -n longhorn-system
# Create snapshot via Longhorn UI
# Port-forward to Longhorn UI (do not expose via ingress)
kubectl port-forward -n longhorn-system svc/longhorn-frontend 8080:80
# Access: http://localhost:8080
# WARNING: Longhorn UI grants access to sensitive storage information
# and should never be exposed through the ingress controller
Accessing Internal Services
For debugging and troubleshooting, you may need direct access to internal services.
PostgreSQL
PostgreSQL is managed by the Cloudnative PG operator. Connection details are stored in the acd-cluster-postgresql-app Secret:
# View connection details
kubectl describe secret acd-cluster-postgresql-app
# Extract individual fields
PG_HOST=$(kubectl get secret acd-cluster-postgresql-app -o jsonpath='{.data.host}' | base64 -d)
PG_USER=$(kubectl get secret acd-cluster-postgresql-app -o jsonpath='{.data.username}' | base64 -d)
PG_PASS=$(kubectl get secret acd-cluster-postgresql-app -o jsonpath='{.data.password}' | base64 -d)
PG_DB=$(kubectl get secret acd-cluster-postgresql-app -o jsonpath='{.data.dbname}' | base64 -d)
# Connect via psql
kubectl exec -it acd-cluster-postgresql-0 -- psql -U $PG_USER -d $PG_DB
Secret fields: The CNPG operator populates the following fields: username, password, host, port, dbname, uri, jdbc-uri, fqdn-uri, fqdn-jdbc-uri, pgpass.
Redis
Redis runs on port 6379 with no authentication:
# Connect via redis-cli
kubectl exec -it acd-manager-redis-master-0 -- redis-cli
# Or connect from another pod
kubectl run redis-test --rm -it --image=redis -- redis-cli -h acd-manager-redis-master
Kafka
kafka-topics.sh –bootstrap-server
The selection_input topic is pre-configured for selection input events.
Kubernetes Port Forwarding
For accessing internal Kubernetes services that are not exposed via ingress or services, use kubectl port-forward to create a secure tunnel from your local machine to the service.
Basic Port Forwarding
# Forward local port to a service
kubectl port-forward -n <namespace> svc/<service-name> <local-port>:<service-port>
# Example: Forward local port 8080 to Grafana (port 3000)
kubectl port-forward -n default svc/acd-manager-grafana 8080:3000
Note: “Local” refers to the machine where you run kubectl. This can be:
- A Server node in the cluster (common for administrative tasks)
- A remote machine with
kubectlconfigured to access the cluster
Accessing the Forwarded Service
Once the port-forward is established, access the service at http://localhost:<local-port> from the machine where you ran kubectl port-forward.
If running on a Server node: To access the forwarded port from your local workstation:
- Ensure the firewall on the Server node allows traffic on the forwarded port from your network
- Use the Server node’s IP address instead of
localhostfrom your workstation
# From your workstation (if firewall allows)
curl http://<server-node-ip>:<local-port>
For simplicity, consider running port-forward from your local machine (if kubectl is configured for remote cluster access) rather than from a Server node.
Background Port Forwarding
To run port-forward in the background:
kubectl port-forward -n <namespace> svc/<service-name> <local-port>:<service-port> &
Security Considerations
Port forwarding is recommended for:
- Administrative interfaces (e.g., Longhorn UI) that should not be publicly exposed
- Debugging and troubleshooting internal services
- Temporary access to services without modifying ingress configuration
The port-forward tunnel remains active only while the kubectl port-forward command is running. Press Ctrl+C to terminate the tunnel.
Example: The Longhorn storage UI is intentionally not exposed via ingress due to security risks. Access it via port-forward:
kubectl port-forward -n longhorn-system svc/longhorn-frontend 8080:80Then navigate to
http://localhost:8080in your browser.
Longhorn Storage
Longhorn is a distributed block storage system for Kubernetes that provides persistent volumes for stateful applications such as PostgreSQL and Kafka.
Architecture
Longhorn deploys controller and replica engines on each node, forming a distributed storage system. When a volume is created, Longhorn replicates data across multiple nodes to ensure durability even in the event of node failures.
Storage Protocols:
- iSCSI: Used for standard Read-Write-Once (RWO) volumes
- NFS: Used for Read-Write-Many (RWX) volumes that can be mounted by multiple pods simultaneously
Configuration
The CDN Manager deploys Longhorn with a single replica configuration, which differs from the Longhorn default of 3 replicas. This configuration is optimized for the cluster architecture where:
- Pod-node affinity is configured to schedule pods on the same node as their persistent volume data
- This optimizes I/O performance by reducing network traffic
- Data locality is maintained while still providing volume portability
Capacity Planning
Longhorn storage requires an additional 30% capacity headroom for internal operations and scaling. If less than 30% of the total partition capacity is available, Longhorn may mark volumes as “full” and prevent further writes.
For detailed storage requirements and disk partitioning guidance, see the System Requirements Guide.
Configuration Backup
Always backup your Helm values before making changes:
# Export current values
helm get values acd-manager -o yaml > ~/values-backup-$(date +%Y%m%d).yaml
# Backup custom values files
cp ~/values.yaml ~/values-backup-$(date +%Y%m%d).yaml
Backup Schedule Recommendations
| Component | Frequency | Retention |
|---|---|---|
| PostgreSQL | Daily | 30 days |
| Longhorn Snapshots | Before changes | 7 days |
| Configuration | Before each change | Indefinite |
Updating MaxMind GeoIP Databases
The MaxMind GeoIP databases (GeoIP2-City, GeoLite2-ASN, GeoIP2-Anonymous-IP) are used for GeoIP-based routing and validation features. These databases should be updated periodically to ensure accurate IP geolocation data.
Prerequisites
- Updated MaxMind database files (
.mmdbformat) obtained from MaxMind - Access to the cluster via
kubectl - Helm CLI installed
Update Procedure
Step 1: Create New Volume with Updated Databases
Run the volume generation utility with a unique volume name that includes a revision identifier:
# Mount the installation ISO if not already mounted
mkdir -p /mnt/esb3027
mount -o loop,ro esb3027-acd-manager-X.Y.Z.iso /mnt/esb3027
# Generate new volume with updated databases
/mnt/esb3027/generate-maxmind-volume
When prompted:
- Provide the paths to the three database files:
GeoIP2-City.mmdbGeoLite2-ASN.mmdbGeoIP2-Anonymous-IP.mmdb
- Enter a unique volume name with a revision number or date, for example:
maxmind-geoip-2026-04maxmind-geoip-v2
Tip: Using a revision-based naming convention simplifies rollback if needed.
Step 2: Update Helm Configuration
Edit your values.yaml file to reference the new volume:
manager:
maxmindDbVolume: maxmind-geoip-2026-04
Replace maxmind-geoip-2026-04 with the volume name you specified in Step 1.
Step 3: Apply Configuration Update
Upgrade the Helm release with the updated configuration:
helm upgrade acd-manager /mnt/esb3027/charts/acd-manager --values ~/values.yaml
Step 4: Rolling Restart (Optional)
To ensure all pods immediately use the new database files, perform a rolling restart of the manager deployment:
kubectl rollout restart deployment acd-manager
Monitor the rollout status:
kubectl rollout status deployment acd-manager
Step 5: Verify Update
Verify the pods are running with the new volume:
kubectl get pods
kubectl describe pod -l app.kubernetes.io/component=manager | grep -A 5 "Volumes"
Step 6: Clean Up Old Volume (Optional)
After verifying the new databases are working correctly, you can delete the old persistent volume:
# List persistent volumes to find the old one
kubectl get pv
# Delete the old volume
kubectl delete pv <old-volume-name>
Caution: Ensure the new volume is functioning correctly before deleting the old volume. Keep the old volume for at least 24-48 hours as a rollback option.
Rollback Procedure
If issues occur after updating the databases:
- Revert the
maxmindDbVolumevalue in yourvalues.yamlto the previous volume name - Run
helm upgradewith the reverted configuration - Optionally restart the deployment:
kubectl rollout restart deployment acd-manager
Update Frequency Recommendations
| Database | Recommended Update Frequency |
|---|---|
| GeoIP2-City | Weekly or monthly |
| GeoLite2-ASN | Monthly |
| GeoIP2-Anonymous-IP | Weekly or monthly |
MaxMind releases database updates on a regular schedule. Subscribe to MaxMind notifications to stay informed of new releases.
Log Management
Application Logs
# View manager logs
kubectl logs -l app.kubernetes.io/component=manager
# Follow logs in real-time
kubectl logs -l app.kubernetes.io/component=manager -f
# View logs from specific pod
kubectl logs <pod-name>
# View previous instance logs (after crash)
kubectl logs <pod-name> -p
# View logs with timestamps
kubectl logs <pod-name> --timestamps
# View logs from all containers in pod
kubectl logs <pod-name> --all-containers
Component-Specific Logs
# Zitadel logs
kubectl logs -l app.kubernetes.io/name=zitadel
# Gateway logs
kubectl logs -l app.kubernetes.io/component=gateway
# Confd logs
kubectl logs -l app.kubernetes.io/component=confd
# MIB Frontend logs
kubectl logs -l app.kubernetes.io/component=mib-frontend
# PostgreSQL logs
kubectl logs -l app.kubernetes.io/name=postgresql
# Kafka logs
kubectl logs -l app.kubernetes.io/name=kafka
# Redis logs
kubectl logs -l app.kubernetes.io/name=redis
Log Aggregation
Logs are collected by Telegraf and sent to VictoriaMetrics:
# Access Grafana for log visualization
# https://<manager-host>/grafana
# Query logs via Grafana Explore
# Select VictoriaMetrics datasource and use log queries
Log Rotation
Container logs are automatically rotated by Kubernetes:
- Default max size: 10MB per container
- Default max files: 5 rotated files
- Total per pod: ~50MB maximum
Scaling Operations
Manual Scaling
Note: If HPA (Horizontal Pod Autoscaler) is enabled for a deployment, manual scaling changes will be overridden by the HPA. To manually scale, you must first disable the HPA.
# Check if HPA is enabled
kubectl get hpa
# Disable HPA before manual scaling
kubectl patch hpa acd-manager -p '{"spec": {"minReplicas": null, "maxReplicas": null}}'
# Or delete the HPA entirely
kubectl delete hpa acd-manager
# Scale manager replicas
kubectl scale deployment acd-manager --replicas=3
# Scale gateway replicas
kubectl scale deployment acd-manager-gateway --replicas=2
# Scale MIB frontend replicas
kubectl scale deployment acd-manager-mib-frontend --replicas=2
HPA Configuration
# View HPA status
kubectl get hpa
# Describe HPA details
kubectl describe hpa acd-manager
# Edit HPA configuration
kubectl edit hpa acd-manager
Configuration Updates
Updating Helm Values
# Edit values file
vi ~/values.yaml
# Validate with dry-run
helm upgrade acd-manager /mnt/esb3027/charts/acd-manager \
--values ~/values.yaml \
--dry-run
# Apply changes
helm upgrade acd-manager /mnt/esb3027/charts/acd-manager \
--values ~/values.yaml
# Verify rollout
kubectl rollout status deployment/acd-manager
Rolling Back Changes
# View revision history
helm history acd-manager
# Rollback to previous revision
helm rollback acd-manager
# Rollback to specific revision
helm rollback acd-manager <revision>
# Verify rollback
helm history acd-manager
Certificate Management
Checking Certificate Expiration
# Check TLS secret expiration
kubectl get secret acd-manager-tls -o jsonpath='{.data.tls\.crt}' | base64 -d | openssl x509 -noout -dates
# Check via Grafana dashboard
# Certificate expiration metrics are available in Grafana
Renewing Certificates
# For Helm-managed self-signed certificates
helm upgrade acd-manager /mnt/esb3027/charts/acd-manager \
--values ~/values.yaml \
--set ingress.selfSigned=true
# For manual certificates, update the secret
kubectl create secret tls acd-manager-tls \
--cert=new-tls.crt \
--key=new-tls.key \
--dry-run=client -o yaml | kubectl apply -f -
# Restart pods to pick up new certificate
kubectl rollout restart deployment acd-manager
Health Checks
Component Health
# Check all pods
kubectl get pods
# Check specific component
kubectl get pods -l app.kubernetes.io/component=manager
# Check persistent volumes
kubectl get pvc
# Check cluster status
kubectl get nodes
# Check ingress
kubectl get ingress
API Health Endpoints
# Liveness check
curl -k https://<manager-host>/api/v1/health/alive
# Readiness check
curl -k https://<manager-host>/api/v1/health/ready
Database Health
# PostgreSQL cluster status
kubectl get clusters -n default
# Check PostgreSQL pods
kubectl get pods -l app.kubernetes.io/name=postgresql
# Kafka cluster status
kubectl get pods -l app.kubernetes.io/name=kafka
# Redis status
kubectl get pods -l app.kubernetes.io/name=redis
Maintenance Windows
Planned Maintenance
Before performing maintenance:
- Notify users of potential service impact
- Verify backups are current
- Document the maintenance procedure
- Prepare rollback plan
Node Maintenance
# Cordon node to prevent new pods
kubectl cordon <node-name>
# Drain node (evict pods)
kubectl drain <node-name> --ignore-daemonsets --delete-emptydir-data
# Perform maintenance
# Uncordon node
kubectl uncordon <node-name>
Cluster Upgrades
See the Upgrade Guide for cluster upgrade procedures.
Troubleshooting Quick Reference
Common Commands
# Describe problematic pod
kubectl describe pod <pod-name>
# View pod events
kubectl get events --sort-by='.lastTimestamp'
# Check resource usage
kubectl top pods
kubectl top nodes
# Exec into container
kubectl exec -it <pod-name> -- /bin/sh
# Check network policies
kubectl get networkpolicies
# Check service endpoints
kubectl get endpoints
Restarting Components
# Restart deployment
kubectl rollout restart deployment/<deployment-name>
# Restart statefulset
kubectl rollout restart statefulset/<statefulset-name>
# Delete pod (auto-recreated)
kubectl delete pod <pod-name>
Security Operations
Rotating Service Account Tokens
# Delete service account secret (auto-regenerated)
kubectl delete secret <service-account-token-secret>
# Tokens are automatically regenerated
Updating RBAC Permissions
# View current roles
kubectl get roles
kubectl get clusterroles
# View role bindings
kubectl get rolebindings
kubectl get clusterrolebindings
# Edit role
kubectl edit role <role-name>
Audit Log Access
# K3s audit logs location
/var/lib/rancher/k3s/server/logs/audit.log
# View recent audit events
tail -f /var/lib/rancher/k3s/server/logs/audit.log
Disaster Recovery
Pod Recovery
Pods are automatically recreated if they fail:
# Check pod status
kubectl get pods
# If pod is stuck in Terminating
kubectl delete pod <pod-name> --force --grace-period=0
# If pod is stuck in Pending, check resources
kubectl describe pod <pod-name>
kubectl get events --sort-by='.lastTimestamp'
Node Failure Recovery
When a node fails:
- Automatic: Pods are rescheduled on healthy nodes (after timeout)
- Manual: Force delete stuck pods
# Force delete pods on failed node
kubectl delete pod --all --force --grace-period=0 \
--field-selector spec.nodeName=<failed-node>
Data Recovery
For data recovery scenarios, refer to:
- PostgreSQL: Cloudnative PG backup/restore procedures
- Longhorn: Volume snapshot restoration
- Kafka: Partition replication handles node failures
Routine Maintenance Checklist
Daily
- Review Grafana dashboards for anomalies
- Check alert notifications
- Verify backup completion
Weekly
- Review pod restart counts
- Check certificate expiration dates
- Review log storage usage
- Verify HPA is functioning correctly
Monthly
- Test backup restoration procedure
- Review and rotate credentials if needed
- Update documentation if configuration changed
- Review resource utilization trends
Next Steps
After mastering operations:
- Troubleshooting Guide - Deep dive into problem resolution
- Performance Tuning Guide - Optimize system performance
- Metrics & Monitoring Guide - Comprehensive monitoring setup
- API Guide - REST API reference and automation
11.9 - Metrics & Monitoring Guide
Overview
The CDN Manager includes a comprehensive monitoring stack based on VictoriaMetrics for time-series data storage, Telegraf for metrics collection, and Grafana for visualization. This guide describes the monitoring architecture and how to access and use the monitoring capabilities.
Quick Links
| Guide | Description |
|---|---|
| Grafana Dashboards | Using and customising the built-in and advanced Grafana dashboards |
| Grafana Authentication & Roles | Configuring Grafana authentication, roles, and permissions |
| Alerts & Alarms | Configuring and managing alerts and alarms |
Architecture
Components
| Component | Purpose |
|---|---|
| Telegraf | Metrics collector running on each node, gathering system and application metrics |
| VictoriaMetrics Agent | Metrics scraper and forwarder; scrapes Prometheus endpoints and forwards to VictoriaMetrics |
| VictoriaMetrics (Short-term) | Time-series database for operational dashboards (30-90 day retention) |
| VictoriaMetrics (Long-term) | Time-series database for billing and compliance (1+ year retention) |
| Grafana | Visualization and dashboard platform; deployed as two replicas for high availability |
| Alertmanager | Alert routing and notification management |
Metrics Flow
The following diagram illustrates how metrics flow through the monitoring stack:
flowchart TB
subgraph External["External Sources"]
Streamers[Streamers/External Clients]
end
subgraph Cluster["Kubernetes Cluster"]
Telegraf[Telegraf DaemonSet]
subgraph Applications["Application Components"]
Director[CDN Director]
Kafka[Kafka]
Redis[Redis]
Manager[ACD Manager]
Alertmanager[Alertmanager]
end
VMAgent[VictoriaMetrics Agent]
subgraph Storage["Storage"]
VMShort[VictoriaMetrics<br/>Short-term]
VMLong[VictoriaMetrics<br/>Long-term]
end
Grafana[Grafana<br/>2 replicas, HA]
PostgreSQL[(PostgreSQL)]
Zitadel[Zitadel]
end
Streamers -->|Push metrics| Telegraf
Telegraf -->|remote_write| VMShort
Telegraf -->|remote_write| VMLong
Director -->|Scrape| VMAgent
Kafka -->|Scrape| VMAgent
Redis -->|Scrape| VMAgent
Manager -->|Scrape| VMAgent
Alertmanager -->|Scrape| VMAgent
VMAgent -->|remote_write| VMShort
VMAgent -->|remote_write| VMLong
VMShort -->|Query| Grafana
VMLong -->|Query| Grafana
Grafana <-->|Shared state| PostgreSQL
Grafana -->|OAuth2 / OIDC| ZitadelMetrics Flow Summary:
External metrics ingestion:
- External clients (streamers) push metrics to Telegraf
- Telegraf forwards metrics via
remote_writeto both VictoriaMetrics instances
Internal metrics scraping:
- VictoriaMetrics Agent scrapes Prometheus endpoints from:
- CDN Director instances
- Kafka cluster
- Redis
- ACD Manager components
- Alertmanager
- VMAgent forwards scraped metrics via
remote_writeto both VictoriaMetrics instances
- VictoriaMetrics Agent scrapes Prometheus endpoints from:
Data visualization:
- Grafana queries both VictoriaMetrics databases depending on the dashboard requirements
- Operational dashboards use short-term storage
- Billing and compliance dashboards use long-term storage
Metrics Collection
Application Metrics
Applications expose metrics on Prometheus-compatible endpoints. VictoriaMetrics Agent (VMAgent) scrapes these endpoints and forwards metrics to VictoriaMetrics via remote_write.
System Metrics
Telegraf collects system-level metrics including:
- CPU usage
- Memory utilization
- Disk I/O
- Network statistics
- Process metrics
Kubernetes Metrics
Cluster metrics are collected including:
- Pod resource usage
- Node status
- Deployment status
- Persistent volume usage
Metrics Retention
VictoriaMetrics is configured with default retention policies. For custom retention settings, modify the VictoriaMetrics configuration in your values.yaml:
acd-metrics:
victoria-metrics-single:
retentionPeriod: "3" # Retention period in months
Troubleshooting
Metrics Not Appearing
If metrics are not appearing in Grafana:
Check Telegraf pods:
kubectl get pods -l app.kubernetes.io/component=telegrafCheck Telegraf logs:
kubectl logs -l app.kubernetes.io/component=telegrafVerify VictoriaMetrics is running:
kubectl get pods -l app.kubernetes.io/component=victoria-metricsCheck application metrics endpoints:
kubectl exec <pod-name> -- curl localhost:8080/metrics
For dashboard and authentication issues, see the Grafana Dashboards and Grafana Authentication & Roles guides.
Next Steps
After setting up monitoring:
- Grafana Authentication & Roles - Configure SSO and permissions before accessing Grafana
- Grafana Dashboards - Explore and customise dashboards
- Alerts & Alarms - Set up alerting and notifications
- Operations Guide - Day-to-day operational procedures
- Troubleshooting Guide - Resolve monitoring issues
- API Guide - Access metrics via API
11.9.1 - Grafana Authentication & Roles
Overview
Grafana authentication is delegated entirely to Zitadel via OAuth2/OIDC. Local username/password login is not available to end users. When a user logs into Grafana, they are redirected to Zitadel to authenticate, and their Grafana role is automatically determined by the Zitadel project roles assigned to their account.
The OIDC integration between Grafana and Zitadel is configured automatically at install time — no manual Zitadel application registration is required.
How It Works
During installation, an init container runs before Grafana starts and:
- Authenticates with Zitadel using a machine-account service key.
- Registers a
GrafanaOIDC application in the Zitadel project (or re-uses an existing one if already registered). - Writes the resulting
client_idandclient_secretinto a Kubernetes Secret, which Grafana picks up on startup.
This means the Grafana OIDC application in Zitadel is managed automatically and does not need to be created or modified manually.
Role Mapping
Grafana roles are mapped from Zitadel project roles using the following rule:
| Zitadel Project Role | Grafana Role |
|---|---|
grafana_admin | Admin — full access, can manage users, datasources, and dashboards |
| (any other role, or no role) | Viewer — read-only access to dashboards |
Note: There is no Grafana
Editorrole mapped by default. All authenticated users who are not explicitly grantedgrafana_adminreceive Viewer access. If you need an Editor tier, see Customising the Role Mapping.
The mapping is enforced on every login. If a user’s Zitadel role changes, the change takes effect the next time they log into Grafana.
Prerequisites
- Zitadel is configured and accessible at
https://<manager-host> - At least one Zitadel user account exists (see Next Steps — Create User Accounts)
- Grafana is accessed via the correct DNS hostname (see Accessing Grafana)
Accessing Grafana
Grafana is accessible at:
https://<manager-host>/grafana
Important: Grafana must be accessed using the DNS name specified in the first entry of
global.hosts.managerin your configuration. Accessing Grafana via an IP address or an alternative hostname will cause OAuth2 redirect URI mismatches and CORS errors, preventing login from completing successfully.
To log in:
- Navigate to
https://<manager-host>/grafana - Click “Login with Zitadel”
- Authenticate with your Zitadel account credentials
Granting Admin Access
By default, all Zitadel users who log into Grafana receive Viewer access. To grant a user Admin access, assign them the grafana_admin project role in Zitadel.
Step 1: Ensure the grafana_admin Role Exists
- Log into the Zitadel Console at
https://<manager-host>/ui/console - Navigate to Projects and open the ZITADEL project
- Click the Roles tab
- Check whether a role named
grafana_adminalready exists - If it does not exist, click New Role and create it:
- Key:
grafana_admin - Display Name: Grafana Admin (or any label you prefer)
- Click Save
- Key:
Step 2: Assign the Role to a User
- In the Zitadel Console, navigate to Users and open the user you want to grant admin access to
- Click the Authorizations tab
- Click New Authorization
- Select the ZITADEL project
- Select the
grafana_adminrole - Click Save
The user will have Grafana Admin access the next time they log in.
Revoking Admin Access
To demote a user back to Viewer, remove the grafana_admin authorization from their account:
- In the Zitadel Console, open the user’s Authorizations tab
- Find the
grafana_adminauthorization on the ZITADEL project - Click the delete icon to remove it
The change takes effect on their next Grafana login.
Customising the Role Mapping
The role mapping expression is configured in values.yaml under grafana."grafana.ini".auth.generic_oauth.role_attribute_path. It uses JMESPath syntax evaluated against the OIDC token’s role claims.
The default expression is:
grafana:
"grafana.ini":
auth.generic_oauth:
role_attribute_path: >-
contains(keys("urn:zitadel:iam:org:project:roles"), 'grafana_admin') && 'Admin' || 'Viewer'
Example: Adding an Editor Tier
To map a grafana_editor Zitadel role to Grafana’s Editor role, create the grafana_editor role in Zitadel (following the same steps as above) and extend the expression:
grafana:
"grafana.ini":
auth.generic_oauth:
role_attribute_path: >-
contains(keys("urn:zitadel:iam:org:project:roles"), 'grafana_admin') && 'Admin'
|| contains(keys("urn:zitadel:iam:org:project:roles"), 'grafana_editor') && 'Editor'
|| 'Viewer'
Apply the change using the standard upgrade procedure in the Configuration Guide.
Blocking Unauthenticated Access
By default, role_attribute_strict is set to false, which means any authenticated Zitadel user can log into Grafana as a Viewer even if they have no explicit Grafana role assigned. To restrict Grafana access to only users who have been explicitly granted a role, set this to true:
grafana:
"grafana.ini":
auth.generic_oauth:
role_attribute_strict: true
With role_attribute_strict: true, users who do not match any role in the role_attribute_path expression will be denied access entirely.
Managing Users in Grafana
User accounts in Grafana are created automatically on first login via Zitadel. There is no need to pre-create users in the Grafana UI.
To view and manage users who have logged in:
- Log into Grafana as an Admin
- Navigate to Administration > Users and access > Users
From here you can see each user’s current role, last login time, and authentication provider. Role changes should always be made via Zitadel (as described above) rather than directly in Grafana, as they will be overwritten on the user’s next login.
Break-Glass Admin Access
A local Grafana admin account is available as a break-glass fallback for situations where Zitadel is unavailable. This account is not accessible via the standard login page (which only shows the Zitadel SSO button).
To use the local admin account, navigate directly to:
https://<manager-host>/grafana/login
The default credentials are listed in the Glossary. Change the default password immediately after installation.
Security recommendation: The break-glass account should be used only for emergency access. Do not use it for routine administration.
Troubleshooting
OAuth2 Redirect URI Mismatch / CORS Errors
Grafana is registered in Zitadel with the redirect URI https://<manager-host>/grafana/login/generic_oauth, derived from the first entry of global.hosts.manager. Accessing Grafana via a different hostname or IP address will not match this URI and will cause the login to fail.
Resolution: Always access Grafana via the configured hostname. If the hostname has changed, re-run the helm upgrade to re-register the application with the updated URI.
User Receives Viewer Instead of Admin
The grafana_admin role is not included in the user’s Zitadel token.
Resolution:
- Confirm the
grafana_adminrole exists on the ZITADEL project in the Zitadel Console - Confirm the role is assigned to the user under their Authorizations tab
- Ask the user to log out of Grafana and log back in — role changes are applied on the next login, not the current session
Login Fails with “Role not found” or Access Denied
role_attribute_strict may be set to true and the user has no matching Zitadel role.
Resolution: Either assign the user an appropriate Zitadel project role, or set role_attribute_strict: false in values.yaml to allow all authenticated users Viewer access.
Admin Role Assigned in Zitadel but User Still Gets Viewer
The grafana_admin role is correctly assigned to the user in Zitadel, but Grafana still grants them Viewer access. This indicates that role claims are not being included in the Zitadel userinfo response.
Grafana determines roles by calling the Zitadel userinfo endpoint (/oidc/v1/userinfo) and evaluating the urn:zitadel:iam:org:project:roles claim. Zitadel only includes this claim when the Grafana OIDC application has Access Token Role Assertions enabled. If the claim is absent, the role_attribute_path expression always falls through to 'Viewer'.
To verify and fix:
- Log into the Zitadel Console at
https://<manager-host>/ui/console - Navigate to Projects > ZITADEL > Applications > Grafana
- Open the Token Settings tab
- Ensure Access Token Role Assertions is enabled
- Save the change
The fix takes effect on the user’s next login — no Grafana or Helm changes are required.
Grafana OIDC App Not Registered in Zitadel
If the init container failed during installation, the Grafana OIDC application may not have been created in Zitadel.
Resolution: Check the init container logs for errors:
kubectl logs -l app.kubernetes.io/component=grafana --previous -c zitadel-oauth-setup
Common causes are Zitadel not being ready when the init container ran, or a machine-key permission issue. Re-running the helm upgrade will re-trigger the init container and attempt registration again.
Next Steps
- Grafana Dashboards - Using and customising dashboards
- Alerts & Alarms - Configure alerting and notifications
- Metrics & Monitoring Overview - Return to the monitoring overview
11.9.2 - Grafana Dashboards
Overview
Grafana is the primary visualization platform for the CDN Manager monitoring stack. It provides pre-built dashboards for cluster health, application performance, and billing analytics, and is accessible via the manager ingress.
Prerequisites
- Grafana is deployed and running (verify with
kubectl get pods -l app.kubernetes.io/component=grafana) - A Zitadel user account is available for login
- Grafana is accessed via the correct DNS hostname (see Grafana Authentication & Roles)
Accessing Grafana
Grafana is accessible via the manager ingress:
URL: https://<manager-host>/grafana
To log in:
- Navigate to
https://<manager-host>/grafana - Click the “Login with Zitadel” button
- Authenticate with your Zitadel account credentials
Important: Grafana must be accessed using the DNS name specified in the first entry of
global.hosts.managerin your configuration. Accessing Grafana via an IP address or an alternative hostname will cause OAuth2 redirect URI mismatches and CORS errors, preventing login from completing successfully.
For details on authentication and role configuration, see Grafana Authentication & Roles.
Standard Dashboards
Accessing Dashboards
After logging into Grafana:
- Navigate to Dashboards in the left menu
- Browse the folder structure to find the dashboard you need
- Click on a dashboard to open it
Dashboards are organised into the following folders:
- Alerting — alert state history and alerting system health
- Billing — redirect counts for billing analytics
- CDN Manager — ACD Manager API performance
- Hardware — host-level CPU, memory, disk, and network telemetry
- Infrastructure — Kubernetes cluster, Kafka, Longhorn, and Redis health
- Streaming — CDN routing, streamer performance, and QoE
- Internal Debugging — low-level ACD Director diagnostics
Alerting
Active Alarms
A live view of all currently firing alerts. Shows the alert name, severity, affected host, and description. Use this as the first stop when investigating an active incident.
Alert Statistics
Historical view of alert firing activity over time. Shows which alert groups and individual rules have been firing, with timelines and trend charts. Useful for identifying recurring or flapping alerts.
vmalert
Operational health dashboard for the vmalert component itself. Covers evaluation rate, evaluation errors, alerting and recording rule counts, remote write throughput, and resource usage. Use this to verify the alerting pipeline is functioning correctly.
Billing
Billing Dashboard
Tracks redirect volumes for billing and usage analytics. Shows initial managed and unmanaged redirects, segment redirects, and endpoint redirects — both as totals and as ratios over time. Data is sourced from long-term VictoriaMetrics storage to support historical reporting.
CDN Manager
CDN Manager API
Health and performance dashboard for the ACD Manager REST API. Covers:
- Overview: API health status, active pod count, total request volume, 5xx error rate, and average latency
- Traffic: Request rate by pod, distribution across API endpoints
- Errors: 5xx errors per endpoint, response code breakdown per endpoint, error rate by pod
- Latency: P99 and average latency by endpoint, overall API response latency
- Resources & Auth: Route validation API activity
Hardware
HW Metrics
Condensed host hardware overview covering CPU usage and load averages, memory utilisation, network interface throughput, swap usage, and root filesystem disk space. Suitable for day-to-day health checks across all cluster nodes.
An expanded HW Metrics (Advanced) dashboard is available as part of the Advanced Dashboards licence.
Infrastructure
k3s Cluster Infrastructure
Kubernetes cluster health overview using node-exporter and kube-state-metrics. Covers:
- Cluster Overview: Node count, running pod count, OOMKilled containers, and overall cluster health status
- Compute: CPU usage, memory usage, and load average per node
- Network: Inbound and outbound bytes per node
- Disk: Read/write throughput and I/O pressure per node
- Longhorn PVC Disk Usage: Usage percentage per persistent volume
- Workload Health: Pod restart counts and OOMKill occurrences
Kafka
Kafka broker health using JMX exporter metrics. Covers:
- Cluster Health: Active controller, broker state, topic and partition counts, offline and under-replicated partitions, active and fenced broker counts, metadata log lag
- Throughput: Bytes in/out and messages in by topic, replication bytes in/out
- Internals: Request handler idle percentage, network processor idle percentage
Longhorn Storage
Persistent storage health for the Longhorn distributed block storage layer. Covers:
- Overview: Total, healthy, degraded, and faulted volume counts; nodes down
- Capacity: Total cluster capacity, used, and available storage
- Volume Detail: Usage percentage per volume, actual size per volume, volume robustness state, volumes approaching capacity (>85%)
- Node & Disk: Disk usage percentage and available bytes per node, node condition checks
Redis
Redis instance health using redis-exporter metrics. Covers:
- Instance Health: Status, uptime, connected and blocked clients, slow log length, rejected connections
- Memory: Usage and fragmentation ratio
- Throughput & Keyspace: Commands processed, network I/O, keyspace hit rate, keys per database
- Evictions & Persistence: Evictions, expirations, RDB unsaved changes
- CPU & Connections: CPU usage and connection metrics
- Command Analysis: Per-command breakdown
Streaming
Extended Monitoring
The primary operational dashboard for CDN routing activity. This is the home dashboard displayed on Grafana login. Covers:
- Latency Statistics: ACD router latency and CDN latency over time
- Redirects: Total redirect volume, status code breakdown, managed vs unmanaged ratio
- Content Popularity: Top 10 requested content and top 10 most rapidly increasing popularity scores
- CDN Selection: Redirect distribution across CDN endpoints, current and historical ratios
- CDN Failovers and Retries: Failover events and retry rates by CDN
- Host Selection: Endpoint request distribution
- Session Statistics: Active session counts and session type breakdown
- Client Responses: Client-facing HTTP status code distribution
- Incoming Requests: Raw request volume
- HTTPS Certificate Statistics: Certificate validity and expiry indicators
- Warnings & Errors: Application-level warnings and errors over time
- LUA Statistics: Lua exception counts and execution time
- Configuration Change History: Timeline of routing configuration changes
Router Monitoring
External-facing view of ACD Director routing activity. Shows the number of initial routing decisions made, HTTP status code distribution, incoming HTTP/HTTPS request volumes, and selection input metrics. Useful for a high-level view of traffic hitting the directors.
QoE Monitoring
Quality of Experience scoring dashboard. Shows average QoE scores per host, per session group, per CDN, and per agent, as well as the initial CDN selection rate. Use this to identify CDN providers or content hosts that are delivering a degraded experience.
Streamer Statistics
Condensed view of streamer node performance, covering network ingress/egress throughput, TCP and HTTP connection counts, active session counts, HTTP request rates and response codes, response times (ingress and egress), and storage/memory/CPU. Suitable for routine streamer health monitoring.
An expanded Streamer Statistics (Advanced) dashboard is available as part of the Advanced Dashboards licence.
Internal Debugging
These dashboards expose low-level ACD Director internals and are primarily intended for advanced diagnostics and support investigations.
Debugging Information
Lua runtime statistics from the ACD Director: exception counts, active Lua context count, time spent in Lua execution, and router latency. Use when investigating unexpected Director behaviour or Lua errors.
ACD: Incoming Internet Connections
SSL-level connection statistics at the Director: SSL warnings and errors, valid and invalid HTTP and HTTPS request counts from external clients. Use when investigating TLS handshake failures or unexpected rejection rates.
Performance Metrics
ACD Director process-level resource usage: router CPU utilisation, router memory usage, and Lua memory consumption. Useful for identifying resource pressure on the Director process itself rather than the host.
Prometheus: ACD
ACD application metrics exposed via Prometheus: active and total session counts, session type breakdown, managed and unmanaged redirect counts, QoE corrections, manifest parse failures, initial endpoint request counts, HTTP request rates, and logged warnings and errors.
CDN Failures
CDN-level failure tracking: response code distribution from CDN backends, CDN-level failover events, host-level failovers, and host retry counts. Use when investigating CDN reliability issues or failover behaviour.
ACD: CDN Latencies Detail
Detailed CDN latency analysis with configurable percentile plots and a full latency histogram. Use when investigating tail latency issues on specific CDN backends.
ACD: Router Latencies
ACD Director routing latency distributions for both 2xx (successful) and 3xx (redirect) responses, visualised as heatmap buckets over time. Use alongside CDN Latencies Detail to separate router processing time from CDN response time.
Prometheus/ACD: SubRunners
Internal async processing queue depth and throughput metrics for the ACD Director subrunner system: client connection counts, low/medium/high priority queue depths (current and max), send/receive data block usage, wakeup counts, overload events, and autopause activations. Use when investigating Director throughput bottlenecks or queue backpressure.
Advanced Dashboards
Advanced dashboards are a paid add-on that unlocks more detailed variants of two standard dashboards, providing deeper visibility for performance investigation and capacity planning.
Licensing: Advanced dashboards require a separate licence key. To obtain a key for your deployment, contact your AgileTV account representative.
Enabling Advanced Dashboards
Once you have your licence key, add the following to your values.yaml:
dashboards:
advanced:
licenceKey: "<your-licence-key>"
Then apply the change by following the upgrade procedure in the Configuration Guide. The advanced dashboards will become available in Grafana automatically once the upgrade completes.
HW Metrics (Advanced)
Expanded hardware telemetry that supplements the standard HW Metrics dashboard with additional depth and additional sections: kernel metrics, TCP and UDP network stack statistics, per-interface error counters, disk IOPS, and metrics collection velocity. Use this when investigating performance anomalies surfaced by the standard dashboard or by alerts.
Streamer Statistics (Advanced)
Full streamer telemetry that supplements the standard Streamer Statistics dashboard. Includes all standard metrics plus:
- OTT JCQ: Server group and node request rates and ratios, circuit breaker state (closed/open backends), global backend stats, pending requests per backend, and pop-out per backend
- Account Records: Session counts, total traffic in/out, HTTP request rates (ingress/egress), cache hit ratio, backend request rates, and response times
- Detailed network error and drop counters from
/proc/net/dev
CDN Director Metrics
Director DNS Names in Grafana
CDN Director instances are identified in Grafana by their DNS name, which is derived from the name field in global.hosts.routers:
global:
hosts:
routers:
- name: my-router-1
address: 192.0.2.1
The DNS name used in Grafana dashboards will be: my-router-1.external
This naming convention is automatically applied for all configured directors.
Customising Dashboards
Permissions: Creating and importing dashboards requires Grafana Admin access. See Grafana Authentication & Roles for details on granting admin rights.
The pre-provisioned dashboards are read-only and managed by the Helm chart — changes made to them in the Grafana UI will not persist across upgrades. To create persistent custom dashboards:
- In Grafana, navigate to Dashboards > New > New Dashboard
- Add panels using the VictoriaMetrics or Prometheus datasource
- Save the dashboard to a folder of your choice
Custom dashboards saved this way are stored in the Grafana PostgreSQL database and are unaffected by Helm upgrades.
Note: Do not save custom dashboards into the provisioned folders (Alerting, Billing, CDN Manager, etc.). Grafana marks these folders as provisioned and may behave unexpectedly if user dashboards are mixed in.
Customising a Pre-provisioned Dashboard
If you want a modified version of one of the built-in dashboards as a starting point:
- Open the dashboard you want to customise
- Click the Share icon (top toolbar) > Export > Save to file to download the dashboard JSON
- In Grafana, navigate to Dashboards > New > Import
- Upload the downloaded JSON file
- On the import screen, give the dashboard a new name to distinguish it from the original, and choose a destination folder outside the provisioned set
- Click Import
You now have an independently editable copy. The original provisioned dashboard remains unchanged and will continue to be updated by future Helm upgrades. Your copy is stored in PostgreSQL and persists across upgrades independently.
Troubleshooting
Dashboard Loading Issues
If dashboards fail to load:
Check Grafana pods:
kubectl get pods -l app.kubernetes.io/component=grafanaReview Grafana logs:
kubectl logs -l app.kubernetes.io/component=grafanaVerify datasource configuration in Grafana UI
For login and authentication issues, see Grafana Authentication & Roles.
Next Steps
- Alerts & Alarms - Set up alerting and notifications
- Operations Guide - Day-to-day operational procedures
- Metrics & Monitoring Overview - Return to the monitoring overview
11.9.3 - Alerts & Alarms
Overview
The CDN Manager ships a set of pre-configured alerting rules evaluated by vmalert against VictoriaMetrics. When a rule fires, the alert is routed to Alertmanager, which handles deduplication, grouping, silencing, and delivery to configured notification channels.
This page documents every built-in alert rule, what it means, its severity, and the recommended operator action.
Alert Severity Levels
| Severity | Meaning |
|---|---|
| critical | Immediate action required. The condition poses a risk to data integrity, service availability, or active traffic. |
| warning | Investigate soon. The condition is not immediately harmful but will degrade into a critical state if left unattended. |
Alert Groups
Alerts are organised into the following groups, each evaluated on a 15-second interval.
- infra-disk — Disk space and I/O
- infra-compute — CPU and memory
- infra-network — Network errors and traffic anomalies
- longhorn — Persistent storage health
infra-disk
Monitors disk space utilisation and I/O latency on cluster nodes.
StorageFillingUp
| Property | Value |
|---|---|
| Severity | warning |
| Condition | Root filesystem usage exceeds 85% |
| Must persist for | 2 minutes |
What it means: A node’s root filesystem is running low on space. If left unchecked this will progress to a full disk, which can cause pod evictions, write failures, and potential data loss.
Recommended actions:
- Identify the node from the
hostlabel in the alert. - Log into the node and check disk usage:
df -h / du -sh /var/log/* | sort -rh | head -20 - Clear old log files, unused container images, or temporary files:
# On the node journalctl --vacuum-size=500M crictl rmi --prune - If disk usage is due to application data growth, consider expanding the volume or adjusting retention settings. See Metrics Retention.
HighDiskLatency
| Property | Value |
|---|---|
| Severity | warning |
| Condition | Average disk write latency exceeds 100 ms |
| Must persist for | 2 minutes |
What it means: Disk write operations are taking longer than 100 ms on average. High disk latency can degrade database performance (PostgreSQL, VictoriaMetrics) and cause timeouts in write-heavy components.
Recommended actions:
- Identify the affected disk from the
namelabel in the alert. - Check for I/O-intensive processes on the node:
iostat -x 2 5 iotop -o - Check for Longhorn replica rebuilds or rebalancing activity, which can saturate disk I/O.
- If the issue persists on a production node, review whether the storage hardware meets the System Requirements.
infra-compute
Monitors CPU and memory utilisation on cluster nodes.
CpuSaturation
| Property | Value |
|---|---|
| Severity | warning |
| Condition | Total CPU usage exceeds 90% |
| Must persist for | 5 minutes |
What it means: A node is running at near-full CPU capacity. Sustained CPU saturation causes request latency increases across all workloads on that node and may result in pod throttling.
Recommended actions:
- Identify the saturated node from the
hostlabel in the alert. - Check which pods are consuming CPU:
kubectl top pods --sort-by=cpu -A - Check for runaway processes on the node:
top -b -n 1 | head -20 - If saturation is caused by a legitimate workload spike (e.g. CDN traffic burst), consider scaling the deployment or redistributing load across nodes.
MemoryCriticallyLow
| Property | Value |
|---|---|
| Severity | critical |
| Condition | Available RAM falls below 10% |
| Must persist for | 2 minutes |
What it means: The node has very little free memory remaining. The Linux OOM killer may begin terminating processes, which can cause abrupt pod restarts, data corruption in in-memory caches, and service unavailability.
Recommended actions:
- Identify the affected node from the
hostlabel in the alert. - Immediately check for memory-leaking or oversized pods:
kubectl top pods --sort-by=memory -A - Identify and restart any pods showing abnormal memory consumption:
kubectl rollout restart deployment/<name> - Check kernel OOM kill log for any processes already killed:
dmesg | grep -i "oom\|killed" - Review memory resource limits and requests for affected deployments and adjust if necessary.
SwapUsageDetected
| Property | Value |
|---|---|
| Severity | warning |
| Condition | Swap usage exceeds 5% |
| Must persist for | 1 minute |
What it means: The node is swapping memory to disk. Swap usage in a Kubernetes cluster is a strong indicator of memory pressure. It degrades performance significantly and may mask an underlying memory shortage that could escalate to a MemoryCriticallyLow event.
Recommended actions:
- Treat this as an early warning for the same conditions as
MemoryCriticallyLow. - Identify memory-intensive pods and investigate whether resource limits are configured appropriately.
- Swap should ideally never be active on a production Kubernetes node. If it persists, escalate to a memory capacity review.
infra-network
Monitors network interface errors and traffic anomalies on cluster nodes.
NetworkInterfaceErrors
| Property | Value |
|---|---|
| Severity | critical |
| Condition | Any non-zero rate of inbound or outbound packet errors on a network interface |
| Must persist for | 1 minute |
What it means: A network interface is dropping or corrupting packets. Even a low error rate can cause TCP retransmissions, increased latency, and connection failures — directly impacting CDN Director communication and external traffic delivery.
Recommended actions:
- Identify the affected host and interface from the
hostandinterfacelabels in the alert. - Check interface error counters on the node:
ip -s link show <interface> ethtool -S <interface> | grep -i error - Check for duplex/speed mismatches between the node NIC and the upstream switch:
ethtool <interface> | grep -E "Speed|Duplex" - Escalate to network/hardware team if errors are persistent and cannot be attributed to a software configuration issue.
SuddenNetworkEgressDrop
| Property | Value |
|---|---|
| Severity | critical |
| Condition | Egress throughput drops to less than 50% of the 2-minute baseline, when baseline traffic is above 1 Mbit/s |
| Must persist for | 1 minute |
What it means: A significant, sudden reduction in outbound traffic has been detected. This typically indicates a upstream network failure, link fault, or a routing issue. A CDN node that stops transmitting traffic is effectively out of service.
Recommended actions:
- Identify the affected node and interface from the alert labels.
- Verify the node’s network connectivity:
ping <gateway-ip> traceroute <upstream-endpoint> - Check for interface errors or link-down events:
ip link show dmesg | grep -i "link\|eth\|nic" - Verify that upstream routing and firewall rules have not changed.
- If the node is healthy and traffic has legitimately dropped (e.g. a CDN traffic shift), the alert can be silenced if the traffic reduction is expected and understood.
SuddenNetworkIngressSpike
| Property | Value |
|---|---|
| Severity | warning |
| Condition | Ingress throughput exceeds twice the 5-minute baseline |
| Must persist for | 1 minute |
What it means: A sudden surge of inbound traffic has been detected. This may indicate a legitimate traffic event (e.g. a large stream audience spike), a DDoS attempt, or a misconfigured client sending unexpected volume.
Recommended actions:
- Identify the affected node and interface from the alert labels.
- Review active connections and top talkers:
ss -s netstat -an | awk '{print $5}' | cut -d: -f1 | sort | uniq -c | sort -rn | head - Correlate with CDN Director metrics in Grafana to determine whether the spike is legitimate CDN traffic.
- If the spike is unexpected and sustained, consider rate-limiting or blocking the source at the network edge.
longhorn
Monitors the health of Longhorn distributed block storage, which backs persistent volumes for PostgreSQL, VictoriaMetrics, and other stateful components.
Note: Longhorn alert rules are always present in the alert configuration, but will not fire in environments where Longhorn is not installed (e.g. cloud deployments using external storage).
LonghornVolumeDegraded
| Property | Value |
|---|---|
| Severity | warning |
| Condition | A Longhorn volume’s robustness state is Degraded |
| Must persist for | 2 minutes |
What it means: A Longhorn volume has fewer healthy replicas than its configured replication factor. Data is not at immediate risk, but the volume has reduced redundancy. A single additional node or disk failure could result in data loss or volume unavailability.
Recommended actions:
- Identify the affected volume from the
volumelabel in the alert. - Open the Longhorn UI and inspect the volume’s replica status.
- Check whether a replica is in the process of rebuilding (this is normal after a node restart). Rebuilding may take several minutes depending on volume size.
- If a replica has failed and is not rebuilding, attempt to evict and re-schedule it via the Longhorn UI.
- Investigate the health of the node that hosted the failed replica:
kubectl get nodes kubectl describe node <node-name>
LonghornVolumeFaulted
| Property | Value |
|---|---|
| Severity | critical |
| Condition | A Longhorn volume’s robustness state is Faulted |
| Must persist for | 1 minute |
What it means: A Longhorn volume has lost all healthy replicas and is no longer accessible. Any workload that depends on this volume (e.g. PostgreSQL, VictoriaMetrics) will be unable to write and may crash. Data may be at risk.
Recommended actions:
- Identify the affected volume from the
volumelabel. - Immediately check which pods are using the volume:
kubectl get pods -A -o wide | grep -i <volume-name> - Open the Longhorn UI. Check whether any replicas are still present and whether they can be recovered.
- Do not delete faulted replicas without first attempting recovery — they may contain the only copy of the data.
- Contact AgileTV support if the volume cannot be recovered, providing Longhorn UI screenshots and node logs.
LonghornNodeDown
| Property | Value |
|---|---|
| Severity | critical |
| Condition | A Longhorn node reports a non-ready state |
| Must persist for | 2 minutes |
What it means: A storage node is unreachable or unhealthy from Longhorn’s perspective. All volumes with replicas on this node are at reduced redundancy. If more than one node goes down simultaneously, faulted volumes and data loss become a risk.
Recommended actions:
- Identify the affected node from the
nodelabel in the alert. - Check the node’s status in Kubernetes:
kubectl get nodes kubectl describe node <node-name> - Attempt to SSH to the node and check system health:
ssh root@<node-ip> systemctl status k3s - If the node has crashed and cannot be recovered quickly, consider evicting its Longhorn replicas to allow rebuilding on healthy nodes — but only if the remaining healthy nodes have sufficient capacity.
LonghornDiskSpaceLow
| Property | Value |
|---|---|
| Severity | warning |
| Condition | Available Longhorn disk space on a node falls below 15% |
| Must persist for | 2 minutes |
What it means: A node’s Longhorn-managed disk is running low on storage. When Longhorn disk space is exhausted, it cannot schedule new replicas or accommodate volume growth, which can lead to LonghornVolumeDegraded or LonghornVolumeFaulted conditions.
Recommended actions:
- Identify the affected node and disk from the
nodeanddisklabels in the alert. - Open the Longhorn UI and check which volumes have replicas on this disk.
- Check for snapshots or backups that can be cleaned up to reclaim space.
- If space cannot be reclaimed, consider adding a disk to the node or expanding the underlying block device.
- Review Metrics Retention settings — reducing VictoriaMetrics retention is often the fastest way to reclaim Longhorn disk space in a monitoring-heavy deployment.
Adding Custom Alert Rules
Additional alert rules can be defined by extending the victoria_metrics_alert.server.config.alerts.groups list in your values.yaml. Rules follow the Prometheus alerting rule format.
Example: Adding a Custom Alert
The following example adds an alert group that fires when a Kafka consumer lag exceeds a threshold:
victoria_metrics_alert:
server:
config:
alerts:
groups:
# ... existing groups are preserved alongside your additions ...
- name: kafka
interval: 15s
rules:
- alert: KafkaConsumerLagHigh
expr: kafka_consumer_group_lag > 10000
for: 5m
labels:
severity: warning
annotations:
summary: "High consumer lag on {{ $labels.topic }}"
description: "Consumer group {{ $labels.group }} is {{ $value }} messages behind on topic {{ $labels.topic }}."
Apply the change using the standard upgrade procedure in the Configuration Guide.
Rule Fields Reference
| Field | Required | Description |
|---|---|---|
alert | Yes | Alert name. Must be unique within the group. |
expr | Yes | PromQL expression. The alert fires when this evaluates to a non-zero/non-empty result. |
for | No | How long the condition must hold before the alert fires. Omitting this fires immediately. |
labels.severity | Recommended | Set to critical or warning to match the built-in routing rules. |
annotations.summary | Recommended | Short human-readable description. Supports Go template labels (e.g. {{ $labels.host }}). |
annotations.description | Recommended | Detailed description with context for the on-call operator. |
Tip: Use the Alertmanager UI (
https://<manager-host>/alertmanager) to verify that fired alerts are being received and routed correctly after adding new rules.
Configuring Alert Routes
By default, all alerts are routed to the built-in null receiver, which silently discards them. To receive alerts, configure one or more receivers and update the routing rules — all within the alertmanager.config section of your values.yaml.
Route Structure
The top-level route defines the default behaviour. Child routes under routes match alerts by label and direct them to specific receivers:
alertmanager:
config:
route:
receiver: 'null' # Default: discard unmatched alerts
group_by: ['alertname']
group_wait: 10s # Wait before sending first notification for a new group
group_interval: 10s # Wait before sending updated notifications for a group
repeat_interval: 1h # Re-notify if an alert is still firing after this period
routes:
- matchers:
- severity="critical"
receiver: 'slack'
- matchers:
- severity="warning"
receiver: 'email-warning'
Routes are evaluated top-to-bottom. The first matching route wins unless continue: true is set on the route.
Notification Channels
Email requires an SMTP server to be configured globally. Both a critical and warning receiver can be defined independently.
alertmanager:
config:
global:
smtp_smarthost: 'smtp.example.com:587'
smtp_from: 'alertmanager@example.com'
smtp_require_tls: true
route:
routes:
- matchers:
- severity="critical"
receiver: 'email-critical'
- matchers:
- severity="warning"
receiver: 'email-warning'
receivers:
- name: 'null'
- name: 'email-critical'
email_configs:
- to: 'oncall@example.com'
send_resolved: true
- name: 'email-warning'
email_configs:
- to: 'alerts@example.com'
send_resolved: true
Slack
Requires an incoming webhook URL created in your Slack workspace.
alertmanager:
config:
route:
routes:
- matchers:
- severity="critical"
receiver: 'slack'
receivers:
- name: 'null'
- name: 'slack'
slack_configs:
- api_url: 'https://hooks.slack.com/services/YOUR/WEBHOOK/URL'
channel: '#alerts'
send_resolved: true
title: '[{{ .Status | toUpper }}] {{ .CommonLabels.alertname }}'
text: |
*Severity:* {{ .CommonLabels.severity }}
*Host:* {{ .CommonLabels.host }}
{{ range .Alerts }}{{ .Annotations.description }}{{ end }}
Telegram
Requires a Telegram bot token and a channel/group chat ID. Create a bot via @BotFather and add it to your alert channel before configuring.
alertmanager:
config:
route:
routes:
- matchers:
- severity="critical"
receiver: 'telegram'
receivers:
- name: 'null'
- name: 'telegram'
telegram_configs:
- bot_token: 'your-bot-token'
chat_id: -1234567890
parse_mode: 'Markdown'
send_resolved: true
message: |
*Alert:* {{ .CommonLabels.alertname }}
*Severity:* {{ .CommonLabels.severity }}
*Host:* {{ .CommonLabels.host }}
{{ range .Alerts }}
{{ .Annotations.description }}
{{ end }}
Finding your chat ID: Add your bot to the channel or group, send a message, then call
https://api.telegram.org/bot<token>/getUpdatesand read thechat.idfrom the response. Note that group and channel chat IDs are negative numbers.
Combining Multiple Receivers
Routes and receivers can be combined to send different alert severities to different channels simultaneously. For example, critical alerts to PagerDuty and Slack, warnings to email only:
alertmanager:
config:
route:
receiver: 'null'
routes:
- matchers:
- severity="critical"
receiver: 'slack'
continue: true # Continue matching so the next route also fires
- matchers:
- severity="critical"
receiver: 'email-critical'
- matchers:
- severity="warning"
receiver: 'email-warning'
receivers:
- name: 'null'
- name: 'slack'
slack_configs:
- api_url: 'https://hooks.slack.com/services/YOUR/WEBHOOK/URL'
channel: '#critical-alerts'
send_resolved: true
- name: 'email-critical'
email_configs:
- to: 'oncall@example.com'
send_resolved: true
- name: 'email-warning'
email_configs:
- to: 'alerts@example.com'
send_resolved: true
Apply any receiver or routing changes using the standard upgrade procedure in the Configuration Guide.
Silencing Alerts
Silences suppress alert notifications for a defined time window without disabling the underlying alert rule. They are useful during planned maintenance, known incidents, or when investigating a non-urgent condition.
Silences are managed via the Alertmanager UI, accessible at:
https://<manager-host>/alertmanager
Creating a Silence
- Navigate to the Alertmanager UI and click Silences in the top navigation.
- Click Create Silence.
- Set the Start and End times for the silence window.
- Add one or more matchers to scope which alerts are suppressed. For example:
alertname = StorageFillingUp— silence a specific alertseverity = warning— silence all warningshost = node-01— silence all alerts from a specific host
- Add a Comment describing the reason for the silence (e.g.
Planned disk expansion on node-01). - Click Create. The silence takes effect immediately.
Expiring a Silence
Silences expire automatically at the configured end time. To remove a silence early, navigate to Silences in the Alertmanager UI, locate the silence, and click Expire.
Next Steps
- Operations Guide - Day-to-day operational procedures
- Troubleshooting Guide - Resolve underlying issues surfaced by alerts
- Metrics & Monitoring Overview - Return to the monitoring overview
11.10 - API Guide
Overview
The CDN Manager exposes versioned HTTP APIs under /api (v1 and v2), using JSON payloads by default. When sending request bodies, set Content-Type: application/json. Server errors typically respond with { "message": "..." } where available, or an empty body with the relevant status code.
Authentication uses a two-step flow:
- Create a session
- Exchange that session for an access token with
grant_type=session
Use the access token in Authorization: Bearer <token> when calling bearer-protected routes. CORS preflight (OPTIONS) is supported and wildcard origins are accepted by default.
Durations such as TTLs use humantime strings (for example, 60s, 5m, 1h).
Base URL
All API endpoints are relative to:
https://<manager-host>/api
API Reference Guides
The API documentation is organized by functional area:
| Guide | Description |
|---|---|
| Authentication API | Login, token exchange, logout, and session management |
| Health API | Liveness and readiness probes |
| Selection Input API | Key-value and list storage with search capabilities |
| Data Store API | Generic JSON key/value storage |
| Subnets API | CIDR-to-value mappings for routing decisions |
| Routing API | GeoIP lookups and IP validation |
| Discovery API | Host and namespace discovery |
| Metrics API | Metrics submission and aggregation |
| Configuration API | Configuration document management |
| Operator UI API | Blocked tokens, user agents, and referrers |
| OpenAPI Specification | Complete OpenAPI 3.0 specification |
Authentication Flow
All authenticated API calls follow the same authentication flow. For detailed instructions, see the Authentication API Guide.
Quick Start:
# Step 1: Login to get session
curl -s -X POST "https://cdn-manager/api/v1/auth/login" \
-H "Content-Type: application/json" \
-d '{
"email": "user@example.com",
"password": "Password1!"
}' | tee /tmp/session.json
SESSION_ID=$(jq -r '.session_id' /tmp/session.json)
SESSION_TOKEN=$(jq -r '.session_token' /tmp/session.json)
# Step 2: Exchange session for access token
curl -s -X POST "https://cdn-manager/api/v1/auth/token" \
-H "Content-Type: application/json" \
-d "$(jq -nc --arg sid "$SESSION_ID" --arg st "$SESSION_TOKEN" \
'{session_id:$sid,session_token:$st,grant_type:"session",scope:"openid"}')" \
| tee /tmp/token.json
ACCESS_TOKEN=$(jq -r '.access_token' /tmp/token.json)
# Step 3: Call a protected endpoint
curl -s "https://cdn-manager/api/v1/metrics" \
-H "Authorization: Bearer ${ACCESS_TOKEN}"
Error Responses
The API uses standard HTTP response codes to indicate the success or failure of an API request.
Most errors return an empty response body with the relevant HTTP status code (e.g., 404 Not Found or 409 Conflict).
In some cases, the server may return a JSON body containing a user-facing error message:
{
"message": "Human-readable error message"
}
Next Steps
After learning the API:
- Operations Guide - Day-to-day operational procedures
- Troubleshooting Guide - Resolve API issues
- Configuration Guide - Full configuration reference
11.10.1 - Authentication API
Overview
The Authentication API provides endpoints for user authentication, session management, and token exchange. All authenticated API calls require a valid access token obtained through the authentication flow.
Base URL
https://<manager-host>/api/v1/auth
Endpoints
POST /api/v1/auth/login
Create a session from email/password credentials.
Request:
POST /api/v1/auth/login
Content-Type: application/json
{
"email": "user@example.com",
"password": "Password1!"
}
Success Response (200):
{
"session_id": "session-1",
"session_token": "token-1",
"verified_at": "2024-01-01T00:00:00Z",
"expires_at": "2024-01-01T01:00:00Z"
}
Errors:
401- Authentication failure (invalid credentials)500- Backend/state errors
POST /api/v1/auth/token
Exchange a session for an access token (required for bearer auth).
Request:
POST /api/v1/auth/token
Content-Type: application/json
{
"session_id": "session-1",
"session_token": "token-1",
"grant_type": "session",
"scope": "openid profile"
}
Success Response (200):
{
"access_token": "<token>",
"scope": "openid profile",
"expires_in": 3600,
"token_type": "bearer"
}
Token Scopes
The scope parameter in the token exchange request is a space-separated string of permissions requested for the access token.
Scope Resolution When a token is requested, the backend system filters the requested scopes against the user’s actual permissions. The resulting access token will only contain the subset of requested scopes that the user is authorized to possess.
Naming and Design
Scope names are defined by the applications that consume the tokens, not by the central IAM system. To prevent collisions between different applications or modules, it is highly recommended that application developers use URN-style prefixes for scope names (e.g., urn:acd:manager:config:read).
Errors:
401- Authentication failure (invalid session)500- Backend/state errors
POST /api/v1/auth/logout
Revoke a session. Note: This does not revoke issued access tokens; they remain valid until expiration.
Request:
POST /api/v1/auth/logout
Content-Type: application/json
{
"session_id": "session-1",
"session_token": "token-1"
}
Success Response (200):
{
"status": "Ok"
}
Errors:
400- Invalid session parameters500- Backend/state errors
Complete Authentication Flow Example
# Step 1: Login to get session
curl -s -X POST "https://cdn-manager/api/v1/auth/login" \
-H "Content-Type: application/json" \
-d '{
"email": "user@example.com",
"password": "Password1!"
}' | tee /tmp/session.json
SESSION_ID=$(jq -r '.session_id' /tmp/session.json)
SESSION_TOKEN=$(jq -r '.session_token' /tmp/session.json)
# Step 2: Exchange session for access token
curl -s -X POST "https://cdn-manager/api/v1/auth/token" \
-H "Content-Type: application/json" \
-d "$(jq -nc --arg sid "$SESSION_ID" --arg st "$SESSION_TOKEN" \
'{session_id:$sid,session_token:$st,grant_type:"session",scope:"openid"}')" \
| tee /tmp/token.json
ACCESS_TOKEN=$(jq -r '.access_token' /tmp/token.json)
# Step 3: Call a protected endpoint
curl -s "https://cdn-manager/api/v1/metrics" \
-H "Authorization: Bearer ${ACCESS_TOKEN}"
Using the Access Token
Once you have obtained an access token, include it in the Authorization header of all API requests:
Authorization: Bearer <access_token>
Example:
curl -s "https://cdn-manager/api/v1/configuration" \
-H "Authorization: Bearer ${ACCESS_TOKEN}"
Token Expiration
Access tokens expire after the duration specified in expires_in (typically 3600 seconds / 1 hour). When a token expires, you must re-authenticate to obtain a new token.
Next Steps
- Health API - Liveness and readiness probes
- Selection Input API - Key-value and list storage
- OpenAPI Specification - Complete API specification
11.10.2 - Health API
Overview
The Health API provides endpoints for Kubernetes health probes and service health checking.
Base URL
https://<manager-host>/api/v1/health
Endpoints
GET /api/v1/health/alive
Liveness probe that indicates whether the service is running. Always returns 200 OK.
Request:
GET /api/v1/health/alive
Response (200):
{
"status": "Ok"
}
Use Case: Kubernetes liveness probe to determine if the pod should be restarted.
GET /api/v1/health/ready
Readiness probe that checks service readiness including downstream dependencies.
Request:
GET /api/v1/health/ready
Success Response (200):
{
"status": "Ok"
}
Failure Response (503):
{
"status": "Fail"
}
Use Case: Kubernetes readiness probe to determine if the pod should receive traffic. Returns 503 if any downstream dependencies (database, Kafka, Redis) are unavailable.
Kubernetes Configuration
Example Kubernetes probe configuration:
livenessProbe:
httpGet:
path: /api/v1/health/alive
port: 8080
initialDelaySeconds: 10
periodSeconds: 10
readinessProbe:
httpGet:
path: /api/v1/health/ready
port: 8080
initialDelaySeconds: 5
periodSeconds: 5
Next Steps
- Authentication API - User authentication
- Selection Input API - Key-value and list storage
- OpenAPI Specification - Complete API specification
11.10.3 - Selection Input API
Overview
The Selection Input API provides JSON key/value storage with search capabilities. It supports two API versions (v1 and v2) with different operation models.
Base URL
https://<manager-host>/api/v1/selection_input
https://<manager-host>/api/v2/selection_input
Version Comparison
| Feature | v1 /api/v1/selection_input | v2 /api/v2/selection_input |
|---|---|---|
| Primary operation | Merge/UPSERT (POST) | Insert/Replace (PUT) |
| List append | N/A | POST to push to list |
| Search syntax | Wildcard prefix (foo* implicit) | Full wildcard (foo* explicit) |
| Query params | search, sort, limit, ttl | search, ttl, correlation_id |
| Sort support | Yes (asc/desc) | No |
| Limit support | Yes | No |
| Use case | Simple key-value with optional search | List-like operations, full wildcard |
When to Use Each Version
| Scenario | Recommended Version |
|---|---|
| Simple key-value storage | v1 |
| List/queue operations (append to array) | v2 POST |
| Full wildcard pattern matching | v2 |
| Need to sort or paginate results | v1 |
v1 Endpoints
GET /api/v1/selection_input/{path}
Fetch stored JSON. If value is an object, optional search/limit/sort applies to its keys.
Query Parameters:
search- Wildcard prefix search (adds*implicitly)sort- Sort order (ascordesc)limit- Maximum results (must be > 0)
Success Response (200):
{
"foo": 1,
"foobar": 2
}
Errors:
404- Path does not exist400- Invalid search/sort/limit parameters500- Backend failure
Example:
curl -s "https://cdn-manager/api/v1/selection_input/config?search=foo&limit=2"
POST /api/v1/selection_input/{path}
Upsert (merge) JSON at path. Nested objects are merged recursively.
Query Parameters:
ttl- Expiry time as humantime string (e.g.,10m,1h)
Request:
{
"feature_flag": true,
"ratio": 0.5
}
Success: 201 Created echoing the payload
Errors:
500/503- Backend failure
Example:
curl -s -X POST "https://cdn-manager/api/v1/selection_input/config?ttl=10m" \
-H "Content-Type: application/json" \
-d '{
"feature_flag": true,
"ratio": 0.5
}'
DELETE /api/v1/selection_input/{path}
Delete stored value.
Success: 204 No Content
Errors: 503 - Backend failure
v2 Endpoints
GET /api/v2/selection_input/{path}
Fetch stored JSON with optional wildcard filtering.
Query Parameters:
search- Full wildcard pattern (e.g.,foo*,*bar*)correlation_id- Accepted but currently ignored (logging only)
Success Response (200):
{
"foo": 1,
"foobar": 2
}
Errors:
400- Invalid search pattern404- Path does not exist500- Backend failure
Example:
curl -s "https://cdn-manager/api/v2/selection_input/config?search=foo*"
PUT /api/v2/selection_input/{path}
Insert/replace value. Old value is discarded.
Query Parameters:
ttl- Expiry time as humantime string
Request:
{
"items": ["a", "b", "c"]
}
Success: 200 OK
Example:
curl -s -X PUT "https://cdn-manager/api/v2/selection_input/catalog" \
-H "Content-Type: application/json" \
-d '{
"items": ["a", "b", "c"]
}'
POST /api/v2/selection_input/{path}
Push a value to the back of a list-like entry (append to array).
Query Parameters:
ttl- Expiry time as humantime string
Request (any JSON value):
{
"item": 42
}
Or a simple string:
"ready-for-publish"
Success: 200 OK
Example:
curl -s -X POST "https://cdn-manager/api/v2/selection_input/queue" \
-H "Content-Type: application/json" \
-d '"ready-for-publish"'
DELETE /api/v2/selection_input/{path}
Delete stored value.
Success: 204 No Content
Next Steps
- Data Store API - Generic key/value storage
- Subnets API - CIDR-to-value mappings
- OpenAPI Specification - Complete API specification
11.10.4 - Data Store API
Overview
The Data Store API provides generic JSON key/value storage for short-lived or simple structured data.
Base URL
https://<manager-host>/api/v1/datastore
Endpoints
GET /api/v1/datastore
List all known keys.
Query Parameters:
show_hidden- Boolean (defaultfalse). Whentrue, includes internal keys starting with_.
Success Response (200):
["user:123", "config:settings", "session:abc"]
Hidden Keys: Keys starting with _ are reserved for internal use (e.g., subnet service). Writing to hidden keys via the datastore API returns 400 Bad Request.
GET /api/v1/datastore/{key}
Retrieve the JSON value for a specific key.
Success Response (200): The stored JSON value
Errors:
404- Key does not exist500- Backend failure
Example:
curl -s "https://cdn-manager/api/v1/datastore/user:123"
POST /api/v1/datastore/{key}
Create a new JSON value at the specified key. Fails if the key already exists.
Query Parameters:
ttl- Expiry time as humantime string (e.g.,60s,1h)
Request:
{
"id": 123,
"name": "alice"
}
Success: 201 Created
Errors:
409 Conflict- Key already exists500- Backend failure
Example:
curl -s -X POST "https://cdn-manager/api/v1/datastore/user:123?ttl=1h" \
-H "Content-Type: application/json" \
-d '{"id":123,"name":"alice"}'
PUT /api/v1/datastore/{key}
Update or replace the JSON value at an existing key.
Query Parameters:
ttl- Expiry time as humantime string
Success: 200 OK
Errors:
404- Key does not exist500- Backend failure
Example:
curl -s -X PUT "https://cdn-manager/api/v1/datastore/user:123" \
-H "Content-Type: application/json" \
-d '{"id":123,"name":"alice-updated"}'
DELETE /api/v1/datastore/{key}
Delete the value at the specified key. Idempotent operation.
Success: 204 No Content
Errors: 500 - Backend failure
Example:
curl -s -X DELETE "https://cdn-manager/api/v1/datastore/user:123"
Next Steps
- Subnets API - CIDR-to-value mappings
- Routing API - GeoIP lookups
- OpenAPI Specification - Complete API specification
11.10.5 - Subnets API
Overview
The Subnets API manages CIDR-to-value mappings used for routing decisions. This allows classification of IP ranges for routing purposes.
Base URL
https://<manager-host>/api/v1/subnets
Endpoints
PUT /api/v1/subnets
Create or update subnet mappings.
Request:
{
"192.168.1.0/24": "office",
"10.0.0.0/8": "internal",
"203.0.113.0/24": "external"
}
Success: 200 OK
Errors:
400- Invalid CIDR format500- Backend failure
Example:
curl -s -X PUT "https://cdn-manager/api/v1/subnets" \
-H "Content-Type: application/json" \
-d '{
"192.168.1.0/24": "office",
"10.0.0.0/8": "internal"
}'
GET /api/v1/subnets
List all subnet mappings.
Success Response (200): JSON object of CIDR-to-value mappings
Example:
curl -s "https://cdn-manager/api/v1/subnets" | jq '.'
DELETE /api/v1/subnets
Delete all subnet mappings.
Success: 204 No Content
GET /api/v1/subnets/byKey/{subnet}
Retrieve subnet mappings whose CIDR begins with the given prefix.
Example:
curl -s "https://cdn-manager/api/v1/subnets/byKey/192.168" | jq '.'
GET /api/v1/subnets/byValue/{value}
Retrieve subnet mappings with the given classification value.
Example:
curl -s "https://cdn-manager/api/v1/subnets/byValue/office" | jq '.'
DELETE /api/v1/subnets/byKey/{subnet}
Delete subnet mappings whose CIDR begins with the given prefix.
DELETE /api/v1/subnets/byValue/{value}
Delete subnet mappings with the given classification value.
Next Steps
- Routing API - GeoIP lookups and IP validation
- Discovery API - Host and namespace discovery
- OpenAPI Specification - Complete API specification
11.10.6 - Routing API
Overview
The Routing API provides GeoIP information lookup and IP address validation for routing decisions.
Base URL
https://<manager-host>/api/v1/routing
Endpoints
GET /api/v1/routing/geoip
Look up GeoIP information for an IP address.
Query Parameters:
ip- IP address to look up
Success Response (200):
{
"city": {
"name": "Washington"
},
"asn": 64512
}
Errors:
400- Invalid IP format500- Backend failure
Caching: Cache-Control: public, max-age=86400 (24 hours)
Example:
curl -s "https://cdn-manager/api/v1/routing/geoip?ip=149.101.100.0"
GET /api/v1/routing/validate
Validate if an IP address is allowed (not blocked).
Query Parameters:
ip- IP address to validate
Success Response (200): Empty body (IP is allowed)
Forbidden Response (403):
Access Denied
Errors:
400- Invalid IP format500- Backend failure
Caching: Cache-Control headers included (default: max-age=300, configurable via [tuning] section)
Example:
curl -i "https://cdn-manager/api/v1/routing/validate?ip=149.101.100.0"
Use Cases
GeoIP-Based Routing
Use the /geoip endpoint to determine the geographic location and ASN of an IP address for routing decisions:
# Get location data for routing
IP_INFO=$(curl -s "https://cdn-manager/api/v1/routing/geoip?ip=203.0.113.50")
CITY=$(echo "$IP_INFO" | jq -r '.city.name')
ASN=$(echo "$IP_INFO" | jq -r '.asn')
echo "Routing based on city: $CITY, ASN: $ASN"
IP Validation
Use the /validate endpoint to check if an IP is allowed before processing requests:
# Check if IP is allowed
RESPONSE=$(curl -s -o /dev/null -w "%{http_code}" \
"https://cdn-manager/api/v1/routing/validate?ip=203.0.113.50")
if [ "$RESPONSE" = "200" ]; then
echo "IP is allowed"
elif [ "$RESPONSE" = "403" ]; then
echo "IP is blocked"
fi
Next Steps
- Discovery API - Host and namespace discovery
- Metrics API - Metrics submission and aggregation
- OpenAPI Specification - Complete API specification
11.10.7 - Discovery API
Overview
The Discovery API provides information about discovered hosts and namespaces. Discovery is configured via the Helm chart values.yaml file. Each entry defines a namespace with a list of hostnames.
Base URL
https://<manager-host>/api/v1/discovery
Endpoints
GET /api/v1/discovery/hosts
Return discovered hosts grouped by namespace.
Success Response (200):
{
"directors": [
{ "name": "director-1.example.com" }
],
"edge-servers": [
{ "name": "cdn1.example.com" },
{ "name": "cdn2.example.com" }
]
}
Example:
curl -s "https://cdn-manager/api/v1/discovery/hosts"
GET /api/v1/discovery/namespaces
Return discovery namespaces with their corresponding Confd URIs.
Success Response (200):
[
{
"namespace": "edge-servers",
"confd_uri": "/api/v1/confd/edge-servers"
},
{
"namespace": "directors",
"confd_uri": "/api/v1/confd/directors"
}
]
Example:
curl -s "https://cdn-manager/api/v1/discovery/namespaces"
Configuration
Discovery is configured via the Helm chart values.yaml file under manager.discovery:
manager:
discovery:
- namespace: "directors"
hosts:
- director-1.example.com
- director-2.example.com
- namespace: "edge-servers"
hosts:
- cdn1.example.com
- cdn2.example.com
Each entry defines a namespace with a list of hostnames. Optionally, a pattern field can be specified for regex-based host matching.
Next Steps
- Metrics API - Metrics submission and aggregation
- Configuration API - Configuration document management
- OpenAPI Specification - Complete API specification
11.10.8 - Metrics API
Overview
The Metrics API allows submission and retrieval of metrics data from CDN components.
Base URL
https://<manager-host>/api/v1/metrics
Endpoints
POST /api/v1/metrics
Submit metrics data.
Request:
{
"example.com": {
"metric1": 100,
"metric2": 200
}
}
Success: 200 OK
Errors: 500 - Validation/backend errors
Example:
curl -s -X POST "https://cdn-manager/api/v1/metrics" \
-H "Content-Type: application/json" \
-d '{
"example.com": {
"metric1": 100,
"metric2": 200
}
}'
GET /api/v1/metrics
Return aggregated metrics per host.
Response: JSON object with aggregated metrics per host
Note: Metrics are stored per host for up to 5 minutes. Hosts that stop reporting disappear from aggregation after that window. When no metrics are being reported, returns empty object {}.
Example:
curl -s "https://cdn-manager/api/v1/metrics"
Metrics Retention
- Metrics are stored for up to 5 minutes in the aggregation layer
- For long-term metrics storage, data is forwarded to VictoriaMetrics
- Query historical metrics via Grafana dashboards at
/grafana
Next Steps
- Configuration API - Configuration document management
- Operator UI API - Blocked tokens, user agents, and referrers
- OpenAPI Specification - Complete API specification
11.10.9 - Configuration API
Overview
The Configuration API provides endpoints for managing the system configuration document. ETag is supported; send If-None-Match for conditional GET (may return 304).
Operational Note: This API is intended for internal verification only. Behavior is undefined in multi-replica clusters because pods do not coordinate config writes.
Base URL
https://<manager-host>/api/v1/configuration
Endpoints
GET /api/v1/configuration
Retrieve the configuration document.
Success: 200 OK with configuration JSON
Conditional GET: Returns 304 Not Modified if If-None-Match header matches current ETag
Example:
# Get ETag from response headers
etag=$(curl -s -D- "https://cdn-manager/api/v1/configuration" | awk '/ETag/{print $2}')
# Conditional GET - returns 304 if config unchanged
curl -s -H "If-None-Match: $etag" "https://cdn-manager/api/v1/configuration" -o /tmp/cfg.json -w "%{http_code}\n"
PUT /api/v1/configuration
Replace the configuration document.
Request:
{
"feature_flag": false,
"ratio": 0.25
}
Success: 200 OK
Errors:
400- Invalid configuration format500- Backend failure
DELETE /api/v1/configuration
Delete the configuration document.
Success: 200 OK
ETag Usage
The configuration API supports ETags for optimistic concurrency control:
# 1. Get current config and ETag
response=$(curl -s -D headers.txt "https://cdn-manager/api/v1/configuration")
etag=$(grep -i ETag headers.txt | cut -d' ' -f2 | tr -d '\r')
# 2. Modify the config as needed
modified_config=$(echo "$response" | jq '.feature_flag = true')
# 3. Update with ETag to prevent overwriting concurrent changes
curl -s -X PUT "https://cdn-manager/api/v1/configuration" \
-H "Content-Type: application/json" \
-H "If-Match: $etag" \
-d "$modified_config"
Next Steps
- Operator UI API - Blocked tokens, user agents, and referrers
- OpenAPI Specification - Complete API specification
11.10.10 - Operator UI API
Overview
The Operator UI API provides read-only helpers exposing curated selection input content for the operator interface.
Query Parameters: search, sort, limit (same as selection input v1)
Note: Stored keys for user agents/referrers are URL-safe base64; responses decode them to human-readable values.
Base URL
https://<manager-host>/api/v1/operator_ui
Endpoints
Blocked Household Tokens
GET /api/v1/operator_ui/modules/blocked_tokens
List all blocked household tokens.
Success Response (200):
[
{
"household_token": "house-001_token-abc",
"expire_time": 1625247600
}
]
GET /api/v1/operator_ui/modules/blocked_tokens/{token}
Get details for a specific blocked token.
Success Response (200):
{
"household_token": "house-001_token-abc",
"expire_time": 1625247600
}
Blocked User Agents
GET /api/v1/operator_ui/modules/blocked_user_agents
List all blocked user agents.
Success Response (200):
[
{
"user_agent": "Mozilla/5.0 (Windows NT 10.0; Win64; x64)"
},
{
"user_agent": "curl/7.68.0"
}
]
GET /api/v1/operator_ui/modules/blocked_user_agents/{encoded}
Get details for a specific blocked user agent. The path variable is URL-safe base64 encoded.
Example:
# Encode the user agent
ENC=$(python3 -c "import base64; print(base64.urlsafe_b64encode(b'curl/7.68.0').decode().rstrip('='))")
# Get details
curl -s "https://cdn-manager/api/v1/operator_ui/modules/blocked_user_agents/$ENC"
Blocked Referrers
GET /api/v1/operator_ui/modules/blocked_referrers
List all blocked referrers.
Success Response (200):
[
{
"referrer": "https://spam-example.com"
}
]
GET /api/v1/operator_ui/modules/blocked_referrers/{encoded}
Get details for a specific blocked referrer. The path variable is URL-safe base64 encoded.
Example:
# Encode the referrer
ENC=$(python3 -c "import base64; print(base64.urlsafe_b64encode(b'spam-example.com').decode().rstrip('='))")
# Get details
curl -s "https://cdn-manager/api/v1/operator_ui/modules/blocked_referrers/$ENC"
URL-Safe Base64 Encoding
The Operator UI API uses URL-safe base64 encoding for path parameters. To encode values:
Python:
import base64
# Encode
encoded = base64.urlsafe_b64encode(b'value').decode().rstrip('=')
# Decode
decoded = base64.urlsafe_b64decode(encoded + '=' * (-len(encoded) % 4)).decode()
Bash (with openssl):
# Encode
echo -n "value" | openssl base64 -urlsafe | tr -d '='
# Decode
echo "encoded" | openssl base64 -urlsafe -d
Next Steps
- OpenAPI Specification - Complete API specification
11.10.11 - OpenAPI Specification
Overview
The CDN Manager API is documented using the OpenAPI 3.0 specification. This appendix provides the complete specification for reference and for generating API clients.
OpenAPI Specification (YAML)
openapi: 3.0.3
info:
title: AgileTV CDN Manager API
version: "1.0"
servers:
- url: https://<manager-host>/api
description: CDN Manager API server
paths:
/v1/auth/login:
post:
summary: Login and create session
requestBody:
required: true
content:
application/json:
schema:
$ref: '#/components/schemas/LoginRequest'
responses:
'200':
description: Session created
content:
application/json:
schema:
$ref: '#/components/schemas/LoginResponse'
'401': { description: Unauthorized, content: { application/json: { schema: { $ref: '#/components/schemas/ErrorResponse' } } } }
'500': { description: Internal error, content: { application/json: { schema: { $ref: '#/components/schemas/ErrorResponse' } } } }
/v1/auth/token:
post:
summary: Exchange session for access token
requestBody:
required: true
content:
application/json:
schema:
$ref: '#/components/schemas/TokenRequest'
responses:
'200':
description: Access token
content:
application/json:
schema:
$ref: '#/components/schemas/TokenResponse'
'401': { description: Unauthorized, content: { application/json: { schema: { $ref: '#/components/schemas/ErrorResponse' } } } }
'500': { description: Internal error, content: { application/json: { schema: { $ref: '#/components/schemas/ErrorResponse' } } } }
/v1/auth/logout:
post:
summary: Revoke session
requestBody:
required: true
content:
application/json:
schema:
$ref: '#/components/schemas/LogoutRequest'
responses:
'200': { description: Revoked, content: { application/json: { schema: { $ref: '#/components/schemas/LogoutResponse' } } } }
'401': { description: Unauthorized, content: { application/json: { schema: { $ref: '#/components/schemas/ErrorResponse' } } } }
'500': { description: Internal error, content: { application/json: { schema: { $ref: '#/components/schemas/ErrorResponse' } } } }
/v1/selection_input{tail}:
get:
summary: Read selection input
parameters:
- $ref: '#/components/parameters/Tail'
- $ref: '#/components/parameters/Search'
- $ref: '#/components/parameters/Sort'
- $ref: '#/components/parameters/Limit'
responses:
'200': { description: JSON value }
'400': { description: Bad request, content: { application/json: { schema: { $ref: '#/components/schemas/ErrorResponse' } } } }
'404': { description: Not found }
'500': { description: Backend failure }
post:
summary: Merge selection input
parameters:
- $ref: '#/components/parameters/Tail'
- $ref: '#/components/parameters/Ttl'
requestBody:
required: true
content:
application/json:
schema:
$ref: '#/components/schemas/AnyJson'
responses:
'201': { description: Created, content: { application/json: { schema: { $ref: '#/components/schemas/AnyJson' } } } }
'500': { description: Backend failure }
'503': { description: Service unavailable }
delete:
summary: Delete selection input
parameters:
- $ref: '#/components/parameters/Tail'
responses:
'204': { description: Deleted }
'503': { description: Service unavailable }
/v2/selection_input{tail}:
get:
summary: Read selection input v2
parameters:
- $ref: '#/components/parameters/TailV2'
- $ref: '#/components/parameters/Search'
responses:
'200': { description: JSON value }
'400': { description: Invalid search pattern }
'404': { description: Not found }
'500': { description: Backend failure }
put:
summary: Replace selection input v2
parameters:
- $ref: '#/components/parameters/TailV2'
- $ref: '#/components/parameters/Ttl'
- $ref: '#/components/parameters/CorrelationId'
requestBody:
required: true
content:
application/json:
schema:
$ref: '#/components/schemas/AnyJson'
responses:
'200': { description: Updated }
'500': { description: Backend failure }
post:
summary: Push to selection input v2
parameters:
- $ref: '#/components/parameters/TailV2'
- $ref: '#/components/parameters/Ttl'
- $ref: '#/components/parameters/CorrelationId'
requestBody:
required: true
content:
application/json:
schema:
$ref: '#/components/schemas/AnyJson'
responses:
'200': { description: Pushed }
'500': { description: Backend failure }
delete:
summary: Delete selection input v2
parameters:
- $ref: '#/components/parameters/TailV2'
responses:
'204': { description: Deleted }
'500': { description: Backend failure }
/v1/configuration:
get:
summary: Read configuration
responses:
'200': { description: Configuration, content: { application/json: { schema: { $ref: '#/components/schemas/AnyJson' } } }, headers: { ETag: { schema: { type: string } } } }
'304': { description: Not modified }
'500': { description: Backend failure }
put:
summary: Replace configuration
requestBody:
required: true
content:
application/json:
schema:
$ref: '#/components/schemas/AnyJson'
responses:
'200': { description: Replaced }
'500': { description: Backend failure }
delete:
summary: Delete configuration
responses:
'200': { description: Deleted }
'500': { description: Backend failure }
/v1/routing/geoip:
get:
summary: GeoIP lookup
parameters:
- name: ip
in: query
required: true
schema: { type: string }
responses:
'200': { description: GeoIP data, content: { application/json: { schema: { $ref: '#/components/schemas/GeoIpResponse' } } } }
'400': { description: Invalid IP }
'500': { description: Backend failure }
/v1/routing/validate:
get:
summary: Validate routing
parameters:
- name: ip
in: query
required: true
schema: { type: string }
responses:
'200': { description: Allowed }
'403': { description: Access Denied }
'400': { description: Invalid IP }
'500': { description: Backend failure }
/v1/metrics:
post:
summary: Ingest metrics
requestBody:
required: true
content:
application/json:
schema:
$ref: '#/components/schemas/MetricsIngress'
responses:
'200': { description: Stored }
'500': { description: Validation/back-end error }
get:
summary: Aggregate metrics
responses:
'200': { description: Aggregated metrics, content: { application/json: { schema: { $ref: '#/components/schemas/AnyJson' } } } }
'500': { description: Backend failure }
/v1/discovery/hosts:
get:
summary: List discovered hosts by namespace
responses:
'200':
description: Discovered hosts keyed by namespace
content:
application/json:
schema:
type: object
additionalProperties:
type: array
items:
$ref: '#/components/schemas/DiscoveryHost'
'500': { description: Backend failure }
/v1/discovery/namespaces:
get:
summary: List discovery namespaces with Confd URIs
responses:
'200':
description: Namespaces with Confd links
content:
application/json:
schema:
type: array
items:
$ref: '#/components/schemas/DiscoveryNamespace'
'500': { description: Backend failure }
/v1/datastore:
get:
summary: List datastore keys
responses:
'200': { description: Keys list, content: { application/json: { schema: { type: array, items: { type: string } } } } }
'500': { description: Backend failure }
/v1/datastore/{key}:
get:
summary: Get a JSON value by key
parameters:
- name: key
in: path
required: true
schema: { type: string }
responses:
'200': { description: JSON value, content: { application/json: { schema: { $ref: '#/components/schemas/AnyJson' } } } }
'404': { description: Not found }
'500': { description: Backend failure }
post:
summary: Create a JSON value at key
parameters:
- name: key
in: path
required: true
schema: { type: string }
- $ref: '#/components/parameters/Ttl'
requestBody:
required: true
content:
application/json:
schema:
$ref: '#/components/schemas/AnyJson'
responses:
'201': { description: Created }
'409': { description: Conflict (already exists) }
'500': { description: Backend failure }
put:
summary: Update/replace a JSON value at key
parameters:
- name: key
in: path
required: true
schema: { type: string }
- $ref: '#/components/parameters/Ttl'
requestBody:
required: true
content:
application/json:
schema:
$ref: '#/components/schemas/AnyJson'
responses:
'200': { description: Updated }
'404': { description: Not found }
'500': { description: Backend failure }
delete:
summary: Delete a datastore key
parameters:
- name: key
in: path
required: true
schema: { type: string }
responses:
'204': { description: Deleted }
'500': { description: Backend failure }
/v1/subnets:
get:
summary: List all subnet mappings
responses:
'200': { description: Subnet mappings, content: { application/json: { schema: { type: object, additionalProperties: { type: string } } } } }
'500': { description: Backend failure }
put:
summary: Create or update subnet mappings
requestBody:
required: true
content:
application/json:
schema:
type: object
additionalProperties:
type: string
description: Map of CIDR strings to classification values
responses:
'200': { description: Created }
'400': { description: Invalid CIDR format }
'500': { description: Backend failure }
delete:
summary: Delete all subnet mappings
responses:
'204': { description: Deleted }
'500': { description: Backend failure }
/v1/subnets/byKey/{subnet}:
get:
summary: Get subnet mappings by CIDR prefix
parameters:
- name: subnet
in: path
required: true
schema: { type: string }
responses:
'200': { description: Subnet mappings, content: { application/json: { schema: { type: object, additionalProperties: { type: string } } } } }
'500': { description: Backend failure }
delete:
summary: Delete subnet mappings by CIDR prefix
parameters:
- name: subnet
in: path
required: true
schema: { type: string }
responses:
'204': { description: Deleted }
'500': { description: Backend failure }
/v1/subnets/byValue/{value}:
get:
summary: Get subnet mappings by value
parameters:
- name: value
in: path
required: true
schema: { type: string }
responses:
'200': { description: Subnet mappings, content: { application/json: { schema: { type: object, additionalProperties: { type: string } } } } }
'500': { description: Backend failure }
delete:
summary: Delete subnet mappings by value
parameters:
- name: value
in: path
required: true
schema: { type: string }
responses:
'204': { description: Deleted }
'500': { description: Backend failure }
/v1/operator_ui/modules/blocked_tokens:
get:
summary: List blocked tokens
parameters:
- $ref: '#/components/parameters/Search'
- $ref: '#/components/parameters/Sort'
- $ref: '#/components/parameters/Limit'
responses:
'200': { description: Blocked tokens, content: { application/json: { schema: { type: array, items: { $ref: '#/components/schemas/BlockedToken' } } } } }
'400': { description: Parse error, content: { application/json: { schema: { $ref: '#/components/schemas/ErrorResponse' } } } }
/v1/operator_ui/modules/blocked_tokens/{token}:
get:
summary: Get blocked token
parameters:
- name: token
in: path
required: true
schema: { type: string }
responses:
'200': { description: Blocked token, content: { application/json: { schema: { $ref: '#/components/schemas/BlockedToken' } } } }
'404': { description: Not found }
'400': { description: Parse error, content: { application/json: { schema: { $ref: '#/components/schemas/ErrorResponse' } } } }
/v1/operator_ui/modules/blocked_user_agents:
get:
summary: List blocked user agents
parameters:
- $ref: '#/components/parameters/Search'
- $ref: '#/components/parameters/Sort'
- $ref: '#/components/parameters/Limit'
responses:
'200': { description: Blocked user agents, content: { application/json: { schema: { type: array, items: { $ref: '#/components/schemas/BlockedUserAgent' } } } } }
'400': { description: Parse error, content: { application/json: { schema: { $ref: '#/components/schemas/ErrorResponse' } } } }
/v1/operator_ui/modules/blocked_user_agents/{encoded}:
get:
summary: Get blocked user agent
parameters:
- name: encoded
in: path
required: true
schema: { type: string }
responses:
'200': { description: Blocked user agent, content: { application/json: { schema: { $ref: '#/components/schemas/BlockedUserAgent' } } } }
'400': { description: Parse error, content: { application/json: { schema: { $ref: '#/components/schemas/ErrorResponse' } } } }
/v1/operator_ui/modules/blocked_referrers:
get:
summary: List blocked referrers
parameters:
- $ref: '#/components/parameters/Search'
- $ref: '#/components/parameters/Sort'
- $ref: '#/components/parameters/Limit'
responses:
'200': { description: Blocked referrers, content: { application/json: { schema: { type: array, items: { $ref: '#/components/schemas/BlockedReferrer' } } } } }
'400': { description: Parse error, content: { application/json: { schema: { $ref: '#/components/schemas/ErrorResponse' } } } }
/v1/operator_ui/modules/blocked_referrers/{encoded}:
get:
summary: Get blocked referrer
parameters:
- name: encoded
in: path
required: true
schema: { type: string }
responses:
'200': { description: Blocked referrer, content: { application/json: { schema: { $ref: '#/components/schemas/BlockedReferrer' } } } }
'400': { description: Parse error, content: { application/json: { schema: { $ref: '#/components/schemas/ErrorResponse' } } } }
/v1/health/alive:
get:
summary: Liveness check
responses:
'200': { description: Alive, content: { application/json: { schema: { $ref: '#/components/schemas/HealthStatus' } } } }
/v1/health/ready:
get:
summary: Readiness check
responses:
'200': { description: Ready, content: { application/json: { schema: { $ref: '#/components/schemas/HealthStatus' } } } }
'503': { description: Unready, content: { application/json: { schema: { $ref: '#/components/schemas/HealthStatus' } } } }
components:
parameters:
Tail:
name: tail
in: path
required: true
schema: { type: string }
TailV2:
name: tail
in: path
required: true
schema: { type: string }
Search:
name: search
in: query
required: false
schema: { type: string }
Sort:
name: sort
in: query
required: false
schema: { type: string, enum: [asc, desc] }
Limit:
name: limit
in: query
required: false
schema: { type: integer, minimum: 1 }
Ttl:
name: ttl
in: query
required: false
schema: { type: string, description: Humantime duration }
CorrelationId:
name: correlation_id
in: query
required: false
schema: { type: string }
schemas:
LoginRequest:
type: object
required: [email, password]
properties:
email: { type: string, format: email }
password: { type: string, format: password }
LoginResponse:
type: object
properties:
session_id: { type: string }
session_token: { type: string }
verified_at: { type: string, format: date-time }
expires_at: { type: string, format: date-time }
LogoutRequest:
type: object
required: [session_id]
properties:
session_id: { type: string }
session_token: { type: string }
LogoutResponse:
type: object
properties:
status: { $ref: '#/components/schemas/StatusValue' }
TokenRequest:
type: object
required: [session_id, session_token, grant_type]
properties:
session_id: { type: string }
session_token: { type: string }
scope: { type: string }
grant_type: { type: string, enum: [session] }
TokenResponse:
type: object
required: [access_token, scope, expires_in, token_type]
properties:
access_token: { type: string }
scope: { type: string }
expires_in: { type: integer, format: int64 }
token_type: { type: string, enum: [bearer] }
ErrorResponse:
type: object
properties:
message: { type: string }
AnyJson:
description: Arbitrary JSON value
MetricsIngress:
type: object
additionalProperties:
type: object
additionalProperties: { type: number }
GeoIpResponse:
type: object
properties:
city:
type: object
properties:
name: { type: string }
asn: { type: integer }
is_anonymous: { type: boolean }
BlockedToken:
type: object
properties:
household_token: { type: string }
expire_time: { type: integer, format: int64 }
BlockedUserAgent:
type: object
properties:
user_agent: { type: string }
BlockedReferrer:
type: object
properties:
referrer: { type: string }
DiscoveryHost:
type: object
properties:
name: { type: string }
DiscoveryNamespace:
type: object
properties:
namespace: { type: string }
confd_uri: { type: string }
HealthStatus:
type: object
properties:
status: { $ref: '#/components/schemas/StatusValue' }
StatusValue:
type: string
enum: [Ok, Fail]
Using the OpenAPI Specification
Generating API Clients
The OpenAPI specification can be used to generate client libraries in multiple languages:
Using openapi-generator:
# Generate Python client
openapi-generator generate -i openapi.yaml -g python -o ./python-client
# Generate TypeScript client
openapi-generator generate -i openapi.yaml -g typescript-axios -o ./typescript-client
# Generate Go client
openapi-generator generate -i openapi.yaml -g go -o ./go-client
Using swagger-codegen:
swagger-codegen generate -i openapi.yaml -l python -o ./python-client
Validating the Specification
To validate the OpenAPI specification:
# Using swagger-cli
swagger-cli validate openapi.yaml
# Using spectral
spectral lint openapi.yaml
Next Steps
- Authentication API - Detailed authentication flow
- API Guide Index - Browse all API documentation
- Operations Guide - Day-to-day operational procedures
11.11 - Troubleshooting Guide
Overview
This guide provides troubleshooting procedures for common issues encountered when operating the AgileTV CDN Manager (ESB3027). Use the diagnostic commands and resolution steps to identify and resolve problems.
Diagnostic Tools
Cluster Status
# Check node status
kubectl get nodes
# Check all pods
kubectl get pods -A
# Check events sorted by time
kubectl get events --sort-by='.lastTimestamp'
# Check resource usage
kubectl top nodes
kubectl top pods
Component Status
# Check deployments
kubectl get deployments
# Check statefulsets
kubectl get statefulsets
# Check persistent volumes
kubectl get pvc
kubectl get pv
# Check services
kubectl get services
# Check ingress
kubectl get ingress
Common Issues
Pods Stuck in Pending State
Symptoms: Pods remain in Pending state indefinitely.
Causes:
- Insufficient cluster resources (CPU/memory)
- No nodes match scheduling constraints
- PersistentVolume not available
Diagnosis:
# Describe the pending pod
kubectl describe pod <pod-name>
# Check events for scheduling failures
kubectl get events --field-selector reason=FailedScheduling
# Check node capacity
kubectl describe nodes | grep -A 5 "Allocated resources"
# Check available PVs
kubectl get pv
Resolution:
# Free up resources by scaling down non-critical workloads
kubectl scale deployment <deployment> --replicas=0
# Or add additional nodes to the cluster
# If PV is stuck, delete and recreate
kubectl delete pvc <pvc-name>
kubectl delete pod <pod-name>
Pods Stuck in ContainerCreating
Symptoms: Pods remain in ContainerCreating state.
Causes:
- Image pull failures
- Volume mount issues
- Network configuration problems
Diagnosis:
kubectl describe pod <pod-name>
# Check for image pull errors
kubectl get events | grep -i "failed to pull"
# Check volume mount status
kubectl get events | grep -i "mount"
Resolution:
# For image pull issues, verify image exists and credentials
kubectl get secret <pull-secret-name> -o yaml
# For volume issues, check Longhorn volume status
kubectl get volumes -n longhorn-system
# Delete stuck pod to trigger recreation
kubectl delete pod <pod-name> --force --grace-period=0
Persistent Volume Mount Failures
Symptoms: Pod fails to start with error “AttachVolume.Attach failed for volume… is not ready for workloads” or similar volume attachment errors.
Causes:
- Longhorn volume created but unable to be successfully mounted
- Network connectivity issues between nodes (Longhorn requires iSCSI and NFS traffic)
- Longhorn service unhealthy
- Incorrect storage class configuration
Diagnosis:
# Describe the failing pod to see the error
kubectl describe pod <pod-name>
# Check Longhorn volumes status
kubectl get volumes -n longhorn-system
# Check Longhorn UI for detailed volume status
kubectl port-forward -n longhorn-system svc/longhorn-frontend 8080:80
# Access: http://localhost:8080
Resolution:
# Verify firewall allows Longhorn traffic between nodes
# Ports 9500 and 8500 must be open (see Networking Guide)
# Check Longhorn is healthy
kubectl get pods -n longhorn-system
# If volume is stuck, delete PVC and pod to trigger recreation
kubectl delete pvc <pvc-name>
kubectl delete pod <pod-name>
Pods in CrashLoopBackOff
Symptoms: Pods repeatedly crash and restart.
Causes:
- Application configuration errors
- Missing dependencies (database not ready)
- Resource limits too low
- Liveness probe failures
Diagnosis:
# View current logs
kubectl logs <pod-name>
# View previous instance logs
kubectl logs <pod-name> -p
# Describe pod for restart reasons
kubectl describe pod <pod-name>
# Check if dependencies are healthy
kubectl get pods | grep -E "(postgres|kafka|redis)"
Resolution:
# For dependency issues, wait for dependencies to be ready
kubectl wait --for=condition=Ready pod/<dependency-pod> --timeout=300s
# For resource issues, increase limits
kubectl edit deployment <deployment-name>
# For configuration issues, check ConfigMaps and Secrets
kubectl get configmap <configmap-name> -o yaml
kubectl get secret <secret-name> -o yaml
# Restart the deployment
kubectl rollout restart deployment/<deployment-name>
Pods in Terminating State
Symptoms: Pods stuck in Terminating state indefinitely.
Causes:
- Volume detachment issues
- Node communication problems
- Finalizer blocking deletion
Diagnosis:
kubectl describe pod <pod-name>
# Check if node is reachable
kubectl get nodes
# Check finalizers
kubectl get pod <pod-name> -o jsonpath='{.metadata.finalizers}'
Resolution:
# Force delete the pod
kubectl delete pod <pod-name> --force --grace-period=0
# If node is unreachable, drain and remove from cluster
kubectl drain <node-name> --ignore-daemonsets --force
kubectl delete node <node-name>
Service Unreachable
Symptoms: Service endpoints not accessible.
Causes:
- No ready pods backing the service
- Network policy blocking traffic
- Service port mismatch
Diagnosis:
# Check service endpoints
kubectl get endpoints <service-name>
# Check if pods are ready
kubectl get pods -l app=<label>
# Check network policies
kubectl get networkpolicies
# Test connectivity from within cluster
kubectl run test --rm -it --image=busybox -- wget -O- <service-name>:<port>
Resolution:
# Ensure pods are ready and matching service selector
kubectl get pods --show-labels
# Check service selector matches pod labels
kubectl get service <service-name> -o jsonpath='{.spec.selector}'
# Temporarily disable network policy for testing
kubectl edit networkpolicy <policy-name>
Ingress Not Working
Symptoms: External access via ingress fails.
Causes:
- Traefik ingress controller not running
- Ingress configuration errors
- TLS certificate issues
- DNS resolution problems
Diagnosis:
# Check Traefik pods
kubectl get pods -n kube-system -l app.kubernetes.io/name=traefik
# Check ingress resources
kubectl get ingress
# Describe ingress for errors
kubectl describe ingress <ingress-name>
# Check Traefik logs
kubectl logs -n kube-system -l app.kubernetes.io/name=traefik
# Test DNS resolution
nslookup <hostname>
Resolution:
# Restart Traefik
kubectl rollout restart deployment -n kube-system traefik
# Fix ingress configuration
kubectl edit ingress <ingress-name>
# Renew or recreate TLS secret
kubectl create secret tls <secret-name> --cert=tls.crt --key=tls.key \
--dry-run=client -o yaml | kubectl apply -f -
# Verify hostname matches certificate
openssl x509 -in tls.crt -noout -subject -issuer
Database Connection Failures
Symptoms: Application cannot connect to PostgreSQL.
Causes:
- PostgreSQL cluster not ready
- Connection pool exhausted
- Network connectivity issues
- Authentication failures
Diagnosis:
# Check PostgreSQL cluster status
kubectl get clusters
# Check PostgreSQL pods
kubectl get pods -l app.kubernetes.io/name=postgresql
# Check PostgreSQL logs
kubectl logs -l app.kubernetes.io/name=postgresql
# Test connectivity
kubectl exec -it <app-pod> -- psql -h <postgres-service> -U <user> -d <database>
Resolution:
# Wait for PostgreSQL to be ready
kubectl wait --for=condition=Ready pod -l app.kubernetes.io/name=postgresql --timeout=300s
# Check connection string in application config
kubectl get secret <secret-name> -o jsonpath='{.data}' | base64 -d
# Restart application pods
kubectl rollout restart deployment/<deployment-name>
Kafka Connection Issues
Symptoms: Application cannot connect to Kafka.
Causes:
- Kafka controllers not ready
- Topic not created
- Network connectivity issues
Diagnosis:
# Check Kafka pods
kubectl get pods -l app.kubernetes.io/name=kafka
# Check Kafka logs
kubectl logs -l app.kubernetes.io/name=kafka
# List topics
kubectl exec -it <kafka-pod> -- kafka-topics.sh --bootstrap-server localhost:9092 --list
Resolution:
# Wait for Kafka controllers to be ready
kubectl wait --for=condition=Ready pod -l app.kubernetes.io/name=kafka --timeout=300s
# Create missing topic
kubectl exec -it <kafka-pod> -- kafka-topics.sh --bootstrap-server localhost:9092 \
--create --topic <topic-name> --partitions 3 --replication-factor 3
# Restart application to reconnect
kubectl rollout restart deployment/<deployment-name>
Redis Connection Issues
Symptoms: Application cannot connect to Redis.
Diagnosis:
# Check Redis pods
kubectl get pods -l app.kubernetes.io/name=redis
# Check Redis logs
kubectl logs -l app.kubernetes.io/name=redis
# Test connectivity
kubectl exec -it <redis-pod> -- redis-cli ping
Resolution:
# Wait for Redis to be ready
kubectl wait --for=condition=Ready pod -l app.kubernetes.io/name=redis --timeout=300s
# Restart application
kubectl rollout restart deployment/<deployment-name>
High Memory Usage
Symptoms: Pods approaching or hitting memory limits.
Diagnosis:
# Check memory usage
kubectl top pods
# Check OOMKilled pods
kubectl get pods --field-selector=status.phase=Failed
# Check for memory leaks in logs
kubectl logs <pod-name> | grep -i "memory\|oom"
Resolution:
# Temporarily increase memory limit
kubectl edit deployment <deployment-name>
# Or scale horizontally if HPA is enabled
kubectl scale deployment <deployment-name> --replicas=<n>
# Long-term: Update values.yaml and perform helm upgrade
High CPU Usage
Symptoms: Pods consistently using high CPU.
Diagnosis:
# Check CPU usage
kubectl top pods
# Check for runaway processes
kubectl top pods --sort-by=cpu
Resolution:
# Scale horizontally if HPA is enabled
kubectl scale deployment <deployment-name> --replicas=<n>
# Or increase CPU limits
kubectl edit deployment <deployment-name>
Persistent Volume Issues
Symptoms: PVC not binding or volume errors.
Diagnosis:
# Check PVC status
kubectl get pvc
# Check PV status
kubectl get pv
# Check Longhorn volumes
kubectl get volumes -n longhorn-system
# Check Longhorn UI for details
kubectl port-forward -n longhorn-system svc/longhorn-frontend 8080:80
Resolution:
# For stuck PVC, delete and recreate
kubectl delete pvc <pvc-name>
kubectl delete pod <pod-name>
# For Longhorn issues, check Longhorn UI
# Access via http://localhost:8080
# Recreate Longhorn volume if necessary
Zitadel Authentication Failures
Symptoms: Users cannot authenticate via Zitadel.
Causes:
- CORS configuration mismatch
- External domain misconfigured
- Zitadel pods not healthy
Diagnosis:
# Check Zitadel pods
kubectl get pods -l app.kubernetes.io/name=zitadel
# Check Zitadel logs
kubectl logs -l app.kubernetes.io/name=zitadel
# Verify external domain configuration
helm get values acd-manager -o yaml | grep -A 5 zitadel
Resolution:
# Ensure global.hosts.manager[0].host matches zitadel.zitadel.ExternalDomain
# Update values.yaml if needed
helm upgrade acd-manager /mnt/esb3027/charts/acd-manager \
--values ~/values.yaml
# Restart Zitadel
kubectl rollout restart deployment -l app.kubernetes.io/name=zitadel
Certificate Errors
Symptoms: TLS/SSL errors in browser or API calls.
Diagnosis:
# Check certificate expiration
kubectl get secret <tls-secret> -o jsonpath='{.data.tls\.crt}' | base64 -d | \
openssl x509 -noout -dates
# Check certificate subject
kubectl get secret <tls-secret> -o jsonpath='{.data.tls\.crt}' | base64 -d | \
openssl x509 -noout -subject -issuer
Resolution:
# Renew self-signed certificate
helm upgrade acd-manager /mnt/esb3027/charts/acd-manager \
--values ~/values.yaml \
--set ingress.selfSigned=true
# Or update manual certificate
kubectl create secret tls <secret-name> \
--cert=new-cert.crt --key=new-key.key \
--dry-run=client -o yaml | kubectl apply -f -
# Restart pods to pick up new certificate
kubectl rollout restart deployment <deployment-name>
Log Collection
Collecting Logs for Support
# Capture timestamp once to ensure consistency
TS=$(date +%Y%m%d-%H%M%S)
# Create log collection directory
mkdir -p ~/cdn-logs-$TS
cd ~/cdn-logs-$TS
# Collect pod logs
for pod in $(kubectl get pods -o name); do
kubectl logs $pod > ${pod#pod/}.log 2>&1
kubectl logs $pod -p > ${pod#pod/}.previous.log 2>&1 || true
done
# Collect cluster events
kubectl get events --sort-by='.lastTimestamp' > events.log
# Collect pod descriptions
for pod in $(kubectl get pods -o name); do
kubectl describe $pod > ${pod#pod/}.describe.txt
done
# Compress for transfer
tar czf cdn-logs-$TS.tar.gz *.log *.txt
Emergency Procedures
Complete Cluster Recovery
If the cluster is completely down:
Assess node status:
kubectl get nodesRestart K3s on nodes:
# On each node systemctl restart k3sIf primary server failed:
- Promote another server node
- Update load balancer/DNS to point to new primary
Restore from backup if necessary:
- See Upgrade Guide for restore procedures
Data Recovery
For data recovery scenarios:
- PostgreSQL: Use Cloudnative PG backup/restore
- Longhorn: Restore from volume snapshots
- Kafka: Replication handles most failures
Getting Help
If issues persist:
- Collect logs using the procedure above
- Check release notes for known issues
- Contact support with log bundle and issue description
Next Steps
After resolving issues:
- Operations Guide - Preventive maintenance procedures
- Configuration Guide - Verify configuration is correct
- Architecture Guide - Understand component dependencies
11.12 - Glossary
Overview
This glossary defines key terms and acronyms used throughout the AgileTV CDN Manager (ESB3027) documentation.
A
ACD (Agile Content Delivery)
The overall CDN solution comprising the Manager (ESB3027) and Director (ESB3024) components.
Agent Node
A Kubernetes node that runs workloads but does not participate in the control plane. Agent nodes provide additional capacity for running application pods.
API Gateway
See NGinx Gateway.
ASN (Autonomous System Number)
A unique identifier for a network on the internet. Used in GeoIP-based routing decisions.
C
CDN Director
The Edge Server Business (ESB3024) component that handles actual content routing and delivery. Multiple Directors can be managed by a single CDN Manager.
Cloudnative PG (CNPG)
A Kubernetes operator that manages PostgreSQL clusters. Provides high availability, automatic failover, and backup capabilities for the Manager’s database layer.
Confd
Configuration daemon that synchronizes configuration from the Manager to CDN Directors. Runs as a sidecar or separate deployment.
CORS (Cross-Origin Resource Sharing)
A security mechanism that allows web applications to make requests to a different domain. Zitadel enforces CORS policies requiring the external domain to match the configured hostname.
CrashLoopBackOff
A Kubernetes pod state indicating the container is repeatedly crashing and being restarted. Typically indicates a configuration or dependency issue.
D
Datastore
The internal key-value storage system used by the Manager for short-lived or simple structured data. Backed by Redis.
Descheduler
A Kubernetes component that periodically analyzes pod distribution and evicts pods from overutilized nodes to optimize cluster balance.
Director
See CDN Director.
E
EDB (EnterpriseDB)
A company that provides PostgreSQL-related software and services. The Cloudnative PG operator was originally developed by EDB.
Ephemeral Storage
Temporary storage available to pods. Used for temporary files and caches. Not persistent across pod restarts.
ESB (Edge Server Business)
The product family designation for CDN components. ESB3027 is the Manager, ESB3024 is the Director.
etcd
A distributed key-value store used by Kubernetes for cluster state management. Runs on Server nodes as part of the control plane.
F
FailedScheduling
A Kubernetes event indicating a pod could not be scheduled due to insufficient resources or scheduling constraints.
Flannel
A network overlay solution for Kubernetes. Provides VXLAN-based networking for pod-to-pod communication.
Frontend GUI
See MIB Frontend.
G
GeoIP
Geographic IP lookup service using MaxMind databases. Used for location-based routing decisions.
Grafana
A visualization and dashboard platform for time-series data. Used to display metrics collected by Telegraf and stored in VictoriaMetrics.
H
Helm Chart
A package of pre-configured Kubernetes resources. The CDN Manager is deployed via a Helm chart that handles all component installation.
HPA (Horizontal Pod Autoscaler)
A Kubernetes feature that automatically scales the number of pods based on CPU/memory utilization or custom metrics.
HTTP Server
The main API server component of the Manager, built with Actix Web (Rust framework).
I
Ingress
A Kubernetes resource that exposes HTTP/HTTPS routes from outside the cluster to services within. The CDN Manager uses Traefik as the ingress controller.
Ingress Controller
A component that implements ingress rules. The CDN Manager uses Traefik for primary ingress and NGinx for external Director communication.
K
Kafka
A distributed event streaming platform used by the Manager for asynchronous communication and event processing.
K3s
A lightweight Kubernetes distribution optimized for edge and production deployments. Used as the underlying cluster technology.
Kubernetes (K8s)
An open-source container orchestration platform. The CDN Manager runs on a K3s-based Kubernetes cluster.
L
Longhorn
A distributed block storage system for Kubernetes. Provides persistent volumes for stateful components like PostgreSQL and Kafka.
Liveness Probe
A Kubernetes health check that determines if a container is running properly. Failed liveness probes trigger container restart.
M
Manager
The central management component (ESB3027) for configuring and monitoring CDN Directors.
MaxMind
A provider of IP intelligence databases including GeoIP City, GeoLite2 ASN, and Anonymous IP databases used by the Manager.
MIB Frontend
The web-based configuration GUI for CDN operators. Provides a user interface for managing streams, routers, and other configuration.
Multi-Factor Authentication (MFA)
An authentication method requiring multiple forms of verification. Note: MFA is not currently supported in the CDN Manager and should be skipped during setup.
N
Name-based Virtual Hosting
A technique where multiple hostnames are served from the same IP address. Zitadel uses this for CORS validation.
Namespace
A Kubernetes abstraction for organizing cluster resources. The CDN Manager uses namespaces to group related components.
NGinx Gateway
An NGinx-based gateway that handles external communication with CDN Directors.
Node Token
A secret token used to authenticate new nodes joining a K3s cluster. Located at /var/lib/rancher/k3s/server/node-token on Server nodes.
O
Operator
A method of packaging, deploying, and managing a Kubernetes application. Cloudnative PG is an operator for PostgreSQL.
OOMKilled
A Kubernetes pod state indicating the container was terminated due to exceeding memory limits.
P
PDB (Pod Disruption Budget)
A Kubernetes feature that ensures a minimum number of pods remain available during voluntary disruptions like maintenance.
PersistentVolume (PV)
A piece of storage in the Kubernetes cluster. Created dynamically by Longhorn for stateful components.
PersistentVolumeClaim (PVC)
A request for storage by a pod. Bound to a PersistentVolume.
Pod
The smallest deployable unit in Kubernetes. Contains one or more containers.
PostgreSQL
An open-source relational database. Used by the Manager for persistent data storage, managed by Cloudnative PG.
Probe
A Kubernetes health check mechanism. Types include liveness, readiness, and startup probes.
Prometheus
An open-source monitoring and alerting toolkit. Telegraf exports metrics in Prometheus format.
R
RBAC (Role-Based Access Control)
A method of regulating access to resources based on user roles. Used by Kubernetes for authorization.
Readiness Probe
A Kubernetes health check that determines if a container is ready to receive traffic. Failed readiness probes remove the pod from service load balancing.
Redis
An in-memory data structure store used for caching and as the datastore backend for the Manager.
Replica
A copy of a pod. Multiple replicas provide high availability and load distribution.
Resource Preset
Predefined resource configurations (nano, micro, small, medium, large, xlarge, 2xlarge) for common deployment sizes.
Rolling Update
A deployment strategy that updates pods one at a time to maintain availability during upgrades.
S
Selection Input
A key-value storage mechanism used for configuration data that can be queried with wildcard patterns. Available in v1 and v2 APIs with different semantics.
Server Node
A Kubernetes node that participates in the control plane (etcd, API server). Can also run workloads unless tainted.
Service
A Kubernetes abstraction that defines a logical set of pods and a policy for accessing them. Provides stable networking endpoints.
ServiceAccount
A Kubernetes identity for processes running in pods. Used for authentication between Kubernetes components.
StatefulSet
A Kubernetes workload API object for managing stateful applications. Used for PostgreSQL and Kafka deployments.
Startup Probe
A Kubernetes health check that determines if a container application has started. Disables liveness and readiness checks until it succeeds.
Stream
A content stream configuration defining source and routing parameters.
T
Telegraf
An agent for collecting, processing, aggregating, and writing metrics. Runs on each node to gather system and application metrics.
TLS (Transport Layer Security)
A cryptographic protocol for secure communication. The CDN Manager uses TLS for all external HTTPS connections.
Topology Aware Hints
A Kubernetes feature that prefers routing traffic to pods in the same zone as the source. Reduces latency by keeping traffic local.
Traefik
A modern HTTP reverse proxy and ingress controller. Used as the primary ingress controller for the CDN Manager.
TTL (Time To Live)
The duration after which data expires. Used in the datastore and selection input APIs.
V
Values.yaml
The Helm chart configuration file. Contains all configurable parameters for the CDN Manager deployment.
VictoriaMetrics
A time-series database used for storing metrics data. Provides long-term storage and querying capabilities.
VXLAN
Virtual Extensible LAN. A network virtualization technology used by Flannel for pod networking.
Z
Zitadel
An identity and access management (IAM) platform used for authentication and authorization in the CDN Manager. Provides OAuth2/OIDC capabilities.
Default Credentials
The following table lists all default credentials used by the CDN Manager. Change these defaults before deploying to production.
| Service | Username | Password | Notes |
|---|---|---|---|
| Zitadel Console | admin@agiletv.dev | Password1! | Primary identity management; accessed at /ui/console |
Security Warning: Use the default
admin@agiletv.devaccount only to create a new administrator account with proper roles. After verifying the new account works, disable or delete the default admin account before exposing the system to users. For details on required roles and administrator permissions, see Zitadel’s Administrator Documentation. See the Next Steps Guide for initial configuration procedures.
Common Abbreviations
| Abbreviation | Meaning |
|---|---|
| API | Application Programming Interface |
| ASN | Autonomous System Number |
| CORS | Cross-Origin Resource Sharing |
| CPU | Central Processing Unit |
| DNS | Domain Name System |
| EDB | EnterpriseDB |
| ESB | Edge Server Business |
| GUI | Graphical User Interface |
| HA | High Availability |
| Helm | Helm Package Manager |
| HPA | Horizontal Pod Autoscaler |
| HTTP | Hypertext Transfer Protocol |
| HTTPS | HTTP Secure |
| IAM | Identity and Access Management |
| IP | Internet Protocol |
| JSON | JavaScript Object Notation |
| K8s | Kubernetes |
| MFA | Multi-Factor Authentication |
| MIB | Management Information Base |
| NIC | Network Interface Card |
| OAuth | Open Authorization |
| OIDC | OpenID Connect |
| PVC | PersistentVolumeClaim |
| PV | PersistentVolume |
| RBAC | Role-Based Access Control |
| SSL | Secure Sockets Layer |
| TCP | Transmission Control Protocol |
| TLS | Transport Layer Security |
| TTL | Time To Live |
| UDP | User Datagram Protocol |
| UI | User Interface |
| VPA | Vertical Pod Autoscaler |
| VXLAN | Virtual Extensible LAN |
Next Steps
After reviewing terminology:
- Architecture Guide - Understand component relationships
- Configuration Guide - Full configuration reference
- Operations Guide - Day-to-day operational procedures
12 - AgileTV CDN Manager (esb3027)
12.1 - Getting Started
Overview
The AgileTV CDN Manager (product code ESB3027) is a cloud-native control plane for managing CDN deployments. It provides centralized orchestration for authentication, configuration, routing, and metrics collection across CDN infrastructure.
Before You Start:
- Deployment type: Lab (single-node) or Production (multi-node)? See Installation Guide
- Hardware: Nodes meeting specifications for your deployment type
- OS: RHEL 9 or compatible clone (Oracle Linux, AlmaLinux, Rocky Linux)
- Software: Installation ISO from AgileTV customer portal; Extras ISO for air-gapped
- Network: Firewall ports configured per Networking Guide
Deployment Models
| Deployment Model | Description | Typical Use Case |
|---|---|---|
| Self-Hosted | K3s Kubernetes cluster on customer premises | Production deployments |
| Lab/Single-Node | Minimal single-node installation | Acceptance testing, demonstrations, development |
Functionality remains consistent across deployment models.
Prerequisites
- Installation ISO: Obtain
esb3027-acd-manager-X.Y.Z.isofrom AgileTV customer portal - Extras ISO (air-gapped): Obtain
esb3027-acd-manager-extras-X.Y.Z.isofor offline installations - OS: RHEL 9 or compatible clone (Oracle Linux, AlmaLinux, Rocky Linux)
- Kubernetes familiarity: Basic understanding of pods, deployments, and Helm charts
For detailed hardware, network, and operating system requirements, see the System Requirements Guide.
Installation
Ready to install? The Installation Guide provides step-by-step procedures for both lab and production deployments:
- Lab/Single-Node: Quick deployment for testing and demonstrations
- Production/Multi-Node: High-availability cluster with 3+ nodes
See the Installation Guide to get started.
Accessing the System
Following successful deployment, the following interfaces are available:
| Service | URL Path | Authentication |
|---|---|---|
| MIB Frontend | /gui | Zitadel SSO |
| API Gateway | /api | Bearer token |
| Zitadel Console | /ui/console | See Glossary |
| Grafana | /grafana | See Glossary |
All services are accessed via https://<cluster-host><path>.
Note: A self-signed SSL certificate is deployed by default. When accessing services through a browser, you will need to accept the self-signed certificate warning. For production deployments, configure a valid SSL certificate before exposing the system to users.
Initial user configuration is performed through Zitadel. Refer to the Configuration Guide for authentication setup procedures. For detailed guidance on managing users, roles, and permissions in the Zitadel Console, see Zitadel’s User Management Documentation.
Documentation Navigation
The following guides provide detailed information for specific operational tasks:
| Guide | Description |
|---|---|
| System Requirements | Hardware, operating system, and network specifications |
| Architecture | Detailed system architecture and scaling guidance |
| Installation | Step-by-step installation and upgrade procedures |
| Configuration | System configuration and customization |
| Performance Tuning | Optimization tips for improved performance |
| API Guide | REST API reference and integration examples |
| Operations | Day-to-day operational procedures |
| Metrics & Monitoring | Monitoring dashboards and alerting configuration |
| Troubleshooting | Common issues and resolution procedures |
| Glossary | Definitions of technical terms |
| Release Notes | Version-specific changes and known issues |
12.2 - System Requirements Guide
Overview
This document specifies the hardware, operating system, and networking requirements for deploying the AgileTV CDN Manager (ESB3027). Requirements vary based on deployment type and node role within the cluster.
Cluster Sizing
Production Deployments
Production deployments require a minimum of three nodes to achieve high availability. The cluster architecture employs distinct node roles:
| Role | Description |
|---|---|
| Server Node (Control Plane Only) | Runs control plane components (etcd, Kubernetes API server) only; does not host application workloads; requires separate Agent nodes |
| Server Node (Combined) | Runs control plane components and hosts application workloads; default configuration |
| Agent Node | Executes application workloads only; does not participate in cluster quorum |
Server nodes can be deployed in either Control Plane Only or Combined role configurations. The choice depends on your deployment requirements:
- Control Plane Only: Dedicated control plane nodes with lower resource requirements; requires separate Agent nodes for workloads
- Combined: Server nodes run both control plane and workloads; minimum 3 nodes required for HA
Why Use Control Plane Only Nodes?
Dedicated Control Plane Only nodes provide several benefits for larger deployments:
- Resource Isolation: Control plane components (etcd, API server, scheduler) run on dedicated hardware without competing with application workloads for CPU and memory
- Stability: Application workload spikes or misbehaving pods cannot impact control plane performance
- Security: Smaller attack surface on control plane nodes; fewer containers and services running
- Predictable Performance: Control plane responsiveness remains consistent regardless of application load
- Flexible Sizing: Control Plane Only nodes can use lower-specification hardware (2 cores, 4 GiB) since they don’t run application workloads
For most small to medium deployments, Combined role servers are simpler and more cost-effective. Control Plane Only nodes are recommended for larger deployments with significant workload requirements or where control plane stability is critical.
High Availability Considerations
Production deployments require 3 nodes running control plane (etcd) and 3 nodes capable of running workloads. These can be the same nodes (Combined role) or separate nodes (CP-Only + Agent).
Node Role Combinations:
| Configuration | Control Plane Nodes | Workload Nodes | Total Nodes |
|---|---|---|---|
| All Combined | 3 Combined servers | 3 Combined servers | 3 |
| Separated | 3 CP-Only servers | 3 Agent nodes | 6 |
| Hybrid | 2 CP-Only + 1 Combined | 1 Combined + 2 Agent | 5 |
Any combination works as long as you have 3 control plane nodes and 3 workload-capable nodes.
Note: Regardless of the deployment configuration, a minimum of 3 nodes capable of running workloads is required for production deployments. This ensures both high availability and sufficient capacity for application pods.
For detailed fault tolerance information and data replication strategies, see the Architecture Guide.
Hardware Requirements
Single-Node Lab Deployment
Lab deployments are intended for acceptance testing, demonstrations, and development only. These configurations are not suitable for production workloads.
| Resource | Minimum | Recommended |
|---|---|---|
| CPU | 8 cores | 12 cores |
| Memory | 16 GiB | 24 GiB |
| Disk* | 128 GiB | 128 GiB |
Production Cluster - Server Node (Control Plane Only)
Server nodes dedicated to control plane functions have modest resource requirements:
| Resource | Minimum | Recommended |
|---|---|---|
| CPU | 2 cores | 4 cores |
| Memory | 4 GiB | 8 GiB |
| Disk* | 64 GiB | 128 GiB |
These nodes run only control plane components and require separate Agent nodes to run application workloads.
Production Cluster - Server Node (Control Plane + Workloads)
Combined role nodes require resources for both control plane and application workloads:
| Resource | Minimum | Recommended |
|---|---|---|
| CPU | 4 cores | 16 cores |
| Memory | 8 GiB | 32 GiB |
| Disk* | 100 GiB | 500 GiB |
Production Cluster - Agent Node
Agent nodes execute application workloads and require the following resources:
| Resource | Minimum | Recommended |
|---|---|---|
| CPU | 4 cores | 16 cores |
| Memory | 8 GiB | 32 GiB |
| Disk* | 100 GiB | 500 GiB |
Storage Notes
* Disk Space: All disk space values must be available in the
/var/lib/longhornpartition. It is recommended that/var/lib/longhornbe a separate partition on a fast SSD for optimal performance, though SSD is not strictly required.Longhorn Capacity: Longhorn storage requires an additional 30% capacity headroom for internal operations and scaling. If less than 30% of the total partition capacity is available, Longhorn may mark volumes as “full” and prevent further writes. Plan disk capacity accordingly.
Storage Performance
For optimal performance, the following storage characteristics are recommended:
- Disk Type: SSD or NVMe storage for Longhorn volumes
- Filesystem: XFS or ext4 with default mount options
- Partition Layout: Dedicated
/var/lib/longhornpartition for persistent storage
Virtual machines and bare-metal hardware are both supported. Nested virtualization (running multiple nodes under a single hypervisor) may impact performance and is not recommended for production deployments.
Operating System Requirements
Supported Operating Systems
The CDN Manager supports Red Hat Enterprise Linux and compatible distributions:
| Operating System | Status |
|---|---|
| Red Hat Enterprise Linux 9 | Supported |
| Red Hat Enterprise Linux 10 | Untested |
| Red Hat Enterprise Linux 8 | Not supported |
Compatible Clones
The following RHEL-compatible distributions are supported when major version requirements are satisfied:
- Oracle Linux 9
- AlmaLinux 9
- Rocky Linux 9
Air-Gapped Deployments
Important: For air-gapped deployments (no internet access), the OS installation ISO must be mounted on all nodes before running the installer or join commands. The installer needs to install one or more packages from the distribution’s repository.
Oracle Linux UEK Kernel
Note: For Oracle Linux 9.7 and later using the Unbreakable Enterprise Kernel (UEK), you must install the
kernel-uek-modules-extra-netfilter-$(uname -r)package before running the installer:# Mount OS ISO first (required for air-gapped) mount -o loop /path/to/oracle-linux-9.iso /mnt/iso # Install required kernel modules dnf install kernel-uek-modules-extra-netfilter-$(uname -r)This package provides netfilter kernel modules required by K3s and Longhorn.
SELinux
SELinux is supported when installed in “Enforcing” mode. The installation process will configure appropriate SELinux policies automatically.
Networking Requirements
Network Interface
Each cluster node must have at least one network interface card (NIC) configured as the default gateway. If the node lacks a pre-configured default route, one must be established prior to installation.
Port Requirements
The cluster requires the following network connectivity:
| Category | Ports | Purpose |
|---|---|---|
| Inter-Node | 2379-2380, 6443, 8472/UDP, 10250, 5001, 9500, 8500 | etcd, API server, Flannel VXLAN, Kubelet, Spegel, Longhorn |
| External Access | 80, 443 | HTTP redirect and HTTPS ingress |
| Application (optional) | 6379, 8125 TCP/UDP, 9093, 9095 | Redis, Telegraf, Alertmanager, Kafka external |
Important: Complete port requirements, network ranges, and firewall configuration procedures are provided in the Networking Guide. Do not expose VictoriaMetrics (8428, 8429), Grafana (3000), or PostgreSQL (5432) directly—access these services only through the secure HTTPS ingress (port 443).
Resource Planning
Calculating Cluster Capacity
When planning cluster capacity, consider the following factors:
- Base Overhead: Kubernetes system components consume approximately 1-2 cores and 2-4 GiB memory per node
- Application Workloads: Refer to individual component resource requirements in the Architecture Guide
- Headroom: Maintain 20-30% resource headroom for workload spikes and automatic scaling
Scaling Considerations
The CDN Manager supports horizontal scaling for most components. The Horizontal Pod Autoscaler (HPA) can automatically adjust replica counts based on resource utilization. Detailed scaling guidance is available in the Architecture Guide.
Example Production Deployment
A minimal production deployment with 3 server nodes (combined role) and 2 agent nodes would require:
| Node Type | Count | CPU Total | Memory Total | Disk Total |
|---|---|---|---|---|
| Server (Combined) | 3 | 12 cores | 24 GiB | 300 GiB |
| Agent | 2 | 8 cores | 16 GiB | 200 GiB |
| Total | 5 | 20 cores | 40 GiB | 500 GiB |
This configuration provides:
- High availability (survives loss of 1 server node)
- Capacity for application workloads across all nodes
- Headroom for horizontal scaling
Next Steps
After verifying system requirements:
- Review the Installation Guide for deployment procedures
- Consult the Networking Guide for firewall configuration
- Examine the Architecture Guide for component resource requirements
12.3 - Networking Guide
Network Architecture
Physical Network
Each cluster node must have at least one network interface card (NIC) configured as the default gateway. If the node lacks a pre-configured default route, it must be established prior to installation.
K3s requires a default route to auto-detect the node’s primary IP and for kube-proxy ClusterIP routing to function properly. If no default route exists, create a dummy interface as a workaround:
ip link add dummy0 type dummy
ip link set dummy0 up
ip addr add 203.0.113.254/31 dev dummy0
ip route add default via 203.0.113.255 dev dummy0 metric 1000
Overlay Network
Kubernetes creates virtual network interfaces for pods that are typically not associated with any specific firewalld zone. The cluster uses the following network ranges:
| Network | CIDR | Purpose |
|---|---|---|
| Pod | 10.42.0.0/16 | Inter-pod communication |
| Service | 10.43.0.0/16 | Kubernetes service discovery |
Firewall regulations should target the primary physical interface. The overlay network traffic is handled by Flannel VXLAN.
Port Requirements
Inter-Node Communication
The following ports must be permitted between all cluster nodes for Kubernetes and cluster infrastructure:
| Port | Protocol | Source | Destination | Purpose |
|---|---|---|---|---|
| 2379-2380 | TCP | Server nodes | Server nodes | etcd cluster communication |
| 6443 | TCP | All nodes | Server nodes | Kubernetes API server |
| 8472 | UDP | All nodes | All nodes | Flannel VXLAN overlay network |
| 10250 | TCP | All nodes | All nodes | Kubelet metrics and management |
| 5001 | TCP | All nodes | Server nodes | Spegel registry mirror |
| 9500-9503 | TCP | All nodes | All nodes | Longhorn management API |
| 8500-8504 | TCP | All nodes | All nodes | Longhorn agent communication |
| 10000-30000 | TCP | All nodes | All nodes | Longhorn data replication |
| 3260 | TCP | All nodes | All nodes | Longhorn iSCSI |
| 2049 | TCP | All nodes | All nodes | Longhorn RWX (NFS) |
Application Services Ports
The following ports must be accessible for application services within the cluster:
| Port | Protocol | Service |
|---|---|---|
| 6379 | TCP | Redis |
| 9093 | TCP | Alertmanager |
| 9095 | TCP | Kafka |
| 8086 | TCP | Vector (InfluxDB line protocol listener) |
External Access Ports
The following ports must be accessible from external clients to cluster nodes:
| Port | Protocol | Service |
|---|---|---|
| 80 | TCP | HTTP ingress (Optional, redirects to HTTPS) |
| 443 | TCP | HTTPS ingress (Required, all services) |
| 9095 | TCP | Kafka (external client connections) |
| 6379 | TCP | Redis (external client connections) |
| 8086 | TCP | Vector (InfluxDB line protocol, external metrics senders) |
Network Configuration Guides
Deployment Type
Choose the guide that matches your deployment architecture:
| Guide | Description | Who Should Use This |
|---|---|---|
| Configuring Segregated Networks | Multi-NIC deployments with air-gapped cluster backplane | Most users - If you have separate interfaces for cluster traffic and external internet access |
| Shared Interface Setup | Single-NIC deployments where all traffic shares one interface | Users with a single network interface for both cluster traffic and external access |
Not sure which to use? If you have explicitly separate interfaces for cluster communication and external access, start with Configuring Segregated Networks. Only use the shared interface guide if your hardware is limited to a single NIC.
12.3.1 - Shared Interface Network Setup
Overview
This guide covers network configuration for standard single-NIC deployments. In this architecture, all traffic—including internal cluster communication (East-West) and external internet access (North-South)—is routed through a single network interface.
Security Warning: Because all traffic shares the same interface and firewall zone, there is no physical or logical isolation between cluster management traffic and public-facing service traffic. For production environments requiring security isolation, see Configuring Segregated Networks.
Note: The installer script automatically detects if firewalld is enabled. If so, it will verify that the required inter-node ports are open through the firewall in the default zone before proceeding. If any required ports are missing, the installer will report an error and exit. Application service ports (such as Kafka, VictoriaMetrics, and Vector) are not checked by the installer as they are configurable.
For network architecture, port requirements, and general information, see the Network Architecture Overview section in the main Networking Guide.
firewall Configuration
Assign Interface to Default Zone
Assign your primary network interface to the default zone:
firewall-cmd --permanent --zone=public --change-interface=<interface>
firewall-cmd --reload
Replace <interface> with your actual interface name (e.g., eth0).
Configure Firewall Rules
In a shared interface setup, you must manually configure firewall rules for both internal cluster traffic and external access, as K3s does not automatically manage the public zone.
# 1. Allow pod and service networks (Internal CIDRs)
firewall-cmd --permanent --zone=public --add-source=10.42.0.0/16
firewall-cmd --permanent --zone=public --add-source=10.43.0.0/16
# 2. Kubernetes and Cluster Infrastructure (East-West Traffic)
# These ports must be opened manually for the cluster to function on a single interface.
firewall-cmd --permanent --zone=public --add-port=2379-2380/tcp
firewall-cmd --permanent --zone=public --add-port=6443/tcp
firewall-cmd --permanent --zone=public --add-port=8472/udp
firewall-cmd --permanent --zone=public --add-port=10250/tcp
firewall-cmd --permanent --zone=public --add-port=5001/tcp
firewall-cmd --permanent --zone=public --add-port=9500-9503/tcp
firewall-cmd --permanent --zone=public --add-port=8500-8504/tcp
firewall-cmd --permanent --zone=public --add-port=10000-30000/tcp
firewall-cmd --permanent --zone=public --add-port=3260/tcp
firewall-cmd --permanent --zone=public --add-port=2049/tcp
# 3. External Access Ports (North-South Traffic)
firewall-cmd --permanent --zone=public --add-port=80/tcp
firewall-cmd --permanent --zone=public --add-port=443/tcp
firewall-cmd --permanent --zone=public --add-port=9095/tcp
firewall-cmd --permanent --zone=public --add-port=6379/tcp
firewall-cmd --permanent --zone=public --add-port=8086/tcp
# Apply changes
firewall-cmd --reload
Verification
Verify all port rules are applied:
firewall-cmd --zone=public --list-all
Expected output:
public (active)
target: default
icmp-block-inversion: no
interfaces: eth0
sources: 10.42.0.0/16 10.43.0.0/16
services: dhcpv6-client ssh
ports: 80/tcp 443/tcp 9095/tcp 6379/tcp 8086/tcp
protocols: 2379-2380/tcp 6443/tcp 8472/udp 10250/tcp 5001/tcp 9500-9503/tcp 8500-8504/tcp 10000-30000/tcp 3260/tcp 2049/tcp
masquerade: no
forward-ports:
source-ports:
icmp-blocks:
rich-rules:
Note: Additional interfaces may appear in the zone (e.g.,
eth0 eth1) if firewalld auto-assigned them based on network configuration. This is expected and does not affect functionality.
Verify the interface is correctly assigned to the public zone:
firewall-cmd --get-active-zones
Expected output will show eth0 listed under the public zone:
public (active)
interfaces: eth0
Troubleshooting
Expected output will show eth0 listed under the public zone:
public (active)
interfaces: eth0
Troubleshooting
Nodes Cannot Communicate
Verify firewall rules allow inter-node traffic in the public zone:
firewall-cmd --list-all
Test basic connectivity between nodes:
ping <node-ip>
Post-Installation Troubleshooting
Once the cluster is installed, if you encounter issues with pod-to-pod communication or service access, verify the following:
- Flannel Interface: Ensure the
flannel.1interface is up and has the correct IP addresses. - Network Routes: Verify that the pod and service CIDR routes are present in the routing table.
- Firewall Rules: Ensure all required Kubernetes and cluster ports are allowed in the
publiczone.
For detailed troubleshooting of Kubernetes-specific components (like Ingress or Pod connectivity), please refer to the Kubernetes Troubleshooting Guide.
12.3.2 - Configuring Segregated Networks
Overview
This guide covers configuring a cluster with separate interfaces for internal cluster communication and external internet access (also known as segregated or dual-homed deployments). In this setup, eth1 handles the internal cluster traffic (pod-to-pod, control plane) while eth0 provides public internet access.
Security Benefit: This configuration provides physical isolation between East-West (cluster) and North-South (external) traffic. The trusted zone allows unrestricted internal communication, while the public zone handles external access with controlled port exposure.
When configuring segregated networks with K3s, proper interface binding is essential. K3s uses the --flannel-iface flag to ensure pod traffic stays on the private network, and the --node-external-ip flag to advertise the public address for external access. Server nodes additionally require --advertise-address=<ETH1_IP> to ensure the API server advertises its internal/private address; without this flag, k3s promotes the external IP to the advertise address when --node-external-ip is set, causing the kubernetes service ClusterIP endpoint to register as an address that is unreachable from within the cluster.
Important: K3s manages pod masquerading and service routing automatically. You only need to configure firewalld zones correctly and pass the proper flags to the K3s installer.
Complete, step-by-step instructions follow.
Prerequisites
Before starting, ensure:
- Operating system is installed and updated on all nodes
- Network connectivity between nodes is available
- SSH access is configured for all cluster nodes
Configure Firewalld Zones
This guide configures separate zones for internal cluster traffic and external access.
Assign Interfaces to Zones
K3s uses trusted zone for the internal network to allow unrestricted pod-to-pod and control plane traffic:
# Assign eth0 (external/internet) to public zone
firewall-cmd --permanent --zone=public --change-interface=eth0
# Assign eth1 (internal/cluster) to trusted zone
firewall-cmd --permanent --zone=trusted --change-interface=eth1
# Allow pod and service CIDRs in trusted zone (required for pod communication)
firewall-cmd --permanent --zone=trusted --add-source=10.42.0.0/16
firewall-cmd --permanent --zone=trusted --add-source=10.43.0.0/16
# Reload firewall
firewall-cmd --reload
Configure Firewall Ports
Open the necessary ports on the public zone for external access:
# External access ports
firewall-cmd --permanent --zone=public --add-port=80/tcp
firewall-cmd --permanent --zone=public --add-port=443/tcp
firewall-cmd --permanent --zone=public --add-port=9095/tcp
firewall-cmd --permanent --zone=public --add-port=6379/tcp
firewall-cmd --permanent --zone=public --add-port=8086/tcp
# Apply changes
firewall-cmd --reload
Note: K3s automatically creates iptables rules for internal cluster ports (6443, 10250, 2379-2380, 8472, 5001, 9500-9503, 8500-8504, 10000-30000, 3260, 2049) when using
--flannel-iface=eth1. Pod and service CIDRs (10.42.0.0/16 and 10.43.0.0/16) are already allowed in the trusted zone via the--add-sourcecommands above.
Verify Zone Configuration
firewall-cmd --zone=public --list-all
firewall-cmd --zone=trusted --list-all
Expected output for public zone:
public (active)
target: default
icmp-block-inversion: no
interfaces: eth0 eth2
sources:
services: dhcpv6-client ssh cockpit
ports: 80/tcp 443/tcp 9095/tcp 6379/tcp 8086/tcp
protocols:
forward: yes
masquerade: no
forward-ports:
source-ports:
icmp-blocks:
rich rules:
Expected output for trusted zone:
trusted (active)
target: ACCEPT
icmp-block-inversion: no
interfaces: eth1
sources: 10.42.0.0/16 10.43.0.0/16
services: ssh mdns
ports:
protocols:
forward: yes
masquerade: no
forward-ports:
source-ports:
icmp-blocks:
rich rules:
Note: Additional interfaces may appear in a zone (e.g.,
eth0 eth2) if firewalld auto-assigned them based on network configuration. This is expected and does not affect functionality.
Single-NIC Alternative
If you only have a single network interface, see the Shared Interface Setup guide instead. This guide is specifically for multi-NIC deployments with separate interfaces for cluster and external traffic.
Troubleshooting
Verify Zone Configuration
If pods cannot communicate with services, verify the trusted zone has the correct sources configured:
firewall-cmd --zone=trusted --list-all
Expected output:
trusted (active)
target: ACCEPT
icmp-block-inversion: no
interfaces: eth1
sources: 10.42.0.0/16 10.43.0.0/16
services: ssh mdns
ports:
protocols:
forward: yes
masquerade: no
forward-ports:
source-ports:
icmp-blocks:
rich rules:
Ensure both 10.42.0.0/16 (pod network) and 10.43.0.0/16 (service network) are listed under sources. If missing, re-run:
firewall-cmd --permanent --zone=trusted --add-source=10.42.0.0/16
firewall-cmd --permanent --zone=trusted --add-source=10.43.0.0/16
firewall-cmd --reload
12.4 - Architecture Guide
Overview
The AgileTV CDN Manager (ESB3027) is a cloud-native Kubernetes application designed for managing CDN operations. This guide provides a detailed description of the system architecture, component interactions, and scaling considerations.
High-Level Architecture
The CDN Manager follows a microservices architecture deployed on Kubernetes. The system is organized into logical layers:
graph LR
Clients[API Clients] --> Ingress[Ingress Controller]
Ingress --> Manager[Core Manager]
Ingress --> Frontend[MIB Frontend]
Ingress --> Grafana[Grafana]
Manager --> Redis[(Redis)]
Manager --> Kafka[(Kafka)]
Manager --> PostgreSQL[(PostgreSQL)]
Manager --> Zitadel[Zitadel IAM]
Manager --> Confd[Configuration Service]
Grafana --> VM[(VictoriaMetrics)]
Confd -.-> Gateway[NGinx Gateway]
Gateway --> Director[CDN Director]Component Architecture
Ingress Layer
The ingress layer manages all incoming traffic to the cluster:
| Component | Role |
|---|---|
| Ingress Controller | Primary ingress for all cluster traffic; routes requests to internal services based on path |
| NGinx Gateway | Reverse proxy for routing traffic to external CDN Directors; used by MIB Frontend to communicate with remote Confd instances on CDN Director nodes |
Traffic flow:
- API clients and Operator UI connect via the Ingress Controller at
/apiand/guipaths respectively - Grafana dashboards are accessed via the Ingress Controller at
/grafana - Zitadel authentication console is accessed via the Ingress Controller at
/ui/console - MIB Frontend uses NGinx Gateway when communicating with external Confd instances on CDN Director nodes
Application Services
The application layer contains the core CDN Manager services:
| Component | Role | Scaling |
|---|---|---|
| Core Manager | Main REST API server (v1/v2 endpoints); handles authentication, configuration, routing, and discovery | Horizontally scalable via HPA |
| MIB Frontend | Web-based configuration GUI for operators | Horizontally scalable via HPA |
| Confd | Configuration service for routing configuration; synchronizes with Core Manager application | Single instance |
| Grafana | Monitoring and visualization dashboards | Single instance |
| Selection Input Worker | Consumes selection input events from Kafka and updates configuration | Single instance |
| Metrics Aggregator | Collects and aggregates metrics from CDN components | Single instance |
| Telegraf | System-level metrics collection from cluster nodes | DaemonSet (one per node) |
| Alertmanager | Alert routing and notification management | Single instance |
Data Layer
The data layer provides persistent and ephemeral storage:
| Component | Role | Scaling |
|---|---|---|
| Redis | In-memory caching, session storage, and ephemeral state | Master + replicas (read-only) |
| Kafka | Event streaming for selection input and metrics; provides durable message queue | Controller cluster (odd count) |
| PostgreSQL | Persistent configuration and state storage | 3-node cluster with HA |
| VictoriaMetrics (Analytics) | Real-time and short-term metrics for operational dashboards | Single instance |
| VictoriaMetrics (Billing) | Long-term metrics retention (1+ years) for billing and license compliance | Single instance |
External Integrations
| Component | Role |
|---|---|
| Zitadel IAM | Identity and access management; provides OAuth2/OIDC authentication |
| CDN Director (ESB3024) | Edge routing infrastructure; receives configuration from Confd |
Detailed Component Descriptions
Core Manager
The Core Manager is the central application server that exposes the REST API. It is implemented in Rust using the Actix-web framework.
Key Responsibilities:
- Authentication and session management via Zitadel
- Configuration document storage and retrieval
- Selection input CRUD operations
- Routing rule evaluation and GeoIP lookups
- Service discovery for CDN Directors and edge servers
- Operator UI helper endpoints
API Endpoints:
/api/v1/auth/*- Authentication (login, token, logout)/api/v1/configuration- Configuration management/api/v1/selection_input/*- Selection input operations/api/v2/selection_input/*- Enhanced selection input with list operations/api/v1/routing/*- Routing evaluation and validation/api/v1/discovery/*- Host and namespace discovery/api/v1/metrics- System metrics/api/v1/health/*- Liveness and readiness probes/api/v1/operator_ui/*- Operator helper endpoints
Runtime Modes: The Core Manager supports multiple runtime modes, each deployed as a separate container:
http-server- Primary HTTP API server (default)metrics-aggregator- Background worker for metrics collectionselection-input- Background worker for Kafka selection input consumption
MIB Frontend
The MIB Frontend provides a web-based GUI for configuration management.
Key Features:
- Intuitive web interface for CDN configuration
- Real-time configuration validation
- Integration with Zitadel for SSO authentication
- Uses NGinx Gateway for external Director communication
Confd (Configuration Service)
Confd provides routing configuration services and synchronizes with the Core Manager application.
Key Responsibilities:
- Hosts the service configuration for routing decisions
- Provides API and CLI for configuration management
- Synchronizes routing configuration with Core Manager
- Maintains configuration state in PostgreSQL
Selection Input Worker
The Selection Input Worker processes selection input events from the Kafka stream.
Key Responsibilities:
- Consumes messages from the
selection_inputKafka topic - Validates and transforms input data
- Updates configuration in the data store
- Maintains message ordering within partitions
Scaling Limitation: The Selection Input Worker cannot be scaled beyond a single consumer per Kafka partition, as message ordering must be preserved.
Metrics Aggregator
The Metrics Aggregator collects and processes metrics from CDN components.
Key Responsibilities:
- Polls metrics from Director instances
- Aggregates usage statistics
- Writes data to VictoriaMetrics (Analytics) for dashboards
- Writes long-term data to VictoriaMetrics (Billing) for compliance
Telegraf
Telegraf is deployed as a DaemonSet to collect host-level metrics.
Key Responsibilities:
- CPU, memory, disk, and network metrics from each node
- Container-level resource usage
- Kubernetes cluster metrics
- Forwards metrics to VictoriaMetrics
Grafana
Grafana provides visualization and dashboard capabilities.
Features:
- Pre-built dashboards for CDN monitoring
- Custom dashboard support
- VictoriaMetrics as data source
- Alerting integration with Alertmanager
Access: https://<host>/grafana
Alertmanager
Alertmanager handles alert routing and notifications.
Key Responsibilities:
- Receives alerts from Grafana and other sources
- Deduplicates and groups alerts
- Routes to notification channels (email, webhook, etc.)
- Manages alert silencing and inhibition
Data Storage
Redis
Redis provides in-memory storage for:
- User sessions and authentication tokens
- Ephemeral configuration cache
- Real-time state synchronization
Deployment: Master + read replicas for high availability
Kafka
Kafka provides durable event streaming for:
- Selection input events
- Metrics data streams
- Inter-service communication
Deployment: Controller cluster with 3 replicas for production, 1 replica for lab deployments
Node Affinity: Kafka replicas must be scheduled on separate nodes to ensure high availability. The Helm chart configures pod anti-affinity rules to enforce this distribution.
Topics:
selection_input- Selection input eventsmetrics- Metrics data streams
Note: For lab/single-node deployments, the Kafka replica count must be set to 1 in the Helm values. Production deployments require 3 replicas for fault tolerance.
PostgreSQL
PostgreSQL provides persistent storage for:
- Configuration documents
- User and permission data
- System state
Deployment: 3-node cluster managed by Cloudnative PG (CNPG) operator
High Availability: The CNPG operator manages automatic failover and ensures high availability:
- One primary node handles read/write operations
- Two replica nodes provide redundancy and can be promoted to primary on failure
- Automatic failover occurs within seconds of primary node failure
- Synchronous replication ensures data consistency
Note: The PostgreSQL cluster is deployed and managed automatically by the CNPG operator. Manual intervention is typically not required for normal operations.
VictoriaMetrics
Two VictoriaMetrics instances serve different purposes:
VictoriaMetrics (Analytics):
- Real-time and short-term metrics storage
- Supports Grafana dashboards
- Retention: Configurable (typically 30-90 days)
VictoriaMetrics (Billing):
- Long-term metrics retention
- Billing and license compliance data
- Retention: Minimum 1 year
Authentication and Authorization
Zitadel Integration
Zitadel provides identity and access management:
Authentication Flow:
- User accesses MIB Frontend or API
- Redirected to Zitadel for authentication
- Zitadel validates credentials and issues session token
- Session token exchanged for access token
- Access token included in API requests (Bearer authentication)
Default Credentials: See the Glossary for default login credentials.
Access Paths:
- Zitadel Console:
/ui/console - API authentication:
/api/v1/auth/*
CORS Configuration
Zitadel enforces Cross-Origin Resource Sharing (CORS) policies. The external hostname configured in Zitadel must match the first entry in global.hosts.manager in the Helm values.
Network Architecture
Traffic Flow
graph TB
External[External Clients] --> Ingress[Ingress Controller]
External --> Redis[(Redis)]
External --> Kafka[(Kafka)]
External --> Telegraf[Telegraf]
Ingress --> Manager[Core Manager]
Ingress --> Frontend[MIB Frontend]
Ingress --> Grafana[Grafana]
Ingress --> Zitadel[Zitadel]Note: Certain services (Redis, Kafka, Telegraf) can be accessed directly by external clients without traversing the ingress controller. This is typically used for metrics collection, event streaming, and direct data access scenarios.
Internal Communication
All internal services communicate over the Kubernetes overlay network (Flannel VXLAN). Services discover each other via Kubernetes DNS.
External Communication
- CDN Directors: Accessed via NGinx Gateway for simplified routing
- MaxMind GeoIP: Local database files (no external calls)
Scaling
Horizontal Pod Autoscaler (HPA)
The following components support automatic horizontal scaling via HPA:
| Component | Minimum | Maximum | Scale Metrics |
|---|---|---|---|
| Core Manager | 3 | 8 | CPU (50%), Memory (80%) |
| NGinx Gateway | 2 | 4 | CPU (75%), Memory (80%) |
| MIB Frontend | 2 | 4 | CPU (75%), Memory (90%) |
Note: HPA is enabled by default in the Helm chart. The default configuration is tuned for production deployments. Adjust min/max values based on expected load and available cluster capacity.
Manual Scaling
Components can also be scaled manually by setting replica counts in the Helm values:
manager:
replicaCount: 3
mib-frontend:
replicaCount: 2
Important: When manually setting replica counts, you must disable the Horizontal Pod Autoscaler (HPA) for the corresponding component. If HPA remains enabled, it will override manual replica settings. To disable HPA, set
autoscaling.hpa.enabled: falsefor the component in your Helm values.
Components That Do Not Scale
The following components do not support horizontal scaling:
| Component | Reason |
|---|---|
| Confd | Single instance required for configuration consistency |
| PostgreSQL | Cloudnative PG cluster; scaled by adding replicas via operator configuration |
| Kafka | Scaled by adding controllers, not via replica count |
| VictoriaMetrics | Stateful; single instance per role |
| Redis | Master is single; replicas are read-only |
| Grafana | Single instance sufficient for dashboard access |
| Alertmanager | Single instance for alert routing |
| Selection Input Worker | Kafka message ordering requires single consumer |
| Metrics Aggregator | Single instance for consistent metrics aggregation |
Node Scaling
Additional Agent nodes can be added to the cluster at any time to increase workload capacity. Kubernetes automatically schedules pods to nodes with available resources.
Cluster Balancing
The CDN Manager deployment includes the Kubernetes Descheduler to maintain balanced resource utilization across cluster nodes:
- Automatic Rebalancing: The descheduler periodically analyzes pod distribution and evicts pods from overutilized nodes
- Node Balance: Helps prevent resource hotspots by redistributing workloads across available nodes
- Integration with HPA: Works in conjunction with Horizontal Pod Autoscaler to optimize both pod count and placement
The descheduler runs as a background process and does not require manual intervention under normal operating conditions.
Resource Configuration
For detailed resource preset configurations and planning guidance, see the Configuration Guide.
High Availability
Server Node Redundancy
Production deployments require a minimum of 3 Server nodes:
- Survives loss of 1 server node
- Maintains quorum for etcd and Kafka
For enhanced availability, use 5 Server nodes:
- Survives loss of 2 server nodes
- Recommended for critical production environments
For large-scale deployments, 7 or more Server nodes can be used:
- Survives loss of 3+ server nodes
- Suitable for high-capacity production environments
Pod Distribution
Kubernetes automatically distributes pods across nodes to maximize availability:
- Pods with the same deployment are scheduled on different nodes when possible
- Pod Disruption Budgets (PDB) ensure minimum availability during maintenance
Data Replication
| Component | Replication Strategy |
|---|---|
| Redis | Single instance (backup via Longhorn snapshots) |
| Kafka | Replicated partitions (default: 3) |
| PostgreSQL | 3-node cluster via Cloudnative PG |
| VictoriaMetrics | Single instance (backup via snapshots) |
| Longhorn | Single replica with pod-node affinity |
Longhorn Storage: Longhorn volumes are configured with a single replica by default. Pod scheduling is configured with node affinity to prefer scheduling pods on the same node as their persistent volume data. This approach optimizes I/O performance while maintaining data locality.
Next Steps
After understanding the architecture:
- Installation Guide - Deploy the CDN Manager
- Configuration Guide - Configure components for your environment
- Operations Guide - Day-to-day operational procedures
- Performance Tuning Guide - Optimize system performance
- Metrics & Monitoring - Set up monitoring and alerting
12.5 - Installation Guide
Overview
This guide provides detailed instructions for installing the AgileTV CDN Manager (ESB3027) in various deployment scenarios. The installation process varies depending on the target environment and desired configuration.
Estimated Installation Time:
| Deployment Type | Time |
|---|---|
| Single-Node (Lab) | ~15 minutes |
| Multi-Node (3 servers) | ~30 minutes |
Actual installation time may vary depending on hardware performance, network speed, and whether air-gapped procedures are required.
Note: These estimates assume the operating system is already installed on all nodes. OS installation is outside the scope of this guide.
Installation Types
| Installation Type | Description | Use Case |
|---|---|---|
| Single-Node (Lab) | Minimal installation on a single host | Acceptance testing, demonstrations, development |
| Multi-Node (Production) | Full high-availability cluster with 3+ server nodes | Production deployments |
Installation Process Summary
The installation follows a sequential process:
- Prepare the host system - Verify requirements and mount the installation ISO
- Install the Kubernetes cluster - Deploy K3s, Longhorn storage, and PostgreSQL
- Join additional nodes (production only) - Expand the cluster for HA or capacity
- Deploy the Manager application - Install the CDN Manager Helm chart
- Post-installation configuration - Configure authentication, networking, and users
Quick Links
| Guide | Description |
|---|---|
| Installation Checklist | Step-by-step checklist to track progress |
| Single-Node Installation | Lab and acceptance testing deployment |
| Multi-Node Installation | Production high-availability deployment |
| Air-Gapped Deployment | Air-gapped environment installation |
| Helm Chart Installation | Common helm chart deployment steps |
| Upgrade Guide | Upgrading from previous versions |
| Next Steps | Post-installation configuration tasks |
Prerequisites
Before beginning installation, ensure the following requirements are met:
- Hardware: Nodes meeting the System Requirements including CPU, memory, and disk specifications
- Operating System: RHEL 9 or compatible clone (details); air-gapped deployments require the OS ISO mounted on all nodes
- Network: Proper firewall configuration between nodes (port requirements, firewall configuration)
- Software: Installation ISO obtained from AgileTV; air-gapped deployments also require the Extras ISO
- Kernel Tuning: For production deployments, apply recommended sysctl settings (Performance Tuning Guide)
We recommend using the Installation Checklist to track your progress through the installation process.
Getting Help
If you encounter issues during installation:
- Review the Troubleshooting Guide for common issues
- Check the System Requirements to verify your environment
- Consult the Release Notes for version-specific known issues
12.5.1 - Installation Checklist
Overview
Use this checklist to track your installation progress. Print this page or keep it open during your installation to ensure all steps are completed correctly.
Pre-Installation
Hardware and Software
- Verify hardware meets System Requirements
- Confirm operating system is supported (RHEL 9 or compatible clone)
- Configure firewall rules between nodes (details)
- Apply recommended sysctl settings (details)
- Obtain installation ISO (
esb3027-acd-manager-X.Y.Z.iso)
Air-Gapped Deployments
- Obtain Extras ISO (
esb3027-acd-manager-extras-X.Y.Z.iso) - Mount OS ISO on all nodes before installation
- Verify OS packages are accessible from mounted ISO
Special Requirements
- Oracle Linux UEK: Install
kernel-uek-modules-extra-netfilter-$(uname -r)package - Control Plane Only nodes: Set
SKIP_REQUIREMENTS_CHECK=1if below lab minimums - SELinux: Set to “Enforcing” mode before running installer (cannot enable after)
Cluster Installation
Single-Node Deployment
Follow the Single-Node Installation Guide.
- Mount installation ISO (Step 1)
- Install the base cluster (Step 2)
- Verify cluster status (Step 3)
- Air-gapped only: Load container images (Step 4)
- Create configuration file (Step 5)
- Optional: Load MaxMind GeoIP databases (Step 6)
- Deploy the Manager Helm chart (Step 7)
- Verify deployment (Step 8)
Multi-Node Deployment
Follow the Multi-Node Installation Guide.
Primary Server Node
- Mount installation ISO (Step 1)
- Install the base cluster (Step 2)
- Verify system pods are running (Step 2)
- Retrieve the node token (Step 3)
Additional Server Nodes
- Mount installation ISO (Step 5)
- Join the cluster (Step 5)
- Verify each node joins (Step 5)
- Optional: Taint Control Plane Only nodes (Step 5b)
Agent Nodes (Optional)
- Mount installation ISO (Step 6)
- Join the cluster as an agent (Step 6)
- Verify each agent joins (Step 6)
Cluster Verification
- Verify all nodes are ready (Step 7)
- Verify system pods running on all nodes (Step 7)
- Air-gapped only: Load container images on each node (Step 9)
Application Deployment
- Create configuration file (Step 10)
- Optional: Load MaxMind GeoIP databases (Step 11)
- Optional: Configure TLS certificates from trusted CA (Step 12)
- Deploy the Manager Helm chart (Step 13)
- Verify all pods are running and distributed (Step 14)
- Configure DNS records for manager hostname (Step 15)
Post-Installation
Initial Access
- Access the system via HTTPS
- Accept self-signed certificate warning (if using default certificate)
- Log in with default credentials (see Glossary)
Security Configuration
- Create new administrator account in Zitadel
- Delete or secure the default admin account
- Configure additional users and permissions
- Review Zitadel Administrator Documentation for role assignments
Monitoring and Operations
- Access Grafana dashboards at
/grafana - Review pre-built monitoring dashboards
- Configure alerting rules (optional)
- Set up notification channels (optional)
Next Steps
- Review Next Steps Guide for additional configuration
- Configure CDN routing rules
- Set up GeoIP-based routing (if using MaxMind databases)
- Review Operations Guide for day-to-day procedures
Troubleshooting
If you encounter issues during installation:
- Check pod status:
kubectl describe pod <pod-name> - Review logs:
kubectl logs <pod-name> - Check cluster events:
kubectl get events --sort-by='.lastTimestamp' - Review the Troubleshooting Guide for common issues
12.5.2 - Single-Node Installation
Warning: Single-node deployments are for lab environments, acceptance testing, and demonstrations only. This configuration is not suitable for production workloads. For production deployments, see the Multi-Node Installation Guide, which requires a minimum of 3 server nodes for high availability.
Air-Gapped Deployment? This guide assumes internet connectivity. For air-gapped deployments, see the Air-Gapped Deployment Guide for additional requirements and procedures.
Overview
This guide describes the installation of the AgileTV CDN Manager on a single node. This configuration is intended for lab environments, acceptance testing, and demonstrations only. It is not suitable for production workloads.
Prerequisites
Hardware Requirements
Refer to the System Requirements Guide for hardware specifications. Single-node deployments require the “Single-Node (Lab)” configuration.
Operating System
Refer to the System Requirements Guide for supported operating systems.
Software Access
- Installation ISO:
esb3027-acd-manager-X.Y.Z.iso - Extras ISO (air-gapped only):
esb3027-acd-manager-extras-X.Y.Z.iso
Network Configuration
Ensure that required firewall ports are configured before installation. See the Networking Guide for complete firewall configuration requirements.
SELinux
If SELinux is to be used, it must be set to “Enforcing” mode before running the installer script. The installer will configure appropriate SELinux policies automatically. SELinux cannot be enabled after installation.
Installation Steps
Step 1: Mount the ISO
Create a mount point and mount the installation ISO:
mkdir -p /mnt/esb3027
mount -o loop,ro esb3027-acd-manager-X.Y.Z.iso /mnt/esb3027
Replace X.Y.Z with the actual version number.
Step 2: Install the Base Cluster
Run the installer to set up the K3s Kubernetes cluster:
/mnt/esb3027/install
This installs:
- K3s Kubernetes distribution
- Longhorn distributed storage
- Cloudnative PG operator for PostgreSQL
- Base system dependencies
The installer will configure the node as both a server and agent node.
Step 3: Verify Cluster Status
After the installer completes, verify that all components are operational before proceeding. This verification serves as an important checkpoint to confirm the installation is progressing correctly.
1. Verify the node is ready:
kubectl get nodes
Expected output:
NAME STATUS ROLES AGE VERSION
k3s-server Ready control-plane,etcd,master 2m v1.33.4+k3s1
2. Verify system pods in both namespaces are running:
# Check kube-system namespace (Kubernetes core components)
kubectl get pods -n kube-system
# Check longhorn-system namespace (distributed storage)
kubectl get pods -n longhorn-system
All pods should show Running status. If any pods are still Pending or ContainerCreating, wait until they are ready. Proceeding with incomplete system pods can cause subsequent steps to fail in unpredictable ways.
This verification confirms:
- K3s cluster is operational
- Longhorn distributed storage is running
- Cloudnative PG operator is deployed
- All core components are healthy before continuing
Step 4: Air-Gapped Deployments (If Applicable)
If deploying in an air-gapped environment, load container images from the extras ISO:
mkdir -p /mnt/esb3027-extras
mount -o loop,ro esb3027-acd-manager-extras-X.Y.Z.iso /mnt/esb3027-extras
/mnt/esb3027-extras/load-images
Step 5: Deploy the Manager Helm Chart
For complete instructions on deploying the CDN Manager Helm chart, including configuration file setup, MaxMind GeoIP database loading, TLS certificate configuration, deployment commands, and verification steps, see the Helm Chart Installation Guide.
This guide covers the common deployment steps that apply to all installation types. After completing the helm chart installation steps, proceed to Post-Installation below.
Post-Installation
After installation completes, proceed to the Next Steps guide for:
- Initial user configuration
- Accessing the web interfaces
- Configuring authentication
- Setting up monitoring
Accessing the System
Refer to the Accessing the System section in the Getting Started guide for service URLs and default credentials.
Note: A self-signed SSL certificate is deployed by default. You will need to accept the certificate warning in your browser.
Troubleshooting
If pods fail to start:
- Check pod status:
kubectl describe pod <pod-name> - Review logs:
kubectl logs <pod-name> - Verify resources:
kubectl top pods
See the Troubleshooting Guide for additional assistance.
Next Steps
After successful installation:
- Next Steps Guide - Post-installation configuration
- Configuration Guide - System configuration
- Operations Guide - Day-to-day operations
Appendix: Lab Configuration File
The installation ISO includes a pre-built lab configuration at /mnt/esb3027/values-lab.yaml, designed specifically for single-node deployments. It handles single-replica settings for Kafka and Zitadel, resource sizing, and TLS configuration automatically.
Copy it as your starting point:
cp /mnt/esb3027/values-lab.yaml ~/values.yaml
At minimum, update these two fields to match your environment before deploying:
global:
hosts:
manager:
- host: manager.local # Replace with your hostname or IP
zitadel:
zitadel:
configmapConfig:
ExternalDomain: manager.local # Must match global.hosts.manager[0].host
These two values must match exactly or authentication will fail. For a full description of all available options in values-lab.yaml, see the Configuration Guide.
12.5.3 - Multi-Node Installation
Overview
This guide describes the installation of the AgileTV CDN Manager across multiple nodes for production deployments. This configuration provides high availability and horizontal scaling capabilities.
Air-Gapped Deployment? This guide assumes internet connectivity. For air-gapped deployments, see the Air-Gapped Deployment Guide for additional requirements and procedures.
Prerequisites
Hardware Requirements
Refer to the System Requirements Guide for hardware specifications. Production deployments require:
- Minimum 3 Server nodes (Control Plane Only or Combined role)
- Optional Agent nodes for additional workload capacity
Operating System
Refer to the System Requirements Guide for supported operating systems.
Software Access
- Installation ISO:
esb3027-acd-manager-X.Y.Z.iso(for each node) - Extras ISO (air-gapped only):
esb3027-acd-manager-extras-X.Y.Z.iso
Network Configuration
Ensure that required firewall ports are configured between all nodes before installation. See the Configuring Segregated Networks guide for the standard firewall configuration.
Note: When using segregated networks, the K3s API server on the primary node will be reachable via its internal/private interface. Consequently, when joining additional nodes, the <primary-server-ip> provided to the join script must be the internal/private IP address of the primary node to ensure the join request is routed correctly through the private network.
Single-NIC Deployments: If your nodes have only a single network interface, see the Shared Interface Setup guide instead. This guide assumes segregated networks with separate interfaces for cluster traffic (eth1) and external access (eth0).
Segregated Network Configuration
If your nodes have multiple network interfaces and you want to use a separate interface for cluster traffic (not the default route interface), configure the INSTALL_K3S_EXEC environment variable before installing the cluster or joining nodes.
For segregated networks (private cluster network on eth1 + public external access on eth0), set all three K3s flags:
# For server nodes
export INSTALL_K3S_EXEC="server --node-ip=<ETH1_IP> --node-external-ip=<ETH0_IP> --flannel-iface=eth1 --advertise-address=<ETH1_IP>"
# For agent nodes
export INSTALL_K3S_EXEC="agent --node-ip=<ETH1_IP> --node-external-ip=<ETH0_IP> --flannel-iface=eth1"
Where:
- Mode: Use
serverfor the primary node establishing the cluster, or for additional server nodes. Useagentfor agent nodes joining the cluster. --node-ip=<ETH1_IP>: The internal/private IP address of eth1 for cluster communication--node-external-ip=<ETH0_IP>: The public IP address of eth0 for external access (LoadBalancer services, ingress)--flannel-iface=eth1: The network interface name for Flannel VXLAN overlay traffic--advertise-address=<ETH1_IP>: The address the API server uses to advertise itself to cluster members. Must be set to the internal/private IP address in a segregated-network deployment; without this flag, k3s defaults to the external IP when--node-external-ipis set, causing thekubernetesservice endpoint to register as an unreachable address. This flag is required for server nodes only; agent nodes do not run an API server.
Set this variable on each node before running the install or join scripts.
SELinux
If SELinux is to be used, it must be set to “Enforcing” mode before running the installer script. The installer will configure appropriate SELinux policies automatically. SELinux cannot be enabled after installation.
Installation Steps
Step 1: Prepare the Primary Server Node
Mount the installation ISO on the primary server node:
mkdir -p /mnt/esb3027
mount -o loop,ro esb3027-acd-manager-X.Y.Z.iso /mnt/esb3027
Replace X.Y.Z with the actual version number.
Step 2: Install the Base Cluster on Primary Server
Segregated Networks: If your node has multiple network interfaces, set the
INSTALL_K3S_EXECenvironment variable with the complete segregated network configuration before running the installer (see Segregated Network Configuration):export INSTALL_K3S_EXEC="server --node-ip=<ETH1_IP> --node-external-ip=<ETH0_IP> --flannel-iface=eth1 --advertise-address=<ETH1_IP>"Replace
<ETH1_IP>with the internal/private IP address and<ETH0_IP>with the public IP address.
If your node has only a single network interface, do not set INSTALL_K3S_EXEC. K3s will use the default interface automatically.
Run the installer to set up the K3s Kubernetes cluster:
/mnt/esb3027/install
This installs:
- K3s Kubernetes distribution
- Longhorn distributed storage
- Cloudnative PG operator for PostgreSQL
- Base system dependencies
Important: After the installer completes, verify that all system pods in both namespaces are in the Running state before proceeding:
# Check kube-system namespace (Kubernetes core components)
kubectl get pods -n kube-system
# Check longhorn-system namespace (distributed storage)
kubectl get pods -n longhorn-system
All pods should show Running status. If any pods are still Pending or ContainerCreating, wait until they are ready. Proceeding with incomplete system pods can cause subsequent steps to fail in unpredictable ways.
This verification confirms:
- K3s cluster is operational
- Longhorn distributed storage is running
- Cloudnative PG operator is deployed
- All core components are healthy before continuing
Step 3: Retrieve the Node Token
Retrieve the node token for joining additional nodes:
cat /var/lib/rancher/k3s/server/node-token
Save this token for use on additional nodes. Also note the IP address of the primary server node.
Step 4: Server vs Agent Node Roles
Before joining additional nodes, determine which nodes will serve as Server nodes vs Agent nodes:
| Role | Control Plane | Workloads | HA Quorum | Use Case |
|---|---|---|---|---|
| Server Node (Combined) | Yes (etcd, API server) | Yes | Participates | Default production role; minimum 3 nodes |
| Server Node (Control Plane Only) | Yes (etcd, API server) | No | Participates | Dedicated control plane; requires separate Agent nodes |
| Agent Node | No | Yes | No | Additional workload capacity only |
Guidance:
- Combined role (default): Server nodes run both control plane and workloads; minimum 3 nodes required for HA
- Control Plane Only: Dedicate nodes to control plane functions; requires at least 3 Server nodes plus 3+ Agent nodes for workloads
- Agent nodes are required if using Control Plane Only servers; optional if using Combined role servers
- For most deployments, 3 Server nodes (Combined role) with no Agent nodes is sufficient
- Add Agent nodes to scale workload capacity without affecting control plane quorum
Proceed to Step 5 to join Server nodes. Agent nodes are joined after all Server nodes are ready.
Step 5: Join Additional Server Nodes
On each additional server node:
Mount the ISO:
mkdir -p /mnt/esb3027 mount -o loop,ro esb3027-acd-manager-X.Y.Z.iso /mnt/esb3027Join the cluster:
Segregated Networks: If your node has multiple network interfaces, set the
INSTALL_K3S_EXECenvironment variable with the complete segregated network configuration before running the join script (see Segregated Network Configuration):export INSTALL_K3S_EXEC="server --node-ip=<ETH1_IP> --node-external-ip=<ETH0_IP> --flannel-iface=eth1 --advertise-address=<ETH1_IP>"Replace
<ETH1_IP>with the internal/private IP address and<ETH0_IP>with the public IP address.
If your node has only a single network interface, do not set INSTALL_K3S_EXEC. K3s will use the default interface automatically.
Note for Segregated Networks: When joining nodes in a segregated network environment, ensure the
<primary-server-ip>used in the join command is the internal/private IP address (theeth1address) of the primary server. Using the external IP will cause the join attempt to fail as the service will be listening on the private interface.
Run the join script:
/mnt/esb3027/join-server https://<primary-server-ip>:6443 <node-token>
Replace <primary-server-ip> with the IP address of the primary server and <node-token> with the token retrieved in Step 3.
- Verify the node joined successfully:
kubectl get nodes
Repeat for each server node. A minimum of 3 server nodes is required for high availability.
Step 5b: Taint Control Plane Only Nodes (Optional)
If you are using dedicated Control Plane Only nodes (not Combined role), apply taints to prevent workload scheduling:
kubectl taint nodes <node-name> CriticalAddonsOnly=true:NoSchedule
Apply this taint to each Control Plane Only node. Verify taints are applied:
kubectl describe nodes | grep -A 5 "Taints"
Note: This step is only required if you want dedicated control plane nodes. For Combined role deployments, do not apply taints.
Important: Control Plane Only Server nodes can be deployed with lower hardware specifications (2 cores, 4 GiB, 64 GiB) than the installer’s default minimum requirements. If your Control Plane Only Server nodes do not meet the Single-Node Lab configuration minimums (8 cores, 16 GiB, 128 GiB), you must set the
SKIP_REQUIREMENTS_CHECKenvironment variable before running the installer or join command:# For the primary server node export SKIP_REQUIREMENTS_CHECK=1 /mnt/esb3027/install # For additional Control Plane Only Server nodes export SKIP_REQUIREMENTS_CHECK=1 /mnt/esb3027/join-server https://<primary-server-ip>:6443 <node-token>Note: This applies to Server nodes only. Agent nodes have separate minimum requirements.
Step 6: Join Agent Nodes (Optional)
On each agent node:
Mount the ISO:
mkdir -p /mnt/esb3027 mount -o loop,ro esb3027-acd-manager-X.Y.Z.iso /mnt/esb3027Join the cluster as an agent:
Segregated Networks: If your node has multiple network interfaces, set the
INSTALL_K3S_EXECenvironment variable with the complete segregated network configuration before running the join script (see Segregated Network Configuration):export INSTALL_K3S_EXEC="agent --node-ip=<ETH1_IP> --node-external-ip=<ETH0_IP> --flannel-iface=eth1"Replace
<ETH1_IP>with the internal/private IP address and<ETH0_IP>with the public IP address.
If your node has only a single network interface, do not set INSTALL_K3S_EXEC. K3s will use the default interface automatically.
Run the join script:
/mnt/esb3027/join-agent https://<primary-server-ip>:6443 <node-token>
Note for Segregated Networks: When joining nodes in a segregated network environment, ensure the
<primary-server-ip>used in the join command is the internal/private IP address (theeth1address) of the primary server. Using the external IP will cause the join attempt to fail as the service will be listening on the private interface.
- Verify the node joined successfully from an existing server node:
kubectl get nodes
Agent nodes provide additional workload capacity but do not participate in the control plane quorum.
Step 7: Verify Cluster Status
After all nodes are joined, verify the cluster is operational:
1. Verify all nodes are ready:
kubectl get nodes
Expected output:
NAME STATUS ROLES AGE VERSION
k3s-server-0 Ready control-plane,etcd,master 5m v1.33.4+k3s1
k3s-server-1 Ready control-plane,etcd,master 3m v1.33.4+k3s1
k3s-server-2 Ready control-plane,etcd,master 2m v1.33.4+k3s1
k3s-agent-1 Ready <none> 1m v1.33.4+k3s1
k3s-agent-2 Ready <none> 1m v1.33.4+k3s1
2. Verify system pods in both namespaces are running:
# Check kube-system namespace (Kubernetes core components)
kubectl get pods -n kube-system
# Check longhorn-system namespace (distributed storage)
kubectl get pods -n longhorn-system
All pods should show Running status. If any pods are still Pending or ContainerCreating, wait until they are ready.
This verification confirms:
- K3s cluster is operational across all nodes
- Longhorn distributed storage is running
- Cloudnative PG operator is deployed
- All core components are healthy before proceeding to application deployment
Step 9: Air-Gapped Deployments (If Applicable)
If deploying in an air-gapped environment, on each node:
mkdir -p /mnt/esb3027-extras
mount -o loop,ro esb3027-acd-manager-extras-X.Y.Z.iso /mnt/esb3027-extras
/mnt/esb3027-extras/load-images
Step 10: Deploy the Manager Helm Chart
For complete instructions on deploying the CDN Manager Helm chart, including configuration file setup, MaxMind GeoIP database loading, TLS certificate configuration, deployment commands, and verification steps, see the Helm Chart Installation Guide.
This guide covers the common deployment steps that apply to all installation types. After completing the helm chart installation steps, proceed to Post-Installation below.
Step 15: Configure DNS (Optional)
Add DNS records for the manager hostname. For high availability, configure multiple A records pointing to different server nodes:
manager.example.com. IN A <server-1-ip>
manager.example.com. IN A <server-2-ip>
manager.example.com. IN A <server-3-ip>
Alternatively, configure a load balancer to distribute traffic across nodes.
Post-Installation
After installation completes, proceed to the Next Steps guide for:
- Initial user configuration
- Accessing the web interfaces
- Configuring authentication
- Setting up monitoring
Accessing the System
Refer to the Accessing the System section in the Getting Started guide for service URLs and default credentials.
Note: A self-signed SSL certificate is deployed by default. For production deployments, configure a valid SSL certificate before exposing the system to users.
High Availability Considerations
Pod Distribution
The Helm chart configures pod anti-affinity rules to ensure:
- Kafka controllers are scheduled on separate nodes
- PostgreSQL cluster members are distributed across nodes
- Application pods are spread across available nodes
Data Replication and Failure Tolerance
For detailed information on data replication strategies and failure scenario tolerance, refer to the Architecture Guide and System Requirements Guide.
Troubleshooting
If pods fail to start or nodes fail to join:
- Check node status:
kubectl get nodes - Describe problematic pods:
kubectl describe pod <pod-name> - Review logs:
kubectl logs <pod-name> - Check cluster events:
kubectl get events --sort-by='.lastTimestamp'
Nodes Ready but Workloads Cannot Reach the API Server (Segregated Networks)
Symptom: All nodes show Ready status, but cluster components (kubelet, controller-manager, scheduler) or workloads fail to communicate with the API server. Pods in kube-system or longhorn-system may fail to start or remain in a crash loop.
Cause: This is caused by omitting --advertise-address from the server-node INSTALL_K3S_EXEC. When --node-external-ip is set without --advertise-address, k3s defaults the API server’s advertise address to the external IP (eth0). In a segregated-network topology where nodes are not routable to each other over eth0, the kubernetes service ClusterIP endpoint registers as an unreachable address.
Diagnostic check:
kubectl get endpoints kubernetes -n default
If the IP shown is the eth0 (external) address rather than the eth1 (internal) address, the cluster was installed without --advertise-address.
Remediation: The kubernetes service endpoint cannot be corrected by reconfiguration alone. K3s must be reinstalled on all server nodes with the correct flags:
export INSTALL_K3S_EXEC="server --node-ip=<ETH1_IP> --node-external-ip=<ETH0_IP> --flannel-iface=eth1 --advertise-address=<ETH1_IP>"
After reinstallation, re-run the diagnostic check to confirm the endpoint IP is now the eth1 (internal) address.
See the Troubleshooting Guide for additional assistance.
Next Steps
After successful installation:
- Next Steps Guide - Post-installation configuration
- Configuration Guide - System configuration
- Operations Guide - Day-to-day operations
12.5.4 - Air-Gapped Deployment
Overview
This guide describes the installation of the AgileTV CDN Manager in air-gapped environments (no internet access). Air-gapped deployments require additional preparation compared to connected deployments.
Key differences from connected deployments:
- Both Installation ISO and Extras ISO are required on all nodes
- OS installation ISO must be mounted on all nodes for package access
- Container images must be loaded from the Extras ISO on each node
- Additional firewall considerations for OS package repositories
Prerequisites
Required ISOs
Before beginning installation, obtain the following:
| ISO | Filename | Purpose |
|---|---|---|
| Installation ISO | esb3027-acd-manager-X.Y.Z.iso | Kubernetes cluster and Manager application |
| Extras ISO | esb3027-acd-manager-extras-X.Y.Z.iso | Container images for air-gapped environments |
| OS Installation ISO | RHEL 9 or compatible clone | Operating system packages (required on all nodes) |
Hardware Requirements
Refer to the System Requirements Guide for hardware specifications.
- Single-Node (Lab): Minimum 8 cores, 16 GiB RAM, 128 GiB disk
- Multi-Node (Production): Minimum 3 Server nodes for high availability
Network Configuration
Air-gapped environments may have internal network mirrors for OS packages. If no internal mirror exists, the OS installation ISO must be mounted on each node to provide packages during installation.
Ensure that required firewall ports are configured before installation. See the Networking Guide for complete firewall configuration requirements.
SELinux
If SELinux is to be used, it must be set to “Enforcing” mode before running the installer script. The installer will configure appropriate SELinux policies automatically. SELinux cannot be enabled after installation.
Installation Steps
Step 1: Prepare All Nodes
On each node (primary server, additional servers, and agents):
- Mount the OS installation ISO:
mkdir -p /mnt/os
mount -o loop,ro /path/to/rhel-9.iso /mnt/os
- Configure local repository (if no internal mirror):
cat > /etc/yum.repos.d/local.repo <<EOF
[local]
name=Local OS Repository
baseurl=file:///mnt/os/BaseOS
enabled=1
gpgcheck=0
EOF
# Also configure AppStream if needed
cat >> /etc/yum.repos.d/local.repo <<EOF
[appstream]
name=AppStream Repository
baseurl=file:///mnt/os/AppStream
enabled=1
gpgcheck=0
EOF
- Verify repository is accessible:
dnf repolist
dnf makecache
Step 2: Prepare the Primary Server Node
Mount the installation ISOs on the primary server node:
# Mount Installation ISO
mkdir -p /mnt/esb3027
mount -o loop,ro esb3027-acd-manager-X.Y.Z.iso /mnt/esb3027
# Mount Extras ISO
mkdir -p /mnt/esb3027-extras
mount -o loop,ro esb3027-acd-manager-extras-X.Y.Z.iso /mnt/esb3027-extras
Step 3: Install the Base Cluster on Primary Server
Run the installer to set up the K3s Kubernetes cluster:
/mnt/esb3027/install
This installs:
- K3s Kubernetes distribution
- Longhorn distributed storage
- Cloudnative PG operator for PostgreSQL
- Base system dependencies
Important: After the installer completes, verify that all system pods in both namespaces are in the Running state before proceeding:
# Check kube-system namespace (Kubernetes core components)
kubectl get pods -n kube-system
# Check longhorn-system namespace (distributed storage)
kubectl get pods -n longhorn-system
All pods should show Running status. If any pods are still Pending or ContainerCreating, wait until they are ready. Proceeding with incomplete system pods can cause subsequent steps to fail in unpredictable ways.
This verification confirms:
- K3s cluster is operational
- Longhorn distributed storage is running
- Cloudnative PG operator is deployed
- All core components are healthy before continuing
Step 4: Retrieve the Node Token
Retrieve the node token for joining additional nodes:
cat /var/lib/rancher/k3s/server/node-token
Save this token for use on additional nodes. Also note the IP address of the primary server node.
Step 5: Join Additional Server Nodes (Multi-Node Only)
On each additional server node:
- Mount the OS ISO:
mkdir -p /mnt/os
mount -o loop,ro /path/to/rhel-9.iso /mnt/os
# Configure local repository
cat > /etc/yum.repos.d/local.repo <<EOF
[local]
name=Local OS Repository
baseurl=file:///mnt/os/BaseOS
enabled=1
gpgcheck=0
[appstream]
name=AppStream Repository
baseurl=file:///mnt/os/AppStream
enabled=1
gpgcheck=0
EOF
dnf makecache
- Mount the Installation ISOs:
# Mount Installation ISO
mkdir -p /mnt/esb3027
mount -o loop,ro esb3027-acd-manager-X.Y.Z.iso /mnt/esb3027
# Mount Extras ISO
mkdir -p /mnt/esb3027-extras
mount -o loop,ro esb3027-acd-manager-extras-X.Y.Z.iso /mnt/esb3027-extras
- Join the cluster:
Run the join script:
/mnt/esb3027/join-server https://<primary-server-ip>:6443 <node-token>
Replace <primary-server-ip> with the IP address of the primary server and <node-token> with the token retrieved in Step 4.
- Verify the node joined successfully:
kubectl get nodes
Repeat for each server node. A minimum of 3 server nodes is required for high availability.
Step 6: Join Agent Nodes (Optional)
On each agent node:
- Mount the OS ISO:
mkdir -p /mnt/os
mount -o loop,ro /path/to/rhel-9.iso /mnt/os
# Configure local repository
cat > /etc/yum.repos.d/local.repo <<EOF
[local]
name=Local OS Repository
baseurl=file:///mnt/os/BaseOS
enabled=1
gpgcheck=0
[appstream]
name=AppStream Repository
baseurl=file:///mnt/os/AppStream
enabled=1
gpgcheck=0
EOF
dnf makecache
- Mount the Installation ISOs:
# Mount Installation ISO
mkdir -p /mnt/esb3027
mount -o loop,ro esb3027-acd-manager-X.Y.Z.iso /mnt/esb3027
# Mount Extras ISO
mkdir -p /mnt/esb3027-extras
mount -o loop,ro esb3027-acd-manager-extras-X.Y.Z.iso /mnt/esb3027-extras
- Join the cluster as an agent:
Run the join script:
/mnt/esb3027/join-agent https://<primary-server-ip>:6443 <node-token>
- Verify the node joined successfully from an existing server node:
kubectl get nodes
Agent nodes provide additional workload capacity but do not participate in the control plane quorum.
Step 7: Load Container Images
On each node in the cluster:
/mnt/esb3027-extras/load-images
This script loads all container images from the Extras ISO into the local container runtime.
Important: This step must be performed on every node (primary server, additional servers, and agents) before deploying the Manager application.
Step 8: Verify Cluster Status
After all nodes are joined and images are loaded, verify the cluster is operational:
1. Verify all nodes are ready:
kubectl get nodes
Expected output:
NAME STATUS ROLES AGE VERSION
k3s-server-0 Ready control-plane,etcd,master 5m v1.33.4+k3s1
k3s-server-1 Ready control-plane,etcd,master 3m v1.33.4+k3s1
k3s-server-2 Ready control-plane,etcd,master 2m v1.33.4+k3s1
k3s-agent-1 Ready <none> 1m v1.33.4+k3s1
2. Verify system pods in both namespaces are running:
# Check kube-system namespace (Kubernetes core components)
kubectl get pods -n kube-system
# Check longhorn-system namespace (distributed storage)
kubectl get pods -n longhorn-system
All pods should show Running status.
3. Verify container images are loaded:
crictl images | grep acd-manager
Step 9: Deploy the Manager Helm Chart
For complete instructions on deploying the CDN Manager Helm chart, including configuration file setup, MaxMind GeoIP database loading, TLS certificate configuration, deployment commands, and verification steps, see the Helm Chart Installation Guide.
This guide covers the common deployment steps that apply to all installation types. After completing the helm chart installation steps, proceed to Post-Installation below.
Post-Installation
After installation completes, proceed to the Next Steps guide for:
- Initial user configuration
- Accessing the web interfaces
- Configuring authentication
- Setting up monitoring
Accessing the System
Refer to the Accessing the System section in the Getting Started guide for service URLs and default credentials.
Note: A self-signed SSL certificate is deployed by default. You will need to accept the certificate warning in your browser.
Updating MaxMind GeoIP Databases
If using GeoIP-based routing, load the MaxMind databases:
/mnt/esb3027/generate-maxmind-volume
The utility will prompt for the database file locations and volume name. Reference the volume in your values.yaml:
manager:
maxmindDbVolume: maxmind-geoip-2026-04
See the Operations Guide for database update procedures.
Troubleshooting
Image Pull Errors
If pods fail with image pull errors:
- Verify the
load-imagesscript completed successfully on all nodes - Check container runtime image list:
crictl images | grep <image-name> - Ensure image tags in Helm chart match tags on the Extras ISO
OS Package Errors
If the installer reports missing OS packages:
- Verify OS ISO is mounted on the affected node
- Check repository configuration:
dnf repolist dnf info <package-name> - Ensure the ISO matches the installed OS version
Longhorn Volume Issues
If Longhorn volumes fail to mount:
- Verify all nodes have the
load-imagesscript completed - Check Longhorn system pods:
kubectl get pods -n longhorn-system - Review Longhorn UI via port-forward:
kubectl port-forward -n longhorn-system svc/longhorn-frontend 8080:80
Next Steps
After successful installation:
- Next Steps Guide - Post-installation configuration
- Configuration Guide - System configuration
- Operations Guide - Day-to-day operational procedures
- Troubleshooting Guide - Common issues and resolution
12.5.5 - Helm Chart Installation
Overview
This guide covers the common steps for deploying the CDN Manager Helm chart. These steps apply to all deployment types (single-node, multi-node, and air-gapped) after the Kubernetes cluster is fully operational.
Prerequisites: This guide assumes the Kubernetes cluster is already installed and all system pods are running. If you haven’t installed the cluster yet, refer to:
- Single-Node Installation for lab environments
- Multi-Node Installation for production deployments
- Air-Gapped Deployment for air-gapped environments
Prerequisites
Before proceeding, verify the following:
- Cluster operational: All nodes show
Readystatus - System pods running: All pods in
kube-systemandlonghorn-systemnamespaces areRunning - ISO mounted: Installation ISO is mounted at
/mnt/esb3027 - Extras ISO mounted (air-gapped only): Extras ISO is mounted at
/mnt/esb3027-extrasand images are loaded on all nodes
Step 1: Create Configuration File
The installation ISO includes environment-specific configuration files as the recommended starting points. Choose the file that matches your deployment type:
| Deployment | Starting file | Copy command |
|---|---|---|
| Single-node lab | /mnt/esb3027/values-lab.yaml | cp /mnt/esb3027/values-lab.yaml ~/values.yaml |
| Multi-node production | /mnt/esb3027/values-production.yaml | cp /mnt/esb3027/values-production.yaml ~/values.yaml |
After copying, edit ~/values.yaml for your environment. The two fields that must be updated in either file are:
global:
hosts:
manager:
- host: manager.example.com # Your manager hostname
zitadel:
zitadel:
configmapConfig:
ExternalDomain: manager.example.com # Must match global.hosts.manager[0].host exactly
Important:
global.hosts.manager[0].hostandzitadel.zitadel.configmapConfig.ExternalDomainmust match exactly or authentication will fail due to CORS policy violations.
For a full description of what each file configures and the complete list of required changes per environment, see the Configuration Guide.
Complete reference: /mnt/esb3027/values.yaml documents every available option with its default value. Use this as a reference, not as a starting point for your configuration.
Split configuration files: For better organisation, split your configuration into multiple files and specify them with repeated --values flags. Later files override earlier files:
helm install acd-manager /mnt/esb3027/charts/acd-manager \
--values ~/values.yaml \
--values ~/values-tls.yaml
Step 2: Load MaxMind GeoIP Databases (Optional)
If you plan to use GeoIP-based routing or validation features, load the MaxMind GeoIP databases. The following databases are used by the manager:
GeoIP2-City.mmdb- The City DatabaseGeoLite2-ASN.mmdb- The ASN DatabaseGeoIP2-Anonymous-IP.mmdb- The VPN and Anonymous IP Database
Create the Kubernetes volume using the helper utility:
/mnt/esb3027/generate-maxmind-volume
The utility will prompt for:
- Location of
GeoIP2-City.mmdb - Location of
GeoLite2-ASN.mmdb - Location of
GeoIP2-Anonymous-IP.mmdb - Name of the volume
After running this command, reference the volume in your configuration file:
manager:
maxmindDbVolume: maxmind-db-volume
Replace maxmind-db-volume with the volume name you specified when running the utility.
Tip: When naming the volume, include a revision number or date (e.g.,
maxmind-db-volume-2026-04ormaxmind-db-volume-v2). This simplifies future updates: create a new volume with an updated name, update thevalues.yamlto reference the new volume, and delete the old volume after verification.
Step 3: Configure TLS Certificates (Optional)
For production deployments, configure a valid TLS certificate from a trusted Certificate Authority (CA). A self-signed certificate is deployed by default if no certificate is provided.
Method 1: Create TLS Secret Manually
Create a Kubernetes TLS secret with your certificate and key:
kubectl create secret tls acd-manager-tls --cert=tls.crt --key=tls.key
Method 2: Helm-Managed Secret
Add the certificate directly to your values.yaml:
ingress:
secrets:
acd-manager-tls: |
-----BEGIN CERTIFICATE-----
...
-----END CERTIFICATE-----
tls:
- hosts:
- manager.example.com
secretName: acd-manager-tls
Configuring All Ingress Controllers
All ingress controllers must be configured with the same certificate secret and hostname:
ingress:
hostname: manager.example.com
tls: true
secretName: acd-manager-tls
zitadel:
ingress:
tls:
- hosts:
- manager.example.com
secretName: acd-manager-tls
confd:
ingress:
hostname: manager.example.com
tls: true
secretName: acd-manager-tls
mib-frontend:
ingress:
hostname: manager.example.com
tls: true
secretName: acd-manager-tls
Important: The hostname must match the first entry in
global.hosts.managerfor Zitadel CORS compatibility. The secret name has a maximum length of 53 characters.
Step 4: Deploy the Manager Helm Chart
Deploy the CDN Manager application:
helm install acd-manager /mnt/esb3027/charts/acd-manager --values ~/values.yaml
Real-time output: By default, helm install runs silently until completion. To see real-time output during deployment, add the --debug flag:
helm install acd-manager /mnt/esb3027/charts/acd-manager --values ~/values.yaml --debug
Monitor deployment:
kubectl get pods --watch
Wait for all pods to show Running status before proceeding.
Timeout handling: The default Helm timeout is 5 minutes. If the installation fails due to a rollout timeout, retry with a larger timeout value:
helm install acd-manager /mnt/esb3027/charts/acd-manager --values ~/values.yaml --timeout 10m
Retry failed installation: If a previous installation attempt failed and you receive an error that the release name is already in use, uninstall the previous release before retrying:
helm uninstall acd-manager
helm install acd-manager /mnt/esb3027/charts/acd-manager --values ~/values.yaml
Step 5: Verify Deployment
Verify all application pods are running:
kubectl get pods
Expected Output: Single-Node
NAME READY STATUS RESTARTS AGE
acd-manager-5b98d569d9-abc12 1/1 Running 0 3m
acd-manager-confd-6fb78548c4-xnrh4 1/1 Running 0 3m
acd-manager-gateway-8bc8446fc-chs26 1/1 Running 0 3m
acd-manager-kafka-controller-0 2/2 Running 0 3m
acd-manager-metrics-aggregator-76d96c4964-lwdcj 1/1 Running 0 3m
acd-manager-mib-frontend-7bdb69684b-6qxn8 1/1 Running 0 3m
acd-manager-postgresql-0 1/1 Running 0 3m
acd-manager-redis-master-0 2/2 Running 0 3m
acd-manager-redis-replicas-0 2/2 Running 0 3m
acd-manager-selection-input-5fb694b857-qxt67 1/1 Running 0 3m
acd-manager-zitadel-8448b4c4fc-2pkd8 1/1 Running 0 3m
acd-manager-zitadel-init-hh6j7 0/1 Completed 0 4m
acd-manager-zitadel-setup-nwp8k 0/2 Completed 0 4m
alertmanager-0 1/1 Running 0 3m
grafana-6d948cfdc6-77ggk 1/1 Running 0 3m
victoria-metrics-agent-dc87df588-tn8wv 1/1 Running 0 3m
victoria-metrics-alert-757c44c58f-kk9lp 1/1 Running 0 3m
victoria-metrics-longterm-server-0 1/1 Running 0 3m
victoria-metrics-server-0 1/1 Running 0 3m
Expected Output: Multi-Node
NAME READY STATUS RESTARTS AGE
acd-cluster-postgresql-1 1/1 Running 0 11m
acd-cluster-postgresql-2 1/1 Running 0 11m
acd-cluster-postgresql-3 1/1 Running 0 10m
acd-manager-5b98d569d9-2pbph 1/1 Running 0 3m
acd-manager-5b98d569d9-m54f9 1/1 Running 0 3m
acd-manager-5b98d569d9-pq26f 1/1 Running 0 3m
acd-manager-confd-6fb78548c4-xnrh4 1/1 Running 0 3m
acd-manager-gateway-8bc8446fc-chs26 1/1 Running 0 3m
acd-manager-gateway-8bc8446fc-wzrml 1/1 Running 0 3m
acd-manager-kafka-controller-0 2/2 Running 0 3m
acd-manager-kafka-controller-1 2/2 Running 0 3m
acd-manager-kafka-controller-2 2/2 Running 0 3m
acd-manager-metrics-aggregator-76d96c4964-lwdcj 1/1 Running 2 3m
acd-manager-mib-frontend-7bdb69684b-6qxn8 1/1 Running 0 3m
acd-manager-mib-frontend-7bdb69684b-pkjrw 1/1 Running 0 3m
acd-manager-redis-master-0 2/2 Running 0 3m
acd-manager-redis-replicas-0 2/2 Running 0 3m
acd-manager-selection-input-5fb694b857-qxt67 1/1 Running 2 3m
acd-manager-zitadel-8448b4c4fc-2pkd8 1/1 Running 0 3m
acd-manager-zitadel-8448b4c4fc-vchp9 1/1 Running 0 3m
acd-manager-zitadel-init-hh6j7 0/1 Completed 0 4m
acd-manager-zitadel-setup-nwp8k 0/2 Completed 0 4m
alertmanager-0 1/1 Running 0 3m
grafana-6d948cfdc6-77ggk 1/1 Running 0 3m
telegraf-54779f5f46-2jfj5 1/1 Running 0 3m
victoria-metrics-agent-dc87df588-tn8wv 1/1 Running 0 3m
victoria-metrics-alert-757c44c58f-kk9lp 1/1 Running 0 3m
victoria-metrics-longterm-server-0 1/1 Running 0 3m
victoria-metrics-server-0 1/1 Running 0 3m
Pod Distribution Verification
Verify pods are distributed across nodes:
kubectl get pods -o wide
Expected Behavior
- Init pods (such as
zitadel-initandzitadel-setup) will showCompletedstatus after successful initialization. This is expected behavior. - Multi-node deployments: Some pods may enter
CrashLoopBackoffstate during initial deployment depending on the timing of other containers starting up. This is expected behavior as some services wait for dependencies (such as databases or Kafka) to become available. The deployment should stabilize automatically after a few minutes. - Restart counts: Some pods may show restart counts as they wait for dependencies to become available. This is normal during initial deployment.
Next Steps
After successful deployment:
- Next Steps Guide - Post-installation configuration
- Getting Started Guide - Accessing the system
- Configuration Guide - System configuration
- Operations Guide - Day-to-day operations
12.5.6 - Upgrade Guide
Overview
This guide describes the procedure for upgrading the AgileTV CDN Manager (ESB3027) to a newer version. The upgrade process involves updating the Kubernetes cluster components and redeploying the Helm chart with the new version.
Prerequisites
Backup Requirements
Before beginning any upgrade, ensure you have:
- PostgreSQL Backup: Verify recent backups are available via the Cloudnative PG operator
- Configuration Backup: Save your current
values.yamlfile(s) - TLS Certificates: Ensure certificate files are backed up
- MaxMind Volumes: Note the current volume names if using GeoIP databases
Version Compatibility
Review the Release Notes for the target version to check for:
- Breaking changes requiring manual intervention
- Required intermediate upgrade steps
- New configuration options that should be set
Cluster Health
Verify the cluster is healthy before upgrading:
kubectl get nodes
kubectl get pods
kubectl get pvc
All nodes should show Ready status and all pods should be Running (or Completed for job pods).
Upgrade Methods
There are three upgrade methods available. Choose the one that best fits your situation:
| Method | Downtime | Use Case |
|---|---|---|
| Rolling Upgrade | Minimal | Patch releases; minor version upgrades; configuration updates |
| Clean Upgrade | Brief | Major version upgrades; component changes; troubleshooting |
| Full Reinstall | Extended | Cluster rebuilds; troubleshooting persistent issues; ensuring clean state |
Method Selection Guidance:
Rolling Upgrade (Method 1) is the default choice for most upgrades. Use this for patch releases (e.g., 1.6.0 → 1.6.1) and even minor version upgrades (e.g., 1.4.0 → 1.6.0) where no breaking changes are documented. This method preserves all existing resources and performs an in-place update. Note: This method supports Helm’s automatic rollback (
helm rollback) if the upgrade fails, allowing quick recovery to the previous state.Clean Upgrade (Method 2) is recommended for major version upgrades (e.g., 1.x → 2.x) or when the release notes indicate significant component changes. This method ensures all resources are recreated with the new version, avoiding potential issues with stale configurations. Also use this method when troubleshooting upgrade failures from Method 1.
Full Reinstall (Method 3) should only be used when a completely clean cluster state is required. This includes troubleshooting persistent cluster-level issues, recovering from failed upgrades that cannot be rolled back, or when migrating between significantly different deployment configurations. This method requires verified backups and should be planned for extended downtime.
Upgrade Steps
Method 1: Rolling Upgrade (Recommended)
This method performs an in-place rolling upgrade with minimal downtime. All upgrade commands are executed from the primary server node.
Step 1: Obtain the New Installation ISO
Unmount the old ISO (if mounted) and mount the new installation ISO:
umount /mnt/esb3027 2>/dev/null || true
mount -o loop,ro esb3027-acd-manager-X.Y.Z.iso /mnt/esb3027
Replace X.Y.Z with the target version number.
Step 2: Update Containers and Cluster Software
Run the installation script to update the container images and cluster software:
/mnt/esb3027/install
Wait for the script to complete.
Step 2b: Air-Gapped Environments (If Applicable)
If deploying in an air-gapped environment, also mount and load the extras ISO:
# Mount the Extras ISO
mkdir -p /mnt/esb3027-extras
mount -o loop,ro esb3027-acd-manager-extras-X.Y.Z.iso /mnt/esb3027-extras
# Load container images from the extras ISO
/mnt/esb3027-extras/load-images
Replace X.Y.Z with the target version number.
Step 4: Review and Update Configuration
Compare the default values.yaml from the new ISO with your current configuration:
diff /mnt/esb3027/values.yaml ~/values.yaml
Update your configuration file to include any new required settings. Common updates include:
# ~/values.yaml
global:
hosts:
manager:
- host: manager.example.com
routers:
- name: director-1
address: 192.0.2.1
zitadel:
zitadel:
ExternalDomain: manager.example.com
# Add any new required settings for the target version
Important: Do not modify settings unrelated to the upgrade unless specifically documented in the release notes.
Step 5: Update MaxMind GeoIP Volumes (If Applicable)
If you use MaxMind GeoIP databases, use the utility from the new ISO to create an updated volume:
/mnt/esb3027/generate-maxmind-volume
Update your values.yaml to reference the new volume name:
manager:
maxmindDbVolume: maxmind-geoip-2026-04
Tip: Using dated or versioned volume names (e.g.,
maxmind-geoip-2026-04) allows you to create new volumes during upgrades and delete old ones after verification.
Step 6: Update TLS Certificates (If Needed)
If your TLS certificates need renewal or the new version requires certificate updates, create or update the secret:
kubectl create secret tls acd-manager-tls --cert=tls.crt --key=tls.key --dry-run=client -o yaml | kubectl apply -f -
Step 7: Upgrade the Helm Release
Perform a Helm upgrade with the new chart:
helm upgrade acd-manager /mnt/esb3027/charts/acd-manager \
--values ~/values.yaml
Note: The upgrade performs a rolling update of each deployment in the chart. Deployments are upgraded one at a time, with pods being terminated and recreated sequentially. StatefulSets (PostgreSQL, Kafka, Redis) roll out one pod at a time to maintain data availability.
Monitor the upgrade progress:
kubectl get pods --watch
Wait for all pods to stabilize and show Running status before considering the upgrade complete. Some pods may temporarily enter CrashLoopBackoff during the transition as they wait for dependencies to become available.
Step 8: Verify the Upgrade
Check the deployed version:
helm list
kubectl get deployments -o wide
Verify application functionality:
- Access the MIB Frontend and confirm it loads
- Test API connectivity
- Verify Grafana dashboards are accessible
- Check that Zitadel authentication is working
Step 9: Clean Up
After confirming the upgrade is successful:
Unmount the old ISO (if still mounted):
umount /mnt/esb3027Delete old MaxMind volumes (if replaced):
kubectl get pvc kubectl delete pvc <old-volume-name>Remove old configuration files if no longer needed.
Method 2: Clean Upgrade (Helm Uninstall/Install)
This method removes the existing Helm release before installing the new version. This is useful for major version upgrades or when troubleshooting upgrade issues. All upgrade commands are executed from the primary server node.
Warning: This method causes brief downtime as all resources are deleted before reinstallation.
Step 1: Obtain the New Installation ISO
Mount the new installation ISO:
umount /mnt/esb3027 2>/dev/null || true
mount -o loop,ro esb3027-acd-manager-X.Y.Z.iso /mnt/esb3027
Step 2: Backup Configuration
Save your current Helm values:
helm get values acd-manager -o yaml > ~/values-backup.yaml
Step 3: Uninstall the Existing Release
Remove the existing Helm release:
helm uninstall acd-manager
Wait for pods to terminate:
kubectl get pods --watch
Note: Helm uninstall does not remove PersistentVolumes (PVs) or PersistentVolumeClaims (PVCs). All data stored in PostgreSQL, Kafka, Redis, and Longhorn volumes is preserved during the uninstall process. When the new version is installed, it will reattach to the existing PVCs and restore data automatically.
Step 4: Review and Update Configuration
Compare the default values.yaml from the new ISO with your configuration:
diff /mnt/esb3027/values.yaml ~/values.yaml
Update your configuration file as needed.
Step 5: Install the New Release
Install the new version:
helm install acd-manager /mnt/esb3027/charts/acd-manager \
--values ~/values.yaml
Monitor the deployment:
kubectl get pods --watch
Wait for all pods to stabilize before proceeding.
Step 6: Verify the Upgrade
Verify the upgrade as described in Method 1, Step 8.
Method 3: Full Reinstall (Cluster Rebuild)
This method completely removes Kubernetes and reinstalls from scratch. Use only for cluster rebuilds or when other upgrade methods fail.
Warning: This method causes extended downtime and permanent data loss. The K3s uninstall process destroys all Longhorn PersistentVolumes (PVs) and PersistentVolumeClaims (PVCs). All data stored in PostgreSQL, Kafka, Redis, and application volumes will be permanently lost. Verified backups are required before proceeding.
Warning: This method should only be used when necessary. Ensure you have verified backups before proceeding.
Step 1: Stop Kubernetes Services
On all nodes (server and agent), stop the K3s service:
systemctl stop k3s
Step 2: Uninstall K3s (Server Nodes Only)
On the primary server node first, then each additional server node:
/usr/local/bin/k3s-uninstall.sh
Step 3: Clean Up Residual State (All Nodes)
On all nodes, remove residual state:
/usr/local/bin/k3s-kill-all.sh
rm -rf /var/lib/rancher/k3s/*
Warning: This removes all cluster data including Longhorn PersistentVolumes (PVs) and PersistentVolumeClaims (PVCs). All data stored in PostgreSQL, Kafka, Redis, and application volumes will be permanently lost. Ensure verified backups are available before proceeding.
Step 4: Reinstall K3s Cluster and Deploy Manager
Follow the installation procedure in the Installation Guide to reinstall the cluster and deploy the Helm chart. At this point, you are in the same state as a fresh installation:
- Primary server installation
- Additional server joins (if applicable)
- Agent joins (if applicable)
- Helm chart deployment
Note: The K3s node token is regenerated during reinstallation. Retrieve the new token from /var/lib/rancher/k3s/server/node-token on the primary server after installation if you need to join additional nodes.
Rollback Procedure
Rollback procedures vary by upgrade method:
Method 1 (Rolling Upgrade)
Use Helm’s built-in rollback command:
helm rollback acd-manager
This reverts to the previous Helm release revision automatically.
Or manually redeploy the previous version:
helm upgrade acd-manager /mnt/esb3027-old/helm/charts/acd-manager \
--values ~/values.yaml
Note: If you use multiple --values files for organization, ensure they are specified in the same order as the original installation.
Method 2 (Clean Upgrade)
Reinstall the previous version:
helm uninstall acd-manager
helm install acd-manager /mnt/esb3027-old/helm/charts/acd-manager \
--values ~/values-backup.yaml
Method 3 (Full Reinstall)
Rollback requires repeating the full cluster reinstall procedure using the old installation ISO. Follow Method 3 steps with the previous version’s ISO. Ensure verified backups are available before attempting.
Troubleshooting
Pods Fail to Start
Check pod status and events:
kubectl describe pod <pod-name> kubectl get events --sort-by='.lastTimestamp'Review pod logs:
kubectl logs <pod-name> kubectl logs <pod-name> -p # Previous instance logs
Database Migration Issues
If PostgreSQL migrations fail:
Check Cloudnative PG cluster status:
kubectl get clusters kubectl describe cluster <cluster-name>Review migration job logs:
kubectl get jobs kubectl logs job/<migration-job-name>
Helm Upgrade Fails
If helm upgrade fails:
Check Helm release status:
helm status acd-manager helm history acd-managerReview the error message for specific failures
Attempt rollback if necessary
Post-Upgrade
After a successful upgrade:
- Review the Release Notes for any post-upgrade tasks
- Update monitoring dashboards if new metrics are available
- Test all critical functionality
- Document the upgrade in your change management system
Next Steps
After completing the upgrade:
- Next Steps Guide - Review post-installation tasks
- Operations Guide - Day-to-day operational procedures
- Release Notes - Review new features and changes
12.5.7 - Next Steps
Overview
After completing the installation of the AgileTV CDN Manager (ESB3027), several post-installation configuration tasks must be performed before the system is ready for production use. This guide walks you through the essential next steps.
Prerequisites
Before proceeding, ensure:
- The CDN Manager Helm chart is successfully deployed
- All pods are in
Runningstatus - You have network access to the cluster hostname or IP
- You have the default credentials available
Step 1: Access Zitadel Console
The first step is to configure user authentication through Zitadel Identity and Access Management (IAM).
Navigate to the Zitadel Console:
https://<manager-host>/ui/consoleReplace
<manager-host>with your configured hostname (e.g.,manager.localormanager.example.com).Important: The
<manager-host>must match the first entry inglobal.hosts.managerfrom your Helm values exactly. Zitadel uses name-based virtual hosting and CORS validation. If the hostname does not match, authentication will fail.Log in with the default administrator credentials (also listed in the Glossary):
- Username:
admin@agiletv.dev - Password:
Password1!
- Username:
Important: If prompted to configure Multi-Factor Authentication (MFA), you must skip this step for now. MFA is not currently supported. Attempting to configure MFA may lock you out of the administrator account.
Security Recommendation: After logging in, create a new administrator account with proper roles. Once verified, disable or delete the default
admin@agiletv.devaccount. For details on required roles and administrator permissions, see Zitadel’s Administrator Documentation.
Step 2: Configure SMTP Settings (Recommended)
Zitadel requires an SMTP server to send email notifications and perform email validations.
In the Zitadel Console, navigate to Settings > Default Settings
Configure the SMTP settings:
- SMTP Host: Your mail server hostname
- SMTP Port: Typically 587 (TLS) or 465 (SSL)
- SMTP Username: Mail account username
- SMTP Password: Mail account password
- Sender Address: Email address for outgoing mail (e.g.,
noreply@example.com)
Save the configuration
Note: Without SMTP configuration, email-based user validation and password recovery features will not function.
Step 3: Create Additional User Accounts
Create user accounts for operators and administrators:
Tip: For detailed guidance on managing users, roles, and permissions in the Zitadel Console, see Zitadel’s User Management Documentation.
In the Zitadel Console, navigate to Users > Add User
Fill in the user details:
- Username: Unique username
- First Name: User’s first name
- Last Name: User’s last name
- Email: User’s email address (this is their login username)
Known Issue: Due to a limitation in this release of Zitadel, the username must match the local part (the portion before the
@) of the email address. For example, if the email isfoo@example.com, the username must befoo.If these do not match, Zitadel may allow login with the mismatched local part while blocking the full email address. For instance, if username is
foobut email isfoo.bar@example.com, login withfoo@example.commay succeed whilefoo.bar@example.comis blocked.Workaround: Always ensure the username matches the email local part exactly.
Important: The following options must be configured:
- Email Verified: Check this box to skip email verification
- Set Initial Password: Enter a temporary password for the user
Note: If you configured SMTP settings in Step 2, the user will receive an email asking to verify their address and set their initial password. If SMTP is not configured, you must check the “Email Verified” box and set an initial password manually, otherwise the user account will not be enabled.
Click Create User
Provide the user with:
- Their username
- The temporary password (if set manually)
- The Zitadel Console URL
Instruct the user to change their password on first login
Step 4: Configure User Roles and Permissions
Zitadel manages roles and permissions for accessing the CDN Manager:
In the Zitadel Console, navigate to Roles
Assign appropriate roles to users:
- Admin: Full administrative access
- Operator: Operational access without administrative functions
- Viewer: Read-only access
To assign a role:
- Select the user
- Click Add Role
- Select the appropriate role
- Save the assignment
Step 5: Access the MIB Frontend
The MIB Frontend is the web-based configuration GUI for CDN operators:
Navigate to the MIB Frontend:
https://<manager-host>/guiLog in using your Zitadel credentials
Verify you can access the configuration interface
Step 6: Verify API Access
Test API connectivity to ensure the system is functioning:
curl -k https://<manager-host>/api/v1/health/ready
Expected response:
{
"status": "ready"
}
See the API Guide for detailed API documentation.
Step 7: Configure TLS Certificates (If Not Done During Installation)
For production deployments, a valid TLS certificate from a trusted Certificate Authority should be configured. If you did not configure TLS certificates during installation, refer to Step 12: Configure TLS Certificates in the Installation Guide.
Step 8: Set Up Monitoring and Alerting
Configure monitoring dashboards and alerting:
Access Grafana:
- Navigate to
https://<manager-host>/grafana - Log in with default credentials (also listed in the Glossary):
- Username:
admin - Password:
edgeware
- Username:
- Navigate to
Review Pre-built Dashboards:
- System health dashboards are included by default
- CDN metrics dashboards show routing and usage statistics
Note: CDN Director instances automatically have DNS names configured for use in Grafana dashboards. The DNS name is derived from the
namefield inglobal.hosts.routerswith.externalappended. For example, a router namedmy-router-1will have the DNS namemy-router-1.externalin Grafana configuration.
Step 9: Verify Kafka and PostgreSQL Health
Ensure the data layer components are healthy:
kubectl get pods
Verify the following pods are running:
| Component | Pod Name Pattern | Expected Status |
|---|---|---|
| Kafka | acd-manager-kafka-controller-* | Running (3 pods for production) |
| PostgreSQL | acd-cluster-postgresql-0, acd-cluster-postgresql-1, acd-cluster-postgresql-2 | Running (3-node HA cluster) |
| Redis | acd-manager-redis-master-* | Running |
All pods should show Running status with no restarts.
Step 10: Configure Availability Zones (Optional)
For improved network performance, configure availability zones to enable Topology Aware Hints. This optimizes service-to-pod routing by keeping traffic within the same zone when possible.
See the Performance Tuning Guide for detailed instructions on:
- Labeling nodes with zone and region topology
- Verifying topology configuration
- Requirements for Topology Aware Hints to activate
- Integration with pod anti-affinity rules
Note: This step is optional. If zone labels are not configured, the system will fall back to random load-balancing.
Step 11: Review System Configuration
Verify the initial configuration:
Review Helm Values:
helm get values acd-manager -o yamlCheck Ingress Configuration:
kubectl get ingressVerify Service Endpoints:
kubectl get endpoints
Step 12: Document Your Deployment
Maintain documentation for your deployment:
- Cluster hostname and IP addresses
- Configuration file locations
- User accounts and roles created
- TLS certificate expiration dates
- Backup procedures and schedules
- Monitoring and alerting contacts
Next Steps
After completing post-installation configuration:
- Configuration Guide - Detailed system configuration options
- Operations Guide - Day-to-day operational procedures
- Metrics & Monitoring Guide - Comprehensive monitoring setup
- API Guide - REST API reference and integration examples
Troubleshooting
Cannot Access Zitadel Console
- Verify DNS resolution or hosts file configuration
- Check that Traefik ingress is running:
kubectl get pods -n kube-system | grep traefik - Review Traefik logs:
kubectl logs -n kube-system -l app.kubernetes.io/name=traefik
Authentication Failures
- Verify Zitadel pods are healthy:
kubectl get pods | grep zitadel - Check Zitadel logs:
kubectl logs <zitadel-pod-name> - Ensure the external domain matches your hostname in Zitadel configuration
MIB Frontend Not Loading
- Verify MIB Frontend pods are running:
kubectl get pods | grep mib-frontend - Check for connectivity issues to Confd and API services
- Review browser console for JavaScript errors
API Returns 401 Unauthorized
- Verify you have a valid bearer token
- Check token expiration
- Ensure Zitadel authentication is functioning
For additional troubleshooting assistance, refer to the Troubleshooting Guide.
12.6 - Configuration Guide
Overview
The CDN Manager is deployed via Helm chart with configuration supplied through values.yaml files. This guide explains the configuration structure, how to apply changes, and provides a reference for all configurable options.
Configuration Files
The installation ISO provides three configuration files at /mnt/esb3027/:
| File | Purpose |
|---|---|
values-lab.yaml | Recommended starting point for single-node lab deployments |
values-production.yaml | Recommended starting point for multi-node production deployments |
values.yaml | Complete reference of all configurable options with their defaults |
You only need to specify fields that differ from the defaults. Helm applies configuration hierarchically — values from your file override the chart’s built-in defaults, and any key you omit retains its default value.
Lab Configuration (values-lab.yaml)
values-lab.yaml is the recommended starting point for single-node lab, acceptance testing, and demonstration deployments. It pre-configures settings appropriate for a constrained single-node environment:
- Single Kafka controller replica (the default 3 replicas require 3 separate nodes to satisfy pod anti-affinity rules)
- Single Zitadel replica
- Self-signed TLS by default, with real certificate configuration commented out for reference
- Minimal resource requests suited to a single node
Copy the file to a writable location and edit it before deploying:
cp /mnt/esb3027/values-lab.yaml ~/values.yaml
The minimum required changes are:
- Set
global.hosts.manager[0].hostto your node’s hostname or IP address - Set
zitadel.zitadel.configmapConfig.ExternalDomainto the same value
These two values must match exactly or authentication will fail due to CORS policy violations. See Global Settings for details.
Production Configuration (values-production.yaml)
values-production.yaml is the recommended starting point for multi-node production deployments across a minimum three-node cluster. It pre-configures settings appropriate for a high-availability environment:
- Three Zitadel replicas spread across nodes for HA
- Production-grade resource requests and limits for all major components
- Kafka with a dedicated single-replica StorageClass (avoiding unnecessary triple-redundancy on top of Kafka’s own quorum)
- Manager HPA configured to scale between 3 and 8 replicas
- TLS certificate configuration with clearly marked placeholders
Copy the file to a writable location and edit it before deploying:
cp /mnt/esb3027/values-production.yaml ~/values.yaml
The minimum required changes before deploying are:
- Set
global.hosts.manager[0].hostto your primary manager hostname - Set
zitadel.zitadel.configmapConfig.ExternalDomainto the same hostname - Replace the placeholder TLS certificate and key in the
ingress.secretssection, and update thesecretNamevalues inmibFrontend.ingress.extraTlsandzitadel.ingress.tlsto match - Update
global.hosts.routerswith your CDN Director instances
See TLS Configuration and Global Settings for full details.
Hardware requirements: For per-node hardware specifications, refer to the System Requirements Guide. The System Requirements Guide is the authoritative source — the hardware comments in the header of
values-production.yamlmay not reflect the current requirements.
Complete Reference (values.yaml)
The full default values file at /mnt/esb3027/values.yaml documents every configurable option with its default value and inline comments. Use this as a reference when looking up available settings or understanding what the environment-specific files override.
Note:
values.yamlis not intended to be used directly as your deployment configuration. Usevalues-lab.yamlorvalues-production.yamlas your starting point instead.
Configuration Merging
Helm merges configuration files from left to right, with later files overriding earlier values. This allows you to split your configuration into multiple files — for example, keeping TLS certificates separate from the main configuration:
# Multiple files merged left-to-right
helm install acd-manager /mnt/esb3027/charts/acd-manager \
--values ~/values.yaml \
--values ~/values-tls.yaml
Individual Value Overrides
For temporary changes, you can override individual values with --set:
helm upgrade acd-manager /mnt/esb3027/helm/charts/acd-manager \
--values ~/values.yaml \
--set manager.logLevel=debug
Note: Using --set is discouraged for permanent changes, as the same arguments must be specified for every Helm operation.
Applying Configuration
Initial Installation
helm install acd-manager /mnt/esb3027/charts/acd-manager \
--values ~/values.yaml
Updating Configuration
helm upgrade acd-manager /mnt/esb3027/helm/charts/acd-manager \
--values ~/values.yaml
Dry Run
Before applying changes, validate the configuration with a dry run:
helm upgrade acd-manager /mnt/esb3027/helm/charts/acd-manager \
--values ~/values.yaml \
--dry-run
Rollback
If an upgrade fails, rollback to the previous revision:
# View revision history
helm history acd-manager
# Rollback to previous revision
helm rollback acd-manager
# Rollback to specific revision
helm rollback acd-manager <revision_number>
Note: Rollback reverts the Helm release but does not modify your values.yaml file. You must manually revert configuration file changes.
Force Reinstall
If an upgrade fails and rollback is not sufficient, you can perform a clean reinstall:
helm uninstall acd-manager
helm install acd-manager /mnt/esb3027/charts/acd-manager \
--values ~/values.yaml
Warning: This is service-affecting as all pods will be destroyed and recreated.
Configuration Reference
Global Settings
The global section contains cluster-wide settings. The most critical configuration is global.hosts.
global:
hosts:
manager:
- host: manager.local
routers:
- name: default
address: 127.0.0.1
edns_proxy: []
geoip: []
| Key | Type | Description |
|---|---|---|
global.hosts.manager | Array | External IP addresses or DNS hostnames for all Manager cluster nodes |
global.hosts.routers | Array | CDN Director (ESB3024) instances |
global.hosts.edns_proxy | Array | EDNS Proxy addresses (currently unused) |
global.hosts.geoip | Array | GeoIP Proxy addresses for Frontend GUI |
Important: The first entry in global.hosts.manager must match zitadel.zitadel.ExternalDomain exactly. Zitadel enforces CORS protection, and authentication will fail if these do not match.
Manager Configuration
Core Manager API server settings:
| Key | Type | Default | Description |
|---|---|---|---|
manager.image.registry | String | ghcr.io | Container image registry |
manager.image.repository | String | edgeware/acd-manager | Container image repository |
manager.image.tag | String | Image tag override (uses latest if empty) | |
manager.logLevel | String | info | Log level (trace, debug, info, warn, error) |
manager.replicaCount | Number | 1 | Number of replicas (HPA manages this when enabled) |
manager.containerPorts.http | Number | 80 | HTTP container port |
manager.maxmindDbVolume | String | Name of PVC containing MaxMind GeoIP databases |
Manager Resources
The chart supports both resource presets and explicit resource specifications:
| Key | Type | Default | Description |
|---|---|---|---|
manager.resourcesPreset | String | `` (empty) | Resource preset (see Resource Presets table). Ignored if manager.resources is set. |
manager.resources.requests.cpu | String | 300m | CPU request |
manager.resources.requests.memory | String | 512Mi | Memory request |
manager.resources.limits.cpu | String | 1 | CPU limit |
manager.resources.limits.memory | String | 4Gi | Memory limit |
Note: For production workloads, explicitly set manager.resources rather than using presets.
Manager Datastore
manager:
datastore:
type: redis
namespace: "cdn_manager_ds"
default_ttl: ""
compression: zstd
| Key | Type | Default | Description |
|---|---|---|---|
manager.datastore.type | String | redis | Datastore backend type |
manager.datastore.namespace | String | cdn_manager_ds | Redis namespace for manager data |
manager.datastore.default_ttl | String | `` (empty) | Default TTL for entries |
manager.datastore.compression | String | zstd | Compression algorithm (none, zstd, etc.) |
Manager Discovery
manager:
discovery: []
# Example:
# - namespace: "other"
# hosts:
# - other-host1
# - other-host2
# pattern: "other-.*"
| Key | Type | Description |
|---|---|---|
manager.discovery | Array | Array of discovery host configurations. Each entry can specify hosts (list of hostnames), pattern (regex pattern), or both |
Manager Tuning
manager:
tuning:
enable_cache_control: true
cache_control_max_age: "5m"
cache_control_miss_max_age: ""
| Key | Type | Default | Description |
|---|---|---|---|
manager.tuning.enable_cache_control | Boolean | true | Enable cache control headers in responses |
manager.tuning.cache_control_max_age | String | 5m | Maximum age for cache control headers |
manager.tuning.cache_control_miss_max_age | String | `` (empty) | Maximum age for cache control headers on cache misses |
Manager Container Arguments
manager:
args:
- --config-file=/etc/manager/config.toml
- http-server
Gateway Configuration
NGinx Gateway settings for external Director communication:
| Key | Type | Default | Description |
|---|---|---|---|
gateway.replicaCount | Number | 1 | Number of gateway replicas |
gateway.resources.requests.cpu | String | 100m | CPU request |
gateway.resources.requests.memory | String | 128Mi | Memory request |
gateway.resources.limits.cpu | String | 150m | CPU limit |
gateway.resources.limits.memory | String | 192Mi | Memory limit |
gateway.service.type | String | ClusterIP | Service type |
MIB Frontend Configuration
Web-based configuration GUI settings:
| Key | Type | Default | Description |
|---|---|---|---|
mib-frontend.enabled | Boolean | true | Enable the frontend GUI |
mib-frontend.frontend.resourcePreset | String | nano | Resource preset |
mib-frontend.frontend.autoscaling.hpa.enabled | Boolean | true | Enable HPA |
mib-frontend.frontend.autoscaling.hpa.minReplicas | Number | 2 | Minimum replicas |
mib-frontend.frontend.autoscaling.hpa.maxReplicas | Number | 4 | Maximum replicas |
Confd Configuration
Confd settings for configuration management:
| Key | Type | Default | Description |
|---|---|---|---|
confd.enabled | Boolean | true | Enable Confd |
confd.service.ports.internal | Number | 15000 | Internal service port |
VictoriaMetrics Configuration
Time-series database for metrics:
| Key | Type | Default | Description |
|---|---|---|---|
acd-metrics.enabled | Boolean | true | Enable metrics components |
acd-metrics.victoria-metrics-single.enabled | Boolean | true | Enable VictoriaMetrics |
acd-metrics.grafana.enabled | Boolean | true | Enable Grafana |
acd-metrics.telegraf.enabled | Boolean | true | Enable Telegraf |
acd-metrics.prometheus.enabled | Boolean | true | Enable Prometheus metrics |
Ingress Configuration
Traffic exposure settings:
| Key | Type | Default | Description |
|---|---|---|---|
ingress.enabled | Boolean | true | Enable ingress record generation |
ingress.pathType | String | Prefix | Ingress path type |
ingress.hostname | String | `` (empty) | Primary hostname (defaults to manager.local via global.hosts) |
ingress.path | String | /api | Default path for ingress |
ingress.tls | Boolean | false | Enable TLS configuration |
ingress.selfSigned | Boolean | false | Generate self-signed certificate via Helm |
ingress.secrets | Array | Custom TLS certificate secrets |
Ingress Extra Paths
The chart includes default extra paths for Confd and GeoIP:
ingress:
extraPaths:
- path: /confd
pathType: Prefix
backend:
service:
name: acd-manager-gateway
port:
name: http
- path: /geoip
pathType: Prefix
backend:
service:
name: acd-manager-gateway
port:
name: http
TLS Certificate Secrets
For production TLS certificates:
ingress:
secrets:
- name: manager.local-tls
key: |-
-----BEGIN RSA PRIVATE KEY-----
...
-----END RSA PRIVATE KEY-----
certificate: |-
-----BEGIN CERTIFICATE-----
...
-----END CERTIFICATE-----
tls: true
Resource Configuration
Resource Presets
Predefined resource configurations for common deployment sizes:
| Preset | Request CPU | Request Memory | Limit CPU | Limit Memory | Ephemeral Storage Limit |
|---|---|---|---|---|---|
nano | 100m | 128Mi | 150m | 192Mi | 2Gi |
micro | 250m | 256Mi | 375m | 384Mi | 2Gi |
small | 500m | 512Mi | 750m | 768Mi | 2Gi |
medium | 500m | 1024Mi | 750m | 1536Mi | 2Gi |
large | 1000m | 2048Mi | 1500m | 3072Mi | 2Gi |
xlarge | 1000m | 3072Mi | 3000m | 6144Mi | 2Gi |
2xlarge | 1000m | 3072Mi | 6000m | 12288Mi | 2Gi |
Note: Limits are calculated as requests plus 50% (except for xlarge/2xlarge and ephemeral-storage).
Custom Resources
Override preset with custom values:
manager:
resources:
requests:
cpu: "300m"
memory: "512Mi"
limits:
cpu: "1"
memory: "1Gi"
Note:
- CPU values use millicores (1000m = 1 core)
- Memory values use binary SI units (1024Mi = 1GiB)
- Requests represent minimum guaranteed resources
- Limits represent maximum consumable resources
Capacity Planning
When sizing resources:
- Requests determine scheduling (node must have available capacity)
- Limits prevent resource starvation
- Maintain 20-30% cluster headroom for scaling
- Total capacity = sum of all requests × replica count + headroom
Security Contexts
Pod Security Context
manager:
podSecurityContext:
enabled: true
fsGroup: 1001
fsGroupChangePolicy: Always
sysctls: []
supplementalGroups: []
Container Security Context
manager:
containerSecurityContext:
enabled: true
runAsUser: 1001
runAsGroup: 1001
runAsNonRoot: true
readOnlyRootFilesystem: true
privileged: false
allowPrivilegeEscalation: false
capabilities:
drop: ["ALL"]
seccompProfile:
type: "RuntimeDefault"
Health Probes
Probe Types
| Probe | Purpose | Failure Action |
|---|---|---|
startupProbe | Initial startup verification | Container restart |
readinessProbe | Traffic readiness check | Remove from load balancer |
livenessProbe | Health monitoring | Container restart |
Default Probe Configuration
Liveness Probe
manager:
livenessProbe:
enabled: true
initialDelaySeconds: 5
periodSeconds: 30
timeoutSeconds: 10
failureThreshold: 5
successThreshold: 1
httpGet:
path: /api/v1/health/alive
port: http
Readiness Probe
manager:
readinessProbe:
enabled: true
initialDelaySeconds: 5
periodSeconds: 10
timeoutSeconds: 7
failureThreshold: 3
successThreshold: 1
httpGet:
path: /api/v1/health/ready
port: http
Startup Probe
manager:
startupProbe:
enabled: true
initialDelaySeconds: 0
periodSeconds: 5
timeoutSeconds: 3
failureThreshold: 10
successThreshold: 1
httpGet:
path: /api/v1/health/alive
port: http
Autoscaling Configuration
Horizontal Pod Autoscaler (HPA)
manager:
autoscaling:
hpa:
enabled: true
minReplicas: 3
maxReplicas: 8
targetCPU: 50
targetMemory: 80
| Key | Type | Default | Description |
|---|---|---|---|
manager.autoscaling.hpa.enabled | Boolean | true | Enable HPA |
manager.autoscaling.hpa.minReplicas | Number | 3 | Minimum number of replicas |
manager.autoscaling.hpa.maxReplicas | Number | 8 | Maximum number of replicas |
manager.autoscaling.hpa.targetCPU | Number | 50 | Target CPU utilization percentage |
manager.autoscaling.hpa.targetMemory | Number | 80 | Target Memory utilization percentage |
Network Policy
networkPolicy:
enabled: true
allowExternal: true
allowExternalEgress: true
addExternalClientAccess: true
| Key | Type | Default | Description |
|---|---|---|---|
networkPolicy.enabled | Boolean | true | Enable NetworkPolicy |
networkPolicy.allowExternal | Boolean | true | Allow connections from any source (don’t require pod label) |
networkPolicy.allowExternalEgress | Boolean | true | Allow pod to access any range of port and destinations |
networkPolicy.addExternalClientAccess | Boolean | true | Allow access from pods with client label set to “true” |
Pod Affinity and Anti-Affinity
manager:
podAffinityPreset: ""
podAntiAffinityPreset: soft
nodeAffinityPreset:
type: ""
key: ""
values: []
affinity: {}
| Key | Type | Default | Description |
|---|---|---|---|
manager.podAffinityPreset | String | `` (empty) | Pod affinity preset (soft or hard). Ignored if affinity is set |
manager.podAntiAffinityPreset | String | soft | Pod anti-affinity preset (soft or hard). Ignored if affinity is set |
manager.nodeAffinityPreset.type | String | `` (empty) | Node affinity preset type (soft or hard) |
manager.affinity | Object | {} | Custom affinity rules (overrides presets) |
Service Configuration
service:
type: ClusterIP
ports:
http: 80
annotations:
service.kubernetes.io/topology-mode: Auto
externalTrafficPolicy: Cluster
sessionAffinity: None
| Key | Type | Default | Description |
|---|---|---|---|
service.type | String | ClusterIP | Service type |
service.ports.http | Number | 80 | HTTP service port |
service.annotations | Object | service.kubernetes.io/topology-mode: Auto | Service annotations |
service.externalTrafficPolicy | String | Cluster | External traffic policy |
Persistence Configuration
persistence:
enabled: false
mountPath: /agiletv/manager/data
storageClass: ""
accessModes:
- ReadWriteOnce
size: 8Gi
| Key | Type | Default | Description |
|---|---|---|---|
persistence.enabled | Boolean | false | Enable persistence using PVC |
persistence.mountPath | String | /agiletv/manager/data | Mount path |
persistence.storageClass | String | `` (empty) | Storage class (uses cluster default if empty) |
persistence.size | String | 8Gi | Size of data volume |
RBAC and Service Account
rbac:
create: false
rules: []
serviceAccount:
create: true
name: ""
automountServiceAccountToken: true
annotations: {}
Metrics
metrics:
enabled: false
serviceMonitor:
enabled: false
namespace: ""
annotations: {}
labels: {}
interval: ""
scrapeTimeout: ""
| Key | Type | Default | Description |
|---|---|---|---|
metrics.enabled | Boolean | false | Enable Prometheus metrics export |
metrics.serviceMonitor.enabled | Boolean | false | Create Prometheus Operator ServiceMonitor |
Next Steps
After configuration:
- Installation Guide - Deploy with your configuration
- Operations Guide - Day-to-day management
- Performance Tuning Guide - Optimize system performance
- Architecture Guide - Understand component relationships
12.7 - Performance Tuning Guide
Overview
This guide provides performance tuning recommendations for the AgileTV CDN Manager (ESB3027). While the default configuration is suitable for most deployments, certain environments may benefit from additional optimizations.
Network Topology Optimization
Topology Aware Hints
The CDN Manager uses Kubernetes Topology Aware Hints to prefer routing pods in the same zone as the source of network traffic. This reduces cross-zone latency and improves overall system responsiveness.
How It Works
When nodes are labeled with topology zones, Kubernetes automatically routes traffic to pods in the same zone when possible. This is particularly beneficial for:
- Low-latency requirements: Keeps traffic local to reduce round-trip time
- Cost optimization: Reduces cross-zone data transfer costs in cloud environments
- Load distribution: Prevents hotspots by distributing load across zones
Configuring Availability Zones
Each node must have zone and region labels applied for Topology Aware Hints to function:
# Label a node with a zone
kubectl label nodes <node-name> topology.kubernetes.io/zone=us-east-1a
# Label a node with a region
kubectl label nodes <node-name> topology.kubernetes.io/region=us-east-1
Replace <node-name> with your actual node names and adjust the zone/region values to match your deployment geography.
Note: Labels applied via kubectl label are automatically persistent and will survive node restarts.
Verify Topology Configuration
Verify labels are applied:
kubectl get nodes --show-labels | grep topology.kubernetes.io
Verify EndpointSlices are being generated with hints:
kubectl get endpointslices
Requirements for Topology Aware Hints
For Topology Aware Hints to activate:
- Minimum Nodes: At least one node must be labeled with each zone referenced by endpoints
- Symmetry: The control plane checks for sufficient CPU capacity across zones to balance traffic
- Zone Coverage: All zones with endpoints should have at least one ready node
Integration with Pod Anti-Affinity
Topology labels complement the pod anti-affinity rules already configured in the Helm chart:
- Pod Anti-Affinity: Handles pod-to-node placement to ensure high availability
- Topology Aware Hints: Handles service-to-pod traffic routing to keep requests within the same zone
Together, these features optimize both placement and routing for improved performance.
Fallback Behavior
If zone labels are not configured, the system falls back to random load-balancing across all available pods. This is functionally correct but may result in:
- Increased cross-zone traffic
- Higher latency for some requests
- Less predictable performance characteristics
Kernel Network Tuning (sysctl)
For high-throughput deployments, tuning Linux kernel network parameters can significantly improve connection handling and overall system performance. These settings are particularly beneficial for environments with high connection rates or large numbers of concurrent connections.
Recommended sysctl Settings
Apply the following settings to optimize network performance:
# Networking
net.core.somaxconn = 1024
net.core.netdev_max_backlog = 2048
net.ipv4.tcp_max_syn_backlog = 2048
# Connection Tracking
net.netfilter.nf_conntrack_max = 131072
net.netfilter.nf_conntrack_tcp_timeout_established = 1200
# Port Reuse
net.ipv4.ip_local_port_range = 10240 65535
net.ipv4.tcp_tw_reuse = 1
# Memory Buffers
net.core.rmem_max = 8388608
net.core.wmem_max = 8388608
Setting Descriptions
| Parameter | Recommended Value | Purpose |
|---|---|---|
net.core.somaxconn | 1024 | Maximum socket listen backlog. Increases pending connection queue size. |
net.core.netdev_max_backlog | 2048 | Maximum packets queued at network device level. Helps handle burst traffic. |
net.ipv4.tcp_max_syn_backlog | 2048 | Maximum SYN requests queued. Improves handling of connection floods. |
net.netfilter.nf_conntrack_max | 131072 | Maximum tracked connections. Prevents connection tracking table exhaustion. |
net.netfilter.nf_conntrack_tcp_timeout_established | 1200 | Timeout for established connections (seconds). Reduces stale entry buildup. |
net.ipv4.ip_local_port_range | 10240 65535 | Range of local ports for outbound connections. Expands available ephemeral ports. |
net.ipv4.tcp_tw_reuse | 1 | Allows reusing TIME_WAIT sockets. Reduces port exhaustion under high load. |
net.core.rmem_max | 8388608 | Maximum receive socket buffer size (8MB). Improves high-bandwidth transfers. |
net.core.wmem_max | 8388608 | Maximum send socket buffer size (8MB). Improves high-bandwidth transfers. |
Applying Settings
Temporary (Until Reboot)
Apply settings immediately but they will be lost on reboot:
sudo sysctl -w net.core.somaxconn=1024
sudo sysctl -w net.core.netdev_max_backlog=2048
# ... repeat for each parameter
Persistent (Across Reboots)
Add settings to /etc/sysctl.conf or a file in /etc/sysctl.d/:
# Create a dedicated config file
cat <<EOF | sudo tee /etc/sysctl.d/99-cdn-manager.conf
# CDN Manager Network Tuning
net.core.somaxconn = 1024
net.core.netdev_max_backlog = 2048
net.ipv4.tcp_max_syn_backlog = 2048
net.netfilter.nf_conntrack_max = 131072
net.netfilter.nf_conntrack_tcp_timeout_established = 1200
net.ipv4.ip_local_port_range = 10240 65535
net.ipv4.tcp_tw_reuse = 1
net.core.rmem_max = 8388608
net.core.wmem_max = 8388608
EOF
# Apply all settings
sudo sysctl -p /etc/sysctl.d/99-cdn-manager.conf
Kubernetes Considerations
For Kubernetes deployments, these sysctl settings can be applied via:
- Node-level configuration: Use DaemonSets or node provisioning scripts
- Pod-level safe sysctls: Some sysctls can be set per-pod via
securityContext.sysctls - Container runtime configuration: Configure via container runtime options
Note that some sysctls require privileged containers or node-level configuration.
Monitoring Impact
After applying these settings, monitor:
- Connection establishment rates
- TIME_WAIT socket count:
netstat -n | grep TIME_WAIT | wc -l - Connection tracking table usage:
cat /proc/sys/net/netfilter/nf_conntrack_count - Network buffer utilization via Grafana dashboards
Resource Configuration
Horizontal Pod Autoscaler (HPA)
The default HPA configuration is tuned for production workloads. For environments with variable load, consider adjusting the scale metrics:
| Component | Default Scale Metrics | Tuning Consideration |
|---|---|---|
| Core Manager | CPU 50%, Memory 80% | Lower CPU threshold for faster scale-out |
| NGinx Gateway | CPU 75%, Memory 80% | Increase for cost optimization |
| MIB Frontend | CPU 75%, Memory 90% | Adjust based on operator concurrency |
For detailed HPA configuration, see the Architecture Guide.
Resource Requests and Limits
Ensure resource requests and limits are appropriately sized for your workload. Under-provisioned resources can cause:
- Pod evictions during high load
- Increased latency due to CPU throttling
- Slow scaling responses
Refer to the Configuration Guide for preset configurations and planning guidance.
Database Optimization
PostgreSQL
The PostgreSQL cluster is managed by the Cloudnative PG operator. For improved performance:
- Connection Pooling: The application uses connection pooling by default
- Replica Usage: Read queries can be offloaded to replicas for read-heavy workloads
- Backup Scheduling: Schedule backups during low-traffic periods to minimize I/O impact
Redis
Redis provides in-memory caching for sessions and ephemeral state:
- Memory Allocation: Ensure sufficient memory for cache hit rates
- Persistence: RDB snapshots are enabled; adjust frequency based on durability needs
Kafka
Kafka handles event streaming for selection input and metrics:
- Partition Count: Default partitions are sized for typical workloads
- Replication Factor: Production deployments use 3 replicas for fault tolerance
- Consumer Groups: The Selection Input Worker is limited to one consumer per partition
Monitoring Performance
Key Metrics to Watch
Monitor the following metrics for performance insights:
- API Response Time: Track via Grafana dashboards
- Pod CPU/Memory Usage: Identify resource bottlenecks
- Kafka Lag: Monitor consumer lag for selection input processing
- Database Connections: Watch for connection pool exhaustion
Grafana Dashboards
Pre-built dashboards are available at https://<manager-host>/grafana:
- System Health: Overall cluster and application health
- CDN Metrics: Routing and usage statistics
- Resource Utilization: CPU, memory, and network usage per component
Troubleshooting Performance Issues
High Latency
- Check pod distribution across nodes:
kubectl get pods -o wide - Verify topology labels are applied:
kubectl get nodes --show-labels - Review network latency between nodes
- Check for resource contention:
kubectl top pods
Slow Scaling
- Verify HPA is enabled:
kubectl get hpa - Check cluster capacity for scheduling new pods
- Review HPA metrics:
kubectl describe hpa acd-manager
Database Performance
- Check PostgreSQL cluster status:
kubectl get pods -l app=postgresql - Review slow query logs (if enabled)
- Monitor connection pool usage
Next Steps
After reviewing performance tuning:
- Architecture Guide - Understand component interactions
- Configuration Guide - Detailed configuration options
- Metrics & Monitoring Guide - Comprehensive monitoring setup
- Troubleshooting Guide - Resolve performance issues
12.8 - Operations Guide
Overview
This guide covers day-to-day operational procedures for managing the AgileTV CDN Manager (ESB3027). Topics include routine maintenance, backup procedures, log management, and common operational tasks.
Prerequisites
Before performing operations, ensure you have:
kubectlaccess to the clusterhelmCLI installed- Access to the node where
values.yamlis stored - Appropriate RBAC permissions for administrative tasks
Cluster Access
There are two supported methods for accessing the Kubernetes cluster:
- SSH to a Server Node (Recommended for operations staff) - SSH into any Server node and run
kubectlcommands directly - Remote kubectl - Install
kubectlon your local machine and configure it to connect to the cluster remotely
Method 1: SSH to Server Node (Recommended)
The kubectl command-line tool is pre-configured on all Server nodes and can be used directly without additional setup:
# SSH to any Server node
ssh root@<server-ip>
# Run kubectl commands directly
kubectl get nodes
kubectl get pods
This method is recommended for day-to-day operations as it requires no local configuration and provides direct access to the cluster.
Method 2: Remote kubectl from Local Machine
To use kubectl from your local workstation or laptop:
Step 1: Install kubectl
Download and install kubectl for your operating system:
- Official Documentation: Install kubectl
- macOS (Homebrew):
brew install kubectl - Linux: Download from the official Kubernetes release page
- Windows: Download from the official Kubernetes release page
Step 2: Copy kubeconfig from Server Node
# Copy kubeconfig from any Server node
scp root@<server-ip>:/etc/rancher/k3s/k3s.yaml ~/.kube/config
Step 3: Update kubeconfig
Edit the kubeconfig file to point to the correct server address:
# Replace localhost with the actual server IP
# macOS/Linux:
sed -i '' 's/127.0.0.1/<server-ip>/g' ~/.kube/config # macOS
sed -i 's/127.0.0.1/<server-ip>/g' ~/.kube/config # Linux
# Or manually edit ~/.kube/config and change:
# server: https://127.0.0.1:6443
# to:
# server: https://<server-ip>:6443
Step 4: Verify connectivity
kubectl get nodes
Managing Multiple Clusters
If you manage multiple Kubernetes clusters from the same machine, you can maintain multiple kubeconfig files:
# Set KUBECONFIG environment variable to include multiple config files
export KUBECONFIG=~/.kube/config-prod:~/.kube/config-lab
# View all contexts
kubectl config get-contexts
# Switch between clusters
kubectl config use-context <context-name>
# View current context
kubectl config current-context
For more information, see the official Kubernetes documentation: Organizing Cluster Access
Helm Commands
Helm releases are managed cluster-wide:
# List all releases
helm list
# View release history
helm history acd-manager
# Get deployed values
helm get values acd-manager -o yaml
# Get deployed manifest
helm get manifest acd-manager
Note: If using remote kubectl, ensure helm is installed on your local machine. See Helm Installation for instructions.
Helm Commands
Helm releases are managed cluster-wide:
# List all releases
helm list
# View release history
helm history acd-manager
# Get deployed values
helm get values acd-manager -o yaml
# Get deployed manifest
helm get manifest acd-manager
Backup Procedures
PostgreSQL Backup
PostgreSQL is managed by the Cloudnative PG operator, which provides continuous backup capabilities.
# Check backup status
kubectl get backup
# Create manual backup
kubectl apply -f - <<EOF
apiVersion: postgresql.cnpg.io/v1
kind: Backup
metadata:
name: manual-backup-$(date +%Y%m%d-%H%M%S)
spec:
cluster:
name: acd-cluster-postgresql
EOF
# List available backups
kubectl get backup -o wide
# Restore from backup (requires downtime)
# See Upgrade Guide for restore procedures
Longhorn Volume Backups
Longhorn provides snapshot and backup capabilities for persistent volumes:
# List all volumes
kubectl get volumes -n longhorn-system
# Create snapshot via Longhorn UI
# Port-forward to Longhorn UI (do not expose via ingress)
kubectl port-forward -n longhorn-system svc/longhorn-frontend 8080:80
# Access: http://localhost:8080
# WARNING: Longhorn UI grants access to sensitive storage information
# and should never be exposed through the ingress controller
Accessing Internal Services
For debugging and troubleshooting, you may need direct access to internal services.
PostgreSQL
PostgreSQL is managed by the Cloudnative PG operator. Connection details are stored in the acd-cluster-postgresql-app Secret:
# View connection details
kubectl describe secret acd-cluster-postgresql-app
# Extract individual fields
PG_HOST=$(kubectl get secret acd-cluster-postgresql-app -o jsonpath='{.data.host}' | base64 -d)
PG_USER=$(kubectl get secret acd-cluster-postgresql-app -o jsonpath='{.data.username}' | base64 -d)
PG_PASS=$(kubectl get secret acd-cluster-postgresql-app -o jsonpath='{.data.password}' | base64 -d)
PG_DB=$(kubectl get secret acd-cluster-postgresql-app -o jsonpath='{.data.dbname}' | base64 -d)
# Connect via psql
kubectl exec -it acd-cluster-postgresql-0 -- psql -U $PG_USER -d $PG_DB
Secret fields: The CNPG operator populates the following fields: username, password, host, port, dbname, uri, jdbc-uri, fqdn-uri, fqdn-jdbc-uri, pgpass.
Redis
Redis runs on port 6379 with no authentication:
# Connect via redis-cli
kubectl exec -it acd-manager-redis-master-0 -- redis-cli
# Or connect from another pod
kubectl run redis-test --rm -it --image=redis -- redis-cli -h acd-manager-redis-master
Kafka
kafka-topics.sh –bootstrap-server
The selection_input topic is pre-configured for selection input events.
Kubernetes Port Forwarding
For accessing internal Kubernetes services that are not exposed via ingress or services, use kubectl port-forward to create a secure tunnel from your local machine to the service.
Basic Port Forwarding
# Forward local port to a service
kubectl port-forward -n <namespace> svc/<service-name> <local-port>:<service-port>
# Example: Forward local port 8080 to Grafana (port 3000)
kubectl port-forward -n default svc/acd-manager-grafana 8080:3000
Note: “Local” refers to the machine where you run kubectl. This can be:
- A Server node in the cluster (common for administrative tasks)
- A remote machine with
kubectlconfigured to access the cluster
Accessing the Forwarded Service
Once the port-forward is established, access the service at http://localhost:<local-port> from the machine where you ran kubectl port-forward.
If running on a Server node: To access the forwarded port from your local workstation:
- Ensure the firewall on the Server node allows traffic on the forwarded port from your network
- Use the Server node’s IP address instead of
localhostfrom your workstation
# From your workstation (if firewall allows)
curl http://<server-node-ip>:<local-port>
For simplicity, consider running port-forward from your local machine (if kubectl is configured for remote cluster access) rather than from a Server node.
Background Port Forwarding
To run port-forward in the background:
kubectl port-forward -n <namespace> svc/<service-name> <local-port>:<service-port> &
Security Considerations
Port forwarding is recommended for:
- Administrative interfaces (e.g., Longhorn UI) that should not be publicly exposed
- Debugging and troubleshooting internal services
- Temporary access to services without modifying ingress configuration
The port-forward tunnel remains active only while the kubectl port-forward command is running. Press Ctrl+C to terminate the tunnel.
Example: The Longhorn storage UI is intentionally not exposed via ingress due to security risks. Access it via port-forward:
kubectl port-forward -n longhorn-system svc/longhorn-frontend 8080:80Then navigate to
http://localhost:8080in your browser.
Longhorn Storage
Longhorn is a distributed block storage system for Kubernetes that provides persistent volumes for stateful applications such as PostgreSQL and Kafka.
Architecture
Longhorn deploys controller and replica engines on each node, forming a distributed storage system. When a volume is created, Longhorn replicates data across multiple nodes to ensure durability even in the event of node failures.
Storage Protocols:
- iSCSI: Used for standard Read-Write-Once (RWO) volumes
- NFS: Used for Read-Write-Many (RWX) volumes that can be mounted by multiple pods simultaneously
Configuration
The CDN Manager deploys Longhorn with a single replica configuration, which differs from the Longhorn default of 3 replicas. This configuration is optimized for the cluster architecture where:
- Pod-node affinity is configured to schedule pods on the same node as their persistent volume data
- This optimizes I/O performance by reducing network traffic
- Data locality is maintained while still providing volume portability
Capacity Planning
Longhorn storage requires an additional 30% capacity headroom for internal operations and scaling. If less than 30% of the total partition capacity is available, Longhorn may mark volumes as “full” and prevent further writes.
For detailed storage requirements and disk partitioning guidance, see the System Requirements Guide.
Configuration Backup
Always backup your Helm values before making changes:
# Export current values
helm get values acd-manager -o yaml > ~/values-backup-$(date +%Y%m%d).yaml
# Backup custom values files
cp ~/values.yaml ~/values-backup-$(date +%Y%m%d).yaml
Backup Schedule Recommendations
| Component | Frequency | Retention |
|---|---|---|
| PostgreSQL | Daily | 30 days |
| Longhorn Snapshots | Before changes | 7 days |
| Configuration | Before each change | Indefinite |
Updating MaxMind GeoIP Databases
The MaxMind GeoIP databases (GeoIP2-City, GeoLite2-ASN, GeoIP2-Anonymous-IP) are used for GeoIP-based routing and validation features. These databases should be updated periodically to ensure accurate IP geolocation data.
Prerequisites
- Updated MaxMind database files (
.mmdbformat) obtained from MaxMind - Access to the cluster via
kubectl - Helm CLI installed
Update Procedure
Step 1: Create New Volume with Updated Databases
Run the volume generation utility with a unique volume name that includes a revision identifier:
# Mount the installation ISO if not already mounted
mkdir -p /mnt/esb3027
mount -o loop,ro esb3027-acd-manager-X.Y.Z.iso /mnt/esb3027
# Generate new volume with updated databases
/mnt/esb3027/generate-maxmind-volume
When prompted:
- Provide the paths to the three database files:
GeoIP2-City.mmdbGeoLite2-ASN.mmdbGeoIP2-Anonymous-IP.mmdb
- Enter a unique volume name with a revision number or date, for example:
maxmind-geoip-2026-04maxmind-geoip-v2
Tip: Using a revision-based naming convention simplifies rollback if needed.
Step 2: Update Helm Configuration
Edit your values.yaml file to reference the new volume:
manager:
maxmindDbVolume: maxmind-geoip-2026-04
Replace maxmind-geoip-2026-04 with the volume name you specified in Step 1.
Step 3: Apply Configuration Update
Upgrade the Helm release with the updated configuration:
helm upgrade acd-manager /mnt/esb3027/charts/acd-manager --values ~/values.yaml
Step 4: Rolling Restart (Optional)
To ensure all pods immediately use the new database files, perform a rolling restart of the manager deployment:
kubectl rollout restart deployment acd-manager
Monitor the rollout status:
kubectl rollout status deployment acd-manager
Step 5: Verify Update
Verify the pods are running with the new volume:
kubectl get pods
kubectl describe pod -l app.kubernetes.io/component=manager | grep -A 5 "Volumes"
Step 6: Clean Up Old Volume (Optional)
After verifying the new databases are working correctly, you can delete the old persistent volume:
# List persistent volumes to find the old one
kubectl get pv
# Delete the old volume
kubectl delete pv <old-volume-name>
Caution: Ensure the new volume is functioning correctly before deleting the old volume. Keep the old volume for at least 24-48 hours as a rollback option.
Rollback Procedure
If issues occur after updating the databases:
- Revert the
maxmindDbVolumevalue in yourvalues.yamlto the previous volume name - Run
helm upgradewith the reverted configuration - Optionally restart the deployment:
kubectl rollout restart deployment acd-manager
Update Frequency Recommendations
| Database | Recommended Update Frequency |
|---|---|
| GeoIP2-City | Weekly or monthly |
| GeoLite2-ASN | Monthly |
| GeoIP2-Anonymous-IP | Weekly or monthly |
MaxMind releases database updates on a regular schedule. Subscribe to MaxMind notifications to stay informed of new releases.
Log Management
Application Logs
# View manager logs
kubectl logs -l app.kubernetes.io/component=manager
# Follow logs in real-time
kubectl logs -l app.kubernetes.io/component=manager -f
# View logs from specific pod
kubectl logs <pod-name>
# View previous instance logs (after crash)
kubectl logs <pod-name> -p
# View logs with timestamps
kubectl logs <pod-name> --timestamps
# View logs from all containers in pod
kubectl logs <pod-name> --all-containers
Component-Specific Logs
# Zitadel logs
kubectl logs -l app.kubernetes.io/name=zitadel
# Gateway logs
kubectl logs -l app.kubernetes.io/component=gateway
# Confd logs
kubectl logs -l app.kubernetes.io/component=confd
# MIB Frontend logs
kubectl logs -l app.kubernetes.io/component=mib-frontend
# PostgreSQL logs
kubectl logs -l app.kubernetes.io/name=postgresql
# Kafka logs
kubectl logs -l app.kubernetes.io/name=kafka
# Redis logs
kubectl logs -l app.kubernetes.io/name=redis
Log Aggregation
Logs are collected by Telegraf and sent to VictoriaMetrics:
# Access Grafana for log visualization
# https://<manager-host>/grafana
# Query logs via Grafana Explore
# Select VictoriaMetrics datasource and use log queries
Log Rotation
Container logs are automatically rotated by Kubernetes:
- Default max size: 10MB per container
- Default max files: 5 rotated files
- Total per pod: ~50MB maximum
Scaling Operations
Manual Scaling
Note: If HPA (Horizontal Pod Autoscaler) is enabled for a deployment, manual scaling changes will be overridden by the HPA. To manually scale, you must first disable the HPA.
# Check if HPA is enabled
kubectl get hpa
# Disable HPA before manual scaling
kubectl patch hpa acd-manager -p '{"spec": {"minReplicas": null, "maxReplicas": null}}'
# Or delete the HPA entirely
kubectl delete hpa acd-manager
# Scale manager replicas
kubectl scale deployment acd-manager --replicas=3
# Scale gateway replicas
kubectl scale deployment acd-manager-gateway --replicas=2
# Scale MIB frontend replicas
kubectl scale deployment acd-manager-mib-frontend --replicas=2
HPA Configuration
# View HPA status
kubectl get hpa
# Describe HPA details
kubectl describe hpa acd-manager
# Edit HPA configuration
kubectl edit hpa acd-manager
Configuration Updates
Updating Helm Values
# Edit values file
vi ~/values.yaml
# Validate with dry-run
helm upgrade acd-manager /mnt/esb3027/charts/acd-manager \
--values ~/values.yaml \
--dry-run
# Apply changes
helm upgrade acd-manager /mnt/esb3027/charts/acd-manager \
--values ~/values.yaml
# Verify rollout
kubectl rollout status deployment/acd-manager
Rolling Back Changes
# View revision history
helm history acd-manager
# Rollback to previous revision
helm rollback acd-manager
# Rollback to specific revision
helm rollback acd-manager <revision>
# Verify rollback
helm history acd-manager
Certificate Management
Checking Certificate Expiration
# Check TLS secret expiration
kubectl get secret acd-manager-tls -o jsonpath='{.data.tls\.crt}' | base64 -d | openssl x509 -noout -dates
# Check via Grafana dashboard
# Certificate expiration metrics are available in Grafana
Renewing Certificates
# For Helm-managed self-signed certificates
helm upgrade acd-manager /mnt/esb3027/charts/acd-manager \
--values ~/values.yaml \
--set ingress.selfSigned=true
# For manual certificates, update the secret
kubectl create secret tls acd-manager-tls \
--cert=new-tls.crt \
--key=new-tls.key \
--dry-run=client -o yaml | kubectl apply -f -
# Restart pods to pick up new certificate
kubectl rollout restart deployment acd-manager
Health Checks
Component Health
# Check all pods
kubectl get pods
# Check specific component
kubectl get pods -l app.kubernetes.io/component=manager
# Check persistent volumes
kubectl get pvc
# Check cluster status
kubectl get nodes
# Check ingress
kubectl get ingress
API Health Endpoints
# Liveness check
curl -k https://<manager-host>/api/v1/health/alive
# Readiness check
curl -k https://<manager-host>/api/v1/health/ready
Database Health
# PostgreSQL cluster status
kubectl get clusters -n default
# Check PostgreSQL pods
kubectl get pods -l app.kubernetes.io/name=postgresql
# Kafka cluster status
kubectl get pods -l app.kubernetes.io/name=kafka
# Redis status
kubectl get pods -l app.kubernetes.io/name=redis
Maintenance Windows
Planned Maintenance
Before performing maintenance:
- Notify users of potential service impact
- Verify backups are current
- Document the maintenance procedure
- Prepare rollback plan
Node Maintenance
# Cordon node to prevent new pods
kubectl cordon <node-name>
# Drain node (evict pods)
kubectl drain <node-name> --ignore-daemonsets --delete-emptydir-data
# Perform maintenance
# Uncordon node
kubectl uncordon <node-name>
Cluster Upgrades
See the Upgrade Guide for cluster upgrade procedures.
Troubleshooting Quick Reference
Common Commands
# Describe problematic pod
kubectl describe pod <pod-name>
# View pod events
kubectl get events --sort-by='.lastTimestamp'
# Check resource usage
kubectl top pods
kubectl top nodes
# Exec into container
kubectl exec -it <pod-name> -- /bin/sh
# Check network policies
kubectl get networkpolicies
# Check service endpoints
kubectl get endpoints
Restarting Components
# Restart deployment
kubectl rollout restart deployment/<deployment-name>
# Restart statefulset
kubectl rollout restart statefulset/<statefulset-name>
# Delete pod (auto-recreated)
kubectl delete pod <pod-name>
Security Operations
Rotating Service Account Tokens
# Delete service account secret (auto-regenerated)
kubectl delete secret <service-account-token-secret>
# Tokens are automatically regenerated
Updating RBAC Permissions
# View current roles
kubectl get roles
kubectl get clusterroles
# View role bindings
kubectl get rolebindings
kubectl get clusterrolebindings
# Edit role
kubectl edit role <role-name>
Audit Log Access
# K3s audit logs location
/var/lib/rancher/k3s/server/logs/audit.log
# View recent audit events
tail -f /var/lib/rancher/k3s/server/logs/audit.log
Disaster Recovery
Pod Recovery
Pods are automatically recreated if they fail:
# Check pod status
kubectl get pods
# If pod is stuck in Terminating
kubectl delete pod <pod-name> --force --grace-period=0
# If pod is stuck in Pending, check resources
kubectl describe pod <pod-name>
kubectl get events --sort-by='.lastTimestamp'
Node Failure Recovery
When a node fails:
- Automatic: Pods are rescheduled on healthy nodes (after timeout)
- Manual: Force delete stuck pods
# Force delete pods on failed node
kubectl delete pod --all --force --grace-period=0 \
--field-selector spec.nodeName=<failed-node>
Data Recovery
For data recovery scenarios, refer to:
- PostgreSQL: Cloudnative PG backup/restore procedures
- Longhorn: Volume snapshot restoration
- Kafka: Partition replication handles node failures
Routine Maintenance Checklist
Daily
- Review Grafana dashboards for anomalies
- Check alert notifications
- Verify backup completion
Weekly
- Review pod restart counts
- Check certificate expiration dates
- Review log storage usage
- Verify HPA is functioning correctly
Monthly
- Test backup restoration procedure
- Review and rotate credentials if needed
- Update documentation if configuration changed
- Review resource utilization trends
Next Steps
After mastering operations:
- Troubleshooting Guide - Deep dive into problem resolution
- Performance Tuning Guide - Optimize system performance
- Metrics & Monitoring Guide - Comprehensive monitoring setup
- API Guide - REST API reference and automation
12.9 - Metrics & Monitoring Guide
Overview
The CDN Manager includes a comprehensive monitoring stack based on VictoriaMetrics for time-series data storage, Telegraf for metrics collection, and Grafana for visualization. This guide describes the monitoring architecture and how to access and use the monitoring capabilities.
Quick Links
| Guide | Description |
|---|---|
| Grafana Dashboards | Using and customising the built-in and advanced Grafana dashboards |
| Grafana Authentication & Roles | Configuring Grafana authentication, roles, and permissions |
| Alerts & Alarms | Configuring and managing alerts and alarms |
Architecture
Components
| Component | Purpose |
|---|---|
| Telegraf | Metrics collector running on each node, gathering system and application metrics |
| VictoriaMetrics Agent | Metrics scraper and forwarder; scrapes Prometheus endpoints and forwards to VictoriaMetrics |
| VictoriaMetrics (Short-term) | Time-series database for operational dashboards (30-90 day retention) |
| VictoriaMetrics (Long-term) | Time-series database for billing and compliance (1+ year retention) |
| Grafana | Visualization and dashboard platform; deployed as two replicas for high availability |
| Alertmanager | Alert routing and notification management |
Metrics Flow
The following diagram illustrates how metrics flow through the monitoring stack:
flowchart TB
subgraph External["External Sources"]
Streamers[Streamers/External Clients]
end
subgraph Cluster["Kubernetes Cluster"]
Telegraf[Telegraf DaemonSet]
subgraph Applications["Application Components"]
Director[CDN Director]
Kafka[Kafka]
Redis[Redis]
Manager[ACD Manager]
Alertmanager[Alertmanager]
end
VMAgent[VictoriaMetrics Agent]
subgraph Storage["Storage"]
VMShort[VictoriaMetrics<br/>Short-term]
VMLong[VictoriaMetrics<br/>Long-term]
end
Grafana[Grafana<br/>2 replicas, HA]
PostgreSQL[(PostgreSQL)]
Zitadel[Zitadel]
end
Streamers -->|Push metrics| Telegraf
Telegraf -->|remote_write| VMShort
Telegraf -->|remote_write| VMLong
Director -->|Scrape| VMAgent
Kafka -->|Scrape| VMAgent
Redis -->|Scrape| VMAgent
Manager -->|Scrape| VMAgent
Alertmanager -->|Scrape| VMAgent
VMAgent -->|remote_write| VMShort
VMAgent -->|remote_write| VMLong
VMShort -->|Query| Grafana
VMLong -->|Query| Grafana
Grafana <-->|Shared state| PostgreSQL
Grafana -->|OAuth2 / OIDC| ZitadelMetrics Flow Summary:
External metrics ingestion:
- External clients (streamers) push metrics to Telegraf
- Telegraf forwards metrics via
remote_writeto both VictoriaMetrics instances
Internal metrics scraping:
- VictoriaMetrics Agent scrapes Prometheus endpoints from:
- CDN Director instances
- Kafka cluster
- Redis
- ACD Manager components
- Alertmanager
- VMAgent forwards scraped metrics via
remote_writeto both VictoriaMetrics instances
- VictoriaMetrics Agent scrapes Prometheus endpoints from:
Data visualization:
- Grafana queries both VictoriaMetrics databases depending on the dashboard requirements
- Operational dashboards use short-term storage
- Billing and compliance dashboards use long-term storage
Metrics Collection
Application Metrics
Applications expose metrics on Prometheus-compatible endpoints. VictoriaMetrics Agent (VMAgent) scrapes these endpoints and forwards metrics to VictoriaMetrics via remote_write.
System Metrics
Telegraf collects system-level metrics including:
- CPU usage
- Memory utilization
- Disk I/O
- Network statistics
- Process metrics
Kubernetes Metrics
Cluster metrics are collected including:
- Pod resource usage
- Node status
- Deployment status
- Persistent volume usage
Metrics Retention
VictoriaMetrics is configured with default retention policies. For custom retention settings, modify the VictoriaMetrics configuration in your values.yaml:
acd-metrics:
victoria-metrics-single:
retentionPeriod: "3" # Retention period in months
Troubleshooting
Metrics Not Appearing
If metrics are not appearing in Grafana:
Check Telegraf pods:
kubectl get pods -l app.kubernetes.io/component=telegrafCheck Telegraf logs:
kubectl logs -l app.kubernetes.io/component=telegrafVerify VictoriaMetrics is running:
kubectl get pods -l app.kubernetes.io/component=victoria-metricsCheck application metrics endpoints:
kubectl exec <pod-name> -- curl localhost:8080/metrics
For dashboard and authentication issues, see the Grafana Dashboards and Grafana Authentication & Roles guides.
Next Steps
After setting up monitoring:
- Grafana Authentication & Roles - Configure SSO and permissions before accessing Grafana
- Grafana Dashboards - Explore and customise dashboards
- Alerts & Alarms - Set up alerting and notifications
- Operations Guide - Day-to-day operational procedures
- Troubleshooting Guide - Resolve monitoring issues
- API Guide - Access metrics via API
12.9.1 - Grafana Authentication & Roles
Overview
Grafana authentication is delegated entirely to Zitadel via OAuth2/OIDC. Local username/password login is not available to end users. When a user logs into Grafana, they are redirected to Zitadel to authenticate, and their Grafana role is automatically determined by the Zitadel project roles assigned to their account.
The OIDC integration between Grafana and Zitadel is configured automatically at install time — no manual Zitadel application registration is required.
How It Works
During installation, an init container runs before Grafana starts and:
- Authenticates with Zitadel using a machine-account service key.
- Registers a
GrafanaOIDC application in the Zitadel project (or re-uses an existing one if already registered). - Writes the resulting
client_idandclient_secretinto a Kubernetes Secret, which Grafana picks up on startup.
This means the Grafana OIDC application in Zitadel is managed automatically and does not need to be created or modified manually.
Role Mapping
Grafana roles are mapped from Zitadel project roles using the following rule:
| Zitadel Project Role | Grafana Role |
|---|---|
grafana_admin | Admin — full access, can manage users, datasources, and dashboards |
| (any other role, or no role) | Viewer — read-only access to dashboards |
Note: There is no Grafana
Editorrole mapped by default. All authenticated users who are not explicitly grantedgrafana_adminreceive Viewer access. If you need an Editor tier, see Customising the Role Mapping.
The mapping is enforced on every login. If a user’s Zitadel role changes, the change takes effect the next time they log into Grafana.
Prerequisites
- Zitadel is configured and accessible at
https://<manager-host> - At least one Zitadel user account exists (see Next Steps — Create User Accounts)
- Grafana is accessed via the correct DNS hostname (see Accessing Grafana)
Accessing Grafana
Grafana is accessible at:
https://<manager-host>/grafana
Important: Grafana must be accessed using the DNS name specified in the first entry of
global.hosts.managerin your configuration. Accessing Grafana via an IP address or an alternative hostname will cause OAuth2 redirect URI mismatches and CORS errors, preventing login from completing successfully.
To log in:
- Navigate to
https://<manager-host>/grafana - Click “Login with Zitadel”
- Authenticate with your Zitadel account credentials
Granting Admin Access
By default, all Zitadel users who log into Grafana receive Viewer access. To grant a user Admin access, assign them the grafana_admin project role in Zitadel.
Step 1: Ensure the grafana_admin Role Exists
- Log into the Zitadel Console at
https://<manager-host>/ui/console - Navigate to Projects and open the ZITADEL project
- Click the Roles tab
- Check whether a role named
grafana_adminalready exists - If it does not exist, click New Role and create it:
- Key:
grafana_admin - Display Name: Grafana Admin (or any label you prefer)
- Click Save
- Key:
Step 2: Assign the Role to a User
- In the Zitadel Console, navigate to Users and open the user you want to grant admin access to
- Click the Authorizations tab
- Click New Authorization
- Select the ZITADEL project
- Select the
grafana_adminrole - Click Save
The user will have Grafana Admin access the next time they log in.
Revoking Admin Access
To demote a user back to Viewer, remove the grafana_admin authorization from their account:
- In the Zitadel Console, open the user’s Authorizations tab
- Find the
grafana_adminauthorization on the ZITADEL project - Click the delete icon to remove it
The change takes effect on their next Grafana login.
Customising the Role Mapping
The role mapping expression is configured in values.yaml under grafana."grafana.ini".auth.generic_oauth.role_attribute_path. It uses JMESPath syntax evaluated against the OIDC token’s role claims.
The default expression is:
grafana:
"grafana.ini":
auth.generic_oauth:
role_attribute_path: >-
contains(keys("urn:zitadel:iam:org:project:roles"), 'grafana_admin') && 'Admin' || 'Viewer'
Example: Adding an Editor Tier
To map a grafana_editor Zitadel role to Grafana’s Editor role, create the grafana_editor role in Zitadel (following the same steps as above) and extend the expression:
grafana:
"grafana.ini":
auth.generic_oauth:
role_attribute_path: >-
contains(keys("urn:zitadel:iam:org:project:roles"), 'grafana_admin') && 'Admin'
|| contains(keys("urn:zitadel:iam:org:project:roles"), 'grafana_editor') && 'Editor'
|| 'Viewer'
Apply the change using the standard upgrade procedure in the Configuration Guide.
Blocking Unauthenticated Access
By default, role_attribute_strict is set to false, which means any authenticated Zitadel user can log into Grafana as a Viewer even if they have no explicit Grafana role assigned. To restrict Grafana access to only users who have been explicitly granted a role, set this to true:
grafana:
"grafana.ini":
auth.generic_oauth:
role_attribute_strict: true
With role_attribute_strict: true, users who do not match any role in the role_attribute_path expression will be denied access entirely.
Managing Users in Grafana
User accounts in Grafana are created automatically on first login via Zitadel. There is no need to pre-create users in the Grafana UI.
To view and manage users who have logged in:
- Log into Grafana as an Admin
- Navigate to Administration > Users and access > Users
From here you can see each user’s current role, last login time, and authentication provider. Role changes should always be made via Zitadel (as described above) rather than directly in Grafana, as they will be overwritten on the user’s next login.
Break-Glass Admin Access
A local Grafana admin account is available as a break-glass fallback for situations where Zitadel is unavailable. This account is not accessible via the standard login page (which only shows the Zitadel SSO button).
To use the local admin account, navigate directly to:
https://<manager-host>/grafana/login
The default credentials are listed in the Glossary. Change the default password immediately after installation.
Security recommendation: The break-glass account should be used only for emergency access. Do not use it for routine administration.
Troubleshooting
OAuth2 Redirect URI Mismatch / CORS Errors
Grafana is registered in Zitadel with the redirect URI https://<manager-host>/grafana/login/generic_oauth, derived from the first entry of global.hosts.manager. Accessing Grafana via a different hostname or IP address will not match this URI and will cause the login to fail.
Resolution: Always access Grafana via the configured hostname. If the hostname has changed, re-run the helm upgrade to re-register the application with the updated URI.
User Receives Viewer Instead of Admin
The grafana_admin role is not included in the user’s Zitadel token.
Resolution:
- Confirm the
grafana_adminrole exists on the ZITADEL project in the Zitadel Console - Confirm the role is assigned to the user under their Authorizations tab
- Ask the user to log out of Grafana and log back in — role changes are applied on the next login, not the current session
Login Fails with “Role not found” or Access Denied
role_attribute_strict may be set to true and the user has no matching Zitadel role.
Resolution: Either assign the user an appropriate Zitadel project role, or set role_attribute_strict: false in values.yaml to allow all authenticated users Viewer access.
Admin Role Assigned in Zitadel but User Still Gets Viewer
The grafana_admin role is correctly assigned to the user in Zitadel, but Grafana still grants them Viewer access. This indicates that role claims are not being included in the Zitadel userinfo response.
Grafana determines roles by calling the Zitadel userinfo endpoint (/oidc/v1/userinfo) and evaluating the urn:zitadel:iam:org:project:roles claim. Zitadel only includes this claim when the Grafana OIDC application has Access Token Role Assertions enabled. If the claim is absent, the role_attribute_path expression always falls through to 'Viewer'.
To verify and fix:
- Log into the Zitadel Console at
https://<manager-host>/ui/console - Navigate to Projects > ZITADEL > Applications > Grafana
- Open the Token Settings tab
- Ensure Access Token Role Assertions is enabled
- Save the change
The fix takes effect on the user’s next login — no Grafana or Helm changes are required.
Grafana OIDC App Not Registered in Zitadel
If the init container failed during installation, the Grafana OIDC application may not have been created in Zitadel.
Resolution: Check the init container logs for errors:
kubectl logs -l app.kubernetes.io/component=grafana --previous -c zitadel-oauth-setup
Common causes are Zitadel not being ready when the init container ran, or a machine-key permission issue. Re-running the helm upgrade will re-trigger the init container and attempt registration again.
Next Steps
- Grafana Dashboards - Using and customising dashboards
- Alerts & Alarms - Configure alerting and notifications
- Metrics & Monitoring Overview - Return to the monitoring overview
12.9.2 - Grafana Dashboards
Overview
Grafana is the primary visualization platform for the CDN Manager monitoring stack. It provides pre-built dashboards for cluster health, application performance, and billing analytics, and is accessible via the manager ingress.
Prerequisites
- Grafana is deployed and running (verify with
kubectl get pods -l app.kubernetes.io/component=grafana) - A Zitadel user account is available for login
- Grafana is accessed via the correct DNS hostname (see Grafana Authentication & Roles)
Accessing Grafana
Grafana is accessible via the manager ingress:
URL: https://<manager-host>/grafana
To log in:
- Navigate to
https://<manager-host>/grafana - Click the “Login with Zitadel” button
- Authenticate with your Zitadel account credentials
Important: Grafana must be accessed using the DNS name specified in the first entry of
global.hosts.managerin your configuration. Accessing Grafana via an IP address or an alternative hostname will cause OAuth2 redirect URI mismatches and CORS errors, preventing login from completing successfully.
For details on authentication and role configuration, see Grafana Authentication & Roles.
Standard Dashboards
Accessing Dashboards
After logging into Grafana:
- Navigate to Dashboards in the left menu
- Browse the folder structure to find the dashboard you need
- Click on a dashboard to open it
Dashboards are organised into the following folders:
- Alerting — alert state history and alerting system health
- Billing — redirect counts for billing analytics
- CDN Manager — ACD Manager API performance
- Hardware — host-level CPU, memory, disk, and network telemetry
- Infrastructure — Kubernetes cluster, Kafka, Longhorn, and Redis health
- Streaming — CDN routing, streamer performance, and QoE
- Internal Debugging — low-level ACD Director diagnostics
Alerting
Active Alarms
A live view of all currently firing alerts. Shows the alert name, severity, affected host, and description. Use this as the first stop when investigating an active incident.
Alert Statistics
Historical view of alert firing activity over time. Shows which alert groups and individual rules have been firing, with timelines and trend charts. Useful for identifying recurring or flapping alerts.
vmalert
Operational health dashboard for the vmalert component itself. Covers evaluation rate, evaluation errors, alerting and recording rule counts, remote write throughput, and resource usage. Use this to verify the alerting pipeline is functioning correctly.
Billing
Billing Dashboard
Tracks redirect volumes for billing and usage analytics. Shows initial managed and unmanaged redirects, segment redirects, and endpoint redirects — both as totals and as ratios over time. Data is sourced from long-term VictoriaMetrics storage to support historical reporting.
CDN Manager
CDN Manager API
Health and performance dashboard for the ACD Manager REST API. Covers:
- Overview: API health status, active pod count, total request volume, 5xx error rate, and average latency
- Traffic: Request rate by pod, distribution across API endpoints
- Errors: 5xx errors per endpoint, response code breakdown per endpoint, error rate by pod
- Latency: P99 and average latency by endpoint, overall API response latency
- Resources & Auth: Route validation API activity
Hardware
HW Metrics
Condensed host hardware overview covering CPU usage and load averages, memory utilisation, network interface throughput, swap usage, and root filesystem disk space. Suitable for day-to-day health checks across all cluster nodes.
An expanded HW Metrics (Advanced) dashboard is available as part of the Advanced Dashboards licence.
Infrastructure
k3s Cluster Infrastructure
Kubernetes cluster health overview using node-exporter and kube-state-metrics. Covers:
- Cluster Overview: Node count, running pod count, OOMKilled containers, and overall cluster health status
- Compute: CPU usage, memory usage, and load average per node
- Network: Inbound and outbound bytes per node
- Disk: Read/write throughput and I/O pressure per node
- Longhorn PVC Disk Usage: Usage percentage per persistent volume
- Workload Health: Pod restart counts and OOMKill occurrences
Kafka
Kafka broker health using JMX exporter metrics. Covers:
- Cluster Health: Active controller, broker state, topic and partition counts, offline and under-replicated partitions, active and fenced broker counts, metadata log lag
- Throughput: Bytes in/out and messages in by topic, replication bytes in/out
- Internals: Request handler idle percentage, network processor idle percentage
Longhorn Storage
Persistent storage health for the Longhorn distributed block storage layer. Covers:
- Overview: Total, healthy, degraded, and faulted volume counts; nodes down
- Capacity: Total cluster capacity, used, and available storage
- Volume Detail: Usage percentage per volume, actual size per volume, volume robustness state, volumes approaching capacity (>85%)
- Node & Disk: Disk usage percentage and available bytes per node, node condition checks
Redis
Redis instance health using redis-exporter metrics. Covers:
- Instance Health: Status, uptime, connected and blocked clients, slow log length, rejected connections
- Memory: Usage and fragmentation ratio
- Throughput & Keyspace: Commands processed, network I/O, keyspace hit rate, keys per database
- Evictions & Persistence: Evictions, expirations, RDB unsaved changes
- CPU & Connections: CPU usage and connection metrics
- Command Analysis: Per-command breakdown
Streaming
Extended Monitoring
The primary operational dashboard for CDN routing activity. This is the home dashboard displayed on Grafana login. Covers:
- Latency Statistics: ACD router latency and CDN latency over time
- Redirects: Total redirect volume, status code breakdown, managed vs unmanaged ratio
- Content Popularity: Top 10 requested content and top 10 most rapidly increasing popularity scores
- CDN Selection: Redirect distribution across CDN endpoints, current and historical ratios
- CDN Failovers and Retries: Failover events and retry rates by CDN
- Host Selection: Endpoint request distribution
- Session Statistics: Active session counts and session type breakdown
- Client Responses: Client-facing HTTP status code distribution
- Incoming Requests: Raw request volume
- HTTPS Certificate Statistics: Certificate validity and expiry indicators
- Warnings & Errors: Application-level warnings and errors over time
- LUA Statistics: Lua exception counts and execution time
- Configuration Change History: Timeline of routing configuration changes
Router Monitoring
External-facing view of ACD Director routing activity. Shows the number of initial routing decisions made, HTTP status code distribution, incoming HTTP/HTTPS request volumes, and selection input metrics. Useful for a high-level view of traffic hitting the directors.
QoE Monitoring
Quality of Experience scoring dashboard. Shows average QoE scores per host, per session group, per CDN, and per agent, as well as the initial CDN selection rate. Use this to identify CDN providers or content hosts that are delivering a degraded experience.
Streamer Statistics
Condensed view of streamer node performance, covering network ingress/egress throughput, TCP and HTTP connection counts, active session counts, HTTP request rates and response codes, response times (ingress and egress), and storage/memory/CPU. Suitable for routine streamer health monitoring.
An expanded Streamer Statistics (Advanced) dashboard is available as part of the Advanced Dashboards licence.
Internal Debugging
These dashboards expose low-level ACD Director internals and are primarily intended for advanced diagnostics and support investigations.
Debugging Information
Lua runtime statistics from the ACD Director: exception counts, active Lua context count, time spent in Lua execution, and router latency. Use when investigating unexpected Director behaviour or Lua errors.
ACD: Incoming Internet Connections
SSL-level connection statistics at the Director: SSL warnings and errors, valid and invalid HTTP and HTTPS request counts from external clients. Use when investigating TLS handshake failures or unexpected rejection rates.
Performance Metrics
ACD Director process-level resource usage: router CPU utilisation, router memory usage, and Lua memory consumption. Useful for identifying resource pressure on the Director process itself rather than the host.
Prometheus: ACD
ACD application metrics exposed via Prometheus: active and total session counts, session type breakdown, managed and unmanaged redirect counts, QoE corrections, manifest parse failures, initial endpoint request counts, HTTP request rates, and logged warnings and errors.
CDN Failures
CDN-level failure tracking: response code distribution from CDN backends, CDN-level failover events, host-level failovers, and host retry counts. Use when investigating CDN reliability issues or failover behaviour.
ACD: CDN Latencies Detail
Detailed CDN latency analysis with configurable percentile plots and a full latency histogram. Use when investigating tail latency issues on specific CDN backends.
ACD: Router Latencies
ACD Director routing latency distributions for both 2xx (successful) and 3xx (redirect) responses, visualised as heatmap buckets over time. Use alongside CDN Latencies Detail to separate router processing time from CDN response time.
Prometheus/ACD: SubRunners
Internal async processing queue depth and throughput metrics for the ACD Director subrunner system: client connection counts, low/medium/high priority queue depths (current and max), send/receive data block usage, wakeup counts, overload events, and autopause activations. Use when investigating Director throughput bottlenecks or queue backpressure.
Advanced Dashboards
Advanced dashboards are a paid add-on that unlocks more detailed variants of two standard dashboards, providing deeper visibility for performance investigation and capacity planning.
Licensing: Advanced dashboards require a separate licence key. To obtain a key for your deployment, contact your AgileTV account representative.
Enabling Advanced Dashboards
Once you have your licence key, add the following to your values.yaml:
dashboards:
advanced:
licenceKey: "<your-licence-key>"
Then apply the change by following the upgrade procedure in the Configuration Guide. The advanced dashboards will become available in Grafana automatically once the upgrade completes.
HW Metrics (Advanced)
Expanded hardware telemetry that supplements the standard HW Metrics dashboard with additional depth and additional sections: kernel metrics, TCP and UDP network stack statistics, per-interface error counters, disk IOPS, and metrics collection velocity. Use this when investigating performance anomalies surfaced by the standard dashboard or by alerts.
Streamer Statistics (Advanced)
Full streamer telemetry that supplements the standard Streamer Statistics dashboard. Includes all standard metrics plus:
- OTT JCQ: Server group and node request rates and ratios, circuit breaker state (closed/open backends), global backend stats, pending requests per backend, and pop-out per backend
- Account Records: Session counts, total traffic in/out, HTTP request rates (ingress/egress), cache hit ratio, backend request rates, and response times
- Detailed network error and drop counters from
/proc/net/dev
CDN Director Metrics
Director DNS Names in Grafana
CDN Director instances are identified in Grafana by their DNS name, which is derived from the name field in global.hosts.routers:
global:
hosts:
routers:
- name: my-router-1
address: 192.0.2.1
The DNS name used in Grafana dashboards will be: my-router-1.external
This naming convention is automatically applied for all configured directors.
Customising Dashboards
Permissions: Creating and importing dashboards requires Grafana Admin access. See Grafana Authentication & Roles for details on granting admin rights.
The pre-provisioned dashboards are read-only and managed by the Helm chart — changes made to them in the Grafana UI will not persist across upgrades. To create persistent custom dashboards:
- In Grafana, navigate to Dashboards > New > New Dashboard
- Add panels using the VictoriaMetrics or Prometheus datasource
- Save the dashboard to a folder of your choice
Custom dashboards saved this way are stored in the Grafana PostgreSQL database and are unaffected by Helm upgrades.
Note: Do not save custom dashboards into the provisioned folders (Alerting, Billing, CDN Manager, etc.). Grafana marks these folders as provisioned and may behave unexpectedly if user dashboards are mixed in.
Customising a Pre-provisioned Dashboard
If you want a modified version of one of the built-in dashboards as a starting point:
- Open the dashboard you want to customise
- Click the Share icon (top toolbar) > Export > Save to file to download the dashboard JSON
- In Grafana, navigate to Dashboards > New > Import
- Upload the downloaded JSON file
- On the import screen, give the dashboard a new name to distinguish it from the original, and choose a destination folder outside the provisioned set
- Click Import
You now have an independently editable copy. The original provisioned dashboard remains unchanged and will continue to be updated by future Helm upgrades. Your copy is stored in PostgreSQL and persists across upgrades independently.
Troubleshooting
Dashboard Loading Issues
If dashboards fail to load:
Check Grafana pods:
kubectl get pods -l app.kubernetes.io/component=grafanaReview Grafana logs:
kubectl logs -l app.kubernetes.io/component=grafanaVerify datasource configuration in Grafana UI
For login and authentication issues, see Grafana Authentication & Roles.
Next Steps
- Alerts & Alarms - Set up alerting and notifications
- Operations Guide - Day-to-day operational procedures
- Metrics & Monitoring Overview - Return to the monitoring overview
12.9.3 - Alerts & Alarms
Overview
The CDN Manager ships a set of pre-configured alerting rules evaluated by vmalert against VictoriaMetrics. When a rule fires, the alert is routed to Alertmanager, which handles deduplication, grouping, silencing, and delivery to configured notification channels.
This page documents every built-in alert rule, what it means, its severity, and the recommended operator action.
Alert Severity Levels
| Severity | Meaning |
|---|---|
| critical | Immediate action required. The condition poses a risk to data integrity, service availability, or active traffic. |
| warning | Investigate soon. The condition is not immediately harmful but will degrade into a critical state if left unattended. |
Alert Groups
Alerts are organised into the following groups, each evaluated on a 15-second interval.
- infra-disk — Disk space and I/O
- infra-compute — CPU and memory
- infra-network — Network errors and traffic anomalies
- longhorn — Persistent storage health
infra-disk
Monitors disk space utilisation and I/O latency on cluster nodes.
StorageFillingUp
| Property | Value |
|---|---|
| Severity | warning |
| Condition | Root filesystem usage exceeds 85% |
| Must persist for | 2 minutes |
What it means: A node’s root filesystem is running low on space. If left unchecked this will progress to a full disk, which can cause pod evictions, write failures, and potential data loss.
Recommended actions:
- Identify the node from the
hostlabel in the alert. - Log into the node and check disk usage:
df -h / du -sh /var/log/* | sort -rh | head -20 - Clear old log files, unused container images, or temporary files:
# On the node journalctl --vacuum-size=500M crictl rmi --prune - If disk usage is due to application data growth, consider expanding the volume or adjusting retention settings. See Metrics Retention.
HighDiskLatency
| Property | Value |
|---|---|
| Severity | warning |
| Condition | Average disk write latency exceeds 100 ms |
| Must persist for | 2 minutes |
What it means: Disk write operations are taking longer than 100 ms on average. High disk latency can degrade database performance (PostgreSQL, VictoriaMetrics) and cause timeouts in write-heavy components.
Recommended actions:
- Identify the affected disk from the
namelabel in the alert. - Check for I/O-intensive processes on the node:
iostat -x 2 5 iotop -o - Check for Longhorn replica rebuilds or rebalancing activity, which can saturate disk I/O.
- If the issue persists on a production node, review whether the storage hardware meets the System Requirements.
infra-compute
Monitors CPU and memory utilisation on cluster nodes.
CpuSaturation
| Property | Value |
|---|---|
| Severity | warning |
| Condition | Total CPU usage exceeds 90% |
| Must persist for | 5 minutes |
What it means: A node is running at near-full CPU capacity. Sustained CPU saturation causes request latency increases across all workloads on that node and may result in pod throttling.
Recommended actions:
- Identify the saturated node from the
hostlabel in the alert. - Check which pods are consuming CPU:
kubectl top pods --sort-by=cpu -A - Check for runaway processes on the node:
top -b -n 1 | head -20 - If saturation is caused by a legitimate workload spike (e.g. CDN traffic burst), consider scaling the deployment or redistributing load across nodes.
MemoryCriticallyLow
| Property | Value |
|---|---|
| Severity | critical |
| Condition | Available RAM falls below 10% |
| Must persist for | 2 minutes |
What it means: The node has very little free memory remaining. The Linux OOM killer may begin terminating processes, which can cause abrupt pod restarts, data corruption in in-memory caches, and service unavailability.
Recommended actions:
- Identify the affected node from the
hostlabel in the alert. - Immediately check for memory-leaking or oversized pods:
kubectl top pods --sort-by=memory -A - Identify and restart any pods showing abnormal memory consumption:
kubectl rollout restart deployment/<name> - Check kernel OOM kill log for any processes already killed:
dmesg | grep -i "oom\|killed" - Review memory resource limits and requests for affected deployments and adjust if necessary.
SwapUsageDetected
| Property | Value |
|---|---|
| Severity | warning |
| Condition | Swap usage exceeds 5% |
| Must persist for | 1 minute |
What it means: The node is swapping memory to disk. Swap usage in a Kubernetes cluster is a strong indicator of memory pressure. It degrades performance significantly and may mask an underlying memory shortage that could escalate to a MemoryCriticallyLow event.
Recommended actions:
- Treat this as an early warning for the same conditions as
MemoryCriticallyLow. - Identify memory-intensive pods and investigate whether resource limits are configured appropriately.
- Swap should ideally never be active on a production Kubernetes node. If it persists, escalate to a memory capacity review.
infra-network
Monitors network interface errors and traffic anomalies on cluster nodes.
NetworkInterfaceErrors
| Property | Value |
|---|---|
| Severity | critical |
| Condition | Any non-zero rate of inbound or outbound packet errors on a network interface |
| Must persist for | 1 minute |
What it means: A network interface is dropping or corrupting packets. Even a low error rate can cause TCP retransmissions, increased latency, and connection failures — directly impacting CDN Director communication and external traffic delivery.
Recommended actions:
- Identify the affected host and interface from the
hostandinterfacelabels in the alert. - Check interface error counters on the node:
ip -s link show <interface> ethtool -S <interface> | grep -i error - Check for duplex/speed mismatches between the node NIC and the upstream switch:
ethtool <interface> | grep -E "Speed|Duplex" - Escalate to network/hardware team if errors are persistent and cannot be attributed to a software configuration issue.
SuddenNetworkEgressDrop
| Property | Value |
|---|---|
| Severity | critical |
| Condition | Egress throughput drops to less than 50% of the 2-minute baseline, when baseline traffic is above 1 Mbit/s |
| Must persist for | 1 minute |
What it means: A significant, sudden reduction in outbound traffic has been detected. This typically indicates a upstream network failure, link fault, or a routing issue. A CDN node that stops transmitting traffic is effectively out of service.
Recommended actions:
- Identify the affected node and interface from the alert labels.
- Verify the node’s network connectivity:
ping <gateway-ip> traceroute <upstream-endpoint> - Check for interface errors or link-down events:
ip link show dmesg | grep -i "link\|eth\|nic" - Verify that upstream routing and firewall rules have not changed.
- If the node is healthy and traffic has legitimately dropped (e.g. a CDN traffic shift), the alert can be silenced if the traffic reduction is expected and understood.
SuddenNetworkIngressSpike
| Property | Value |
|---|---|
| Severity | warning |
| Condition | Ingress throughput exceeds twice the 5-minute baseline |
| Must persist for | 1 minute |
What it means: A sudden surge of inbound traffic has been detected. This may indicate a legitimate traffic event (e.g. a large stream audience spike), a DDoS attempt, or a misconfigured client sending unexpected volume.
Recommended actions:
- Identify the affected node and interface from the alert labels.
- Review active connections and top talkers:
ss -s netstat -an | awk '{print $5}' | cut -d: -f1 | sort | uniq -c | sort -rn | head - Correlate with CDN Director metrics in Grafana to determine whether the spike is legitimate CDN traffic.
- If the spike is unexpected and sustained, consider rate-limiting or blocking the source at the network edge.
longhorn
Monitors the health of Longhorn distributed block storage, which backs persistent volumes for PostgreSQL, VictoriaMetrics, and other stateful components.
Note: Longhorn alert rules are always present in the alert configuration, but will not fire in environments where Longhorn is not installed (e.g. cloud deployments using external storage).
LonghornVolumeDegraded
| Property | Value |
|---|---|
| Severity | warning |
| Condition | A Longhorn volume’s robustness state is Degraded |
| Must persist for | 2 minutes |
What it means: A Longhorn volume has fewer healthy replicas than its configured replication factor. Data is not at immediate risk, but the volume has reduced redundancy. A single additional node or disk failure could result in data loss or volume unavailability.
Recommended actions:
- Identify the affected volume from the
volumelabel in the alert. - Open the Longhorn UI and inspect the volume’s replica status.
- Check whether a replica is in the process of rebuilding (this is normal after a node restart). Rebuilding may take several minutes depending on volume size.
- If a replica has failed and is not rebuilding, attempt to evict and re-schedule it via the Longhorn UI.
- Investigate the health of the node that hosted the failed replica:
kubectl get nodes kubectl describe node <node-name>
LonghornVolumeFaulted
| Property | Value |
|---|---|
| Severity | critical |
| Condition | A Longhorn volume’s robustness state is Faulted |
| Must persist for | 1 minute |
What it means: A Longhorn volume has lost all healthy replicas and is no longer accessible. Any workload that depends on this volume (e.g. PostgreSQL, VictoriaMetrics) will be unable to write and may crash. Data may be at risk.
Recommended actions:
- Identify the affected volume from the
volumelabel. - Immediately check which pods are using the volume:
kubectl get pods -A -o wide | grep -i <volume-name> - Open the Longhorn UI. Check whether any replicas are still present and whether they can be recovered.
- Do not delete faulted replicas without first attempting recovery — they may contain the only copy of the data.
- Contact AgileTV support if the volume cannot be recovered, providing Longhorn UI screenshots and node logs.
LonghornNodeDown
| Property | Value |
|---|---|
| Severity | critical |
| Condition | A Longhorn node reports a non-ready state |
| Must persist for | 2 minutes |
What it means: A storage node is unreachable or unhealthy from Longhorn’s perspective. All volumes with replicas on this node are at reduced redundancy. If more than one node goes down simultaneously, faulted volumes and data loss become a risk.
Recommended actions:
- Identify the affected node from the
nodelabel in the alert. - Check the node’s status in Kubernetes:
kubectl get nodes kubectl describe node <node-name> - Attempt to SSH to the node and check system health:
ssh root@<node-ip> systemctl status k3s - If the node has crashed and cannot be recovered quickly, consider evicting its Longhorn replicas to allow rebuilding on healthy nodes — but only if the remaining healthy nodes have sufficient capacity.
LonghornDiskSpaceLow
| Property | Value |
|---|---|
| Severity | warning |
| Condition | Available Longhorn disk space on a node falls below 15% |
| Must persist for | 2 minutes |
What it means: A node’s Longhorn-managed disk is running low on storage. When Longhorn disk space is exhausted, it cannot schedule new replicas or accommodate volume growth, which can lead to LonghornVolumeDegraded or LonghornVolumeFaulted conditions.
Recommended actions:
- Identify the affected node and disk from the
nodeanddisklabels in the alert. - Open the Longhorn UI and check which volumes have replicas on this disk.
- Check for snapshots or backups that can be cleaned up to reclaim space.
- If space cannot be reclaimed, consider adding a disk to the node or expanding the underlying block device.
- Review Metrics Retention settings — reducing VictoriaMetrics retention is often the fastest way to reclaim Longhorn disk space in a monitoring-heavy deployment.
Adding Custom Alert Rules
Additional alert rules can be defined by extending the victoria_metrics_alert.server.config.alerts.groups list in your values.yaml. Rules follow the Prometheus alerting rule format.
Example: Adding a Custom Alert
The following example adds an alert group that fires when a Kafka consumer lag exceeds a threshold:
victoria_metrics_alert:
server:
config:
alerts:
groups:
# ... existing groups are preserved alongside your additions ...
- name: kafka
interval: 15s
rules:
- alert: KafkaConsumerLagHigh
expr: kafka_consumer_group_lag > 10000
for: 5m
labels:
severity: warning
annotations:
summary: "High consumer lag on {{ $labels.topic }}"
description: "Consumer group {{ $labels.group }} is {{ $value }} messages behind on topic {{ $labels.topic }}."
Apply the change using the standard upgrade procedure in the Configuration Guide.
Rule Fields Reference
| Field | Required | Description |
|---|---|---|
alert | Yes | Alert name. Must be unique within the group. |
expr | Yes | PromQL expression. The alert fires when this evaluates to a non-zero/non-empty result. |
for | No | How long the condition must hold before the alert fires. Omitting this fires immediately. |
labels.severity | Recommended | Set to critical or warning to match the built-in routing rules. |
annotations.summary | Recommended | Short human-readable description. Supports Go template labels (e.g. {{ $labels.host }}). |
annotations.description | Recommended | Detailed description with context for the on-call operator. |
Tip: Use the Alertmanager UI (
https://<manager-host>/alertmanager) to verify that fired alerts are being received and routed correctly after adding new rules.
Configuring Alert Routes
By default, all alerts are routed to the built-in null receiver, which silently discards them. To receive alerts, configure one or more receivers and update the routing rules — all within the alertmanager.config section of your values.yaml.
Route Structure
The top-level route defines the default behaviour. Child routes under routes match alerts by label and direct them to specific receivers:
alertmanager:
config:
route:
receiver: 'null' # Default: discard unmatched alerts
group_by: ['alertname']
group_wait: 10s # Wait before sending first notification for a new group
group_interval: 10s # Wait before sending updated notifications for a group
repeat_interval: 1h # Re-notify if an alert is still firing after this period
routes:
- matchers:
- severity="critical"
receiver: 'slack'
- matchers:
- severity="warning"
receiver: 'email-warning'
Routes are evaluated top-to-bottom. The first matching route wins unless continue: true is set on the route.
Notification Channels
Email requires an SMTP server to be configured globally. Both a critical and warning receiver can be defined independently.
alertmanager:
config:
global:
smtp_smarthost: 'smtp.example.com:587'
smtp_from: 'alertmanager@example.com'
smtp_require_tls: true
route:
routes:
- matchers:
- severity="critical"
receiver: 'email-critical'
- matchers:
- severity="warning"
receiver: 'email-warning'
receivers:
- name: 'null'
- name: 'email-critical'
email_configs:
- to: 'oncall@example.com'
send_resolved: true
- name: 'email-warning'
email_configs:
- to: 'alerts@example.com'
send_resolved: true
Slack
Requires an incoming webhook URL created in your Slack workspace.
alertmanager:
config:
route:
routes:
- matchers:
- severity="critical"
receiver: 'slack'
receivers:
- name: 'null'
- name: 'slack'
slack_configs:
- api_url: 'https://hooks.slack.com/services/YOUR/WEBHOOK/URL'
channel: '#alerts'
send_resolved: true
title: '[{{ .Status | toUpper }}] {{ .CommonLabels.alertname }}'
text: |
*Severity:* {{ .CommonLabels.severity }}
*Host:* {{ .CommonLabels.host }}
{{ range .Alerts }}{{ .Annotations.description }}{{ end }}
Telegram
Requires a Telegram bot token and a channel/group chat ID. Create a bot via @BotFather and add it to your alert channel before configuring.
alertmanager:
config:
route:
routes:
- matchers:
- severity="critical"
receiver: 'telegram'
receivers:
- name: 'null'
- name: 'telegram'
telegram_configs:
- bot_token: 'your-bot-token'
chat_id: -1234567890
parse_mode: 'Markdown'
send_resolved: true
message: |
*Alert:* {{ .CommonLabels.alertname }}
*Severity:* {{ .CommonLabels.severity }}
*Host:* {{ .CommonLabels.host }}
{{ range .Alerts }}
{{ .Annotations.description }}
{{ end }}
Finding your chat ID: Add your bot to the channel or group, send a message, then call
https://api.telegram.org/bot<token>/getUpdatesand read thechat.idfrom the response. Note that group and channel chat IDs are negative numbers.
Combining Multiple Receivers
Routes and receivers can be combined to send different alert severities to different channels simultaneously. For example, critical alerts to PagerDuty and Slack, warnings to email only:
alertmanager:
config:
route:
receiver: 'null'
routes:
- matchers:
- severity="critical"
receiver: 'slack'
continue: true # Continue matching so the next route also fires
- matchers:
- severity="critical"
receiver: 'email-critical'
- matchers:
- severity="warning"
receiver: 'email-warning'
receivers:
- name: 'null'
- name: 'slack'
slack_configs:
- api_url: 'https://hooks.slack.com/services/YOUR/WEBHOOK/URL'
channel: '#critical-alerts'
send_resolved: true
- name: 'email-critical'
email_configs:
- to: 'oncall@example.com'
send_resolved: true
- name: 'email-warning'
email_configs:
- to: 'alerts@example.com'
send_resolved: true
Apply any receiver or routing changes using the standard upgrade procedure in the Configuration Guide.
Silencing Alerts
Silences suppress alert notifications for a defined time window without disabling the underlying alert rule. They are useful during planned maintenance, known incidents, or when investigating a non-urgent condition.
Silences are managed via the Alertmanager UI, accessible at:
https://<manager-host>/alertmanager
Creating a Silence
- Navigate to the Alertmanager UI and click Silences in the top navigation.
- Click Create Silence.
- Set the Start and End times for the silence window.
- Add one or more matchers to scope which alerts are suppressed. For example:
alertname = StorageFillingUp— silence a specific alertseverity = warning— silence all warningshost = node-01— silence all alerts from a specific host
- Add a Comment describing the reason for the silence (e.g.
Planned disk expansion on node-01). - Click Create. The silence takes effect immediately.
Expiring a Silence
Silences expire automatically at the configured end time. To remove a silence early, navigate to Silences in the Alertmanager UI, locate the silence, and click Expire.
Next Steps
- Operations Guide - Day-to-day operational procedures
- Troubleshooting Guide - Resolve underlying issues surfaced by alerts
- Metrics & Monitoring Overview - Return to the monitoring overview
12.10 - API Guide
Overview
The CDN Manager exposes versioned HTTP APIs under /api (v1 and v2), using JSON payloads by default. When sending request bodies, set Content-Type: application/json. Server errors typically respond with { "message": "..." } where available, or an empty body with the relevant status code.
Authentication uses a two-step flow:
- Create a session
- Exchange that session for an access token with
grant_type=session
Use the access token in Authorization: Bearer <token> when calling bearer-protected routes. CORS preflight (OPTIONS) is supported and wildcard origins are accepted by default.
Durations such as TTLs use humantime strings (for example, 60s, 5m, 1h).
Base URL
All API endpoints are relative to:
https://<manager-host>/api
API Reference Guides
The API documentation is organized by functional area:
| Guide | Description |
|---|---|
| Authentication API | Login, token exchange, logout, and session management |
| Health API | Liveness and readiness probes |
| Selection Input API | Key-value and list storage with search capabilities |
| Data Store API | Generic JSON key/value storage |
| Subnets API | CIDR-to-value mappings for routing decisions |
| Routing API | GeoIP lookups and IP validation |
| Discovery API | Host and namespace discovery |
| Metrics API | Metrics submission and aggregation |
| Configuration API | Configuration document management |
| Operator UI API | Blocked tokens, user agents, and referrers |
| OpenAPI Specification | Complete OpenAPI 3.0 specification |
Authentication Flow
All authenticated API calls follow the same authentication flow. For detailed instructions, see the Authentication API Guide.
Quick Start:
# Step 1: Login to get session
curl -s -X POST "https://cdn-manager/api/v1/auth/login" \
-H "Content-Type: application/json" \
-d '{
"email": "user@example.com",
"password": "Password1!"
}' | tee /tmp/session.json
SESSION_ID=$(jq -r '.session_id' /tmp/session.json)
SESSION_TOKEN=$(jq -r '.session_token' /tmp/session.json)
# Step 2: Exchange session for access token
curl -s -X POST "https://cdn-manager/api/v1/auth/token" \
-H "Content-Type: application/json" \
-d "$(jq -nc --arg sid "$SESSION_ID" --arg st "$SESSION_TOKEN" \
'{session_id:$sid,session_token:$st,grant_type:"session",scope:"openid"}')" \
| tee /tmp/token.json
ACCESS_TOKEN=$(jq -r '.access_token' /tmp/token.json)
# Step 3: Call a protected endpoint
curl -s "https://cdn-manager/api/v1/metrics" \
-H "Authorization: Bearer ${ACCESS_TOKEN}"
Error Responses
The API uses standard HTTP response codes to indicate the success or failure of an API request.
Most errors return an empty response body with the relevant HTTP status code (e.g., 404 Not Found or 409 Conflict).
In some cases, the server may return a JSON body containing a user-facing error message:
{
"message": "Human-readable error message"
}
Next Steps
After learning the API:
- Operations Guide - Day-to-day operational procedures
- Troubleshooting Guide - Resolve API issues
- Configuration Guide - Full configuration reference
12.10.1 - Authentication API
Overview
The Authentication API provides endpoints for user authentication, session management, and token exchange. All authenticated API calls require a valid access token obtained through the authentication flow.
Base URL
https://<manager-host>/api/v1/auth
Endpoints
POST /api/v1/auth/login
Create a session from email/password credentials.
Request:
POST /api/v1/auth/login
Content-Type: application/json
{
"email": "user@example.com",
"password": "Password1!"
}
Success Response (200):
{
"session_id": "session-1",
"session_token": "token-1",
"verified_at": "2024-01-01T00:00:00Z",
"expires_at": "2024-01-01T01:00:00Z"
}
Errors:
401- Authentication failure (invalid credentials)500- Backend/state errors
POST /api/v1/auth/token
Exchange a session for an access token (required for bearer auth).
Request:
POST /api/v1/auth/token
Content-Type: application/json
{
"session_id": "session-1",
"session_token": "token-1",
"grant_type": "session",
"scope": "openid profile"
}
Success Response (200):
{
"access_token": "<token>",
"scope": "openid profile",
"expires_in": 3600,
"token_type": "bearer"
}
Token Scopes
The scope parameter in the token exchange request is a space-separated string of permissions requested for the access token.
Scope Resolution When a token is requested, the backend system filters the requested scopes against the user’s actual permissions. The resulting access token will only contain the subset of requested scopes that the user is authorized to possess.
Naming and Design
Scope names are defined by the applications that consume the tokens, not by the central IAM system. To prevent collisions between different applications or modules, it is highly recommended that application developers use URN-style prefixes for scope names (e.g., urn:acd:manager:config:read).
Errors:
401- Authentication failure (invalid session)500- Backend/state errors
POST /api/v1/auth/logout
Revoke a session. Note: This does not revoke issued access tokens; they remain valid until expiration.
Request:
POST /api/v1/auth/logout
Content-Type: application/json
{
"session_id": "session-1",
"session_token": "token-1"
}
Success Response (200):
{
"status": "Ok"
}
Errors:
400- Invalid session parameters500- Backend/state errors
Complete Authentication Flow Example
# Step 1: Login to get session
curl -s -X POST "https://cdn-manager/api/v1/auth/login" \
-H "Content-Type: application/json" \
-d '{
"email": "user@example.com",
"password": "Password1!"
}' | tee /tmp/session.json
SESSION_ID=$(jq -r '.session_id' /tmp/session.json)
SESSION_TOKEN=$(jq -r '.session_token' /tmp/session.json)
# Step 2: Exchange session for access token
curl -s -X POST "https://cdn-manager/api/v1/auth/token" \
-H "Content-Type: application/json" \
-d "$(jq -nc --arg sid "$SESSION_ID" --arg st "$SESSION_TOKEN" \
'{session_id:$sid,session_token:$st,grant_type:"session",scope:"openid"}')" \
| tee /tmp/token.json
ACCESS_TOKEN=$(jq -r '.access_token' /tmp/token.json)
# Step 3: Call a protected endpoint
curl -s "https://cdn-manager/api/v1/metrics" \
-H "Authorization: Bearer ${ACCESS_TOKEN}"
Using the Access Token
Once you have obtained an access token, include it in the Authorization header of all API requests:
Authorization: Bearer <access_token>
Example:
curl -s "https://cdn-manager/api/v1/configuration" \
-H "Authorization: Bearer ${ACCESS_TOKEN}"
Token Expiration
Access tokens expire after the duration specified in expires_in (typically 3600 seconds / 1 hour). When a token expires, you must re-authenticate to obtain a new token.
Next Steps
- Health API - Liveness and readiness probes
- Selection Input API - Key-value and list storage
- OpenAPI Specification - Complete API specification
12.10.2 - Health API
Overview
The Health API provides endpoints for Kubernetes health probes and service health checking.
Base URL
https://<manager-host>/api/v1/health
Endpoints
GET /api/v1/health/alive
Liveness probe that indicates whether the service is running. Always returns 200 OK.
Request:
GET /api/v1/health/alive
Response (200):
{
"status": "Ok"
}
Use Case: Kubernetes liveness probe to determine if the pod should be restarted.
GET /api/v1/health/ready
Readiness probe that checks service readiness including downstream dependencies.
Request:
GET /api/v1/health/ready
Success Response (200):
{
"status": "Ok"
}
Failure Response (503):
{
"status": "Fail"
}
Use Case: Kubernetes readiness probe to determine if the pod should receive traffic. Returns 503 if any downstream dependencies (database, Kafka, Redis) are unavailable.
Kubernetes Configuration
Example Kubernetes probe configuration:
livenessProbe:
httpGet:
path: /api/v1/health/alive
port: 8080
initialDelaySeconds: 10
periodSeconds: 10
readinessProbe:
httpGet:
path: /api/v1/health/ready
port: 8080
initialDelaySeconds: 5
periodSeconds: 5
Next Steps
- Authentication API - User authentication
- Selection Input API - Key-value and list storage
- OpenAPI Specification - Complete API specification
12.10.3 - Selection Input API
Overview
The Selection Input API provides JSON key/value storage with search capabilities. It supports two API versions (v1 and v2) with different operation models.
Base URL
https://<manager-host>/api/v1/selection_input
https://<manager-host>/api/v2/selection_input
Version Comparison
| Feature | v1 /api/v1/selection_input | v2 /api/v2/selection_input |
|---|---|---|
| Primary operation | Merge/UPSERT (POST) | Insert/Replace (PUT) |
| List append | N/A | POST to push to list |
| Search syntax | Wildcard prefix (foo* implicit) | Full wildcard (foo* explicit) |
| Query params | search, sort, limit, ttl | search, ttl, correlation_id |
| Sort support | Yes (asc/desc) | No |
| Limit support | Yes | No |
| Use case | Simple key-value with optional search | List-like operations, full wildcard |
When to Use Each Version
| Scenario | Recommended Version |
|---|---|
| Simple key-value storage | v1 |
| List/queue operations (append to array) | v2 POST |
| Full wildcard pattern matching | v2 |
| Need to sort or paginate results | v1 |
v1 Endpoints
GET /api/v1/selection_input/{path}
Fetch stored JSON. If value is an object, optional search/limit/sort applies to its keys.
Query Parameters:
search- Wildcard prefix search (adds*implicitly)sort- Sort order (ascordesc)limit- Maximum results (must be > 0)
Success Response (200):
{
"foo": 1,
"foobar": 2
}
Errors:
404- Path does not exist400- Invalid search/sort/limit parameters500- Backend failure
Example:
curl -s "https://cdn-manager/api/v1/selection_input/config?search=foo&limit=2"
POST /api/v1/selection_input/{path}
Upsert (merge) JSON at path. Nested objects are merged recursively.
Query Parameters:
ttl- Expiry time as humantime string (e.g.,10m,1h)
Request:
{
"feature_flag": true,
"ratio": 0.5
}
Success: 201 Created echoing the payload
Errors:
500/503- Backend failure
Example:
curl -s -X POST "https://cdn-manager/api/v1/selection_input/config?ttl=10m" \
-H "Content-Type: application/json" \
-d '{
"feature_flag": true,
"ratio": 0.5
}'
DELETE /api/v1/selection_input/{path}
Delete stored value.
Success: 204 No Content
Errors: 503 - Backend failure
v2 Endpoints
GET /api/v2/selection_input/{path}
Fetch stored JSON with optional wildcard filtering.
Query Parameters:
search- Full wildcard pattern (e.g.,foo*,*bar*)correlation_id- Accepted but currently ignored (logging only)
Success Response (200):
{
"foo": 1,
"foobar": 2
}
Errors:
400- Invalid search pattern404- Path does not exist500- Backend failure
Example:
curl -s "https://cdn-manager/api/v2/selection_input/config?search=foo*"
PUT /api/v2/selection_input/{path}
Insert/replace value. Old value is discarded.
Query Parameters:
ttl- Expiry time as humantime string
Request:
{
"items": ["a", "b", "c"]
}
Success: 200 OK
Example:
curl -s -X PUT "https://cdn-manager/api/v2/selection_input/catalog" \
-H "Content-Type: application/json" \
-d '{
"items": ["a", "b", "c"]
}'
POST /api/v2/selection_input/{path}
Push a value to the back of a list-like entry (append to array).
Query Parameters:
ttl- Expiry time as humantime string
Request (any JSON value):
{
"item": 42
}
Or a simple string:
"ready-for-publish"
Success: 200 OK
Example:
curl -s -X POST "https://cdn-manager/api/v2/selection_input/queue" \
-H "Content-Type: application/json" \
-d '"ready-for-publish"'
DELETE /api/v2/selection_input/{path}
Delete stored value.
Success: 204 No Content
Next Steps
- Data Store API - Generic key/value storage
- Subnets API - CIDR-to-value mappings
- OpenAPI Specification - Complete API specification
12.10.4 - Data Store API
Overview
The Data Store API provides generic JSON key/value storage for short-lived or simple structured data.
Base URL
https://<manager-host>/api/v1/datastore
Endpoints
GET /api/v1/datastore
List all known keys.
Query Parameters:
show_hidden- Boolean (defaultfalse). Whentrue, includes internal keys starting with_.
Success Response (200):
["user:123", "config:settings", "session:abc"]
Hidden Keys: Keys starting with _ are reserved for internal use (e.g., subnet service). Writing to hidden keys via the datastore API returns 400 Bad Request.
GET /api/v1/datastore/{key}
Retrieve the JSON value for a specific key.
Success Response (200): The stored JSON value
Errors:
404- Key does not exist500- Backend failure
Example:
curl -s "https://cdn-manager/api/v1/datastore/user:123"
POST /api/v1/datastore/{key}
Create a new JSON value at the specified key. Fails if the key already exists.
Query Parameters:
ttl- Expiry time as humantime string (e.g.,60s,1h)
Request:
{
"id": 123,
"name": "alice"
}
Success: 201 Created
Errors:
409 Conflict- Key already exists500- Backend failure
Example:
curl -s -X POST "https://cdn-manager/api/v1/datastore/user:123?ttl=1h" \
-H "Content-Type: application/json" \
-d '{"id":123,"name":"alice"}'
PUT /api/v1/datastore/{key}
Update or replace the JSON value at an existing key.
Query Parameters:
ttl- Expiry time as humantime string
Success: 200 OK
Errors:
404- Key does not exist500- Backend failure
Example:
curl -s -X PUT "https://cdn-manager/api/v1/datastore/user:123" \
-H "Content-Type: application/json" \
-d '{"id":123,"name":"alice-updated"}'
DELETE /api/v1/datastore/{key}
Delete the value at the specified key. Idempotent operation.
Success: 204 No Content
Errors: 500 - Backend failure
Example:
curl -s -X DELETE "https://cdn-manager/api/v1/datastore/user:123"
Next Steps
- Subnets API - CIDR-to-value mappings
- Routing API - GeoIP lookups
- OpenAPI Specification - Complete API specification
12.10.5 - Subnets API
Overview
The Subnets API manages CIDR-to-value mappings used for routing decisions. This allows classification of IP ranges for routing purposes.
Base URL
https://<manager-host>/api/v1/subnets
Endpoints
PUT /api/v1/subnets
Create or update subnet mappings.
Request:
{
"192.168.1.0/24": "office",
"10.0.0.0/8": "internal",
"203.0.113.0/24": "external"
}
Success: 200 OK
Errors:
400- Invalid CIDR format500- Backend failure
Example:
curl -s -X PUT "https://cdn-manager/api/v1/subnets" \
-H "Content-Type: application/json" \
-d '{
"192.168.1.0/24": "office",
"10.0.0.0/8": "internal"
}'
GET /api/v1/subnets
List all subnet mappings.
Success Response (200): JSON object of CIDR-to-value mappings
Example:
curl -s "https://cdn-manager/api/v1/subnets" | jq '.'
DELETE /api/v1/subnets
Delete all subnet mappings.
Success: 204 No Content
GET /api/v1/subnets/byKey/{subnet}
Retrieve subnet mappings whose CIDR begins with the given prefix.
Example:
curl -s "https://cdn-manager/api/v1/subnets/byKey/192.168" | jq '.'
GET /api/v1/subnets/byValue/{value}
Retrieve subnet mappings with the given classification value.
Example:
curl -s "https://cdn-manager/api/v1/subnets/byValue/office" | jq '.'
DELETE /api/v1/subnets/byKey/{subnet}
Delete subnet mappings whose CIDR begins with the given prefix.
DELETE /api/v1/subnets/byValue/{value}
Delete subnet mappings with the given classification value.
Next Steps
- Routing API - GeoIP lookups and IP validation
- Discovery API - Host and namespace discovery
- OpenAPI Specification - Complete API specification
12.10.6 - Routing API
Overview
The Routing API provides GeoIP information lookup and IP address validation for routing decisions.
Base URL
https://<manager-host>/api/v1/routing
Endpoints
GET /api/v1/routing/geoip
Look up GeoIP information for an IP address.
Query Parameters:
ip- IP address to look up
Success Response (200):
{
"city": {
"name": "Washington"
},
"asn": 64512
}
Errors:
400- Invalid IP format500- Backend failure
Caching: Cache-Control: public, max-age=86400 (24 hours)
Example:
curl -s "https://cdn-manager/api/v1/routing/geoip?ip=149.101.100.0"
GET /api/v1/routing/validate
Validate if an IP address is allowed (not blocked).
Query Parameters:
ip- IP address to validate
Success Response (200): Empty body (IP is allowed)
Forbidden Response (403):
Access Denied
Errors:
400- Invalid IP format500- Backend failure
Caching: Cache-Control headers included (default: max-age=300, configurable via [tuning] section)
Example:
curl -i "https://cdn-manager/api/v1/routing/validate?ip=149.101.100.0"
Use Cases
GeoIP-Based Routing
Use the /geoip endpoint to determine the geographic location and ASN of an IP address for routing decisions:
# Get location data for routing
IP_INFO=$(curl -s "https://cdn-manager/api/v1/routing/geoip?ip=203.0.113.50")
CITY=$(echo "$IP_INFO" | jq -r '.city.name')
ASN=$(echo "$IP_INFO" | jq -r '.asn')
echo "Routing based on city: $CITY, ASN: $ASN"
IP Validation
Use the /validate endpoint to check if an IP is allowed before processing requests:
# Check if IP is allowed
RESPONSE=$(curl -s -o /dev/null -w "%{http_code}" \
"https://cdn-manager/api/v1/routing/validate?ip=203.0.113.50")
if [ "$RESPONSE" = "200" ]; then
echo "IP is allowed"
elif [ "$RESPONSE" = "403" ]; then
echo "IP is blocked"
fi
Next Steps
- Discovery API - Host and namespace discovery
- Metrics API - Metrics submission and aggregation
- OpenAPI Specification - Complete API specification
12.10.7 - Discovery API
Overview
The Discovery API provides information about discovered hosts and namespaces. Discovery is configured via the Helm chart values.yaml file. Each entry defines a namespace with a list of hostnames.
Base URL
https://<manager-host>/api/v1/discovery
Endpoints
GET /api/v1/discovery/hosts
Return discovered hosts grouped by namespace.
Success Response (200):
{
"directors": [
{ "name": "director-1.example.com" }
],
"edge-servers": [
{ "name": "cdn1.example.com" },
{ "name": "cdn2.example.com" }
]
}
Example:
curl -s "https://cdn-manager/api/v1/discovery/hosts"
GET /api/v1/discovery/namespaces
Return discovery namespaces with their corresponding Confd URIs.
Success Response (200):
[
{
"namespace": "edge-servers",
"confd_uri": "/api/v1/confd/edge-servers"
},
{
"namespace": "directors",
"confd_uri": "/api/v1/confd/directors"
}
]
Example:
curl -s "https://cdn-manager/api/v1/discovery/namespaces"
Configuration
Discovery is configured via the Helm chart values.yaml file under manager.discovery:
manager:
discovery:
- namespace: "directors"
hosts:
- director-1.example.com
- director-2.example.com
- namespace: "edge-servers"
hosts:
- cdn1.example.com
- cdn2.example.com
Each entry defines a namespace with a list of hostnames. Optionally, a pattern field can be specified for regex-based host matching.
Next Steps
- Metrics API - Metrics submission and aggregation
- Configuration API - Configuration document management
- OpenAPI Specification - Complete API specification
12.10.8 - Metrics API
Overview
The Metrics API allows submission and retrieval of metrics data from CDN components.
Base URL
https://<manager-host>/api/v1/metrics
Endpoints
POST /api/v1/metrics
Submit metrics data.
Request:
{
"example.com": {
"metric1": 100,
"metric2": 200
}
}
Success: 200 OK
Errors: 500 - Validation/backend errors
Example:
curl -s -X POST "https://cdn-manager/api/v1/metrics" \
-H "Content-Type: application/json" \
-d '{
"example.com": {
"metric1": 100,
"metric2": 200
}
}'
GET /api/v1/metrics
Return aggregated metrics per host.
Response: JSON object with aggregated metrics per host
Note: Metrics are stored per host for up to 5 minutes. Hosts that stop reporting disappear from aggregation after that window. When no metrics are being reported, returns empty object {}.
Example:
curl -s "https://cdn-manager/api/v1/metrics"
Metrics Retention
- Metrics are stored for up to 5 minutes in the aggregation layer
- For long-term metrics storage, data is forwarded to VictoriaMetrics
- Query historical metrics via Grafana dashboards at
/grafana
Next Steps
- Configuration API - Configuration document management
- Operator UI API - Blocked tokens, user agents, and referrers
- OpenAPI Specification - Complete API specification
12.10.9 - Configuration API
Overview
The Configuration API provides endpoints for managing the system configuration document. ETag is supported; send If-None-Match for conditional GET (may return 304).
Operational Note: This API is intended for internal verification only. Behavior is undefined in multi-replica clusters because pods do not coordinate config writes.
Base URL
https://<manager-host>/api/v1/configuration
Endpoints
GET /api/v1/configuration
Retrieve the configuration document.
Success: 200 OK with configuration JSON
Conditional GET: Returns 304 Not Modified if If-None-Match header matches current ETag
Example:
# Get ETag from response headers
etag=$(curl -s -D- "https://cdn-manager/api/v1/configuration" | awk '/ETag/{print $2}')
# Conditional GET - returns 304 if config unchanged
curl -s -H "If-None-Match: $etag" "https://cdn-manager/api/v1/configuration" -o /tmp/cfg.json -w "%{http_code}\n"
PUT /api/v1/configuration
Replace the configuration document.
Request:
{
"feature_flag": false,
"ratio": 0.25
}
Success: 200 OK
Errors:
400- Invalid configuration format500- Backend failure
DELETE /api/v1/configuration
Delete the configuration document.
Success: 200 OK
ETag Usage
The configuration API supports ETags for optimistic concurrency control:
# 1. Get current config and ETag
response=$(curl -s -D headers.txt "https://cdn-manager/api/v1/configuration")
etag=$(grep -i ETag headers.txt | cut -d' ' -f2 | tr -d '\r')
# 2. Modify the config as needed
modified_config=$(echo "$response" | jq '.feature_flag = true')
# 3. Update with ETag to prevent overwriting concurrent changes
curl -s -X PUT "https://cdn-manager/api/v1/configuration" \
-H "Content-Type: application/json" \
-H "If-Match: $etag" \
-d "$modified_config"
Next Steps
- Operator UI API - Blocked tokens, user agents, and referrers
- OpenAPI Specification - Complete API specification
12.10.10 - Operator UI API
Overview
The Operator UI API provides read-only helpers exposing curated selection input content for the operator interface.
Query Parameters: search, sort, limit (same as selection input v1)
Note: Stored keys for user agents/referrers are URL-safe base64; responses decode them to human-readable values.
Base URL
https://<manager-host>/api/v1/operator_ui
Endpoints
Blocked Household Tokens
GET /api/v1/operator_ui/modules/blocked_tokens
List all blocked household tokens.
Success Response (200):
[
{
"household_token": "house-001_token-abc",
"expire_time": 1625247600
}
]
GET /api/v1/operator_ui/modules/blocked_tokens/{token}
Get details for a specific blocked token.
Success Response (200):
{
"household_token": "house-001_token-abc",
"expire_time": 1625247600
}
Blocked User Agents
GET /api/v1/operator_ui/modules/blocked_user_agents
List all blocked user agents.
Success Response (200):
[
{
"user_agent": "Mozilla/5.0 (Windows NT 10.0; Win64; x64)"
},
{
"user_agent": "curl/7.68.0"
}
]
GET /api/v1/operator_ui/modules/blocked_user_agents/{encoded}
Get details for a specific blocked user agent. The path variable is URL-safe base64 encoded.
Example:
# Encode the user agent
ENC=$(python3 -c "import base64; print(base64.urlsafe_b64encode(b'curl/7.68.0').decode().rstrip('='))")
# Get details
curl -s "https://cdn-manager/api/v1/operator_ui/modules/blocked_user_agents/$ENC"
Blocked Referrers
GET /api/v1/operator_ui/modules/blocked_referrers
List all blocked referrers.
Success Response (200):
[
{
"referrer": "https://spam-example.com"
}
]
GET /api/v1/operator_ui/modules/blocked_referrers/{encoded}
Get details for a specific blocked referrer. The path variable is URL-safe base64 encoded.
Example:
# Encode the referrer
ENC=$(python3 -c "import base64; print(base64.urlsafe_b64encode(b'spam-example.com').decode().rstrip('='))")
# Get details
curl -s "https://cdn-manager/api/v1/operator_ui/modules/blocked_referrers/$ENC"
URL-Safe Base64 Encoding
The Operator UI API uses URL-safe base64 encoding for path parameters. To encode values:
Python:
import base64
# Encode
encoded = base64.urlsafe_b64encode(b'value').decode().rstrip('=')
# Decode
decoded = base64.urlsafe_b64decode(encoded + '=' * (-len(encoded) % 4)).decode()
Bash (with openssl):
# Encode
echo -n "value" | openssl base64 -urlsafe | tr -d '='
# Decode
echo "encoded" | openssl base64 -urlsafe -d
Next Steps
- OpenAPI Specification - Complete API specification
12.10.11 - OpenAPI Specification
Overview
The CDN Manager API is documented using the OpenAPI 3.0 specification. This appendix provides the complete specification for reference and for generating API clients.
OpenAPI Specification (YAML)
openapi: 3.0.3
info:
title: AgileTV CDN Manager API
version: "1.0"
servers:
- url: https://<manager-host>/api
description: CDN Manager API server
paths:
/v1/auth/login:
post:
summary: Login and create session
requestBody:
required: true
content:
application/json:
schema:
$ref: '#/components/schemas/LoginRequest'
responses:
'200':
description: Session created
content:
application/json:
schema:
$ref: '#/components/schemas/LoginResponse'
'401': { description: Unauthorized, content: { application/json: { schema: { $ref: '#/components/schemas/ErrorResponse' } } } }
'500': { description: Internal error, content: { application/json: { schema: { $ref: '#/components/schemas/ErrorResponse' } } } }
/v1/auth/token:
post:
summary: Exchange session for access token
requestBody:
required: true
content:
application/json:
schema:
$ref: '#/components/schemas/TokenRequest'
responses:
'200':
description: Access token
content:
application/json:
schema:
$ref: '#/components/schemas/TokenResponse'
'401': { description: Unauthorized, content: { application/json: { schema: { $ref: '#/components/schemas/ErrorResponse' } } } }
'500': { description: Internal error, content: { application/json: { schema: { $ref: '#/components/schemas/ErrorResponse' } } } }
/v1/auth/logout:
post:
summary: Revoke session
requestBody:
required: true
content:
application/json:
schema:
$ref: '#/components/schemas/LogoutRequest'
responses:
'200': { description: Revoked, content: { application/json: { schema: { $ref: '#/components/schemas/LogoutResponse' } } } }
'401': { description: Unauthorized, content: { application/json: { schema: { $ref: '#/components/schemas/ErrorResponse' } } } }
'500': { description: Internal error, content: { application/json: { schema: { $ref: '#/components/schemas/ErrorResponse' } } } }
/v1/selection_input{tail}:
get:
summary: Read selection input
parameters:
- $ref: '#/components/parameters/Tail'
- $ref: '#/components/parameters/Search'
- $ref: '#/components/parameters/Sort'
- $ref: '#/components/parameters/Limit'
responses:
'200': { description: JSON value }
'400': { description: Bad request, content: { application/json: { schema: { $ref: '#/components/schemas/ErrorResponse' } } } }
'404': { description: Not found }
'500': { description: Backend failure }
post:
summary: Merge selection input
parameters:
- $ref: '#/components/parameters/Tail'
- $ref: '#/components/parameters/Ttl'
requestBody:
required: true
content:
application/json:
schema:
$ref: '#/components/schemas/AnyJson'
responses:
'201': { description: Created, content: { application/json: { schema: { $ref: '#/components/schemas/AnyJson' } } } }
'500': { description: Backend failure }
'503': { description: Service unavailable }
delete:
summary: Delete selection input
parameters:
- $ref: '#/components/parameters/Tail'
responses:
'204': { description: Deleted }
'503': { description: Service unavailable }
/v2/selection_input{tail}:
get:
summary: Read selection input v2
parameters:
- $ref: '#/components/parameters/TailV2'
- $ref: '#/components/parameters/Search'
responses:
'200': { description: JSON value }
'400': { description: Invalid search pattern }
'404': { description: Not found }
'500': { description: Backend failure }
put:
summary: Replace selection input v2
parameters:
- $ref: '#/components/parameters/TailV2'
- $ref: '#/components/parameters/Ttl'
- $ref: '#/components/parameters/CorrelationId'
requestBody:
required: true
content:
application/json:
schema:
$ref: '#/components/schemas/AnyJson'
responses:
'200': { description: Updated }
'500': { description: Backend failure }
post:
summary: Push to selection input v2
parameters:
- $ref: '#/components/parameters/TailV2'
- $ref: '#/components/parameters/Ttl'
- $ref: '#/components/parameters/CorrelationId'
requestBody:
required: true
content:
application/json:
schema:
$ref: '#/components/schemas/AnyJson'
responses:
'200': { description: Pushed }
'500': { description: Backend failure }
delete:
summary: Delete selection input v2
parameters:
- $ref: '#/components/parameters/TailV2'
responses:
'204': { description: Deleted }
'500': { description: Backend failure }
/v1/configuration:
get:
summary: Read configuration
responses:
'200': { description: Configuration, content: { application/json: { schema: { $ref: '#/components/schemas/AnyJson' } } }, headers: { ETag: { schema: { type: string } } } }
'304': { description: Not modified }
'500': { description: Backend failure }
put:
summary: Replace configuration
requestBody:
required: true
content:
application/json:
schema:
$ref: '#/components/schemas/AnyJson'
responses:
'200': { description: Replaced }
'500': { description: Backend failure }
delete:
summary: Delete configuration
responses:
'200': { description: Deleted }
'500': { description: Backend failure }
/v1/routing/geoip:
get:
summary: GeoIP lookup
parameters:
- name: ip
in: query
required: true
schema: { type: string }
responses:
'200': { description: GeoIP data, content: { application/json: { schema: { $ref: '#/components/schemas/GeoIpResponse' } } } }
'400': { description: Invalid IP }
'500': { description: Backend failure }
/v1/routing/validate:
get:
summary: Validate routing
parameters:
- name: ip
in: query
required: true
schema: { type: string }
responses:
'200': { description: Allowed }
'403': { description: Access Denied }
'400': { description: Invalid IP }
'500': { description: Backend failure }
/v1/metrics:
post:
summary: Ingest metrics
requestBody:
required: true
content:
application/json:
schema:
$ref: '#/components/schemas/MetricsIngress'
responses:
'200': { description: Stored }
'500': { description: Validation/back-end error }
get:
summary: Aggregate metrics
responses:
'200': { description: Aggregated metrics, content: { application/json: { schema: { $ref: '#/components/schemas/AnyJson' } } } }
'500': { description: Backend failure }
/v1/discovery/hosts:
get:
summary: List discovered hosts by namespace
responses:
'200':
description: Discovered hosts keyed by namespace
content:
application/json:
schema:
type: object
additionalProperties:
type: array
items:
$ref: '#/components/schemas/DiscoveryHost'
'500': { description: Backend failure }
/v1/discovery/namespaces:
get:
summary: List discovery namespaces with Confd URIs
responses:
'200':
description: Namespaces with Confd links
content:
application/json:
schema:
type: array
items:
$ref: '#/components/schemas/DiscoveryNamespace'
'500': { description: Backend failure }
/v1/datastore:
get:
summary: List datastore keys
responses:
'200': { description: Keys list, content: { application/json: { schema: { type: array, items: { type: string } } } } }
'500': { description: Backend failure }
/v1/datastore/{key}:
get:
summary: Get a JSON value by key
parameters:
- name: key
in: path
required: true
schema: { type: string }
responses:
'200': { description: JSON value, content: { application/json: { schema: { $ref: '#/components/schemas/AnyJson' } } } }
'404': { description: Not found }
'500': { description: Backend failure }
post:
summary: Create a JSON value at key
parameters:
- name: key
in: path
required: true
schema: { type: string }
- $ref: '#/components/parameters/Ttl'
requestBody:
required: true
content:
application/json:
schema:
$ref: '#/components/schemas/AnyJson'
responses:
'201': { description: Created }
'409': { description: Conflict (already exists) }
'500': { description: Backend failure }
put:
summary: Update/replace a JSON value at key
parameters:
- name: key
in: path
required: true
schema: { type: string }
- $ref: '#/components/parameters/Ttl'
requestBody:
required: true
content:
application/json:
schema:
$ref: '#/components/schemas/AnyJson'
responses:
'200': { description: Updated }
'404': { description: Not found }
'500': { description: Backend failure }
delete:
summary: Delete a datastore key
parameters:
- name: key
in: path
required: true
schema: { type: string }
responses:
'204': { description: Deleted }
'500': { description: Backend failure }
/v1/subnets:
get:
summary: List all subnet mappings
responses:
'200': { description: Subnet mappings, content: { application/json: { schema: { type: object, additionalProperties: { type: string } } } } }
'500': { description: Backend failure }
put:
summary: Create or update subnet mappings
requestBody:
required: true
content:
application/json:
schema:
type: object
additionalProperties:
type: string
description: Map of CIDR strings to classification values
responses:
'200': { description: Created }
'400': { description: Invalid CIDR format }
'500': { description: Backend failure }
delete:
summary: Delete all subnet mappings
responses:
'204': { description: Deleted }
'500': { description: Backend failure }
/v1/subnets/byKey/{subnet}:
get:
summary: Get subnet mappings by CIDR prefix
parameters:
- name: subnet
in: path
required: true
schema: { type: string }
responses:
'200': { description: Subnet mappings, content: { application/json: { schema: { type: object, additionalProperties: { type: string } } } } }
'500': { description: Backend failure }
delete:
summary: Delete subnet mappings by CIDR prefix
parameters:
- name: subnet
in: path
required: true
schema: { type: string }
responses:
'204': { description: Deleted }
'500': { description: Backend failure }
/v1/subnets/byValue/{value}:
get:
summary: Get subnet mappings by value
parameters:
- name: value
in: path
required: true
schema: { type: string }
responses:
'200': { description: Subnet mappings, content: { application/json: { schema: { type: object, additionalProperties: { type: string } } } } }
'500': { description: Backend failure }
delete:
summary: Delete subnet mappings by value
parameters:
- name: value
in: path
required: true
schema: { type: string }
responses:
'204': { description: Deleted }
'500': { description: Backend failure }
/v1/operator_ui/modules/blocked_tokens:
get:
summary: List blocked tokens
parameters:
- $ref: '#/components/parameters/Search'
- $ref: '#/components/parameters/Sort'
- $ref: '#/components/parameters/Limit'
responses:
'200': { description: Blocked tokens, content: { application/json: { schema: { type: array, items: { $ref: '#/components/schemas/BlockedToken' } } } } }
'400': { description: Parse error, content: { application/json: { schema: { $ref: '#/components/schemas/ErrorResponse' } } } }
/v1/operator_ui/modules/blocked_tokens/{token}:
get:
summary: Get blocked token
parameters:
- name: token
in: path
required: true
schema: { type: string }
responses:
'200': { description: Blocked token, content: { application/json: { schema: { $ref: '#/components/schemas/BlockedToken' } } } }
'404': { description: Not found }
'400': { description: Parse error, content: { application/json: { schema: { $ref: '#/components/schemas/ErrorResponse' } } } }
/v1/operator_ui/modules/blocked_user_agents:
get:
summary: List blocked user agents
parameters:
- $ref: '#/components/parameters/Search'
- $ref: '#/components/parameters/Sort'
- $ref: '#/components/parameters/Limit'
responses:
'200': { description: Blocked user agents, content: { application/json: { schema: { type: array, items: { $ref: '#/components/schemas/BlockedUserAgent' } } } } }
'400': { description: Parse error, content: { application/json: { schema: { $ref: '#/components/schemas/ErrorResponse' } } } }
/v1/operator_ui/modules/blocked_user_agents/{encoded}:
get:
summary: Get blocked user agent
parameters:
- name: encoded
in: path
required: true
schema: { type: string }
responses:
'200': { description: Blocked user agent, content: { application/json: { schema: { $ref: '#/components/schemas/BlockedUserAgent' } } } }
'400': { description: Parse error, content: { application/json: { schema: { $ref: '#/components/schemas/ErrorResponse' } } } }
/v1/operator_ui/modules/blocked_referrers:
get:
summary: List blocked referrers
parameters:
- $ref: '#/components/parameters/Search'
- $ref: '#/components/parameters/Sort'
- $ref: '#/components/parameters/Limit'
responses:
'200': { description: Blocked referrers, content: { application/json: { schema: { type: array, items: { $ref: '#/components/schemas/BlockedReferrer' } } } } }
'400': { description: Parse error, content: { application/json: { schema: { $ref: '#/components/schemas/ErrorResponse' } } } }
/v1/operator_ui/modules/blocked_referrers/{encoded}:
get:
summary: Get blocked referrer
parameters:
- name: encoded
in: path
required: true
schema: { type: string }
responses:
'200': { description: Blocked referrer, content: { application/json: { schema: { $ref: '#/components/schemas/BlockedReferrer' } } } }
'400': { description: Parse error, content: { application/json: { schema: { $ref: '#/components/schemas/ErrorResponse' } } } }
/v1/health/alive:
get:
summary: Liveness check
responses:
'200': { description: Alive, content: { application/json: { schema: { $ref: '#/components/schemas/HealthStatus' } } } }
/v1/health/ready:
get:
summary: Readiness check
responses:
'200': { description: Ready, content: { application/json: { schema: { $ref: '#/components/schemas/HealthStatus' } } } }
'503': { description: Unready, content: { application/json: { schema: { $ref: '#/components/schemas/HealthStatus' } } } }
components:
parameters:
Tail:
name: tail
in: path
required: true
schema: { type: string }
TailV2:
name: tail
in: path
required: true
schema: { type: string }
Search:
name: search
in: query
required: false
schema: { type: string }
Sort:
name: sort
in: query
required: false
schema: { type: string, enum: [asc, desc] }
Limit:
name: limit
in: query
required: false
schema: { type: integer, minimum: 1 }
Ttl:
name: ttl
in: query
required: false
schema: { type: string, description: Humantime duration }
CorrelationId:
name: correlation_id
in: query
required: false
schema: { type: string }
schemas:
LoginRequest:
type: object
required: [email, password]
properties:
email: { type: string, format: email }
password: { type: string, format: password }
LoginResponse:
type: object
properties:
session_id: { type: string }
session_token: { type: string }
verified_at: { type: string, format: date-time }
expires_at: { type: string, format: date-time }
LogoutRequest:
type: object
required: [session_id]
properties:
session_id: { type: string }
session_token: { type: string }
LogoutResponse:
type: object
properties:
status: { $ref: '#/components/schemas/StatusValue' }
TokenRequest:
type: object
required: [session_id, session_token, grant_type]
properties:
session_id: { type: string }
session_token: { type: string }
scope: { type: string }
grant_type: { type: string, enum: [session] }
TokenResponse:
type: object
required: [access_token, scope, expires_in, token_type]
properties:
access_token: { type: string }
scope: { type: string }
expires_in: { type: integer, format: int64 }
token_type: { type: string, enum: [bearer] }
ErrorResponse:
type: object
properties:
message: { type: string }
AnyJson:
description: Arbitrary JSON value
MetricsIngress:
type: object
additionalProperties:
type: object
additionalProperties: { type: number }
GeoIpResponse:
type: object
properties:
city:
type: object
properties:
name: { type: string }
asn: { type: integer }
is_anonymous: { type: boolean }
BlockedToken:
type: object
properties:
household_token: { type: string }
expire_time: { type: integer, format: int64 }
BlockedUserAgent:
type: object
properties:
user_agent: { type: string }
BlockedReferrer:
type: object
properties:
referrer: { type: string }
DiscoveryHost:
type: object
properties:
name: { type: string }
DiscoveryNamespace:
type: object
properties:
namespace: { type: string }
confd_uri: { type: string }
HealthStatus:
type: object
properties:
status: { $ref: '#/components/schemas/StatusValue' }
StatusValue:
type: string
enum: [Ok, Fail]
Using the OpenAPI Specification
Generating API Clients
The OpenAPI specification can be used to generate client libraries in multiple languages:
Using openapi-generator:
# Generate Python client
openapi-generator generate -i openapi.yaml -g python -o ./python-client
# Generate TypeScript client
openapi-generator generate -i openapi.yaml -g typescript-axios -o ./typescript-client
# Generate Go client
openapi-generator generate -i openapi.yaml -g go -o ./go-client
Using swagger-codegen:
swagger-codegen generate -i openapi.yaml -l python -o ./python-client
Validating the Specification
To validate the OpenAPI specification:
# Using swagger-cli
swagger-cli validate openapi.yaml
# Using spectral
spectral lint openapi.yaml
Next Steps
- Authentication API - Detailed authentication flow
- API Guide Index - Browse all API documentation
- Operations Guide - Day-to-day operational procedures
12.11 - Troubleshooting Guide
Overview
This guide provides troubleshooting procedures for common issues encountered when operating the AgileTV CDN Manager (ESB3027). Use the diagnostic commands and resolution steps to identify and resolve problems.
Diagnostic Tools
Cluster Status
# Check node status
kubectl get nodes
# Check all pods
kubectl get pods -A
# Check events sorted by time
kubectl get events --sort-by='.lastTimestamp'
# Check resource usage
kubectl top nodes
kubectl top pods
Component Status
# Check deployments
kubectl get deployments
# Check statefulsets
kubectl get statefulsets
# Check persistent volumes
kubectl get pvc
kubectl get pv
# Check services
kubectl get services
# Check ingress
kubectl get ingress
Common Issues
Pods Stuck in Pending State
Symptoms: Pods remain in Pending state indefinitely.
Causes:
- Insufficient cluster resources (CPU/memory)
- No nodes match scheduling constraints
- PersistentVolume not available
Diagnosis:
# Describe the pending pod
kubectl describe pod <pod-name>
# Check events for scheduling failures
kubectl get events --field-selector reason=FailedScheduling
# Check node capacity
kubectl describe nodes | grep -A 5 "Allocated resources"
# Check available PVs
kubectl get pv
Resolution:
# Free up resources by scaling down non-critical workloads
kubectl scale deployment <deployment> --replicas=0
# Or add additional nodes to the cluster
# If PV is stuck, delete and recreate
kubectl delete pvc <pvc-name>
kubectl delete pod <pod-name>
Pods Stuck in ContainerCreating
Symptoms: Pods remain in ContainerCreating state.
Causes:
- Image pull failures
- Volume mount issues
- Network configuration problems
Diagnosis:
kubectl describe pod <pod-name>
# Check for image pull errors
kubectl get events | grep -i "failed to pull"
# Check volume mount status
kubectl get events | grep -i "mount"
Resolution:
# For image pull issues, verify image exists and credentials
kubectl get secret <pull-secret-name> -o yaml
# For volume issues, check Longhorn volume status
kubectl get volumes -n longhorn-system
# Delete stuck pod to trigger recreation
kubectl delete pod <pod-name> --force --grace-period=0
Persistent Volume Mount Failures
Symptoms: Pod fails to start with error “AttachVolume.Attach failed for volume… is not ready for workloads” or similar volume attachment errors.
Causes:
- Longhorn volume created but unable to be successfully mounted
- Network connectivity issues between nodes (Longhorn requires iSCSI and NFS traffic)
- Longhorn service unhealthy
- Incorrect storage class configuration
Diagnosis:
# Describe the failing pod to see the error
kubectl describe pod <pod-name>
# Check Longhorn volumes status
kubectl get volumes -n longhorn-system
# Check Longhorn UI for detailed volume status
kubectl port-forward -n longhorn-system svc/longhorn-frontend 8080:80
# Access: http://localhost:8080
Resolution:
# Verify firewall allows Longhorn traffic between nodes
# Ports 9500 and 8500 must be open (see Networking Guide)
# Check Longhorn is healthy
kubectl get pods -n longhorn-system
# If volume is stuck, delete PVC and pod to trigger recreation
kubectl delete pvc <pvc-name>
kubectl delete pod <pod-name>
Pods in CrashLoopBackOff
Symptoms: Pods repeatedly crash and restart.
Causes:
- Application configuration errors
- Missing dependencies (database not ready)
- Resource limits too low
- Liveness probe failures
Diagnosis:
# View current logs
kubectl logs <pod-name>
# View previous instance logs
kubectl logs <pod-name> -p
# Describe pod for restart reasons
kubectl describe pod <pod-name>
# Check if dependencies are healthy
kubectl get pods | grep -E "(postgres|kafka|redis)"
Resolution:
# For dependency issues, wait for dependencies to be ready
kubectl wait --for=condition=Ready pod/<dependency-pod> --timeout=300s
# For resource issues, increase limits
kubectl edit deployment <deployment-name>
# For configuration issues, check ConfigMaps and Secrets
kubectl get configmap <configmap-name> -o yaml
kubectl get secret <secret-name> -o yaml
# Restart the deployment
kubectl rollout restart deployment/<deployment-name>
Pods in Terminating State
Symptoms: Pods stuck in Terminating state indefinitely.
Causes:
- Volume detachment issues
- Node communication problems
- Finalizer blocking deletion
Diagnosis:
kubectl describe pod <pod-name>
# Check if node is reachable
kubectl get nodes
# Check finalizers
kubectl get pod <pod-name> -o jsonpath='{.metadata.finalizers}'
Resolution:
# Force delete the pod
kubectl delete pod <pod-name> --force --grace-period=0
# If node is unreachable, drain and remove from cluster
kubectl drain <node-name> --ignore-daemonsets --force
kubectl delete node <node-name>
Service Unreachable
Symptoms: Service endpoints not accessible.
Causes:
- No ready pods backing the service
- Network policy blocking traffic
- Service port mismatch
Diagnosis:
# Check service endpoints
kubectl get endpoints <service-name>
# Check if pods are ready
kubectl get pods -l app=<label>
# Check network policies
kubectl get networkpolicies
# Test connectivity from within cluster
kubectl run test --rm -it --image=busybox -- wget -O- <service-name>:<port>
Resolution:
# Ensure pods are ready and matching service selector
kubectl get pods --show-labels
# Check service selector matches pod labels
kubectl get service <service-name> -o jsonpath='{.spec.selector}'
# Temporarily disable network policy for testing
kubectl edit networkpolicy <policy-name>
Ingress Not Working
Symptoms: External access via ingress fails.
Causes:
- Traefik ingress controller not running
- Ingress configuration errors
- TLS certificate issues
- DNS resolution problems
Diagnosis:
# Check Traefik pods
kubectl get pods -n kube-system -l app.kubernetes.io/name=traefik
# Check ingress resources
kubectl get ingress
# Describe ingress for errors
kubectl describe ingress <ingress-name>
# Check Traefik logs
kubectl logs -n kube-system -l app.kubernetes.io/name=traefik
# Test DNS resolution
nslookup <hostname>
Resolution:
# Restart Traefik
kubectl rollout restart deployment -n kube-system traefik
# Fix ingress configuration
kubectl edit ingress <ingress-name>
# Renew or recreate TLS secret
kubectl create secret tls <secret-name> --cert=tls.crt --key=tls.key \
--dry-run=client -o yaml | kubectl apply -f -
# Verify hostname matches certificate
openssl x509 -in tls.crt -noout -subject -issuer
Database Connection Failures
Symptoms: Application cannot connect to PostgreSQL.
Causes:
- PostgreSQL cluster not ready
- Connection pool exhausted
- Network connectivity issues
- Authentication failures
Diagnosis:
# Check PostgreSQL cluster status
kubectl get clusters
# Check PostgreSQL pods
kubectl get pods -l app.kubernetes.io/name=postgresql
# Check PostgreSQL logs
kubectl logs -l app.kubernetes.io/name=postgresql
# Test connectivity
kubectl exec -it <app-pod> -- psql -h <postgres-service> -U <user> -d <database>
Resolution:
# Wait for PostgreSQL to be ready
kubectl wait --for=condition=Ready pod -l app.kubernetes.io/name=postgresql --timeout=300s
# Check connection string in application config
kubectl get secret <secret-name> -o jsonpath='{.data}' | base64 -d
# Restart application pods
kubectl rollout restart deployment/<deployment-name>
Kafka Connection Issues
Symptoms: Application cannot connect to Kafka.
Causes:
- Kafka controllers not ready
- Topic not created
- Network connectivity issues
Diagnosis:
# Check Kafka pods
kubectl get pods -l app.kubernetes.io/name=kafka
# Check Kafka logs
kubectl logs -l app.kubernetes.io/name=kafka
# List topics
kubectl exec -it <kafka-pod> -- kafka-topics.sh --bootstrap-server localhost:9092 --list
Resolution:
# Wait for Kafka controllers to be ready
kubectl wait --for=condition=Ready pod -l app.kubernetes.io/name=kafka --timeout=300s
# Create missing topic
kubectl exec -it <kafka-pod> -- kafka-topics.sh --bootstrap-server localhost:9092 \
--create --topic <topic-name> --partitions 3 --replication-factor 3
# Restart application to reconnect
kubectl rollout restart deployment/<deployment-name>
Redis Connection Issues
Symptoms: Application cannot connect to Redis.
Diagnosis:
# Check Redis pods
kubectl get pods -l app.kubernetes.io/name=redis
# Check Redis logs
kubectl logs -l app.kubernetes.io/name=redis
# Test connectivity
kubectl exec -it <redis-pod> -- redis-cli ping
Resolution:
# Wait for Redis to be ready
kubectl wait --for=condition=Ready pod -l app.kubernetes.io/name=redis --timeout=300s
# Restart application
kubectl rollout restart deployment/<deployment-name>
High Memory Usage
Symptoms: Pods approaching or hitting memory limits.
Diagnosis:
# Check memory usage
kubectl top pods
# Check OOMKilled pods
kubectl get pods --field-selector=status.phase=Failed
# Check for memory leaks in logs
kubectl logs <pod-name> | grep -i "memory\|oom"
Resolution:
# Temporarily increase memory limit
kubectl edit deployment <deployment-name>
# Or scale horizontally if HPA is enabled
kubectl scale deployment <deployment-name> --replicas=<n>
# Long-term: Update values.yaml and perform helm upgrade
High CPU Usage
Symptoms: Pods consistently using high CPU.
Diagnosis:
# Check CPU usage
kubectl top pods
# Check for runaway processes
kubectl top pods --sort-by=cpu
Resolution:
# Scale horizontally if HPA is enabled
kubectl scale deployment <deployment-name> --replicas=<n>
# Or increase CPU limits
kubectl edit deployment <deployment-name>
Persistent Volume Issues
Symptoms: PVC not binding or volume errors.
Diagnosis:
# Check PVC status
kubectl get pvc
# Check PV status
kubectl get pv
# Check Longhorn volumes
kubectl get volumes -n longhorn-system
# Check Longhorn UI for details
kubectl port-forward -n longhorn-system svc/longhorn-frontend 8080:80
Resolution:
# For stuck PVC, delete and recreate
kubectl delete pvc <pvc-name>
kubectl delete pod <pod-name>
# For Longhorn issues, check Longhorn UI
# Access via http://localhost:8080
# Recreate Longhorn volume if necessary
Zitadel Authentication Failures
Symptoms: Users cannot authenticate via Zitadel.
Causes:
- CORS configuration mismatch
- External domain misconfigured
- Zitadel pods not healthy
Diagnosis:
# Check Zitadel pods
kubectl get pods -l app.kubernetes.io/name=zitadel
# Check Zitadel logs
kubectl logs -l app.kubernetes.io/name=zitadel
# Verify external domain configuration
helm get values acd-manager -o yaml | grep -A 5 zitadel
Resolution:
# Ensure global.hosts.manager[0].host matches zitadel.zitadel.ExternalDomain
# Update values.yaml if needed
helm upgrade acd-manager /mnt/esb3027/charts/acd-manager \
--values ~/values.yaml
# Restart Zitadel
kubectl rollout restart deployment -l app.kubernetes.io/name=zitadel
Certificate Errors
Symptoms: TLS/SSL errors in browser or API calls.
Diagnosis:
# Check certificate expiration
kubectl get secret <tls-secret> -o jsonpath='{.data.tls\.crt}' | base64 -d | \
openssl x509 -noout -dates
# Check certificate subject
kubectl get secret <tls-secret> -o jsonpath='{.data.tls\.crt}' | base64 -d | \
openssl x509 -noout -subject -issuer
Resolution:
# Renew self-signed certificate
helm upgrade acd-manager /mnt/esb3027/charts/acd-manager \
--values ~/values.yaml \
--set ingress.selfSigned=true
# Or update manual certificate
kubectl create secret tls <secret-name> \
--cert=new-cert.crt --key=new-key.key \
--dry-run=client -o yaml | kubectl apply -f -
# Restart pods to pick up new certificate
kubectl rollout restart deployment <deployment-name>
Log Collection
Collecting Logs for Support
# Capture timestamp once to ensure consistency
TS=$(date +%Y%m%d-%H%M%S)
# Create log collection directory
mkdir -p ~/cdn-logs-$TS
cd ~/cdn-logs-$TS
# Collect pod logs
for pod in $(kubectl get pods -o name); do
kubectl logs $pod > ${pod#pod/}.log 2>&1
kubectl logs $pod -p > ${pod#pod/}.previous.log 2>&1 || true
done
# Collect cluster events
kubectl get events --sort-by='.lastTimestamp' > events.log
# Collect pod descriptions
for pod in $(kubectl get pods -o name); do
kubectl describe $pod > ${pod#pod/}.describe.txt
done
# Compress for transfer
tar czf cdn-logs-$TS.tar.gz *.log *.txt
Emergency Procedures
Complete Cluster Recovery
If the cluster is completely down:
Assess node status:
kubectl get nodesRestart K3s on nodes:
# On each node systemctl restart k3sIf primary server failed:
- Promote another server node
- Update load balancer/DNS to point to new primary
Restore from backup if necessary:
- See Upgrade Guide for restore procedures
Data Recovery
For data recovery scenarios:
- PostgreSQL: Use Cloudnative PG backup/restore
- Longhorn: Restore from volume snapshots
- Kafka: Replication handles most failures
Getting Help
If issues persist:
- Collect logs using the procedure above
- Check release notes for known issues
- Contact support with log bundle and issue description
Next Steps
After resolving issues:
- Operations Guide - Preventive maintenance procedures
- Configuration Guide - Verify configuration is correct
- Architecture Guide - Understand component dependencies
12.12 - Glossary
Overview
This glossary defines key terms and acronyms used throughout the AgileTV CDN Manager (ESB3027) documentation.
A
ACD (Agile Content Delivery)
The overall CDN solution comprising the Manager (ESB3027) and Director (ESB3024) components.
Agent Node
A Kubernetes node that runs workloads but does not participate in the control plane. Agent nodes provide additional capacity for running application pods.
API Gateway
See NGinx Gateway.
ASN (Autonomous System Number)
A unique identifier for a network on the internet. Used in GeoIP-based routing decisions.
C
CDN Director
The Edge Server Business (ESB3024) component that handles actual content routing and delivery. Multiple Directors can be managed by a single CDN Manager.
Cloudnative PG (CNPG)
A Kubernetes operator that manages PostgreSQL clusters. Provides high availability, automatic failover, and backup capabilities for the Manager’s database layer.
Confd
Configuration daemon that synchronizes configuration from the Manager to CDN Directors. Runs as a sidecar or separate deployment.
CORS (Cross-Origin Resource Sharing)
A security mechanism that allows web applications to make requests to a different domain. Zitadel enforces CORS policies requiring the external domain to match the configured hostname.
CrashLoopBackOff
A Kubernetes pod state indicating the container is repeatedly crashing and being restarted. Typically indicates a configuration or dependency issue.
D
Datastore
The internal key-value storage system used by the Manager for short-lived or simple structured data. Backed by Redis.
Descheduler
A Kubernetes component that periodically analyzes pod distribution and evicts pods from overutilized nodes to optimize cluster balance.
Director
See CDN Director.
E
EDB (EnterpriseDB)
A company that provides PostgreSQL-related software and services. The Cloudnative PG operator was originally developed by EDB.
Ephemeral Storage
Temporary storage available to pods. Used for temporary files and caches. Not persistent across pod restarts.
ESB (Edge Server Business)
The product family designation for CDN components. ESB3027 is the Manager, ESB3024 is the Director.
etcd
A distributed key-value store used by Kubernetes for cluster state management. Runs on Server nodes as part of the control plane.
F
FailedScheduling
A Kubernetes event indicating a pod could not be scheduled due to insufficient resources or scheduling constraints.
Flannel
A network overlay solution for Kubernetes. Provides VXLAN-based networking for pod-to-pod communication.
Frontend GUI
See MIB Frontend.
G
GeoIP
Geographic IP lookup service using MaxMind databases. Used for location-based routing decisions.
Grafana
A visualization and dashboard platform for time-series data. Used to display metrics collected by Telegraf and stored in VictoriaMetrics.
H
Helm Chart
A package of pre-configured Kubernetes resources. The CDN Manager is deployed via a Helm chart that handles all component installation.
HPA (Horizontal Pod Autoscaler)
A Kubernetes feature that automatically scales the number of pods based on CPU/memory utilization or custom metrics.
HTTP Server
The main API server component of the Manager, built with Actix Web (Rust framework).
I
Ingress
A Kubernetes resource that exposes HTTP/HTTPS routes from outside the cluster to services within. The CDN Manager uses Traefik as the ingress controller.
Ingress Controller
A component that implements ingress rules. The CDN Manager uses Traefik for primary ingress and NGinx for external Director communication.
K
Kafka
A distributed event streaming platform used by the Manager for asynchronous communication and event processing.
K3s
A lightweight Kubernetes distribution optimized for edge and production deployments. Used as the underlying cluster technology.
Kubernetes (K8s)
An open-source container orchestration platform. The CDN Manager runs on a K3s-based Kubernetes cluster.
L
Longhorn
A distributed block storage system for Kubernetes. Provides persistent volumes for stateful components like PostgreSQL and Kafka.
Liveness Probe
A Kubernetes health check that determines if a container is running properly. Failed liveness probes trigger container restart.
M
Manager
The central management component (ESB3027) for configuring and monitoring CDN Directors.
MaxMind
A provider of IP intelligence databases including GeoIP City, GeoLite2 ASN, and Anonymous IP databases used by the Manager.
MIB Frontend
The web-based configuration GUI for CDN operators. Provides a user interface for managing streams, routers, and other configuration.
Multi-Factor Authentication (MFA)
An authentication method requiring multiple forms of verification. Note: MFA is not currently supported in the CDN Manager and should be skipped during setup.
N
Name-based Virtual Hosting
A technique where multiple hostnames are served from the same IP address. Zitadel uses this for CORS validation.
Namespace
A Kubernetes abstraction for organizing cluster resources. The CDN Manager uses namespaces to group related components.
NGinx Gateway
An NGinx-based gateway that handles external communication with CDN Directors.
Node Token
A secret token used to authenticate new nodes joining a K3s cluster. Located at /var/lib/rancher/k3s/server/node-token on Server nodes.
O
Operator
A method of packaging, deploying, and managing a Kubernetes application. Cloudnative PG is an operator for PostgreSQL.
OOMKilled
A Kubernetes pod state indicating the container was terminated due to exceeding memory limits.
P
PDB (Pod Disruption Budget)
A Kubernetes feature that ensures a minimum number of pods remain available during voluntary disruptions like maintenance.
PersistentVolume (PV)
A piece of storage in the Kubernetes cluster. Created dynamically by Longhorn for stateful components.
PersistentVolumeClaim (PVC)
A request for storage by a pod. Bound to a PersistentVolume.
Pod
The smallest deployable unit in Kubernetes. Contains one or more containers.
PostgreSQL
An open-source relational database. Used by the Manager for persistent data storage, managed by Cloudnative PG.
Probe
A Kubernetes health check mechanism. Types include liveness, readiness, and startup probes.
Prometheus
An open-source monitoring and alerting toolkit. Telegraf exports metrics in Prometheus format.
R
RBAC (Role-Based Access Control)
A method of regulating access to resources based on user roles. Used by Kubernetes for authorization.
Readiness Probe
A Kubernetes health check that determines if a container is ready to receive traffic. Failed readiness probes remove the pod from service load balancing.
Redis
An in-memory data structure store used for caching and as the datastore backend for the Manager.
Replica
A copy of a pod. Multiple replicas provide high availability and load distribution.
Resource Preset
Predefined resource configurations (nano, micro, small, medium, large, xlarge, 2xlarge) for common deployment sizes.
Rolling Update
A deployment strategy that updates pods one at a time to maintain availability during upgrades.
S
Selection Input
A key-value storage mechanism used for configuration data that can be queried with wildcard patterns. Available in v1 and v2 APIs with different semantics.
Server Node
A Kubernetes node that participates in the control plane (etcd, API server). Can also run workloads unless tainted.
Service
A Kubernetes abstraction that defines a logical set of pods and a policy for accessing them. Provides stable networking endpoints.
ServiceAccount
A Kubernetes identity for processes running in pods. Used for authentication between Kubernetes components.
StatefulSet
A Kubernetes workload API object for managing stateful applications. Used for PostgreSQL and Kafka deployments.
Startup Probe
A Kubernetes health check that determines if a container application has started. Disables liveness and readiness checks until it succeeds.
Stream
A content stream configuration defining source and routing parameters.
T
Telegraf
An agent for collecting, processing, aggregating, and writing metrics. Runs on each node to gather system and application metrics.
TLS (Transport Layer Security)
A cryptographic protocol for secure communication. The CDN Manager uses TLS for all external HTTPS connections.
Topology Aware Hints
A Kubernetes feature that prefers routing traffic to pods in the same zone as the source. Reduces latency by keeping traffic local.
Traefik
A modern HTTP reverse proxy and ingress controller. Used as the primary ingress controller for the CDN Manager.
TTL (Time To Live)
The duration after which data expires. Used in the datastore and selection input APIs.
V
Values.yaml
The Helm chart configuration file. Contains all configurable parameters for the CDN Manager deployment.
VictoriaMetrics
A time-series database used for storing metrics data. Provides long-term storage and querying capabilities.
VXLAN
Virtual Extensible LAN. A network virtualization technology used by Flannel for pod networking.
Z
Zitadel
An identity and access management (IAM) platform used for authentication and authorization in the CDN Manager. Provides OAuth2/OIDC capabilities.
Default Credentials
The following table lists all default credentials used by the CDN Manager. Change these defaults before deploying to production.
| Service | Username | Password | Notes |
|---|---|---|---|
| Zitadel Console | admin@agiletv.dev | Password1! | Primary identity management; accessed at /ui/console |
Security Warning: Use the default
admin@agiletv.devaccount only to create a new administrator account with proper roles. After verifying the new account works, disable or delete the default admin account before exposing the system to users. For details on required roles and administrator permissions, see Zitadel’s Administrator Documentation. See the Next Steps Guide for initial configuration procedures.
Common Abbreviations
| Abbreviation | Meaning |
|---|---|
| API | Application Programming Interface |
| ASN | Autonomous System Number |
| CORS | Cross-Origin Resource Sharing |
| CPU | Central Processing Unit |
| DNS | Domain Name System |
| EDB | EnterpriseDB |
| ESB | Edge Server Business |
| GUI | Graphical User Interface |
| HA | High Availability |
| Helm | Helm Package Manager |
| HPA | Horizontal Pod Autoscaler |
| HTTP | Hypertext Transfer Protocol |
| HTTPS | HTTP Secure |
| IAM | Identity and Access Management |
| IP | Internet Protocol |
| JSON | JavaScript Object Notation |
| K8s | Kubernetes |
| MFA | Multi-Factor Authentication |
| MIB | Management Information Base |
| NIC | Network Interface Card |
| OAuth | Open Authorization |
| OIDC | OpenID Connect |
| PVC | PersistentVolumeClaim |
| PV | PersistentVolume |
| RBAC | Role-Based Access Control |
| SSL | Secure Sockets Layer |
| TCP | Transmission Control Protocol |
| TLS | Transport Layer Security |
| TTL | Time To Live |
| UDP | User Datagram Protocol |
| UI | User Interface |
| VPA | Vertical Pod Autoscaler |
| VXLAN | Virtual Extensible LAN |
Next Steps
After reviewing terminology:
- Architecture Guide - Understand component relationships
- Configuration Guide - Full configuration reference
- Operations Guide - Day-to-day operational procedures
13 - AgileTV Cache (esb2001,esb3004)
Information about the AgileTV Cache Orbit version is available in
EDGS-103 Orbit TV Server User Guide1 and information about the
AgileTV Cache SW Streamer version is available in EDGS-171 SW Streamer User Guide1.
14 - BGP Sniffer (esb3013)
Information about the AgileTV BGP Sniffer is available in
EDGS-214 ESB3013 User Guide1.
15 - AgileTV Convoy Manager (classic) (esb3006)
Information about the classic Orbit CDN Management System (aka Convoy)
is available in EDGS-069 Convoy Management Software User Guide1.
16 - Orbit CDN Request Router (esb3008)
Information about the convoy based Orbit Request Router
is available in EDGS-197 ESB3008 HTTP Request Router - User Guide1.
17 - Releases
17.1 - Release esb3027-1.6.1
Build date
2026-07-02
Release status
Type: production
Included components
- ACD Configuration GUI 4.0.4
Compatibility
This release has been tested with the following product versions:
- AgileTV CDN Director, ESB3024-1.24.0
Breaking changes from 1.4.x release
Support for RHEL 8 has been removed from this release due to upstream requirements with the version of K3s included in this release. RHEL 9 or it’s derivatives are required to run this release.
Change log
- NEW: Bugfix in GUI version 4.0.4[ESB3027-595]
Deprecated functionality
System requirements
Support for RHEL 8 has been removed from this release due to upstream requirements with the version of K3s included in this release. RHEL 9 or it’s derivatives are required to run this release. See the System Requirements Guide for more information.
Known limitations
This release requires a clean install. Upgrade from version 1.4.1 is not possible. Installation of the software is only supported using a self-hosted configuration.
17.2 - Release esb3027-1.6.0
Build date
2026-05-21
Release status
Type: production
Included components
- ACD Configuration GUI 4.0.3
Compatibility
This release has been tested with the following product versions:
- AgileTV CDN Director, ESB3024-1.24.0
Breaking changes from previous release
Support for RHEL 8 has been removed from this release due to upstream requirements with the version of K3s included in this release. RHEL 9 or it’s derivatives are required to run this release.
Change log
- NEW: Port Subnet API to Manager [ESB3027-291]
- NEW: Replace Prometheus stack with VictoriaMetrics [ESB3027-275]
- NEW: New Grafana dashboards for monitoring “CDN Manager API” [ESB3027-424]
- NEW: Update streaming dashboards from CDN Director [ESB3027-360]
- NEW: Make cache-control headers configurable for Validation API [ESB3027-408]
- NEW: Add preflight requirements checks to installer [ESB3027-322]
- NEW: New V2 Selection Input API [ESB3027-297]
- NEW: Add confcli command to all server nodes [ESB3027-352]
- NEW: Support E-Tag response headers from Manager APIs [ESB3027-387]
- NEW: API Performance Improvements [ESB3027-518]
- NEW: Additional Grafana dashboards for monitoring cluster health [ESB3027-359]
- NEW: Support for Zitadel OIDC authentication in Grafana [ESB3027-144]
- FIXED: Redis experiences connection errors when under load [ESB3027-454]
- FIXED: PostgreSQL experiences pod restarts when under load [ESB3027-507]
- FIXED: Manager liveness probes can time out when under load [ESB3027-505]
- FIXED: Grafana dashboard folders are not respected [ESB3027-377]
- FIXED: Missing or incorrect CORS ehaders cause GUI to fail to authenticate [ESB3027-392]
- FIXED: Valid confd configuration fails to parse [ESB3027-367]
- FIXED: Confd client stops reacting to configuration change events [ESB3027-368]
- FIXED: Grafana dashboards refresh too quickly [ESB3027-371]
- FIXED: Hostnames are not resolved in route validation endpoint [ESB3027-534]
- FIXED: Installer completes before K3s is fully ready [ESB3027-541]
- FIXED: If confd monitoring thread dies, stale configuration may be used [ESB3027-491]
- FIXED: Path splitting logic may lead to fatal crash [ESB3027-493]
Deprecated functionality
System requirements
Support for RHEL 8 has been removed from this release due to upstream requirements with the version of K3s included in this release. RHEL 9 or it’s derivatives are required to run this release. See the System Requirements Guide for more information.
Known limitations
This release requires a clean install. Upgrade from version 1.4.1 is not possible. Installation of the software is only supported using a self-hosted configuration.
17.3 - Release esb3027-1.4.1
Build date
2025-11-25
Release status
Type: production
Included components
- ACD Configuration GUI 3.2.10
Compatibility
This release has been tested with the following product versions:
- AgileTV CDN Director, ESB3024-1.22.0
- AgileTV CDN Director, ESB3024-1.20.1 (without GUI)
Breaking changes from previous release
None
Change log
- NEW: Enable the horizontal pod autoscaler by default [ESB3027-354]
- FIXED: Authentication failure when using local DNS records [ESB3027-299]
- FIXED: PostgreSQL container image missing from installer [ESB3027-312]
- FIXED: Kafka messages are retained longer than configured [ESB3027-315]
- FIXED: Busybox container image missing from installer [ESB3027-317]
- FIXED: Prometheus scrape configuration uses wrong target URLs [ESB3027-324]
- FIXED: Grafana datasource connection invalid [ESB3027-325]
- FIXED: Incorrect Grafana dashboard used as Home [ESB3027-346]
- FIXED: Grafana exposes user credentials over plain HTTP [ESB3027-347]
- FIXED: Grafana pods crash and restart after a few minutes [ESB3027-353]
- FIXED: Default kafka volume is too small [ESB3027-357]
Deprecated functionality
None
System requirements
Known limitations
This release requires a clean install. Upgrade from version 1.4.0 is not possible. Installation of the software is only supported using a self-hosted configuration.
17.4 - Release esb3027-1.4.0
Build date
2025-10-23
Release status
Type: production
Included components
- ACD Configuration GUI 2.3.9
Compatibility
This release has been tested with the following product versions:
- AgileTV CDN Director, ESB3024-1.22.0
Breaking changes from previous release
A full installation is required for this version
If the field confd.confd.image.tag is set in the present configuration file it must be removed or updated before upgrading
Change log
- NEW: Monitoring and Metrics support [ESB3027-17]
- NEW: Support for horizontal scaling [ESB3027-63]
- NEW: Deploy GUI container with Manager [ESB3027-67]
- NEW: Support Kafka redundancy [ESB3027-125]
- NEW: Support for Redis high availability [ESB3027-126]
- NEW: Add Prometheus Container [ESB3027-130]
- NEW: Add Grafana Container [ESB3027-131]
- NEW: External DNS Name configuration should be global [ESB3027-180]
- NEW: Deploy hardware metrics services acd-metrics-aggregator and acd-telegraf-metrics-database in k8s cluster [ESB3027-189]
- NEW: REST API Performance Improvements [ESB3027-208]
- NEW: “Star”/Make a Grafana dashboard the home page [ESB3027-243]
- NEW: Support for remote TCP connections for confd subscribers [ESB3027-244]
- NEW: Persist long term usage data [ESB3027-248]
- NEW: New billing dashboard [ESB3027-249]
- NEW: [ANSSI-BP-028] System Settings - Network Configuration and Firewalls [ESB3027-258]
- NEW: [ANSSI-BP-028] System Settings - SELinux [ESB3027-260]
- NEW: Support deploying GUI independently from manager [ESB3027-278]
- NEW: Automatically generate Zitadel secret [ESB3027-280]
- NEW: Deprecate the generate-ssl-secret command [ESB3027-281]
- NEW: Deprecate the generate-zitadel-mastekey command [ESB3027-285]
- FIXED: Access to services restricted with SELinux in Enforcing mode [ESB3027-32]
- FIXED: Authentication token payload contains invalid user details [ESB3027-47]
- FIXED: Unexpected 200 OK response to non-existent confd endpoint [ESB3027-154]
- FIXED: Multiple restarts encountered for selection-input service on startup [ESB3027-155]
- FIXED: Installer script requires case-sensitive hostnames [ESB3027-158]
- FIXED: Installer script does not support configuring additional options [ESB3027-214]
- FIXED: Selection input API accepts keys containing non-urlsafe characters [ESB3027-216]
- FIXED: Installation fails on minimal RHEL installation [ESB3027-287]
- FIXED: Kafka consumer configuration warning logged on startup [ESB3027-294]
Deprecated functionality
None
System requirements
Known limitations
Installation of the software is only supported using a self-hosted configuration.
17.5 - Release esb3027-1.2.1
Build date
2025-05-22
Release status
Type: production
Compatibility
This release is compatible with the following product versions:
- AgileTV CDN Director, ESB3024-1.20.1
Breaking changes from previous release
None
Change log
- FIXED: Installer changes ownership of /var, /etc/ and /usr [ESB3027-146]
- FIXED: K3s installer should not be left on root filesystem [ESB3027-149]
Deprecated functionality
None
System requirements
- A minimum CPU architecture level of x86-64-v2 due to inclusion of Oracle Linux 9 inside the container. While all modern CPUs support this archetecture level, virtual hypervisors may default to a CPU type that has more compatibility with older processors. If this minimum CPU architecture level is not attained the containers may refuse to start. See Operating System Compatibility and Building Red Hat Enterprise Linux 9 for the x86-64-v2 Microarchitecture Level for more information.
Known limitations
Installation of the software is only supported using a self-hosted configuration.
17.6 - Release esb3027-1.2.0
Build date
2025-05-14
Release status
Type: production
Compatibility
This release is compatible with the following product versions:
- AgileTV CDN Director, ESB3024-1.20.1
Breaking changes from previous release
None
Change log
- NEW: Remove
.shextension from all scripts on the ISO [ESB3027-102] - NEW: The script
load-certificates.shshould be calledgenerate-ssl-secret[ESB3027-104] - NEW: Add support for High Availability [ESB3027-108]
- NEW: Enable the K3s Registry Mirror [ESB3027-110]
- NEW: Support for Air-Gapped installations [ESB3027-111]
- NEW: Basic hardware monitoring support for nodes in K8s Cluster [ESB3027-122]
- NEW: Separate docker containers from ISO [ESB3027-124]
- FIXED: GUI is unable to make DELETE request on api/v1/selection_input/modules/blocked_referrers [ESB3027-112]
Deprecated functionality
None
System requirements
- A minimum CPU architecture level of x86-64-v2 due to inclusion of Oracle Linux 9 inside the container. While all modern CPUs support this archetecture level, virtual hypervisors may default to a CPU type that has more compatibility with older processors. If this minimum CPU architecture level is not attained the containers may refuse to start. See Operating System Compatibility and Building Red Hat Enterprise Linux 9 for the x86-64-v2 Microarchitecture Level for more information.
Known limitations
Installation of the software is only supported using a self-hosted configuration.
17.7 - Release esb3027-1.0.0
Build date
2025-04-17
Release status
Type: production
Compatibility
This release is compatible with the following product versions:
- AgileTV CDN Director, ESB3024-1.20.0
Breaking changes from previous release
None
Change log
This is the first production release
Deprecations from previous release
None
System requirements
- A minimum CPU architecture level of x86-64-v2 due to inclusion of Oracle Linux 9 inside the container. While all modern CPUs support this archetecture level, virtual hypervisors may default to a CPU type that has more compatibility with older processors. If this minimum CPU architecture level is not attained the containers may refuse to start. See Operating System Compatibility and Building Red Hat Enterprise Linux 9 for the x86-64-v2 Microarchitecture Level for more information.
Known limitations
Installation of the software is only supported using a self-hosted, single-node configuration.
18 - Change Log
esb3024-1.24.0
- NEW: Add configuration feedback [ESB3024-122]
- NEW: Add module based logging [ESB3024-505]
- NEW: Support for QoE based routing [ESB3024-641]
- NEW: Add nested expressions to condition language [ESB3024-1099]
- NEW: Logging performance improvements [ESB3024-1163]
- NEW: Forward the last error code from CDN to client [ESB3024-1625]
- NEW: Log name of loaded GeoIP database [ESB3024-1646]
- NEW: Restructure logging configuration [ESB3024-1654]
- NEW: Improved logs when connection is closed prematurely [ESB3024-1769]
- FIXED: Dash variants not detected for QoE Streams [ESB3024-390]
- FIXED: Quotation marks not supported in classifier patterns [ESB3024-695]
- FIXED: Restart loop when directory Lua directory is manually created by user root [ESB3024-705]
- FIXED: Invalid JSON makes confd-transformer crash [ESB3024-1041]
- FIXED: Internal Server Error on requests from unknown instream sessions [ESB3024-1376]
- FIXED: Response translate function not invoked when no route found [ESB3024-1377]
- FIXED: Lua response body not set for instream sessions [ESB3024-1378]
- FIXED: Confd schema accepts config without mandatory properties [ESB3024-1583]
- FIXED: Connection header is not respected [ESB3024-1655]
esb3024-1.22.1
- NEW: Performance optimizations and improvements
- NEW: Show number of selection input entries in Grafana [ESB3024-1582]
- NEW: Monitor Lua memory usage [ESB3024-1591]
- NEW: Monitor memory and CPU usage [ESB3024-1592]
- NEW: Improved expiration handling of messages read from Kafka [ESB3024-1594]
- FIXED: Selection input item limit does not work [ESB3024-1472]
- FIXED: The Director does not reconnect when a Kafka topic is recreated [ESB3024-1491]
- FIXED: Segmentation fault when connection to Kafka is lost [ESB3024-1523]
- FIXED: SELinux being set to enforced without consent [ESB3024-1586]
- FIXED: Migraton script missing for
integration.guiconfig [ESB3024-1621] - FIXED: Installation fails if firewalld is disabled [ESB3024-1623]
esb3024-1.22.0
- NEW: Add support for UTF-8 to configuration [ESB3024-489]
- NEW: Add classifier type for HTTP headers [ESB3024-1177]
- NEW: Make Lua
hmac_sha256function return a binary string [ESB3024-1245] - NEW: Limit which headers are forwarded to a host [ESB3024-1387]
- NEW: Reload GeoIP databases without restarting the router service [ESB3024-1429]
- NEW: [ANSSI-BP-028] System Settings - Network Configuration and Firewalls [ESB3024-1450]
- NEW: [ANSSI-BP-028] System Settings - SELinux [ESB3024-1452]
- NEW: [ANSSI-BP-028] Services - SSH Server [ESB3024-1456]
- NEW: Improved classifiers [ESB3024-1492]
- NEW: Improved Selection Input Rest API [ESB3024-1511]
- FIXED: trustedProxies does not support CIDR [ESB3024-1136]
- FIXED: Some valid configurations are rejected [ESB3024-1191]
- FIXED: Lua
print()does not behave according to the documentation [ESB3024-1248] - FIXED: Session translation function only applies to initial sessions [ESB3024-1379]
- FIXED: It is not possible to change the configuration port [ESB3024-1381]
- FIXED: Invalid metrics endpoint response [ESB3024-1388]
- FIXED: Slow CDN response can prevent manifest from being downloaded [ESB3024-1424]
- FIXED: CORS error in select input handler response [ESB3024-1426]
- FIXED: Expired selection input entries are not always deleted [ESB3024-1485]
- FIXED: The Director blocks when loading messages from Kafka [ESB3024-1490]
esb3024-1.20.1
- NEW: Support any 3xx response from redirecting CDNs [ESB3024-1271]
- NEW: Support blocking of previously used tokens [ESB3024-1277]
- NEW: Set and get selection input over Kafka. The new configuration field
dataStreamsintroduces support to interface with Kafka. [ESB3024-1278] - NEW: Support TTL in selection input over Kafka [ESB3024-1286]
- NEW: Add option to disable URL encoding on outgoing requests from Lua [ESB3024-1306]
- NEW: Add Lua function for populating metrics [ESB3024-1334]
- FIXED: Improve selection input performance [ESB3024-1290]
- FIXED: Wildcard certificates wrongly documented as being unsupported [ESB3024-1324]
- FIXED: Selection input items with empty keys are not rejected [ESB3024-1328]
- FIXED: IP addresses wrongly classified as anonymous [ESB3024-1331]
- FIXED: Some selection input payloads are erroneously rejected [ESB3024-1344]
esb3024-1.18.0
- NEW: Support configuration feedback. concli provides very basic feedback [ESB3024-1165]
- NEW: Send HTTP requests from Lua code [ESB3024-1172]
- NEW: Add
acd-metrics-aggregatorservice [ESB3024-1221] - NEW: Add
acd-telegraf-metrics-databaseservice [ESB3024-1224] - NEW: Make all Lua functions snake_case.
timeToEpochandepochToTimehave been deprecated. [ESB3024-1246] - FIXED: Content popularity parameters can’t be configured [ESB3024-1187]
- FIXED:
acd-edns-proxyreturns CNAME records in brackets. Hostnames were erroneously interpreted as IPv6 addresses. [ESB3024-1276]
esb3024-1.16.0
- NEW: Collect metrics per account [ESB3024-911]
- NEW: Strip whitespace from beginning and end of names in configuration [ESB3024-954]
- NEW: Improved reselection logging [ESB3024-1089]
- NEW: Access log to file instead of journald. Access logs can now be found in
/var/log/acd-router/access.log[ESB3024-1164] - NEW: Additional Lua checksum functions [ESB3024-1229]
- NEW: Symlink logging directory
/var/log/acd-routerto/opt/edgeware/acd/router/log[ESB3024-1232] - FIXED: Convoy Bridge retries errors too fast [ESB3024-1120]
- FIXED: Memory safety issue. Certain circumstances could cause the director to crash [ESB3024-1123]
- FIXED: Too high severity on some log messages [ESB3024-1171]
- FIXED: Session Proxy sends lowercase header names, which are not supported by Agile Cache [ESB3024-1183]
- FIXED: Translation functions
hostRequestandrequestfail when used together [ESB3024-1184] - FIXED: Lua hashing functions do not accept binary data [ESB3024-1196]
- FIXED: Session Proxy has poor throughput [ESB3024-1197]
- FIXED: Configuration doesn’t handle nested Lua tables as argument to conditions [ESB3024-1218]
esb3024-1.14.2
- NEW: Define
custom_capacity_varas a number inhost_has_bw_custom(). Using a selection input variable forcustom_capacity_varis no longer necessary. [ESB3024-1119] - FIXED: Predictive load balancing functions do not handle missing interface [ESB3024-1100]
- FIXED: Client closing socket can cause proxy IP to resolve to “?” [ESB3024-1139]
- FIXED: ACD crashes when attempting to read corrupt cached data. The cached data can become corrupt if the filesystem is manipulated by a user or the system runs out of storage. [ESB3024-1147]
- FIXED: Subnets are not being persisted to disk [ESB3024-1149]
- FIXED: ACD overwrites custom GeoIP MMDB files with the default shipped MMDB files when upgrading [ESB3024-1150]
esb3024-1.14.0
- NEW: Remove grafana-loki and fluentbit containers [ESB3024-774]
- NEW: Extend
num_endpoint_requestsmetric with host ID [ESB3024-975] - NEW: Improved subnets endpoint. See API overview documentation for details. [ESB3024-1018]
- NEW: Support RHEL-9 / OL9 [ESB3024-1022]
- NEW: Support OpenSSL 3 [ESB3024-1025]
- NEW: Changed the router base image to oracle linux 9. See breaking changes [ESB3024-1034]
- NEW: Rename allowedProxies to trustedProxies [ESB3024-1085]
- NEW: Deny proxy connections by default if trustedProxies is empty [ESB3024-1088]
- FIXED: Too long classifier name crashes confd-transformer [ESB3024-949]
- FIXED: Lua condition si() doesn’t handle boolean values [ESB3024-1017]
- FIXED: Classifiers of type stringMatcher and regexMatcher can’t use content query params as source [ESB3024-1032]
- FIXED: ConsistentHashing algorithm is not content aware [ESB3024-1053]
- FIXED: Large configurations fail to apply. The REST API max body size is now configurable. [ESB3024-1056]
- FIXED: Convoy-bridge DB connection failure spams logs [ESB3024-1080]
- FIXED: Convoy-bridge does not send correctly formatted session-id [ESB3024-1081]
- FIXED: Response translation removes message body [ESB3024-1082]
esb3024-1.12.1
- NEW: Remove support for EL7 [ESB3024-1046]
- FIXED: Large configuration causes crash [ESB3024-1043]
esb3024-1.12.0
- NEW: Move managed session creation to Lua. Creating managed sessions is now handled by using the session translation function. [ESB3024-454]
- NEW: Grafana dashboards to monitor Quality [ESB3024-511]
- NEW: Measure and expose quality scores. A quality score per host and session group is now available when making routing decisions. [ESB3024-512]
- NEW: Add default session classifiers. When resetting the list of classifiers in confd, it is now populated with commonly used classifers. [ESB3024-769]
- NEW: Add configuration migration tool [ESB3024-824]
- NEW: Add new Random classifier [ESB3024-899]
- NEW: Add URL parsing code to Lua library. An URL parser based on https://github.com/golgote/neturl/ with extensions for path splitting and joining [ESB3024-936]
- NEW: Standard library Lua functions now use the same log mechanism as the Director [ESB3024-966]
- NEW: Extend ’num_sessions’ metric to include a label with the selected host [ESB3024-973]
- NEW: Add quality level metrics [ESB3024-974]
- NEW: Add host request translation function [ESB3024-996]
- FIXED: ConsistentHashing Algorithm only supports MD5. MD5, SDBM and Murmur are now supported. [ESB3024-929]
- FIXED: Confd IPv4 validation rejects IPs with /29 netmask [ESB3024-1010]
- FIXED: Stale timestamped selection input not being pruned. Added configurable timestamped selection input timeout limit. [ESB3024-1016]
esb3024-1.10.2
- FIXED: ConsistentHashing rule broken [ESB3024-969]
- FIXED: Increase configuration size limit [ESB3024-983]
esb3024-1.10.1
- NEW: Change predictive load balancing functions to use megabits/s [ESB3024-932]
- FIXED: Logic classifier statements can consume all memory [ESB3024-937]
esb3024-1.10.0
- NEW: Use metrics from streamers in routing decisions. Added standard library Lua support to use hardware metrics in routing decisions. Added host health checks in the configuration. [ESB3024-154]
- NEW: Remove unused field “apiKey” from configuration [ESB3024-426]
- NEW: Support integration with Convoy Analytics [ESB3024-694]
- NEW: Support combining classifiers using AND/OR in session groups [ESB3024-776]
- NEW: Enable access logging by default [ESB3024-816]
- NEW: Improved Lua translation function error handling [ESB3024-874]
- NEW: Updated predictive load balancing functions to support hardware metrics [ESB3024-887]
- NEW: Remove apiKey from documentation [ESB3024-927]
- FIXED: Condition with ‘or’ statement sometimes generate faulty Lua [ESB3024-863]
esb3024-1.8.0
- NEW: Remove ESB3026 Account Monitor from installer. [ESB3024-354]
- NEW: Improve selection input endpoint flexibility and security. See API overview documentation for details. [ESB3024-423]
- NEW: Support anonymous geoip rules [ESB3024-699]
- NEW: Add ASN IDs list classifiers to confd [ESB3024-778]
- NEW: Enable content popularity tracking by default. Added option to enable/disable in confd/confcli. [ESB3024-781]
- NEW: Remove dependency on session from security token verification [ESB3024-809]
- FIXED: A lot of JSON output on failed routing. HTTP response no longer contains internal routing information. [ESB3024-523]
- FIXED: Returning Lua table from Lua debug endpoint can crash router. Selection Input values now support floating point values in a Lua context [ESB3024-691]
- FIXED: Floating point selection inputs are truncated to ints when passed to Lua context [ESB3024-710]
- FIXED: Race condition between
RestApiandSession[ESB3024-753] - FIXED: confd/concli doesn’t support “forward_host_header” on hostGroups [ESB3024-761]
- FIXED: Support Lua vector keys in reverse order [ESB3024-780]
esb3024-1.6.0
- NEW: Remove the
lua_pathsarray from the config . Lua scripts are now added using a REST API on the/v1/lua/endpoint. [ESB3024-204] - NEW: Separate “account-monitor” from installer [ESB3024-238]
- NEW: Consistent hashing based routing . Added support for content distribution control for load balancing and cache partitioning [ESB3024-274]
- NEW: Predictive load balancing . Account for in-transit traffic to prevent cache overload when there is a sudden burst of new sessions. [ESB3024-275]
- NEW: Support Convoy security tokens [ESB3024-386]
- NEW: Expose quality, host and session ID in the session object in Lua context [ESB3024-429]
- NEW: Support upgrade of system python in installer [ESB3024-442]
- NEW: Do not configure selinux and firewalld in installer [ESB3024-493]
- NEW: Convoy Distribution/Account integration [ESB3024-503]
- NEW: Make eDNS server port configurable . The router configuration
hosts.proxy_addresshas been renamed tohosts.proxy_urland now accepts a port that is used when connecting to the proxy. Thecdns.http_portandcdns.https_portconfigurations now configure the port that is used for connecting to the EDNS server, before they configured the port that was used for connecting to the proxy. [ESB3024-509] - NEW: Expand node table in Lua context . New fields are:
node.id,node.visits,host.id,host.recent_selections[ESB3024-630] - FIXED: DNS lookup can fail . DNS lookup can fail when same content requested from both IPv4 and IPv6 clients [ESB3024-427]
- FIXED: Failed DNS requests are not retried . Fixed bug where failed eDNS requests were not retried [ESB3024-504]
- FIXED: Lua functions are not updated when uploaded [ESB3024-544]
- FIXED: Undefined metatable fields evaluate to
falserather thannil[ESB3024-642] - FIXED:
Evaluator::evaluate()doesn’t support different types of its variadic arguments [ESB3024-687] - FIXED: Segfault when accessing REST api with empty path [ESB3024-752]
- FIXED: Container UID/GID may change between versions [ESB3024-755]
esb3024-1.4.0
- NEW: 1-Page Status Report . Added command
ew-sysinfothat can be used on any machine with an ESB3024 installation. The command outputs various information about the system and installed services which can be used for monitoring and diagnostics. [ESB3024-391] - NEW: Update routing rule property names . Routing rule property names updated for consistency and clarity [ESB3024-455]
- FIXED: Deleting confd API array element inside oneOf object fails [ESB3024-355]
- FIXED: Container logging not captured by
systemduntil services are restarted [ESB3024-359] - FIXED: Alertmanager restricts the configuration to a single file [ESB3024-381]
- FIXED: Split rules in routing configuration should terminate on error [ESB3024-420]
- FIXED: Improve alert configuration in Prometheus [ESB3024-422]
- FIXED: Inconsistent storage paths of service configuration and data [ESB3024-425]
- FIXED: confd-transformer is not working in el7 [ESB3024-430]
esb3024-1.2.3
- NEW: Add more classifiers . New classifiers are
hostName,contentUrlPath,userAgent,contentUrlQueryParameters[ESB3024-298] - NEW: Add allow- and denylist rule blocks [ESB3024-380]
- NEW: Add enhanced validation of scriptable field in routing rules [ESB3024-393]
- NEW: Add
servicesto the config tree [ESB3024-410] - NEW: Prohibit unknown configuration properties [ESB3024-416]
- FIXED: Duplicate session group IDs are allowed [ESB3024-49]
- FIXED: Invalid URL returned for IPv4 requests when using a DNS backend [ESB3024-374]
- FIXED: Not possible to set log level in eDNS proxy [ESB3024-378]
- FIXED: Instream selection fails when DASH manifest has template paths using “../” [ESB3024-384]
esb3024-1.2.0
- NEW: Add meta fields to the configuration . The API now allows the meta data fields “created_at”, “source” and “source_checksum” that can be used for the API consumer to track who did what change when.
- NEW: Control routing behavior based on backend response code . This gives control over when to return backend response codes to the end user and when to trigger a failover to another CDN or host.
- NEW: Manage Lua scripts via API
- NEW: Support popularity-based routing . Content can be ordered in multiple groups with descending popularity. Popularity can also be tracked per session group.
- NEW: Improved support for IPv6 routing . It is now possible to select backend depending on the IP protocol version.
- NEW: Add DNS backend support . This allows delegating routing decisions to an EDNS0 server.
- NEW: Support HMAC with SHA256 in Lua scripts
- NEW: Add alarm support . The alarms are handled by Prometheus and Alertmanager.
- NEW: Support saving Grafana Dashboards
- NEW: Add simplified configuration API and CLI tool . A new configuration API with an easier to use model has been added. The “confcli” tool present in many other Edgeware products is now supported.
- NEW: Add authentication to the REST API
- FIXED: Host headers not forwarded to Request Router when ‘redirecting: true’ is enabled
- FIXED: IP range classifier 0.0.0.0/0 does not work in session groups
esb3024-1.0.0
- NEW: Flexible routing rule engine with support for Lua plugins. Support many use cases, including CDN Offload and CDN Selection.
- NEW: Advanced client classification mechanisms for routing based on group memberships (device type, content type, etc).
- NEW: Geobased routing including dedicated high-performing API for subnet matching, associating an incoming request with a region.
- NEW: Integration API to feed the service with arbitrary variables to use for routing decisions. Can be used to get streaming bitrate in public CDNs, status from network probes, etc.
- NEW: Flexible request/response translation manipulation on the client facing interface. Can be used for URL manipulation, encoding/decoding tokens or adapting the interface to e.g. the PowerDNS backend protocol.
- NEW: Metrics API that can be monitored with standard monitoring software. Out-of-the-box integration with Prometheus and Grafana.
- NEW: Robust deployment with each service instance running independently, and allowing the service to stay in operational state even when backends become temporarily unavailable.
- NEW: RHEL 7/8 support.
- NEW: Online documentation at https://docs.agilecontent.com/